Page 6 of 344

4
3008_en_Chap00b_vue-ensemble_ed01-2015
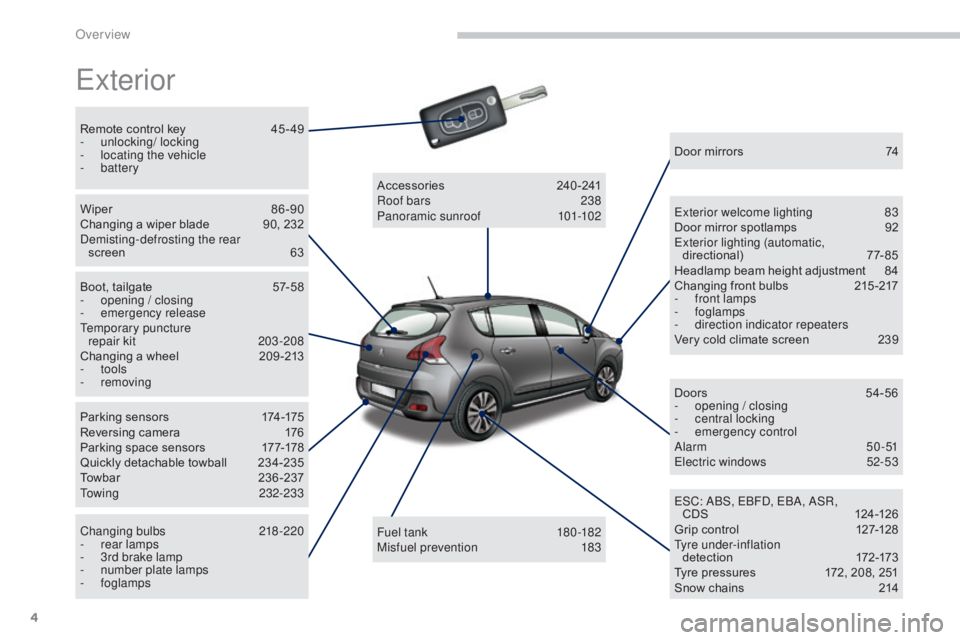
Exterior
Remote control key 45 - 49
- u nlocking/ locking
-
l
ocating the vehicle
-
battery
Wiper
8
6 -90
Changing a wiper blade
9
0, 232
Demisting-defrosting the rear screen
6
3
Boot, tailgate
5
7-58
-
ope
ning / closing
-
em
ergency release
Temporary puncture repair kit
2
03-208
Changing a wheel
2
09 -213
-
tools
-
removing
Parking sensors
1
74-175
Reversing camera
1
76
Parking space sensors
1
77-178
Quickly detachable towball
2
34-235
Towbar
23
6-237
Towing
232-233
Changing bulbs
2
18-220
-
r
ear lamps
-
3
rd brake lamp
-
n
umber plate lamps
-
foglamps Fuel tank
18
0 -182
Misfuel prevention
1
83
Accessories
2
40-241
Roof bars
2
38
Panoramic sunroof
1
01-102Door mirrors
7
4
Exterior welcome lighting
8
3
Door mirror spotlamps
9
2
Exterior lighting (automatic, directional)
7
7-85
Headlamp beam height adjustment
8
4
Changing front bulbs
2
15 -217
-
f
ront lamps
-
foglamps
-
d
irection indicator repeaters
Very cold climate screen
2
39
Doors
5
4-56
-
ope
ning / closing
-
c
entral locking
-
em
ergency control
Alarm
50-51
Electric windows
5
2-53
ESC: ABS, EBFD, EBA, ASR, CDS
12
4 -126
Grip control
1
27-128
Tyre under-inflation d ete c t i o n
17
2-173
Tyre pressures
1
72, 208, 251
Snow chains
2
14
Over view
Page 9 of 344
7
3008_en_Chap00b_vue-ensemble_ed01-2015
Instruments and controls (cont.)
Head-up display 147-148
Distance alert 1 49 -151
Lighting controls
7
7- 82
Direction indicators
1
23
Speed limiter
1
52-154
Cruise control
1
55 -157
Door mirrors
7
4
Electric windows, deactivating
5
2-53
Side switch panel
8
S
top & Start
1
69 -171
Headlamp beam height adjustment
8
4 Multifunction screens
3
1-39
-
S
creen A
-
S
creen C
-
1
6/9 colour screen
Retractable screen
4
0
Screen A (setting the date/time) 3 1-34
Wiper controls
8
6 -90
Trip computer
4
1- 44
Centre switch panel
8
H
azard warning lamps
1
23
Head-up display
1
47-148
Distance alert
1
49 -151
Ignition switch, starting-switching off
1
37-139
Panoramic sunroof
1
01-102
Grip control
1
27-128
Steering wheel adjustment
7
6
H or n
123
Instrument panels, screens
1
4-15
Warning lamps
1
6-26
Indicators
2
6-30
Gear shift indicator
1
68
Buttons
2
8, 30
- s ervice indicator / trip
distance recorder
- d
ashboard lighting dimmer
.
Over view
Page 69 of 344
67
3008_en_Chap03_confort_ed01-2015
Front seats with manual adjustments
Height
F Pull the control upwards to raise or push it downwards to lower, as many times as
required, to obtain the position required.
Backrest angle
F Push the control rearwards.
Forwards-backwards
F Raise the control and slide the seat forwards or backwards.
Seat consisting of a seat cushion, a seat back and a head restraint which can all be adjusted to adapt your position for ease of driving and comfort.
Before moving the seat backwards, ensure that there is nothing that might prevent the full travel of the seat, so as to avoid the risk of of
jamming the seat caused by the presence of objects on the floor behind the seat or rear passengers. If the seat jams, stop the movement
immediately.
3
Comfort
Page 70 of 344
68
3008_en_Chap03_confort_ed01-2015
Driver's electric seat
Forwards-backwards
F Push the control for wards or rear wards to slide the seat.
Cushion height and
angle
F Tilt the rear part of the control upwards or downwards to obtain the required height.
F
T
ilt the front part of the control upwards or
downwards to obtain the required angle.
Backrest angle
F Tilt the control for wards or rear wards to adjust the angle of the seat back.
Seat consisting of a seat cushion, a seat back and a head restraint which can all be adjusted to adapt your position for ease of driving and comfort.
Comfort
Page 71 of 344

69
3008_en_Chap03_confort_ed01-2015
The electric functions of the driver's
seat are active for approximately
one minute after opening the front door.
They are deactivated approximately
one
minute after the ignition is switched
off and in economy mode.
To reactivate them, switch on the ignition.
Before moving the seat backwards,
ensure that there is nothing that might
prevent the full travel of the seat, so
as to avoid the risk of of jamming the
seat caused by the presence of objects
on the floor behind the seat or rear
passengers. If the seat jams, stop the
movement immediately.
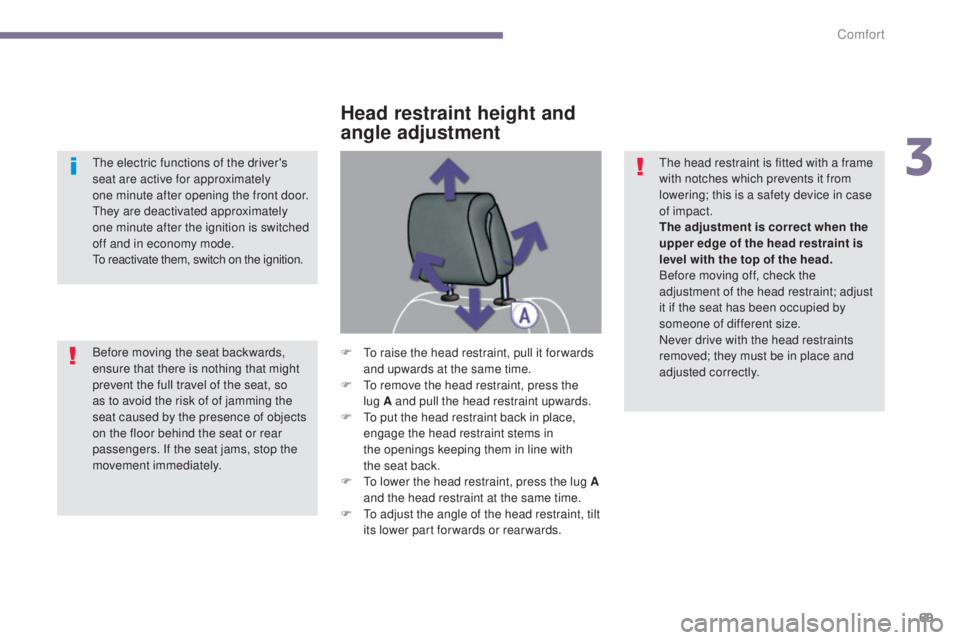
Head restraint height and
angle adjustment
F To raise the head restraint, pull it for wards and upwards at the same time.
F
T
o remove the head restraint, press the
lug
A and pull the head restraint upwards.
F
T
o put the head restraint back in place,
engage the head restraint stems in
the
openings keeping them in line with
the
seat back.
F
T
o lower the head restraint, press the lug A
and the head restraint at the same time.
F
T
o adjust the angle of the head restraint, tilt
its lower part forwards or rearwards. The head restraint is fitted with a frame
with notches which prevents it from
lowering; this is a safety device in case
of impact.
The adjustment is correct when the
upper edge of the head restraint is
level with the top of the head.
Before moving off, check the
adjustment of the head restraint; adjust
it if the seat has been occupied by
someone of different size.
Never drive with the head restraints
removed; they must be in place and
adjusted correctly.
3
Comfort
Page 78 of 344
76
3008_en_Chap03_confort_ed01-2015
Steering wheel adjustment
F When stationary, pull the control lever to
release the adjustment mechanism.
F
A
djust the height and reach to suit your
driving position.
F
P
ush the control lever to lock the
adjustment mechanism.
As a safety precaution, these
operations should only be carried out
with the vehicle stationary.
Comfort
Page 86 of 344

84
3008_en_Chap04_visibilite_ed01-2015
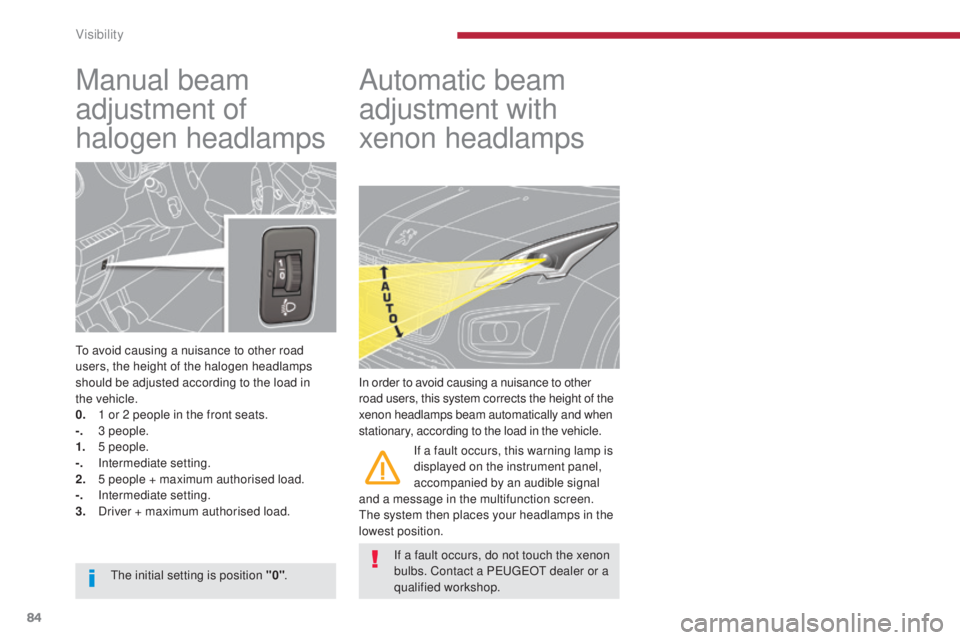
Manual beam
adjustment of
halogen headlamps
To avoid causing a nuisance to other road
users, the height of the halogen headlamps
should be adjusted according to the load in
the
vehicle.
0.
1 o
r 2 people in the front seats.
-.
3
people.
1.
5
people.
-.
I
ntermediate setting.
2.
5 p
eople + maximum authorised load.
-.
I
ntermediate setting.
3.
D
river + maximum authorised load.
Automatic beam
adjustment with
xenon headlamps
In order to avoid causing a nuisance to other
road users, this system corrects the height of the
xenon headlamps beam automatically and when
stationary, according to the load in the vehicle. If a fault occurs, this warning lamp is
displayed on the instrument panel,
accompanied by an audible signal
and a message in the multifunction screen.
The system then places your headlamps in the
lowest position.
The initial setting is position "0" .If a fault occurs, do not touch the xenon
bulbs. Contact a PEUGEOT dealer or a
qualified workshop.
Visibility
Page 109 of 344

107
3008_en_Chap05_amenagements_ed01-2015
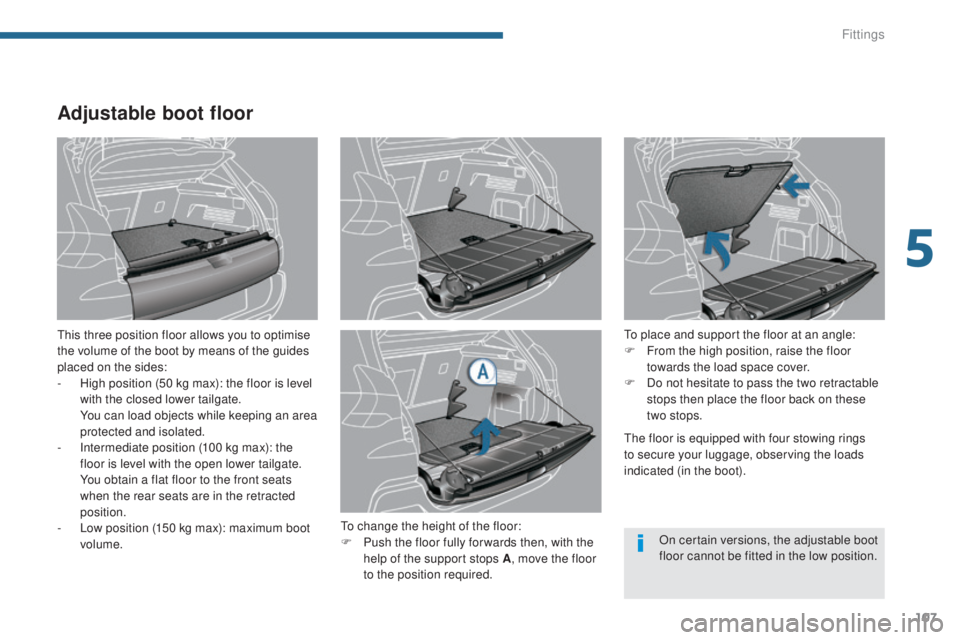
Adjustable boot floor
This three position floor allows you to optimise
the volume of the boot by means of the guides
placed on the sides:
-
H
igh position (50 kg max): the floor is level
with the closed lower tailgate.
Y
ou can load objects while keeping an area
protected and isolated.
-
I
ntermediate position (100 kg max): the
floor is level with the open lower tailgate.
Y
ou obtain a flat floor to the front seats
when the rear seats are in the retracted
position.
-
L
ow position (150 kg max): maximum boot
volume. To place and support the floor at an angle:
F
F rom the high position, raise the floor
towards the load space cover.
F
D
o not hesitate to pass the two retractable
stops then place the floor back on these
two stops.
To change the height of the floor:
F
P
ush the floor fully for wards then, with the
help of the support stops A , move the floor
to the position required. The floor is equipped with four stowing rings
to secure your luggage, observing the loads
indicated (in the boot).
On certain versions, the adjustable boot
floor cannot be fitted in the low position.
5
Fittings