Page 207 of 344
205
3008_en_Chap10_infos-pratiques_ed01-2015
Repair procedure
F Switch off the ignition.
1. Sealing
F Uncoil the white pipe G fully.
F U nscrew the cap from the white pipe.
F
C
onnect the white pipe to the valve of the
tyre to be repaired. F
C onnect the compressor's electric plug to
the vehicle's 12 V socket.
F
S
tart the vehicle and leave the engine
running.
F
T
urn the selector A to the
"sealant" position.
F
C
heck that the switch B is in
position "O" .
Take care, this product is harmful
(e.g.
ethylene-glycol, colophony...) if
swallowed and causes irritation to the eyes.
Keep this product out of the reach of
children.
Avoid removing any foreign bodies
which have penetrated into the tyre.
Do not start the compressor before
connecting the white pipe to the tyre
valve: the sealant product would be
expelled through the pipe.
10
Practical information
Page 209 of 344
207
3008_en_Chap10_infos-pratiques_ed01-2015
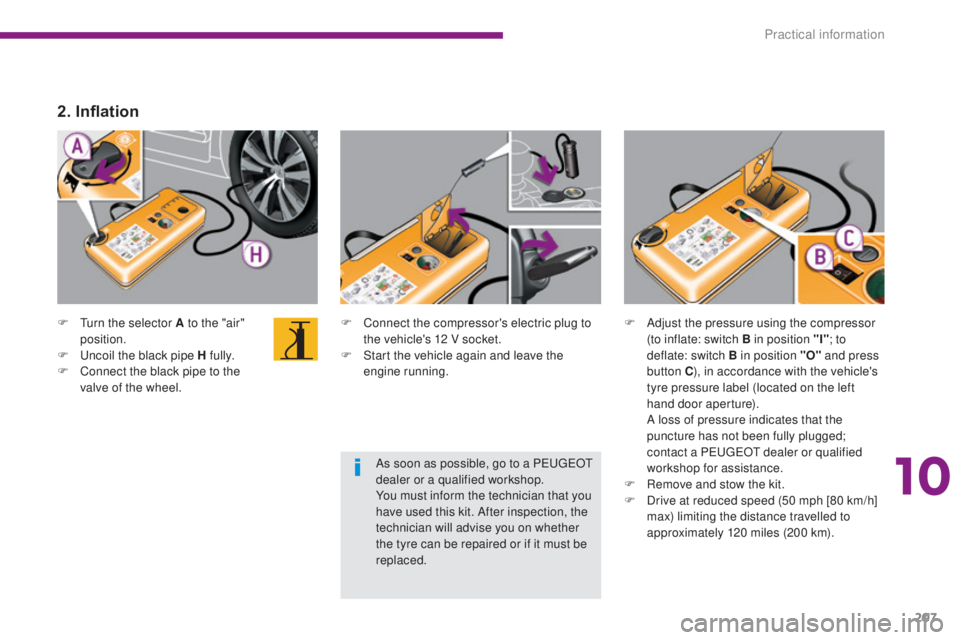
F Turn the selector A to the "air" position.
F
U
ncoil the black pipe H fully.
F
C
onnect the black pipe to the
valve of the wheel. F
C onnect the compressor's electric plug to
the vehicle's 12 V socket.
F
S
tart the vehicle again and leave the
engine running. F
A djust the pressure using the compressor
(to inflate: switch B in position "I" ; to
deflate: switch B
in position "O" and press
button C ), in accordance with the vehicle's
tyre pressure label (located on the left
hand door aperture).
A l
oss of pressure indicates that the
puncture has not been fully plugged;
contact a PEUGEOT dealer or qualified
workshop for assistance.
F
R
emove and stow the kit.
F
D
rive at reduced speed (50 mph [80 km/h]
max) limiting the distance travelled to
approximately 120 miles (200 km).
2. Inflation
As soon as possible, go to a PEUGEOT
dealer or a qualified workshop.
You must inform the technician that you
have used this kit. After inspection, the
technician will advise you on whether
the tyre can be repaired or if it must be
replaced.
10
Practical information
Page 210 of 344
208
3008_en_Chap10_infos-pratiques_ed01-2015
Removing the cartridge
F Stow the black pipe.
F Detach the angled base from the white pipe.
F
S
upport the compressor vertically.
F
U
nscrew the cartridge from the bottom.
Checking tyre pressures /
i nflating accessories
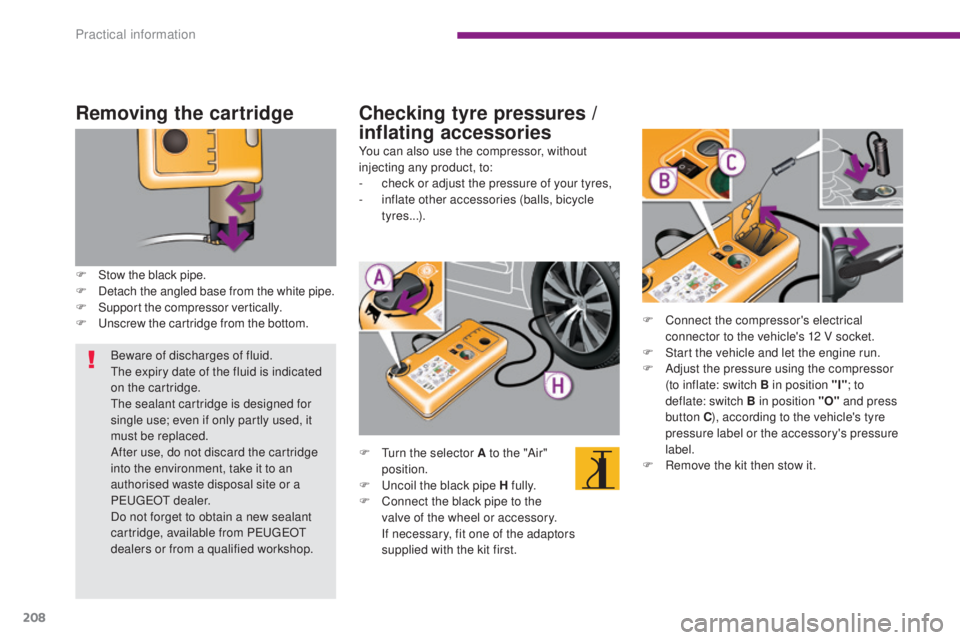
F Turn the selector A to the "Air"
position.
F
U
ncoil the black pipe H fully.
F
C
onnect the black pipe to the
valve of the wheel or accessory.
I
f necessary, fit one of the adaptors
supplied with the kit first.
You can also use the compressor, without
injecting any product, to:
-
c
heck or adjust the pressure of your tyres,
-
i
nflate other accessories (balls, bicycle
tyres...).
F
C
onnect the compressor's electrical
connector to the vehicle's 12 V socket.
F
S
tart the vehicle and let the engine run.
F
A
djust the pressure using the compressor
(to inflate: switch B in position "I" ; to
deflate: switch B in position "O" and press
button C ), according to the vehicle's tyre
pressure label or the accessory's pressure
label.
F R emove the kit then stow it.
Beware of discharges of fluid.
The expiry date of the fluid is indicated
on the cartridge.
The sealant cartridge is designed for
single use; even if only partly used, it
must be replaced.
After use, do not discard the cartridge
into the environment, take it to an
authorised waste disposal site or a
PEUGEOT dealer.
Do not forget to obtain a new sealant
cartridge, available from PEUGEOT
dealers or from a qualified workshop.
Practical information
Page 225 of 344
223
3008_en_Chap10_infos-pratiques_ed01-2015
Access to the fuses
F Refer to the paragraph "Access to the to o ls". Fuse
N° Rating
(A) Functions
F8 20Audio equipment, audio/telephone, CD changer, multifunction
scren, tyre under-inflation detection, alarm siren, alarm control
unit, telematic unit.
F9 30Front 12 V socket, cigarette lighter, rear 12 V socket.
F10 15Steering mounted controls.
F11 15Low current ignition switch.
F12 15Trailer presence, rain
/ sunshine sensor, supply for fuses F32,
F34, F35.
F13 5Engine fusebox, airbag control unit.
F14 15Instrument panel, instrument panel screen, supply for fuse F33.
F15 30Locking and deadlocking.
F17 40Heated rear screen, supply for fuse F30.
10
Practical information
Page 227 of 344
225
3008_en_Chap10_infos-pratiques_ed01-2015
Engine compartment fuses
The fusebox is placed in the engine
compartment near the battery.Fuse N° Rating
(A) Functions
F2 15Horn.
F3 10Front
/ rear wash-wipe.
F4 10Daytime running lamps.
F5 15Purge canister, turbine discharge and Turbo pressure
regulation electrovalves (1.6 litre THP), oil vapour heater
(1.6 litre THP), diesel heater (1.6 litre HDi).
F6 10Diagnostic socket, directional headlamps, particle filter pump
(Diesel), Distance alert, mirror adjustment control.
F7 10Power steering control unit, automatic gearbox, directional
headlamps height adjustment motor.
F8 20Starter motor control.
F9 10Clutch and brake pedal switches.
F11 40Air conditioning fan.
Access to the fuses
F Unclip the cover.
F
C hange the fuse (see corresponding
paragraph).
F
W
hen you have finished, close the cover
carefully to ensure correct sealing of the
fusebox.
Fuse table
10
Practical information
Page 230 of 344
228
3008_en_Chap10_infos-pratiques_ed01-2015
12 V battery
Access to the battery
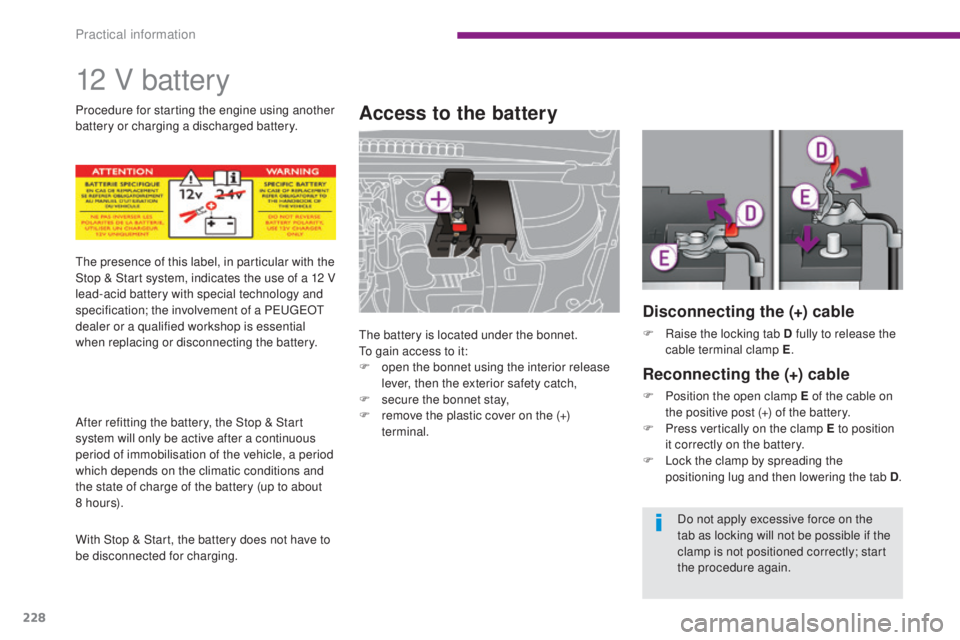
The battery is located under the bonnet.
To gain access to it:
F
o
pen the bonnet using the interior release
lever, then the exterior safety catch,
F
s
ecure the bonnet stay,
F
r
emove the plastic cover on the (+)
terminal.
The presence of this label, in particular with the
Stop & Start system, indicates the use of a 12
V
lead-acid battery with special technology and
specification; the involvement of a PEUGEOT
dealer or a qualified workshop is essential
when replacing or disconnecting the battery.
After refitting the battery, the Stop & Start
system will only be active after a continuous
period of immobilisation of the vehicle, a period
which depends on the climatic conditions and
the state of charge of the battery (up to about
8 h o u r s).
With Stop & Start, the battery does not have to
be disconnected for charging. Procedure for starting the engine using another
battery or charging a discharged battery.
Disconnecting the (+) cable
F Raise the locking tab D fully to release the cable terminal clamp E .
Reconnecting the (+) cable
F Position the open clamp E of the cable on
the positive post (+) of the battery.
F
P
ress vertically on the clamp E to position
it correctly on the battery.
F
L
ock the clamp by spreading the
positioning lug and then lowering the tab D .
Do not apply excessive force on the
tab as locking will not be possible if the
clamp is not positioned correctly; start
the procedure again.
Practical information
Page 231 of 344
229
3008_en_Chap10_infos-pratiques_ed01-2015
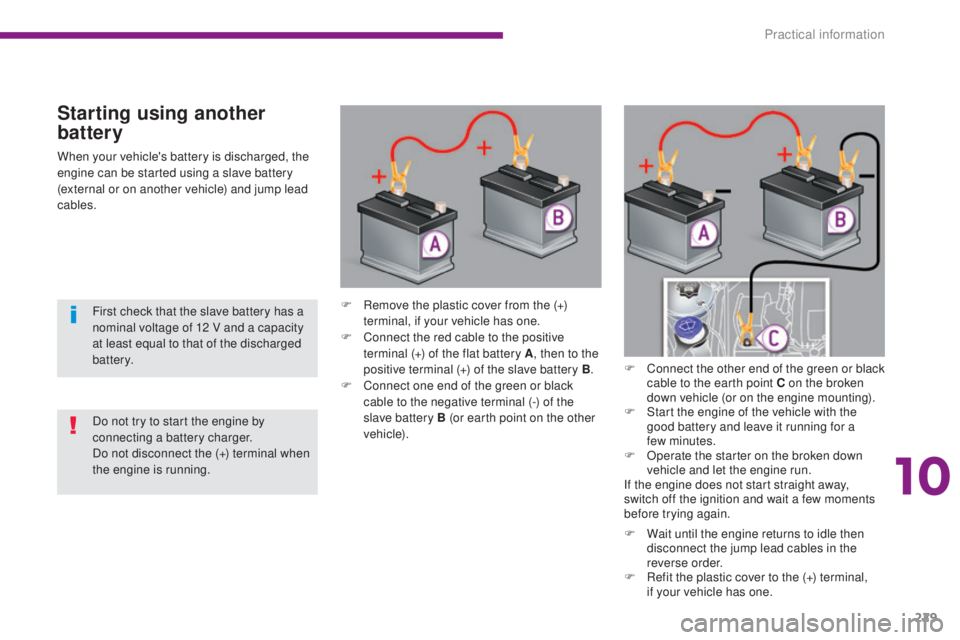
When your vehicle's battery is discharged, the
engine can be started using a slave battery
(external or on another vehicle) and jump lead
cables.
Starting using another
battery
F Remove the plastic cover from the (+) terminal, if your vehicle has one.
F
C
onnect the red cable to the positive
terminal (+) of the flat battery A , then to the
positive terminal (+) of the slave battery B.
F
C
onnect one end of the green or black
cable to the negative terminal (-) of the
slave battery B (or earth point on the other
vehicle). F
C
onnect the other end of the green or black
cable to the earth point C on the broken
down vehicle (or on the engine mounting).
F
S
tart the engine of the vehicle with the
good battery and leave it running for a
few
minutes.
F
O
perate the starter on the broken down
vehicle and let the engine run.
If the engine does not start straight away,
switch off the ignition and wait a few moments
before trying again.
First check that the slave battery has a
nominal voltage of 12 V and a capacity
at least equal to that of the discharged
battery.
Do not try to start the engine by
connecting a battery charger.
Do not disconnect the (+) terminal when
the engine is running.
F
W
ait until the engine returns to idle then
disconnect the jump lead cables in the
reverse order.
F
R
efit the plastic cover to the (+) terminal,
if your vehicle has one.
10
Practical information
Page 232 of 344
230
3008_en_Chap10_infos-pratiques_ed01-2015
Following reconnection of the
battery
Following reconnection of the battery, switch on
the ignition and wait 1 minute before starting to
permit initialisation of the electronic systems.
However, if problems remain following this
operation, contact a PEUGEOT dealer or a
qualified workshop.
Referring to the corresponding section, you
must yourself reinitialise (depending on
version):
-
t
he remote control key,
-
t
he electric blind(s),
-
...
Before disconnecting the battery
Wait 2 minutes after switching off the ignition
before disconnecting the battery.
Close the windows and the doors before
disconnecting the battery.
Charging the battery using
a battery charger
F Disconnect the battery from the vehicle.
F F ollow the instructions for use provided by
the manufacturer of the charger.
F
C
onnect the battery starting with the
negative terminal (-).
F
C
heck that the terminals and connectors
are clean. If they are covered with sulphate
(whitish or greenish deposit), remove them
and clean them.
The batteries contain harmful substances
such as sulphuric acid and lead. They
must be disposed of in accordance
with regulations and must not, in any
circumstances, be discarded with household
waste.
Take used remote control batteries and
vehicle batteries to a special collection point.
It is advisable to disconnect the battery
if the vehicle is to be left unused for
more than one month. Protect your eyes and face before
handling the battery.
All operations on the battery must be
carried out in a well ventilated area and
away from naked flames and sources
of sparks, so as to avoid the risk of
explosion or fire.
Do not try to charge a frozen battery;
the battery must first be thawed out to
avoid the risk of explosion. If the battery
has been frozen, before charging have
it checked by a PEUGEOT dealer or a
qualified workshop who will check that
the internal components have not been
damaged and the casing is not cracked,
which could cause a leak of toxic and
corrosive acid.
Do not reverse the polarity and use only
a 12 V charger.
Do not disconnect the terminals while
the engine is running.
Do not charge the batteries without
disconnecting the terminals first.
Wash your hands afterwards.
Do not push the vehicle to start the
engine if you have an electronic or
automatic gearbox.
Some functions are not available if the
battery is not sufficiently charged.
Practical information