2016 NISSAN ROGUE climate settings
[x] Cancel search: climate settingsPage 7 of 36

5
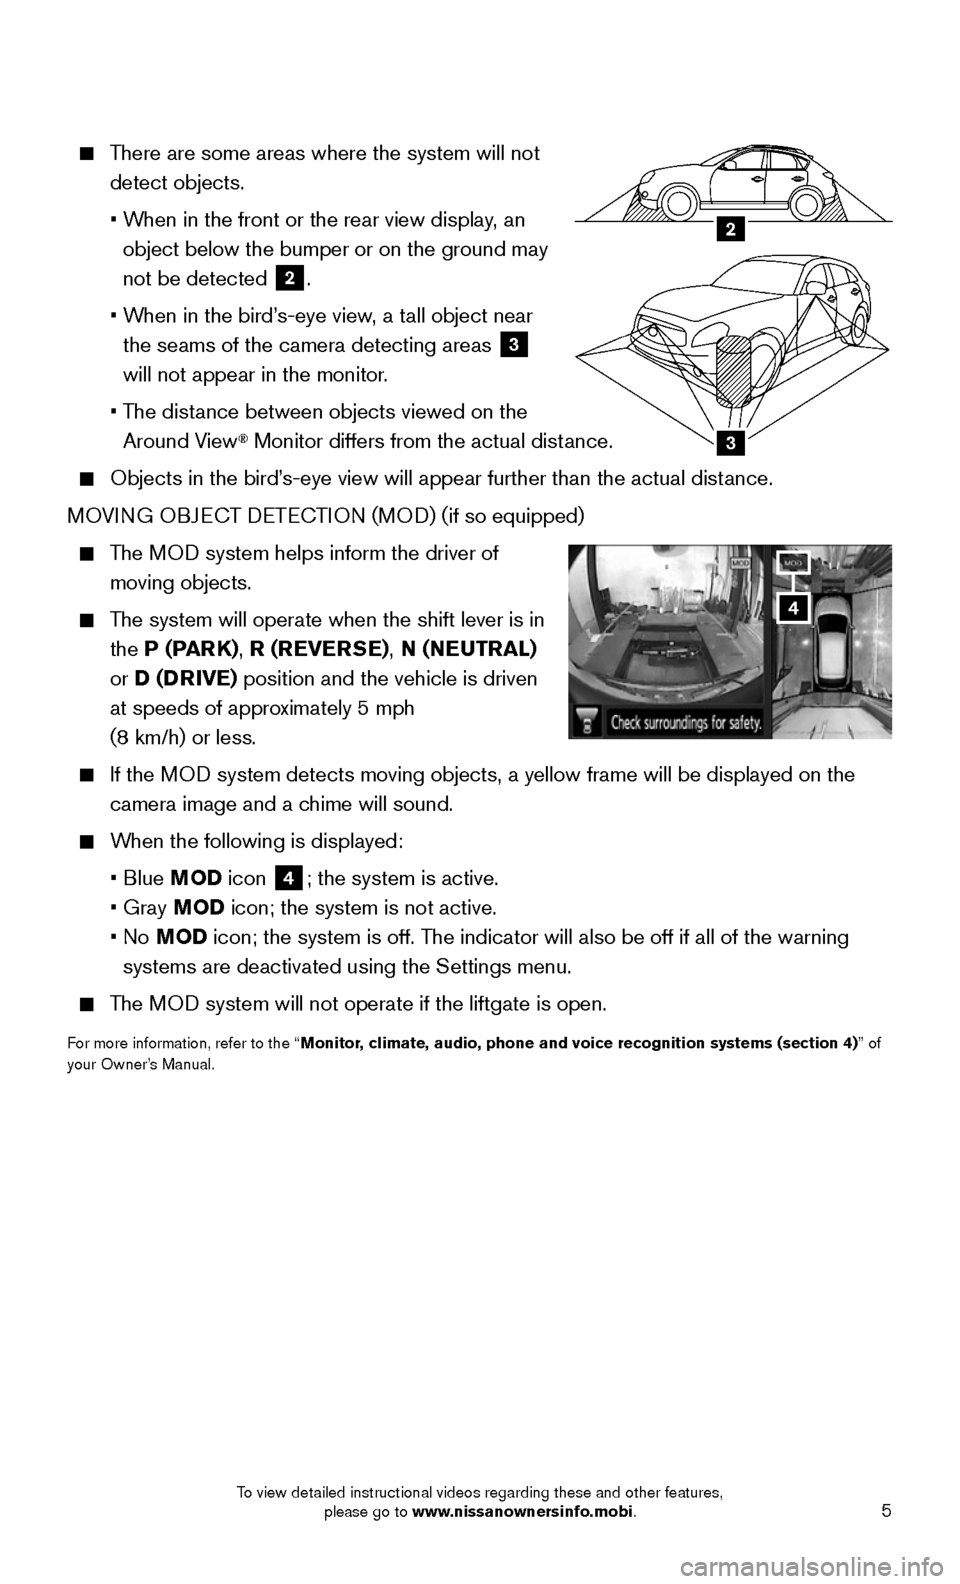
There are some areas where the system will not
detect objects.
• When in the front or the rear view display, an
object below the bumper or on the ground may
not be detected
2.
• When in the bird’s-eye view, a tall object near
the seams of the camera detecting areas 3
will not appear in the monitor.
• The distance between objects viewed on the
Around View® Monitor differs from the actual distance.
Objects in the bird’ s-eye view will appear further than the actual distance.
MOVING OBJECT DETECTION (MOD) (if so equipped)
The MOD system helps inform the driver of
moving objects.
The system will operate when the shift lever is in
the P (PARK), R (REVERSE), N (NEUTRAL)
or D (DRIVE) position and the vehicle is driven
at speeds of approximately 5 mph
(8 km/h) or less.
If the MOD system detects moving objects, a yellow frame will be displayed on the\
camera image and a chime will sound.
When the following is displayed:
• Blue MOD icon 4; the system is active.
• Gray MOD icon; the system is not active.
• No MOD icon; the system is off. The indicator will also be off if all of the warning
systems are deactivated using the Settings menu.
The MOD system will not operate if the liftgate is open.
For more information, refer to the “Monitor, climate, audio, phone and voice recognition systems (section 4) ” of
your Owner’s Manual.
4
3
2
To view detailed instructional videos regarding these and other features, please go to www.nissanownersinfo.mobi.
To view detailed instructional videos regarding these and other features, please go to www.nissanownersinfo.mobi.
Page 14 of 36

12
CLOCK SET/ADJUSTMENT
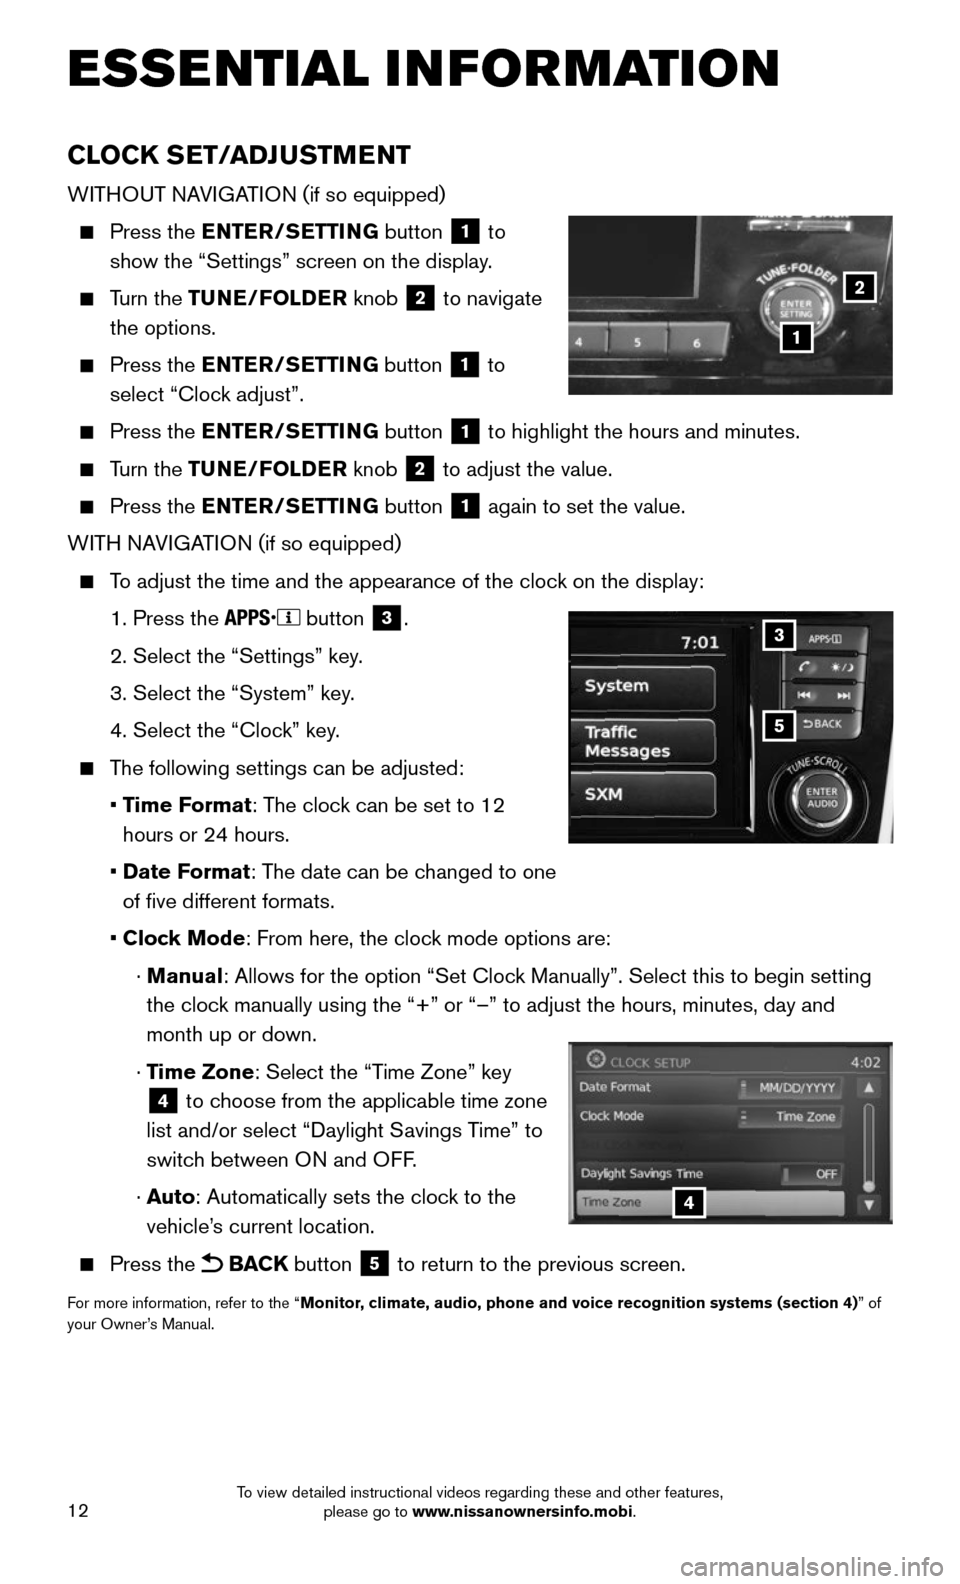
WITHOUT NAVIGATION (if so equipped)
Press the ENTER/SETTING button 1 to
show the “Settings” screen on the display.
Turn the TUNE/FOLDER knob 2 to navigate
the options.
Press the ENTER/SETTING button 1 to
select “Clock adjust”.
Press the ENTER/SETTING button 1 to highlight the hours and minutes.
Turn the TUNE/FOLDER knob 2 to adjust the value.
Press the ENTER/SETTING button 1 again to set the value.
WITH NAVIGATION (if so equipped)
To adjust the time and the appearance of the clock on the display:
1. Press the button 3.
2. Select the “Settings” key .
3. Select the “System” key.
4. Select the “Clock” key.
The following settings can be adjusted:
• Time Format: The clock can be set to 12
hours or 24 hours.
• Date Format: The date can be changed to one
of five different formats.
• Clock Mode: From here, the clock mode options are:
· Manual: Allows for the option “Set Clock Manually”. Select this to begin setting
the clock manually using the “+” or “–” to adjust the hours, minu\
tes, day and
month up or down.
· Time Zone: Select the “Time Zone” key
4 to choose from the applicable time zone
list and/or select “Daylight Savings Time” to
switch between ON and OFF.
· Auto: Automatically sets the clock to the
vehicle’s current location.
Press the BACK button 5 to return to the previous screen.
For more information, refer to the “Monitor, climate, audio, phone and voice recognition systems (section 4) ” of
your Owner’s Manual.
5
3
4
ESSE NTIAL I N FOR MATION
1
2
To view detailed instructional videos regarding these and other features, please go to www.nissanownersinfo.mobi.
Page 22 of 36

20
FIRST DRIVE FEATURES
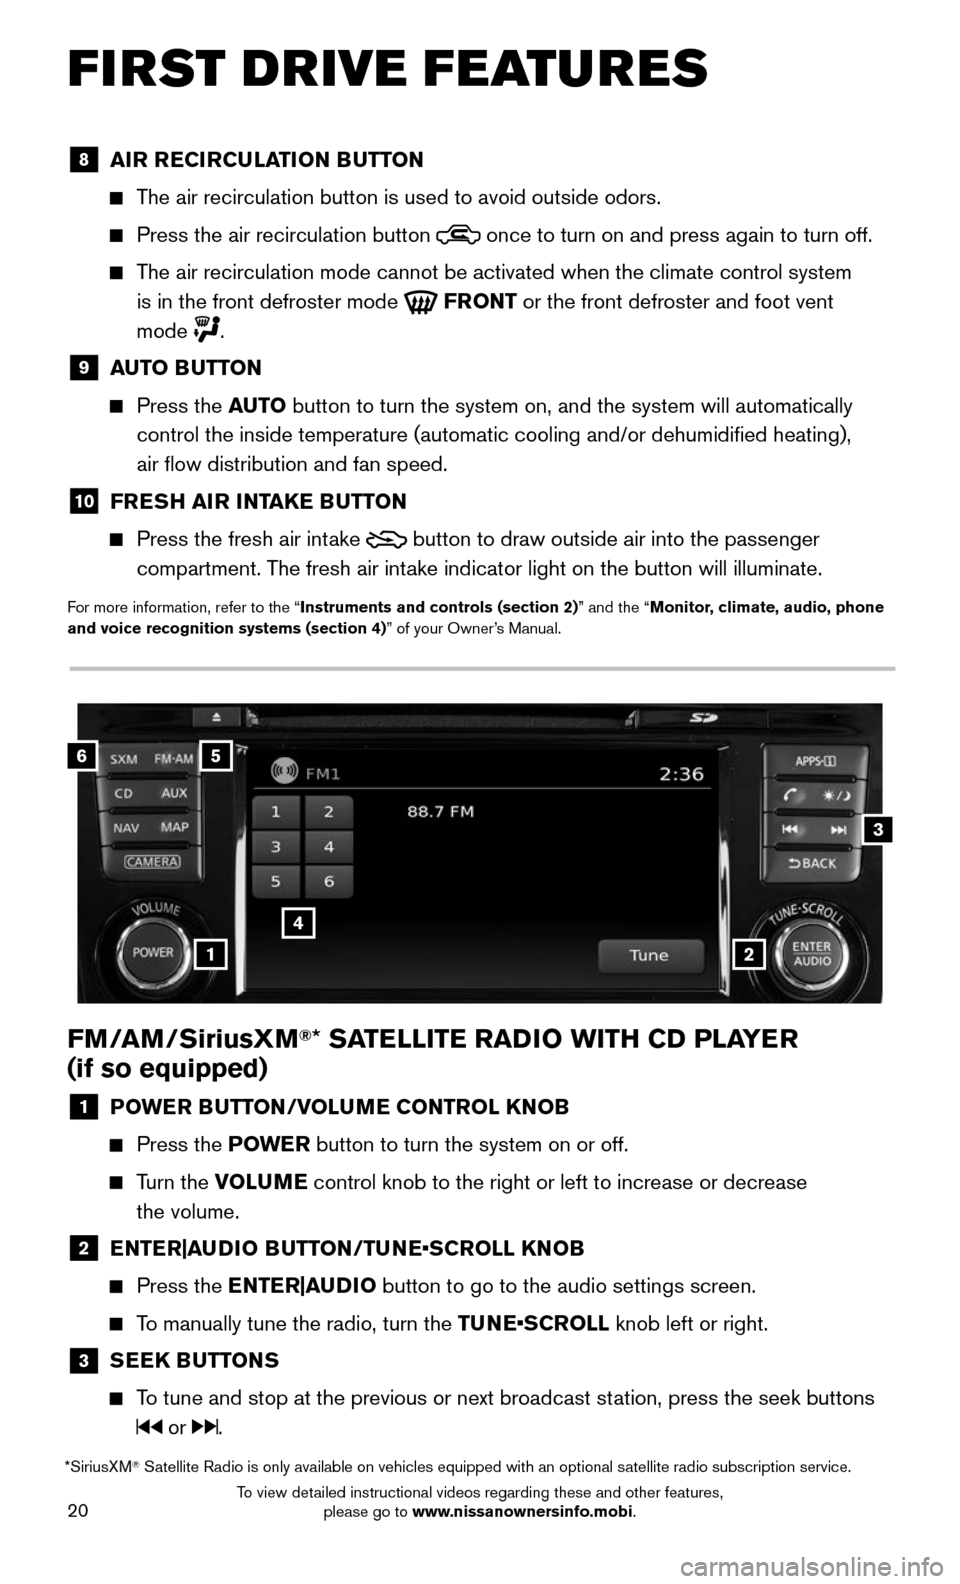
FM/AM/SiriusXM®* SATELLITE RADIO WITH CD PLAYER
(if so equipped)
1 POWER BUTTON/VOLUME CONTROL KNOB
Press the POWE R button to turn the system on or off.
Turn the VOLUME control knob to the right or left to increase or decrease
the volume.
2 ENTER|AUDIO BUTTON/TUNE•SCROLL KNOB
Press the ENTER|AUDIO button to go to the audio settings screen.
To manually tune the radio, turn the TUNE•SCROLL knob left or right.
3 SEEK BUTTONS
To tune and stop at the previous or next broadcast station, press the seek buttons
or .
6
4
3
5
12
*SiriusXM® Satellite Radio is only available on vehicles equipped with an optional s\
atellite radio subscription service.
8 AIR RECIRCULATION BUTTON
The air recirculation button is used to avoid outside odors.
Press the air recirculation button once to turn on and press again to turn off.
The air recirculation mode cannot be activated when the climate control s\
ystem
is in the front defroster mode
FRONT or the front defroster and foot vent
mode
.
9 AUTO BUTTON
Press the AUTO button to turn the system on, and the system will automatically
control the inside temperature (automatic cooling and/or dehumidified\
heating),
air flow distribution and fan speed.
10 FRESH AIR INTAKE BUTTON
Press the fresh air int ake button to draw outside air into the passenger
compartment. The fresh air intake indicator light on the button will illuminate.
For more information, refer to the “Instruments and controls (section 2)” and the “Monitor, climate, audio, phone
and voice recognition systems (section 4)” of your Owner’s Manual.
To view detailed instructional videos regarding these and other features, please go to www.nissanownersinfo.mobi.
Page 32 of 36

30
SYSTEM GUIDE
1
11
4
7
108
2
39
5
6
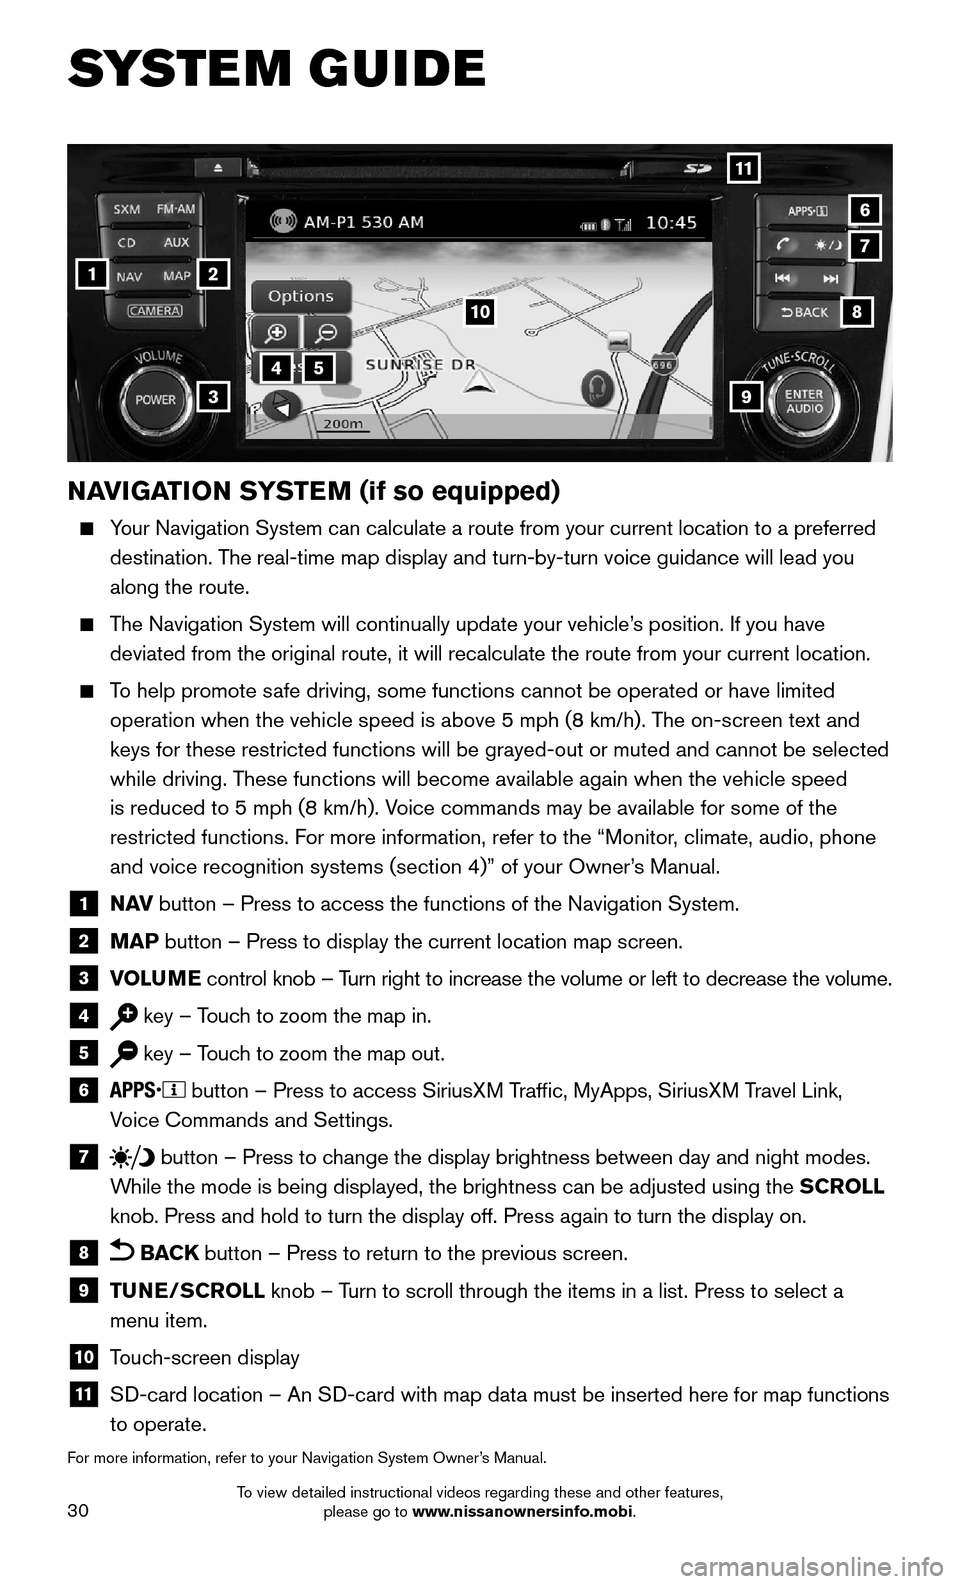
NAVIGATION SYSTEM (if so equipped)
Your Navigation System can calculate a route from your current location t\
o a preferred
destination. The real-time map display and turn-by-turn voice guidance will lead you
along the route.
The Navigation System will continually update your vehicle’s position. If you have
deviated from the original route, it will recalculate the route from you\
r current location.
To help promote safe driving, some functions cannot be operated or have limited
operation when the vehicle speed is above 5 mph (8 km/h). The on-screen text and
keys for these restricted functions will be grayed-out or muted and cann\
ot be selected
while driving. These functions will become available again when the vehicle speed
is reduced to 5 mph (8 km/h). Voice commands may be available for some of the
restricted functions. For more information, refer to the “Monitor, climate, audio, phone
and voice recognition systems (section 4)” of your Owner’s Manual.
1 N AV button – Press to access the functions of the Navigation System.
2 MAP button – Press to display the current location map screen.
3 VOLUME control knob – Turn right to increase the volume or left to decrease the volume.
4 key – Touch to zoom the map in.
5 key – Touch to zoom the map out.
6 button – Press to access SiriusXM Traffic, MyApps, SiriusXM Travel Link,
Voice Commands and Settings.
7 button – Press to change the display brightness between day and night modes.
While the mode is being displayed, the brightness can be adjusted using t\
he SCROLL
knob. Press and hold to turn the display off. Press again to turn the di\
splay on.
8 BACK button – Press to return to the previous screen.
9 TUNE/SCROLL knob – Turn to scroll through the items in a list. Press to select a
menu item.
10 Touch-screen display
11 SD-card location – An SD-card with map data must be inserted here for map functions
to operate.
For more information, refer to your Navigation System Owner’s Manual.
To view detailed instructional videos regarding these and other features, please go to www.nissanownersinfo.mobi.