2016 NISSAN ROGUE instrument panel
[x] Cancel search: instrument panelPage 5 of 36
3
Remote Door Lock/Unlock – Remotely access your vehicle via a NissanConnect
Services Response Specialist, the NissanConnect Services companion app or the
website to remotely lock or unlock your vehicle.
Remote Sound Horn and Flash Lights – Sound the horn and flash the l\
ights remotely
using the NissanConnect Services companion app or website.
Alarm Notification – This system will notify you when the factory-installed vehicle alarm
system has been activated.
Maintenance Alert – Receive notifications via a selected method of \
a vehicle system
malfunction that triggers instrument panel warning lights.
Connected Search – Select “Connected Search” from the Destination menu on the
vehicle’s Navigation System to conduct a Point Of Interest (POI) search within a certain
distance of the vehicle’s location.
Assisted Search – Allows the subscriber to verbally request POI destination data from
a live operator.
Destination Download – Use the NissanConnect Services companion app or website
to search for and send destinations directly to the vehicle.
Journey Planner – Send a route with up to five waypoints and a dest\
ination directly to
the vehicle.
Boundary Alert – Monitor the movement of your vehicle within a specifi\
ed region. Set
up boundaries in the Monitoring section of the NissanConnect Services web portal.
Speed Alert – Set up a maximum speed on the NissanConnect Services web portal.
You will receive notifications if your vehicle exceeds the maximum spee\
d setting.
Valet Alert – Use Valet Alert to set up a 0.2-mile radius around your vehicle.
• Activate alerts via the Niss anConnect Services companion app or website.
Curfew Alert – Specify curfew limits via the NissanConnect Services companion app or
website and be notified via a selected method if curfew is violated.
1 Only use NissanConnectSM Services powered by SiriusXM® and NissanConnectSM Mobile Apps when safe to do so.
NissanConnectSM Services and Mobile Apps availability is dependent on vehicle model, tr\
im level, packaging, and/or
options. See www.NissanUSA.com/connect for complete product and service availability details. Late availability
for some features. Compatible smartphone required to operate NissanConnect
SM Mobile Apps. Services require an
operating vehicle device and cellular and GPS coverage. Cellular network and GPS signals are not available in all
areas and/or at all times. Neither NISSAN nor SiriusXM are responsible for associated costs, if any, for continued
operation due to cellular network termination/changes. Cellular provider may terminate/restrict service without
notice. Certain services require a PIN for activation. Applicable Subscription Agreement required. See
www.NissanUSA.com/connect for details and service limitations. Enrollment is required to receive the full suite of
services. Text rates and/or data usage may apply.
For more information, refer to the “ Information (section 5)” of your Navigation System Owner’s Manual.
To view detailed instructional videos regarding these and other features, please go to www.nissanownersinfo.mobi.
Page 8 of 36
6
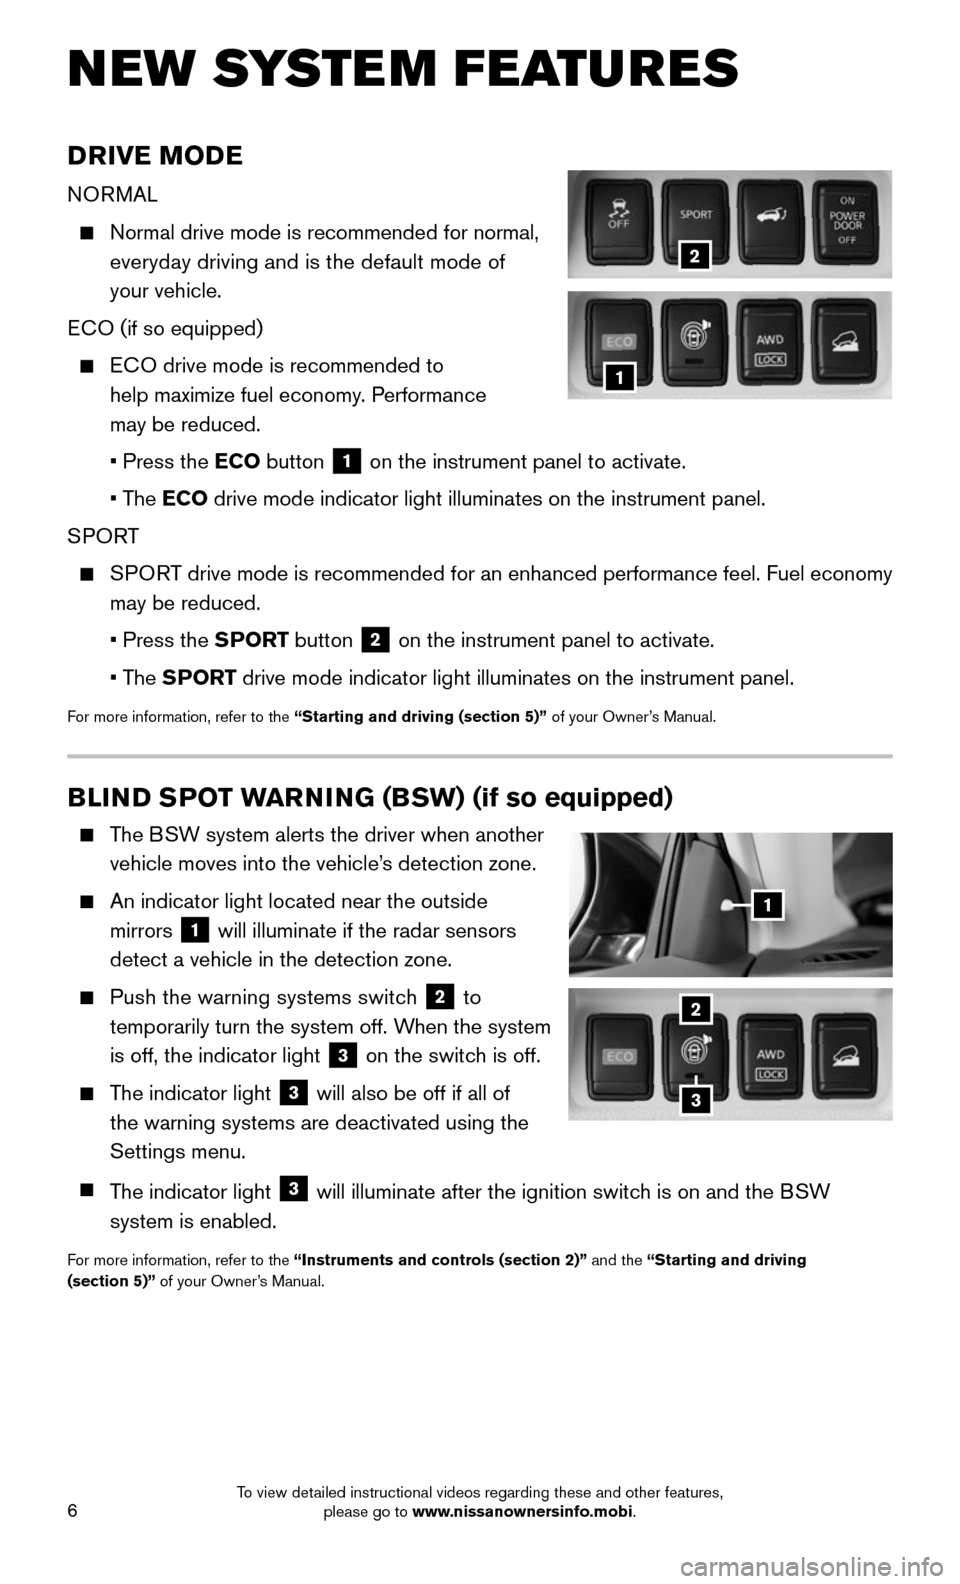
BLIND SPOT WARNING (BSW) (if so equipped)
The BSW system alerts the driver when another
vehicle moves into the vehicle’s detection zone.
An indicator light located near the outside
mirrors
1 will illuminate if the radar sensors
detect a vehicle in the detection zone.
Push the warning systems switc h 2 to
temporarily turn the system off. When the system
is off, the indicator light
3 on the switch is off.
The indicator light 3 will also be off if all of
the warning systems are deactivated using the
Settings menu.
The indicator light 3 will illuminate after the ignition switch is on and the BSW
system is enabled.
For more information, refer to the “Instruments and controls (section 2)” and the “Starting and driving
(section 5)” of your Owner’s Manual.
NEW SYSTEM FEATURES
2
DRIVE MODE
NORMAL
Normal drive mode is recommended for normal,
everyday driving and is the default mode of
your vehicle.
ECO (if so equipped)
ECO drive mode is recommended to
help maximize fuel economy. Performance
may be reduced.
• Press the ECO button 1 on the instrument panel to activate.
• The ECO drive mode indicator light illuminates on the instrument panel.
SPORT
SPORT drive mode is recommended for an enhanced performance feel. Fuel econ\
omy
may be reduced.
• Press the SPORT button 2 on the instrument panel to activate.
• The SPORT drive mode indicator light illuminates on the instrument panel.
For more information, refer to the “Starting and driving (section 5)” of your Owner’s Manual.
2
1
1
3
To view detailed instructional videos regarding these and other features, please go to www.nissanownersinfo.mobi.
Page 12 of 36
10
LOOSE FUEL CAP AND FUEL-FILLER DOOR
LOOSE FUEL CAP
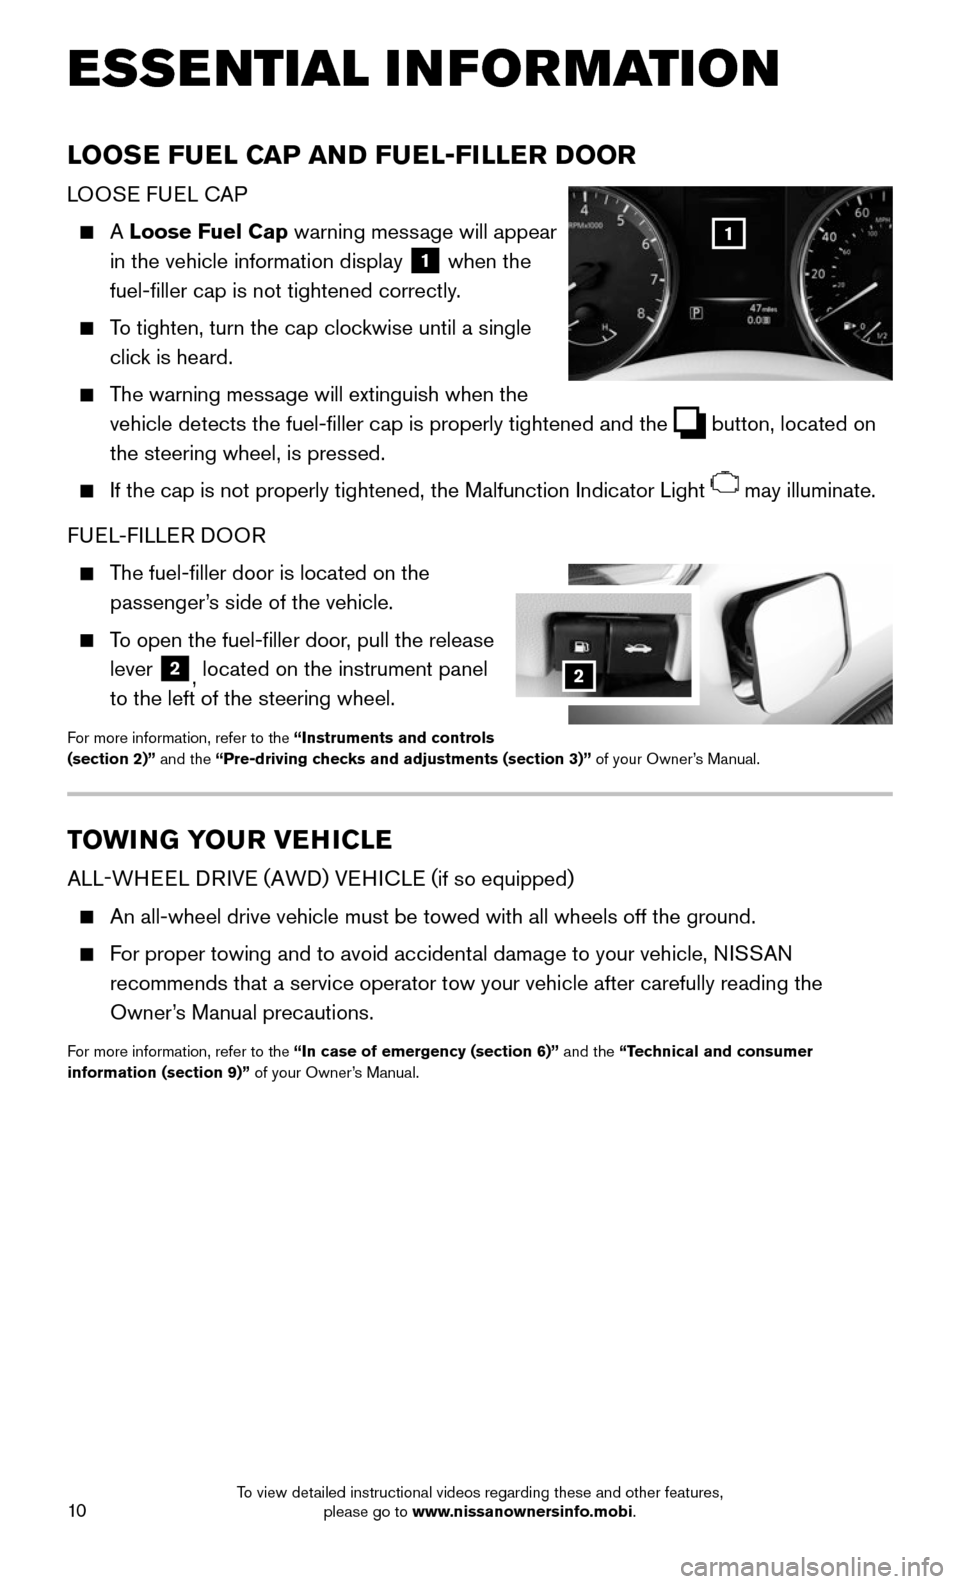
A Loose Fuel Cap warning message will appear
in the vehicle information display
1 when the
fuel-filler cap is not tightened correctly.
To tighten, turn the cap clockwise until a single
click is heard.
The warning message will extinguish when the
vehicle detects the fuel-filler cap is properly tightened and the button, located on
the steering wheel, is pressed.
If the cap is not properly tightened, the Malfunction Indicator Light may illuminate.
FUEL-FILLER DOOR
The fuel-filler door is located on the
passenger’s side of the vehicle.
To open the fuel-filler door, pull the release
lever 2, located on the instrument panel
to the left of the steering wheel.
For more information, refer to the “Instruments and controls
(section 2)” and the “Pre-driving checks and adjustments (section 3)” of your Owner’s Manual.
1
TOWING YOUR VEHICLE
ALL-WHEEL DRIVE (AWD) VEHICLE ( if so equipped)
An all-wheel drive vehicle must be towed with all wheels off the ground.\
For proper towing and to avoid accidental damage to your vehicle, NISSAN
recommends that a service operator tow your vehicle after carefully read\
ing the
Owner’s Manual precautions.
For more information, refer to the “In case of emergency (section 6)” and the “Technical and consumer
information (section 9)” of your Owner’s Manual.
2
ESSE NTIAL I N FOR MATION
To view detailed instructional videos regarding these and other features, please go to www.nissanownersinfo.mobi.
Page 16 of 36
14
POWER LIFTGATE (if so equipped)
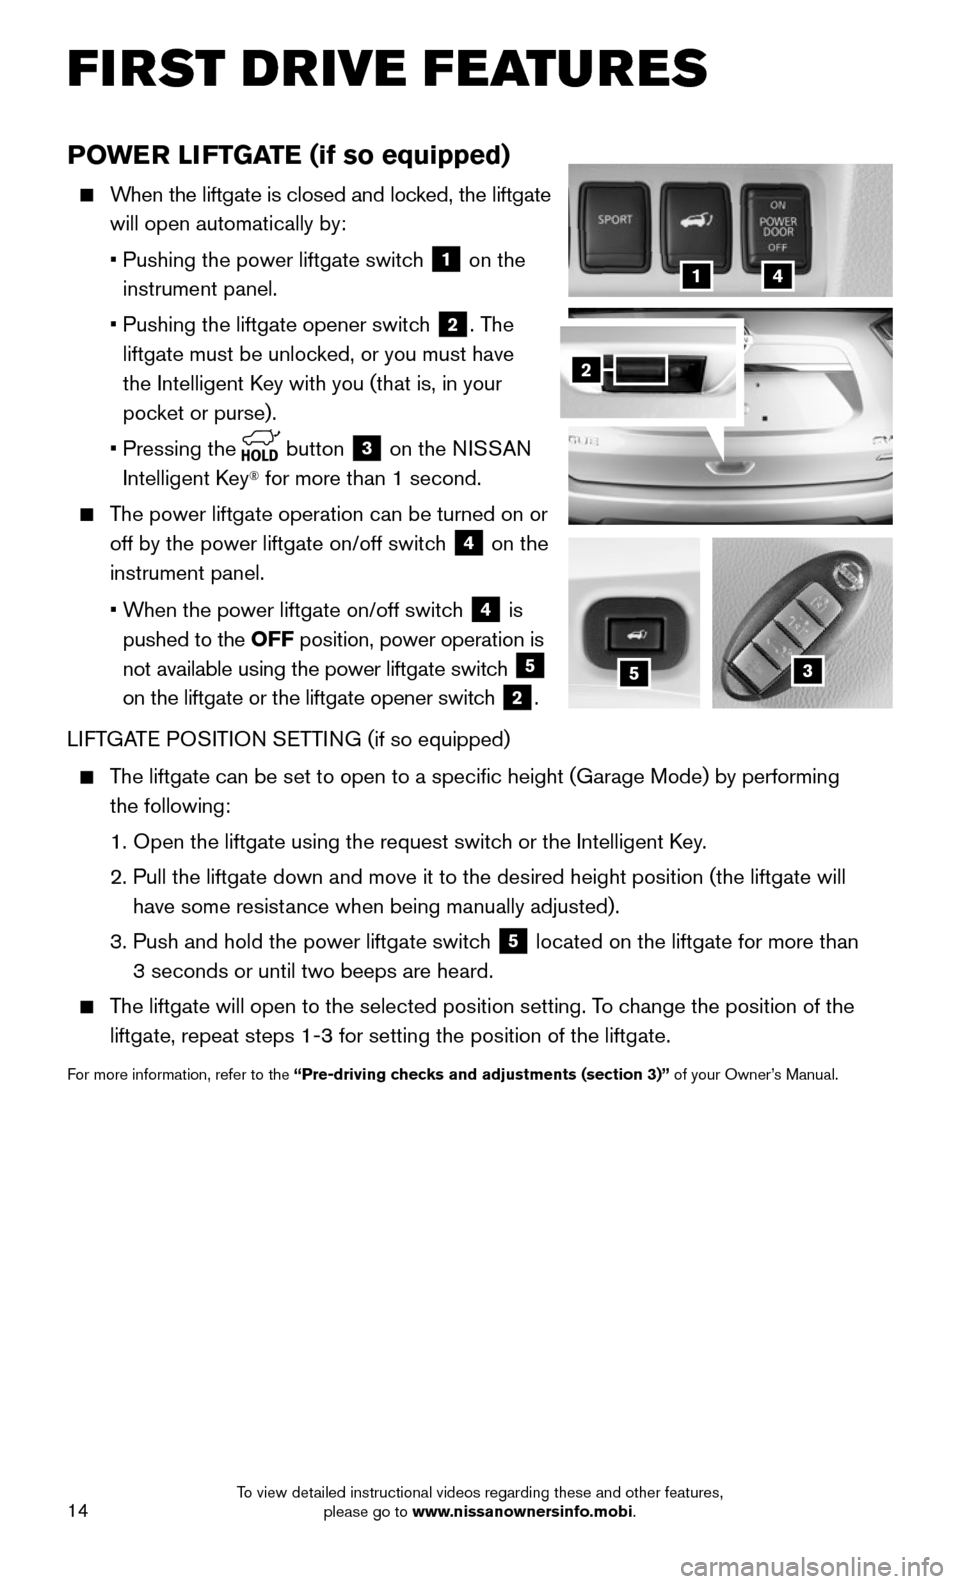
When the liftgate is closed and locked, the liftgate
will open automatically by:
• Pushing the power liftgate switc h 1 on the
instrument panel.
• Pushing the liftgate opener switc h 2. The
liftgate must be unlocked, or you must have
the Intelligent Key with you (that is, in your
pocket or purse).
• Pressing the button 3 on the NISSAN
Intelligent Key® for more than 1 second.
The power liftgate operation can be turned on or
off by the power liftgate on/off switch 4 on the
instrument panel.
• When the power liftgate on/off switch 4 is
pushed to the OFF position, power operation is
not available using the power liftgate switch
5
on the liftgate or the liftgate opener switch
2.
LIFTGATE POSITION SETTING (if so equipped)
The liftgate can be set to open to a specific height (Garage Mode) by\
performing
the following:
1. Open the liftgate using the request switc h or the Intelligent Key.
2. Pull the liftgate down and move it to the desired height position (the \
liftgate will
have some resistance when being manually adjusted).
3. Push and hold the power liftgate switc h 5 located on the liftgate for more than
3 seconds or until two beeps are heard.
The liftgate will open to the selected position setting. To change the position of the
liftgate, repeat steps 1-3 for setting the position of the liftgate.
For more information, refer to the “Pre-driving checks and adjustments (section 3)” of your Owner’s Manual.
3
41
2
5
FIRST DRIVE FEATURES
To view detailed instructional videos regarding these and other features, please go to www.nissanownersinfo.mobi.
Page 19 of 36
17
HEADLIGHT CONTROL SWITCH
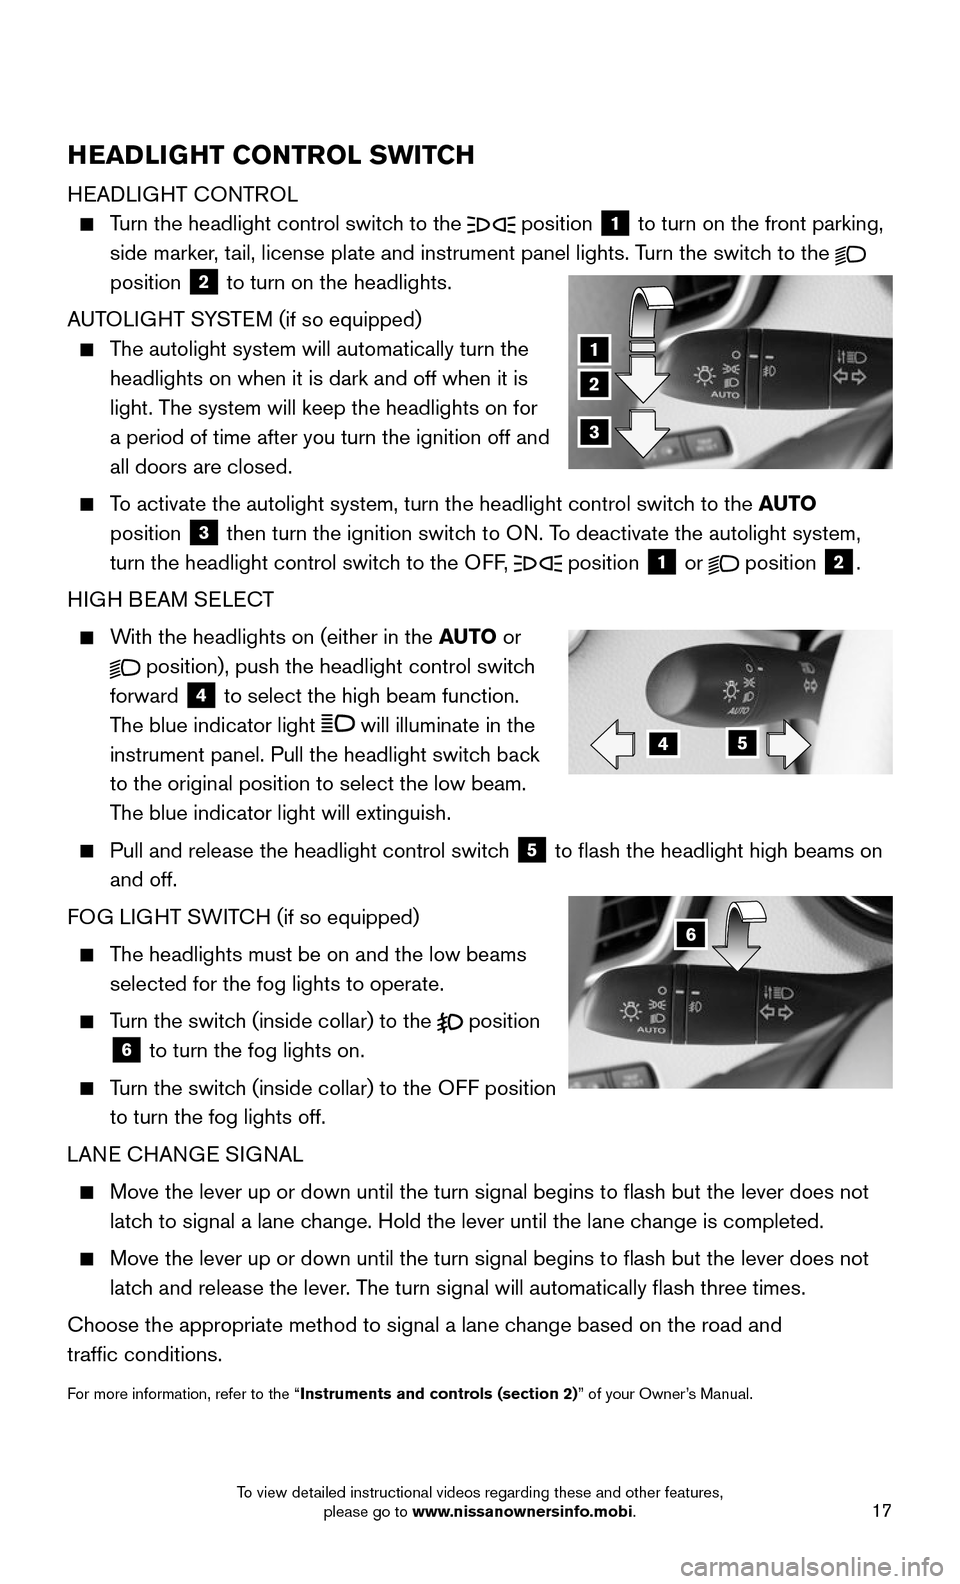
HEADLIGHT CONTROL
Turn the headlight control switch to the position 1 to turn on the front parking,
side marker, tail, license plate and instrument panel lights. Turn the switch to the
position 2 to turn on the headlights.
AUTOLIGHT SYSTEM (if so equipped)
The autolight system will automatically turn the
headlights on when it is dark and off when it is
light. The system will keep the headlights on for
a period of time after you turn the ignition off and
all doors are closed.
To activate the autolight system, turn the headlight control switch to the AUTO
position
3 then turn the ignition switch to ON. To deactivate the autolight system,
turn the headlight control switch to the OFF,
position 1 or
position 2.
HIGH BEAM SELECT
With the headlights on (either in the AUTO or
position), push the headlight control switch
forward 4 to select the high beam function.
The blue indicator light
will illuminate in the
instrument panel. Pull the headlight switch back
to the original position to select the low beam.
The blue indicator light will extinguish.
Pull and release the headlight control switc h 5 to flash the headlight high beams on
and off.
FOG LIGHT SWITCH (if so equipped)
The headlights must be on and the low beams
selected for the fog lights to operate.
Turn the switch (inside collar) to the position
6 to turn the fog lights on.
Turn the switch (inside collar) to the OFF position
to turn the fog lights off.
LANE CHANGE SIGNAL
Move the lever up or down until the turn signal begins to flash but th\
e lever does not
latch to signal a lane change. Hold the lever until the lane change is completed.
Move the lever up or down until the turn signal begins to flash but th\
e lever does not
latch and release the lever. The turn signal will automatically flash three times.
Choose the appropriate method to signal a lane change based on the road and
traffic conditions.
For more information, refer to the “Instruments and controls (section 2)” of your Owner’s Manual.
2
1
3
45
6
To view detailed instructional videos regarding these and other features, please go to www.nissanownersinfo.mobi.
Page 23 of 36
21
CRUISE CONTROL
The cruise control system enables you to set a
constant cruising speed once the vehicle has
reached 25 mph (40 km/h). The system will
automatically maintain the set speed until you tap
the brake pedal, accelerate, cancel or turn the
system off.
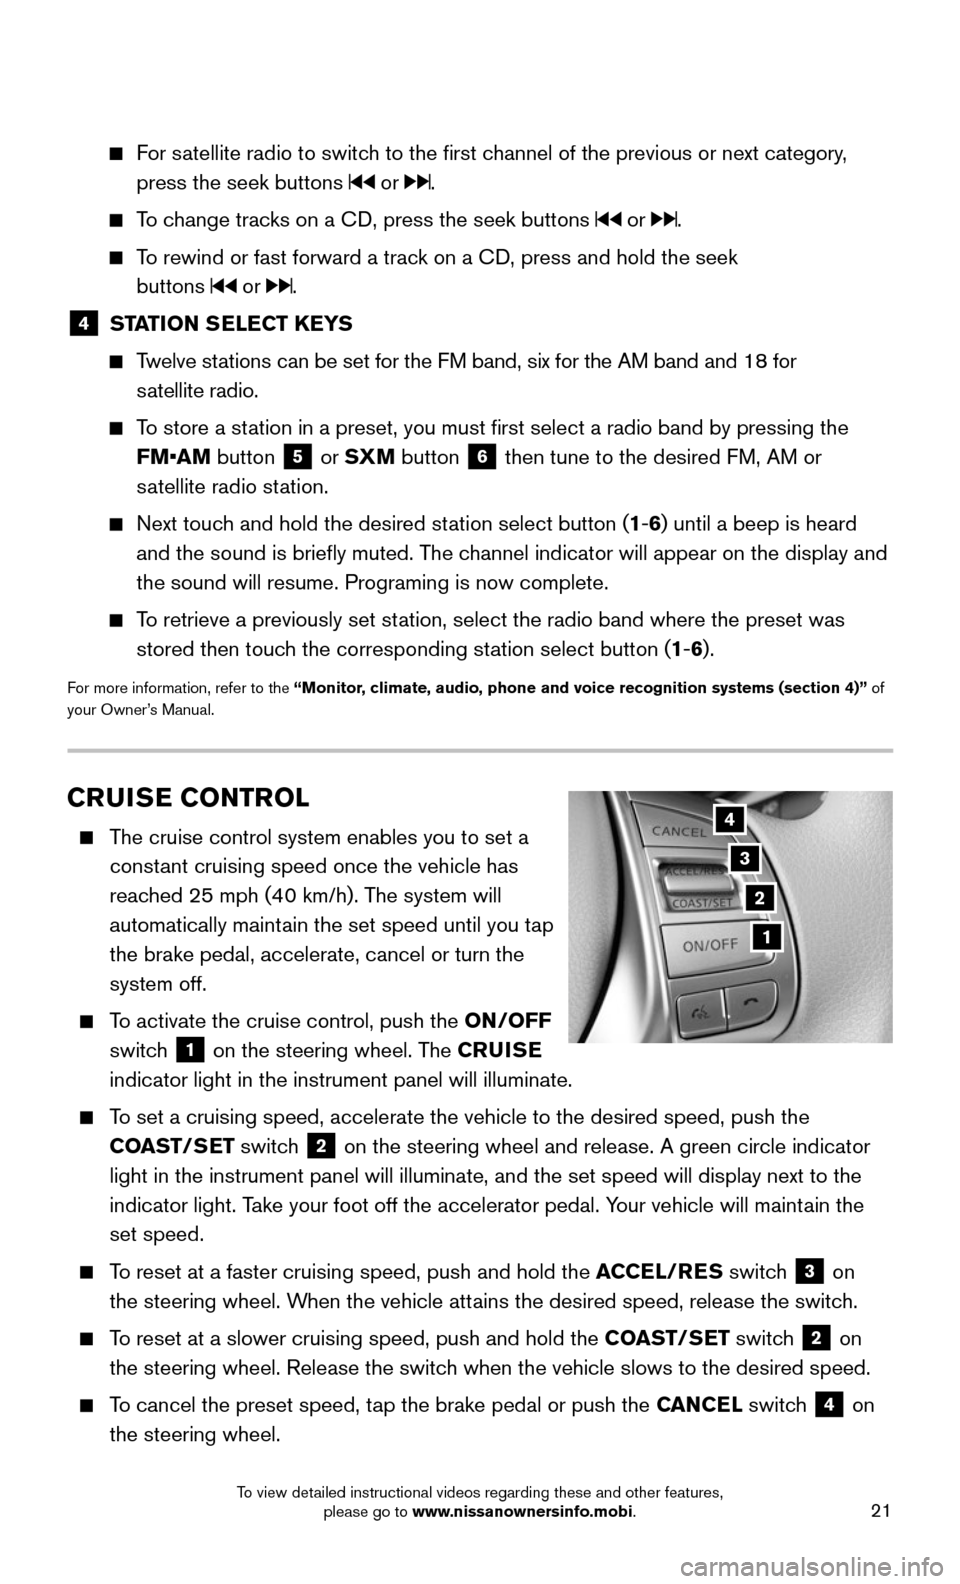
To activate the cruise control, push the ON/OFF
switch
1 on the steering wheel. The CRUISE
indicator light in the instrument panel will illuminate.
To set a cruising speed, accelerate the vehicle to the desired speed, pus\
h the
COAST/SET switch
2 on the steering wheel and release. A green circle indicator
light in the instrument panel will illuminate, and the set speed will di\
splay next to the
indicator light. Take your foot off the accelerator pedal. Your vehicle will maintain the
set speed.
To reset at a faster cruising speed, push and hold the ACCEL/RES switch 3 on
the steering wheel. When the vehicle attains the desired speed, release the switch.
To reset at a slower cruising speed, push and hold the COAST/SET switch 2 on
the steering wheel. Release the switch when the vehicle slows to the desired speed.
To cancel the preset speed, tap the brake pedal or push the CANCEL switch 4 on
the steering wheel.
3
2
1
4
For satellite radio to switch to the first channel of the previous or next category,
press the seek buttons or .
To change tracks on a CD, press the seek buttons or .
To rewind or fast forward a track on a CD, press and hold the seek
buttons
or .
4 STATION SELECT KEYS
Twelve stations can be set for the FM band, six for the AM band and 18 for
satellite radio.
To store a station in a preset, you must first select a radio band by pressing the \
FM•AM button
5 or SXM button 6 then tune to the desired FM, AM or
satellite radio station.
Next touch and hold the desired station select button (1-6) until a beep is heard
and the sound is briefly muted. The channel indicator will appear on the display and
the sound will resume. Programing is now complete.
To retrieve a previously set station, select the radio band where the preset was
stored then touch the corresponding station select button (1-6).
For more information, refer to the “Monitor, climate, audio, phone and voice recognition systems (section 4)” of
your Owner’s Manual.
To view detailed instructional videos regarding these and other features, please go to www.nissanownersinfo.mobi.
Page 24 of 36
22
To turn off cruise control, push the ON/OFF switch 1 on the steering wheel.
Both the CRUISE indicator light and green circle indicator light in the instrument
panel will extinguish.
For more information, refer to the “Starting and driving (section 5)” of your Owner’s Manual.
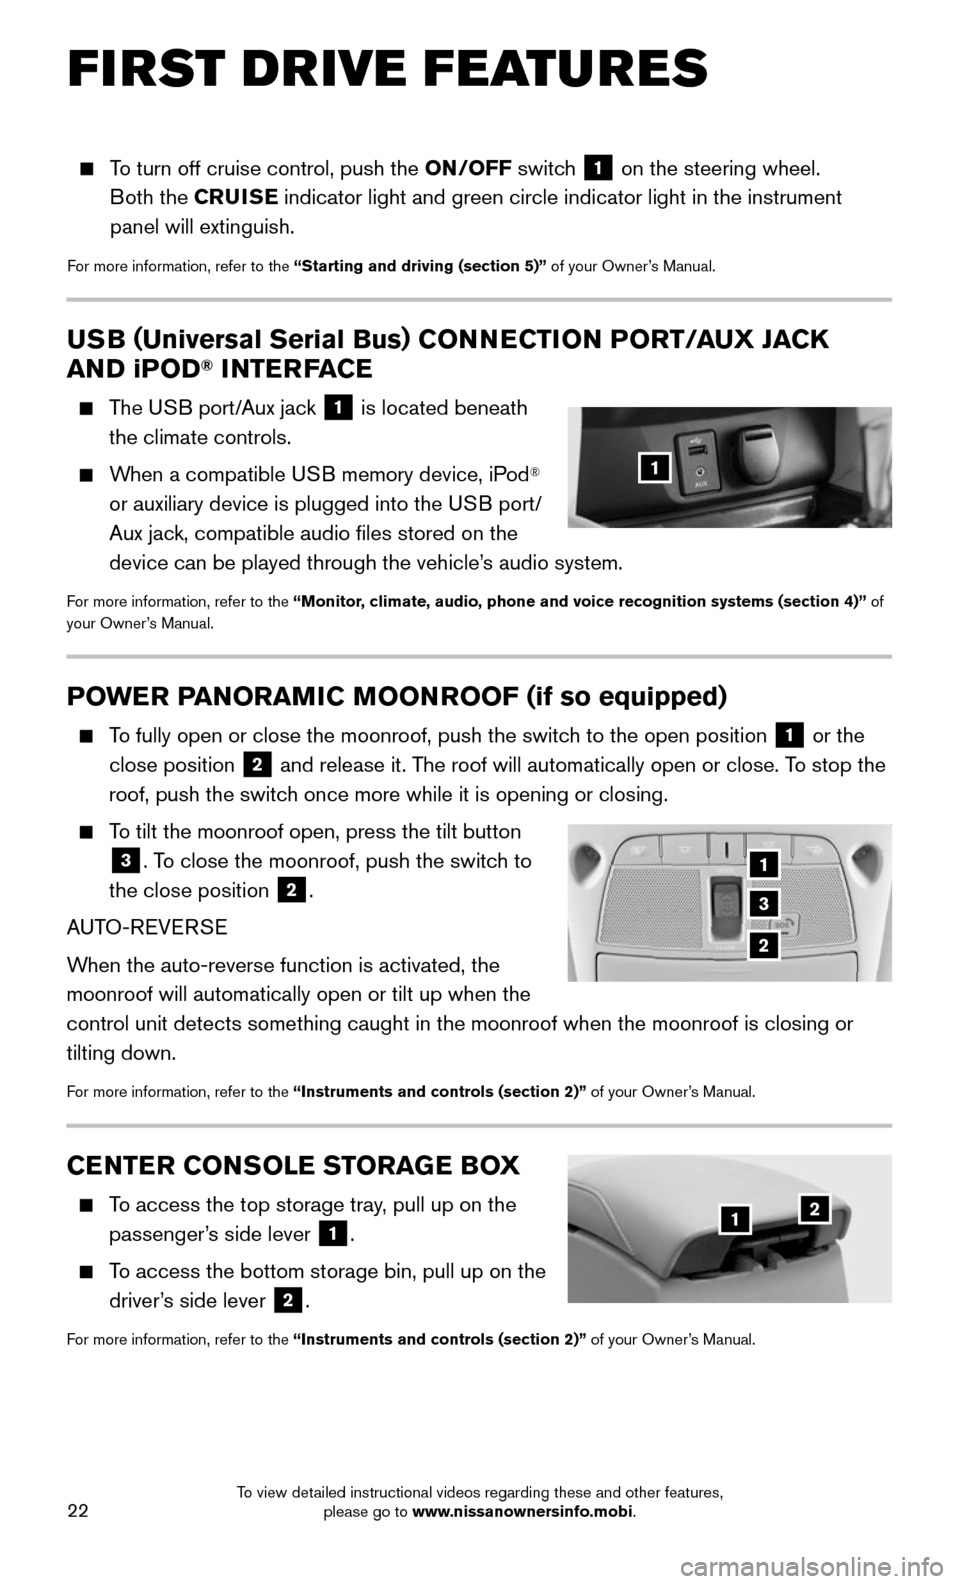
POWER PANORAMIC MOONROOF (if so equipped)
To fully open or close the moonroof, push the switch to the open position 1 or the
close position
2 and release it. The roof will automatically open or close. To stop the
roof, push the switch once more while it is opening or closing.
To tilt the moonroof open, press the tilt button
3. To close the moonroof, push the switch to
the close position
2.
AUTO-REVERSE
When the auto-reverse function is activated, the
moonroof will automatically open or tilt up when the
control unit detects something caught in the moonroof when the moonroof \
is closing or
tilting down.
For more information, refer to the “Instruments and controls (section 2)” of your Owner’s Manual.
USB ( Universal Serial Bus) CONNECTION PORT/ AUX JACK
AND iPOD® INTERFACE
The USB port/Aux jack 1 is located beneath
the climate controls.
When a compatible USB memory device, iPod®
or auxiliary device is plugged into the USB port/
Aux jack, compatible audio files stored on the
device can be played through the vehicle’s audio system.
For more information, refer to the “Monitor, climate, audio, phone and voice recognition systems (section 4)” of
your Owner’s Manual.
1
1
3
2
CENTER CONSOLE STORAGE BOX
To access the top storage tray, pull up on the
passenger’s side lever 1.
To access the bottom storage bin, pull up on the
driver’s side lever
2.
For more information, refer to the “Instruments and controls (section 2)” of your Owner’s Manual.
21
FIRST DRIVE FEATURES
To view detailed instructional videos regarding these and other features, please go to www.nissanownersinfo.mobi.