2016 NISSAN ROGUE change time
[x] Cancel search: change timePage 5 of 36
3
Remote Door Lock/Unlock – Remotely access your vehicle via a NissanConnect
Services Response Specialist, the NissanConnect Services companion app or the
website to remotely lock or unlock your vehicle.
Remote Sound Horn and Flash Lights – Sound the horn and flash the l\
ights remotely
using the NissanConnect Services companion app or website.
Alarm Notification – This system will notify you when the factory-installed vehicle alarm
system has been activated.
Maintenance Alert – Receive notifications via a selected method of \
a vehicle system
malfunction that triggers instrument panel warning lights.
Connected Search – Select “Connected Search” from the Destination menu on the
vehicle’s Navigation System to conduct a Point Of Interest (POI) search within a certain
distance of the vehicle’s location.
Assisted Search – Allows the subscriber to verbally request POI destination data from
a live operator.
Destination Download – Use the NissanConnect Services companion app or website
to search for and send destinations directly to the vehicle.
Journey Planner – Send a route with up to five waypoints and a dest\
ination directly to
the vehicle.
Boundary Alert – Monitor the movement of your vehicle within a specifi\
ed region. Set
up boundaries in the Monitoring section of the NissanConnect Services web portal.
Speed Alert – Set up a maximum speed on the NissanConnect Services web portal.
You will receive notifications if your vehicle exceeds the maximum spee\
d setting.
Valet Alert – Use Valet Alert to set up a 0.2-mile radius around your vehicle.
• Activate alerts via the Niss anConnect Services companion app or website.
Curfew Alert – Specify curfew limits via the NissanConnect Services companion app or
website and be notified via a selected method if curfew is violated.
1 Only use NissanConnectSM Services powered by SiriusXM® and NissanConnectSM Mobile Apps when safe to do so.
NissanConnectSM Services and Mobile Apps availability is dependent on vehicle model, tr\
im level, packaging, and/or
options. See www.NissanUSA.com/connect for complete product and service availability details. Late availability
for some features. Compatible smartphone required to operate NissanConnect
SM Mobile Apps. Services require an
operating vehicle device and cellular and GPS coverage. Cellular network and GPS signals are not available in all
areas and/or at all times. Neither NISSAN nor SiriusXM are responsible for associated costs, if any, for continued
operation due to cellular network termination/changes. Cellular provider may terminate/restrict service without
notice. Certain services require a PIN for activation. Applicable Subscription Agreement required. See
www.NissanUSA.com/connect for details and service limitations. Enrollment is required to receive the full suite of
services. Text rates and/or data usage may apply.
For more information, refer to the “ Information (section 5)” of your Navigation System Owner’s Manual.
To view detailed instructional videos regarding these and other features, please go to www.nissanownersinfo.mobi.
Page 14 of 36
12
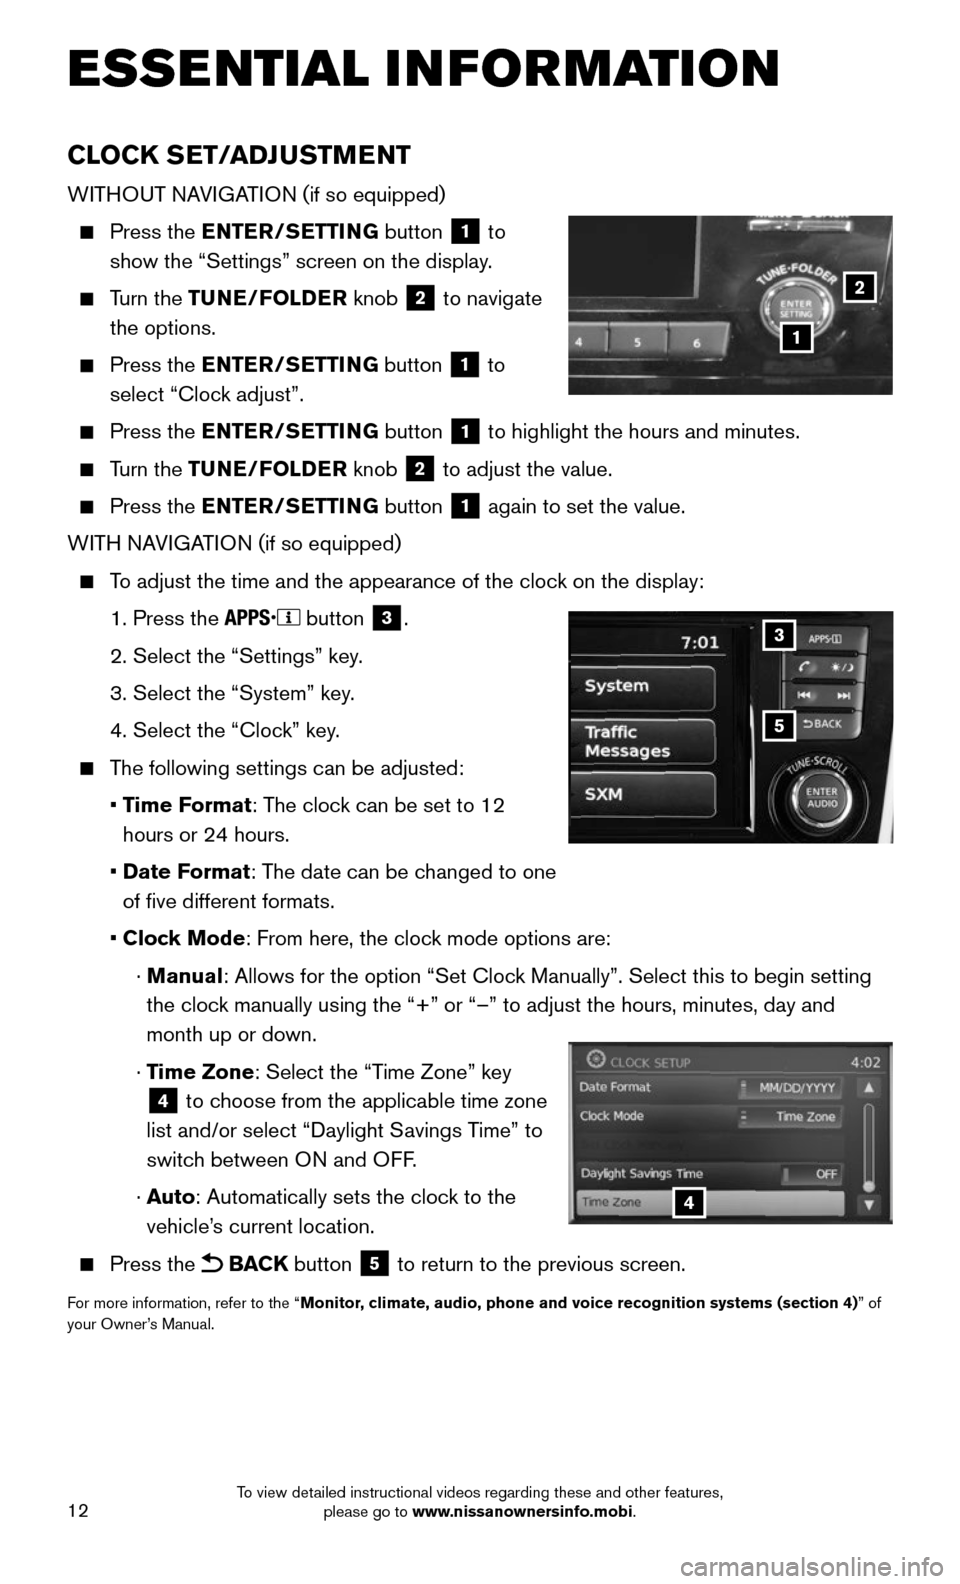
CLOCK SET/ADJUSTMENT
WITHOUT NAVIGATION (if so equipped)
Press the ENTER/SETTING button 1 to
show the “Settings” screen on the display.
Turn the TUNE/FOLDER knob 2 to navigate
the options.
Press the ENTER/SETTING button 1 to
select “Clock adjust”.
Press the ENTER/SETTING button 1 to highlight the hours and minutes.
Turn the TUNE/FOLDER knob 2 to adjust the value.
Press the ENTER/SETTING button 1 again to set the value.
WITH NAVIGATION (if so equipped)
To adjust the time and the appearance of the clock on the display:
1. Press the button 3.
2. Select the “Settings” key .
3. Select the “System” key.
4. Select the “Clock” key.
The following settings can be adjusted:
• Time Format: The clock can be set to 12
hours or 24 hours.
• Date Format: The date can be changed to one
of five different formats.
• Clock Mode: From here, the clock mode options are:
· Manual: Allows for the option “Set Clock Manually”. Select this to begin setting
the clock manually using the “+” or “–” to adjust the hours, minu\
tes, day and
month up or down.
· Time Zone: Select the “Time Zone” key
4 to choose from the applicable time zone
list and/or select “Daylight Savings Time” to
switch between ON and OFF.
· Auto: Automatically sets the clock to the
vehicle’s current location.
Press the BACK button 5 to return to the previous screen.
For more information, refer to the “Monitor, climate, audio, phone and voice recognition systems (section 4) ” of
your Owner’s Manual.
5
3
4
ESSE NTIAL I N FOR MATION
1
2
To view detailed instructional videos regarding these and other features, please go to www.nissanownersinfo.mobi.
Page 19 of 36
17
HEADLIGHT CONTROL SWITCH
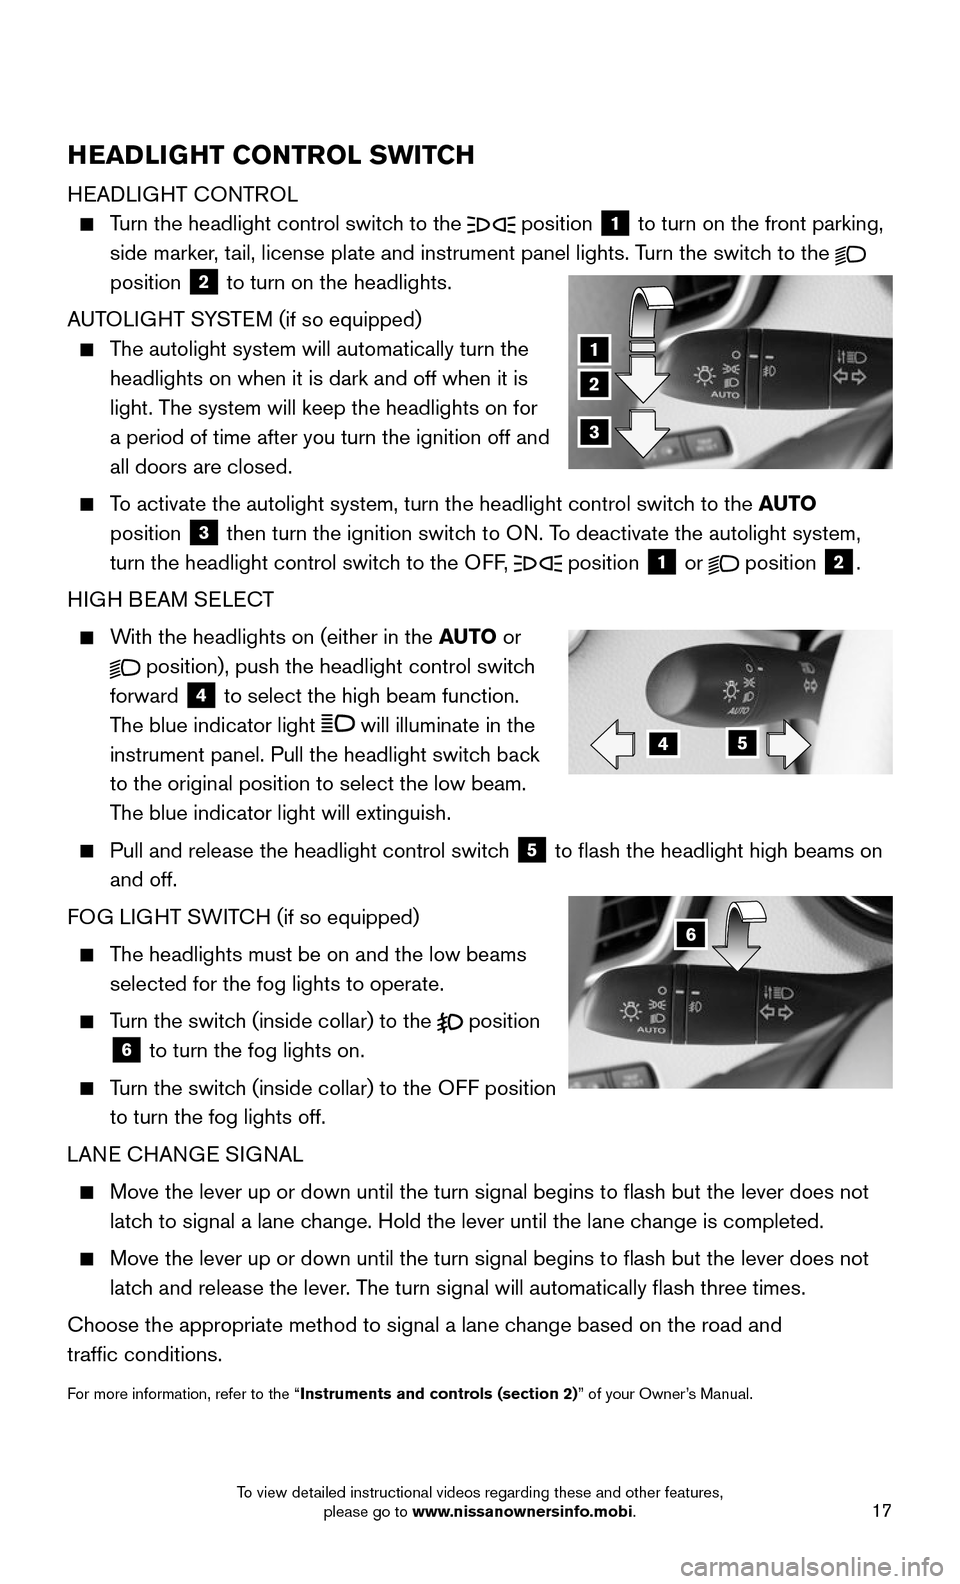
HEADLIGHT CONTROL
Turn the headlight control switch to the position 1 to turn on the front parking,
side marker, tail, license plate and instrument panel lights. Turn the switch to the
position 2 to turn on the headlights.
AUTOLIGHT SYSTEM (if so equipped)
The autolight system will automatically turn the
headlights on when it is dark and off when it is
light. The system will keep the headlights on for
a period of time after you turn the ignition off and
all doors are closed.
To activate the autolight system, turn the headlight control switch to the AUTO
position
3 then turn the ignition switch to ON. To deactivate the autolight system,
turn the headlight control switch to the OFF,
position 1 or
position 2.
HIGH BEAM SELECT
With the headlights on (either in the AUTO or
position), push the headlight control switch
forward 4 to select the high beam function.
The blue indicator light
will illuminate in the
instrument panel. Pull the headlight switch back
to the original position to select the low beam.
The blue indicator light will extinguish.
Pull and release the headlight control switc h 5 to flash the headlight high beams on
and off.
FOG LIGHT SWITCH (if so equipped)
The headlights must be on and the low beams
selected for the fog lights to operate.
Turn the switch (inside collar) to the position
6 to turn the fog lights on.
Turn the switch (inside collar) to the OFF position
to turn the fog lights off.
LANE CHANGE SIGNAL
Move the lever up or down until the turn signal begins to flash but th\
e lever does not
latch to signal a lane change. Hold the lever until the lane change is completed.
Move the lever up or down until the turn signal begins to flash but th\
e lever does not
latch and release the lever. The turn signal will automatically flash three times.
Choose the appropriate method to signal a lane change based on the road and
traffic conditions.
For more information, refer to the “Instruments and controls (section 2)” of your Owner’s Manual.
2
1
3
45
6
To view detailed instructional videos regarding these and other features, please go to www.nissanownersinfo.mobi.
Page 26 of 36
24
SYSTEM GUIDE
VEHICLE INFORMATION DISPLAY
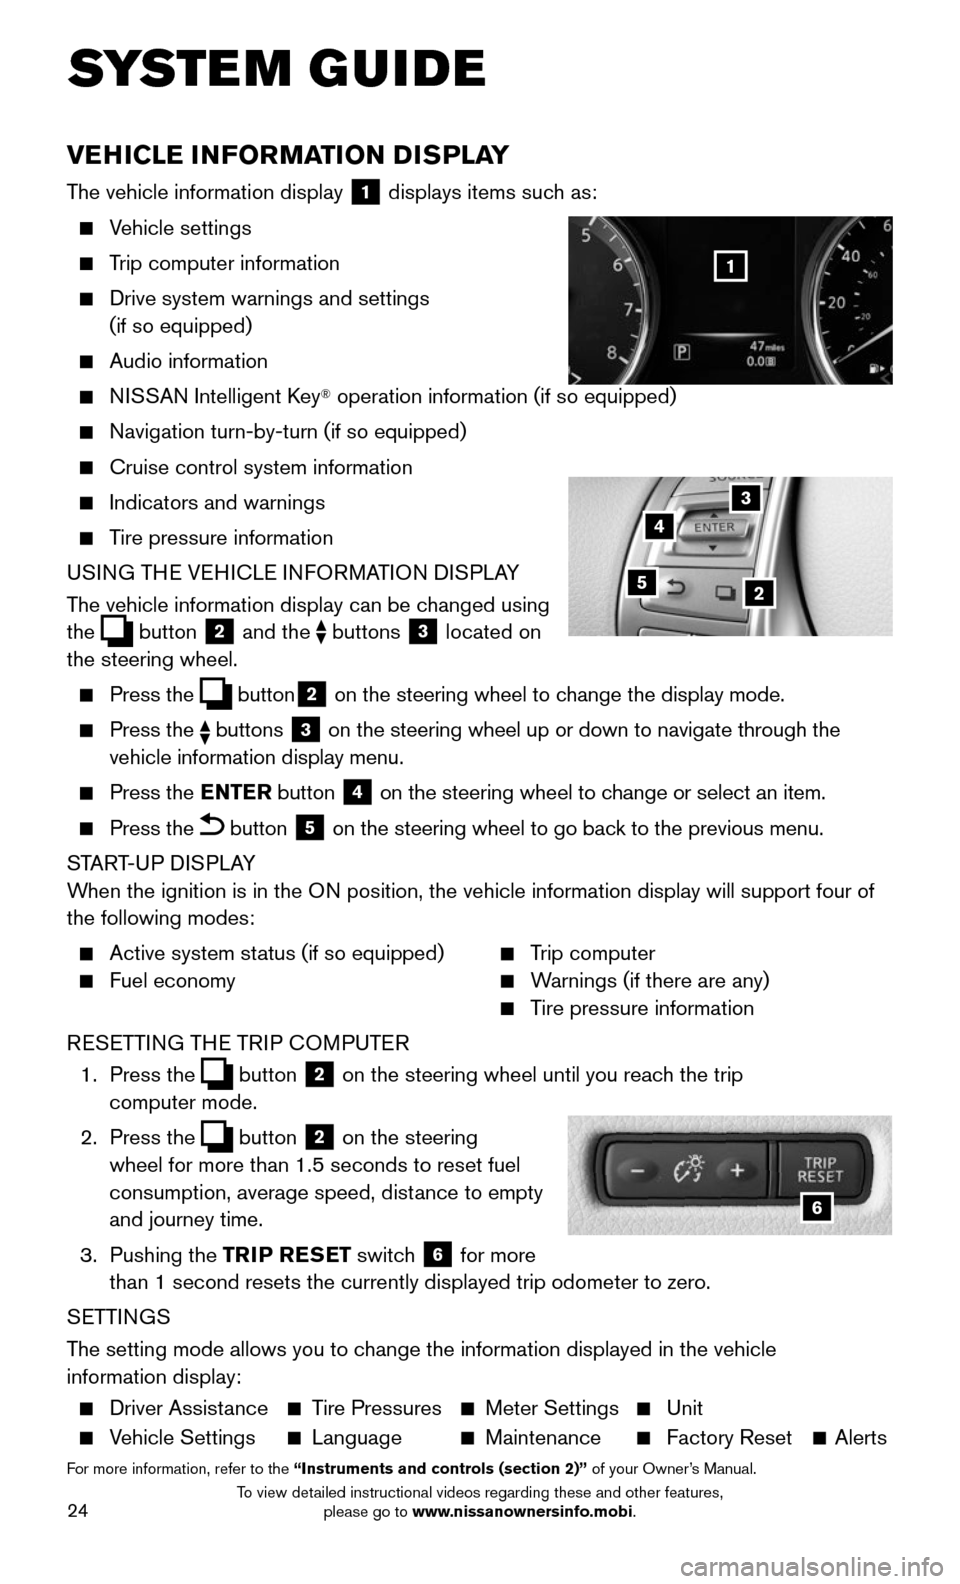
The vehicle information display 1 displays items such as:
Vehicle settings
Trip computer information
Drive system warnings and settings
(if so equipped)
Audio information
NISSAN Intelligent Key® operation information (if so equipped)
Navigation turn-by-turn (if so equipped)
Cruise control system information
Indicators and warnings
Tire pressure information
USING THE VEHICLE INFORMATION DISPLAY
The vehicle information display can be changed using
the
button 2 and the buttons 3 located on
the steering wheel.
Press the button2 on the steering wheel to change the display mode.
Press the buttons 3 on the steering wheel up or down to navigate through the
vehicle information display menu.
Press the ENTER button 4 on the steering wheel to change or select an item.
Press the button 5 on the steering wheel to go back to the previous menu.
START-UP DISPLAY
When the ignition is in the ON position, the vehicle information display will support four of
the following modes:
Active system st atus (if so equipped)
Fuel economy
Trip computer
Warnings (if there are any)
Tire pressure information
RESETTING THE TRIP COMPUTER
1. Press the button 2 on the steering wheel until you reach the trip
computer mode.
2. Press the button 2 on the steering
wheel for more than 1.5 seconds to reset fuel
consumption, average speed, distance to empty
and journey time.
3. Pushing the TRIP RESET switch 6 for more
than 1 second resets the currently displayed trip odometer to zero.
SETTINGS
The setting mode allows you to change the information displayed in the vehicle
information display:
Driver Assist ance Tire Pressures Meter Settings Unit
Vehicle Settings Language Maintenance Factory Reset Alerts
For more information, refer to the “Instruments and controls (section 2)” of your Owner’s Manual.
5
3
2
4
6
1
To view detailed instructional videos regarding these and other features, please go to www.nissanownersinfo.mobi.
Page 27 of 36
25
NISSANCONNECTSM MOBILE APPS1 (if so equipped)
Integrates popular smartphone apps and services into your vehicle.
The NissanConnect Mobile Apps companion app must be downloaded to your
smartphone, and you must be enrolled in a NissanConnect account.
FOR SYSTEM WITH NAVIGATION
• iPhone®,2: Please connect via USB when using an iPhone® with NissanConnect
M obile Apps.
• Android®,3: Please connect via Bluetooth®,4 when using an Android® device with
NissanConnect Mobile Apps.
FOR SYSTEM WITHOUT NAVIGATION
• iPhone®: Please connect via Bluetooth®,4 when using an iPhone® with NissanConnect
Mobile Apps.
• Android®: Please connect via Bluetooth®,4 when using an Android® device with
NissanConnect M obile Apps.
For more information on how to pair your cellular phone and set up NissanConnect
Mobile Apps, visit: www.NissanUSA.com/connect/support.
1 Only use Niss anConnectSM Services powered by SiriusXM® and NissanConnectSM Mobile Apps when safe to do so.
NissanConnectSM Services and Mobile Apps availability is dependent on vehicle model, tr\
im level, packaging, and/or
options. See www.NissanUSA.com/connect for complete product and service availability details. Late availability
for some features. Compatible smartphone required to operate NissanConnect
SM Mobile Apps. Services require an
operating vehicle device and cellular and GPS coverage. Cellular network and GPS signals are not available in all
areas and/or at all times. Neither NISSAN nor SiriusXM are responsible for associated costs, if any, for continued
operation due to cellular network termination/changes. Cellular provider may terminate/restrict service without
notice. Certain services require a PIN for activation. Applicable Subscription Agreement required. See
www.NissanUSA.com/connect for details and service limitations. Enrollment is required to receive the full suite of
services. Text rates and/or data usage may apply.
2 iPhone is registered trademark of Apple, Inc. All rights reserved. iPho\
ne not included.
3 Android® is a registered trademark of Google, Inc.
4 Availability of specific features is dependent upon the phone’s Bluetooth® support. Please refer to your phone Owner’s
Manual for details. Bluetooth® word mark and logos are owned by Bluetooth SIG, Inc., and any use of such marks by
NISSAN is under license. See www.NissanUSA.com/bluetooth for details.
For more information, refer to the “Monitor, climate, audio, phone and voice recognition systems (section 4) ” of
your Owner’s Manual.
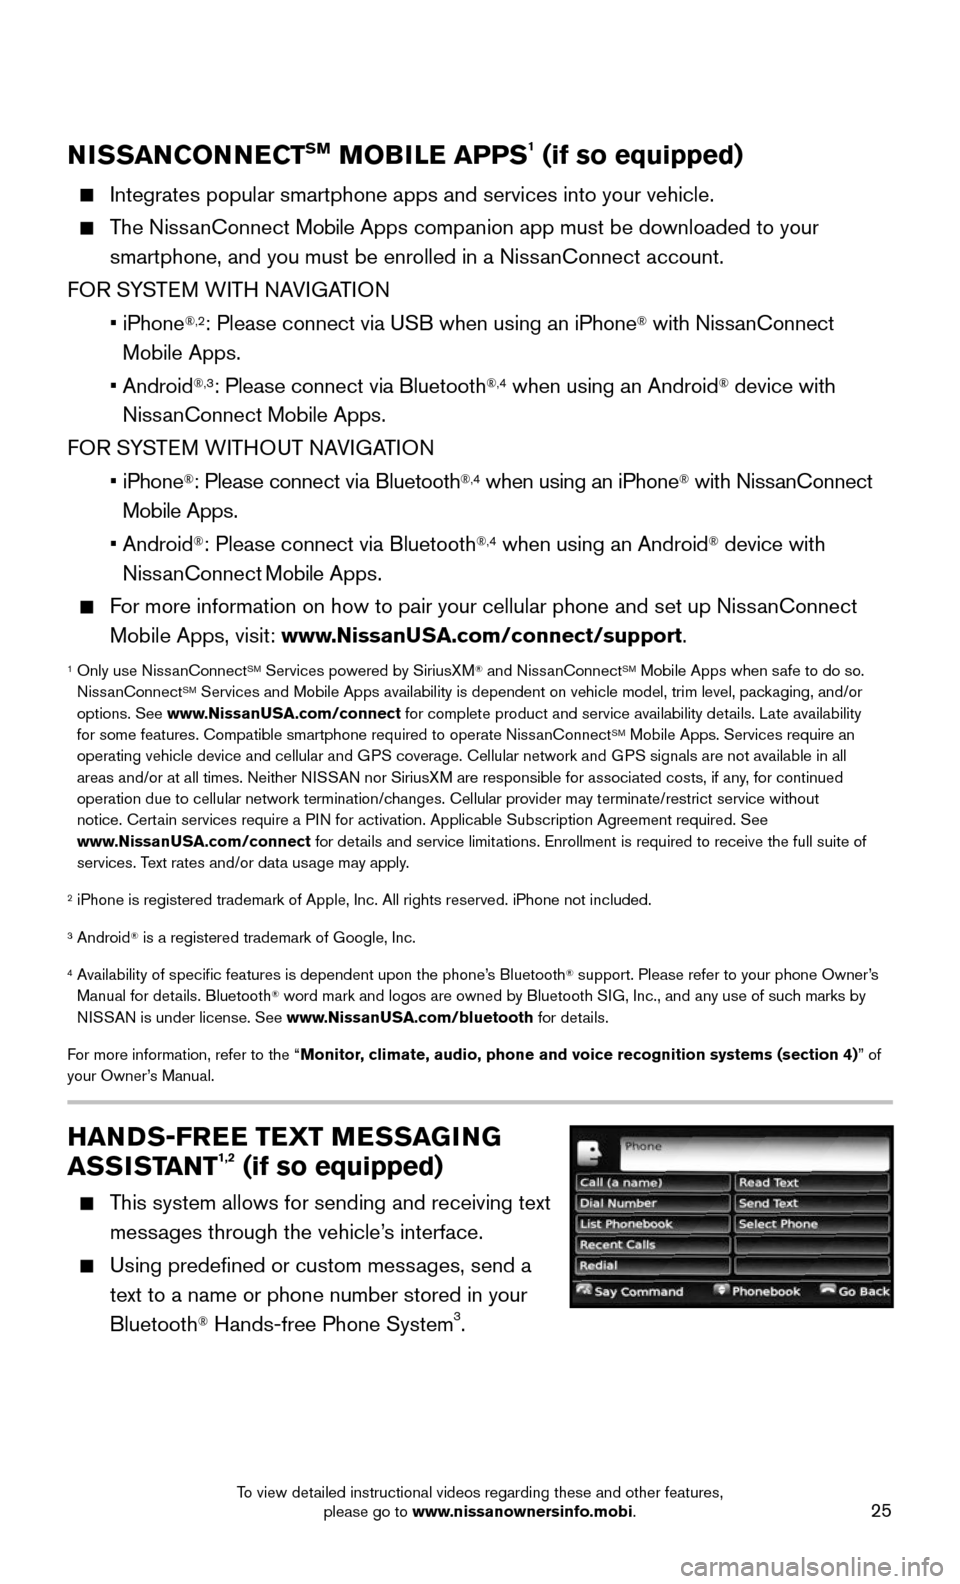
HANDS-FREE TEXT MESSAGING
ASSISTANT1,2 (if so equipped)
This system allows for sending and receiving text
messages through the vehicle’s interface.
Using predefined or custom messages, send a
text to a name or phone number stored in your
Bluetooth
® Hands-free Phone System3.
To view detailed instructional videos regarding these and other features, please go to www.nissanownersinfo.mobi.
Page 32 of 36
30
SYSTEM GUIDE
1
11
4
7
108
2
39
5
6
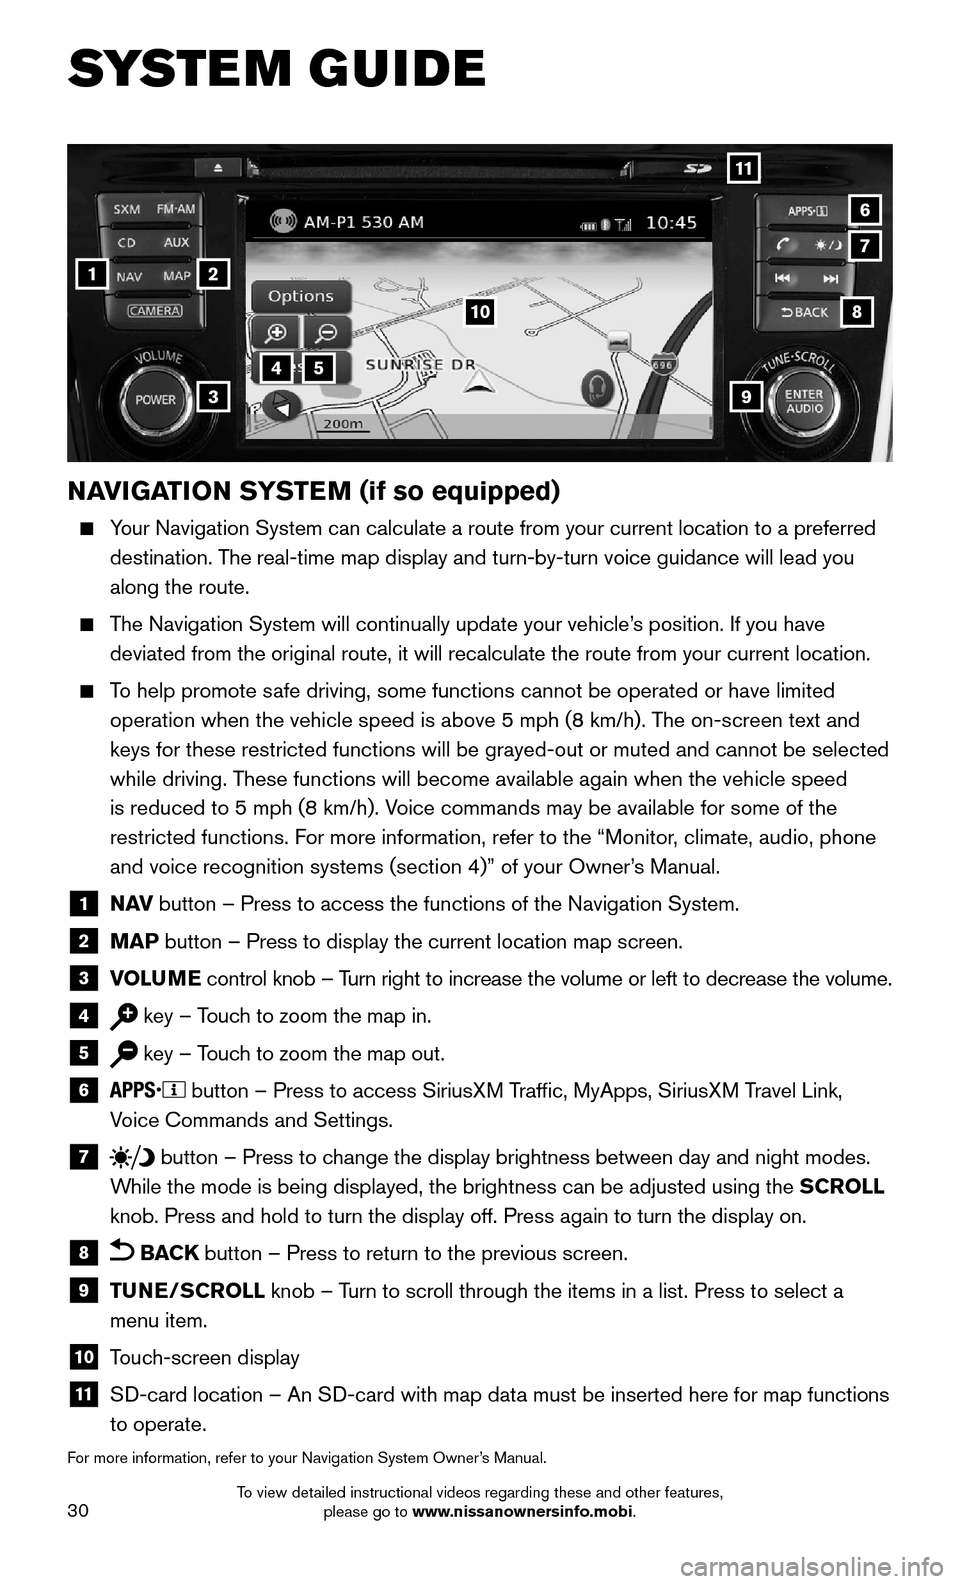
NAVIGATION SYSTEM (if so equipped)
Your Navigation System can calculate a route from your current location t\
o a preferred
destination. The real-time map display and turn-by-turn voice guidance will lead you
along the route.
The Navigation System will continually update your vehicle’s position. If you have
deviated from the original route, it will recalculate the route from you\
r current location.
To help promote safe driving, some functions cannot be operated or have limited
operation when the vehicle speed is above 5 mph (8 km/h). The on-screen text and
keys for these restricted functions will be grayed-out or muted and cann\
ot be selected
while driving. These functions will become available again when the vehicle speed
is reduced to 5 mph (8 km/h). Voice commands may be available for some of the
restricted functions. For more information, refer to the “Monitor, climate, audio, phone
and voice recognition systems (section 4)” of your Owner’s Manual.
1 N AV button – Press to access the functions of the Navigation System.
2 MAP button – Press to display the current location map screen.
3 VOLUME control knob – Turn right to increase the volume or left to decrease the volume.
4 key – Touch to zoom the map in.
5 key – Touch to zoom the map out.
6 button – Press to access SiriusXM Traffic, MyApps, SiriusXM Travel Link,
Voice Commands and Settings.
7 button – Press to change the display brightness between day and night modes.
While the mode is being displayed, the brightness can be adjusted using t\
he SCROLL
knob. Press and hold to turn the display off. Press again to turn the di\
splay on.
8 BACK button – Press to return to the previous screen.
9 TUNE/SCROLL knob – Turn to scroll through the items in a list. Press to select a
menu item.
10 Touch-screen display
11 SD-card location – An SD-card with map data must be inserted here for map functions
to operate.
For more information, refer to your Navigation System Owner’s Manual.
To view detailed instructional videos regarding these and other features, please go to www.nissanownersinfo.mobi.
Page 36 of 36
Nissan, the Nissan Brand Symbol, Z and
Nissan model names are Nissan trademarks.
©
2015 Nissan North America, Inc.
QR16E A 0T32U2
Printing: Februar y 2016 (10)
To view detailed instructional videos, go to www.nissanownersinfo.mobi/2016/rogue
or snap this barcode with an appropriate barcode reader.
This Quick Reference Guide is intended to provide an overview of some of the uniq\
ue features of your new vehicle. Please see your Owner’s Manual for important safety information and system operation limitations. Features and equipment in your vehicle
may vary depending on model, trim level, options selected, order, date of production, region or availability. Therefore, you may
find information about features or equipment that are not included or \
installed on your vehicle.
All information, specifications and illustrations in this Quick Reference Guide are those in effect at the time of printing.
NISSAN reserves the right to change specifications, performance, design or component suppliers witho\
ut notice and without
obligation. From time to time, NISSAN may update or revise this Quick Reference Guide to provide owners with the most
accurate information currently available. Please carefully read and retain with this Quick Reference Guide all revision updates
sent to you by NISSAN to ensure you have access to accurate and up-to-date information reg\
arding your vehicle. Current
versions of vehicle Quick Reference Guides, Owner’s Manuals and any updates can also be found in the Owner section of
the NISSAN website at https://owners.nissanusa.com/nowners/navigation/manualsGuide . If you have questions
concerning any information in your Owner’s Manual, contact NISSAN Consumer Affairs. See the NISSAN CUSTOMER CARE
PROGRAM page in the Owner’s Manual for contact information.
Helpful Resources
Below is a list of helpful resources that can be used to learn
more about the vehicle’s systems and feature operations.
Vehicle Owner’s Manual
Navigation Owner ’s Manual (if so equipped)
Printed Quick Reference Guide (this document)
www.NissanUSA.com/bluetooth
www.NissanUSA.com/connect
www.youtube.com/user/NissanUSA
Nissan Consumer Affairs: 1-800-647-7261
Electronic Quic k Reference Guide
(Use Quick Response (QR) code or URL below.)
Nissan Quick Guide (available in the iPhone App
Store or Android Google Play Store for download to
your smartphone)