2016 NISSAN NV PASSENGER VAN ad blue
[x] Cancel search: ad bluePage 160 of 380
9. CAMERA button
10. NAV button*
* For additional information, refer to the separate
Navigation System Owner’s Manual regarding
the Navigation system control buttons.
** For additional information, refer to the
“Bluetooth® Hands-Free Phone System with
navigation system” or “Bluetooth® Hands-Free
Phone System without navigation system” in this
section.
When you use this system, make sure the engine
is running.
If you use the system with the engine not
running (ignition ON or ACC) for a long
time, it will discharge the battery, and the
engine will not start.
Reference symbols:
“Example” — Words marked in quotes refer to a
key shown only on the display. These keys can be
selected by touching the screen.HOW TO USE THE TOUCH-
SCREEN
CAUTION
● The glass display screen may break if it
is hit with a hard or sharp object. If the
glass screen breaks, do not touch it.
Doing so could result in an injury.
● To clean the display, never use a rough
cloth, alcohol, benzine, thinner or any
kind of solvent or paper towel with a
chemical cleaning agent. They will
scratch or deteriorate the panel.
● Do not splash any liquid such as water
or car fragrance on the display. Contact
with liquid will cause the system to
malfunction.
To help ensure safe driving, some functions can-
not be operated while driving.
The on-screen functions that are not available
while driving will be grayed out or muted.
Park the vehicle in a safe location and then oper-
ate the navigation system.
WARNING
● ALWAYS give your full attention to
driving.
● Avoid using vehicle features that could
distract you. If distracted, you could
lose control of your vehicle and cause
an accident.
Monitor, climate, audio, phone and voice recognition systems4-5
Page 163 of 380
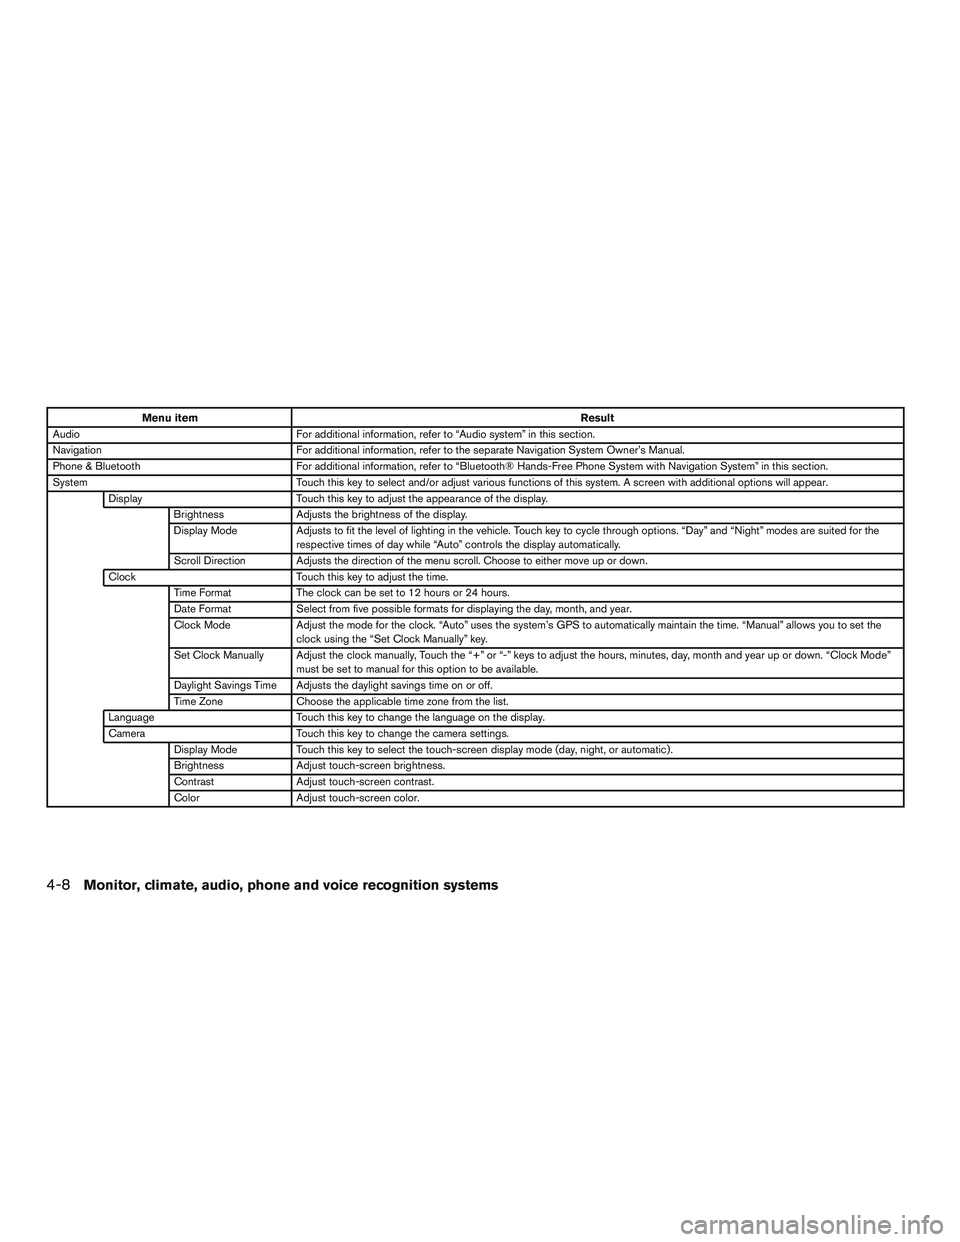
Menu itemResult
Audio For additional information, refer to “Audio system” in this section.
Navigation For additional information, refer to the separate Navigation System Owner’s Manual.
Phone & Bluetooth For additional information, refer to “Bluetooth® Hands-Free Phone System with Navigation System” in this section.
System Touch this key to select and/or adjust various functions of this system. A screen with additional options will appear.
Display Touch this key to adjust the appearance of the display.
Brightness Adjusts the brightness of the display.
Display Mode Adjusts to fit the level of lighting in the vehicle. Touch key to cycle through options. “Day” and “Night” modes are suited for the
respective times of day while “Auto” controls the display automatically.
Scroll Direction Adjusts the direction of the menu scroll. Choose to either move up or down.
Clock Touch this key to adjust the time.
Time Format The clock can be set to 12 hours or 24 hours.
Date Format Select from five possible formats for displaying the day, month, and year.
Clock Mode Adjust the mode for the clock. “Auto” uses the system’s GPS to automatically maintain the time. “Manual” allows you to set the
clock using the “Set Clock Manually” key.
Set Clock Manually Adjust the clock manually, Touch the “+” or “-” keys to adjust the hours, minutes, day, month and year up or down. “Clock Mode” must be set to manual for this option to be available.
Daylight Savings Time Adjusts the daylight savings time on or off.
Time Zone Choose the applicable time zone from the list.
Language Touch this key to change the language on the display.
Camera Touch this key to change the camera settings.
Display Mode Touch this key to select the touch-screen display mode (day, night, or automatic) .
Brightness Adjust touch-screen brightness.
Contrast Adjust touch-screen contrast.
Color Adjust touch-screen color.
4-8Monitor, climate, audio, phone and voice recognition systems
Page 200 of 380
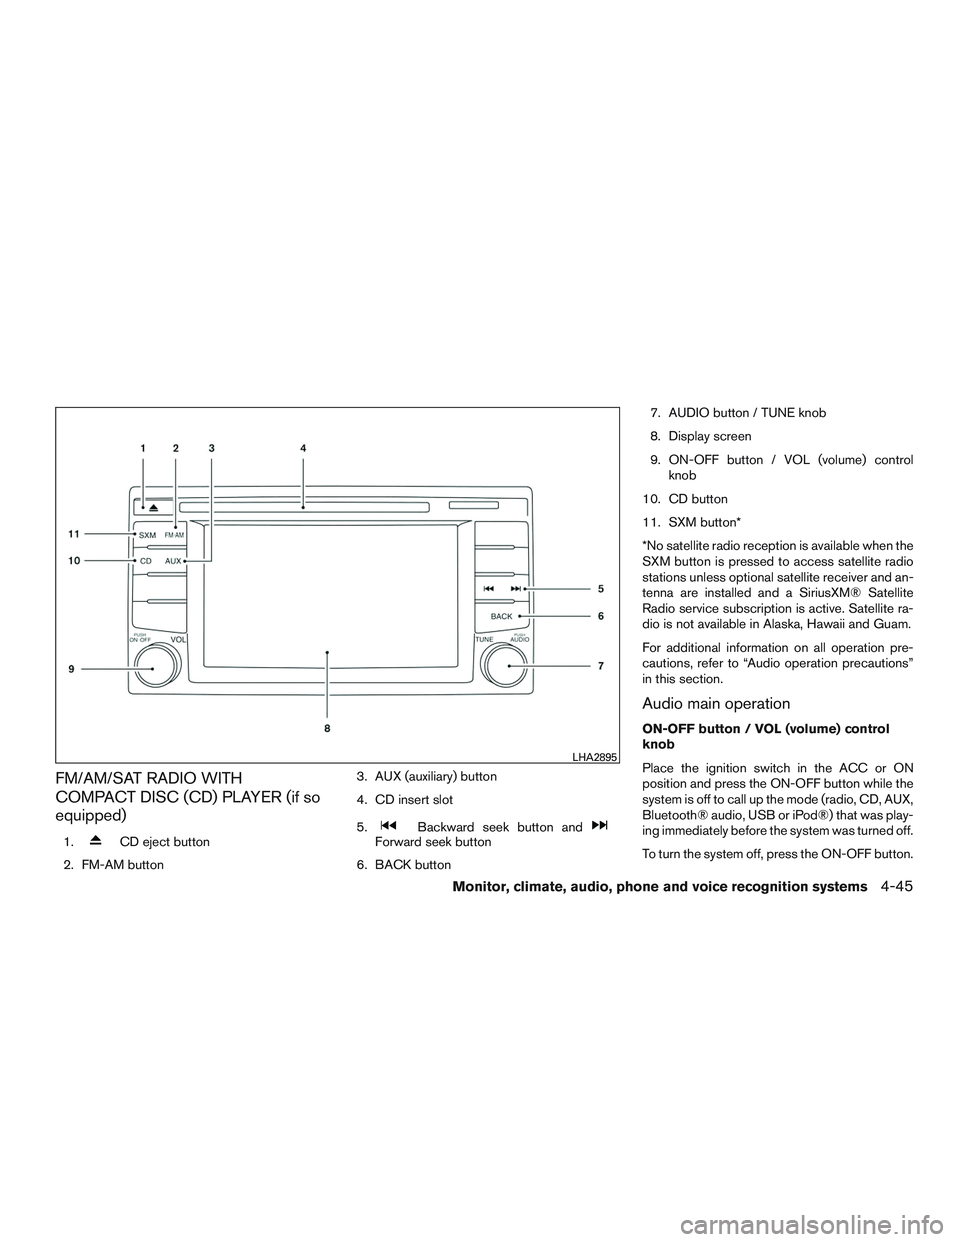
FM/AM/SAT RADIO WITH
COMPACT DISC (CD) PLAYER (if so
equipped)
1.CD eject button
2. FM-AM button 3. AUX (auxiliary) button
4. CD insert slot
5.Backward seek button andForward seek button
6. BACK button 7. AUDIO button / TUNE knob
8. Display screen
9. ON-OFF button / VOL (volume) control
knob
10. CD button
11. SXM button*
*No satellite radio reception is available when the
SXM button is pressed to access satellite radio
stations unless optional satellite receiver and an-
tenna are installed and a SiriusXM® Satellite
Radio service subscription is active. Satellite ra-
dio is not available in Alaska, Hawaii and Guam.
For additional information on all operation pre-
cautions, refer to “Audio operation precautions”
in this section.
Audio main operation
ON-OFF button / VOL (volume) control
knob
Place the ignition switch in the ACC or ON
position and press the ON-OFF button while the
system is off to call up the mode (radio, CD, AUX,
Bluetooth® audio, USB or iPod®) that was play-
ing immediately before the system was turned off.
To turn the system off, press the ON-OFF button.
LHA2895
Monitor, climate, audio, phone and voice recognition systems4-45
Page 206 of 380
SEEK (Reverse or FastForward) buttons
Press and hold the seek buttons
orfor 1.5 seconds while the compact disc is playing
to reverse or fast forward the track being played.
The compact disc plays at an increased speed
while reversing or fast forwarding. When the but-
ton is released, the compact disc returns to nor-
mal play speed.
SEEK buttons
Press the SEEK button
while a CD or
MP3/WMA CD is playing to return to the begin-
ning of the current track. Press the SEEK
button
several times to skip backward sev-
eral tracks.
Press the SEEK button
while a CD or
MP3/WMA CD is playing to advance one track.
Press the SEEK button
several times to
skip forward several tracks. If the last track on a
CD is skipped, the first track on the disc is played.
If the last track in a folder of an MP3/WMA CD is
skipped, the first track of the next folder is played. AUX button
The AUX IN audio input jack accepts any stan-
dard analog audio input such as from a portable
cassette tape/CD player, MP3 player or a laptop
computer. Press the AUX button to play a com-
patible device plugged into the AUX IN jack.
CD EJECT button
When the
CD EJECT button is pressed
with a compact disc loaded, the compact disc
will eject and the last source will be played.
If the disc is not removed within 10 seconds, the
disc will reload.
Additional features
For additional information, refer to “iPod® player
operation with Navigation System”in this section.
For additional information, refer to “USB (Univer-
sal Serial Bus) Connection Port (models with
Navigation System)” in this section.
For additional information, refer to “Bluetooth®
streaming audio with Navigation System” in this
section.USB (Universal Serial Bus)
CONNECTION PORT (models with
Navigation System)
Connecting a device to the USB
Connection Port
WARNING
Do not connect, disconnect, or operate the
USB device while driving. Doing so can be
a distraction. If distracted you could lose
control of your vehicle and cause an acci-
dent or serious injury.
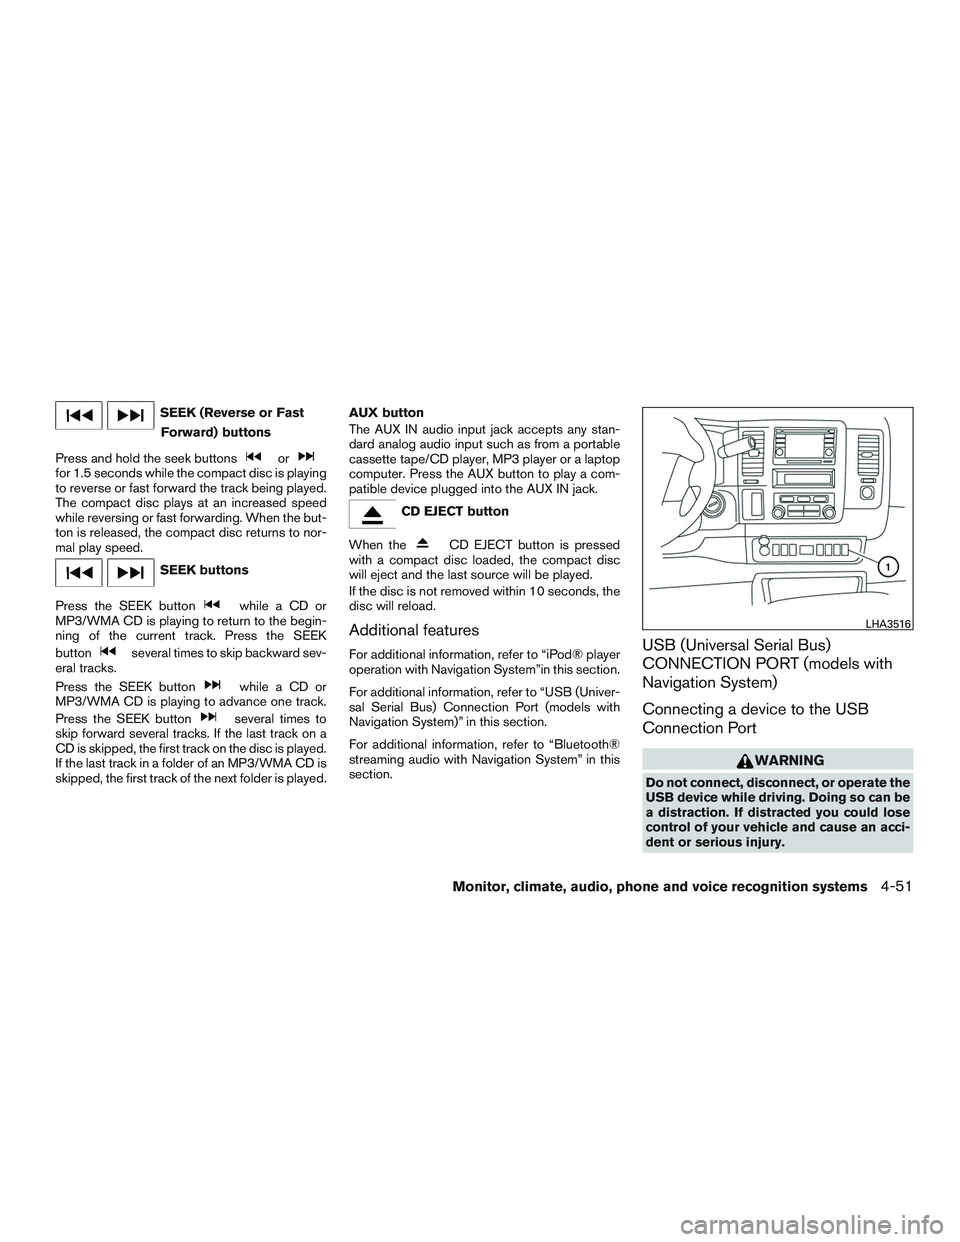
LHA3516
Monitor, climate, audio, phone and voice recognition systems4-51
Page 211 of 380
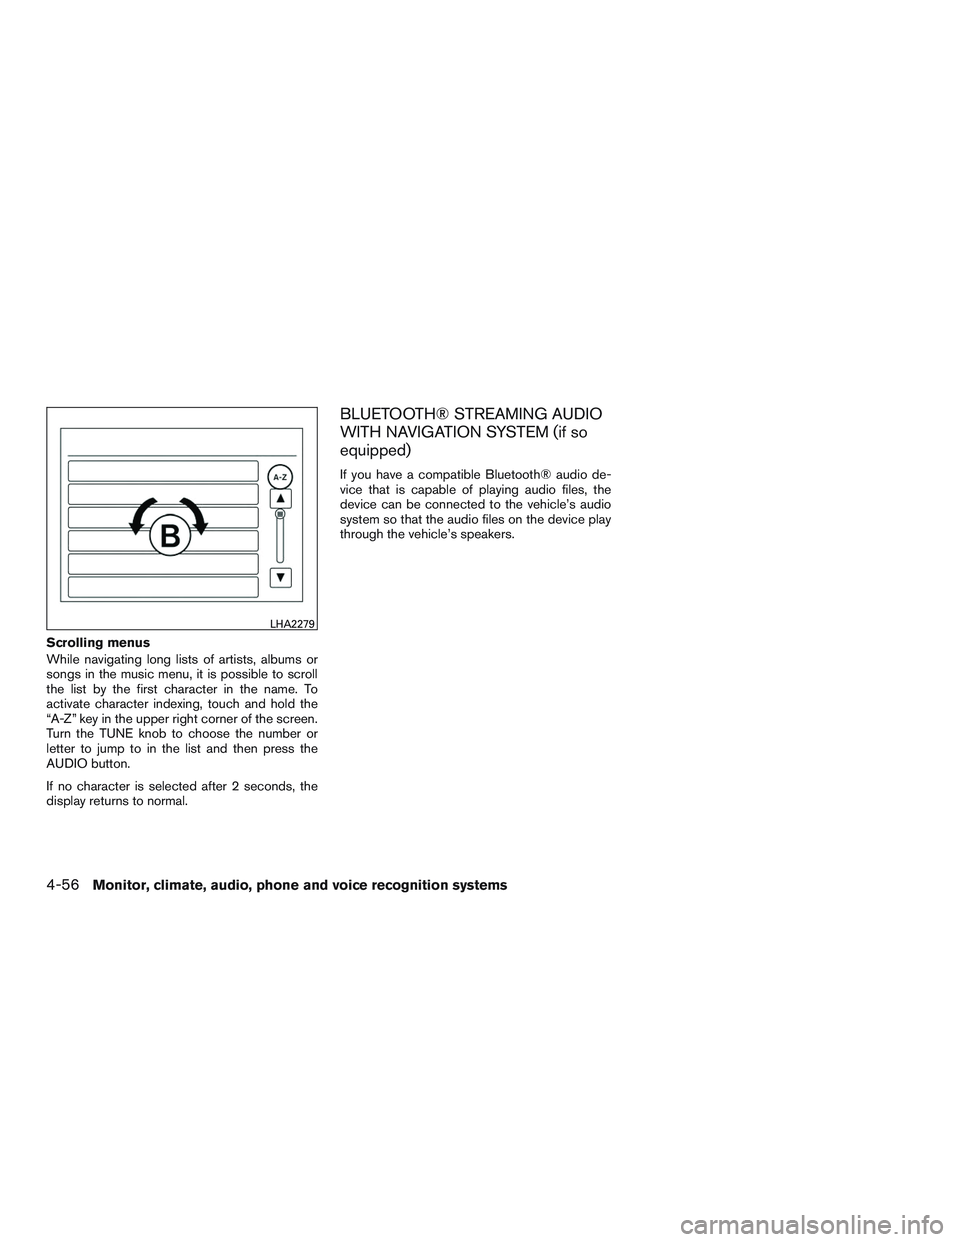
Scrolling menus
While navigating long lists of artists, albums or
songs in the music menu, it is possible to scroll
the list by the first character in the name. To
activate character indexing, touch and hold the
“A-Z” key in the upper right corner of the screen.
Turn the TUNE knob to choose the number or
letter to jump to in the list and then press the
AUDIO button.
If no character is selected after 2 seconds, the
display returns to normal.
BLUETOOTH® STREAMING AUDIO
WITH NAVIGATION SYSTEM (if so
equipped)
If you have a compatible Bluetooth® audio de-
vice that is capable of playing audio files, the
device can be connected to the vehicle’s audio
system so that the audio files on the device play
through the vehicle’s speakers.
LHA2279
4-56Monitor, climate, audio, phone and voice recognition systems
Page 212 of 380
![NISSAN NV PASSENGER VAN 2016 Owners Manual Connecting Bluetooth® audio
To connect your Bluetooth® audio device to the
vehicle, follow the procedure below:1. Press the [
] button.
2. Touch the “Settings” key.
3. Touch the “Phone & Bluet NISSAN NV PASSENGER VAN 2016 Owners Manual Connecting Bluetooth® audio
To connect your Bluetooth® audio device to the
vehicle, follow the procedure below:1. Press the [
] button.
2. Touch the “Settings” key.
3. Touch the “Phone & Bluet](/manual-img/5/58179/w960_58179-211.png)
Connecting Bluetooth® audio
To connect your Bluetooth® audio device to the
vehicle, follow the procedure below:1. Press the [
] button.
2. Touch the “Settings” key.
3. Touch the “Phone & Bluetooth” key. 4. Touch the “Connect New Device” key.
5. The system acknowledges the command
and asks you to initiate connecting from the
phone handset. NOTE:
The connecting procedure of the cellular
phone varies according to each cellular
phone model. For additional information, re-
fer to the cellular phone Owner’s Manual. You
can also visit www.nissanusa.com/bluetooth
or www.nissan.ca/bluetooth for instructions
on connecting NISSAN recommended cellu-
lar phones.
Audio main operation
To switch to the Bluetooth® audio mode, press
the AUX button repeatedly until the Bluetooth®
audio mode is displayed on the screen.
The controls for the Bluetooth® audio are dis-
played on the screen.
LHA3747LHA2844
Monitor, climate, audio, phone and voice recognition systems4-57
Page 214 of 380
SOURCE select switch
Push the SOURCE select switch to change the
mode in the following sequence:
AM→FM* →XM** (if so equipped) →CD*** →
USB/iPod*** (if so equipped) →Bluetooth®
Streaming Audio*** (if so equipped) →AUX*** →
AM
* When using the SOURCE switch, the audio
mode switches to the FM preset bank (FM1 or
FM2) that was last active. To switch between the
FM1 and FM2 preset banks, use the controls on
the audio system.
** When using the SOURCE switch, the audio
mode switches to the XM preset bank (XM1 or
XM2) that was last active. To switch between the
XM1 and XM2 preset banks, use the controls on
the audio system.
*** These modes are only available when compat-
ible media is connected to the system.
Volume control switch
Push the volume control switch up or down to
increase or decrease the volume.
Tuning switch
Memory change (radio)
Push the tuning switch (
or) for less
than 1.5 seconds to change presets.
Seek tuning (radio)
Push the tuning switch (
or) for more
than 1.5 seconds to seek the next or previous
radio station.
Next/Previous track (CD)
Push the tuning switch
orfor less
than 1.5 seconds to return to the beginning of the
present track or skip to the next track. Push
several times to skip back or skip through tracks.
ANTENNA
The antenna cannot be shortened, but can be
removed. When you need to remove the antenna,
turn the antenna rod counterclockwise.
To install the antenna rod, turn the antenna clock-
wise. Tighten the antenna rod to specification
using a suitable tool such as an open-end
wrench. The antenna rod tightening specification
is 3.4 – 3.6 N·m (30 – 32 in-lb) . Do not use pliers
to tighten the antenna as they can leave marks on
the antenna surface. The antenna rod cannot be
hand tightened to the proper specification.
CAUTION
Always properly tighten the antenna rod
during installation or the antenna rod may
break during vehicle operation.
Monitor, climate, audio, phone and voice recognition systems4-59
Page 215 of 380
This vehicle is equipped with Smartphone Integra-
tion technology. This allows many compatible
Smartphone applications to be displayed and eas-
ily controlled through the vehicle’s touch-screen.
NOTE:
A compatible smartphone and registration
is required to use mobile applications or to
access connected features of certain ve-
hicle applications.
REGISTERING WITH
NISSANCONNECTSMMOBILE APPS
To use the Smartphone Integration feature, it is
necessary for the user to register. In order to
register, visit the NissanConnect
SMwebsite,
www.nissanusa.com/connect/ or
https://canada.nissanconnect.com (For Canada)
and sign up or create an account through the
prompts on the NissanConnect Mobile App.
Once registered, download the NissanConnect
App from your compatible phone’s application
download source and then log into the applica-
tion. If you already have an account created
through the App, please log in.
CONNECT PHONE
To use this feature, a compatible smartphone
must be connected via Bluetooth® or USB to the
vehicle. For additional information, refer to
“Bluetooth® Hands-Free Phone System with
Navigation System” in this section.
NOTE:
Apple iPhones® must be paired via USB for
NissanConnect Mobile Apps to function.
NOTE:
For Android phones, NissanConnect Mo-
bile Apps REQUIRES the phone to be
paired via Bluetooth®.
APPLICATION DOWNLOAD
Once connected, the NissanConnect Mobile Apps
will search your phone to determine which compat-
ible applications are currently installed. The vehicle
will then download the in-vehicle interface for each
of these compatible applications. Once
downloaded, the user can access many
smartphone Applications through the vehicle dis-
play by pressing the INFO button followed by
touching the “My Apps” key or pressing the APPS
button on the audio unit. For additional information
on application availability refer to the NissanCon-
nect website https://canada.nissanconnect.com
or www.nissanusa.com/connect/ or contact
NISSAN Customer Service.
NISSANCONNECTSMMOBILE APPS
(if so equipped)
4-60Monitor, climate, audio, phone and voice recognition systems