Page 232 of 465
 .
1. Choose the radio band AM, FM1 or FM2
using the FM·")
1 to 6 Station memory operations
Six stations can be set for the AM band. Twelve
stations can be set for the FM band (six for FM1,
six for FM2) .
1. Choose the radio band AM, FM1 or FM2
using the FM·AM button.
2. Tune to the desired station using the
SEEK button or theTRACK button.
Press and hold any of the desired station
memory buttons (1 – 6) until the preset
number is updated on the display and a
beep is heard.
3. Programming is now complete.
4. Other buttons can be set in the same man-
ner.
If the battery cable is disconnected, or if the fuse
opens, the radio memory will be canceled. In that
case, reset the desired stations.
Compact disc (CD) player operation
If the radio is already operating, it automatically
turns off and the compact disc begins to play.
MEDIA button
With a CD loaded, press the MEDIA button until
the CD mode is displayed on the screen.CD/MP3 display mode
While listening to an MP3/WMA CD, certain text
may be displayed on the screen if the CD has
been encoded with text information. Depending
on how the MP3/WMA CD is encoded, informa-
tion such as Artist, Song and Folder will be dis-
played.
The track number and the total number of tracks
in the current folder or on the current disc are
displayed on the screen as well.
SEEK/TRACK (Reverse or
Fast Forward) button
Press and hold the
orSEEK/TRACK button for 1.5 seconds while the
compact disc is playing to reverse or fast forward
the track being played. The compact disc plays at
an increased speed while reversing or fast for-
warding. When the button is released, the com-
pact disc returns to normal play speed.
SEEK/TRACK button
Press the
SEEK/TRACK button while a CD
or MP3/WMA CD is playing to return to the
beginning of the current track. Press
the
SEEK/TRACK button several times to
skip backward several tracks.Press the
SEEK/TRACK button while a CD
or MP3/WMA CD is playing to advance one
track. Press the
SEEK/TRACK button sev-
eral times to skip forward several tracks. If the last
track on a CD is skipped, the first track on the
disc is played. If the last track in a folder of an
MP3/WMA CD is skipped, the first track of the
next folder is played.
TUNE-SCROLL knob (MP3/WMA CD only)
If an MP3/WMA CD with multiple folders is play-
ing, turn the TUNE-SCROLL knob to change
folders. Turn the knob to the left to skip back a
folder. Turn the knob to the right to skip ahead a
folder.
RPT (repeat) button
When the RPT (repeat) button is pressed while a
compact disc is playing, the play pattern can be
changed as follows:
CD:
1 Track Repeat←→OFF
CD with MP3 or WMA:
1 Folder Repeat→1 Track Repeat→OFF
1 Track Repeat: the current track will be re-
peated.
1 Folder Repeat: the current folder will be re-
peated.
Display screen, heater, air conditioner, audio and phone systems4-41
Page 254 of 465

TROUBLESHOOTING GUIDE
The system should respond correctly to all voice
commands without difficulty. If problems are en-
countered, try the following solutions.Where the solutions are listed by number, try
each solution in turn, starting with number 1, until
the problem is resolved.
Symptom Solution
System fails to interpret the command correctly.1. Ensure that the command is valid. For additional information, refer to “Voice commands” in this section.
2. Ensure that the command is spoken after the tone.
3. Speak clearly without pausing between words and at a level appropriate to the ambient noise level in the vehicle.
4. Ensure that the ambient noise level is not excessive (for example, windows open or defroster on) . NOTE: If it is too
noisy to use the phone, it is likely that the voice commands will not be recognized.
5. If more than one command was said at a time, try saying the commands separately.
The system consistently selects the wrong entry from the
phone book.1. Ensure that the phone book entry name requested matches what was originally stored. This can be confirmed by
using the “List Names” command. For additional information, refer to “Phonebook” in this section.
2. Replace one of the names being confused with a new name.
3. Please speak both first and last name of contact to improve recognition accuracy.
Display screen, heater, air conditioner, audio and phone systems4-63
Page 370 of 465

8 Maintenance and do-it-yourself
Maintenance requirements..........................8-2
General maintenance..............................8-2
Explanation of general maintenance items.........8-2
Maintenance precautions...........................8-5
Engine compartment check locations................8-7
Engine cooling system.............................8-8
Checking engine coolant level...................8-9
Changing engine coolant........................8-9
Engine oil........................................8-10
Checking engine oil level.......................8-10
Changing engine oil...........................8-11
Changing engine oil filter.......................8-12
Continuously Variable Transmission (CVT) fluid......8-13
Power steering fluid...............................8-14
Brake fluid.......................................8-14
Windshield-washer fluid...........................8-15
Windshield-washer fluid reservoir...............8-15
Battery..........................................8-16
Jump starting.................................8-17
Drive belt........................................8-18
Spark plugs......................................8-18
Replacing spark plugs.........................8-18Air cleaner.......................................8-19
In-cabin microfilter.............................8-20
Windshield wiper blades..........................8-20
Cleaning.....................................8-20
Replacing....................................8-20
Brakes..........................................8-22
Fuses...........................................8-22
Engine compartment...........................8-23
Passenger compartment.......................8-24
Battery replacement..............................8-25
NISSAN Intelligent Key®.......................8-26
Lights...........................................8-27
Headlights....................................8-27
Fog lights (if so equipped)......................8-28
Exterior and interior lights
.......................8-29
Wheels and tires.................................8-31
Tire pressure..................................8-31
Tire labeling...................................8-34
Types of tires..................................8-37
Tire chains....................................8-38
Changing wheels and tires.....................8-39
Page 376 of 465
VQ35DE engine
1. Engine coolant reservoir
2. Drive belt location
3. Engine oil dipstick
4. Engine oil filler cap
5. Brake fluid reservoir
6. Air cleaner
7. Fuse box
8. Fuse/Fusible link box
9. Battery
10 Radiator cap
11. Power steering fluid reservoir
12. Windshield-washer fluid reservoir
LDI2633
ENGINE COMPARTMENT CHECK
LOCATIONS
Maintenance and do-it-yourself8-7
Page 391 of 465

If the brakes do not operate properly, have the
brakes checked by a NISSAN dealer.
Self-adjusting brakes
Your vehicle is equipped with self-adjusting
brakes.
The front and rear disc-type brakes self-adjust
every time the brake pedal is applied.
WARNING
Have your brake system checked if the
brake pedal height does not return to nor-
mal. It is recommended that you visit a
NISSAN dealer for this service.
Brake pad wear indicators
The disc brake pads on your vehicle have audible
wear indicators. When a brake pad requires re-
placement, a high pitched scraping or screech-
ing sound will be heard when the vehicle is in
motion. The noise will be heard whether or not the
brake pedal is depressed. Have the brakes
checked as soon as possible if the wear indicator
sound is heard.
Under some driving or climate conditions, occa-
sional brake squeak, squeal or other noise may
be heard. Occasional brake noise during light to
moderate stops is normal and does not affect the
function or performance of the brake system.Proper brake inspection intervals should
be followed.For additional information regard-
ing brake inspections, refer to the appropriate
maintenance schedule information in the
“NISSAN Service and Maintenance Guide”.
If any electrical equipment does not operate,
check for an open fuse.
Fuses are used in the passenger and engine
compartment. Spare fuses are provided and can
be found in the passenger compartment fuse
box.
When installing a fuse make sure the fuse is
installed in the fuse box securely.
LDI2385
BRAKESFUSES
8-22Maintenance and do-it-yourself
Page 392 of 465
ENGINE COMPARTMENT
WARNING
Never use a fuse of higher or lower amper-
age rating than that specified on the fuse
box cover. This could damage the electri-
cal system or electronic control units or
cause a fire.If any electrical equipment does not come on,
check for an open fuse.
1. Be sure the ignition switch and the headlight
switch are OFF.
2. Open the engine hood.
3. Remove the fuse box cover by pushing the
tab and lifting the cover up.
4. Remove the fuse with the fuse puller. The
fuse puller is located in the center of the fuse
block in the passenger compartment.
5. If the fuse is open
�A, replace it with a new
fuse
�B.
6. If a new fuse also opens, have the electrical
system checked and repaired. It is recom-
mended you visit a NISSAN dealer for this
service.
LDI2636LDI0456
Maintenance and do-it-yourself8-23
Page 393 of 465
Fusible links
If the electrical equipment does not operate and
fuses are in good condition, check the fusible
links. If any of these fusible links are melted,
replace with only Genuine NISSAN parts.
PASSENGER COMPARTMENT
WARNING
Never use a fuse of higher or lower amper-
age rating than that specified on the fuse
box cover. This could damage the electri-
cal system or electronic control units or
cause a fire.
If any electrical equipment does not operate,
check for an open fuse.NOTE:
The fuse box is located on the driver’s side
of the instrument panel.
1. Be sure the ignition switch and the headlight
switch are OFF.
2. Pull down on fuse box cover
�Ato remove.
3. Locate the fuse that needs to be replaced.
LDI2560LDI2901
8-24Maintenance and do-it-yourself
Page 394 of 465
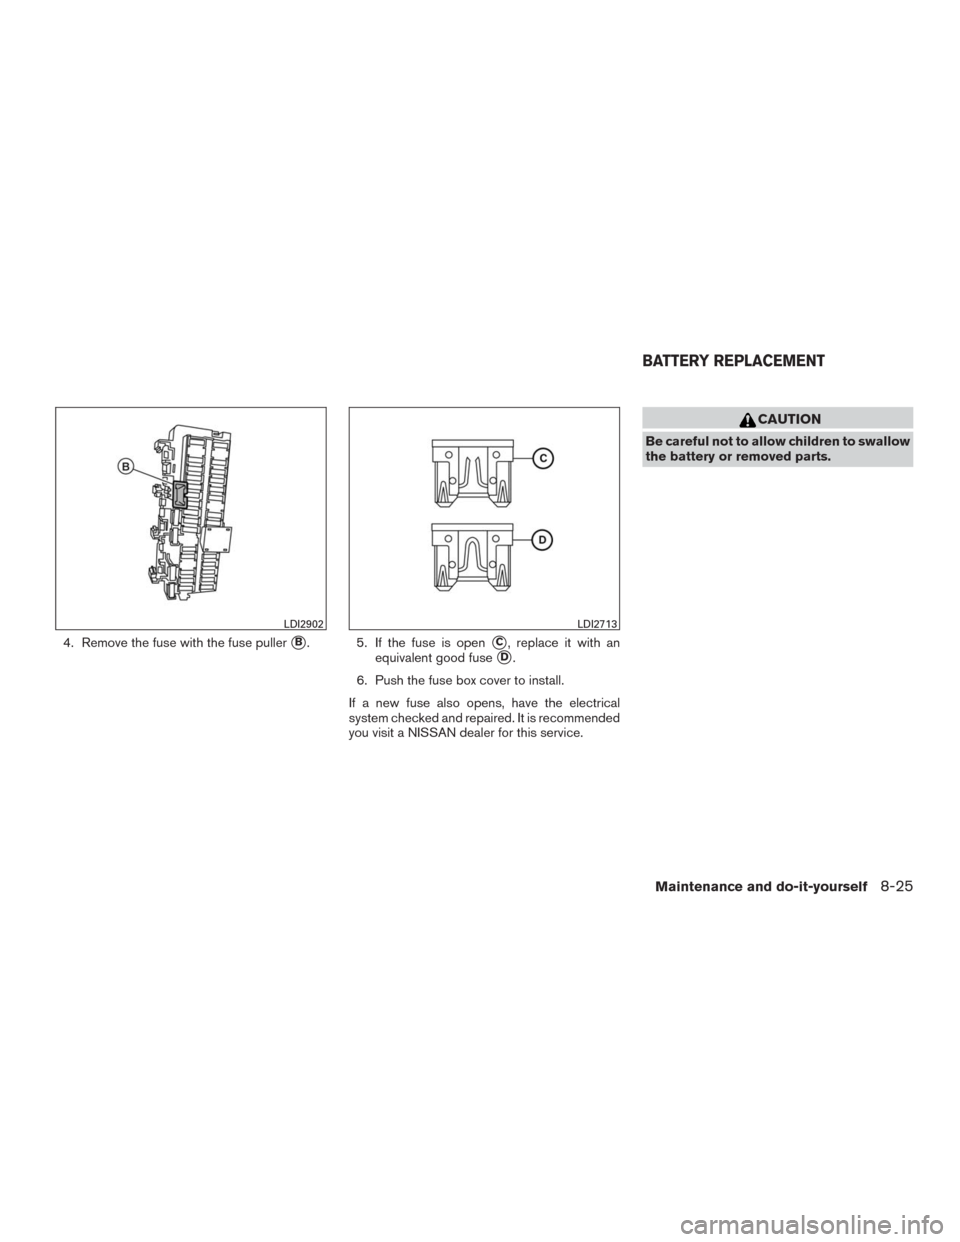
4. Remove the fuse with the fuse puller�B. 5. If the fuse is open�C, replace it with an
equivalent good fuse
�D.
6. Push the fuse box cover to install.
If a new fuse also opens, have the electrical
system checked and repaired. It is recommended
you visit a NISSAN dealer for this service.
CAUTION
Be careful not to allow children to swallow
the battery or removed parts.
LDI2902LDI2713
BATTERY REPLACEMENT
Maintenance and do-it-yourself8-25