Page 5 of 49
1. About the Murano HYBRID
This
hybrid electric vehicle (HEV) uses two types of batteries. One is a 12-volt battery that is the same as
the battery in vehicles powered by internal combustion engines. The 12-volt battery is located in the front of
the vehicle on the left side of the engine compartment. The other is the high-voltage battery for the traction
motor which propels the vehicle. The high-voltage battery is located under the center console between the
driver’s and passenger’s seats with service plug access through the center console area storage bin.
When the high-voltage battery level is low, engine output is used to generate power from the traction motor
and charge the high-voltage battery. Additionally, the vehicle system can recharge the high-voltage battery
by converting driving force into electricity while the vehicle is decelerating or being driven downhill. This is
called regenerative charging.
DG–5
Page 10 of 49

2. Basic High-voltage System and 12-volt System Information
2-1
Battery Information
The Murano HYBRID utilizes two batteries in order to supply both high and low voltage.
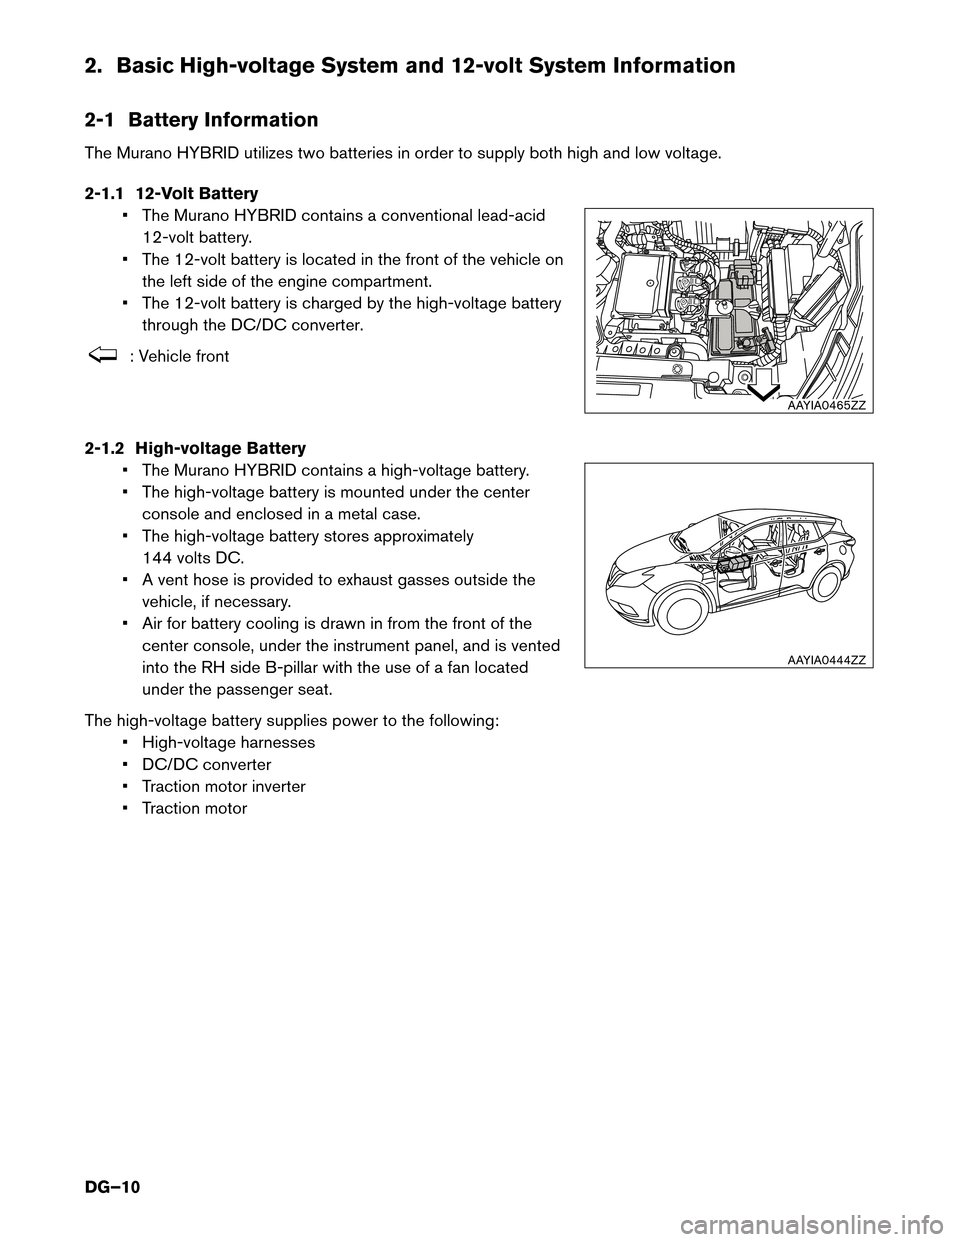
2-1.1 12-Volt Battery • The Murano HYBRID contains a conventional lead-acid12-volt battery.
• The 12-volt battery is located in the front of the vehicle on the left side of the engine compartment.
• The 12-volt battery is charged by the high-voltage battery through the DC/DC converter. : Vehicle front
2-1.2
High-voltage Battery
• The Murano HYBRID contains a high-voltage battery.
• The high-voltage battery is mounted under the center console and enclosed in a metal case.
• The high-voltage battery stores approximately 144 volts DC.
• A vent hose is provided to exhaust gasses outside the vehicle, if necessary.
• Air for battery cooling is drawn in from the front of the center console, under the instrument panel, and is vented
into the RH side B-pillar with the use of a fan located
under the passenger seat.
The high-voltage battery supplies power to the following: • High-voltage harnesses
• DC/DC converter
• Traction motor inverter
• Traction motor AAYIA0465ZZ
AAYIA0444ZZ
DG–10
Page 12 of 49

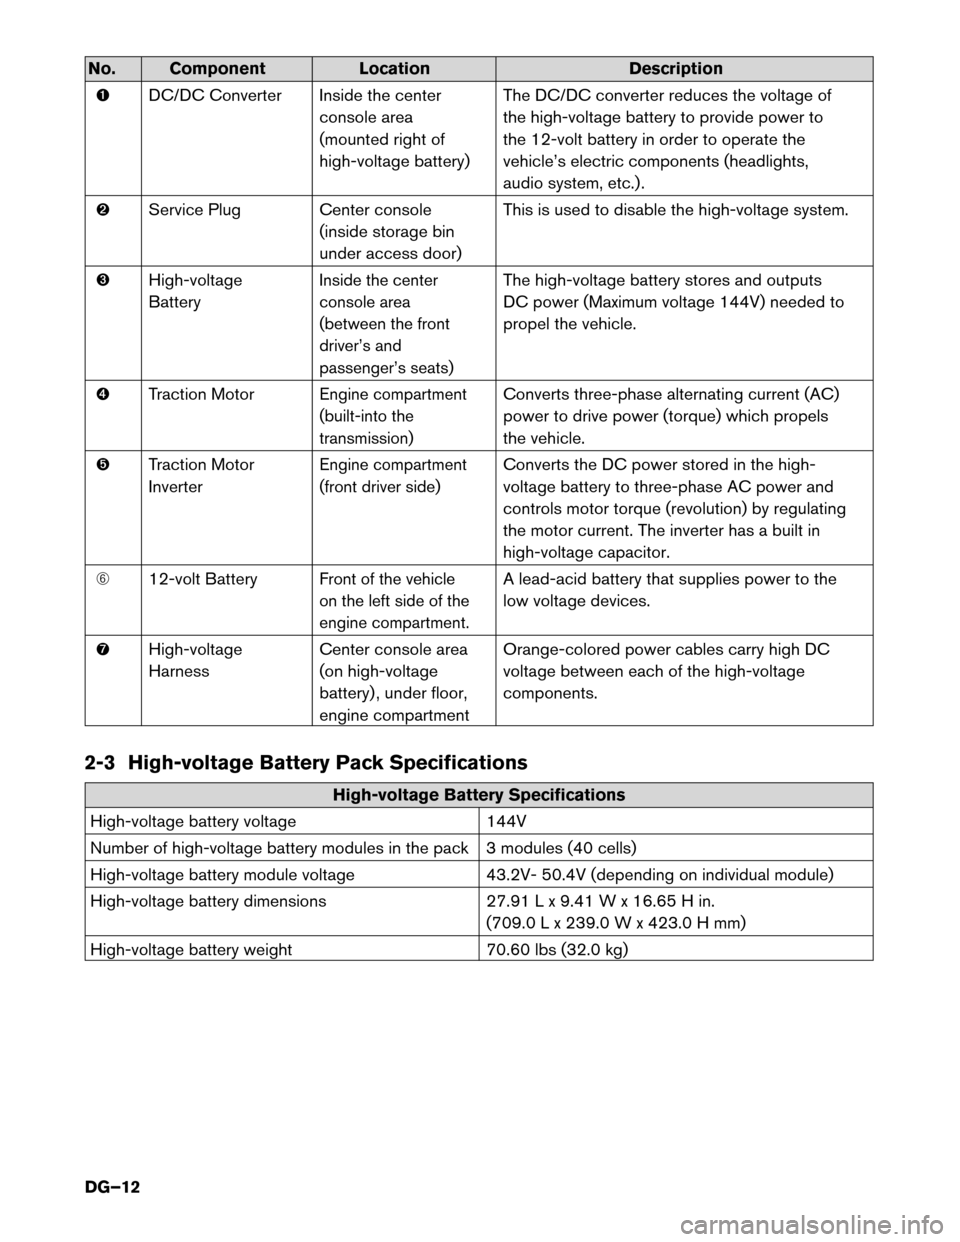
No. Component
LocationDescription
� DC/DC
Converter Inside the centerconsole area
(mounted right of
high-voltage battery) The DC/DC converter reduces the voltage of
the high-voltage battery to provide power to
the 12-volt battery in order to operate the
vehicle’s electric components (headlights,
audio system, etc.) .
� Service Plug Center console
(inside storage bin
under access door) This is used to disable the high-voltage system.
� High-voltage
Battery
Inside the center
console area
(between the front
driver’s and
passenger’s seats)The high-voltage battery stores and outputs
DC power (Maximum voltage 144V) needed to
propel the vehicle.
� Traction Motor
Engine compartment
(built-into the
transmission)Converts three-phase alternating current (AC)
power to drive power (torque) which propels
the vehicle.
� Traction Motor
Inverter
Engine compartment
(front driver side)Converts the DC power stored in the high-
voltage battery to three-phase AC power and
controls motor torque (revolution) by regulating
the motor current. The inverter has a built in
high-voltage capacitor.
� 12-volt Battery
Front of the vehicle
on the left side of the
engine compartment.A lead-acid battery that supplies power to the
low voltage devices.
� High-voltage
Harness Center console area
(on high-voltage
battery) , under floor,
engine compartment Orange-colored power cables carry high DC
voltage between each of the high-voltage
components.
2-3 High-voltage Battery Pack Specifications High-voltage Battery Specifications
High-voltage
battery voltage 144V
Number of high-voltage battery modules in the pack 3 modules (40 cells)
High-voltage battery module voltage 43.2V- 50.4V (depending on individual module)
High-voltage battery dimensions 27.91 L x 9.41 W x 16.65 H in.
(709.0 L x 239.0 W x 423.0 H mm)
High-voltage battery weight 70.60 lbs (32.0 kg)
DG–12
Page 13 of 49
2-4 High-voltage Safety Measures
Circuit insulation
The high-voltage positive (+) and negative (-) circuits are insulated
from the metal chassis.
Reducing the risk of electrocution The high-voltage components and harnesses have insulated cases or orange-colored coverings which provide insulation and easy
identification.
The high-voltage battery case is electrically connected to the vehicle
ground. This connection helps protect the vehicle occupants and
vehicle dismantlers from high-voltage electrical shock.
Identification The high-voltage components are labeled “WARNING” similar to label
shown below. All high-voltage harnesses are coated in orange.
2-4.1 Warning Labels
The following warning label is applied to the high-voltage inverter located in the engine compartment.
The following warning label is applied to the service plug access cover located inside the passenger
compartment center console. AAYIA0454ZZ
AAYIA0455ZZ
DG–13
Page 14 of 49
The following warning label is applied to the high-voltage battery located inside the passenger compartment
center
console.
2-5 High-voltage Safety System
The high-voltage safety system is intended to help keep vehicle occupants and emergency responders safe
from high-voltage electricity. • A high-voltage fuse provides short circuit protection inside the high-voltage battery.
• The high-voltage safety system is insulated from the metal chassis.
• Positive and negative high-voltage power cables are connected to the high-voltage battery and arecontrolled by normally open system main relays (SMR1 and SMR2) . When the vehicle is shut off,
the relays stop electrical flow from leaving the high-voltage battery. However, it can take
approximately ten (10) minutes for the high-voltage capacitor to fully discharge. AAYIA0456ZZ
DG–14
Page 27 of 49
5. Open the center console and use a suitable tool to remove the service plug access cover.
6.
Remove the service plug (A)by pulling the locking lever (B), then pressing the locking tab (C)
and rotating the handle (D)fully outward. Using the handle, pull the service plug (E)completely
out of its socket.
7. Cover the service plug socket with insulated tape.
8. Wait approximately ten (10) minutes for complete discharge of the high-voltage capacitor
after the service plug has been removed. AAYIA0448ZZ
A B C
D E
AAYIA0450ZZ
DG–27
Page 41 of 49

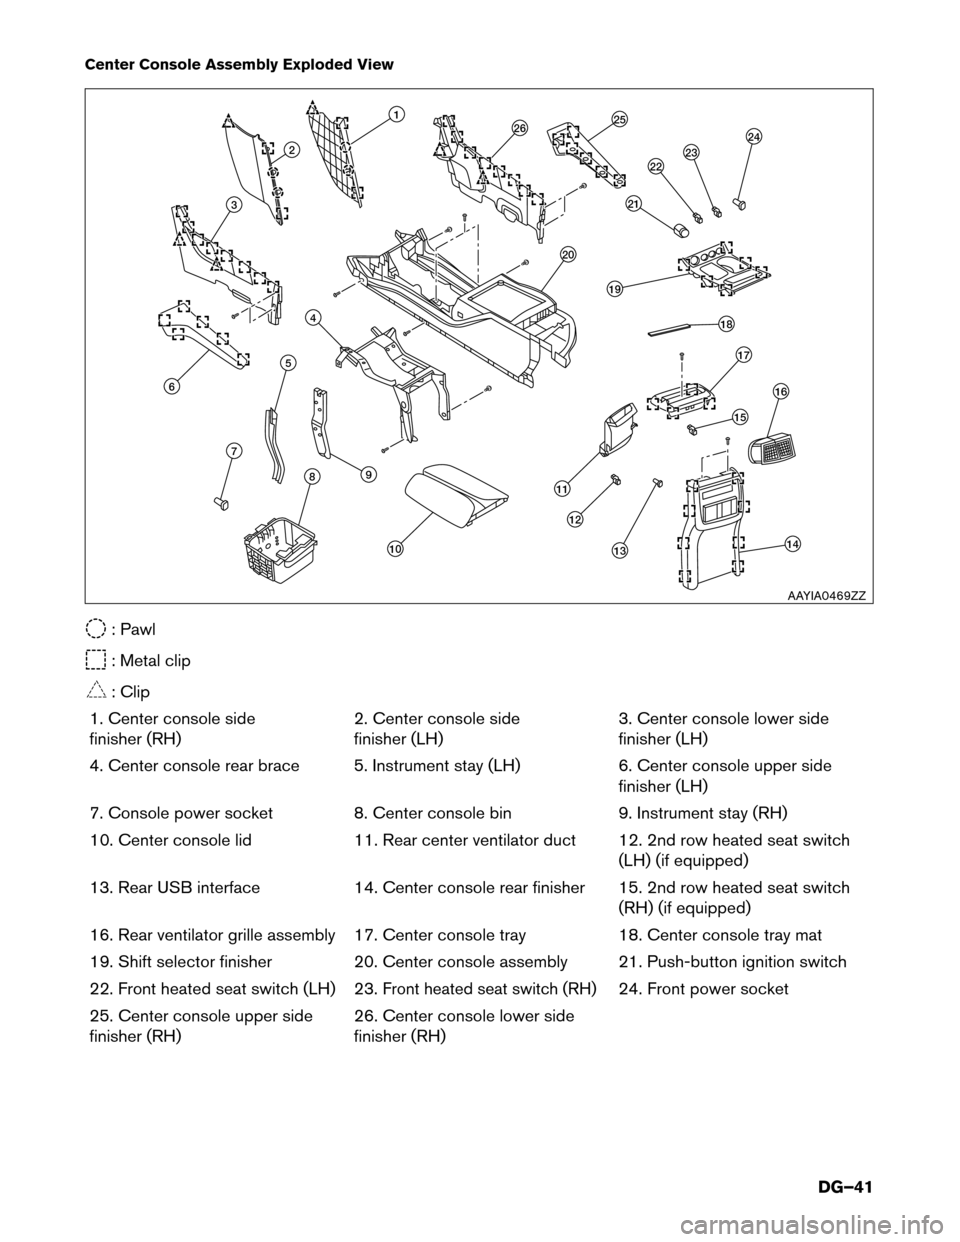
Center Console Assembly Exploded View
: Pawl
: Metal clip
: Clip
1.
Center console side
finisher (RH) 2. Center console side
finisher (LH)3. Center console lower side
finisher (LH)
4. Center console rear brace 5. Instrument stay (LH) 6. Center console upper side
finisher (LH)
7. Console power socket 8. Center console bin 9. Instrument stay (RH)
10. Center console lid 11. Rear center ventilator duct 12. 2nd row heated seat switch
(LH) (if equipped)
13. Rear USB interface 14. Center console rear finisher 15. 2nd row heated seat switch
(RH) (if equipped)
16. Rear ventilator grille assembly 17. Center console tray 18. Center console tray mat
19. Shift selector finisher 20. Center console assembly 21. Push-button ignition switch
22. Front heated seat switch (LH) 23.
Front heated seat switch (RH)24. Front power socket
25. Center console upper side
finisher (RH) 26. Center console lower side
finisher (RH) 1
26
2
3
5
7
86
10
19
11
12
13
9
1415 16174 22
21 2325
20
18
24
AAYIA0469ZZ
DG–41
Page 42 of 49

6-2.2 Removal Procedure
1. Discharge high-voltage battery. Refer to 3-3 Discharge Procedures (DG–19).
2.
Remove the front seats. a. Slide front seats to full rearward position.
b. Disconnect negative and positive battery terminals then wait at least three minutes.
c. Disconnect harness connectors for side airbag modules.
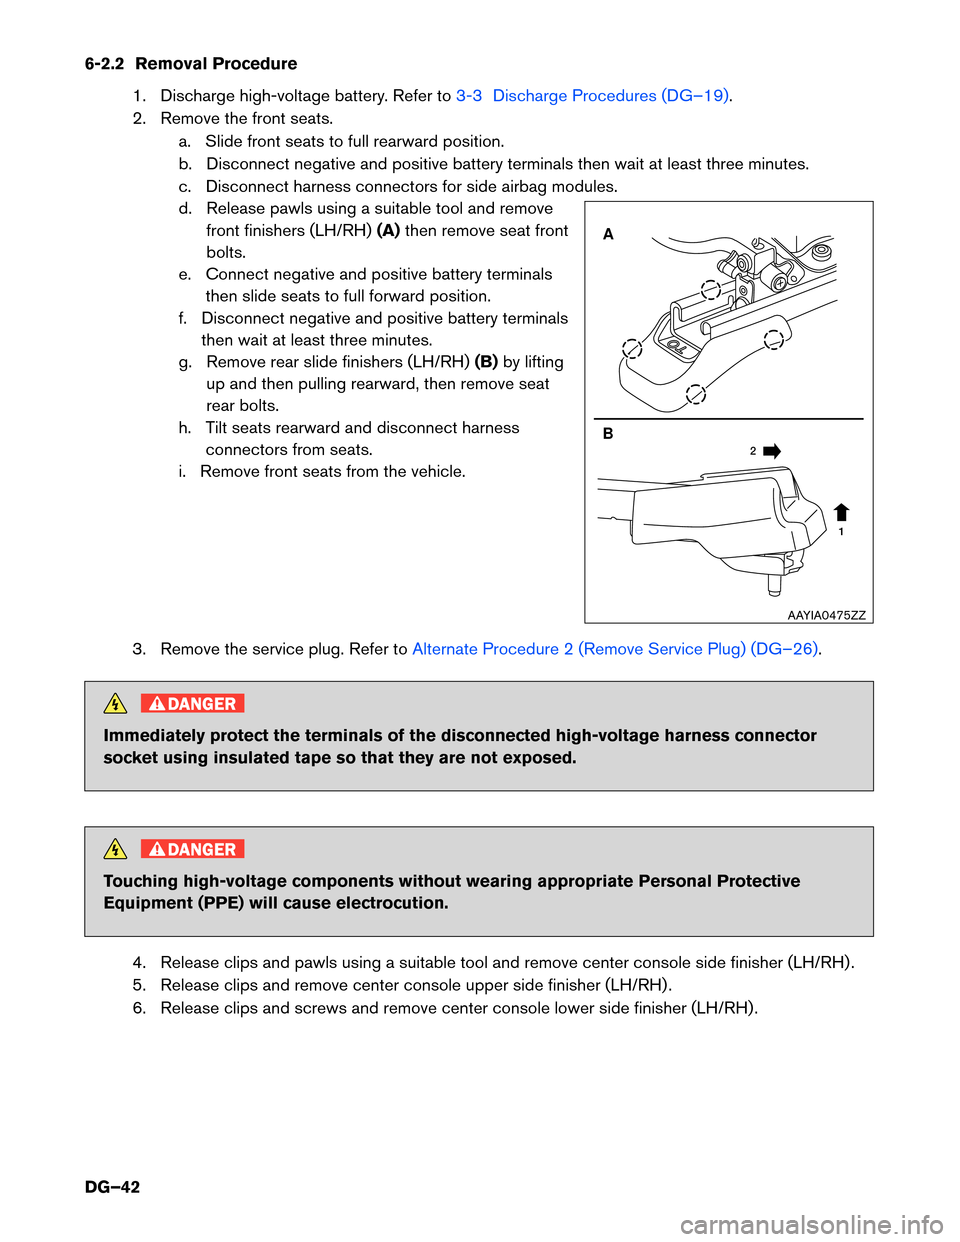
d. Release pawls using a suitable tool and remove front finishers (LH/RH) (A)then remove seat front
bolts.
e. Connect negative and positive battery terminals then slide seats to full forward position.
f. Disconnect negative and positive battery terminals then wait at least three minutes.
g. Remove rear slide finishers (LH/RH) (B)by lifting
up and then pulling rearward, then remove seat
rear bolts.
h. Tilt seats rearward and disconnect harness connectors from seats.
i. Remove front seats from the vehicle.
3. Remove the service plug. Refer to Alternate Procedure 2 (Remove Service Plug) (DG–26).DANGER
Immediately protect the terminals of the disconnected high-voltage harness connector
socket
using insulated tape so that they are not exposed. DANGER
Touching high-voltage components without wearing appropriate Personal Protective
Equipment
(PPE) will cause electrocution.
4. Release clips and pawls using a suitable tool and remove center console side finisher (LH/RH) .
5. Release clips and remove center console upper side finisher (LH/RH) .
6. Release clips and screws and remove center console lower side finisher (LH/RH) . A
B 1
2 AAYIA0475ZZ
DG–42