2016 NISSAN 370Z COUPE display
[x] Cancel search: displayPage 14 of 28
12
FI RST DR IVE FEATU R ES
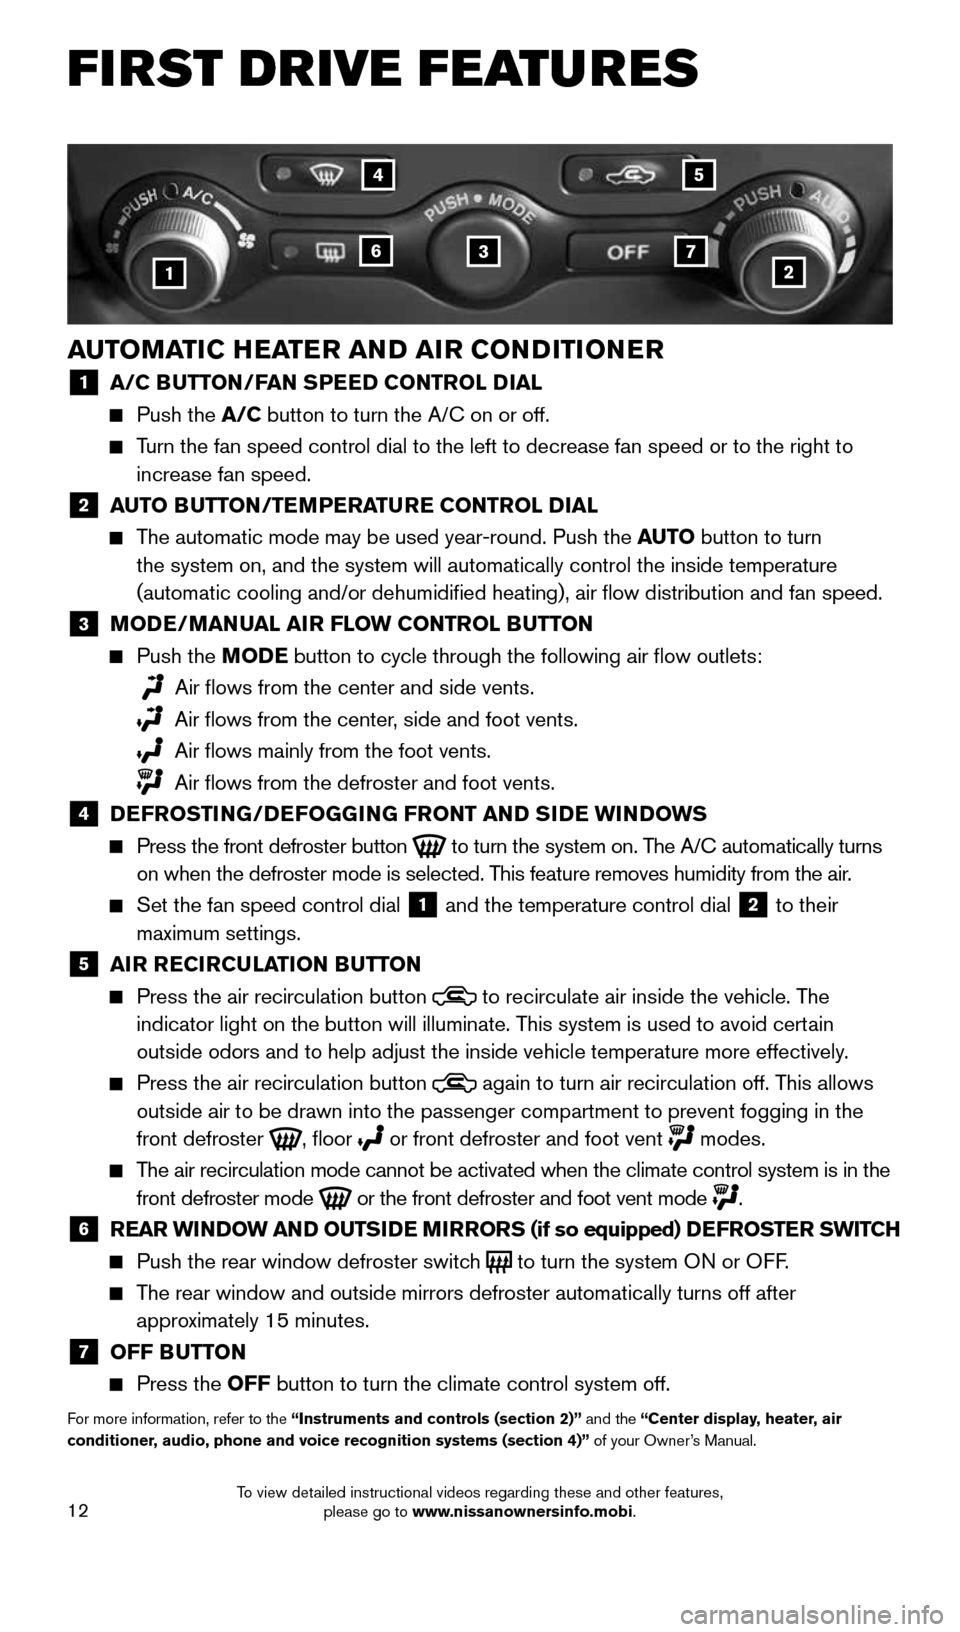
AUTOMATIC HEATER AND AIR CONDITIONER
1 A/C BUTTON/FAN SPEED CONTROL DIAL
Push the A/C button to turn the A/C on or off.
Turn the fan speed control dial to the left to decrease fan speed or to t\
he right to
increase fan speed.
2 AUTO BUTTON/TEMPERATURE CONTROL DIAL
The automatic mode may be used year-round. Push the AUTO button to turn
the system on, and the system will automatically control the inside temp\
erature
(automatic cooling and/or dehumidified heating), air flow distribu\
tion and fan speed.
3 MODE/MANUAL AIR FLOW CONTROL BUTTON
Push the MODE button
to cycle through the following air flow outlets:
Air flows from the center and side vents.
Air flows from the center, side and foot vents.
Air flows mainly from the foot vents.
Air flows from the defroster and foot vents.4 DEFROSTING/DEFOGGING FRONT AND SIDE WINDOWS
Press the front defroster button
to turn the system on. The A/C automatically turns
on when the defroster mode is selected. This feature removes humidity from the air.
Set the fan speed control dial
1 and the temperature control dial 2 to their
maximum settings.
5 AIR RECIRCULATION BUTTON
Press the air recirculation button
to recirculate air inside the vehicle. The
indicator light on the button will illuminate. This system is used to avoid certain
outside odors and to help adjust the inside vehicle temperature more eff\
ectively.
Press the air recirculation button
again to turn air recirculation off. This allows
outside air to be drawn into the passenger compartment to prevent foggin\
g in the
front defroster
, floor or front defroster and foot vent modes.
The air recirculation mode cannot be activated when the climate control s\
ystem is in the
front defroster mode
or the front defroster and foot vent mode
.
6 REAR WINDOW AND OUTSIDE MIRRORS (if so equipped) DEFROSTER SWITCH
Push the rear window defroster switch
to turn the system ON or OFF.
The rear window and outside mirrors defroster automatically turns off aft\
er
approximately 15 minutes.
7 OFF BUTTON
Press the OFF button to turn the climate control system off.
For more information, refer to the “Instruments and controls (section 2)” and the “Center display, heater, air
conditioner, audio, phone and voice recognition systems (section 4)” of your Owner’s Manual.
1
4
637
5
2
1870658_16_370Z_QRG_012315.indd 121/23/15 12:08 PM
To view detailed instructional videos regarding these and other features, please go to www.nissanownersinfo.mobi.
Page 15 of 28
13
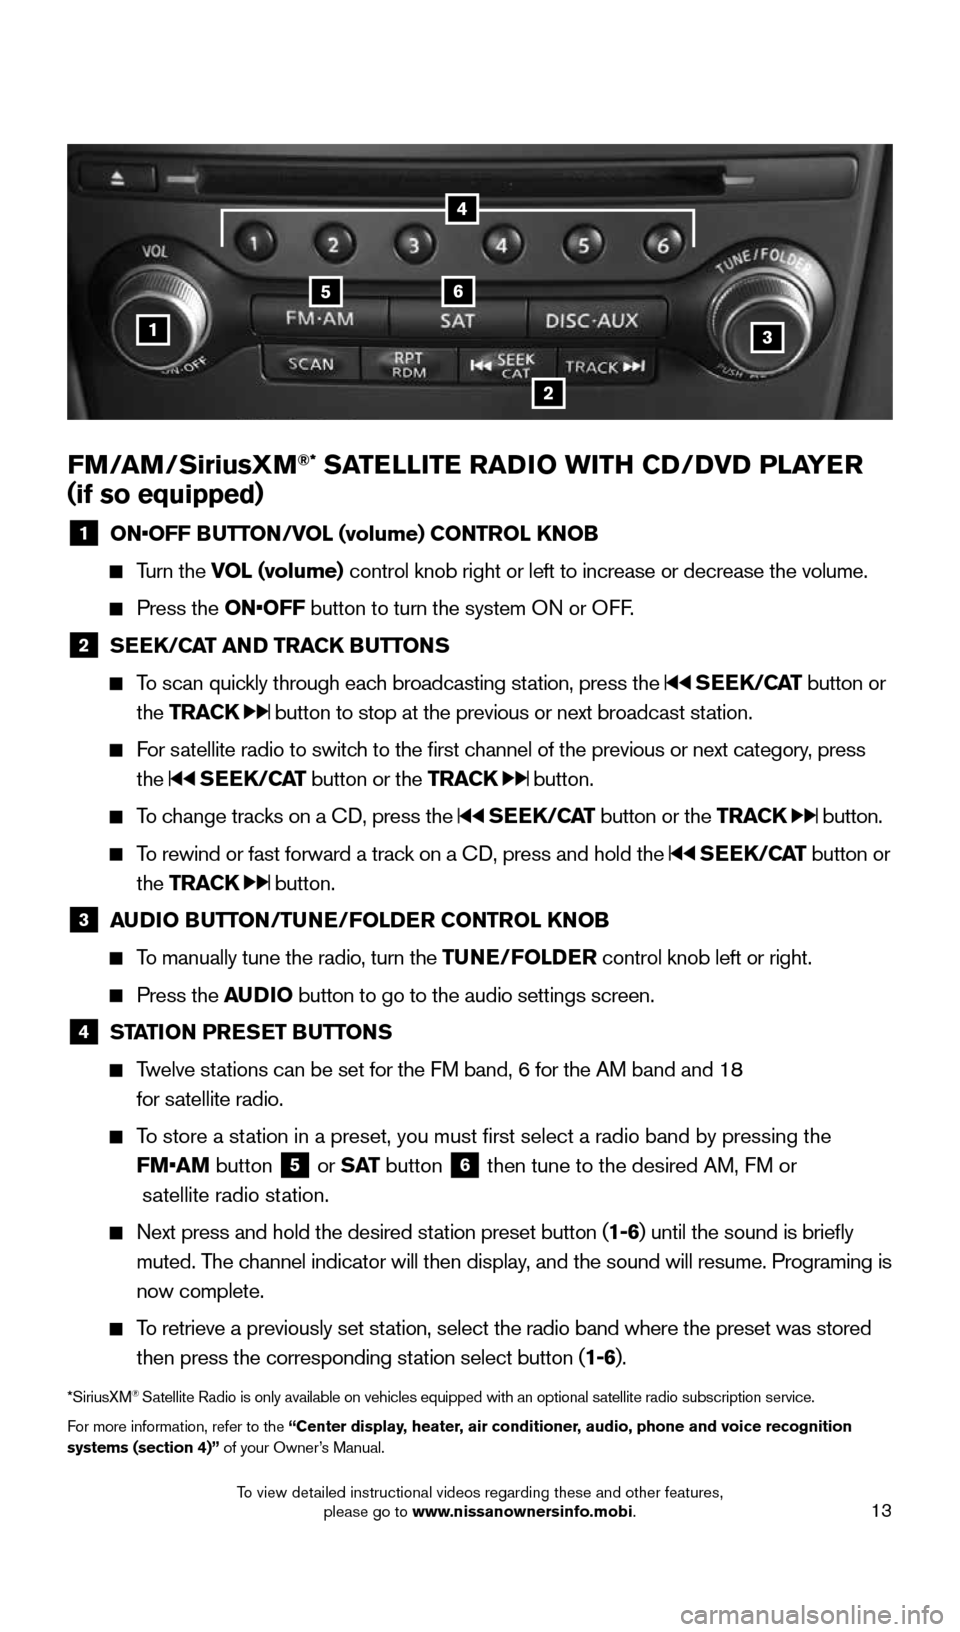
FM/AM/SiriusXM®* SATELLITE RADIO WITH CD/DVD PLAYER
( if so equipped)
1 ON•OFF BUTTON/VOL (volume) CONTROL KNOB
Turn the VOL (volume) control knob right or left to increase or decrease the volume.
Press the ON•OFF button to turn the system ON or OFF.
2 SEEK/CAT AND TRACK BUTTONS
To scan quickly through each broadcasting station, press the SEEK/CAT button or
the TRACK
button to stop at the previous or next broadcast station.
For satellite radio to switch to the first channel of the previous or next category, press
the
SEEK/CAT button or the TRACK button.
To change tracks on a CD, press the SEEK/CAT button or the TRACK button.
To rewind or fast forward a track on a CD, press and hold the SEEK/CAT button or
the TRACK
button.
3 AUDIO BUTTON/TUNE/FOLDER CONTROL KNOB
To manually tune the radio, turn the TUNE/FOLDER control knob left or right.
Press the AUDIO button to go to the audio settings screen.
4 STATION PRESET BUTTONS
Twelve stations can be set for the FM band, 6 for the AM band and 18
for satellite radio.
To store a station in a preset, you must first select a radio band by pressing the
FM•AM button
5 or
S AT button
6 then tune to the desired AM, FM or
satellite radio station.
Next press and hold the desired station preset button (1-6) until the sound is briefly
muted. The channel indicator will then display, and the sound will resume. Programing is
now complete.
To retrieve a previously set station, select the radio band where the preset was stored
then press the corresponding station select button (1-6).
*SiriusXM® Satellite Radio is only available on vehicles equipped with an optional s\
atellite radio subscription service.
For more information, refer to the “Center display, heater, air conditioner, audio, phone and voice recognition
systems (section 4)” of your Owner’s Manual.
1
56
2
3
4
1870658_16_370Z_QRG_012315.indd 131/23/15 12:08 PM
To view detailed instructional videos regarding these and other features, please go to www.nissanownersinfo.mobi.
Page 17 of 28
15
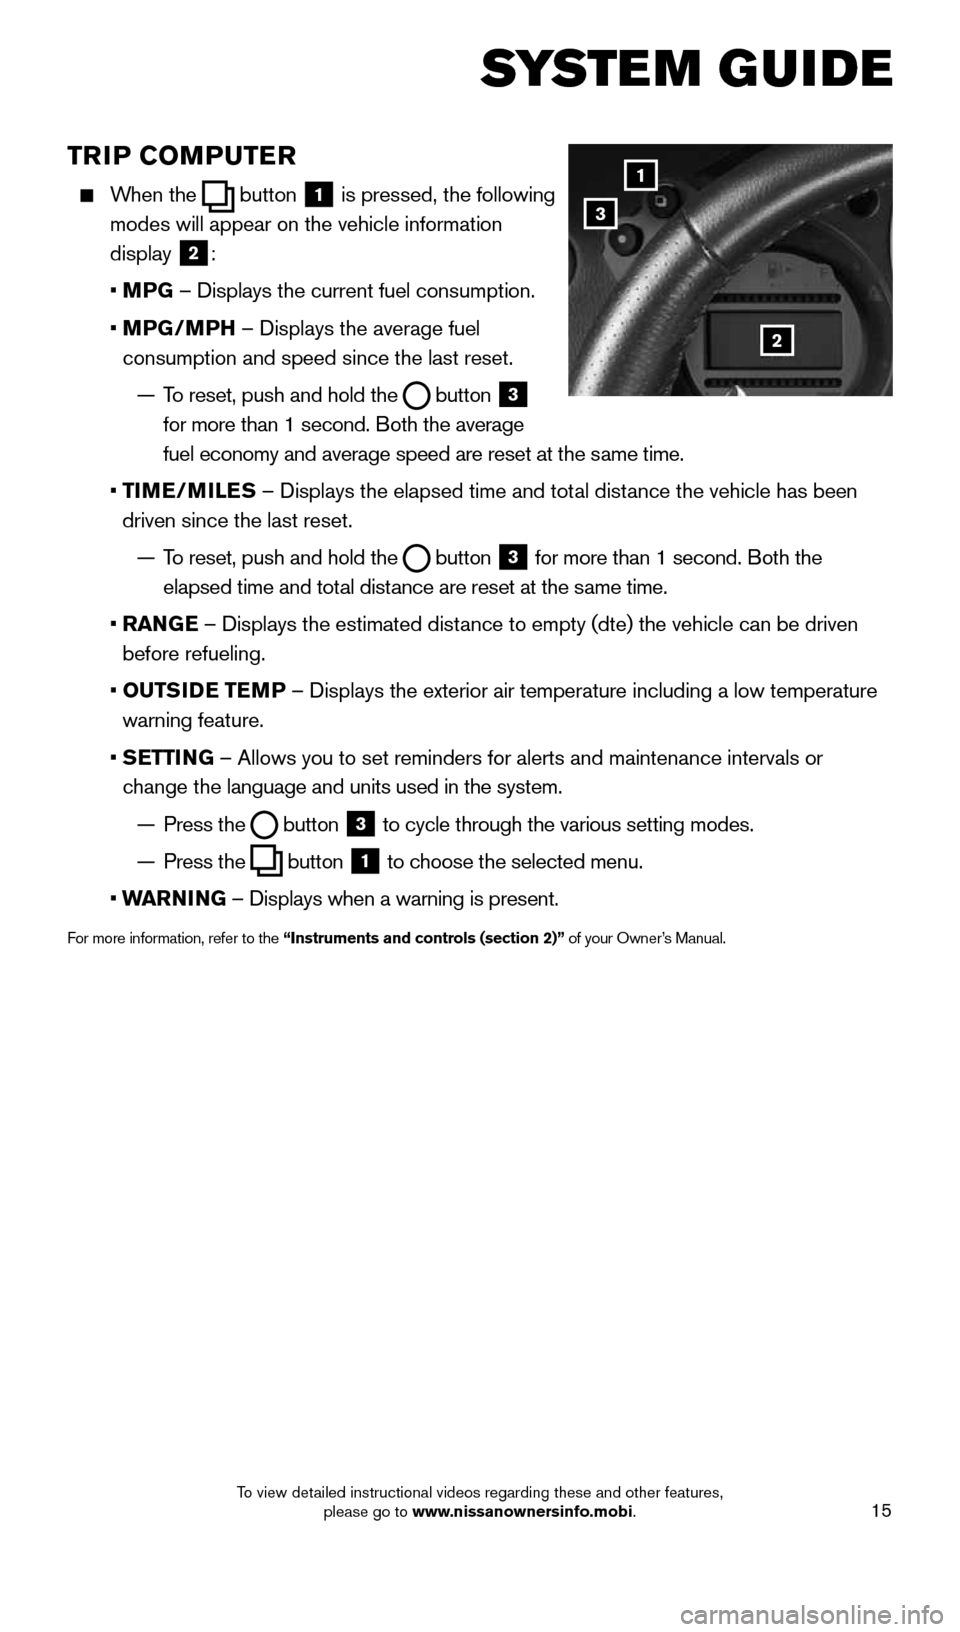
TRIP COMPUTER
When the button
1 is pressed, the following
modes will appear on the vehicle information
display
2:
• MPG – Displays the current fuel consumption.
• MPG/MPH – Displays the average fuel
consumption and speed since the last reset.
— To reset, push and hold the
button 3
for more than 1 second. Both the average
fuel economy and average speed are reset at the same time.
• TIME/MILES – Displays the elapsed time and total distance the vehicle has been
driven since the last reset.
— To reset, push and hold the
button 3 for more than 1 second. Both the
elapsed time and total distance are reset at the same time.
• RANGE – Displays the estimated distance to empty (dte) the vehicle can be driven
before refueling.
• OUTSIDE TEMP – Displays the exterior air temperature including a low temperature
warning feature.
• SETTING – Allows you to set reminders for alerts and maintenance intervals o\
r
change the language and units used in the system.
— Press the
button
3 to cycle through the various setting modes.
— Press the
button
1 to choose the selected menu.
• WARNING – Displays when a warning is present.
For more information, refer to the “Instruments and controls (section 2)” of your Owner’s Manual.
1
3
2
SYSTEM GUIDE
1870658_16_370Z_QRG_012315.indd 151/23/15 12:08 PM
To view detailed instructional videos regarding these and other features, please go to www.nissanownersinfo.mobi.
Page 18 of 28
16
SYSTEM GUIDE
BLUETOOTH® STREAMING AUDIO WITH NAVIGATION
(if so equipped)
If you have a compatible Bluetooth® device with
streaming audio (A2DP profile), you can set up the
wireless connection between your Bluetooth
® device
and your vehicle’s audio system. This connection
allows you to listen to audio from the Bluetooth
®
device using your vehicle’s speakers. A cellular phone
should not be used while driving so full attention may
be given to vehicle operation.*
CONNECTING PROCEDURE FOR A PHONE
Using your cellular phone as a streaming audio device:
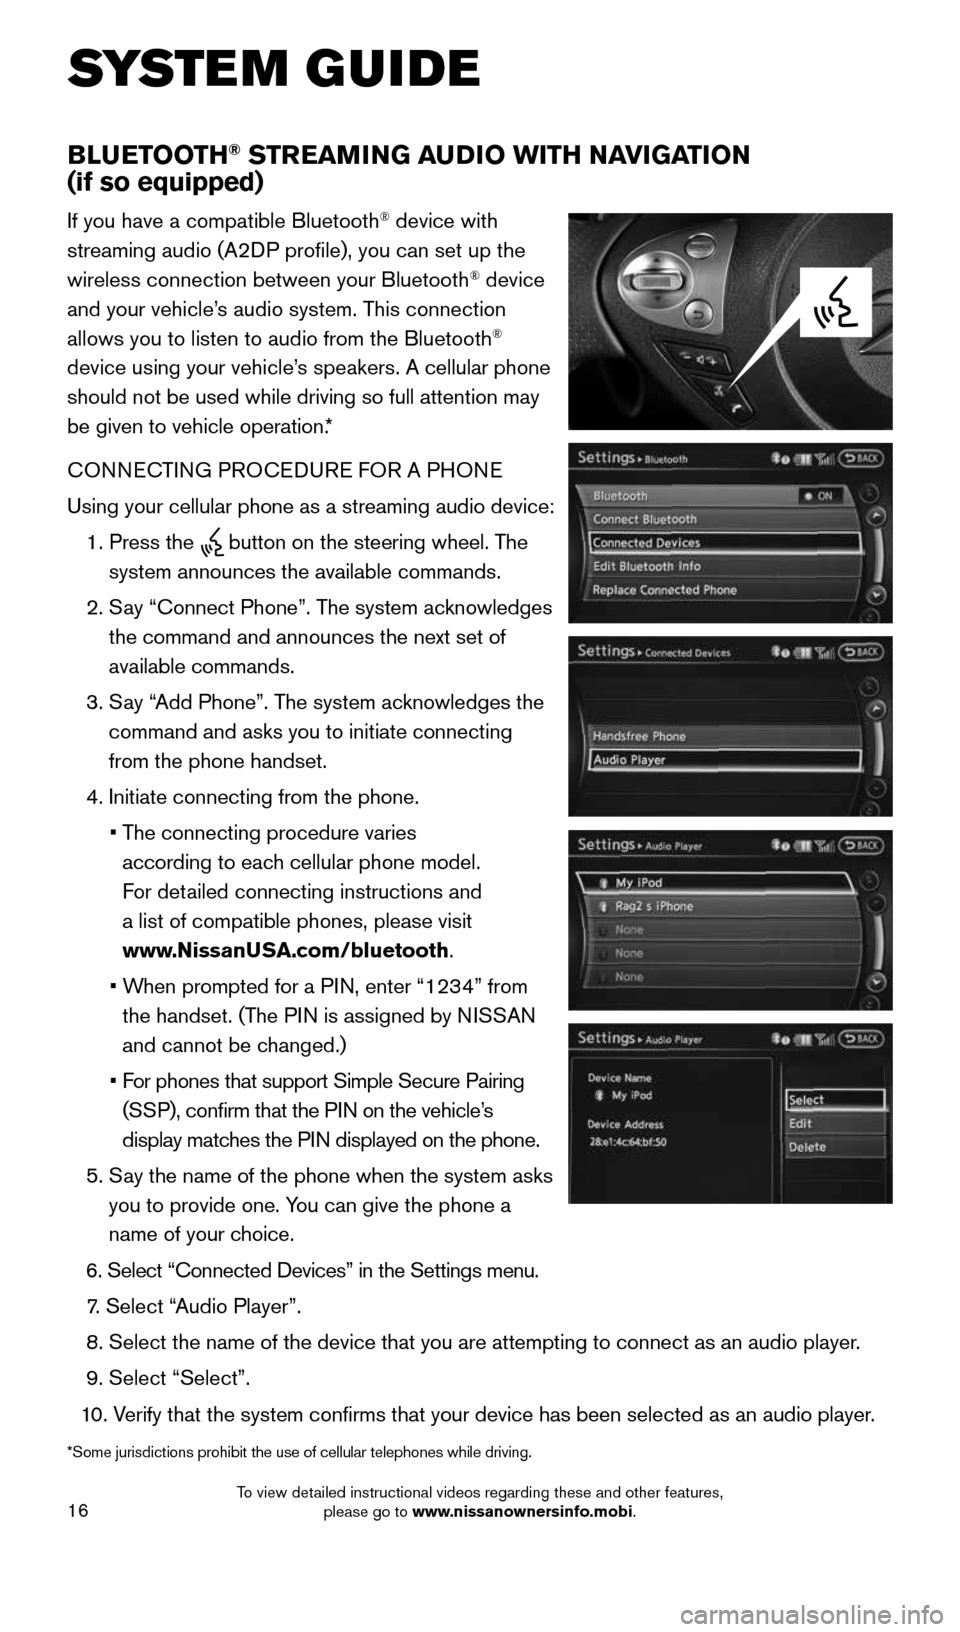
1. Press the
button on the steering wheel. The
system announces the available commands.
2. Say “Connect Phone”. The system acknowledges
the command and announces the next set of
available commands.
3. Say “Add Phone”. The system acknowledges the
command and asks you to initiate connecting
from the phone handset.
4. Initiate connecting from the phone.
• The connecting procedure varies
according to each cellular phone model.
For detailed connecting instructions and
a list of compatible phones, please visit
www.NissanUSA.com/bluetooth.
• When prompted for a PIN, enter “1234” from
the handset. (The PIN is assigned by NISSAN
and cannot be changed.)
• For phones that support Simple Secure Pairing
(SSP), confirm that the PIN on the vehicle’s
display matches the PIN displayed on the phone.
5. Say the name of the phone when the system asks
you to provide one. You can give the phone a
name of your choice.
6. Select “Connected Devices” in the Settings menu.
7. Select “Audio Player”.
8. Select the name of the device that you are attempting to connect as an a\
udio player.
9. Select “Select”.
10. Verify that the system confirms that your device has been selected as a\
n audio player.
*Some jurisdictions prohibit the use of cellular telephones while drivin\
g.
1870658_16_370Z_QRG_012315.indd 161/23/15 12:08 PM
To view detailed instructional videos regarding these and other features, please go to www.nissanownersinfo.mobi.
Page 19 of 28
17
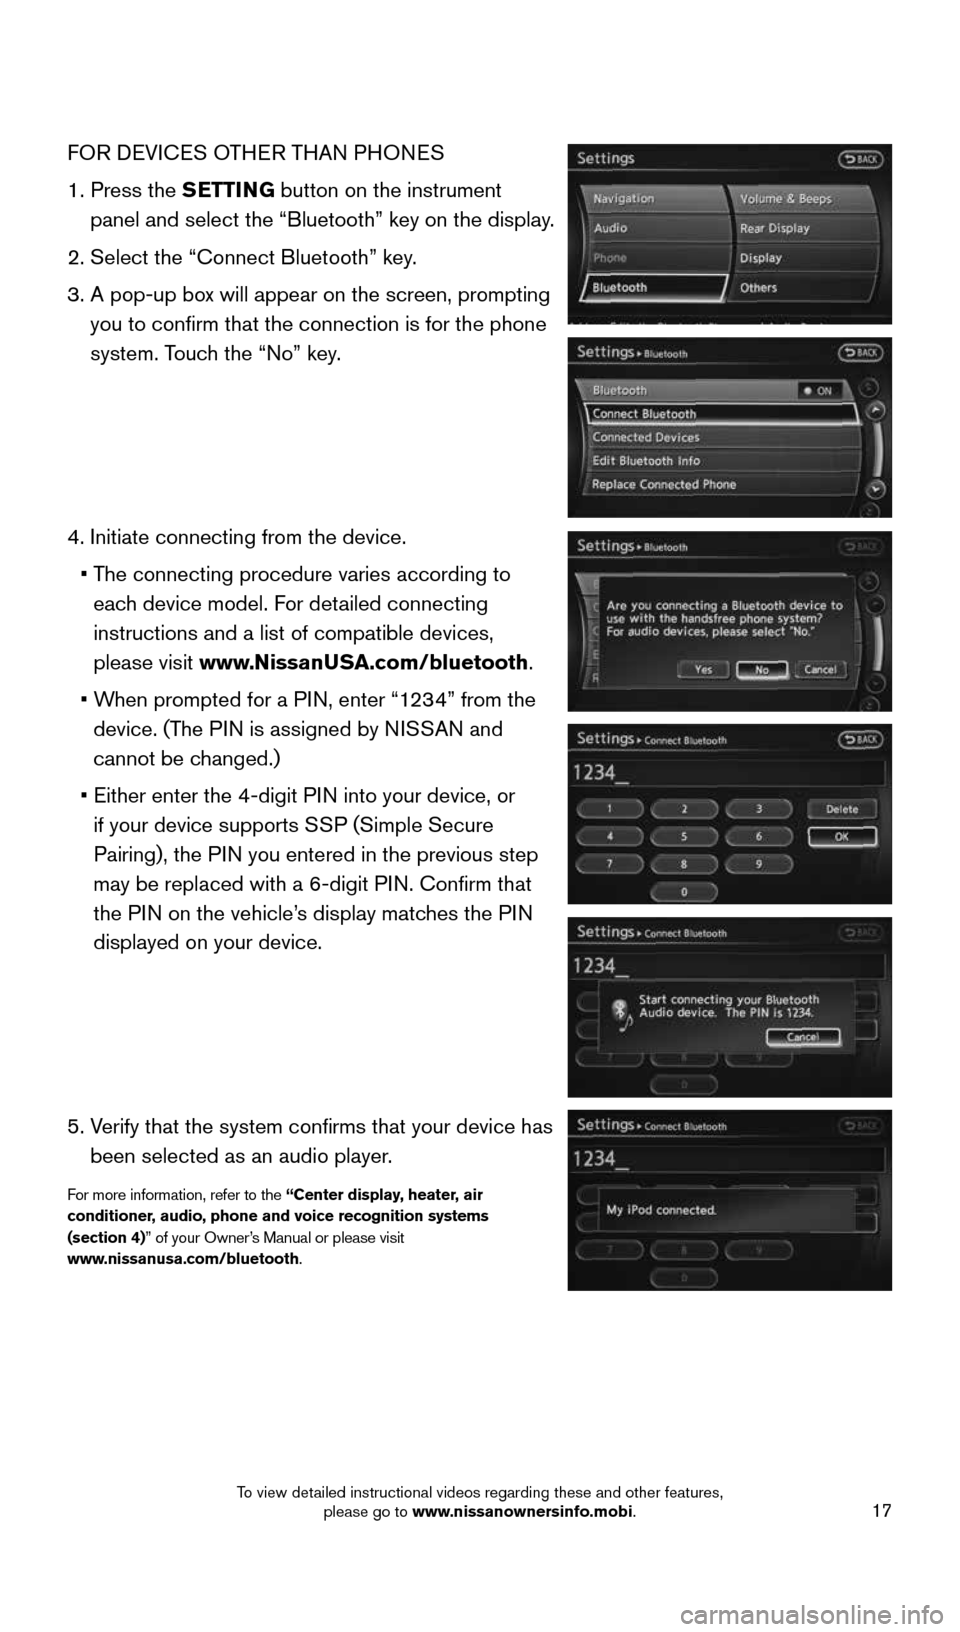
FOR DEVICES OTHER THAN PHONES
1. Press the SETTING button on the instrument
panel and select the “Bluetooth” key on the display.
2. Select the “Connect Bluetooth” key.
3. A pop-up box will appear on the screen, prompting
you to confirm that the connection is for the phone
system. Touch the “No” key.
4. Initiate connecting from the device.
• The connecting procedure varies according to
each device model. For detailed connecting
instructions and a list of compatible devices,
please visit www.NissanUSA.com/bluetooth.
• When prompted for a PIN, enter “1234” from the
device. (The PIN is assigned by NISSAN and
cannot be changed.)
• Either enter the 4-digit PIN into your device, or
if your device supports SSP (Simple Secure
Pairing), the PIN you entered in the previous step
may be replaced with a 6-digit PIN. Confirm that
the PIN on the vehicle’s display matches the PIN
displayed on your device.
5. Verify that the system confirms that your device has
been selected as an audio player.
For more information, refer to the “Center display, heater, air
conditioner, audio, phone and voice recognition systems
(section 4)” of your Owner’s Manual or please visit
www.nissanusa.com/bluetooth.
1870658_16_370Z_QRG_012315.indd 171/23/15 12:08 PM
To view detailed instructional videos regarding these and other features, please go to www.nissanownersinfo.mobi.
Page 21 of 28
19
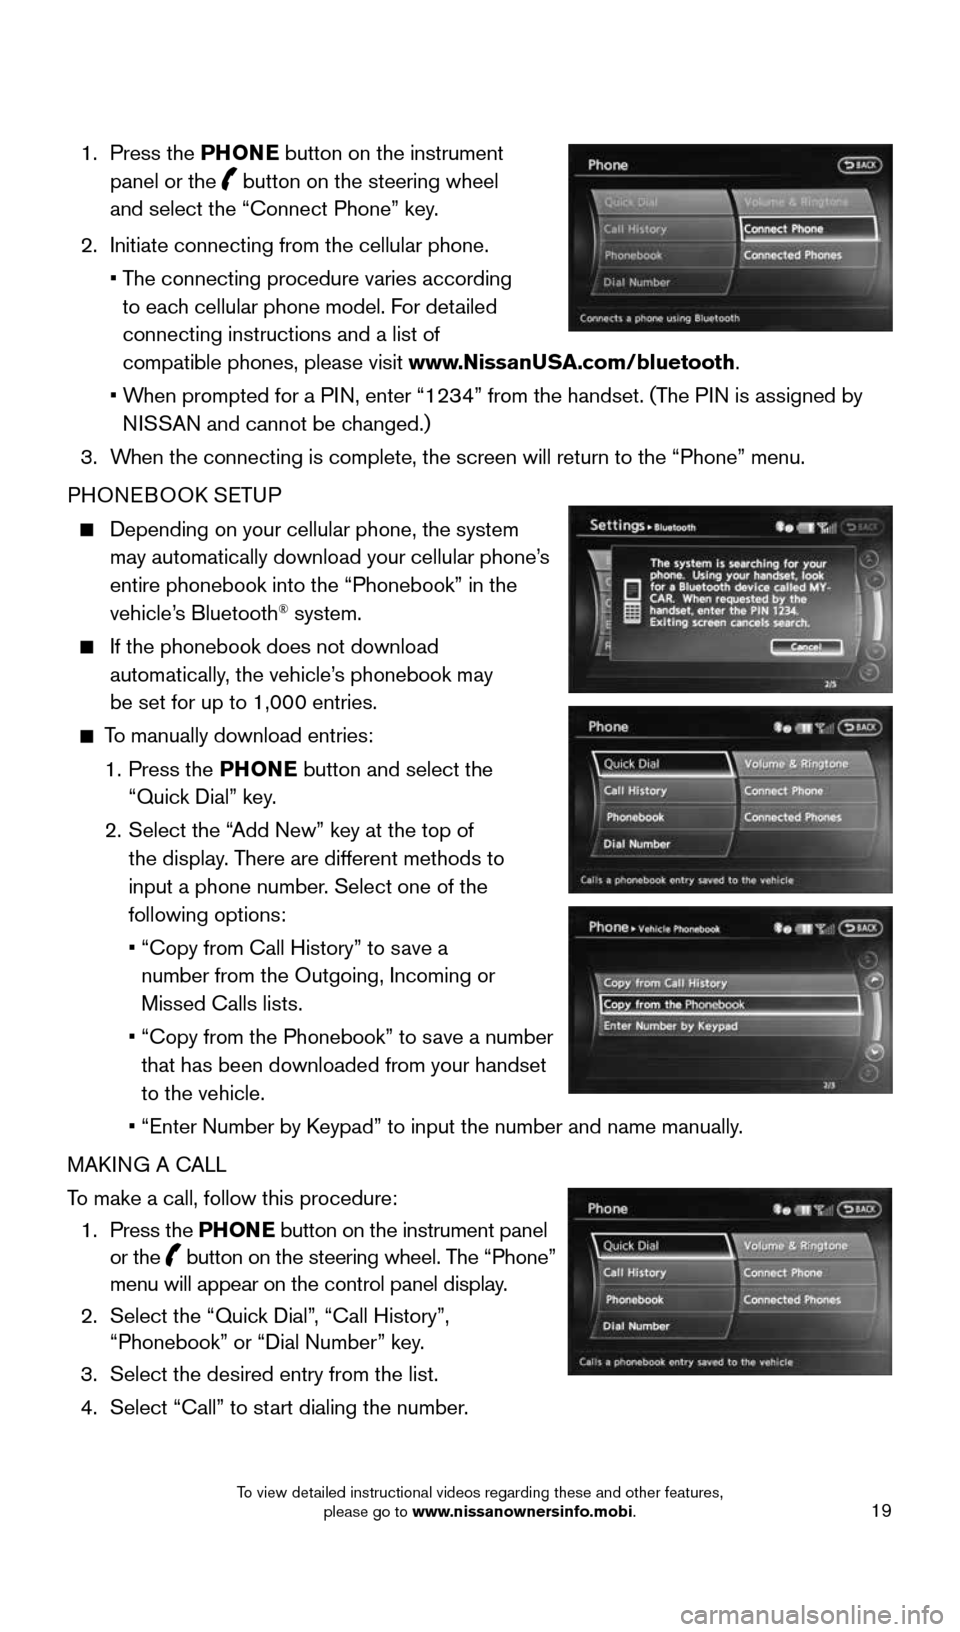
1. Press the PHONE button on the instrument
panel or the
button on the steering wheel
and select the “Connect Phone” key.
2. Initiate connecting from the cellular phone.
• The connecting procedure varies according
to each cellular phone model. For detailed
connecting instructions and a list of
compatible phones, please visit www.NissanUSA.com/bluetooth.
• When prompted for a PIN, enter “1234” from the handset. (The PIN is assigned by
NISSAN and cannot be changed.)
3. When the connecting is complete, the screen will return to the “Phone”\
menu.
PHONEBOOK SETUP
Depending on your cellular phone, the system
may automatically download your cellular phone’s
entire phonebook into the “Phonebook” in the
vehicle’s Bluetooth
® system.
If the phonebook does not download
automatically, the vehicle’s phonebook may
be set for up to 1,000 entries.
To manually download entries:
1. Press the PHONE button and select the
“Quick Dial” key.
2. Select the “Add New” key at the top of
the display. There are different methods to
input a phone number. Select one of the
following options:
• “Copy from Call History” to save a
number from the Outgoing, Incoming or
Missed Calls lists.
• “Copy from the Phonebook” to save a number
that has been downloaded from your handset
to the vehicle.
• “Enter Number by Keypad” to input the number and name manually.
MAKING A CALL
To make a call, follow this procedure:
1. Press the PHONE button on the instrument panel
or the
button on the steering wheel. The “Phone”
menu will appear on the control panel display.
2. Select the “Quick Dial”, “Call History”,
“Phonebook” or “Dial Number” key.
3. Select the desired entry from the list.
4. Select “Call” to start dialing the number.
1870658_16_370Z_QRG_012315.indd 191/23/15 12:09 PM
To view detailed instructional videos regarding these and other features, please go to www.nissanownersinfo.mobi.
Page 23 of 28
21
1
23
4567891011
1213
NAVIGATION SYSTEM (if so equipped)
Your Navigation System can calculate a route from your current location to a
preferred destination. The real-time map display and turn-by-turn voice guidance will
lead you along the route.
The Navigation System will continually update your vehicle’s position. If you have
deviated from the original route, it will recalculate the route from your current location.
MAKING A CALL
1. Push the
button on the steering wheel. A tone will sound.
2. Say “Call”. The system acknowledges the command and announces the next set of
available commands.
3. Say the registered person’s name. The system acknowledges the name. If there
are multiple locations associated with the name, the system asks the use\
r to choose
the location.
4. Once the name and location are confirmed, the system begins the call.
RECEIVING/ENDING A CALL
To accept the call, press the
button on the steering wheel.
To reject the call, press the button on the steering wheel.
To hang-up, press the button on the steering wheel.
For more information, refer to the “Center display, heater, air conditioner, audio, phone and voice recognition sys-
tems (section 4)” of your Owner’s Manual or please visit www.nissanusa.com/bluetooth.
1870658_16_370Z_QRG_012315.indd 211/23/15 12:09 PM
To view detailed instructional videos regarding these and other features, please go to www.nissanownersinfo.mobi.
Page 24 of 28

22
SYSTEM GUIDE
To help promote safe driving, some functions cannot be operated or have limited
operation when the vehicle speed is above 5 mph (8 km/h). The on-screen
text and keys for these restricted functions will be grayed-out or muted\
and cannot
be selected while driving. These functions will become available again when the
vehicle speed is reduced to 5 mph (8 km/h). Voice commands may be available for
some of the restricted functions. For more information, refer to the “Center display,
heater, air conditioner, audio, phone and voice recognition systems (section 4)” of your
Owner’s Manual.
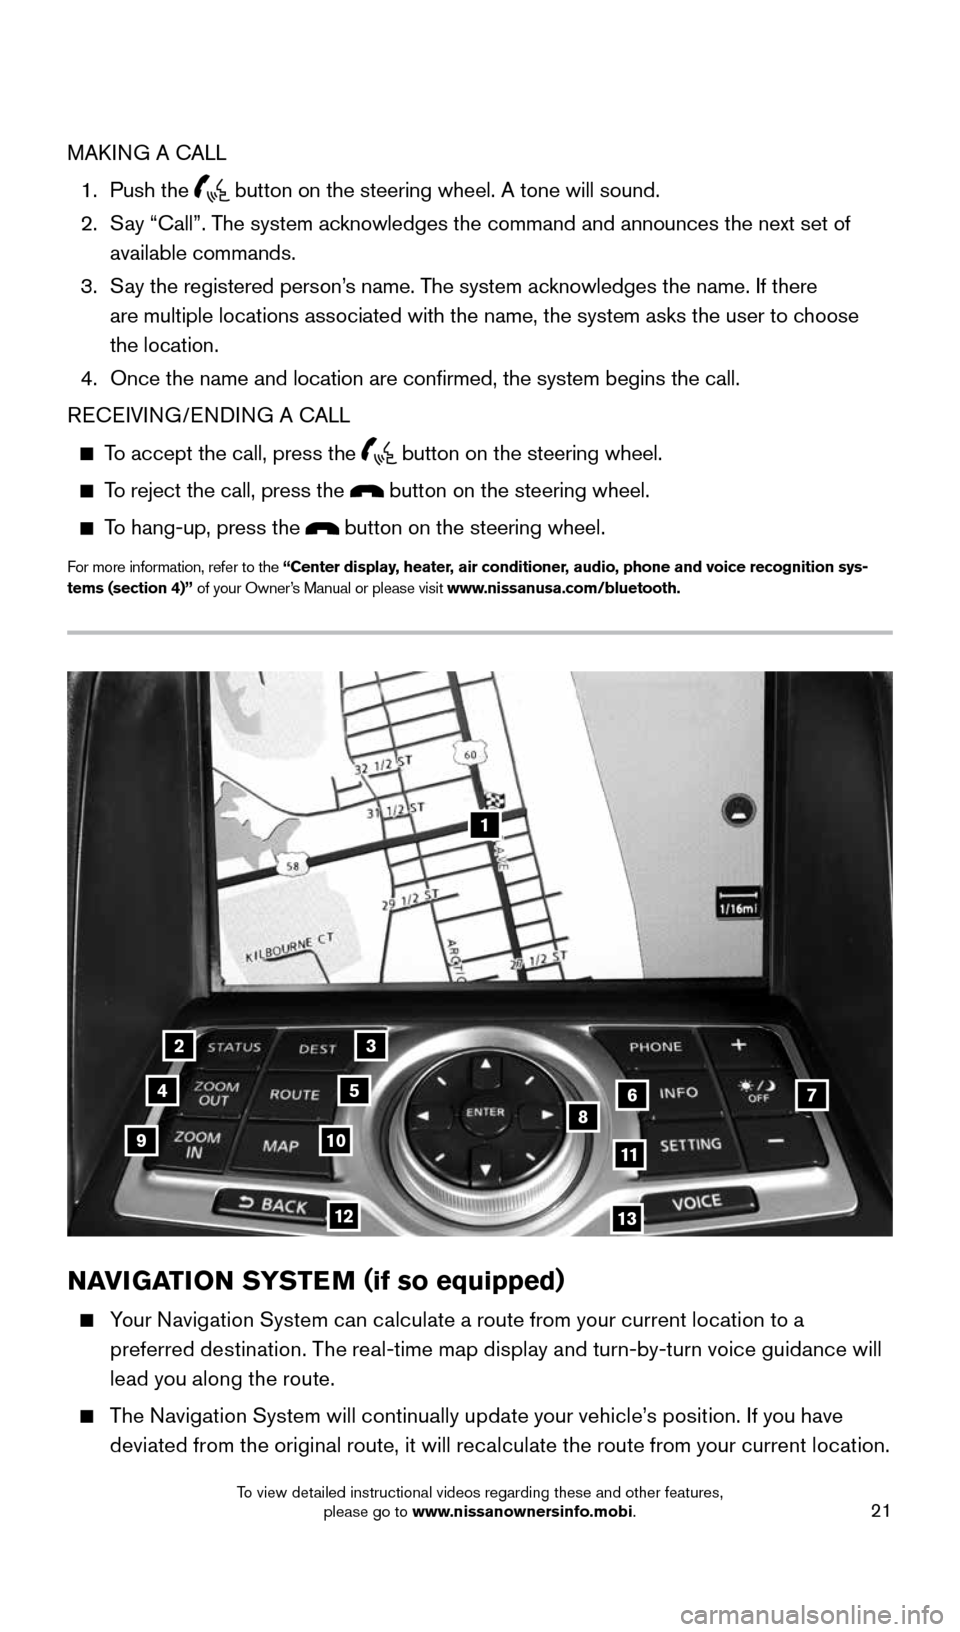
1 Touch-screen display.
2 S TAT U S – Press multiple times to display audio information with either the air
conditioner status, fuel economy or navigation directions.
3 Destination (DEST) – Press to enter a destination.
4 ZOOM OUT – Press to zoom out the map.
5 ROUTE – Press to access guidance control functions (guidance cancellation, route
priority, waypoint setting on the route, etc.).
6 Information (INFO) – Press to display the vehicle, traffic (if so equipped), weather
(if so equipped) or Voice Recognition information.
7 – Press to switch between the day screen (bright) and the night screen (dark).
Press and hold the button to turn the display off. Press again to turn the display on.
8 Multi Function Controller
• ENTER – Press to select the highlighted item on the screen. If this button is pushed
while a map is displayed, the map menu screen is displayed.
• Main directional buttons – Press to move across the map, highlight an item on the
screen or adjust a setting.
• Additional directional buttons – Press to move across the map or highlight an item
on the character input screen.
• Center dial – Turn the dial to highlight an item on the screen, adjust a setting or
adjust the map scale.
9 ZOOM IN – Press to zoom in the map.
10 MAP – Press to display the map. While following a programed route, press multiple
times to change the type of route information.
11 SETTING – Press to access the system settings.
12 BACK
– Press to return to the previous screen. In a settings screen, this button
can also be used to apply the setting. In a character input screen, this button can
also delete the characters that have been entered.
13 VOICE – Press to hear the current voice guidance for a programed route.
For more information, refer to the “Navigation (section 2)” of your Multi Function Display Owner’s Manual.
1870658_16_370Z_QRG_012315.indd 221/23/15 12:09 PM
To view detailed instructional videos regarding these and other features, please go to www.nissanownersinfo.mobi.