Page 9 of 28

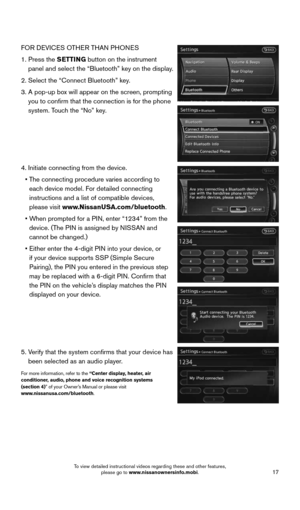
7
FI RST DR IVE FEATU R ES
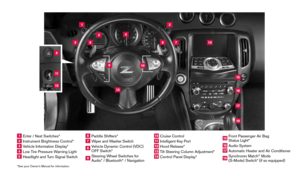
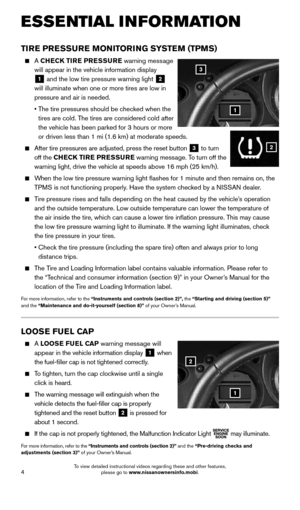
NISSAN INTELLIGENT KEY® SYSTE M
The NISSAN Intelligent Key® system allows you to
lock or unlock your vehicle, open your rear hatch/trunk
lid and start the engine. It is important to make sure
the Intelligent Key is with you (that is, in your pocket
or purse).
The operating range of the Intelligent Key is within
31.5 in (80 cm) from each request switch.
To lock the vehicle, push either door handle request switch
1
once or press the
button
2 on the key fob.
To unlock the vehicle, perform one of the following procedures:
• Push either door handle request switch
1 once; the
corresponding door will unlock. Push the door handle request
switch
1 again within 1 minute; all other doors will unlock, or
• Press the
button
3 on the key fob to unlock the driver’s
side door.
• Press the
button 3 again; all other doors will unlock.
The Intelligent Key can also be used to activate the panic alarm by
pressing and holding the
button
4 for more than 1 second. Once activated, the
panic alarm and headlights will stay on for a period of time.
INTELLIGENT KEY BATTERY DISCHARGE
If the low battery indicator
5 appears in the
vehicle information display, replace the battery as
soon as possible.
If the battery in the Intelligent Key is almost
discharged, the guide light
6 of the Intelligent
Key port blinks and the key insertion indicator 7
will appear in the vehicle information display.
To start the engine under these circumstances,
insert the Intelligent Key into the key port with the
key ring end toward you until it latches into place.
Then push the ignition switch to start the engine.
To remove the Intelligent Key from the port, push
the ignition switch to turn the engine off and then
pull the Intelligent Key out of the port.
Do not insert the mechanical key or any other
objects into the Intelligent Key port. Inserting any
object other than the Intelligent Key will damage
the Intelligent Key port.
For more information, refer to the “Pre-driving checks and adjustments (section 3)”, the “Starting and driving
(section 5)” and the “Maintenance and do-it-yourself (section 8)” of your Owner’s Manual.
6
F
5
7
2
3
4
1
1870658_16_370Z_QRG_012315.indd 71/23/15 12:08 PM
To view detailed instructional videos regarding these and other features, please go to www.nissanownersinfo.mobi.
Page 10 of 28
.
Unlock the rear hatch/tru")
8
FI RST DR IVE FEATU R ES
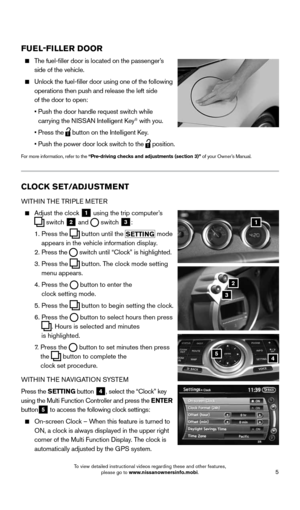
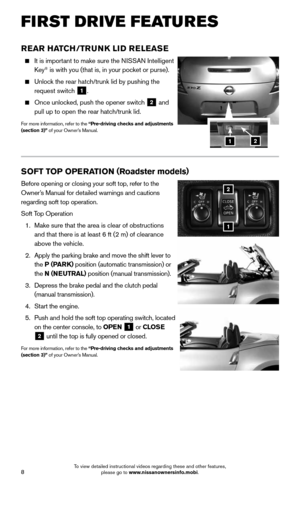
REAR HATCH/TRUNK LID RELEASE
It is important to make sure the NISSAN Intelligent
Key® is with you (that is, in your pocket or purse).
Unlock the rear hatch/trunk lid by pushing the
request switch
1.
Once unlocked, push the opener switch
2 and
pull up to open the rear hatch/trunk lid.
For more information, refer to the “Pre-driving checks and adjustments
(section 3)” of your Owner’s Manual.
12
SOFT TOP OPERATION ( Roadster models)
Before opening or closing your soft top, refer to the
Owner’s Manual for detailed warnings and cautions
regarding soft top operation.
Soft Top Operation
1. Make sure that the area is clear of obstructions
and that there is at least 6 ft (2 m) of clearance
above the vehicle.
2. Apply the parking brake and move the shift lever to
the P (PARK) position (automatic transmission) or
the N (NEUTRAL) position (manual transmission).
3. Depress the brake pedal and the clutch pedal
(manual transmission).
4. Start the engine.
5. Push and hold the soft top operating switch, located
on the center console, to OPEN
1 or
CLOSE
2 until the top is fully opened or closed.
For more information, refer to the “Pre-driving checks and adjustments
(section 3)” of your Owner’s Manual.
1
2
1870658_16_370Z_QRG_012315.indd 81/23/15 12:08 PM
To view detailed instructional videos regarding these and other features, please go to www.nissanownersinfo.mobi.
Page 11 of 28

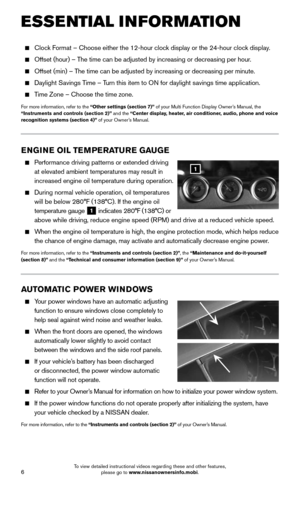
To slide the seat forward or backward, push the
control switch
1 forward or backward.
To adjust the angle of the seatback, push the switch
2 f")
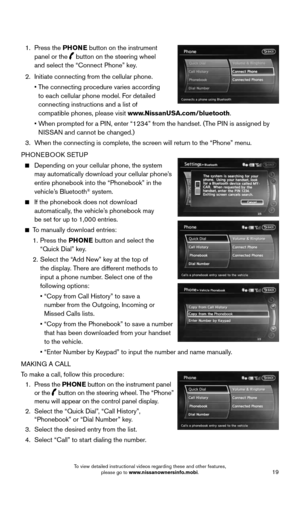
9
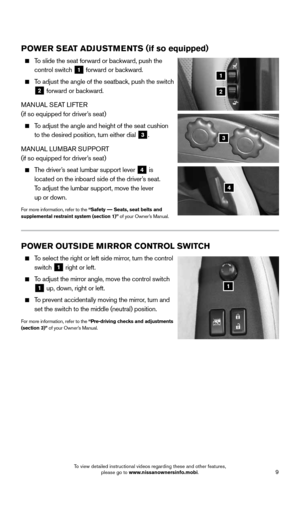
POWER SEAT ADJUSTMENTS (if so equipped)
To slide the seat forward or backward, push the
control switch
1 forward or backward.
To adjust the angle of the seatback, push the switch
2 forward or backward.
MANUAL SEAT LIFTER
(if so equipped for driver’s seat)
To adjust the angle and height of the seat cushion
to the desired position, turn either dial
3.
MANUAL LUMBAR SUPPORT
(if so equipped for driver’s seat)
The driver’s seat lumbar support lever
4 is
located on the inboard side of the driver’s seat.
To adjust the lumbar support, move the lever
up or down.
For more information, refer to the “Safety –– Seats, seat belts and
supplemental restraint system (section 1)” of your Owner’s Manual.
1
2
3
4
POWER OUTSIDE MIRROR CONTROL SWITCH
To select the right or left side mirror, turn the control
switch
1 right or left.
To adjust the mirror angle, move the control switch
1 up, down, right or left.
To prevent accidentally moving the mirror, turn and
set the switch to the middle (neutral) position.
For more information, refer to the “Pre-driving checks and adjustments
(section 3)” of your Owner’s Manual.
1
1870658_16_370Z_QRG_012315.indd 91/23/15 12:08 PM
To view detailed instructional videos regarding these and other features, please go to www.nissanownersinfo.mobi.
Page 12 of 28
.
AUTOMATIC TRANSMISSION (if so eq")
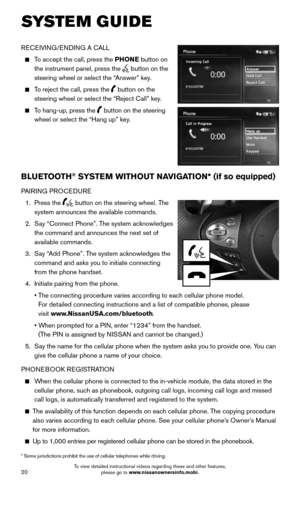
10
FI RST DR IVE FEATU R ES
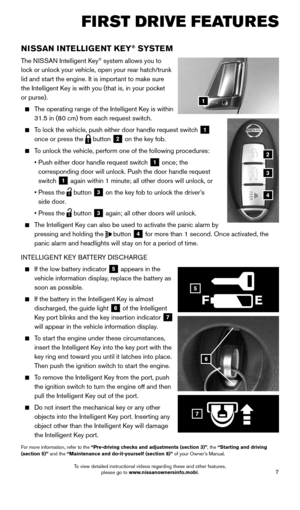
STARTING/STOPPING THE ENGINE
It is important to make sure the NISSAN Intelligent
Key® is with you (that is, in your pocket or purse).
AUTOMATIC TRANSMISSION (if so equipped)
Depress the brake pedal.
• If the brake pedal is not depressed, pushing the
ignition switch once will activate the ACC mode.
• Pushing the ignition switch a second time will
activate the ON mode.
Move the shift lever to the P (PARK) position.
Press the ignition switch START/STOP button to start the engine.
MANUAL TRANSMISSION (if so equipped)
Depress the brake pedal.
Depress the clutch pedal to the floor.
• If the clutch pedal is not depressed, pushing the ignition switch once will activate the
ACC mode.
• Pushing the ignition switch a second time will activate the ON mode.
Move the shift lever to the N (NEUTRAL) position.
Press the ignition switch START/STOP button to start the engine.
TURNING THE ENGINE OFF
For an automatic transmission, move the shift lever to the P (PARK) position, apply the
parking brake and press the ignition switch START/STOP button to turn the engine off.
For a manual transmission, move the shift lever to the N (NEUTRAL) position, apply the
parking brake, place the vehicle in 1 (FIRST) gear and press the ignition switch START/
STOP button to turn the engine off.
For more information, refer to the “Starting and driving (section 5)” of your Owner’s Manual.
3
1
2
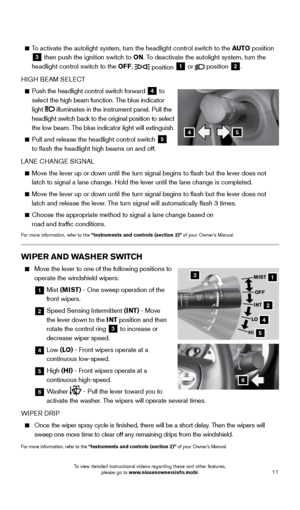
HEADLIGHT CONTROL SWITCH
HEADLIGHT CONTROL
Turn the headlight control switch to the
position 1 to turn on the front parking, side
marker, tail, license plate and instrument panel
lights. Turn the switch to the
position
2 to
turn on the headlights.
AUTOLIGHT SYSTEM
The autolight system will automatically turn the headlights on when it is\
dark and off
when it is light. The system will keep the headlights on for a period of time after you tur\
n
the ignition off and all the doors are closed.
1870658_16_370Z_QRG_012315.indd 101/23/15 12:08 PM
To view detailed instructional videos regarding these and other features, please go to www.nissanownersinfo.mobi.
Page 13 of 28

11
To activate the autolight system, turn the headlight control switch to the AUTO position
3 then push the ignition switch to ON. To deactivate the autolight system, turn the
headlight control switch to the OFF, position 1 or
position
2.
HIGH BEAM SELECT
Push the headlight control switch forward
4 to
select the high beam function. The blue indicator
light
illuminates in the instrument panel. Pull the
headlight switch back to the original position to select
the low beam. The blue indicator light will extinguish.
Pull and release the headlight control switch
5
to flash the headlight high beams on and off.
LANE CHANGE SIGNAL
Move the lever up or down until the turn signal begins to flash but th\
e lever does not
latch to signal a lane change. Hold the lever until the lane change is completed.
Move the lever up or down until the turn signal begins to flash but th\
e lever does not
latch and release the lever. The turn signal will automatically flash 3 times.
Choose the appropriate method to signal a lane change based on
road and traffic conditions.
For more information, refer to the “Instruments and controls (section 2)” of your Owner’s Manual.
WIPER AND WASHER SWITCH
Move the lever to one of the following positions to
operate the windshield wipers:
1 Mist (MIST) - One sweep operation of the
front wipers.
2 Speed Sensing Intermittent (INT) - Move
the lever down to the INT position and then
rotate the control ring
3 to increase or
decrease wiper speed.
4 Low (LO) - Front wipers operate at a
continuous low-speed.
5 High (HI) - Front wipers operate at a
continuous high-speed.
6 Washer
- Pull the lever toward you to
activate the washer. The wipers will operate several times.
WIPER DRIP
Once the wiper spray cycle is finished, there will be a short delay. Then the wipers will
sweep one more time to clear off any remaining drips from the windshield\
.
For more information, refer to the “Instruments and controls (section 2)” of your Owner’s Manual.
31
2
4
5
MIST
OFF
INT
LO
HI
6
45
1870658_16_370Z_QRG_012315.indd 111/23/15 12:08 PM
To view detailed instructional videos regarding these and other features, please go to www.nissanownersinfo.mobi.
Page 14 of 28

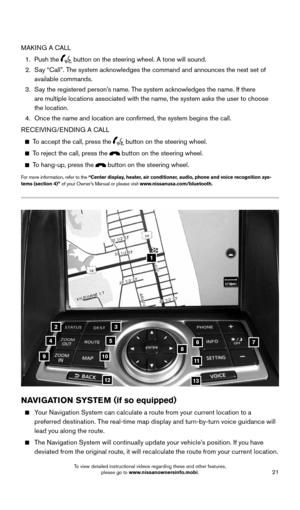
12
FI RST DR IVE FEATU R ES
AUTOMATIC HEATER AND AIR CONDITIONER
1 A/C BUTTON/FAN SPEED CONTROL DIAL
Push the A/C button to turn the A/C on or off.
Turn the fan speed control dial to the left to decrease fan speed or to t\
he right to
increase fan speed.
2 AUTO BUTTON/TEMPERATURE CONTROL DIAL
The automatic mode may be used year-round. Push the AUTO button to turn
the system on, and the system will automatically control the inside temp\
erature
(automatic cooling and/or dehumidified heating), air flow distribu\
tion and fan speed.
3 MODE/MANUAL AIR FLOW CONTROL BUTTON
Push the MODE button
to cycle through the following air flow outlets:
Air flows from the center and side vents.
Air flows from the center, side and foot vents.
Air flows mainly from the foot vents.
Air flows from the defroster and foot vents.4 DEFROSTING/DEFOGGING FRONT AND SIDE WINDOWS
Press the front defroster button
to turn the system on. The A/C automatically turns
on when the defroster mode is selected. This feature removes humidity from the air.
Set the fan speed control dial
1 and the temperature control dial 2 to their
maximum settings.
5 AIR RECIRCULATION BUTTON
Press the air recirculation button
to recirculate air inside the vehicle. The
indicator light on the button will illuminate. This system is used to avoid certain
outside odors and to help adjust the inside vehicle temperature more eff\
ectively.
Press the air recirculation button
again to turn air recirculation off. This allows
outside air to be drawn into the passenger compartment to prevent foggin\
g in the
front defroster
, floor or front defroster and foot vent modes.
The air recirculation mode cannot be activated when the climate control s\
ystem is in the
front defroster mode
or the front defroster and foot vent mode
.
6 REAR WINDOW AND OUTSIDE MIRRORS (if so equipped) DEFROSTER SWITCH
Push the rear window defroster switch
to turn the system ON or OFF.
The rear window and outside mirrors defroster automatically turns off aft\
er
approximately 15 minutes.
7 OFF BUTTON
Press the OFF button to turn the climate control system off.
For more information, refer to the “Instruments and controls (section 2)” and the “Center display, heater, air
conditioner, audio, phone and voice recognition systems (section 4)” of your Owner’s Manual.
1
4
637
5
2
1870658_16_370Z_QRG_012315.indd 121/23/15 12:08 PM
To view detailed instructional videos regarding these and other features, please go to www.nissanownersinfo.mobi.
Page 15 of 28

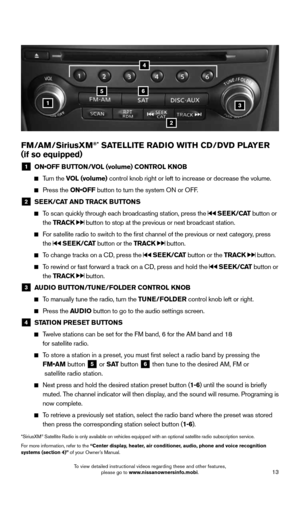
1 ON•OFF BUTTON/VOL (volume) CONTROL KNOB
Turn the VOL (volume) control knob right or left to increase or decrease")
13
FM/AM/SiriusXM®* SATELLITE RADIO WITH CD/DVD PLAYER
( if so equipped)
1 ON•OFF BUTTON/VOL (volume) CONTROL KNOB
Turn the VOL (volume) control knob right or left to increase or decrease the volume.
Press the ON•OFF button to turn the system ON or OFF.
2 SEEK/CAT AND TRACK BUTTONS
To scan quickly through each broadcasting station, press the SEEK/CAT button or
the TRACK
button to stop at the previous or next broadcast station.
For satellite radio to switch to the first channel of the previous or next category, press
the
SEEK/CAT button or the TRACK button.
To change tracks on a CD, press the SEEK/CAT button or the TRACK button.
To rewind or fast forward a track on a CD, press and hold the SEEK/CAT button or
the TRACK
button.
3 AUDIO BUTTON/TUNE/FOLDER CONTROL KNOB
To manually tune the radio, turn the TUNE/FOLDER control knob left or right.
Press the AUDIO button to go to the audio settings screen.
4 STATION PRESET BUTTONS
Twelve stations can be set for the FM band, 6 for the AM band and 18
for satellite radio.
To store a station in a preset, you must first select a radio band by pressing the
FM•AM button
5 or
S AT button
6 then tune to the desired AM, FM or
satellite radio station.
Next press and hold the desired station preset button (1-6) until the sound is briefly
muted. The channel indicator will then display, and the sound will resume. Programing is
now complete.
To retrieve a previously set station, select the radio band where the preset was stored
then press the corresponding station select button (1-6).
*SiriusXM® Satellite Radio is only available on vehicles equipped with an optional s\
atellite radio subscription service.
For more information, refer to the “Center display, heater, air conditioner, audio, phone and voice recognition
systems (section 4)” of your Owner’s Manual.
1
56
2
3
4
1870658_16_370Z_QRG_012315.indd 131/23/15 12:08 PM
To view detailed instructional videos regarding these and other features, please go to www.nissanownersinfo.mobi.
Page 16 of 28
.
The system will automatically maintain the set speed")
14
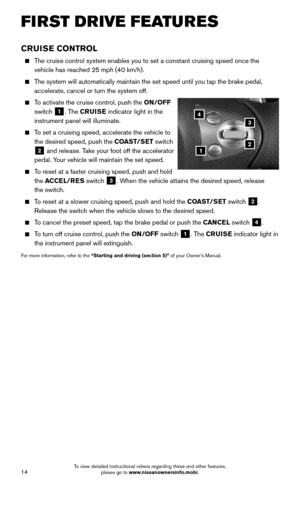
CRUISE CONTROL
The cruise control system enables you to set a constant cruising speed once the
vehicle has reached 25 mph (40 km/h).
The system will automatically maintain the set speed until you tap the brake pedal,
accelerate, cancel or turn the system off.
To activate the cruise control, push the ON/OFF
switch
1. The CRUISE indicator light in the
instrument panel will illuminate.
To set a cruising speed, accelerate the vehicle to
the desired speed, push the COAST/SET switch
2 and release. Take your foot off the accelerator
pedal. Your vehicle will maintain the set speed.
To reset at a faster cruising speed, push and hold
the ACCEL/RES
switch
3. When the vehicle attains the desired speed, release
the switch.
To reset at a slower cruising speed, push and hold the COAST/SET
switch
2.
Release the switch when the vehicle slows to the desired speed.
To cancel the preset speed, tap the brake pedal or push the CANCEL switch
4.
To turn off cruise control, push the ON/OFF
switch 1. The CRUISE
indicator light in
the instrument panel will extinguish.
For more information, refer to the “Starting and driving (section 5)” of your Owner’s Manual.
1
3
2
4
FI RST DR IVE FEATU R ES
1870658_16_370Z_QRG_012315.indd 141/23/15 12:08 PM
To view detailed instructional videos regarding these and other features, please go to www.nissanownersinfo.mobi.