Page 5 of 404

Instruments and Controls (Driver’s area)E001001084321. Supplemental restraint system - airbag (for driver’s seat) p. 4-36Horn switch p. 5-50
2. Instruments p. 5-02
3. Hazard warning flasher switch p. 5-42
4. Windscreen wiper and washer switch p. 5-44 Rear window wiper and washer switch p. 5-48
5. Cruise control switch* p. 6-48
6. Ignition switch p. 6-11
7. Active Stability Control switch p. 6-44
8. Fuel tank filler door release lever p. 2-03
9. Steering control switch (for Bluetooth ®
2.0 interface)* p. 7-51
10. Steering wheel height adjustment p. 6-07
11. Bonnet release lever p. 10-03
12. Fuse block lid p. 10-20
13. Sonar cancel switch* p. 6-57
14. Headlamp levelling switch* p. 5-40 Automatic high-beam switch* p. 5-36
15. Electric remote-controlled outside rear-view mirror switch p. 6-09
16. Front fog lamp switch* p. 5-43 Rear fog lamp switch p. 5-43
17. Audio switch* p. 7-24
18. Combination headlamps and dipper switch p. 5-34 Turn-signal lever p. 5-42
Headlamp washer switch* p. 5-48
19. Daytime dipper button (meter illumination control) p. 5-07
Instruments and Controls (Driver’s area)
1-02OVWE16E1Overview1LHD
Page 6 of 404
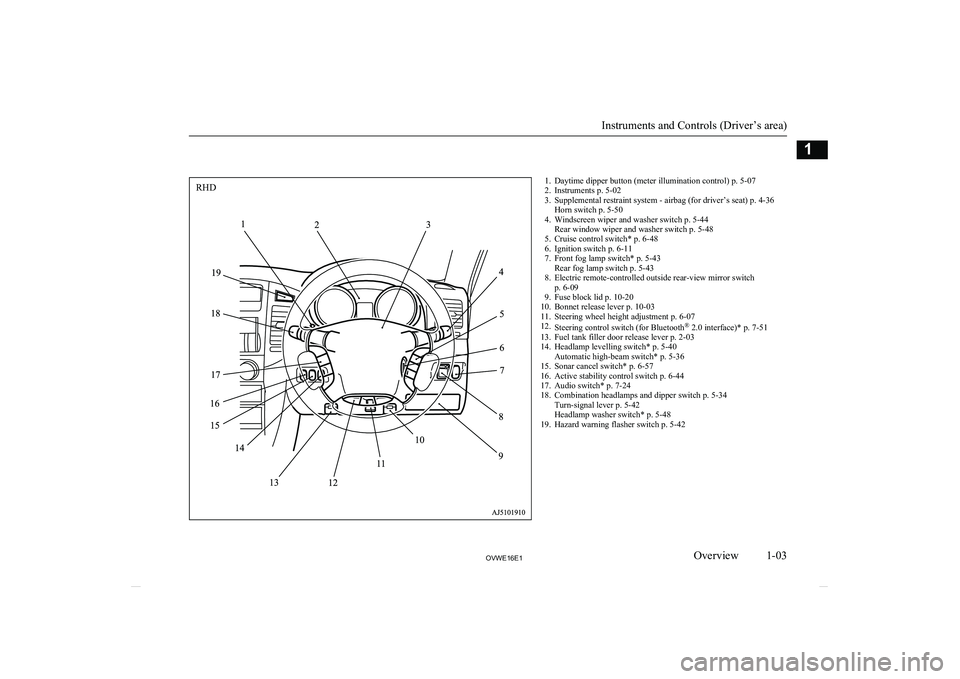
1. Daytime dipper button (meter illumination control) p. 5-07
2. Instruments p. 5-02
3. Supplemental restraint system - airbag (for driver’s seat) p. 4-36 Horn switch p. 5-50
4. Windscreen wiper and washer switch p. 5-44 Rear window wiper and washer switch p. 5-48
5. Cruise control switch* p. 6-48
6. Ignition switch p. 6-11
7. Front fog lamp switch* p. 5-43 Rear fog lamp switch p. 5-43
8. Electric remote-controlled outside rear-view mirror switch p. 6-09
9. Fuse block lid p. 10-20
10. Bonnet release lever p. 10-03
11. Steering wheel height adjustment p. 6-07
12. Steering control switch (for Bluetooth ®
2.0 interface)* p. 7-51
13. Fuel tank filler door release lever p. 2-03
14. Headlamp levelling switch* p. 5-40 Automatic high-beam switch* p. 5-36
15. Sonar cancel switch* p. 6-57
16. Active stability control switch p. 6-44
17. Audio switch* p. 7-24
18. Combination headlamps and dipper switch p. 5-34 Turn-signal lever p. 5-42
Headlamp washer switch* p. 5-48
19. Hazard warning flasher switch p. 5-42
Instruments and Controls (Driver’s area)
1-03OVWE16E1Overview1RHD
Page 43 of 404
SeatsE004001008201- Front seats
lTo adjust forward or backward
® p. 4-05
l To recline the seatback
® p. 4-06
l To adjust seat cushion height
® p. 4-07
l Lumbar support adjustment (Power type, driver’s seat)
® p. 4-08
l Armrest
® p. 4-08
l To get in and out of the rear seat (3-door models, passenger’s seat)
® p. 4-08
l Heated seats*
® p. 4-09
Seats
4-02OVWE16E1Seat and seat belts4
Page 46 of 404

Seat adjustmentE00400300314
Adjust the driver’s seat so that you are com- fortable and that you can reach the pedals,
steering wheel, switches etc. while retaining a clear field of vision.WARNINGl Do not attempt to adjust the seat while
driving. This can cause loss of vehicle con- trol and result in an accident. After ad-
justments are made, ensure the seating is locked in position by attempting to move
the seat forward and rearward without
using the adjusting mechanism.
l Do not allow people or children to ride in
any area of your vehicle that is not equip- ped with seats and seat belts, and make
sure that everyone travelling in your vehi- cle is in a seat and wearing a seat belt, or
in the case of a child is strapped in a child restraint.
l To minimize the risk of personal injury in
the event of a collision or sudden braking,the seatbacks should always be in the al-
most upright position while the vehicle is in motion. The protection provided by theseat belts may be reduced significantly
when the seatback is reclined. There is greater risk that the passenger will slide
under the seat belt, resulting in serious in- jury, when the seatback is reclined.CAUTIONl Make sure the seat is adjusted by an adult or
with adult supervision for correct and safe operation.
l Do not place a cushion or the like between
your back and the seatback while driving.The effectiveness of the head restraints will
be reduced in the event of an accident.
l When sliding the seats, be careful not to
catch your hand or foot.Front seats
E00400400100To adjust forward or back-
ward
E00400500055
Manual type
Pull the seat adjusting lever and adjust the seat forward or backward to the desired posi-tion, and release the adjusting lever.
WARNINGl To ensure the seat is locked securely, try
to move the seat forward or backward
without using the adjusting lever.
Seat adjustment
4-05OVWE16E1Seat and seat belts4
Page 49 of 404

3- To move the whole seat cushion up and
down
Lumbar support adjustment
(Power type, driver’s seat)
E00400800032
A lumbar support adjustment is located in the seatback of the driver’s seat. To adjust the
lumbar support, operate the switch as indica-
ted by arrows.
1- Strong
2- Weak
NOTEl To prevent the battery from running down,
operate the power seat with the engine run-ning.Armrest
E00400900118
Slide forward the centre console lid while
pressing the right upper lever (A).
To get in and out of the rear
seat (3-door models, passen- ger’s seat)
E00401000044
The lever can be used to make getting in and out easier.
Pull up the lever (A) or depress the pedal (B),
tilt the seatback forward. Then slide the en-
tire seat forward. To return the seat, raise the seatback, then slide the entire seat backward until there is a “click” in a locked position.
Adjust the seat position.WARNINGl Do not drive the vehicle with the seatback
folded forward. The seat is not retainedwith the seatback in this position, so seri- ous injuries could be suffered in the event
of hard braking or a collision.
Front seats
4-08OVWE16E1Seat and seat belts4
Page 129 of 404

Headlamp levellingE00517400015Headlamp levelling switch*
E00517501895
Except for vehicles with dis-
charge headlamps
The angle of the headlamp beam varies de- pending on the load carried by the vehicle.The headlamp levelling dial can be used to
adjust the headlamp illumination distance (when the lower beam is illuminated) so that
the headlamps’ glare does not distract other drivers.
Set the dial according to the following table.
LHDRHD
CAUTIONl Always perform adjustments before driving.
Do not attempt to adjust while driving, as it could cause an accident.NOTEl When adjusting the beam position, first put
the dial in the “0” position (the highest beamposition).
3-door models
Except for vehicles with only the front
seats
Vehicle conditionSwitch position“0”“0”“2”Vehicle conditionSwitch position“3”“4”●:1 person:Full luggage loadingSwitch position 0-Driver only/ Driver + 1
front passengerSwitch position 2-5 passengers (including
driver)Switch position 3-5 passengers (including
driver) + Full luggage loadingSwitch position 4-Driver + Full luggageloading
Vehicles with only the front seats
Vehicle conditionSwitch position“0”
Headlamp levelling
5-40OVWE16E1Instruments and controls5
