2016 MITSUBISHI OUTLANDER SPORT instrument cluster
[x] Cancel search: instrument clusterPage 2 of 398
Instruments and controls 1-1
1
Overview
N00100202560
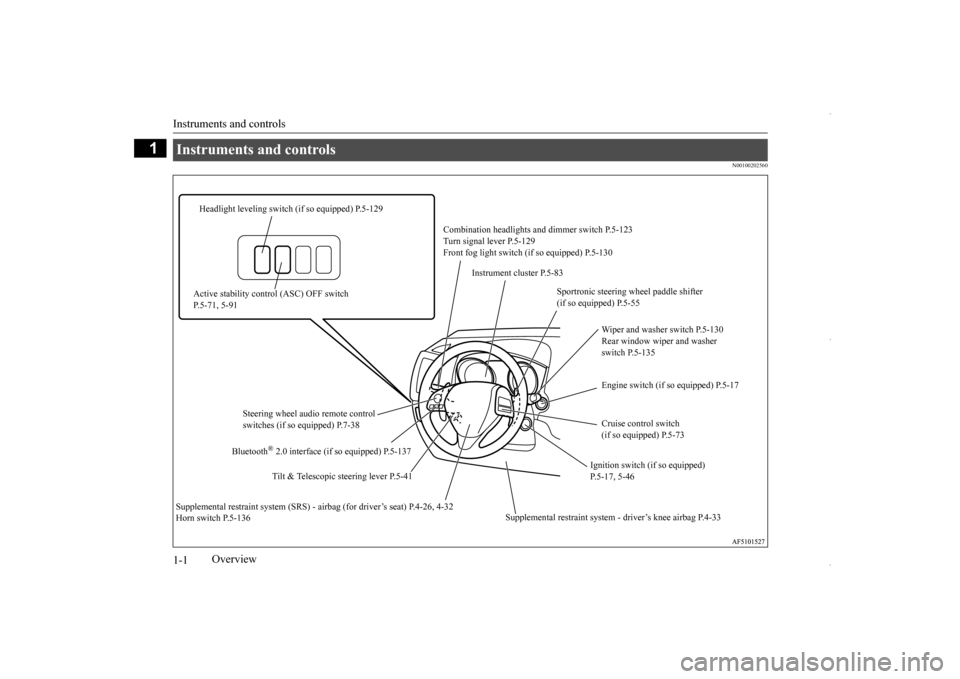
Instruments and controls
Combination headlights
and dimmer switch P.5-123
Turn signal lever P.5-129 Front fog light switch (if so equipped) P.5-130
Headlight leveling switch (if so equipped) P.5-129
Instrument cluster P.5-83
Active stability control (ASC) OFF switch P.5-71, 5-91
Sportronic steering wheel paddle shifter (if so equipped) P.5-55
Wiper and washer switch P.5-130 Rear window wiper and washer switch P.5-135 Engine switch (if so equipped) P.5-17
Steering wheel audio remote control switches (if so equipped) P.7-38
Cruise control switch (if so equipped) P.5-73
Tilt & Telescopic steering lever P.5-41
Ignition switch (if so equipped) P.5-17, 5-46
Bluetooth
® 2.0 interface (if so
equipped) P.5-137
Supplemental restraint system
- driver’s knee airbag P.4-33
Supplemental restraint system (SRS) - ai
rbag (for driver’s seat) P.4-26, 4-32
Horn switch P.5-136BK0229600US.bo
ok 1 ページ 2015年10月1日 木曜日 午後2時29分
Page 63 of 398
5
Features and controlsBreak-in recommendation
s ..............................................................5-3
Keys ..........................................
.......................................................5-3
Electronic immobilizer (Anti-thef
t starting system) ........................5-4
Keyless entry system (if so equipped) ..............................................5-7Free-hand Advanced Security Transmitter (F.A.S.T.-key) (if so equipped)
.................................................
........................5-12
Door locks .......................
...............................................................5-28
Power door locks ............
...............................................................5-30
Child safety locks for r
ear door .....................................................5-31
Liftgate ......................................
.....................................................5-32
Inside liftgate releas
e .............................................
........................5-33
Theft-alarm system
................................................
........................5-34
Power window control
...........................................
........................5-37
Sunshade (if so equi
pped)..............................................................5-39
Parking brake ..................
...............................................................5-40
Steering wheel height and reach adjustment ..................................5-41Inside rearview mirro
r ...........................................
........................5-42
Outside rearview mirr
ors ...............................................................5-44
Ignition switch ......
.................................................
........................5-46
Starting the engine
.................................................
........................5-47
Manual transaxle (if so equipped) .................................................5-49 Continuously variable transmission
(CVT) (if so equipped).........5-51
Electronically controlled 4WD system (if so equipped)................5-584-wheel drive operation
.........................................
........................5-60
Inspection and maintenance following rough road operation ........5-63 Cautions on the handling of 4-wheel drive vehicles ......................5-63Service brake ..................
...............................................................5-64
Hill start assist .......
.................................................
........................5-65
Brake assist system
...............................................
......................... 5-66
Anti-lock braking syst
em .....................................
......................... 5-67
Electric power steering syst
em (EPS) ........................................... 5-69
Active stability control
(ASC) ....................
................................... 5-70
Cruise control (if so eq
uipped) ...................................................... 5-73
Tire pressure monitoring
system ................................................... 5-77
Rear-view camera (if so eq
uipped) ................................................ 5-81
Instrument cluster
.................................................
......................... 5-83
Multi-information disp
lay ....................................
......................... 5-85
Indicator light, warning light, and information screen disp
lay list ................................................. 5-106
Indicators .................................
.................................................... 5-119
Warning lights ................
.................................................
............. 5-120
Information screen disp
lay ...................................
....................... 5-121
Combination headlights and dimmer switch ............................... 5-123 Headlight leveling switch (if so equipped).................................. 5-129Turn signal lever ..
.................................................
....................... 5-129
Hazard warning flasher
switch .................................................... 5-130
Front fog light switch (if
so equipped) ........................................ 5-130
Wiper and washer swit
ch ......................................
....................... 5-130
Electric rear window def
ogger switch ......................................... 5-136
Horn switch .............................
.................................................... 5-136
Link System (if so equi
pped) .....................
................................. 5-137
Bluetooth
® 2.0 interface (if so
equipped)..................................... 5-137
USB input terminal (if so
equipped) ........................................... 5-160
Sun visors ......................
.................................................
............. 5-163
12 V power outlets .........
.................................................
............. 5-164
HomeLink
® Wireless Control System (if so equipped) ............... 5-165
BK0229600US.bo
ok 1 ページ 2015年10月1日 木曜日 午後2時29分
Page 102 of 398
Parking brake 5-40 Features and controls
5
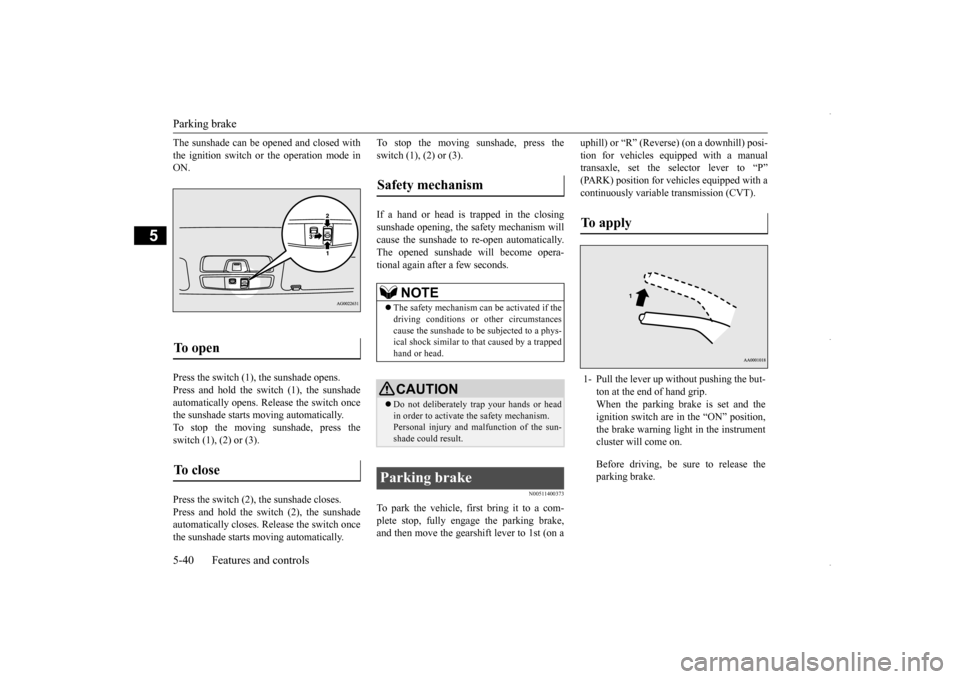
The sunshade can be opened and closed with the ignition switch or the operation mode in ON. Press the switch (1), the sunshade opens. Press and hold the switch (1), the sunshade automatically opens. Release the switch once the sunshade starts moving automatically.To stop the moving sunshade, press the switch (1), (2) or (3). Press the switch (2), the sunshade closes. Press and hold the switch (2), the sunshade automatically closes. Release the switch oncethe sunshade starts moving automatically.
To stop the moving sunshade, press the switch (1), (2) or (3). If a hand or head is trapped in the closing sunshade opening, the safety mechanism will cause the sunshade to re-open automatically. The opened sunshade will become opera-tional again after a few seconds.
N00511400373
To park the vehicle, first bring it to a com-plete stop, fully engage the parking brake, and then move the gearshift lever to 1st (on a
uphill) or “R” (Reverse) (on a downhill) posi- tion for vehicles equipped with a manual transaxle, set the selector lever to “P” (PARK) position for vehicles equipped with acontinuously variable transmission (CVT).
To open
To close
Safety mechanism
NOTE
The safety mechanism can be activated if the driving conditions or other circumstances cause the sunshade to be subjected to a phys-ical shock similar to that caused by a trapped hand or head.CAUTION Do not deliberately trap your hands or head in order to activate the safety mechanism. Personal injury and malfunction of the sun- shade could result.
Parking brake
To apply 1- Pull the lever up without pushing the but-
ton at the end of hand grip. When the parking brake is set and the ignition switch are in the “ON” position,the brake warning light in the instrument cluster will come on. Before driving, be sure to release the parking brake.
BK0229600US.bo
ok 40 ページ 2015年10月1日 木曜日 午後2時29分
Page 145 of 398
Instrument cluster
Features and controls 5-83
5
N00519000388
• When there is an upward slope at the back. (Case 2)CAUTION
Case 1 A- Actual objects B- Objects shown on the screenCase 2 A- Actual objects B- Objects shown on the screen
CAUTION The reference lines for distance and vehicle width are intended to indicate the distance to a flat object such as a level, flat road surface. They may not indicate correct distance depending on the shape of an obstacle.For example, when there is an object behind the vehicle that has upper sections projecting in the direction of the vehicle, the referencelines on the screen will indicate that point A is the farthest point a
nd point B is the closest
point to the vehicle. In reality, point A and Bare actually the same distance from the vehi- cle, and point C is farther off than point A and B.NOTE
Mirror image is displayed on the screen. Monitor brightness is adjusted automatically by sensors.
On vehicles equipped with Mitsubishi Multi- Communication System, it is possible to change the display language of the screen. For details, please refer to the separated owner’s manual. Under certain circumstances, it may become difficult to see an image on the screen, evenwhen the system is functioning correctly. • In a dark area, such as at night. • When water drops or condensation are on the lens. • When sun light or headlights shine directly into the lens.
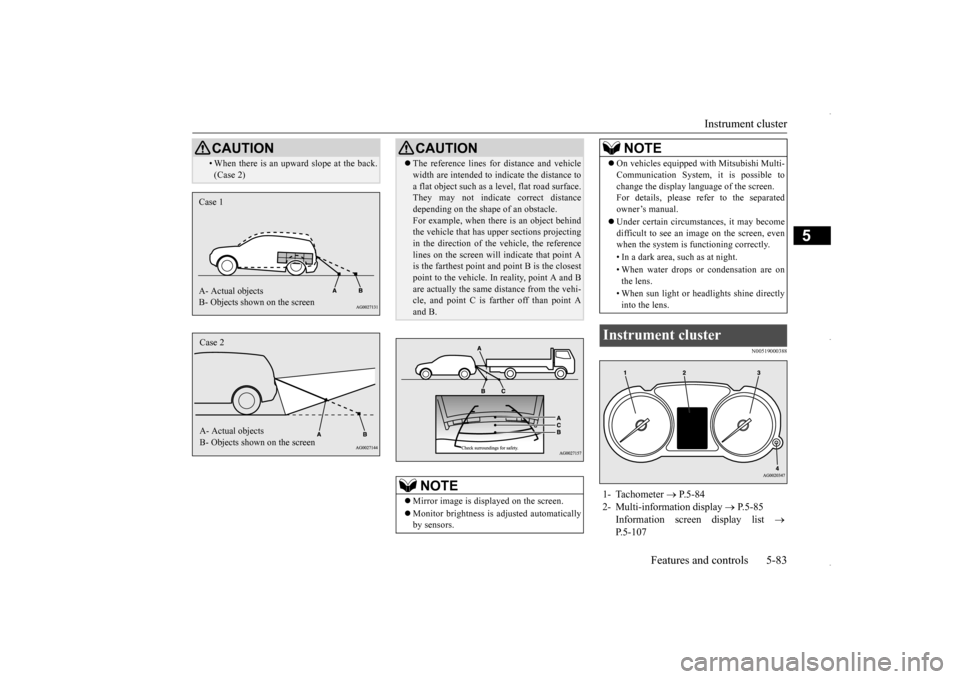
Instrument cluster 1- Tachometer
P.5-84
2- Multi-information display
P.5-85
Information screen display list
P.5-107NOTE
BK0229600US.bo
ok 83 ページ 2015年10月1日 木曜日 午後2時29分
Page 146 of 398
Instrument cluster 5-84 Features and controls
5
N00519100259
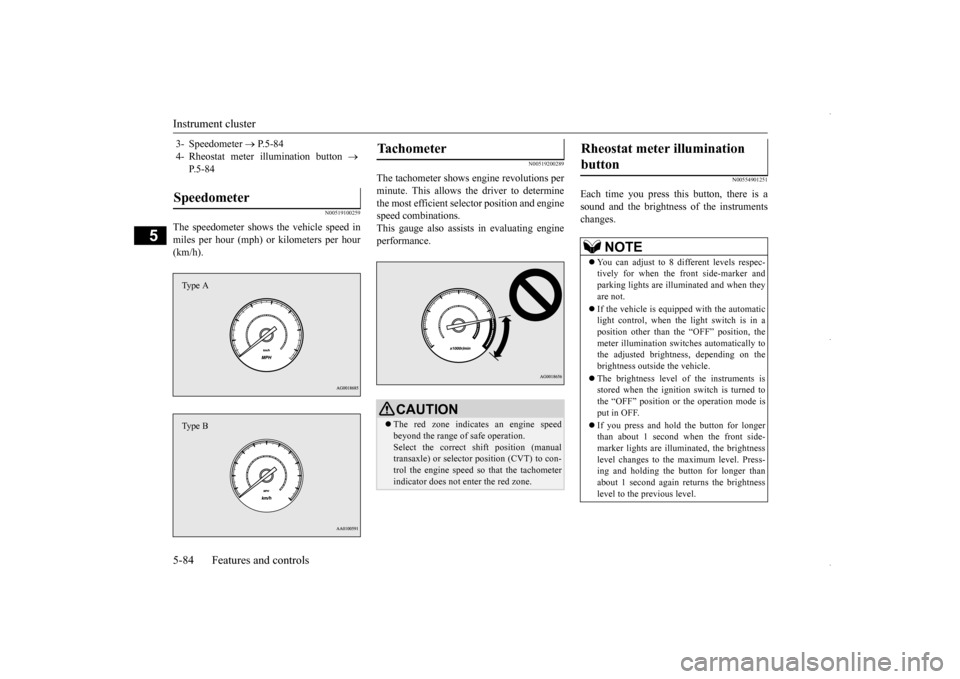
The speedometer shows the vehicle speed in miles per hour (mph) or kilometers per hour (km/h).
N00519200289
The tachometer shows engine revolutions perminute. This allows the driver to determinethe most efficient selector position and engine speed combinations. This gauge also assists in evaluating engineperformance.
N00554901251
Each time you press this button, there is asound and the brightness of the instruments changes.
3- Speedometer
P.5-84
4- Rheostat meter illumination button
P.5-84
Speedometer Type AType B
Tachometer
CAUTION The red zone indicates an engine speed beyond the range of safe operation. Select the correct shift position (manual transaxle) or selector position (CVT) to con-trol the engine speed so that the tachometer indicator does not enter the red zone.
Rheostat meter illumination button
NOTE
You can adjust to 8 different levels respec- tively for when the front side-marker and parking lights are illuminated and when they are not. If the vehicle is equipped with the automatic light control, when the light switch is in aposition other than the “OFF” position, the meter illumination switches automatically to the adjusted brightness, depending on thebrightness outside the vehicle. The brightness level of the instruments is stored when the ignition switch is turned to the “OFF” position or the operation mode is put in OFF. If you press and hold the button for longer than about 1 second when the front side-marker lights are illuminated, the brightness level changes to the maximum level. Press- ing and holding the button for longer than about 1 second again returns the brightness level to the previous level.
BK0229600US.bo
ok 84 ページ 2015年10月1日 木曜日 午後2時29分
Page 184 of 398

Information screen display 5-122 Features and controls
5
Ty p e 2 This warning is displayed if the vehicle is being driven with the parking brake still applied. The warning light in the instrumentcluster only comes on when the parking brake is applied. Ty p e 1 Ty p e 2
When the ignition switch is turned to the “ON” position or the operation mode is put in ON, if the brake fluid is low, this warning is displayed.The warning light in the instrument cluster also illuminates.
N00558600103
Ty p e 1 Ty p e 2 If there is a fault in the charging system, the warning display warning is displayed on theinformation screen in the multi-information display. The warning light in the instrument cluster also illuminates.
CAUTION If a vehicle is driven without releasing the parking brake, the brakes will overheat,resulting in ineffective braking and possible brake failure. If this warning is displayed, release the park- ing brake.
CAUTION If this warning stays on and does not go out while driving, there is a danger of ineffective braking. If this happens, park the vehicle in a safe place, and contact an authorizedMitsubishi Motors dealer or a repair facility of your choice. If the brake warning display, brake warning light, and the Anti-lock braking system warning light are illuminated at the sametime, the braking force distribution function will not operate, so the vehicle may be desta- bilized during sudden braking. Avoid suddenbraking and high-speed driving. Park the vehicle in a safe place, and contact an autho- rized Mitsubishi Motors dealer or a repairfacility of your choice. The vehicle should be brought to a halt in the following manner when brake performance is deteriorated.• Confirm that the vehicle slows down when you press down on the brake pedal harderthan usual. In some cases, the brake pedal may go all the way to the floor.
• Should the brakes fail, use engine brakingto reduce your speed and slowly apply the parking brake. Depress the brake pedal to illuminate the stop lights to alert the vehicles behind you.
Charging system warning dis- play
CAUTION
BK0229600US.book
122 ページ 2015年10月1日 木曜日 午後2時29分
Page 189 of 398
![MITSUBISHI OUTLANDER SPORT 2016 3.G Owners Manual Combination headlights and dimmer switch
Features and controls 5-127
5
[When using the F.A.S.T.-key to start the engine] If the driver’s door is opened with the opera- tion mode is put in OFF or AC MITSUBISHI OUTLANDER SPORT 2016 3.G Owners Manual Combination headlights and dimmer switch
Features and controls 5-127
5
[When using the F.A.S.T.-key to start the engine] If the driver’s door is opened with the opera- tion mode is put in OFF or AC](/manual-img/19/7549/w960_7549-188.png)
Combination headlights and dimmer switch
Features and controls 5-127
5
[When using the F.A.S.T.-key to start the engine] If the driver’s door is opened with the opera- tion mode is put in OFF or ACC, or if theoperation mode is changed to OFF while the lights are on, the tone will sound to remind you to turn off the lights. In either case, the lights will turn off automat- ically and so will the tone. Or you can turnthe light switch to the
“OFF” position to stop
the tone.
N00549900142
To change the headlights from high beam to low beam and vice versa, pull the turn signal lever to (1). Switch the headlights to lowbeam as a courtesy whenever there are oncoming vehicles, or when there is traffic moving ahead of you. An illuminated bluelight in the instrument cluster indicates when the headlights are on high beam.
N00550000185
You can flash the high beams by pulling the lever gently toward you (2). The lights willgo back to normal when you let go. While the high beam is on, you will see a blue light on the instrument panel.
N00563201191
This function turns on the front side-markerand parking lights for about 30 seconds afterthe UNLOCK button (A) on the remote con- trol transmitter is pressed when the combina- tion headlights and dimmer switch is in the“OFF” or “AUTO” position (for vehicles equipped with the automatic light control). On vehicles equipped with the automatic lightcontrol, the welcome light function will oper-ate only when it is dark outside the vehicle.
Dimmer (high/low beam change)
Headlight flasher
NOTE
You can flash the high beams by pulling the lever toward you, even if the light switch isoff. If you turn the lights off with the head lights set to high-beam illumination, the headlights are automatically returned to their low-beam setting when the light switch is next turned to the “ ” position.
Welcome light
NOTE
While the welcome light function is operat- ing, perform one of the following operationsto cancel the function.
BK0229600US.book
127 ページ 2015年10月1日 木曜日 午後2時29分
Page 191 of 398
Headlight leveling switch (if so equipped)
Features and controls 5-129
5
N00537100105
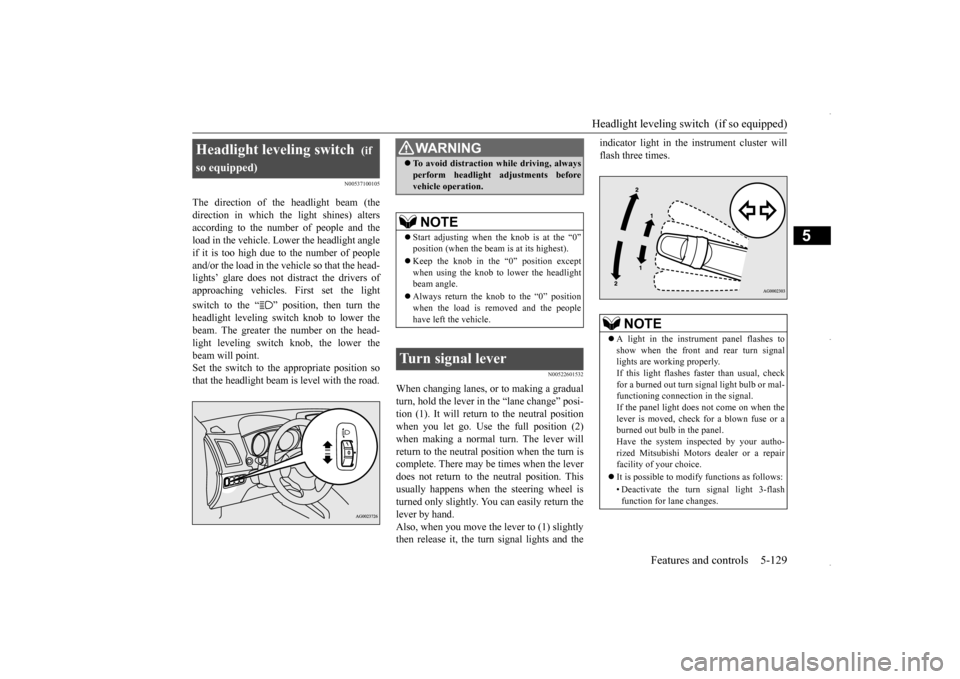
The direction of the headlight beam (the direction in which the light shines) alters according to the number of people and the load in the vehicle. Lower the headlight angleif it is too high due to the number of people and/or the load in the vehicle so that the head- lights’ glare does not distract the drivers ofapproaching vehicles. First set the light switch to the “ ” position, then turn the headlight leveling switch knob to lower the beam. The greater the number on the head- light leveling switch knob, the lower thebeam will point. Set the switch to the appropriate position so that the headlight beam is level with the road.
N00522601532
When changing lanes, or to making a gradual turn, hold the lever in
the “lane change” posi-
tion (1). It will return to the neutral positionwhen you let go. Use the full position (2) when making a normal turn. The lever will return to the neutral position when the turn iscomplete. There may be times when the lever does not return to the neutral position. This usually happens when the steering wheel isturned only slightly. You can easily return the lever by hand. Also, when you move the lever to (1) slightlythen release it, the turn signal lights and the
indicator light in the instrument cluster will flash three times.
Headlight leveling switch
(if
so equipped)
WA R N I N G To avoid distraction while driving, always perform headlight adjustments before vehicle operation.NOTE
Start adjusting when
the knob is at the “0”
position (when the beam is at its highest). Keep the knob in the “0” position except when using the knob to lower the headlightbeam angle. Always return the knob to the “0” position when the load is removed and the people have left the vehicle.
Turn signal lever
NOTE
A light in the instrument panel flashes to show when the front and rear turn signal lights are working properly. If this light flashes faster than usual, checkfor a burned out turn signal light bulb or mal- functioning connection in the signal. If the panel light does not come on when thelever is moved, check for a blown fuse or a burned out bulb in the panel. Have the system inspected by your autho-rized Mitsubishi Motors dealer or a repair facility of your choice. It is possible to modify functions as follows: • Deactivate the turn signal light 3-flash function for lane changes.
BK0229600US.book
129 ページ 2015年10月1日 木曜日 午後2時29分