2016 MITSUBISHI OUTLANDER SPORT brake
[x] Cancel search: brakePage 206 of 398

Bluetooth® 2.0 interface (if so equipped) 5-144 Features and controls
5
3. If you have completed a speaker enroll- ment process once already, the voice guide will say either “Enrollment is enabled. Would you like to disable orretrain?” or “Enrollment is disabled. Would you like to enable or retrain?” 4. When enrollment is “enabled,” the voicemodel is on; when enrollment is “dis- abled,” the voice model is off. Say the command that fits your needs. Say “Retrain” to start the speaker enroll-ment process and recreate a new voice model. (Refer to “Speaker enrollment” on page 5-142.)
N00565001311
Before you can make or receive hands-free calls or play music using the Bluetooth
® 2.0
interface function, you must pair the Blue- tooth
® device and Bluetooth
® 2.0 interface.
Up to 7 Bluetooth
® devices can be paired
with the Bluetooth
® 2.0 interface.
If multiple paired Bluetooth
® devices are
available in the vehicle, the cellular phone or music player most recently connected is auto- matically connected to the Bluetooth
® 2.0
interface. You can also change a Bluetooth
® device to
be connected. To pair a Bluetooth
® device with the Blue-
tooth
® 2.0 interface, use either one of the fol-
lowing 2 methods (Type 1 or Type 2).
1. Stop your vehicle in a safe area, put the gearshift lever in the “N” (Neutral) posi- tion (manual transaxle), or the selectorlever in the “P” (PARK) position (contin- uously variable transmission (CVT)), and pull the parking brake lever. 2. Press the SPEECH button (except for vehicles with Mitsubishi Multi-Commu- nication System) or PICK-UP button (forvehicles with Mitsubishi Multi-Commu- nication System). 3. Say “Setup.”4. Say “Pairing Options.”5. The voice guide will say “Select one of the following: pair, edit, delete, or list.” Say “Pair.”
® 2.0
interface and Bluetooth
® device
NOTE
Pairing is required only when the device is used for the first time. Once the device has been paired with the Bluetooth
® 2.0 inter-
face, all you need is
to bring the device into
the vehicle next time and the device will connect to the Bluetooth
® 2.0 interface auto-
matically (if supported by the device). The device must have Bluetooth
® turned ON to
connect.
To p a i r
Pairing procedure- Type 1
(if so
equipped)NOTE
You cannot pair any Bluetooth
® device with
the Bluetooth
® 2.0 interface unless the vehi-
cle is parked. Before pairing a Bluetooth
®
device with the Bluetooth
® 2.0 interface,
confirm that the vehicle is parked in a safe location.
BK0229600US.book
144 ページ 2015年10月1日 木曜日 午後2時29分
Page 208 of 398

Bluetooth® 2.0 interface (if so equipped) 5-146 Features and controls
5
1. Stop your vehicle in a safe area, put the gearshift lever in the “N” (Neutral) posi- tion (manual transaxle), or the selectorlever in the “P” (PARK) position (contin- uously variable transmission (CVT)), and pull the parking brake lever. 2. Press the SPEECH button (except for vehicles with Mitsubishi Multi-Commu- nication System) or PICK-UP button (forvehicles with Mitsubishi Multi-Commu- nication System). 3. Say “Pair Device.”
4. The voice guide will say “Start pairing procedure on the device. See the devicemanual for instructions.” and then willsay “The pairing code is
5. Enter in the Bluetooth
® device the 4-digit
number that has been read out in Step 4.
Pairing procedure- Type 2
(if so
equipped)NOTE
You cannot pair any Bluetooth
® device with
the Bluetooth
® 2.0 interface unless the vehi-
cle is parked. Before pairing a Bluetooth
®
device with the Bluetooth
® 2.0 interface,
confirm that the vehicle is parked in a safe location.
NOTE
The following procedure ( to ) can also be used instead of saying “Pair Device.” Replace this step 3 with the following proce- dure if you prefer. Say “Setup.” Say “Pairing Options.” The voice guide will say “Select one of the following: pair, edit, delete, or list.” Say “Pair.” voice guide will say “Maximum devicespaired” and then the system will end the pairing process. To register a new device, delete one device and then repeat the pairing process. (Refer to “Selecting a device: Deleting adevice” on page 5-147.)NOTE
Some Bluetooth
® devices require a specific
pairing code. Please refer to the device man- ual for pairing code requirements and read the next section “If your device requires a specific pairing code” on page 5-147 to setthe pairing code.
The pairing code entered here is only used for the Bluetooth
® connection certification.
Depending on the connection settings of the Bluetooth
® device, this code may have to be
entered each time you connect the Blue- tooth
® device to the Bluetooth
® 2.0 inter-
face. For the default connection settings,refer to the instructions for the device.NOTE
Depending on the Bluetooth
® device, it may
take a few minutes to pair it with the Blue- tooth
® 2.0 interface.
If the Bluetooth
® 2.0 interface cannot recog-
nize the Bluetooth
® device, the voice guide
will say “Pairing has timed out” and the pair- ing process will be cancelled. Confirm that the device you are pairing sup- ports Bluetooth
®, and try pairing it again.
NOTE
BK0229600US.book
146 ページ 2015年10月1日 木曜日 午後2時29分
Page 245 of 398
Floor mat
Driving safety 6-3
6
N00628600046
The original equipmen
t floor mat provided
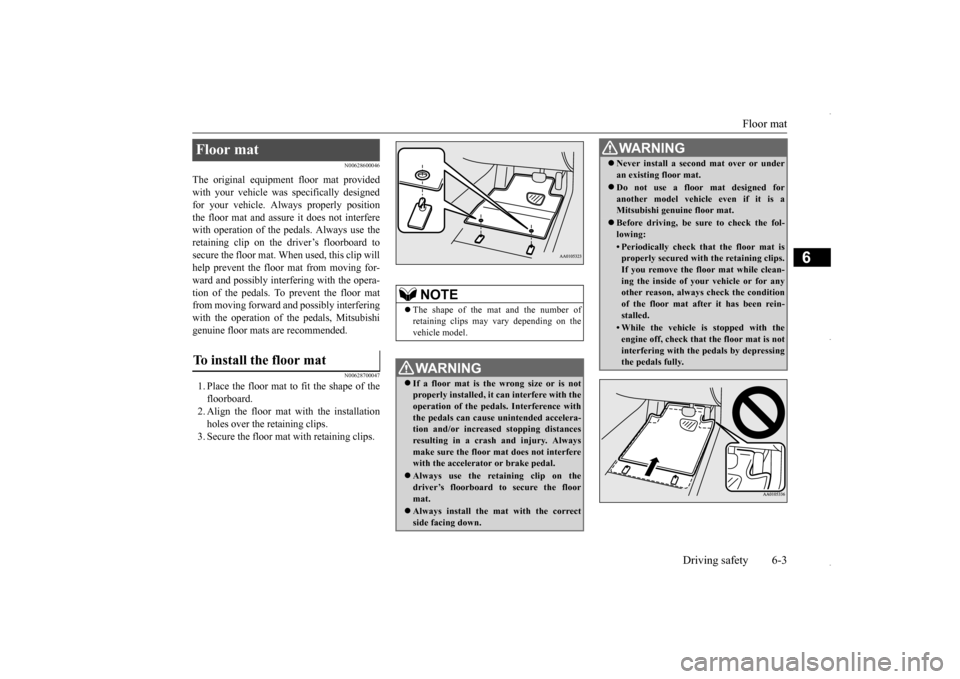
with your vehicle was specifically designedfor your vehicle. Always properly position the floor mat and assure it does not interfere with operation of the pedals. Always use theretaining clip on the driver’s floorboard to secure the floor mat. When used, this clip will help prevent the floor mat from moving for-ward and possibly interfering with the opera-tion of the pedals. To prevent the floor mat from moving forward and possibly interfering with the operation of the pedals, Mitsubishigenuine floor mats are recommended.
N00628700047
1. Place the floor mat to fit the shape of thefloorboard. 2. Align the floor mat with the installation holes over the retaining clips.3. Secure the floor mat with retaining clips.Floor mat To install the floor mat
NOTE
The shape of the mat and the number of retaining clips may vary depending on the vehicle model.WA R N I N G If a floor mat is the wrong size or is not properly installed, it can interfere with the operation of the pedals. Interference with the pedals can cause unintended accelera-tion and/or increased stopping distances resulting in a crash and injury. Always make sure the floor mat does not interferewith the accelerator or brake pedal. Always use the reta
ining clip on the
driver’s floorboard to secure the floor mat. Always install the mat with the correct side facing down.
Never install a second mat over or under an existing floor mat. Do not use a floor mat designed for another model vehicle even if it is aMitsubishi genuine floor mat. Before driving, be sure to check the fol- lowing:• Periodically check that the floor mat isproperly secured with the retaining clips. If you remove the floor mat while clean- ing the inside of your vehicle or for anyother reason, always check the condition of the floor mat after it has been rein- stalled.• While the vehicle is stopped with theengine off, check that the floor mat is notinterfering with the pedals by depressing the pedals fully.WA R N I N G
BK0229600US.bo
ok 3 ページ 2015年10月1日 木曜日 午後2時29分
Page 246 of 398
Vehicle preparation before driving 6-4 Driving safety
6
N00629000669
For a safer and more enjoyable trip, always check for the following: Before starting the vehicle, make certain that you and all passengers are seated and wearing their seat belts properly (with children in the rear seat, in appropriaterestraints), and that all the doors and lift- gate are locked. Move the driver’s seat as far backward as possible, while still keeping good visibil- ity, and good control of the steering wheel, brakes, accelerator, and controls.Check the instrument panel indicators and multi-information display for any possible problem. In the same way, the front passenger seat should also be moved as far back as possi- ble. Make sure that infants and small children are properly restrained in accordance with all laws and regulations.
Check these by selecting the defroster mode, and set the blower switch on high. Youshould be able to feel the air blowing against the windshield. Refer to “Defrosting or defogging (wind-shield, door windows)” on page 7-8, 7-13, 7-18, 7-23. Check all the tires for heavy tread wear or uneven wear patterns. Look for stones, nails, glass, or other objects stuck in the tread. Look for any tread cuts or sidewall cracks. Checkthe wheel nuts for tightness, and the tires (including spare tire) for proper pressure. Replace your tires before they are heavilyworn out. As your vehicle is equipped with a tire pres- sure monitoring system, there is a risk ofdamage to the tire inflation pressure sensors when the tire is replaced on the rim. Tire replacement should, therefore, be performedonly by an authorized Mitsubishi Motors dealer.
Have someone watch while you turn all the exterior lights on and off. Also check the turnsignal indicators and high-beam indicators on the instrument panel. Check the ground under the vehicle after parking overnight, for fuel, water, oil, or other leaks. Make sure all the fluid levels are correct. Also, if you can smell fuel, you needto find out why immediately and have it fixed.
N00629200094
Even this vehicle’s safety equipment, andyour safest driving, cannot guarantee that you can avoid an accident or injury. However, ifyou give extra attention to the following areas, you can better protect yourself and your passengers: Drive defensively. Be aware of traffic, road and weather conditions. Leave plenty of stopping distance between your vehicle and the vehicle ahead.
Vehicle preparation before driving Seat belts and seats
Defrosters Tires
Lights Fluid leaks Safe driving techniques
BK0229600US.bo
ok 4 ページ 2015年10月1日 木曜日 午後2時29分
Page 247 of 398
Driving during cold weather
Driving safety 6-5
6
Before changing lanes, check your mir- rors and use your turn-signal light. While driving, watch the behavior of other drivers, bicyclists, and pedestrians. Always obey applicable laws and regula- tions. Be a polite and alert driver. Always leave room for unexpected events, such assudden braking. If you plan to drive in another country, obey their vehicle registration laws andmake sure you will be able to get the rightfuel.
N00629400461
Check the battery. At the same time, check the terminals and wiring. During extremely cold weather, the battery will not be as strong. Also, the battery powerlevel may drop because more power is used for cold starting and driving. Before driving the vehicle, check to see ifthe engine runs at the proper speed and if the headlights are as bright as normally. Charge or replace the battery if necessary.During extreme cold weather, it is possi- ble that a very low battery could freeze.
Warm the engine sufficiently. After start- ing the engine, allow a short warm-up time to distribute oil to all cylinders. Then drive your vehicle slowly. Stay at low speeds at first so that the transaxle, transfer case and rear axle oil have time to spread to all the lubricationpoints. Manual transaxle can be harder to shift in cold weather conditions. This is normaland shifting will get easier as the transaxle warms up. Check the engine antifreeze. If there is not enough coolant because of a leak or from engine overheating, add Mitsubishi Motors Genuine Super LongLife Coolant Premium or equivalent. Please read this section in conjunction with the “Engine coolant” on page 9-7.
N00629500491
All the parts of the brake system are criticalto safety. Have the vehicle serviced by anauthorized Mitsubishi Motors dealer or a repair facility of your choice at regular inter- vals according to the “WARRANTY ANDMAINTENANCE MANUAL”. Check the brake system while driving at a low speed immediately after starting, espe- cially when the brakes are wet, to confirm they work normally.A film of water can be formed on the brake discs and prevent normal braking after driv- ing in heavy rain or through large puddles, orafter the vehicle is wash
ed. If this occurs, dry
the brakes out by driving slowly while lightly depressing the brake pedal.
Driving during cold weather
WA R N I N G The battery gives off explosive hydrogen gas. Any spark or flame can cause the bat- tery to explode, which could cause serious injury or death. Always wear protective clothes and a facemask when working with your battery, or let a skilled mechanic do it.
WA R N I N G Never open the radiator cap when the radiator is hot. You could be seriously burned.
Braking When brakes are wet
BK0229600US.bo
ok 5 ページ 2015年10月1日 木曜日 午後2時29分
Page 248 of 398
Parking 6-6 Driving safety
6
On snowy roads, ice can form on the braking system, making the brakes less effective.While driving in such
conditions, pay close
attention to preceding and following vehicles and to the condition of
the road surface. From
time to time, lightly depress the brake pedal and check how effective the brakes are. It is important to take advantage of the engine braking by downshifting while driving on steep downhill roads in order to prevent the brakes from overheating.
N00629600304
When parking on a hill, set the parking brake,and turn the front wheels toward the curb on adownhill, or away from the curb on an uphill. If necessary, apply chocks to wheels.
Place the gearshift lever into the “R” (Reverse) position when parking on a down- hill slope, into the 1st position when parkingon an uphill slope. Be sure that the parking brake is firmly set when parked and that the selector lever is in the “P” (PARK) position. When parking on a hill, it is important to setthe parking brake before moving the selector lever to the “P” (PARK) position. This pre- vents loading the parking brake against thetransaxle. When this happens, it is difficult to move the selector lever out of the “P” (PARK) position. Never leave the engi
ne running while you
take a short sleep or rest. Also, never leave the engine running in a closed or poorly ven- tilated place.
Your front bumper can be damaged if you scrape it over curbs or parking stop blocks.Be careful when traveling up or down steep slopes where your bumper can scrape the road. More effort could be required to turn the steering wheel. Refer to “Electric power steering system (EPS)” on page 5-69.
When driving in cold weather When driving downhill Parking Parking on a hill
For vehicles equipped with man- ual transaxle For vehicles equipped with contin- uously variable transmission (CVT) Parking with the engine run- ning
WA R N I N G Leaving the engine running risks injury or death from accidentally moving the gear- shift lever (manual transaxle) or the selec- tor lever (CVT) or from the accumulation of toxic exhaust fumes in the passengercompartment.
Where you park
WA R N I N G Do not park your vehicle in areas where combustible materials such as dry grass or leaves can come in contact with a hotexhaust, since a fire could occur.
Do not keep the steering wheel fully turned for a long time
BK0229600US.bo
ok 6 ページ 2015年10月1日 木曜日 午後2時29分
Page 249 of 398
Loading information Driving safety 6-7
6
Always remove the key from the ignition switch and lock all doors and the liftgatewhen leaving the vehicle unattended. Always try to park your vehicle in a well lit area.
N00629900408
It is very importan
t to know how much
weight your vehicle can carry. This weight is called the vehicle capacity weight andincludes the weight of all occupants, cargo (including the roof load), non-factory- installed options, if any, being towed. The tireand loading information placard located on the driver’s door sill of your vehicle will show how much weight it may properly carry. It is important to fami
liarize yourself with the
following terms before loading your vehicle:
Vehicle maximum load on the tire: load on an individual tire that is determined by distributing to each axle its share of the maximum loaded vehicle weight anddividing by two. Vehicle normal load on the tire: load on an individual tire that is determined bydistributing to each axle its share of the curb weight, accessory weight, and nor- mal occupant weight and dividing by two. Maximum loaded vehicle weight: the sum of - (a) Curb weight; (b) Accessory weight;(c) Vehicle capacity weight; and (d) Production options weight. Curb weight: the weight of a motor vehi- cle with standard equipment including the maximum capacity of fuel, oil, and cool- ant. Accessory weight: the combined weight (in excess of those standard items which may be replaced) of automatic transmis-sion, power steering, power brakes, power windows, power seats, radio, and heater, to the extent that these items are availableas factory- installed equipment (whether installed or not). Vehicle capacity weight: the rated cargo and luggage load plus 150 lbs (68 kg)
*
times the vehicle’s designated seating capacity.
Production options weight: the combined weight of those installed regular produc- tion options weighing over 5 lbs (2.3 kg) in excess of those standard items whichthey replace, not previously considered in curb weight or accessory weight, includ- ing heavy duty brakes, ride levelers, roofrack, heavy duty battery, and special trim. Normal occupant weight: 150 lbs (68 kg)
* times the number of specified
occupants. (In your vehicle the number is3) Occupant distribution: Occupant distribu- tion within the passenger compartment (Inyour vehicle the distribution is 2 in front, 1 in second row seat)
N00630100383
The tire and loading information placard is located on the inside sill of the driver’s door.
When leaving the vehicle Loading information
WA R N I N G Never overload your vehicle. Overloading can damage your vehicle, adversely affect vehicle performance, including handling and braking, cause tire failure, and result in an accident.
* :150 lbs (68 kg) is the weight of one per- son as defined by U.S.A. and Canadian regulations.
Tire and loading information placard
BK0229600US.bo
ok 7 ページ 2015年10月1日 木曜日 午後2時29分
Page 253 of 398
Cargo loads
Driving safety 6-11
6
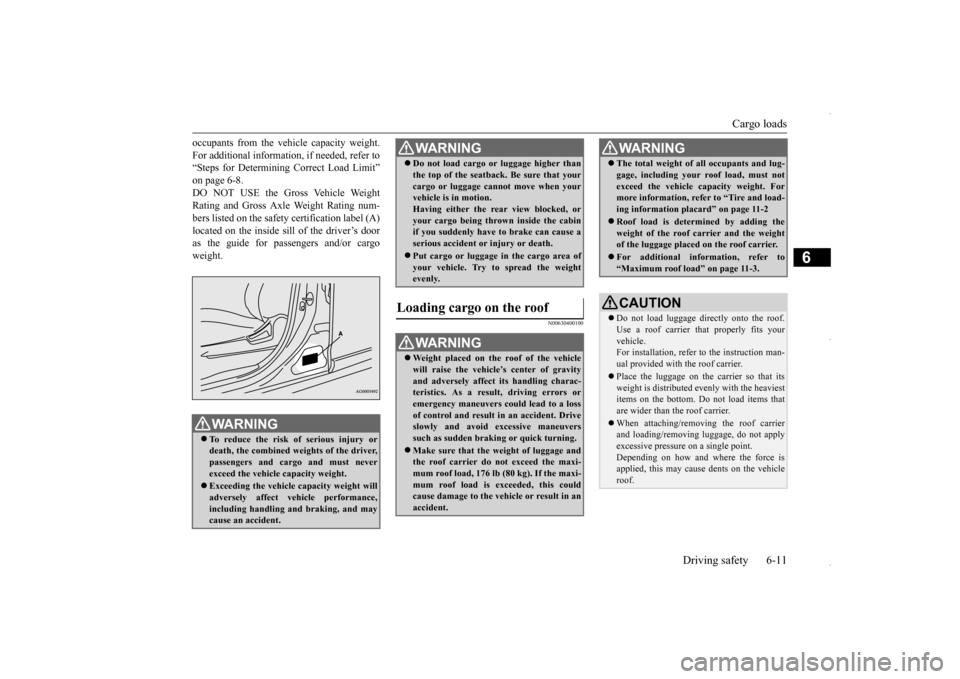
occupants from the vehicle capacity weight. For additional information, if needed, refer to “Steps for Determining Correct Load Limit” on page 6-8.DO NOT USE the Gross Vehicle Weight Rating and Gross Axle Weight Rating num- bers listed on the safety certification label (A)located on the inside sill of the driver’s door as the guide for passengers and/or cargo weight.
N00630400100
WA R N I N G To reduce the risk of serious injury or death, the combined weights of the driver, passengers and cargo and must neverexceed the vehicle capacity weight. Exceeding the vehicle capacity weight will adversely affect vehicle performance, including handling and braking, and may cause an accident.
Do not load cargo or luggage higher than the top of the seatback. Be sure that your cargo or luggage cannot move when your vehicle is in motion. Having either the rear view blocked, oryour cargo being thrown inside the cabin if you suddenly have to brake can cause a serious accident or injury or death. Put cargo or luggage in the cargo area of your vehicle. Try to spread the weightevenly.
Loading cargo on the roof
WA R N I N G Weight placed on the roof of the vehicle will raise the vehicle’s center of gravity and adversely affect its handling charac- teristics. As a result, driving errors oremergency maneuvers could lead to a loss of control and result in an accident. Drive slowly and avoid excessive maneuverssuch as sudden braking or quick turning. Make sure that the weight of luggage and the roof carrier do not exceed the maxi- mum roof load, 176 lb (80 kg). If the maxi-mum roof load is exceeded, this could cause damage to the vehicle or result in an accident.WA R N I N G
The total weight of all occupants and lug- gage, including your roof load, must not exceed the vehicle capacity weight. For more information, refer to “Tire and load- ing information placard” on page 11-2 Roof load is determined by adding the weight of the roof carrier and the weightof the luggage placed on the roof carrier. For additional information, refer to “Maximum roof load” on page 11-3.CAUTION Do not load luggage directly onto the roof. Use a roof carrier th
at properly fits your
vehicle.For installation, refer to the instruction man- ual provided with the roof carrier. Place the luggage on the carrier so that its weight is distributed evenly with the heaviest items on the bottom. Do not load items thatare wider than the roof carrier. When attaching/removing the roof carrier and loading/removing luggage, do not apply excessive pressure on a single point. Depending on how and where the force is applied, this may cause dents on the vehicle roof.WA R N I N G
BK0229600US.bo
ok 11 ページ 2015年10月1日 木曜日 午後2時29分