2016 MITSUBISHI OUTLANDER SPORT headlights
[x] Cancel search: headlightsPage 187 of 398
![MITSUBISHI OUTLANDER SPORT 2016 3.G Owners Manual Combination headlights and dimmer switch
Features and controls 5-125
5
[When the engine is started after the parking brake is released]
[When the engine is not running, or when the engine is started MITSUBISHI OUTLANDER SPORT 2016 3.G Owners Manual Combination headlights and dimmer switch
Features and controls 5-125
5
[When the engine is started after the parking brake is released]
[When the engine is not running, or when the engine is started](/manual-img/19/7549/w960_7549-186.png)
Combination headlights and dimmer switch
Features and controls 5-125
5
[When the engine is started after the parking brake is released]
[When the engine is not running, or when the engine is started before the parking brake is released]
N00532601593
If the following operation is performed with the combination headlights and dim- mer switch in the “ ” or “ ” position, the lights automatically turn off. [Except for vehicles equipped with the F. A . S . T. - k e y ]The ignition switch is
turned to the “OFF”
or “ACC” position or the key is removed from the ignition swit
ch and the driver’s
door is opened.
Vehicles equipped with daytime running lights OFF
The daytime running lights illumi- nated
AUTO
The daytime running lights illumi- nated (when it is light outside the vehicle)Headlights and other lights turn on and off automatically in accordance with outside light level. The daytime running lights illumi- nated Parking, tail, front and rear side- marker lights, license plate and instrument panel lights on Headlights and other lights on
NOTE
Once the daytime running light come on, they do not go out until the ignition switch is turned to the “OFF” or “ACC” position orthe operation mode is changed to OFF or ACC.
OFF All lights off AUTO
Headlights and other lights turn on and off automatically in accordance with outside light level. Parking, tail, front and rear side- marker lights, license plate and instrument panel lights on Headlights and other lights on
NOTE
Even if the daytime running lights are not on, they will come on once the vehicle starts moving. Once the daytime running light come on, they do not go out until the ignition switch isturned to the “OFF” or “ACC” position or the operation mode is changed to OFF or ACC. The sensitivity of the automatic on/off con- trol can be adjusted.For further information, please contact your authorized Mitsubishi Motors dealer or a repair facility of your choice.
Do not cover the sensor (A) for the automatic on/off control by affixing a sticker or label to the windshield. If the lights do not turn on or off with the switch in the “AUTO” position, manuallyoperate the switch. Have the system checked by an authorized Mitsubishi Motors dealer or a repair facility of your choice.
Light auto-cutout function (headlights and other lights)
NOTE
BK0229600US.book
125 ページ 2015年10月1日 木曜日 午後2時29分
Page 188 of 398
![MITSUBISHI OUTLANDER SPORT 2016 3.G Owners Manual Combination headlights and dimmer switch 5-126 Features and controls
5
[For vehicles equipped with the F.A.S.T.- key] The operation mode is changed to OFF or ACC and the driver’s door is opened. Whe MITSUBISHI OUTLANDER SPORT 2016 3.G Owners Manual Combination headlights and dimmer switch 5-126 Features and controls
5
[For vehicles equipped with the F.A.S.T.- key] The operation mode is changed to OFF or ACC and the driver’s door is opened. Whe](/manual-img/19/7549/w960_7549-187.png)
Combination headlights and dimmer switch 5-126 Features and controls
5
[For vehicles equipped with the F.A.S.T.- key] The operation mode is changed to OFF or ACC and the driver’s door is opened. When using a key to start the engine • If the driver’s door is opened after the key is removed from the ignition switch, a high-pitched constant tone will soundto remind you to turn off the lights. • If the driver’s door is opened with the key in the ignition switch, a low-pitchedbeep will sound to remind you to removethe key. When using the F.A.S.T.-key to start the engine • If the operation mode is put in OFF andthe driver’s door is opened, a high- pitched constant buzzer will sound to remind you to turn off the lights.• If the operation mode is changed to any mode other than OFF and the driver’s door is opened, a low-pitched constantbuzzer will sound to remind you to put the operation mode in OFF.
If the following operation is performed with the combination headlights and dim- mer switch in the “ ” or “ ” position, the lights automatically turn off afterabout 3 minutes.
[Except for vehicles equipped with the F. A . S . T. - k e y ] The ignition switch is turned to the “OFF” or “ACC” position or the key is removedfrom the ignition switch and the driver’s door is not opened. [For vehicles equipped with the F.A.S.T.- key]The operation mode is changed to OFF or ACC and the driver’s door is not opened.
If the combination headlights and dimmer switch is turned to the “ ” or “ ” posi- tion again after the engine is turned off, theabout 3-minute auto-cutout function described above will not work. The lights (the parking lights, tail lights and license platelights) will stay on and will not turn off auto- matically.
N00549800226
[When using a key to start the engine]If the driver’s door is opened with the key in the “OFF” or “ACC” position or removedfrom the ignition switch while the lights are on, the tone will sound to remind you to turn off the lights.
NOTE
The light auto-cutout function can be deacti- vated. See your authorized Mitsubishi Motors dealer for details.
When you want to keep the lights on:
NOTE
When the engine is started using the key, if the driver’s door is opened and the key is removed, the headlight reminder buzzer intermittently emits a high-pitched sound. If the key is still in the ignition switch the keyreminder buzzer intermittently emits a low- pitched sound. The buzzer stops when the driver’s door isclosed. (A warning is also displayed in the multi-information display.) F.A.S.T.-key, if the driver’s door is opened and the operation mode is put in OFF, theheadlight reminder buzzer intermittently emits a high-pitched sound. If the operation mode is in any mode other than OFF, theoperation mode on reminder buzzer intermit- tently emits a low-pitched sound. The buzzer stops when the driver’s door isclosed. (A warning is also displayed in the multi-information display.)
BK0229600US.book
126 ページ 2015年10月1日 木曜日 午後2時29分
Page 189 of 398
![MITSUBISHI OUTLANDER SPORT 2016 3.G Owners Manual Combination headlights and dimmer switch
Features and controls 5-127
5
[When using the F.A.S.T.-key to start the engine] If the driver’s door is opened with the opera- tion mode is put in OFF or AC MITSUBISHI OUTLANDER SPORT 2016 3.G Owners Manual Combination headlights and dimmer switch
Features and controls 5-127
5
[When using the F.A.S.T.-key to start the engine] If the driver’s door is opened with the opera- tion mode is put in OFF or AC](/manual-img/19/7549/w960_7549-188.png)
Combination headlights and dimmer switch
Features and controls 5-127
5
[When using the F.A.S.T.-key to start the engine] If the driver’s door is opened with the opera- tion mode is put in OFF or ACC, or if theoperation mode is changed to OFF while the lights are on, the tone will sound to remind you to turn off the lights. In either case, the lights will turn off automat- ically and so will the tone. Or you can turnthe light switch to the
“OFF” position to stop
the tone.
N00549900142
To change the headlights from high beam to low beam and vice versa, pull the turn signal lever to (1). Switch the headlights to lowbeam as a courtesy whenever there are oncoming vehicles, or when there is traffic moving ahead of you. An illuminated bluelight in the instrument cluster indicates when the headlights are on high beam.
N00550000185
You can flash the high beams by pulling the lever gently toward you (2). The lights willgo back to normal when you let go. While the high beam is on, you will see a blue light on the instrument panel.
N00563201191
This function turns on the front side-markerand parking lights for about 30 seconds afterthe UNLOCK button (A) on the remote con- trol transmitter is pressed when the combina- tion headlights and dimmer switch is in the“OFF” or “AUTO” position (for vehicles equipped with the automatic light control). On vehicles equipped with the automatic lightcontrol, the welcome light function will oper-ate only when it is dark outside the vehicle.
Dimmer (high/low beam change)
Headlight flasher
NOTE
You can flash the high beams by pulling the lever toward you, even if the light switch isoff. If you turn the lights off with the head lights set to high-beam illumination, the headlights are automatically returned to their low-beam setting when the light switch is next turned to the “ ” position.
Welcome light
NOTE
While the welcome light function is operat- ing, perform one of the following operationsto cancel the function.
BK0229600US.book
127 ページ 2015年10月1日 木曜日 午後2時29分
Page 190 of 398
Combination headlights and dimmer switch 5-128 Features and controls
5
N00547301123
This function turns on the headlights in the low beam setting for about 30 seconds afterthe ignition switch is turned to the “OFF”position or the operation mode is put in OFF.
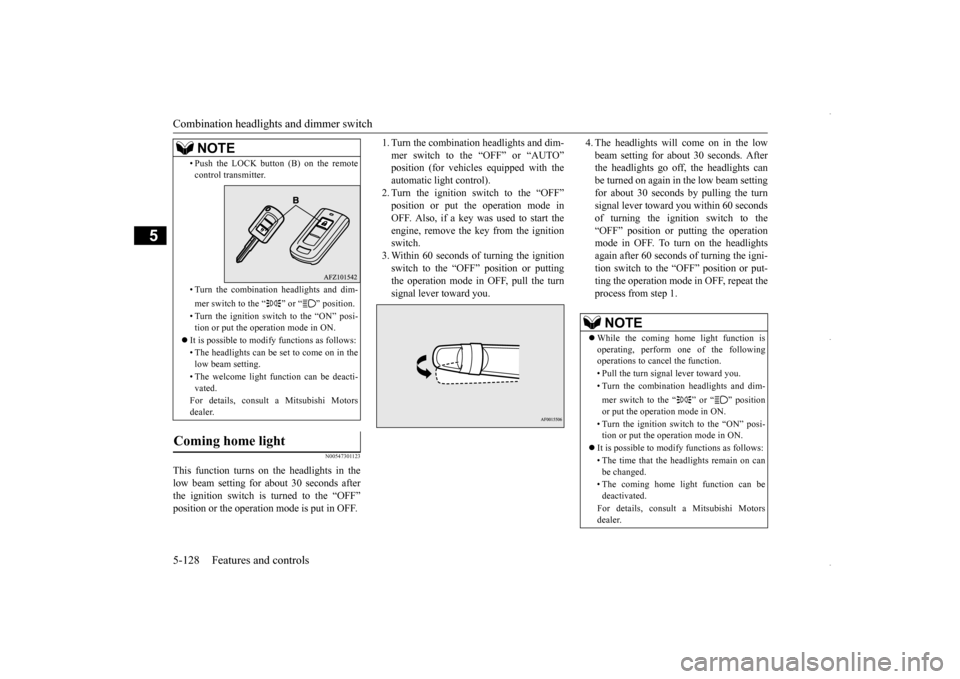
1. Turn the combination headlights and dim- mer switch to the “OFF” or “AUTO” automatic light control).2. Turn the ignition switch to the “OFF” position or put the operation mode in OFF. Also, if a key was used to start theengine, remove the key from the ignition switch. 3. Within 60 seconds of turning the ignitionswitch to the “OFF” position or puttingthe operation mode in OFF, pull the turn signal lever toward you.
4. The headlights will come on in the low beam setting for about 30 seconds. After the headlights go off, the headlights can be turned on again in the low beam settingfor about 30 seconds by pulling the turn signal lever toward you within 60 seconds of turning the ignition switch to the“OFF” position or putting the operation mode in OFF. To turn on the headlights again after 60 seconds of turning the igni-tion switch to the “OFF” position or put-ting the operation mode in OFF, repeat the process from step 1.
• Push the LOCK button (B) on the remote control transmitter. • Turn the combination headlights and dim- mer switch to the “ ” or “ ” position. • Turn the ignition switch to the “ON” posi- tion or put the operation mode in ON.
It is possible to modify functions as follows: • The headlights can be set to come on in the low beam setting. • The welcome light function can be deacti- vated. For details, consult a Mitsubishi Motors dealer.
Coming home light
NOTE
NOTE
While the coming home light function is operating, perform one of the followingoperations to cancel the function. • Pull the turn signal lever toward you.• Turn the combination headlights and dim- mer switch to the “ ” or “ ” position or put the operation mode in ON. • Turn the ignition switch to the “ON” posi- tion or put the operation mode in ON.
It is possible to modify functions as follows: • The time that the headlights remain on can be changed. • The coming home light function can be deactivated. For details, consult a Mitsubishi Motors dealer.
BK0229600US.book
128 ページ 2015年10月1日 木曜日 午後2時29分
Page 192 of 398
Hazard warning flasher switch 5-130 Features and controls
5
N00522700275
If you press the flasher switch, the front and rear turn signals will flash intermittently, and so will the hazard warn
ing lights. This is an
emergency warning system and should not beused when the vehicle is in motion, except for emergencies. If you need to leave your vehicle, the flasherswill keep working after the ignition switch is removed or the operation mode is put in OFF.
N00522800393
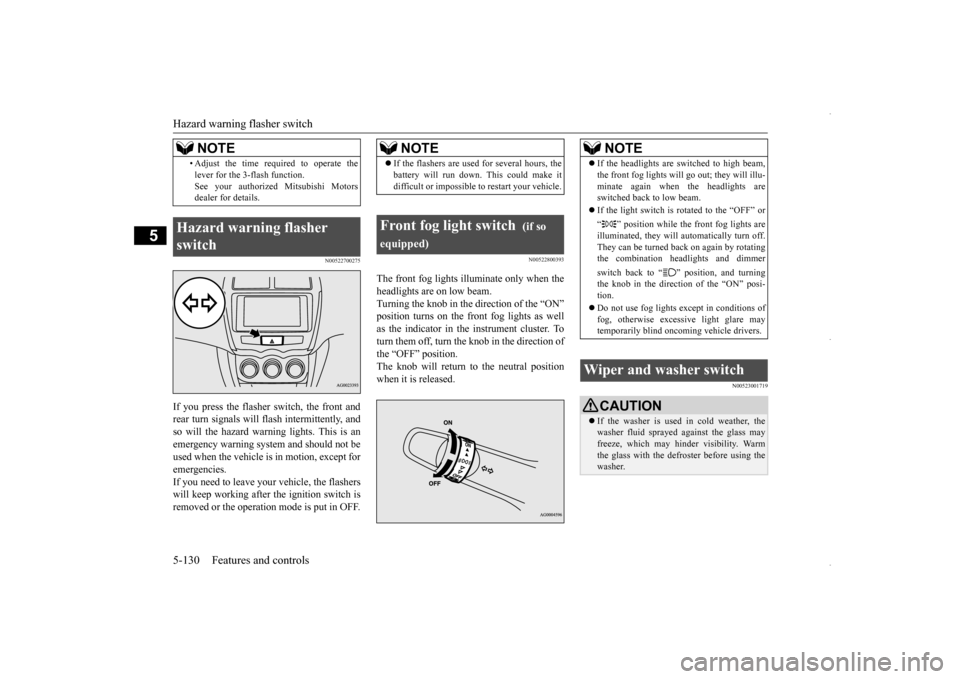
The front fog lights illuminate only when the headlights are on low beam. Turning the knob in the direction of the “ON” position turns on the front fog lights as wellas the indicator in the instrument cluster. To turn them off, turn the knob in the direction of the “OFF” position.The knob will return to the neutral position when it is released.
N00523001719
• Adjust the time required to operate the lever for the 3-flash function. See your authorized Mitsubishi Motors dealer for details.
Hazard warning flasher switch
NOTE
NOTE
If the flashers are used for several hours, the battery will run down. This could make it difficult or impossible to restart your vehicle.
Front fog light switch
(if so
equipped)
NOTE
If the headlights are switched to high beam, the front fog lights will go
out; they will illu-
minate again when the headlights are switched back to low beam. If the light switch is rotated to the “OFF” or “ ” position while the front fog lights are illuminated, they will automatically turn off. They can be turned back on again by rotating the combination headlights and dimmer switch back to “ ” position, and turning the knob in the direction of the “ON” posi- tion. Do not use fog lights except in conditions of fog, otherwise excessive light glare may temporarily blind oncoming vehicle drivers.
Wiper and washer switch
CAUTION If the washer is used in cold weather, the washer fluid sprayed against the glass may freeze, which may hinder visibility. Warmthe glass with the defroster before using the washer.
BK0229600US.book
130 ページ 2015年10月1日 木曜日 午後2時29分
Page 247 of 398
Driving during cold weather
Driving safety 6-5
6
Before changing lanes, check your mir- rors and use your turn-signal light. While driving, watch the behavior of other drivers, bicyclists, and pedestrians. Always obey applicable laws and regula- tions. Be a polite and alert driver. Always leave room for unexpected events, such assudden braking. If you plan to drive in another country, obey their vehicle registration laws andmake sure you will be able to get the rightfuel.
N00629400461
Check the battery. At the same time, check the terminals and wiring. During extremely cold weather, the battery will not be as strong. Also, the battery powerlevel may drop because more power is used for cold starting and driving. Before driving the vehicle, check to see ifthe engine runs at the proper speed and if the headlights are as bright as normally. Charge or replace the battery if necessary.During extreme cold weather, it is possi- ble that a very low battery could freeze.
Warm the engine sufficiently. After start- ing the engine, allow a short warm-up time to distribute oil to all cylinders. Then drive your vehicle slowly. Stay at low speeds at first so that the transaxle, transfer case and rear axle oil have time to spread to all the lubricationpoints. Manual transaxle can be harder to shift in cold weather conditions. This is normaland shifting will get easier as the transaxle warms up. Check the engine antifreeze. If there is not enough coolant because of a leak or from engine overheating, add Mitsubishi Motors Genuine Super LongLife Coolant Premium or equivalent. Please read this section in conjunction with the “Engine coolant” on page 9-7.
N00629500491
All the parts of the brake system are criticalto safety. Have the vehicle serviced by anauthorized Mitsubishi Motors dealer or a repair facility of your choice at regular inter- vals according to the “WARRANTY ANDMAINTENANCE MANUAL”. Check the brake system while driving at a low speed immediately after starting, espe- cially when the brakes are wet, to confirm they work normally.A film of water can be formed on the brake discs and prevent normal braking after driv- ing in heavy rain or through large puddles, orafter the vehicle is wash
ed. If this occurs, dry
the brakes out by driving slowly while lightly depressing the brake pedal.
Driving during cold weather
WA R N I N G The battery gives off explosive hydrogen gas. Any spark or flame can cause the bat- tery to explode, which could cause serious injury or death. Always wear protective clothes and a facemask when working with your battery, or let a skilled mechanic do it.
WA R N I N G Never open the radiator cap when the radiator is hot. You could be seriously burned.
Braking When brakes are wet
BK0229600US.bo
ok 5 ページ 2015年10月1日 木曜日 午後2時29分
Page 367 of 398
Replacement of light bulbs
Vehicle care and maintenance 9-31
9
N00950401672
* : If so equipped
N00901801144
1. Turn the cap (A) counterclockwise to remove it.
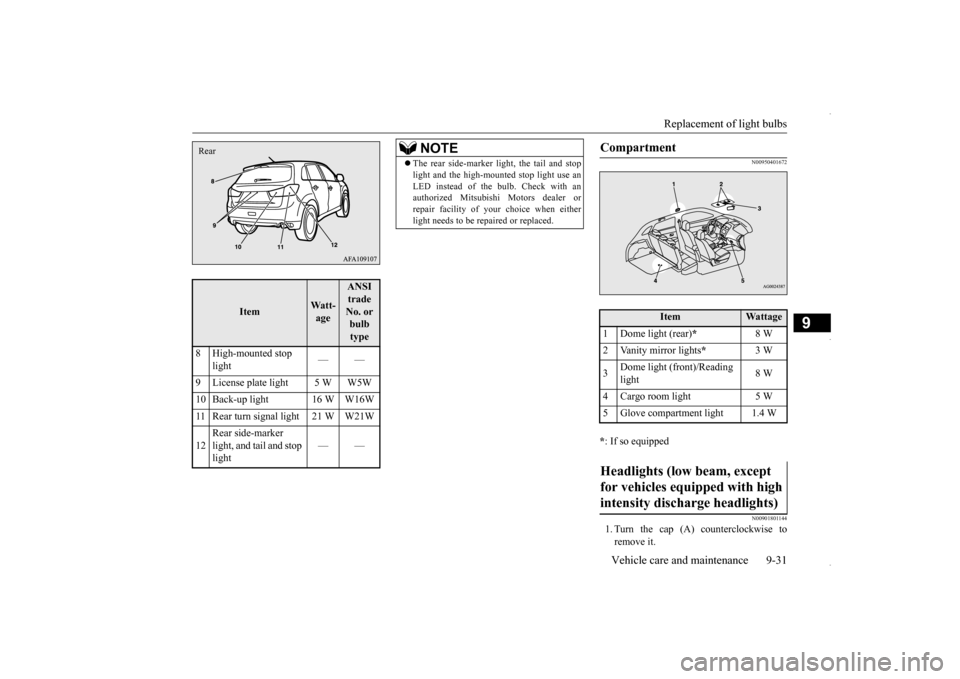
Item
Watt-age
ANSI trade No. or bulb type
8 High-mounted stop
light
——
9 License plate light 5 W W5W 10 Back-up light 16 W W16W11 Rear turn signal light 21 W W21W 12
Rear side-marker light, and tail and stop light
——
Rear
NOTE
The rear side-marker light, the tail and stop light and the high-mounted stop light use an LED instead of the bulb. Check with an authorized Mitsubishi Motors dealer or repair facility of your
choice when either
light needs to be repaired or replaced.
Compartment
Item
Wattage
1 Dome light (rear)
*
8 W
2 Vanity mirror lights
*
3 W
3
Dome light (front)/Reading light
8 W
4 Cargo room light 5 W 5 Glove compartment light 1.4 WHeadlights (low beam, except for vehicles equipped with high intensity discharge headlights)
BK0229600US.bo
ok 31 ページ 2015年10月1日 木曜日 午後2時29分
Page 368 of 398
Replacement of light bulbs 9-32 Vehicle care and maintenance
9
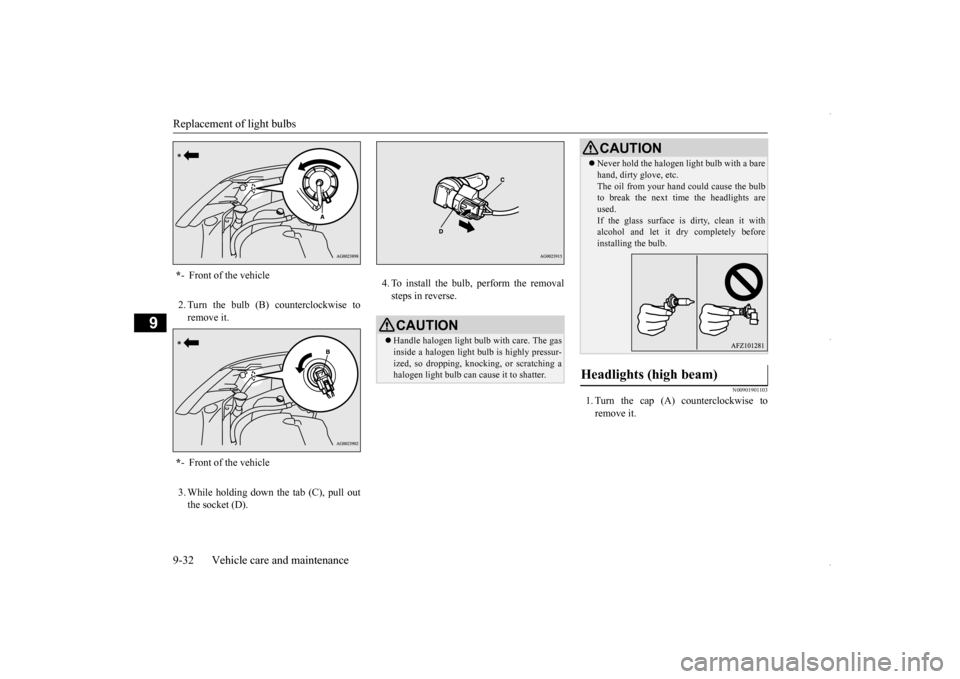
2. Turn the bulb (B) counterclockwise to remove it. 3. While holding down the tab (C), pull out the socket (D).
4. To install the bulb, perform the removal steps in reverse.
N00901901103
1. Turn the cap (A) counterclockwise to remove it.
* - Front of the vehicle * - Front of the vehicle
CAUTIONHandle halogen light bulb with care. The gas inside a halogen light bulb is highly pressur- ized, so dropping, knocking, or scratching a halogen light bulb can cause it to shatter.
Never hold the halogen light bulb with a bare hand, dirty glove, etc. The oil from your hand could cause the bulb to break the next time the headlights are used.If the glass surface is dirty, clean it with alcohol and let it dry completely before installing the bulb.
Headlights (high beam)
CAUTION
BK0229600US.bo
ok 32 ページ 2015年10月1日 木曜日 午後2時29分