2016 MITSUBISHI OUTLANDER SPORT instrument panel
[x] Cancel search: instrument panelPage 61 of 398
Supplemental Restraint System (SRS) - airbag
Seat and restraint systems 4-41
4
N00408500698
SRS servicing
WA R N I N G Any maintenance performed on or near the components of the SRS should be per- formed only by an authorized Mitsubishi Motors dealer. Do not permit anyone elseto do any service, inspection, maintenance or repair on any SRS components or wir- ing. Similarly, no part of the SRS shouldever be handled, removed or disposed by anyone except an authorized Mitsubishi Motors dealer.Improper work methods on the SRS com- ponents or wiring could result in an acci- dental airbag deployment or could makethe SRS inoperable. Either of these situa- tions could result in serious injury or death. Do not modify your steering wheel or any other SRS component or related vehiclepart. For example, replacement of the steering wheel, or modifications to the front bumper or body structure canadversely affect SRS performance and may lead to injury. If your vehicle has received any damage, you should have the SRS inspected by an authorized Mitsubishi Motors dealer to make sure it is in proper working order.
Do not modify your front seats, center pil- lar or center console. Such modifications can adversely affect SRS performance and may lead to injury. Also, if you discover any tear or openseam in the seat fabric near the side air- bag, have the seat inspected by an autho- rized Mitsubishi Motors dealer. If you have found any scratch, crack or damage to the portion of the front andrear pillars and roof side rail, you should have the SRS inspected by an authorized Mitsubishi Motors dealer.NOTE
When you transfer ownership of the vehicle to another person, we urge you to alert the new owner that it is equipped with the SRS and refer that owner to the applicable sec-tions in this owner’s manual. If you decide to junk or scrap your vehicle, we urge you to first take
it to an authorized
Mitsubishi Motors dealer so that the SRS can be made safe for disposal. If any of the following parts needs to be modified for use by a handicapped person, the advanced airbag system will be greatly affected. Please consult an authorizedMitsubishi Motors dealer. • Driver’s seat• Front passenger seat • Front seat beltWA R N I N G
• Steering wheel • Instrument panel[For vehicles sold in U.S.A.] To contact Mitsubishi Motors North America, Inc. call 1-888-648-7820 or write to:Mitsubishi Motors North America, Inc. Customer Relations Department P.O. Box 6400Cypress, CA 90630-0064 [For vehicles sold in Canada] To contact Mitsubishi Motor Sales of Canada, Inc. call 1-888-576-4878 or write to:Mitsubishi Motor Sales of Canada, Inc. Customer Relations Department P.O. Box 410094141 Dixie Road Mississauga, ON L4W 5C9 [For vehicles sold in Puerto Rico] To contact Mitsubishi Motor Sales ofCaribbean, Inc. call 1-787-251-8715 or write to: Mitsubishi Motor Sales of Caribbean,Inc. Customer Service Department P.O. Box 192216SAN JUAN PR 00919-2216NOTE
BK0229600US.bo
ok 41 ページ 2015年10月1日 木曜日 午後2時29分
Page 76 of 398
Free-hand Advanced Security Transmitte
r (F.A.S.T.-key) (if so equipped)
5-14 Features and controls
5
N00503300067
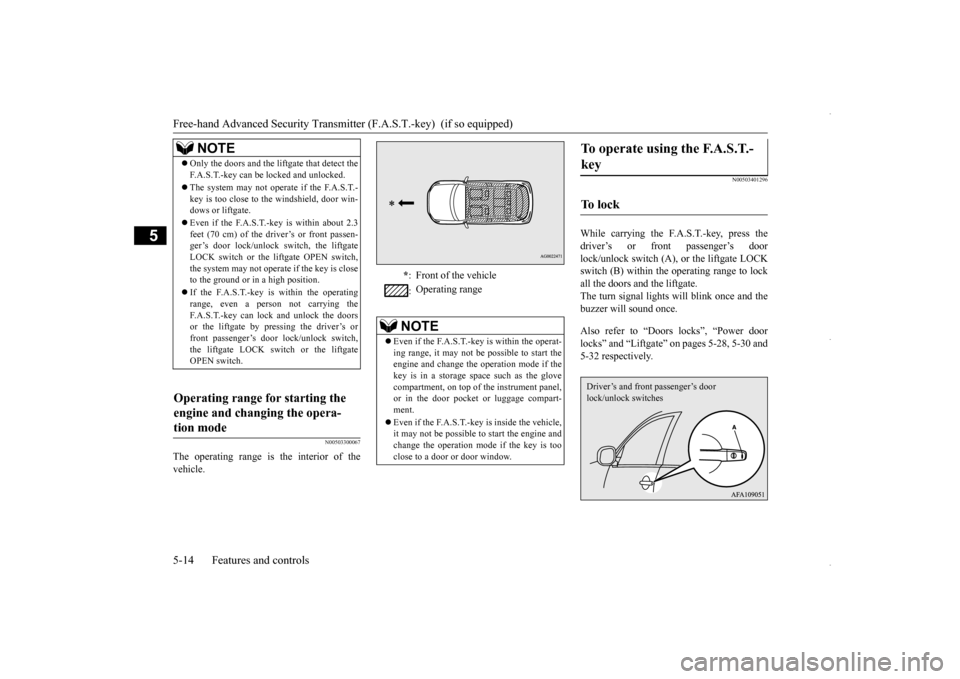
The operating range is the interior of the vehicle.
N00503401296
While carrying the F.A.S.T.-key, press thedriver’s or front passenger’s door lock/unlock switch (A), or the liftgate LOCK switch (B) within the operating range to lockall the doors and the liftgate.The turn signal lights will blink once and the buzzer will sound once. Also refer to “Doors locks”, “Power door locks” and “Liftgate” on pages 5-28, 5-30 and5-32 respectively.
NOTE
Only the doors and the liftgate that detect the F.A.S.T.-key can be locked and unlocked. The system may not operate if the F.A.S.T.- key is too close to the windshield, door win-dows or liftgate. Even if the F.A.S.T.-key is within about 2.3 feet (70 cm) of the driver’s or front passen- ger’s door lock/unlock switch, the liftgate LOCK switch or the liftgate OPEN switch,the system may not operate if the key is close to the ground or in a high position. If the F.A.S.T.-key is within the operating range, even a person not carrying the F.A.S.T.-key can lock and unlock the doorsor the liftgate by pressing the driver’s or front passenger’s door lock/unlock switch, the liftgate LOCK switch or the liftgateOPEN switch.
Operating range for starting the engine and changing the opera- tion mode
* : Front of the vehicle : Operating range
NOTE
Even if the F.A.S.T.-key is within the operat- ing range, it may not be possible to start the engine and change the operation mode if thekey is in a storage space such as the glove compartment, on top of
the instrument panel,
or in the door pocket or luggage compart-ment. Even if the F.A.S.T.-key is inside the vehicle, it may not be possible to start the engine and change the operation mode if the key is too close to a door or door window.
To operate using the F.A.S.T.- key
To l o c k
Driver’s and front passenger’s door lock/unlock switches
BK0229600US.bo
ok 14 ページ 2015年10月1日 木曜日 午後2時29分
Page 186 of 398
![MITSUBISHI OUTLANDER SPORT 2016 3.G Owners Manual Combination headlights and dimmer switch 5-124 Features and controls
5
[When the engine is started after the parking brake is released]
[When the engine is not running, or when the engine is started MITSUBISHI OUTLANDER SPORT 2016 3.G Owners Manual Combination headlights and dimmer switch 5-124 Features and controls
5
[When the engine is started after the parking brake is released]
[When the engine is not running, or when the engine is started](/manual-img/19/7549/w960_7549-185.png)
Combination headlights and dimmer switch 5-124 Features and controls
5
[When the engine is started after the parking brake is released]
[When the engine is not running, or when the engine is started before the parking brake isreleased]
Rotate the switch to operate the lights. The combinations of switch operations and illuminated lights differ in accordance with the following conditions.
Except for vehicles equipped with day- time running lights OFF All lights off
Parking, tail, front and rear side- marker lights, license plate and instrument panel lights on Headlights and other lights on
Vehicles equipped with daytime running lights OFF
The daytime running lights illumi- nated The daytime running lights illumi- natedParking, tail, front and rear side- marker lights, license plate and instrument panel lights on Headlights and other lights on
NOTE
Once the daytime running light come on, they do not go out until the ignition switch is turned to the “OFF” or “ACC” position or the operation mode is changed to OFF or ACC.
OFF All lights off
Parking, tail, front and rear side- marker lights, license plate and instrument panel lights on Headlights and other lights onNOTE
Even if the daytime running lights are not on, they will come on once the vehicle starts moving. Once the daytime running light come on, they do not go out until the ignition switch isturned to the “OFF” or “ACC” position or the operation mode is changed to OFF or ACC.
Ty p e 2 Except for vehicles equipped with day- time running lights OFF All lights off AUTO
Headlights and other lights turn on and off automatically in accordance with outside light level. Parking, tail, front and rear side- marker lights, license plate and instrument panel lights on Headlights and other lights on
BK0229600US.book
124 ページ 2015年10月1日 木曜日 午後2時29分
Page 187 of 398
![MITSUBISHI OUTLANDER SPORT 2016 3.G Owners Manual Combination headlights and dimmer switch
Features and controls 5-125
5
[When the engine is started after the parking brake is released]
[When the engine is not running, or when the engine is started MITSUBISHI OUTLANDER SPORT 2016 3.G Owners Manual Combination headlights and dimmer switch
Features and controls 5-125
5
[When the engine is started after the parking brake is released]
[When the engine is not running, or when the engine is started](/manual-img/19/7549/w960_7549-186.png)
Combination headlights and dimmer switch
Features and controls 5-125
5
[When the engine is started after the parking brake is released]
[When the engine is not running, or when the engine is started before the parking brake is released]
N00532601593
If the following operation is performed with the combination headlights and dim- mer switch in the “ ” or “ ” position, the lights automatically turn off. [Except for vehicles equipped with the F. A . S . T. - k e y ]The ignition switch is
turned to the “OFF”
or “ACC” position or the key is removed from the ignition swit
ch and the driver’s
door is opened.
Vehicles equipped with daytime running lights OFF
The daytime running lights illumi- nated
AUTO
The daytime running lights illumi- nated (when it is light outside the vehicle)Headlights and other lights turn on and off automatically in accordance with outside light level. The daytime running lights illumi- nated Parking, tail, front and rear side- marker lights, license plate and instrument panel lights on Headlights and other lights on
NOTE
Once the daytime running light come on, they do not go out until the ignition switch is turned to the “OFF” or “ACC” position orthe operation mode is changed to OFF or ACC.
OFF All lights off AUTO
Headlights and other lights turn on and off automatically in accordance with outside light level. Parking, tail, front and rear side- marker lights, license plate and instrument panel lights on Headlights and other lights on
NOTE
Even if the daytime running lights are not on, they will come on once the vehicle starts moving. Once the daytime running light come on, they do not go out until the ignition switch isturned to the “OFF” or “ACC” position or the operation mode is changed to OFF or ACC. The sensitivity of the automatic on/off con- trol can be adjusted.For further information, please contact your authorized Mitsubishi Motors dealer or a repair facility of your choice.
Do not cover the sensor (A) for the automatic on/off control by affixing a sticker or label to the windshield. If the lights do not turn on or off with the switch in the “AUTO” position, manuallyoperate the switch. Have the system checked by an authorized Mitsubishi Motors dealer or a repair facility of your choice.
Light auto-cutout function (headlights and other lights)
NOTE
BK0229600US.book
125 ページ 2015年10月1日 木曜日 午後2時29分
Page 189 of 398
![MITSUBISHI OUTLANDER SPORT 2016 3.G Owners Manual Combination headlights and dimmer switch
Features and controls 5-127
5
[When using the F.A.S.T.-key to start the engine] If the driver’s door is opened with the opera- tion mode is put in OFF or AC MITSUBISHI OUTLANDER SPORT 2016 3.G Owners Manual Combination headlights and dimmer switch
Features and controls 5-127
5
[When using the F.A.S.T.-key to start the engine] If the driver’s door is opened with the opera- tion mode is put in OFF or AC](/manual-img/19/7549/w960_7549-188.png)
Combination headlights and dimmer switch
Features and controls 5-127
5
[When using the F.A.S.T.-key to start the engine] If the driver’s door is opened with the opera- tion mode is put in OFF or ACC, or if theoperation mode is changed to OFF while the lights are on, the tone will sound to remind you to turn off the lights. In either case, the lights will turn off automat- ically and so will the tone. Or you can turnthe light switch to the
“OFF” position to stop
the tone.
N00549900142
To change the headlights from high beam to low beam and vice versa, pull the turn signal lever to (1). Switch the headlights to lowbeam as a courtesy whenever there are oncoming vehicles, or when there is traffic moving ahead of you. An illuminated bluelight in the instrument cluster indicates when the headlights are on high beam.
N00550000185
You can flash the high beams by pulling the lever gently toward you (2). The lights willgo back to normal when you let go. While the high beam is on, you will see a blue light on the instrument panel.
N00563201191
This function turns on the front side-markerand parking lights for about 30 seconds afterthe UNLOCK button (A) on the remote con- trol transmitter is pressed when the combina- tion headlights and dimmer switch is in the“OFF” or “AUTO” position (for vehicles equipped with the automatic light control). On vehicles equipped with the automatic lightcontrol, the welcome light function will oper-ate only when it is dark outside the vehicle.
Dimmer (high/low beam change)
Headlight flasher
NOTE
You can flash the high beams by pulling the lever toward you, even if the light switch isoff. If you turn the lights off with the head lights set to high-beam illumination, the headlights are automatically returned to their low-beam setting when the light switch is next turned to the “ ” position.
Welcome light
NOTE
While the welcome light function is operat- ing, perform one of the following operationsto cancel the function.
BK0229600US.book
127 ページ 2015年10月1日 木曜日 午後2時29分
Page 191 of 398
Headlight leveling switch (if so equipped)
Features and controls 5-129
5
N00537100105
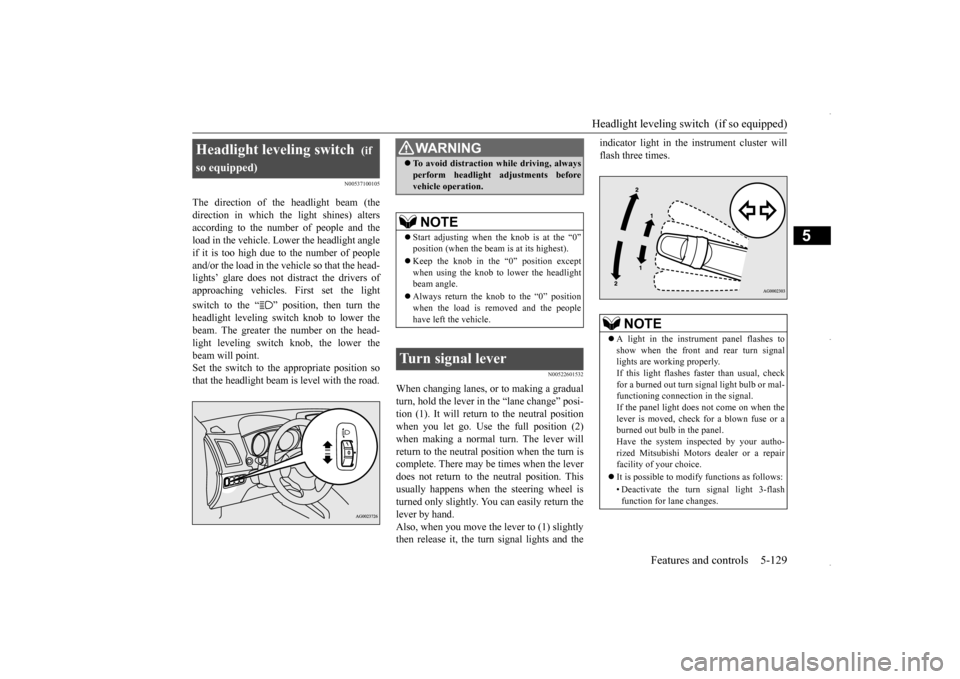
The direction of the headlight beam (the direction in which the light shines) alters according to the number of people and the load in the vehicle. Lower the headlight angleif it is too high due to the number of people and/or the load in the vehicle so that the head- lights’ glare does not distract the drivers ofapproaching vehicles. First set the light switch to the “ ” position, then turn the headlight leveling switch knob to lower the beam. The greater the number on the head- light leveling switch knob, the lower thebeam will point. Set the switch to the appropriate position so that the headlight beam is level with the road.
N00522601532
When changing lanes, or to making a gradual turn, hold the lever in
the “lane change” posi-
tion (1). It will return to the neutral positionwhen you let go. Use the full position (2) when making a normal turn. The lever will return to the neutral position when the turn iscomplete. There may be times when the lever does not return to the neutral position. This usually happens when the steering wheel isturned only slightly. You can easily return the lever by hand. Also, when you move the lever to (1) slightlythen release it, the turn signal lights and the
indicator light in the instrument cluster will flash three times.
Headlight leveling switch
(if
so equipped)
WA R N I N G To avoid distraction while driving, always perform headlight adjustments before vehicle operation.NOTE
Start adjusting when
the knob is at the “0”
position (when the beam is at its highest). Keep the knob in the “0” position except when using the knob to lower the headlightbeam angle. Always return the knob to the “0” position when the load is removed and the people have left the vehicle.
Turn signal lever
NOTE
A light in the instrument panel flashes to show when the front and rear turn signal lights are working properly. If this light flashes faster than usual, checkfor a burned out turn signal light bulb or mal- functioning connection in the signal. If the panel light does not come on when thelever is moved, check for a blown fuse or a burned out bulb in the panel. Have the system inspected by your autho-rized Mitsubishi Motors dealer or a repair facility of your choice. It is possible to modify functions as follows: • Deactivate the turn signal light 3-flash function for lane changes.
BK0229600US.book
129 ページ 2015年10月1日 木曜日 午後2時29分
Page 246 of 398
Vehicle preparation before driving 6-4 Driving safety
6
N00629000669
For a safer and more enjoyable trip, always check for the following: Before starting the vehicle, make certain that you and all passengers are seated and wearing their seat belts properly (with children in the rear seat, in appropriaterestraints), and that all the doors and lift- gate are locked. Move the driver’s seat as far backward as possible, while still keeping good visibil- ity, and good control of the steering wheel, brakes, accelerator, and controls.Check the instrument panel indicators and multi-information display for any possible problem. In the same way, the front passenger seat should also be moved as far back as possi- ble. Make sure that infants and small children are properly restrained in accordance with all laws and regulations.
Check these by selecting the defroster mode, and set the blower switch on high. Youshould be able to feel the air blowing against the windshield. Refer to “Defrosting or defogging (wind-shield, door windows)” on page 7-8, 7-13, 7-18, 7-23. Check all the tires for heavy tread wear or uneven wear patterns. Look for stones, nails, glass, or other objects stuck in the tread. Look for any tread cuts or sidewall cracks. Checkthe wheel nuts for tightness, and the tires (including spare tire) for proper pressure. Replace your tires before they are heavilyworn out. As your vehicle is equipped with a tire pres- sure monitoring system, there is a risk ofdamage to the tire inflation pressure sensors when the tire is replaced on the rim. Tire replacement should, therefore, be performedonly by an authorized Mitsubishi Motors dealer.
Have someone watch while you turn all the exterior lights on and off. Also check the turnsignal indicators and high-beam indicators on the instrument panel. Check the ground under the vehicle after parking overnight, for fuel, water, oil, or other leaks. Make sure all the fluid levels are correct. Also, if you can smell fuel, you needto find out why immediately and have it fixed.
N00629200094
Even this vehicle’s safety equipment, andyour safest driving, cannot guarantee that you can avoid an accident or injury. However, ifyou give extra attention to the following areas, you can better protect yourself and your passengers: Drive defensively. Be aware of traffic, road and weather conditions. Leave plenty of stopping distance between your vehicle and the vehicle ahead.
Vehicle preparation before driving Seat belts and seats
Defrosters Tires
Lights Fluid leaks Safe driving techniques
BK0229600US.bo
ok 4 ページ 2015年10月1日 木曜日 午後2時29分
Page 339 of 398
Engine hood
Vehicle care and maintenance 9-3
9
To reduce the possibility of catalytic con- verter damage: Use UNLEADED GASOLINE ONLY of the type of recommended in “Fuel selec- tion”. Do not drive with an extremely low fuel level. Running out of gas could damage the catalytic converter. Do not try to start the engine by pushing or towing the vehicle. If the battery is weak or run down, use jumper cables to properly start the engine.
Do not idle the engine with any spark plug wires disconnected or removed, such as when performing diagnostic tests. Do not idle the engine for a long time if it is idling roughly or otherwise obviously malfunctioning. To prevent the catalytic converter from being damaged from unburned gas, do not race the engine when stopping the engine. Stop driving the vehicle if you think the performance is noticeably low, or theengine has a malfunction such as with the ignition, etc. If you
are not able to stop
driving immediately, slow down and drivefor only a short time. Have your vehicle checked at an authorized Mitsubishi Motors dealer or a repair facility of yourchoice as soon as possible. In unusual situations involving major engine problems, a burning odor mayindicate severe and abnormal catalytic converter overheating. If this occurs, stop in a safe place, shut the engine off and letthe vehicle cool. Once the engine is cool, immediately take your vehicle to a dealer or a repair facility of your choice for ser-vice.
N00937501618
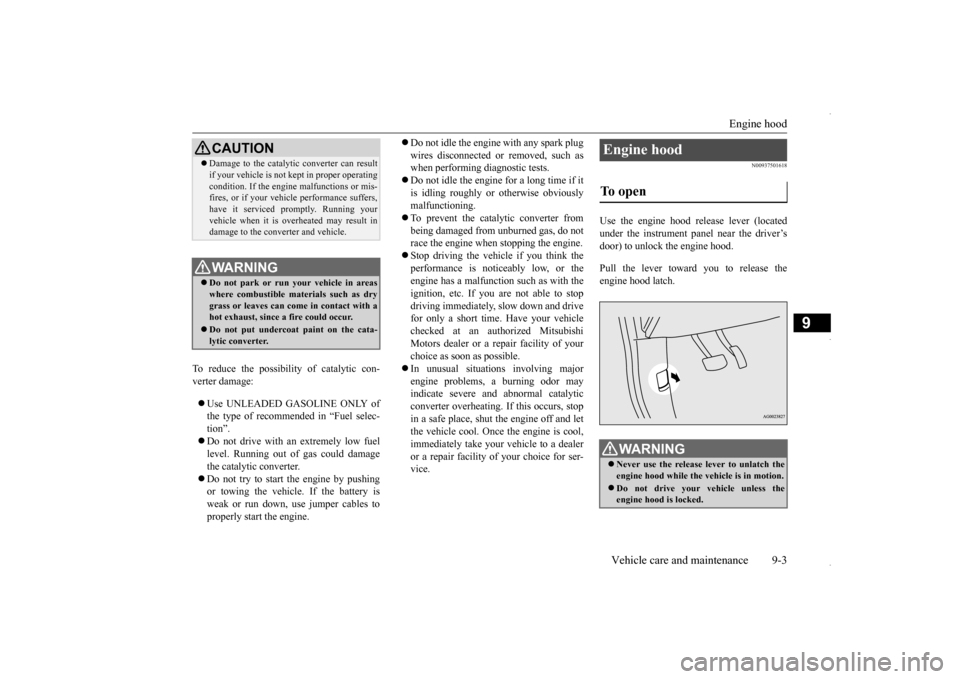
Use the engine hood release lever (locatedunder the instrument panel near the driver’sdoor) to unlock the engine hood. Pull the lever toward you to release the engine hood latch.
CAUTION Damage to the catalytic converter can result if your vehicle is not kept in proper operating condition. If the engine malfunctions or mis- fires, or if your vehicle performance suffers, have it serviced promptly. Running yourvehicle when it is overheated may result in damage to the converter and vehicle.WA R N I N G Do not park or run your vehicle in areas where combustible materials such as dry grass or leaves can come in contact with a hot exhaust, since a fire could occur. Do not put undercoat paint on the cata- lytic converter.
Engine hood To open
WA R N I N G Never use the release lever to unlatch the engine hood while the vehicle is in motion. Do not drive your vehicle unless the engine hood is locked.
BK0229600US.bo
ok 3 ページ 2015年10月1日 木曜日 午後2時29分