2016 MITSUBISHI OUTLANDER SPORT child lock
[x] Cancel search: child lockPage 43 of 398
Child restraint systems
Seat and restraint systems 4-23
4
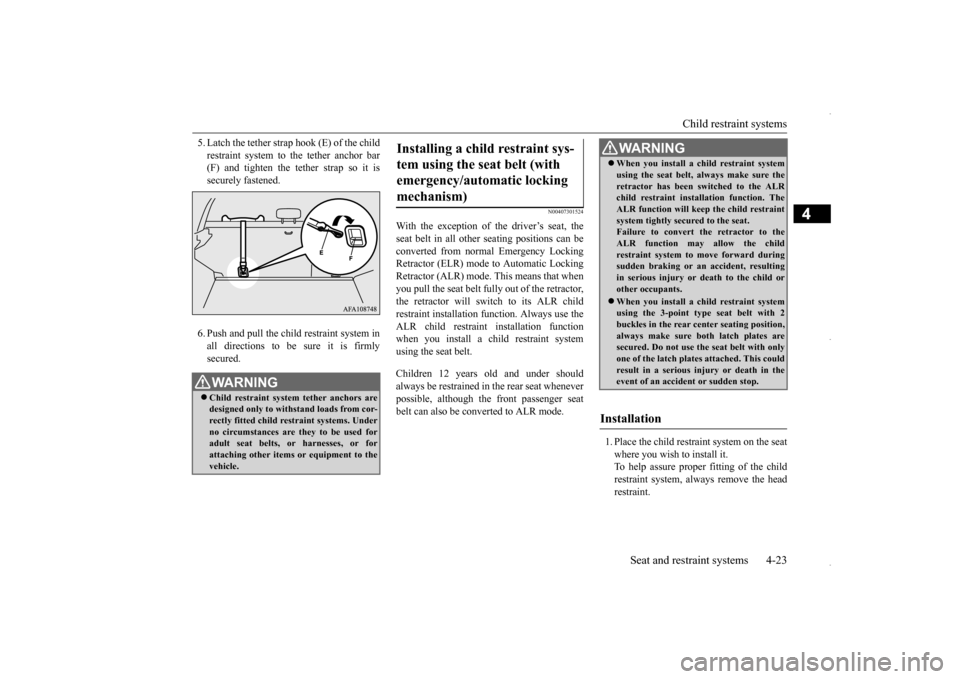
5. Latch the tether strap hook (E) of the child restraint system to the tether anchor bar (F) and tighten the tether strap so it is securely fastened. 6. Push and pull the ch
ild restraint system in
all directions to be sure it is firmlysecured.
N00407301524
With the exception of the driver’s seat, theseat belt in all other seating positions can beconverted from normal Emergency Locking Retractor (ELR) mode to Automatic Locking Retractor (ALR) mode. This means that whenyou pull the seat belt fully out of the retractor,the retractor will switch to its ALR child restraint installation function. Always use the ALR child restraint installation functionwhen you install a child restraint system using the seat belt. Children 12 years old and under should always be restrained in the rear seat wheneverpossible, although the front passenger seat belt can also be converted to ALR mode.
1. Place the child restraint system on the seat where you wish to install it. To help assure proper fitting of the childrestraint system, always remove the head restraint.
WA R N I N G Child restraint system tether anchors are designed only to withstand loads from cor-rectly fitted child restraint systems. Under no circumstances are they to be used for adult seat belts, or harnesses, or forattaching other items or equipment to the vehicle.
Installing a child restraint sys- tem using the seat belt (with emergency/automatic locking mechanism)
WA R N I N G When you install a child restraint system using the seat belt, always make sure the retractor has been switched to the ALR child restraint installation function. The ALR function will keep the child restraintsystem tightly secured to the seat. Failure to convert the retractor to the ALR function may allow the childrestraint system to move forward during sudden braking or an accident, resulting in serious injury or death to the child orother occupants. When you install a child restraint system using the 3-point type seat belt with 2 buckles in the rear center seating position, always make sure both latch plates aresecured. Do not use the seat belt with only one of the latch plates attached. This could result in a serious injury or death in theevent of an accident or sudden stop.
Installation
BK0229600US.bo
ok 23 ページ 2015年10月1日 木曜日 午後2時29分
Page 44 of 398
Child restraint systems 4-24 Seat and restraint systems
4
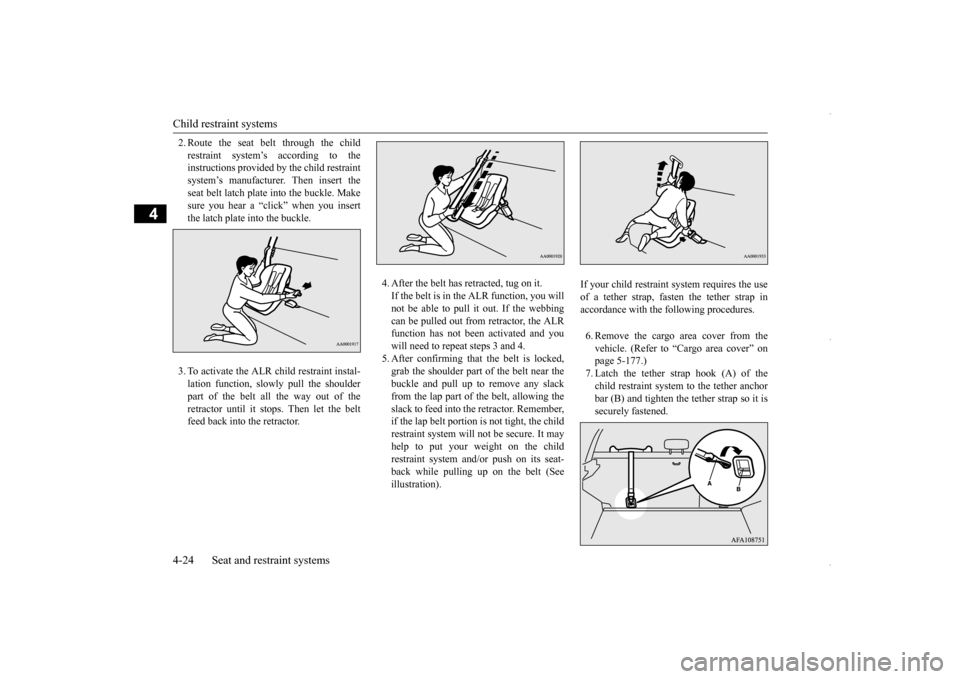
2. Route the seat belt through the child restraint system’s according to the instructions provided by the child restraint system’s manufacturer. Then insert theseat belt latch plate into the buckle. Make sure you hear a “click” when you insert the latch plate into the buckle. 3. To activate the ALR child restraint instal- lation function, slow
ly pull the shoulder
part of the belt all the way out of theretractor until it stops. Then let the belt feed back into the retractor.
4. After the belt has retracted, tug on it. If the belt is in the ALR function, you will not be able to pull it out. If the webbingcan be pulled out from retractor, the ALR function has not been activated and you will need to repeat steps 3 and 4.5. After confirming that the belt is locked,grab the shoulder part of the belt near the buckle and pull up to remove any slack from the lap part of the belt, allowing theslack to feed into the retractor. Remember, if the lap belt portion is not tight, the child restraint system will not be secure. It mayhelp to put your weight on the child restraint system and/or push on its seat- back while pulling up on the belt (Seeillustration).
6. Remove the cargo area cover from the vehicle. (Refer to “Cargo area cover” on page 5-177.) 7. Latch the tether strap hook (A) of thechild restraint system to the tether anchorbar (B) and tighten the tether strap so it is securely fastened.
If your child restraint system requires the use of a tether strap, fasten the tether strap in accordance with the following procedures.
BK0229600US.bo
ok 24 ページ 2015年10月1日 木曜日 午後2時29分
Page 45 of 398
Maintenance and inspection of seat belts
Seat and restraint systems 4-25
4
8. Before putting your child in the restraint, push and pull the restraint in all directions to be sure it is firmly secure. Do this before each use. If the child restraint sys-tem is not firmly secure, repeat steps 1 through 7. 9. To remove a child restraint system fromthe vehicle and deactivate the ALR mode, remove the child from the restraint. Unlatch the buckle. Then remove the beltfrom the restraint and let the belt fully retract.
10. Reinstall the head restraint.
Refer to “Head restraints” on page 4-7.
N00407601673
Children who have outgrown a child restraint system should be seated in the rear seat and wear the seat belt. If the shoulder belt crossestheir face or neck, and/or the lap belt crosses
their stomach, a commercially available booster seat must be used to raise the child so that the shoulder belt crosses their shoulder and the lap belt remains positioned lowacross their hips. The booster seat should fit the vehicle seat and have a label certifying compliance with Federal Motor VehicleSafety Standards or Motor Vehicle Restraint Systems and Booster Seats Safety Regula- tions.
N00407000221
The seat belt webbing may be cleaned withmild soap or detergent solution. Do not use anorganic solvent. Allow the belts to dry in the shade. Do not allow them to retract until com- pletely dry. Do not attempt to bleach or re-dye the belts. The color may rub off and the webbing strength may be affected. Regularly check your seat belt buckles and their release mechanisms for positive engage- ment and release of the latch plate. Check theretractors for automatic locking when in the Automatic Locking Retractor function. The entire seat belt assembly should be replaced if the webbing shows any obviouscuts, tears, increase in thickness in any sec- tion of the webbing from broken fibers, or severe fading from sunlight. All of these con-ditions indicate a weakening of the belt, which may adversely affect seat belt perfor- mance in an accident.
WA R N I N G Child restraint system tether anchors are designed only to withstand loads from cor- rectly fitted child restraint systems. Under no circumstances are they to be used for adult seat belts, or harnesses, or forattaching other items or equipment to the vehicle.
Children who have outgrown child restraint systems
WA R N I N G Any child who is too small to properly wear a seat belt must be properlyrestrained in an appropriate child restraint system, to reduce their risk of serious injury or death in an accident. A child should never be left unattended in, or unsupervised around, your vehicle.When you leave the vehicle, always take the child out as well. Children can die from heat stroke if left or trapped inside the vehicle, especially on hot days. Keep your vehicle locked when not in use. Keep your vehicle keys away from chil- dren.
Maintenance and inspection of seat belts
BK0229600US.bo
ok 25 ページ 2015年10月1日 木曜日 午後2時29分
Page 63 of 398
5
Features and controlsBreak-in recommendation
s ..............................................................5-3
Keys ..........................................
.......................................................5-3
Electronic immobilizer (Anti-thef
t starting system) ........................5-4
Keyless entry system (if so equipped) ..............................................5-7Free-hand Advanced Security Transmitter (F.A.S.T.-key) (if so equipped)
.................................................
........................5-12
Door locks .......................
...............................................................5-28
Power door locks ............
...............................................................5-30
Child safety locks for r
ear door .....................................................5-31
Liftgate ......................................
.....................................................5-32
Inside liftgate releas
e .............................................
........................5-33
Theft-alarm system
................................................
........................5-34
Power window control
...........................................
........................5-37
Sunshade (if so equi
pped)..............................................................5-39
Parking brake ..................
...............................................................5-40
Steering wheel height and reach adjustment ..................................5-41Inside rearview mirro
r ...........................................
........................5-42
Outside rearview mirr
ors ...............................................................5-44
Ignition switch ......
.................................................
........................5-46
Starting the engine
.................................................
........................5-47
Manual transaxle (if so equipped) .................................................5-49 Continuously variable transmission
(CVT) (if so equipped).........5-51
Electronically controlled 4WD system (if so equipped)................5-584-wheel drive operation
.........................................
........................5-60
Inspection and maintenance following rough road operation ........5-63 Cautions on the handling of 4-wheel drive vehicles ......................5-63Service brake ..................
...............................................................5-64
Hill start assist .......
.................................................
........................5-65
Brake assist system
...............................................
......................... 5-66
Anti-lock braking syst
em .....................................
......................... 5-67
Electric power steering syst
em (EPS) ........................................... 5-69
Active stability control
(ASC) ....................
................................... 5-70
Cruise control (if so eq
uipped) ...................................................... 5-73
Tire pressure monitoring
system ................................................... 5-77
Rear-view camera (if so eq
uipped) ................................................ 5-81
Instrument cluster
.................................................
......................... 5-83
Multi-information disp
lay ....................................
......................... 5-85
Indicator light, warning light, and information screen disp
lay list ................................................. 5-106
Indicators .................................
.................................................... 5-119
Warning lights ................
.................................................
............. 5-120
Information screen disp
lay ...................................
....................... 5-121
Combination headlights and dimmer switch ............................... 5-123 Headlight leveling switch (if so equipped).................................. 5-129Turn signal lever ..
.................................................
....................... 5-129
Hazard warning flasher
switch .................................................... 5-130
Front fog light switch (if
so equipped) ........................................ 5-130
Wiper and washer swit
ch ......................................
....................... 5-130
Electric rear window def
ogger switch ......................................... 5-136
Horn switch .............................
.................................................... 5-136
Link System (if so equi
pped) .....................
................................. 5-137
Bluetooth
® 2.0 interface (if so
equipped)..................................... 5-137
USB input terminal (if so
equipped) ........................................... 5-160
Sun visors ......................
.................................................
............. 5-163
12 V power outlets .........
.................................................
............. 5-164
HomeLink
® Wireless Control System (if so equipped) ............... 5-165
BK0229600US.bo
ok 1 ページ 2015年10月1日 木曜日 午後2時29分
Page 90 of 398
Door locks 5-28 Features and controls
5
N00562100066
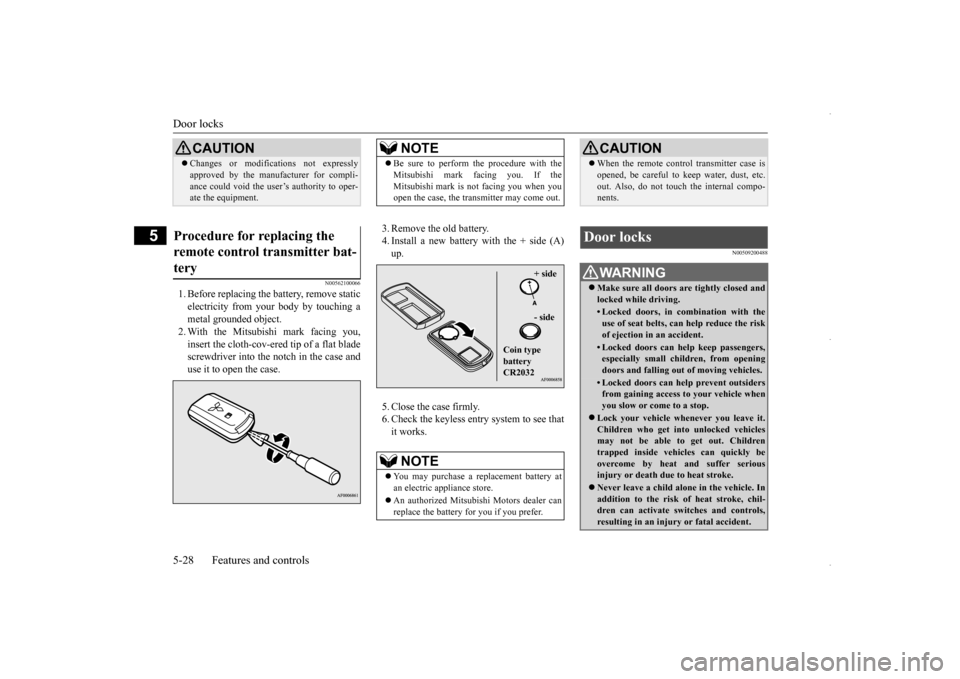
1. Before replacing the battery, remove static electricity from your body by touching a metal grounded object. 2. With the Mitsubishi mark facing you,insert the cloth-cov-ered tip of a flat blade screwdriver into the notch in the case and use it to open the case.
3. Remove the old battery. 4. Install a new battery with the + side (A) up. 5. Close the case firmly. 6. Check the keyless entry system to see that it works.
N00509200488
CAUTION Changes or modifications not expressly approved by the manufacturer for compli- ance could void the user’s authority to oper- ate the equipment.
Procedure for replacing the remote control transmitter bat-tery
NOTE
Be sure to perform the procedure with the Mitsubishi mark facing you. If the Mitsubishi mark is not facing you when you open the case, the transmitter may come out.NOTE
You may purchase a replacement battery at an electric appliance store. An authorized Mitsubishi Motors dealer can replace the battery for you if you prefer.
+ side - side
Coin type battery CR2032
CAUTION When the remote control transmitter case is opened, be careful to keep water, dust, etc. out. Also, do not touch the internal compo- nents.
Door locks
WA R N I N G Make sure all doors are tightly closed and locked while driving.• Locked doors, in combination with theuse of seat belts, can help reduce the risk of ejection in an accident.• Locked doors can help keep passengers,especially small children, from opening doors and falling out of moving vehicles.• Locked doors can help prevent outsidersfrom gaining access to your vehicle whenyou slow or come to a stop.
Lock your vehicle whenever you leave it. Children who get into unlocked vehicles may not be able to get out. Children trapped inside vehicles can quickly be overcome by heat and suffer serious injury or death due to heat stroke. Never leave a child alone in the vehicle. In addition to the risk of heat stroke, chil-dren can activate switches and controls, resulting in an injury or fatal accident.
BK0229600US.bo
ok 28 ページ 2015年10月1日 木曜日 午後2時29分
Page 93 of 398
Child safety locks for rear door Features and controls 5-31
5
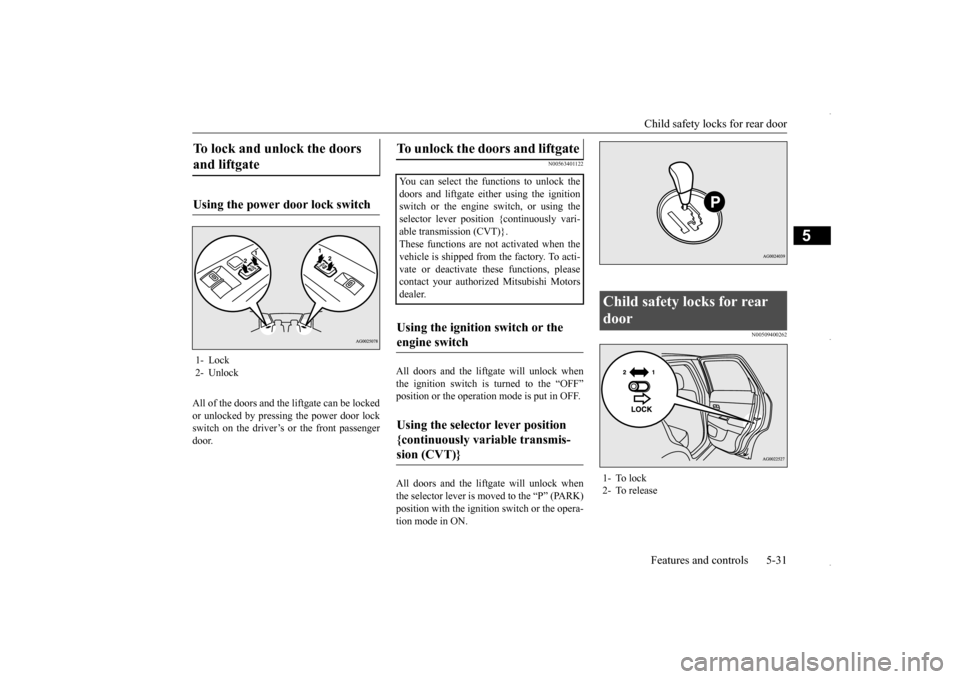
All of the doors and the
liftgate can be locked
or unlocked by pressing the power door lock switch on the driver’s or the front passenger door.
N00563401122
All doors and the liftgate will unlock when the ignition switch is
turned to the “OFF”
position or the operation mode is put in OFF. All doors and the liftgate will unlock when the selector lever is moved to the “P” (PARK) position with the ignition switch or the opera- tion mode in ON.
N00509400262
To lock and unlock the doors and liftgate Using the power door lock switch 1- Lock 2- Unlock
To unlock the doors and liftgate You can select the functions to unlock thedoors and liftgate either using the ignition switch or the engine switch, or using the selector lever position {continuously vari-able transmission (CVT)}. These functions are not activated when the vehicle is shipped from the factory. To acti-vate or deactivate these functions, please contact your authorized Mitsubishi Motors dealer.Using the ignition switch or the engine switch Using the selector lever position {continuously variable transmis- sion (CVT)}
Child safety locks for rear door 1- To lock 2- To release
BK0229600US.bo
ok 31 ページ 2015年10月1日 木曜日 午後2時29分
Page 94 of 398
Liftgate 5-32 Features and controls
5
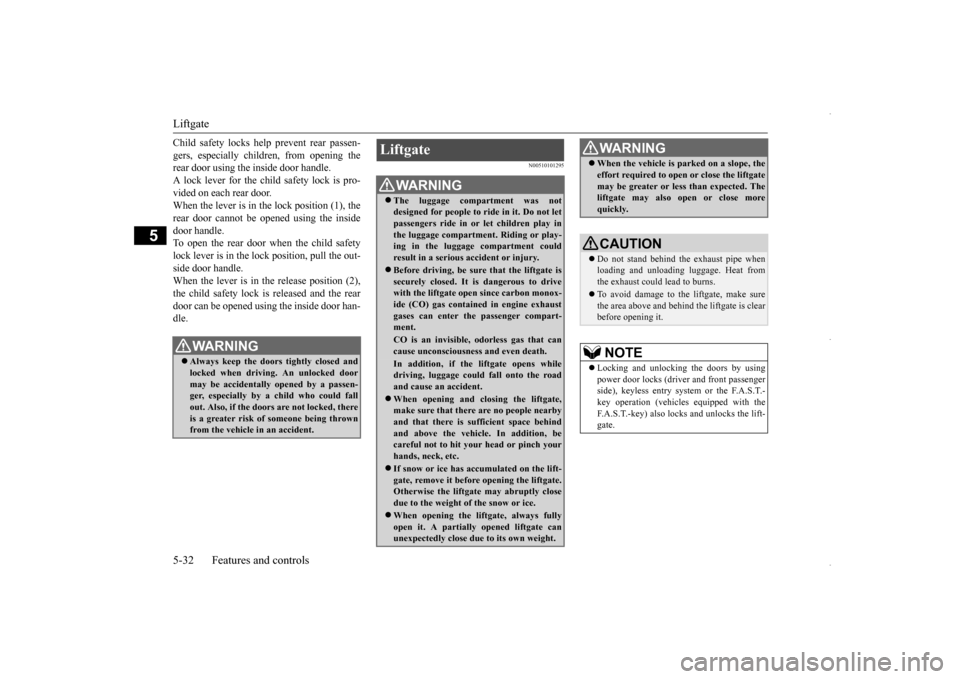
Child safety locks help prevent rear passen- gers, especially children, from opening the rear door using the inside door handle. A lock lever for the child safety lock is pro-vided on each rear door. When the lever is in the lock position (1), the rear door cannot be opened using the insidedoor handle. To open the rear door when the child safety lock lever is in the lock position, pull the out-side door handle.When the lever is in the release position (2), the child safety lock is released and the rear door can be opened using the inside door han-dle.
N00510101295
WA R N I N G Always keep the doors tightly closed and locked when driving. An unlocked door may be accidentally opened by a passen- ger, especially by a child who could fallout. Also, if the doors are not locked, there is a greater risk of someone being thrown from the vehicle in an accident.
Liftgate
WA R N I N G The luggage compartment was not designed for people to ride in it. Do not let passengers ride in or let children play in the luggage compartment. Riding or play-ing in the luggage compartment could result in a serious accident or injury. Before driving, be sure that the liftgate is securely closed. It is dangerous to drive with the liftgate open
since carbon monox-
ide (CO) gas contained in engine exhaust gases can enter the passenger compart- ment.CO is an invisible, odorless gas that cancause unconsciousness and even death.In addition, if the liftgate opens whiledriving, luggage could fall onto the roadand cause an accident. When opening and closing the liftgate, make sure that there are no people nearby and that there is sufficient space behind and above the vehicle. In addition, becareful not to hit your head or pinch your hands, neck, etc. If snow or ice has accumulated on the lift- gate, remove it before opening the liftgate. Otherwise the liftgate may abruptly close due to the weight of the snow or ice. When opening the liftgate, always fully open it. A partially opened liftgate can unexpectedly close due to its own weight.
When the vehicle is parked on a slope, the effort required to open or close the liftgate may be greater or less than expected. The liftgate may also open or close more quickly.CAUTION Do not stand behind the exhaust pipe when loading and unloading luggage. Heat from the exhaust could lead to burns. To avoid damage to the liftgate, make sure the area above and behind the liftgate is clear before opening it.NOTE
Locking and unlocking the doors by using power door locks (driver and front passenger side), keyless entry system or the F.A.S.T.-key operation (vehicles equipped with the F.A.S.T.-key) also locks and unlocks the lift- gate.WA R N I N G
BK0229600US.bo
ok 32 ページ 2015年10月1日 木曜日 午後2時29分
Page 99 of 398
Power window control
Features and controls 5-37
5
N00510800370
N00548700097
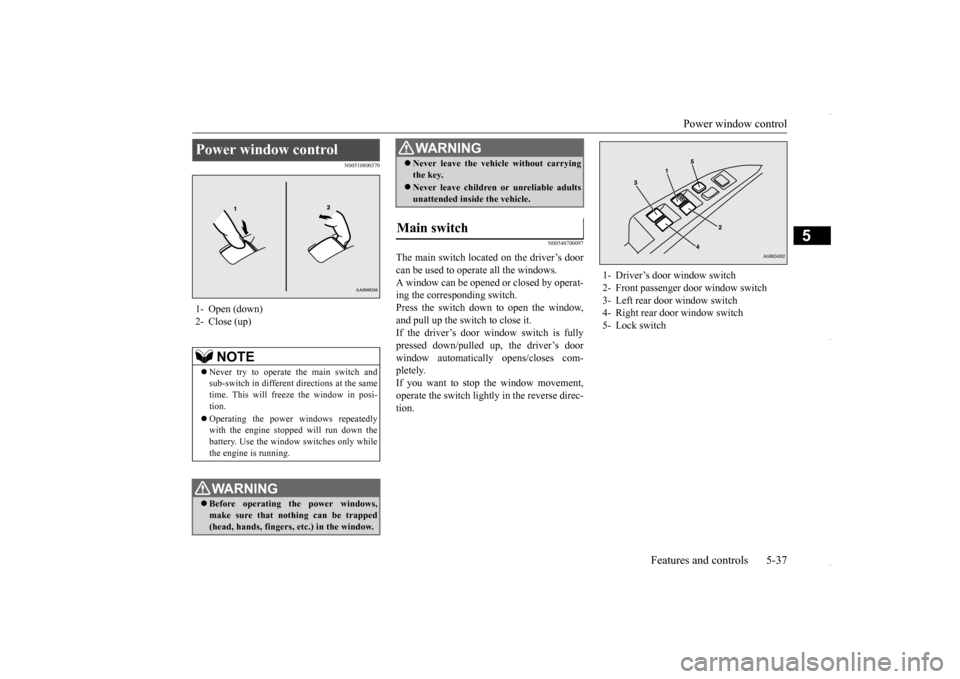
The main switch located on the driver’s door can be used to operate all the windows.A window can be opened or closed by operat- ing the corresponding switch. Press the switch down to open the window,and pull up the switch to close it. If the driver’s door window switch is fully pressed down/pulled up, the driver’s doorwindow automatically opens/closes com- pletely. If you want to stop the window movement,operate the switch lightly in the reverse direc- tion.
Power window control 1- Open (down)2- Close (up)
NOTE
Never try to operate the main switch and sub-switch in different directions at the sametime. This will freeze the window in posi- tion. Operating the power windows repeatedly with the engine stopped will run down the battery. Use the window switches only whilethe engine is running.WA R N I N G Before operating the power windows, make sure that nothing can be trapped(head, hands, fingers, etc.) in the window.
Never leave the vehicle without carrying the key. Never leave children or unreliable adults unattended inside the vehicle.
Main switch
WA R N I N G
1- Driver’s door window switch 2- Front passenger door window switch3- Left rear door window switch 4- Right rear door window switch 5- Lock switch
BK0229600US.bo
ok 37 ページ 2015年10月1日 木曜日 午後2時29分