2016 MITSUBISHI OUTLANDER height
[x] Cancel search: heightPage 2 of 464

Instruments and controls 1-1
1
Overview
N00100202658
Instruments and controls
Combination headlights and dimmer switch P.5-177 Turn signal lever P.5-183 Front fog light switch (if so equipped) P.5-184
Steering wheel audio remote control switches P.7-27 [For DISPLAY AUDIO and MMCS, refer to the separateowner’s manuals.]
Active stability control (ASC) OFF switch P.5-95
Supplemental restraint system (SRS) - airbag (for driver’s seat) P.4-33, 4-40 Horn switch P.5-191
Instrument cluster P.5-126
Windshield wiper and washer switch P.5-185 Rear window wiper and washer switch P.5-189
Cruise control switch P.5-96
Steering wheel height and reach adjustment lever P.5-54
Engine switch (if so equipped) P.5-18
Bluetooth
® 2.0 interface (if so equipped)
P.5-192
Driver’s vents P. 7 - 2
Sportronic steering wheel paddle shifter (if so equipped) P.5-68, 5-76
Driver’s vents P. 7 - 2
Multi information display switch (if so equipped) P.5-129
Headlight leveling switch (if so equipped) P.5-182 Driver’s side power liftgate switch (if so equipped) P.5-40
Fuse box P.9-25
Lane departure warning (LDW) switch (if so equipped) P.5-117 Forward collision mitigation system (FCM) ON/OFF switch (if so equipped) P. 5 - 1 1 4
Supplemental restraint system (SRS) - front knee airbag (for driver’s seat) P.4-40
Ignition switch (if so equipped) P.5-60
BK0223400US.book 1 ページ 2015年2月13日 金曜日 午後12時15分
Page 28 of 464
Seats 4-2 Seat and restraint systems
4
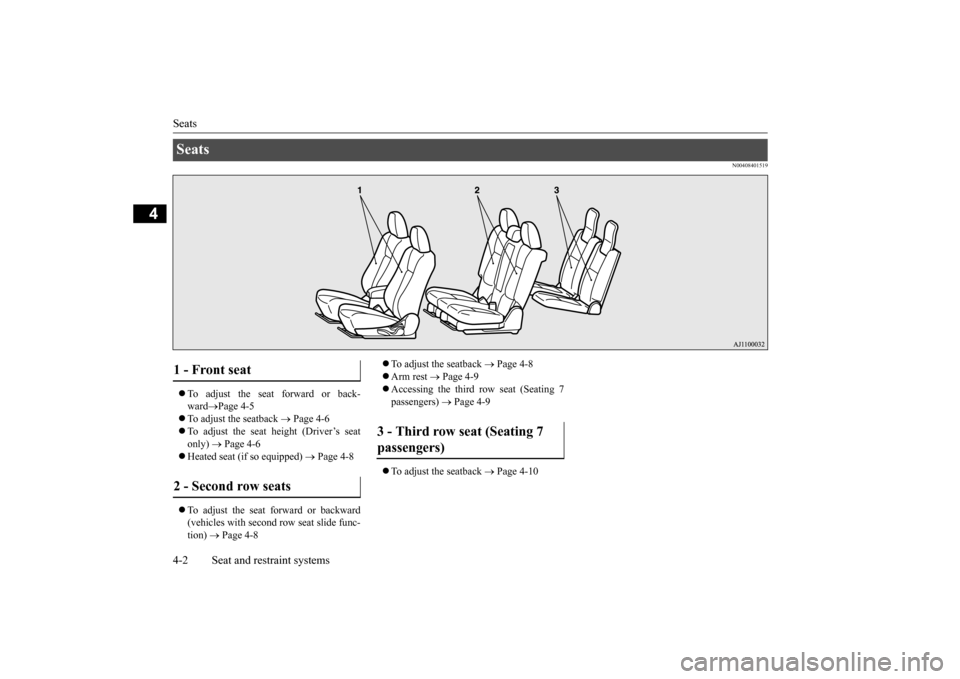
N00408401519
To adjust the seat forward or back- ward
Page 4-5
To adjust the seatback
Page 4-6
To adjust the seat height (Driver’s seat only)
Page 4-6
Heated seat (if so equipped)
Page 4-8
To adjust the seat forward or backward (vehicles with second
row seat slide func-
tion)
Page 4-8
To adjust the seatback
Page 4-8
Arm rest
Page 4-9
Accessing the third row seat (Seating 7 passengers)
Page 4-9
To adjust the seatback
Page 4-10
Seats 1 - Front seat 2 - Second row seats
3 - Third row seat (Seating 7 passengers)
BK0223400US.book 2 ページ 2015年2月13日 金曜日 午後12時15分
Page 32 of 464

Front seats 4-6 Seat and restraint systems
4
N00402001379
To adjust the seatback, lean forward slightly, gently pull the seatback lock lever up, then lean backward to a comfortable position andrelease the lever. The seatback will lock in place.
Operate the switch in the direction of the arrows to adjust the seatback.
N00402101253
Operate the lever repeatedly to raise or lower the seat.
To adjust the seatbacks Manual seat adjustment
CAUTION The reclining mechanism used in the seat- back is spring loaded, and will cause theseatback to return quickly to the vertical position when the lock lever is operated. When pulling the lever, sit close to the seat-back or hold the seatback with your hand to control its return motion.
Power seat adjustment 1- Move forward 2- Move backward
NOTE
To prevent the battery from completely dis- charging, operate the
power seat with the
engine running.
WA R N I N G To reduce the risk of serious injury or death in the event of
an accident or sud-
den stop, all seatbacks should be kept inthe upright position while the vehicle is in motion. Seat belt performance during an accidentcan be adversely affect
ed if the seatbacks
are reclined. The more a seatback is reclined, the more likely seat belt perfor-mance will be adversely affected. If the seat belt is not proper
ly positioned against
the body during an accident, there isincreased risk you will slide under the belt and receive serious
injury or death.
To adjust the seat height (Driver’s seat only) Manual seat adjustment
BK0223400US.book 6 ページ 2015年2月13日 金曜日 午後12時15分
Page 34 of 464

Second row seats 4-8 Seat and restraint systems
4
N00435601391
The heated seats can
be operated by pushing
the switch when the ignition switch or the operation mode is in ON. The indicator light(A) will illuminate while the heater is on.
N00402501231
When sitting in the middle seating position of the second row seat, adju
st the head restraints
to an appropriate height where they lock in position. Refer to “Hea
d restraints” on page
4-10. Pull the seat adjusting lever up and slide the seat forward or backward to the desired posi- tion. Release the adjusting lever to lock the seat in place.
Heated seat (if so equipped) 1 (HI) - Heater high (for quick heating)2 - Heater off3 (LO) - Heater low (to keep the seat warm)
WA R N I N G Persons who are unable
to feel tempera-
ture change or skin
pain due to age, ill-
ness, injury, medication, alcohol use, fatigue or other phys
ical conditions or
who have sensitive skin may suffer burnswhen using the heated seat even at low temperatures. To reduce the risk of burns, people with such conditions must use carewhen using the heated seat.
CAUTION Switch off the heated seats when not in use. Operate the heaters at the “HI” position forquick heating. After the seat has becomewarm, set the heater switch to the “LO” posi- tion to keep it warm. Sl
ight variations in the
seat temperature may be felt while using theheated seats. This is caused by the operation of the heater’s internal thermostat and does not indicate a malfunction. Do not place heavy obj
ects on the seat or
stick pins, needles, or
other pointed objects
into the seat. Do not place a blanket,
cushion, or other
insulating material on the seat while using the heater; doing so can
cause the heater ele-
ment to overheat. When cleaning the seat, do not use benzine, kerosene, gasoline, alc
ohol, or other organic
solvents; doing so can cause damage not only to the surface of the seat, but also to the heater. If water or any other liquid is spilled on the seat, allow it to dry thoroughly beforeattempting to use the heater. Turn the heater off immediately if it a
ppears to be malfunc-
tioning during use.
Second row seats
To adjust the seat forward or backward (vehicles with sec- ond row seat slide function)
NOTE
You can adjust the seat
forward or backward
on either side separately.
BK0223400US.book 8 ページ 2015年2月13日 金曜日 午後12時15分
Page 36 of 464
Third row seat (Seating 7 passengers) 4-10 Seat and restraint systems
4
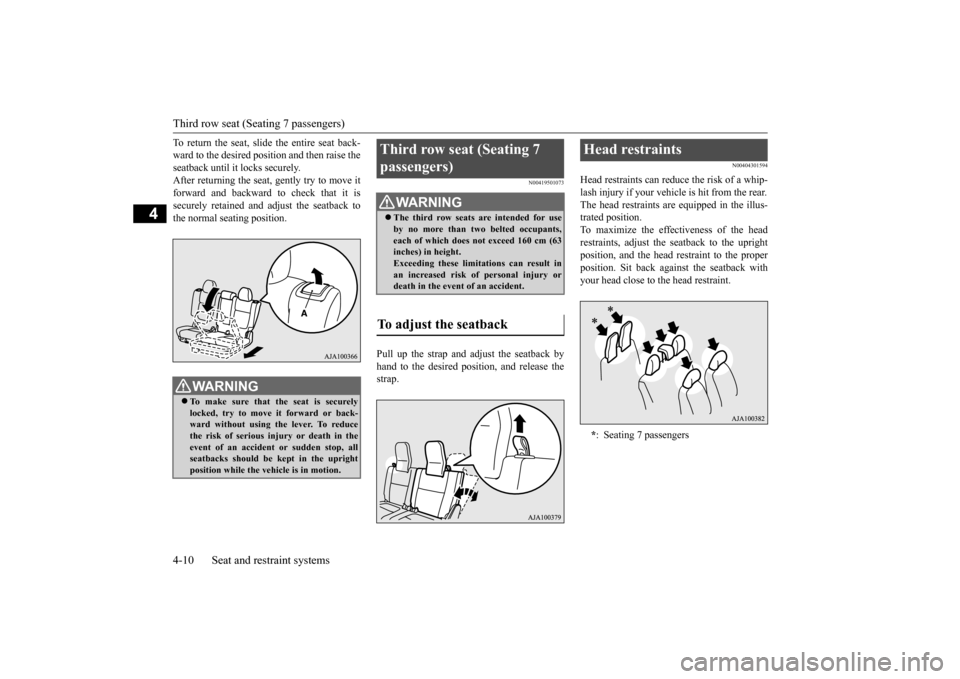
To return the seat, slide the entire seat back- ward to the desired position and then raise theseatback until it locks securely. After returning the seat, gently try to move it forward and backward to check that it issecurely retained and adjust the seatback to the normal seating position.
N00419501073
Pull up the strap and adjust the seatback by hand to the desired posit
ion, and release the
strap.
N00404301594
Head restraints can reduce the risk of a whip- lash injury if your vehicle is hit from the rear. The head restraints ar
e equipped in the illus-
trated position. To maximize the effectiveness of the head restraints, adjust the seatback to the uprightposition, and the head restraint to the proper position. Sit back against the seatback with your head close to the head restraint.
WA R N I N G To make sure that the seat is securely locked, try to move it forward or back-ward without using the lever. To reduce the risk of serious in
jury or death in the
event of an accident
or sudden stop, all
seatbacks should be kept in the upright position while the vehicle is in motion.
Third row seat (Seating 7 passengers)
WA R N I N G The third row seats are intended for use by no more than two belted occupants,each of which does not exceed 160 cm (63 inches) in height. Exceeding these limitations can result inan increased risk of
personal injury or
death in the event of an accident.
To adjust the seatback
Head restraints * : Seating 7 passengers
BK0223400US.book 10 ページ 2015年2月13日 金曜日 午後12時15分
Page 37 of 464
Head restraints
Seat and restraint systems 4-11
4
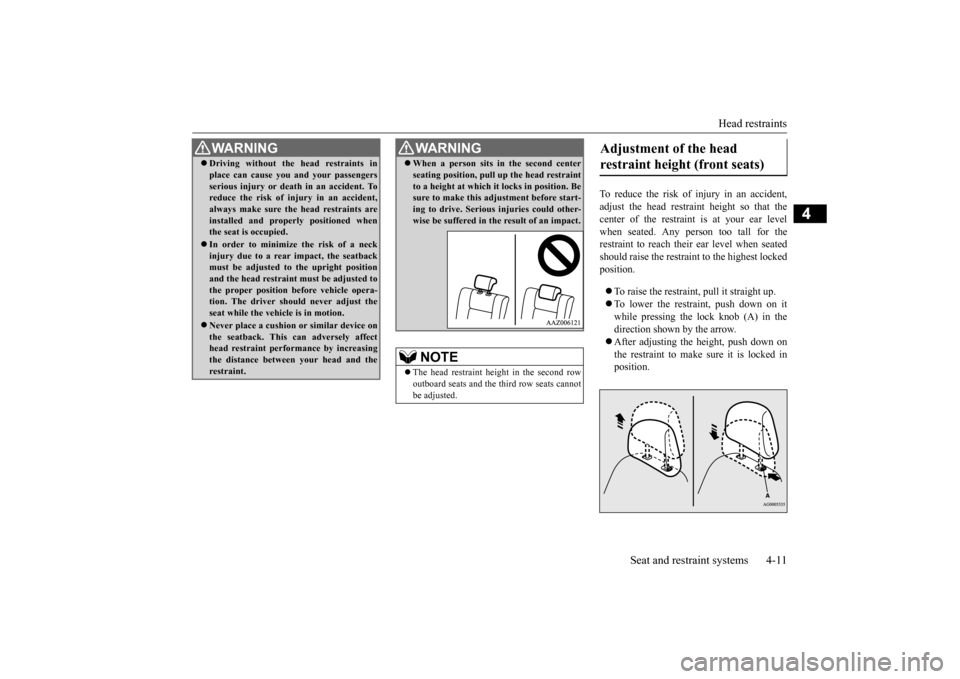
To reduce the risk of injury in an accident, adjust the head restraint height so that thecenter of the restraint is at your ear level when seated. Any person too tall for the restraint to reach their ear level when seatedshould raise the restrain
t to the highest locked
position. To raise the restraint,
pull it straight up.
To lower the restraint, push down on it while pressing the lock knob (A) in the direction shown by the arrow. After adjusting the height, push down on the restraint to make sure it is locked in position.
WA R N I N G Driving without the head restraints in place can cause you and your passengersserious injury or deat
h in an accident. To
reduce the risk of injury in an accident, always make sure the head restraints are installed and properly positioned whenthe seat is occupied. In order to minimize
the risk of a neck
injury due to a rear impact, the seatback must be adjusted to the upright position and the head restraint must be adjusted tothe proper position
before vehicle opera-
tion. The driver shou
ld never adjust the
seat while the vehicle is in motion. Never place a cushion
or similar device on
the seatback. This can adversely affecthead restraint performance by increasing the distance between your head and the restraint.
When a person sits in the second center seating position, pull
up the head restraint
to a height at which it locks in position. Besure to make this adjustment before start- ing to drive. Serious injuries could other- wise be suffered in the result of an impact.NOTE
The head restraint height in the second row outboard seats and the third row seats cannot be adjusted.WA R N I N G
Adjustment of the head restraint height (front seats)
BK0223400US.book 11 ページ 2015年2月13日 金曜日 午後12時15分
Page 38 of 464
Making a cargo area 4-12 Seat and restraint systems
4
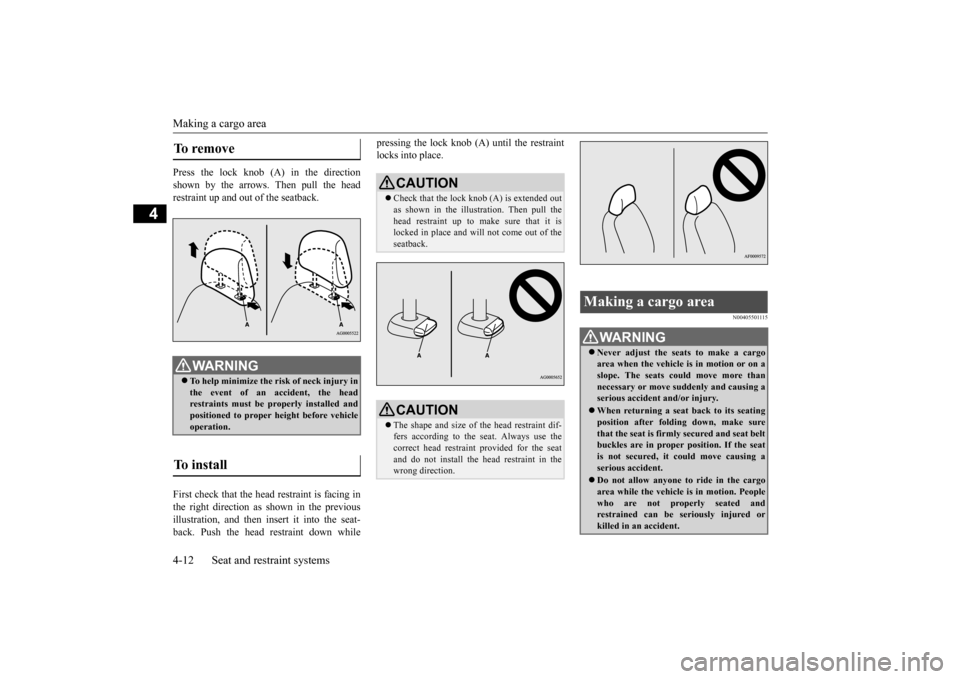
Press the lock knob (A) in the direction shown by the arrows. Then pull the head restraint up and out of the seatback. First check that the head restraint is facing in the right direction as
shown in the previous
illustration, and then insert it into the seat- back. Push the head restraint down while
pressing the lock knob (A) until the restraint locks into place.
N00405501115
To remove
WA R N I N G To help minimize the risk of neck injury in the event of an
accident, the head
restraints must be properly installed and positioned to proper height before vehicle operation.
To install
CAUTION Check that the lock knob (A) is extended out as shown in the illustration. Then pull the head restraint up to make sure that it is locked in place and will
not come out of the
seatback.CAUTION The shape and size of the head restraint dif- fers according to the seat. Always use the correct head restrain
t provided for the seat
and do not install the he
ad restraint in the
wrong direction.
Making a cargo area
WA R N I N G Never adjust the seats to make a cargo area when the vehicle is
in motion or on a
slope. The seats could move more thannecessary or move suddenly and causing a serious accident
and/or injury.
When returning a seat back to its seating position after folding down, make sure that the seat is firmly secured and seat beltbuckles are in proper position. If the seat is not secured, it could move causing a serious accident. Do not allow anyone to ride in the cargo area while the vehicle
is in motion. People
who are not properly seated and restrained can be seriously injured or killed in an accident.
BK0223400US.book 12 ページ 2015年2月13日 金曜日 午後12時15分
Page 49 of 464
Seat belts
Seat and restraint systems 4-23
4
N00406301354
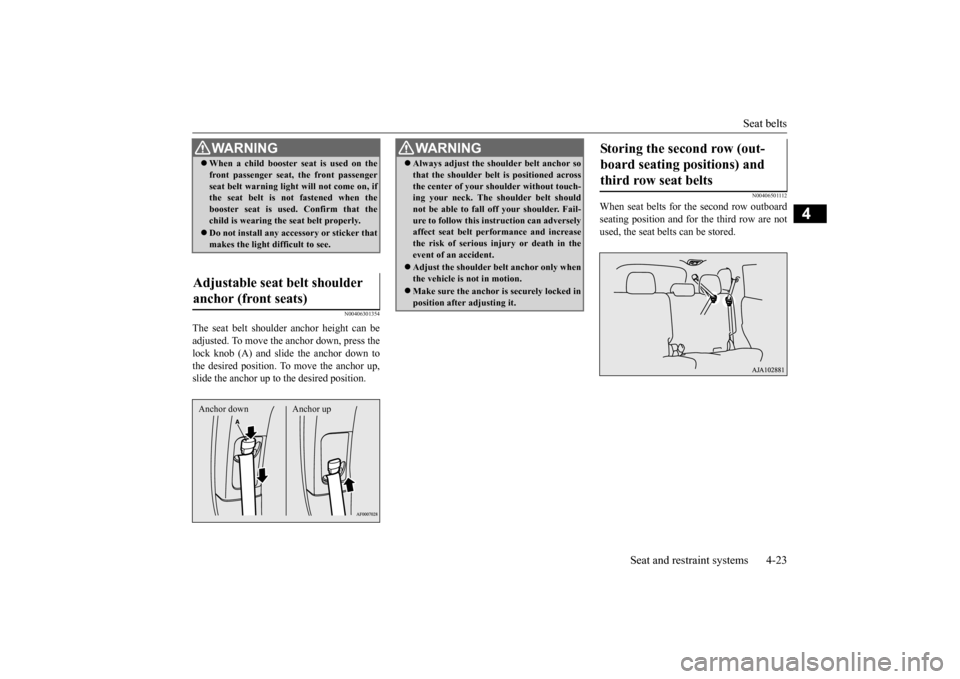
The seat belt shoulder
anchor height can be
adjusted. To move the anchor down, press thelock knob (A) and slide the anchor down to the desired position. To
move the anchor up,
slide the anchor up to the desired position.
N00406501112
When seat belts for the second row outboardseating position and for the third row are not used, the seat belts can be stored.
WA R N I N G When a child booster se
at is used on the
front passenger seat, the front passengerseat belt warning ligh
t will not come on, if
the seat belt is not fastened when the booster seat is used
. Confirm that the
child is wearing the seat belt properly. Do not install any acce
ssory or sticker that
makes the light difficult to see.
Adjustable seat belt shoulder anchor (front seats) Anchor down Anchor up
WA R N I N G Always adjust the shou
lder belt anchor so
that the shoulder belt
is positioned across
the center of your shoulder without touch-ing your neck. The sh
oulder belt should
not be able to fall off your shoulder. Fail- ure to follow this instruction can adverselyaffect seat belt performance and increase the risk of serious in
jury or death in the
event of an accident. Adjust the shoulder be
lt anchor only when
the vehicle is not in motion. Make sure the anchor is securely locked in position after adjusting it.
Storing the second row (out- board seating positions) and third row seat belts
BK0223400US.book 23 ページ 2015年2月13日 金曜日 午後12時15分