2016 MITSUBISHI OUTLANDER III reset
[x] Cancel search: resetPage 354 of 464

Operation Keys 7-26 Comfort controls
7
N00716700070
This explains names and functions of each part.Explanation of Buttons 1- key
Use to eject a disc.
2- 3 key/4 key
For audio, rewind/fast forward. For radio, use as preset keys 3 and 4.
3- 2RDM key
For audio, play random playback; for radio, use as preset key 2.
4- 1RPT key
For audio, play repeat playback; for radio, use as preset key 1.
5- RADIO key
Switch the radio and the band.
6- PWR/VOL key
Adjust the volume, and turn the powerON/OFF.
7- MEDIA key
Switch between CD
and other sources.
8- INFO key
Switch the content of the display.
9- CAT key
CAT (category content) searches and scans can be performed while receiving radio RBDS broadcasts. Search channels in the satellite radio*
1.
10- SCAN key
For audio, play scan playback; forradio, scan for stations.
11- Disc slot 12- PAGE key
Display indicator page advance.
BK0223400US.book 26 ページ 2015年2月13日 金曜日 午後12時15分
Page 355 of 464

Operation Keys
Comfort controls 7-27
7
N00716800042
13-
5 key Play/Pause Bluetooth Audio
*2, and use
as preset key 5 for radio.
14-
6 key Return during audio track search, and stop Bluetooth Audio
*2.
For radio, use as preset key 6.
15-
key/ key
For audio, select a
udio track/file; for
radio, perform auto
matic station selec-
tion. Select channels in the satellite radio*
1.
16- MENU key
Switch to Menu mode.
17- /SEL key
Adjust audio quality and select items. For radio, manually select stations. Select channels in the satellite radio*
1.
*1: Requires a satellite
tuner connection.
*2: Requires a separate
ly-purchased Blue-
tooth-capable audio
device in equip-
ment by type (vehicles with a Bluetooth
® 2.0 interface).
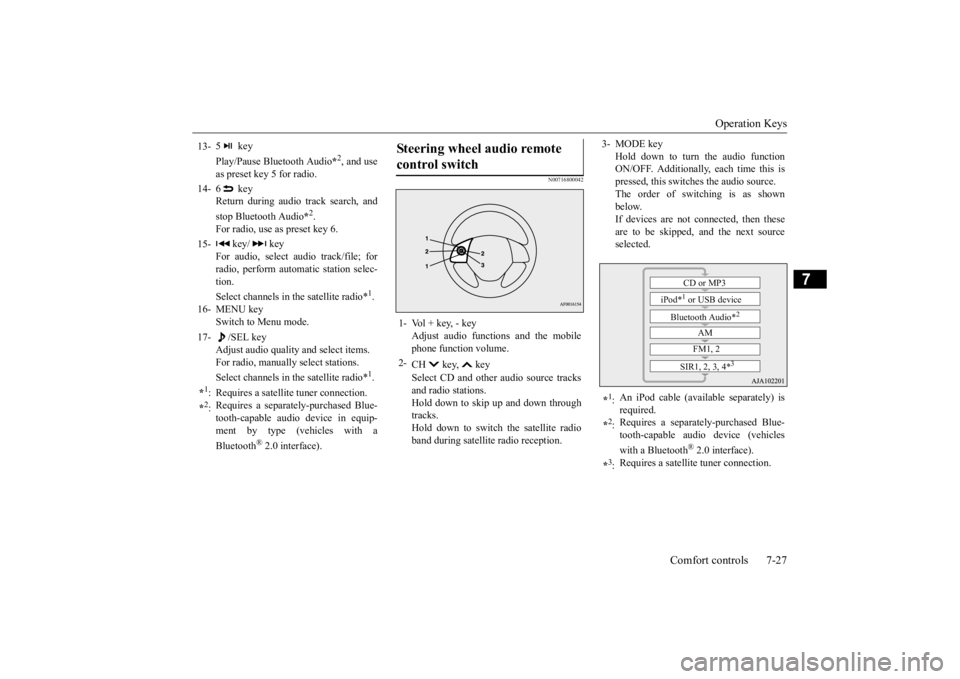
Steering wheel audio remote control switch 1- Vol + key, - key
Adjust audio functions and the mobile phone function volume.
2-
CH key, key Select CD and other
audio source tracks
and radio stations. Hold down to skip up and down through tracks.Hold down to switch the satellite radio band during satellit
e radio reception.
3- MODE key
Hold down to turn the audio function ON/OFF. Additionally, each time this ispressed, this switches the audio source. The order of switching is as shown below.If devices are not connected, then these are to be skipped, and the next source selected.
*1: An iPod cable (availa
ble separately) is
required.
*2: Requires a separately
-purchased Blue-
tooth-capable audio device (vehicles with a Bluetooth
® 2.0 interface).
*3: Requires a satellit
e tuner connection.CD or MP3
iPod*
1 or USB device
Bluetooth Audio*
2
AM FM1, 2
SIR1, 2, 3, 4*
3
BK0223400US.book 27 ページ 2015年2月13日 金曜日 午後12時15分
Page 356 of 464

Listen to Radio 7-28 Comfort controls
7
N00716900069
This explains how to listen to AM and FM radio broadcasts. Press the RADIO key to switch the band. Switch between AM and FM bands. The selected band is indicated on the display. *: When a satellite
tuner is connected
Turn the /SEL key to the frequency to lis- ten to.
Collective search for stations that can be received. Press the SCAN key.When a station is received, this is played for 5 seconds, then the product searches for the next station. Register the broadcast st
ation in advance, and
select this at a later time. 1. Tune in to the frequency to register.
2. Hold down any of the keys from the 1RPT key to the 6 key. A “Beep” sounds, and the preset key is registered.
During RBDS broadcast
reception,
select
CAT (category conten
t), and automatically
scan for stations. 1. During FM reception, press the CAT key. This switches to the CAT selection mode. 2. Press the CAT key to select CAT. 3. Press the key or key. The CAT (category content) indicator will flash, and station selection will automati- cally start.When a station is received, the frequency is displayed.
Listen to Radio To Listen to the Radio
NOTE
Bands switch in the order AM, FM1, FM2, SIR1*, SIR2*, SIR3*, and SIR4*. If no signal is receiv
ed, bands will not be
switched to SIR2, SIR3, or SIR4.
Manual/Seek Station Selection
/SEL key (counter- clockwise)
Reduces the frequency being received.
/SEL key (clockwise)
Increases the frequency being received.
key
(hold down)
Release the button to start seek station selection, and when a station is received, scanning stops.
key
(hold down)Scan Station Selection
NOTE
Press this button again while receiving the station to return
to normal reception.
Preset Memory
NOTE
The preset memory can register a maximum of 6 stations for each band. If a preset key that al
ready has a station reg-
istered is selected, then this is overwritten with the new preset. Pressing the preset ke
y will select the previ-
ously registered frequency.
CAT Search
BK0223400US.book 28 ページ 2015年2月13日 金曜日 午後12時15分
Page 358 of 464

Listen to Satellite Radio (if so equipped) 7-30 Comfort controls
7
Channels are received in order and take 10 seconds each. Press the SCAN key. All of the channels are scanned. 1. Press the CAT key. Switches to the category search mode, and the category name is indicated on thedisplay. 2. Turn the /SEL key to select the cate- gory.3. Press the SCAN key. The channels in the selected category are scanned.
Register the channel in
advance, and select
this at a later time. 1. Tune in to the channel to register. 2. Hold down any of the keys from the 1RPT key to the 6 key. A “Beep” sounds, and the preset key isregistered.
Other channels can be
selected while listen-
ing to a channel. 1. Press the CAT key. Switches to the category search mode,and the category name is indicated on the display. 2. Turn the /SEL key to select the cate- gory. 3. Press the /SEL key. Switches to channe
l search mode.
4. Turn the /SEL key to select the chan- nel. 5. Press the /SEL key. A “Beep” sounds, and the selected chan- nel is received. (Channel preliminary set-ting mode) The channel name shown on the display flashes. Press the /SEL key again to cancel the search mode and retu
rn to normal recep-
tion. 6. To continue the search, turn the /SEL key to select the channel. The selected channel is received. 7. Press the /SEL key. Cancels the search mode and returns tonormal reception.
Scan Station Selection
Scan All Channels
NOTE
Press this key again while receiving the channel to return to normal reception. Selecting a channel will cancel this.
Scan Category Channels
NOTE
Press the SCAN key or CAT key again while receiving the channel to return to normalreception. Turning the /SET key will cancel.
Preset Memory
NOTE
The preset memory can register a maximum of 6 stations per band. If a preset key that already has a channel reg- istered is selected, then this is overwritten with the new preset. Pressing the preset key will select the previ- ously registered channel. The preset channels on the display are shownas “P1” though “P6”.
Channel Search
BK0223400US.book 30 ページ 2015年2月13日 金曜日 午後12時15分
Page 362 of 464

Listen to an iPod 7-34 Comfort controls
7
Press the MEDIA key to set the iPod as the source. The selected source is
indicated on the dis-
play.
Press the key or key to select the track. This enables selection of
the next or previous
track. Hold down the 3 key or the 4 key. Fast forward/rewind is possible. Repeat playback and
shuffle playback are
possible. Press the 1RPT key. Repeat playback of th
e track currently being
played.
For vehicles with a Bluetooth
® 2.0 interface,
the types of devices
that can be connected
may vary. [For vehicles sold in U.S.A.]For details, access the Mitsubishi Motors North America website. [For vehicles sold in
Canada and Mexico]
For details, access the Mitsubishi Motors website. Please read and agree to the “Warn- ing about Links to the Web Sites of OtherCompanies”. The webs
ites mentioned above
may connect you to websites other than the Mitsubishi Motors website.http://www.mitsubishi
-motors.com/en/prod-
ucts/index.html Regarding how to c
onnect the iPod/iPhone,
refer to “How to c
onnect an iPod” on page
5-216. When connecting th
e iPod/iPhone, use a
commercially-available iPod connection cable. Set up the device in order that no unsafe actions, such as pluggi
ng in the connection
cable are taken while driving. When inserting and removing the iPod/iPhone, for safety’s
sake first stop the
vehicle. Depending on the status
of the iPod/iPhone,
it may take some time
until the device is rec-
ognized, or playback starts. Buttons on the product will not operate while iPod/iPhone is
connected.
NOTE
iPod/iPhone specificati
ons and settings may
mean that connection is not possible, orresult in differences
in operation or display.
Depending on audio data in the iPod/iPhone, track information may
not be displayed cor-
rectly. Depending on the status of the vehicle and device, the iPod/iPhone
may not play back
after starting the engine. Data containing copyri
ght information may
not play back. It is recommended
that the iPod/iPhone
equalizer settings be set to flat. Operate the iPod/iPhone while connected to this product. If the iPod/iPhone is
connected via Bluetooth
as a Bluetooth-capable
audio device, then do
not connect the iPod/iP
hone using an iPod
cable. Connection us
ing both methods will
result in erroneous operation. If an iPod/iPhone does
not operate
correctly,
then remove the iPod/iPhone from the prod- uct, reset, then reconnect.
Play iPod
NOTE
Select the Track (File) Fast Forward or Rewind Switch Playback Mode Repeat Playback (RPT)
NOTE
Pressing again will cancel.
BK0223400US.book 34 ページ 2015年2月13日 金曜日 午後12時15分
Page 374 of 464

System Settings 7-46 Comfort controls
7
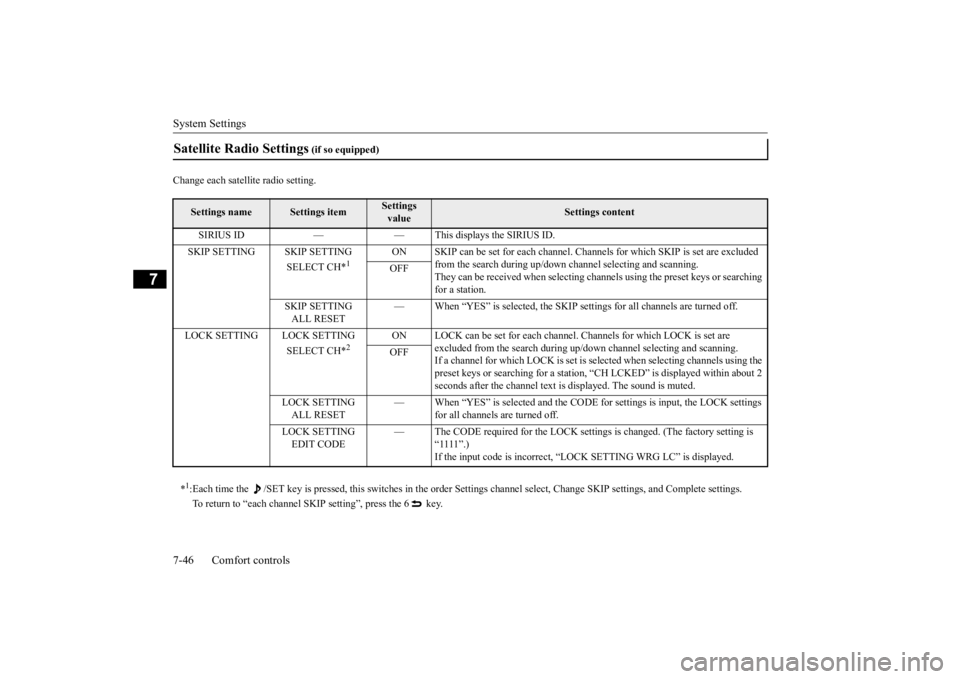
Change each satellite radio setting.Satellite Radio Settings
(if so equipped)
Settings name
Settings item
Settings value
Settings content
SIRIUS ID — — This displays the SIRIUS ID. SKIP SETTING SKIP SETTING
SELECT CH*
1
ON SKIP can be set for each channel. Chan
nels for which SKIP is set are excluded
from the search during up/down ch
annel selecting and scanning.
They can be received when selecting cha
nnels using the preset keys or searching
for a station.
OFF
SKIP SETTING ALL RESET
— When “YES” is selected, the SKIP settings for all channels are turned off.
LOCK SETTING LOCK SETTING
SELECT CH*
2
ON LOCK can be set for each channel. Channels for which LOCK is set are
excluded from the search during up/
down channel select
ing and scanning.
If a channel for which LOCK is set is sele
cted when selecting channels using the
preset keys or searching for a station,
“CH LCKED” is displayed within about 2
seconds after the channel text is
displayed. The sound is muted.
OFF
LOCK SETTING ALL RESET
— When “YES” is select
ed and the CODE for settings
is input, the LOCK settings
for all channels are turned off.
LOCK SETTING EDIT CODE
— The CODE required for the
LOCK settings is changed.
(The factory setting is
“1111”.) If the input code is incorrect, “L
OCK SETTING WRG LC” is displayed.
*1: Each time the /SET key is pressed, this sw
itches in the order Settings channel select
, Change SKIP settings
, and Complete setti
ngs.
To return to “each channel SKIP setting”, press the 6 key.
BK0223400US.book 46 ページ 2015年2月13日 金曜日 午後12時15分
Page 375 of 464

System Settings
Comfort controls 7-47
7
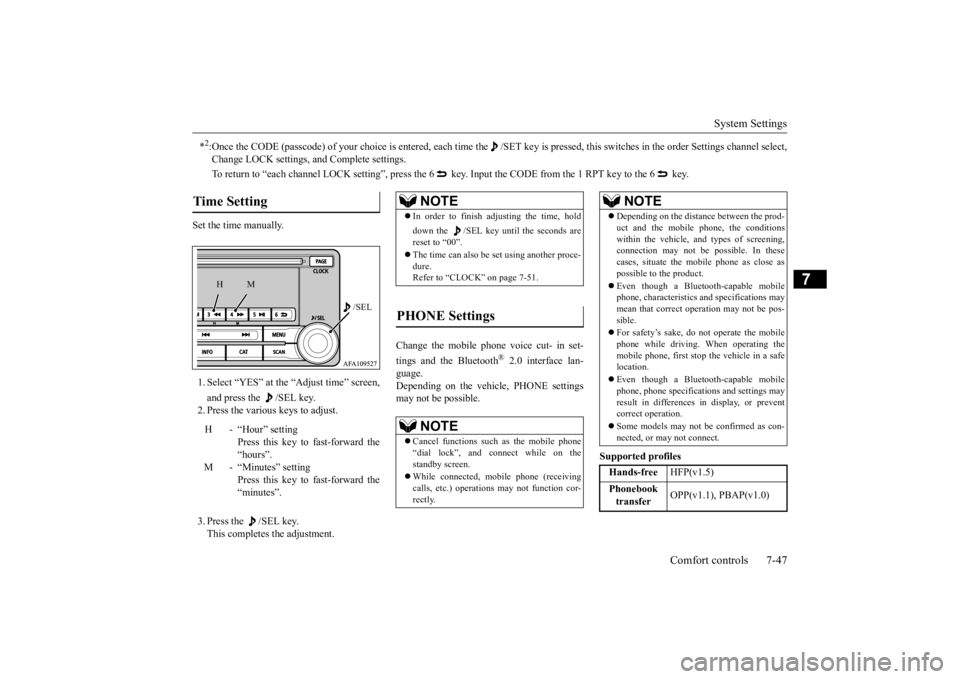
Set the time manually. 1. Select “YES” at the “Adjust time” screen, and press the /SEL key. 2. Press the various keys to adjust. 3. Press the /SEL key. This completes the adjustment.
Change the mobile phone voice cut- in set- tings and the Bluetooth
® 2.0 interface lan-
guage. Depending on the vehi
cle, PHONE settings
may not be possible.
Supported profiles
*2:Once the CODE (passcode) of your choice is
entered, each time the /SET
key is pressed, this switch
es in the order Settings chan
nel select,
Change LOCK settings,
and Complete settings.
To return to “each channel LOCK se
tting”, press the 6 key. Input the CODE from the 1 RPT key to the 6 key.
Time Setting
H - “Hour” setting
Press this key to fast-forward the “hours”.
M - “Minutes” setting
Press this key to fast-forward the “minutes”.
/SEL
M
H
NOTE
In order to finish adjusting the time, hold down the /SEL key unt
il the seconds are
reset to “00”. The time can also be
set using another proce-
dure. Refer to “CLOCK” on page 7-51.
PHONE Settings
NOTE
Cancel functions such as the mobile phone “dial lock”, and connect while on the standby screen. While connected, mobile phone (receiving calls, etc.) operations
may not function cor-
rectly.
Depending on the distan
ce between the prod-
uct and the mobile
phone, the conditions
within the vehicle, and types of screening, connection may not be
possible. In these
cases, situate the mobile phone as close as possible to the product. Even though a Bluet
ooth-capable mobile
phone, characteristics an
d specifications may
mean that correct ope
ration may not be pos-
sible. For safety’s sake, do not operate the mobile phone while driving. When operating the mobile phone, first stop the vehicle in a safe location. Even though a Bluet
ooth-capable mobile
phone, phone specificati
ons and settings may
result in differences in display, or prevent correct operation. Some models may not
be confirmed as con-
nected, or may not connect.Hands-free
HFP(v1.5)
Phonebook transfer
OPP(v1.1), PBAP(v1.0)
NOTE
BK0223400US.book 47 ページ 2015年2月13日 金曜日 午後12時15分
Page 379 of 464

Antenna
Comfort controls 7-51
7
N00734201494
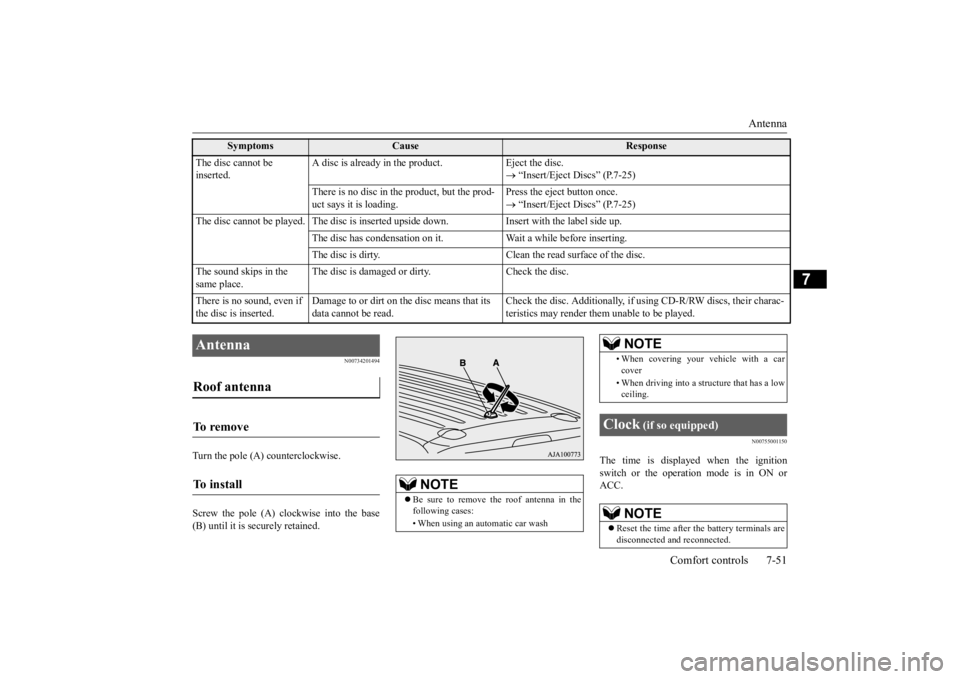
Turn the pole (A) counterclockwise. Screw the pole (A) clockwise into the base (B) until it is securely retained.
N00755001150
The time is displayed when the ignition switch or the operation mode is in ON orACC.
The disc cannot be inserted.
A disc is already in the product. Eject the disc.
“Insert/Eject Discs” (P.7-25)
There is no disc in
the product, but the prod-
uct says it is loading.
Press the eject button once. “Insert/Eject Discs” (P.7-25)
The disc cannot be played. The
disc is inserted up
side down. Insert with
the label side up.
The disc has condensation on it
. Wait a while before inserting.
The disc is dirty. Clean the
read surface of the disc.
The sound skips in the same place.
The disc is damaged or dirty. Check the disc.
There is no sound, even if the disc is inserted.
Damage to or dirt on the disc means that its data cannot be read.
Check the disc. Additionally, if using CD-R/RW discs, their charac- teristics may render them
unable to be played.
Symptoms
Cause
Response
Antenna Roof antenna To remove To install
NOTE
Be sure to remove the roof antenna in the following cases: • When using an automatic car wash
• When covering your ve
hicle with a car
cover • When driving into a structure that has a low ceiling.
Clock
(if so equipped)
NOTE
Reset the time after the battery terminals are disconnected an
d reconnected.
NOTE
BK0223400US.book 51 ページ 2015年2月13日 金曜日 午後12時15分