2016 MITSUBISHI OUTLANDER III ECO mode
[x] Cancel search: ECO modePage 369 of 464
Listen to Bluetooth Audio (if so equipped)
Comfort controls 7-41
7
6. After the voice gui
de says “Playing
the voice recognition
mode and starts playback.
N00717500020
This product can play back tracks on com-mercially-available Blue
tooth-capable audio
devices.
Regarding how to connect your Bluetooth device, refer to “Connecting the Bluetooth
®
2.0 interface and Blue
tooth device” on page
5-199. Operation methods belo
w describe situations
once connection ha
s been completed.
1. Press the MEDIA key to set Bluetooth Audio as the source. The selected source is indicated on the display.
NOTE
If you say “No” to three
or all genres uttered
by the system, the voice guide will say“Genre not found, please try again” and thesystem returns to step 2.NOTE
If the confirmation f
unction is active, the
voice guide confirms if
the genre is correct.
If the genre is correct, say “Yes”. If not, say“No”. After the voice
guide says “Genre not
found, please try again,” the system returns to step 2. Refer to “Confirmation functionsetting” on page 5-196.
Listen to Bluetooth Audio
(if
so equipped)
CAUTION Never hold these devices in your hand to operate while driving, as this is dangerous. Do not leave the Bluetooth audio device unattended in the vehicle. Depending on how the de
vices are handled,
audio files being damage
d or lost, therefore
it is recommended that
data be backed up.
NOTE
Depending on the type
of Bluetooth-capable
audio devices, usage may not be possible, or functions that can be us
ed may be restricted.
Confirm together with the user manuals for the commercially-availa
ble Bluetooth-capa-
ble audio devices. Depending on the type
of Bluetooth-capable
audio devices, volume
levels may differ.
There is the danger of loud volumes, so prior to use, it is recommended that you turn the volume down. “Adjust Volume” (P.7-25)
Depending on the status of the Bluetooth audio device, it
may take some time until the
device is recognized,
or playback starts.
Bluetooth audio device
specifications and
settings may mean that connection is not possible, or result in
differences in operation
or display. Depending on audio data in the Bluetooth audio device, track in
formation may not be
displayed correctly.
Depending on the status of the vehicle and device, the iPod/iPhone
may not play back
after starting
the engine.
Connect a Bluetooth-capable Audio Device
NOTE
If the iPod/iPhone is c
onnected via Bluetooth
as a Bluetooth-capable
audio device, then do
not connect the iPod/iP
hone using an iPod
cable. Connection us
ing both methods will
result in erroneous operation.
Play Bluetooth Audio
NOTE
BK0223400US.book 41 ページ 2015年2月13日 金曜日 午後12時15分
Page 370 of 464

Listen to Bluetooth Audio (if so equipped) 7-42 Comfort controls
7
2. Press the 5 key. Bluetooth Audio play- back starts.
Press the key or key to select the track. This enables selection of
the next or previous
track. Hold down the 3 key or the 4 key. Fast forward/rewind is possible. Repeat playback, random
playback, and scan
playback are possible.
Press the 1RPT key. Repeat playback of the track currently being played. Press the 2RDM key. Play the tracks in the Bluetooth Audio device in a random order. Press the SCAN key. Play the first 10 seconds of each of the tracks on the whole Bluetooth Audio device in order.
NOTE
Hold down the 5 key to pause. Press the 6 key to stop.
Select the Track (File)
Fast Forward or Rewind
Switch Playback Mode
Repeat Playback (RPT)
NOTE
Each time the 1RPT key is pressed, this switches in the order Repeat OFF, 1 track repeat, All track repe
at, and Repeat OFF.
Random Playback (RDM)
NOTE
Pressing again will cancel.
Scan Playback (SCAN)
NOTE
Press this button again during playback if you wish to hear that track, and that trackwill play normally.
BK0223400US.book 42 ページ 2015年2月13日 金曜日 午後12時15分
Page 375 of 464
System Settings
Comfort controls 7-47
7
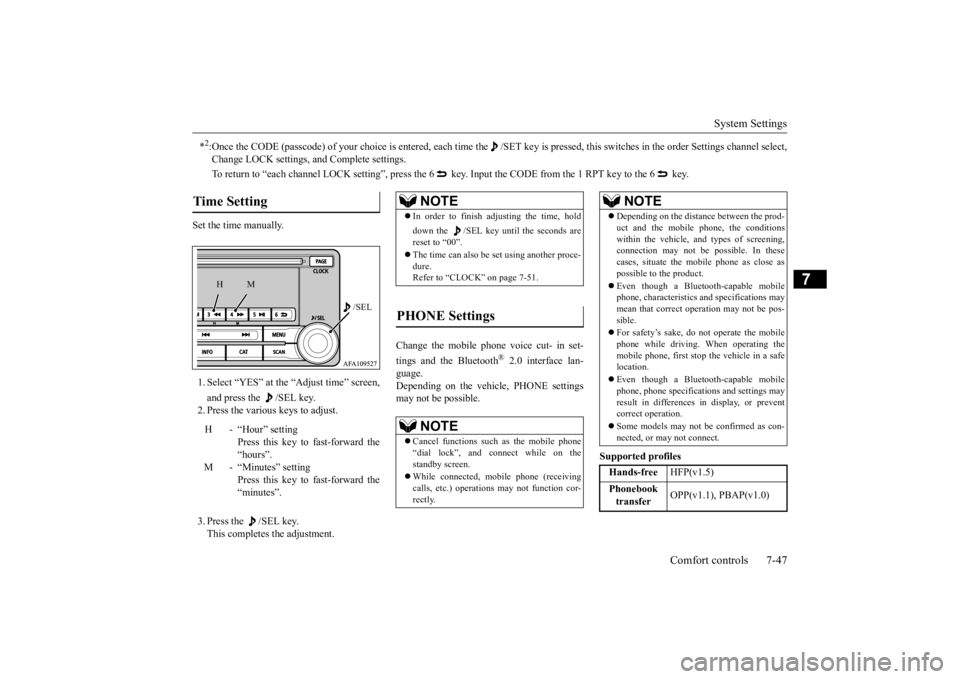
Set the time manually. 1. Select “YES” at the “Adjust time” screen, and press the /SEL key. 2. Press the various keys to adjust. 3. Press the /SEL key. This completes the adjustment.
Change the mobile phone voice cut- in set- tings and the Bluetooth
® 2.0 interface lan-
guage. Depending on the vehi
cle, PHONE settings
may not be possible.
Supported profiles
*2:Once the CODE (passcode) of your choice is
entered, each time the /SET
key is pressed, this switch
es in the order Settings chan
nel select,
Change LOCK settings,
and Complete settings.
To return to “each channel LOCK se
tting”, press the 6 key. Input the CODE from the 1 RPT key to the 6 key.
Time Setting
H - “Hour” setting
Press this key to fast-forward the “hours”.
M - “Minutes” setting
Press this key to fast-forward the “minutes”.
/SEL
M
H
NOTE
In order to finish adjusting the time, hold down the /SEL key unt
il the seconds are
reset to “00”. The time can also be
set using another proce-
dure. Refer to “CLOCK” on page 7-51.
PHONE Settings
NOTE
Cancel functions such as the mobile phone “dial lock”, and connect while on the standby screen. While connected, mobile phone (receiving calls, etc.) operations
may not function cor-
rectly.
Depending on the distan
ce between the prod-
uct and the mobile
phone, the conditions
within the vehicle, and types of screening, connection may not be
possible. In these
cases, situate the mobile phone as close as possible to the product. Even though a Bluet
ooth-capable mobile
phone, characteristics an
d specifications may
mean that correct ope
ration may not be pos-
sible. For safety’s sake, do not operate the mobile phone while driving. When operating the mobile phone, first stop the vehicle in a safe location. Even though a Bluet
ooth-capable mobile
phone, phone specificati
ons and settings may
result in differences in display, or prevent correct operation. Some models may not
be confirmed as con-
nected, or may not connect.Hands-free
HFP(v1.5)
Phonebook transfer
OPP(v1.1), PBAP(v1.0)
NOTE
BK0223400US.book 47 ページ 2015年2月13日 金曜日 午後12時15分
Page 379 of 464
Antenna
Comfort controls 7-51
7
N00734201494
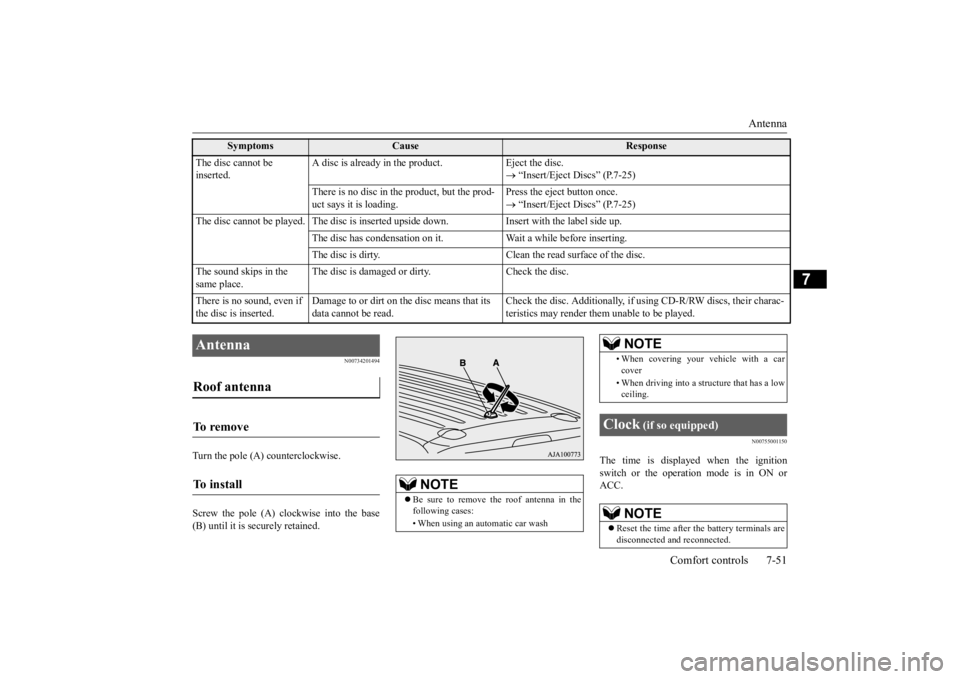
Turn the pole (A) counterclockwise. Screw the pole (A) clockwise into the base (B) until it is securely retained.
N00755001150
The time is displayed when the ignition switch or the operation mode is in ON orACC.
The disc cannot be inserted.
A disc is already in the product. Eject the disc.
“Insert/Eject Discs” (P.7-25)
There is no disc in
the product, but the prod-
uct says it is loading.
Press the eject button once. “Insert/Eject Discs” (P.7-25)
The disc cannot be played. The
disc is inserted up
side down. Insert with
the label side up.
The disc has condensation on it
. Wait a while before inserting.
The disc is dirty. Clean the
read surface of the disc.
The sound skips in the same place.
The disc is damaged or dirty. Check the disc.
There is no sound, even if the disc is inserted.
Damage to or dirt on the disc means that its data cannot be read.
Check the disc. Additionally, if using CD-R/RW discs, their charac- teristics may render them
unable to be played.
Symptoms
Cause
Response
Antenna Roof antenna To remove To install
NOTE
Be sure to remove the roof antenna in the following cases: • When using an automatic car wash
• When covering your ve
hicle with a car
cover • When driving into a structure that has a low ceiling.
Clock
(if so equipped)
NOTE
Reset the time after the battery terminals are disconnected an
d reconnected.
NOTE
BK0223400US.book 51 ページ 2015年2月13日 金曜日 午後12時15分
Page 385 of 464
Jump-starting the engine For emergencies 8-3
8
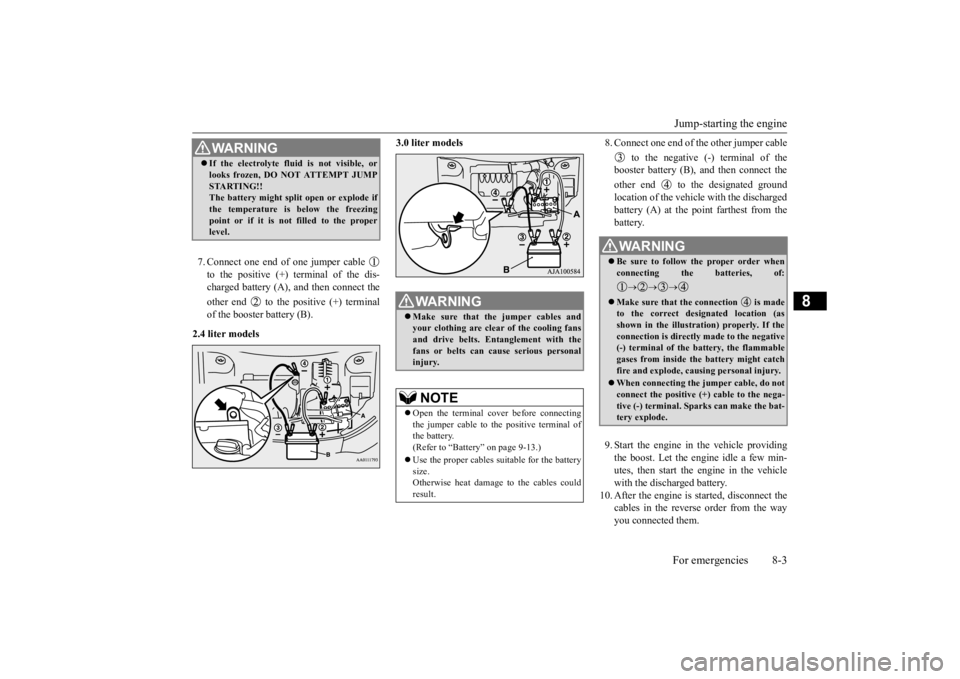
7. Connect one end of one jumper cable to the positive (+) terminal of the dis- charged battery (A),
and then connect the
other end to the positive (+) terminal of the booster battery (B).
2.4 liter models
3.0 liter models
8. Connect one end of the other jumper cable
to the negative (-) terminal of the booster battery (B), a
nd then connect the
other end to the designated ground location of the vehicl
e with the discharged
battery (A) at the point farthest from the battery. 9. Start the engine in the vehicle providing the boost. Let the engine idle a few min- utes, then start the engine in the vehiclewith the discharged battery.
10. After the engine is
started, disconnect the
cables in the reverse order from the wayyou connected them.
WA R N I N G If the electrolyte flui
d is not visible, or
looks frozen, DO NOT ATTEMPT JUMPSTARTING!!The battery might split open or explode if the temperature is below the freezing point or if it is not filled to the properlevel.
WA R N I N G Make sure that the jumper cables and your clothing are clear of the cooling fans and drive belts. Entanglement with thefans or belts can ca
use serious personal
injury.NOTE
Open the terminal cover before connecting the jumper cable to the positive terminal of the battery.(Refer to “Battery” on page 9-13.) Use the proper cables suitable for the battery size. Otherwise heat damage
to the cables could
result.
WA R N I N G Be sure to follow the proper order when connecting the batteries, of:
Make sure that the connection is made to the correct designated location (as shown in the illustration) properly. If theconnection is directly made to the negative (-) terminal of the battery, the flammable gases from inside the battery might catchfire and explode, caus
ing personal injury.
When connecting the jumper cable, do not connect the positive (+) cable to the nega- tive (-) terminal. Sparks can make the bat- tery explode.
BK0223400US.book 3 ページ 2015年2月13日 金曜日 午後12時15分
Page 397 of 464
Operation under adverse driving conditions
For emergencies 8-15
8
Release the parking brake. Set the selector lever to the “N” (NEUTRAL) position.
N00837201760
If your vehicle becomes
stuck in snow, sand,
or mud, it can often be moved by a rocking motion. Rock your vehicle back and forth to free it.Do not rev the engine or spin the wheels. Constant efforts to free a stuck vehicle can cause overheating and tr
ansaxle failure. Let
the engine idle for a few minutes to cool the transaxle before trying again. If your vehicle is still
stuck after several rock-
ing attempts, call for a commercial tow truck service.
[For front-wheel driv
e vehicle equipped with
the active stability control (ASC)]If the vehicle is towed with the ignitionswitch in the “ON” pos
ition or the operation
mode in ON and only the front wheels raised off the ground (Type C), the ASC may oper-ate, resulting in an accident. When towing the vehicle with the front wheels raised, keep the ignition switch or
the operation mode as
follows. [Except for vehicles equipped with the F. A . S . T. - k e y ]The ignition switch is in “LOCK”, “OFF” or “ACC” position. [Vehicles equipped with the F.A.S.T.-key]The operation mode is in OFF or ACC.
Towing a front-wheel drive vehi- cle with front wheels off the ground (Type C)
CAUTION
Operation under adverse driving conditions If your vehicle becomes stuck in sand, mud or snow
WA R N I N G When trying to rock
your vehicle out of a
stuck position, make sure that there are nopeople nearby. The
rocking motion can
make your vehicle suddenly lurch forward or backward, and inju
re any bystanders.
On wet roads
CAUTIONAvoid flooded roads. Water is often deeper than it looks, and you could be seriously hurtby driving into flood water. When driving in rain, on water-covered roads, or through a car
wash, water could get
into the brake discs and make them fail tem- porarily. In such cases, lightly press thebrake pedal to see if they are working prop- erly. If they are not, press the pedal lightly several times while driving to dry the brakepads or linings, then check them again. When driving in rain, a layer of water may form between the tires and the road surface (hydroplaning). This loosens your tires’ grip on the road, making it difficult to steer orbrake properly. When driving on a wet road:• Drive your vehicle at a safe speed.• Do not drive on worn tires.• Always keep the tires at the correct infla- tion pressures.
BK0223400US.book 15 ページ 2015年2月13日 金曜日 午後12時15分
Page 404 of 464
Engine oil and oil filter 9-6 Vehicle care and maintenance
9
N00937702024
It is normal for an engi
ne to use oil. You may
need to add oil between the recommended oil change intervals. Befo
re starting the engine,
check the engine oil leve
l. Refill if necessary.
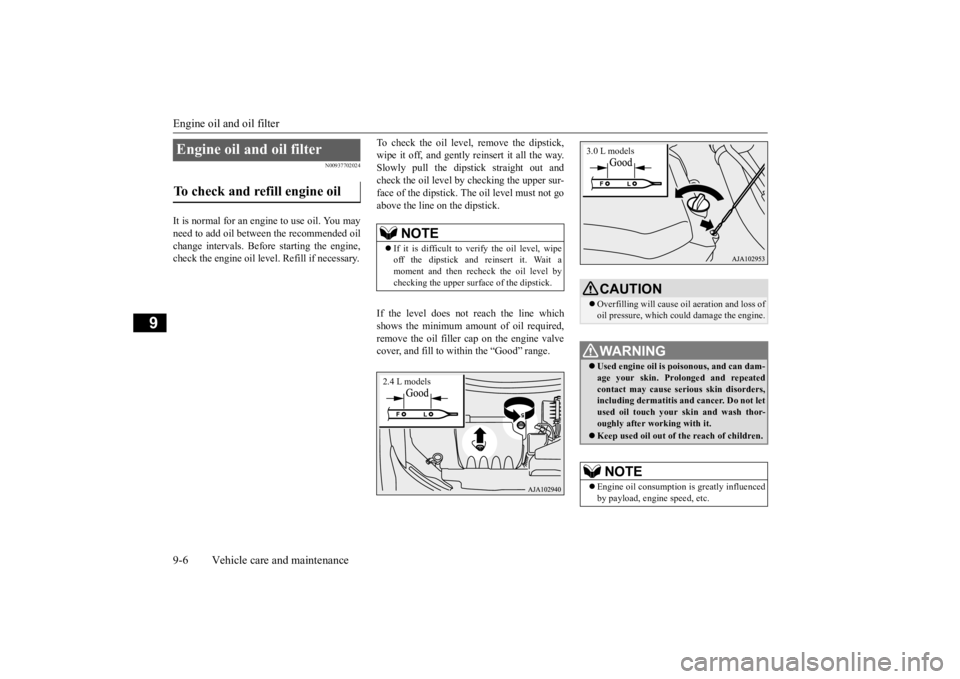
To check the oil level, remove the dipstick, wipe it off, and gently
reinsert it all the way.
Slowly pull the dipsti
ck straight out and
check the oil level by checking the upper sur- face of the dipstick. Th
e oil level must not go
above the line on the dipstick. If the level does not reach the line which shows the minimum amo
unt of oil required,
remove the oil filler cap on the engine valve cover, and fill to within the “Good” range.
Engine oil and oil filter To check and refill engine oil
NOTE
If it is difficult to verify the oil level, wipe off the dipstick and
reinsert it. Wait a
moment and then recheck the oil level by checking the upper surfa
ce of the dipstick.
2.4 L models
CAUTIONOverfilling will cause
oil aeration and loss of
oil pressure, which coul
d damage the engine.
WA R N I N GUsed engine oil is po
isonous, and can dam-
age your skin. Prolonged and repeatedcontact may cause serious skin disorders, including dermatitis and cancer. Do not let used oil touch your sk
in and wash thor-
oughly after working with it. Keep used oil out of
the reach of children.
NOTE
Engine oil consumption
is greatly influenced
by payload, engine speed, etc.3.0 L models
BK0223400US.book 6 ページ 2015年2月13日 金曜日 午後12時15分
Page 408 of 464

Air cleaner filter 9-10 Vehicle care and maintenance
9
3. Unclamp the cover. Open up the top of the cover and take out th
e air cleaner filter.
4. Replace the air cleane
r filter and put the
cover back on in its original position.
5. For 2.4 L models, put the duct back on in its original position.
2.4 L models
NOTE
Mitsubishi Motors Genuine Parts are recom- mended when replacing th
e air cleaner filter.
For 2.4 L models, make
sure that the connec-
tor is properly reconnected. After replacing the air cleaner filter, make sure that the hinges at the bottom of coverare firmly set.3.0 L models
CAUTION Take care not to scra
tch the engine air flow
sensor when removing
the air cleaner cover.
2.4 L models3.0 L models
BK0223400US.book 10 ページ 2015年2月13日 金曜日 午後12時15分