2016 MERCEDES-BENZ SL ROADSTER radio
[x] Cancel search: radioPage 246 of 333
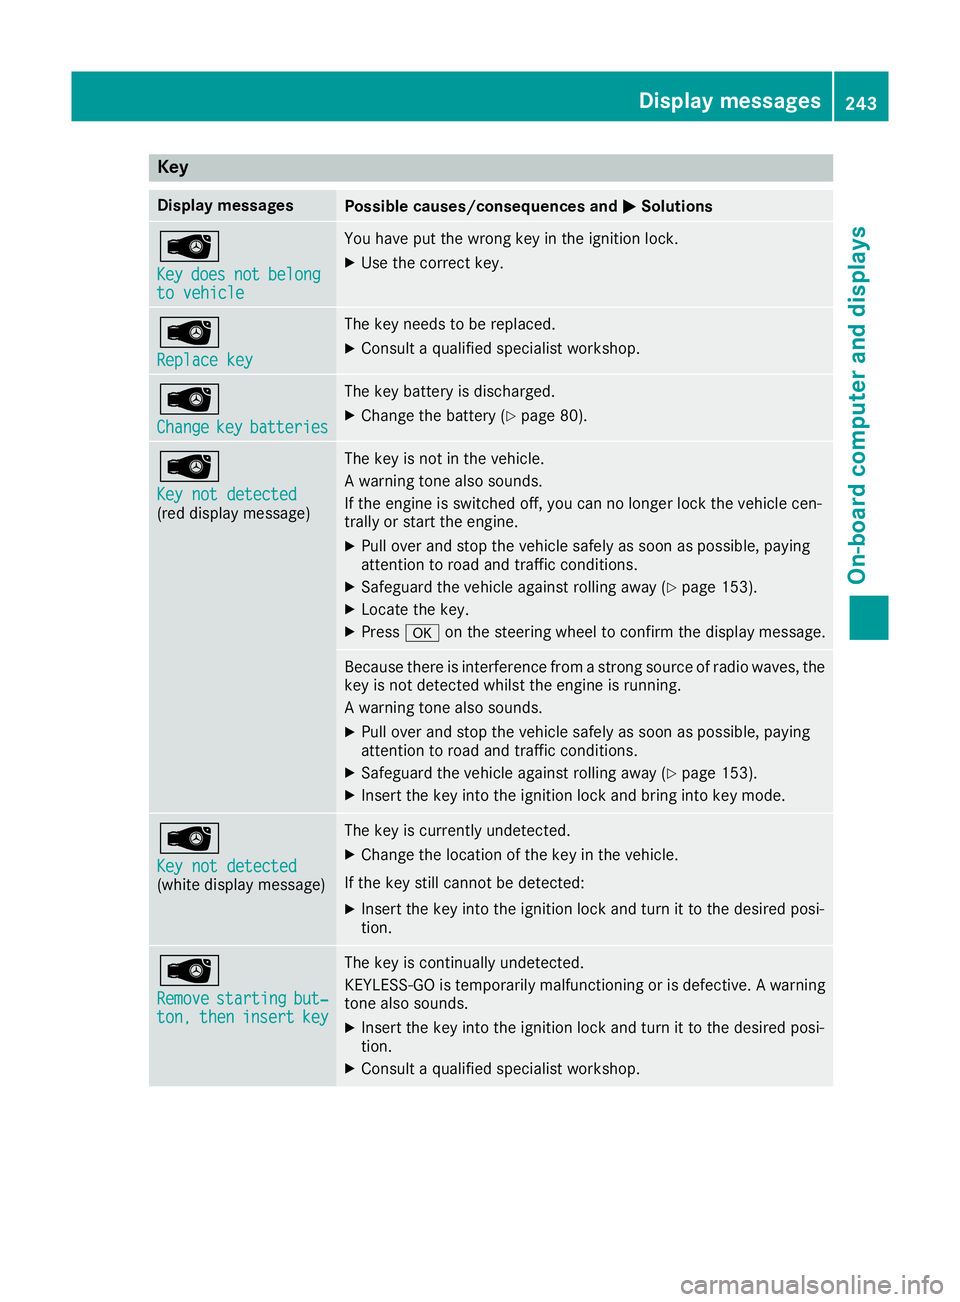
Key
Display messages
Possible causes/consequences and
M
MSolutions Â
Key Key
does
does not
notbelong
belong
to vehicle
to vehicle You have put the wrong key in the ignition lock.
X Use the correct key. Â
Replace key Replace key The key needs to be replaced.
X Consult a qualified specialist workshop. Â
Change Change
key
keybatteries
batteries The key battery is discharged.
X Change the battery (Y page 80).Â
Key not detected Key not detected
(red display message) The key is not in the vehicle.
A warning tone also sounds.
If the engine is switched off, you can no longer lock the vehicle cen-
trally or start the engine.
X Pull over and stop the vehicle safely as soon as possible, paying
attention to road and traffic conditions.
X Safeguard the vehicle against rolling away (Y page 153).
X Locate the key.
X Press aon the steering wheel to confirm the display message. Because there is interference from a strong source of radio waves, the
key is not detected whilst the engine is running.
A warning tone also sounds.
X Pull over and stop the vehicle safely as soon as possible, paying
attention to road and traffic conditions.
X Safeguard the vehicle against rolling away (Y page 153).
X Insert the key into the ignition lock and bring into key mode. Â
Key not detected Key not detected
(white display message) The key is currently undetected.
X Change the location of the key in the vehicle.
If the key still cannot be detected:
X Insert the key into the ignition lock and turn it to the desired posi-
tion. Â
Remove Remove
starting
starting but‐
but‐
ton,
ton, then
theninsert
insert key
key The key is continually undetected.
KEYLESS-GO is temporarily malfunctioning or is defective. A warning
tone also sounds.
X Insert the key into the ignition lock and turn it to the desired posi-
tion.
X Consult a qualified specialist workshop. Display
messages
243On-board computer and displays Z
Page 257 of 333
Adjusting the volume
X
Turn the qcontrol knob.
The volume is adjusted:
R for the currently selected media source
R during traffic or navigation announcements
R in hands-free mode during a phone call
Switching the sound on/off X
Press the 8button on the control panel.
If the audio output is switched off, the status
line will show the 8symbol. If you switch
the media source or set the volume, the sound
is automatically switched on.
i Navigation messages will be heard even if
the sound is muted.
Functions The multimedia system has the following func-
tions:
R Radio mode
R Media mode with media search
R Sound systems
R Navigation system
COMAND Online: navigation via the hard drive
Audio 20: navigation via SD card
R Communication functions
R Vehicle functions with system settings
R Favourites functions
Controller The controller in the centre console lets you:
R select menu items on the display
R enter characters
R select a destination on the map
R save entries
The controller can be:
R turned 3
R slid left or right 1
R slid forwards or back 4
R slid diagonally 2
R pressed briefly or pressed and held 7Back button You can use the
%button to exit a menu or to
call up the basic display of the current operating mode.
X To exit the menu: briefly press the%
button.
The multimedia system changes to the next
higher menu level in the current operating
mode.
X To call up the basic display: press the%
button for longer than two seconds.
The multimedia system changes to the basic
display of the current operating mode. Favourites
Calling up and exiting favourites X
To call up: press theòbutton on the con-
troller.
X Select a favourite, e. g. Vehicle Vehicle.
The favourites are displayed.
X To exit: press the òbutton again.
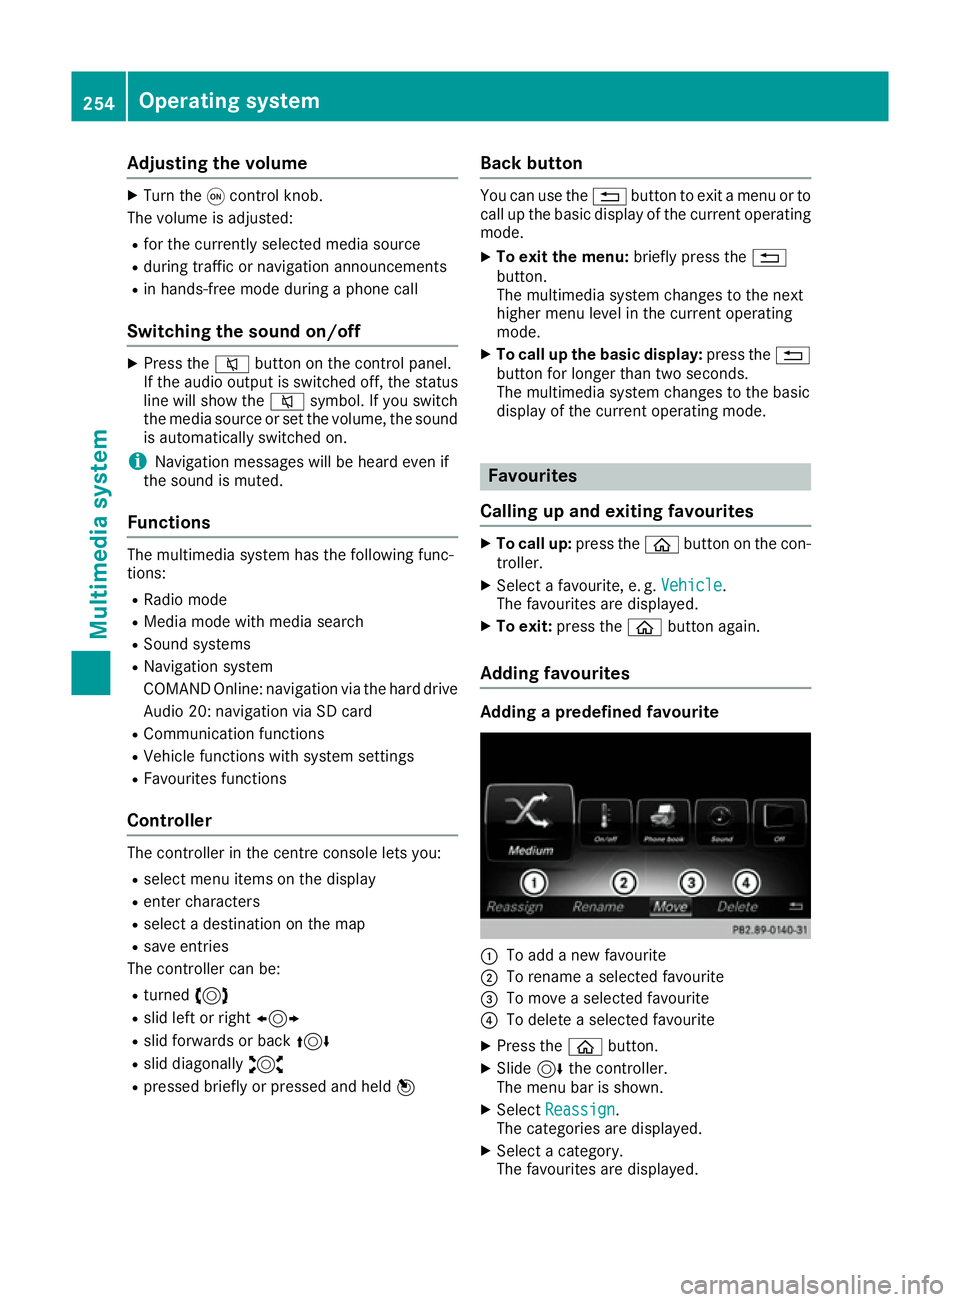
Adding favourites Adding a predefined favourite
:
To add a new favourite
; To rename a selected favourite
= To move a selected favourite
? To delete a selected favourite
X Press the òbutton.
X Slide 6the controller.
The menu bar is shown.
X Select Reassign
Reassign.
The categories are displayed.
X Select a category.
The favourites are displayed. 254
Operating systemMultimedia system
Page 272 of 333
cause you to lose control of the vehicle. There
is a risk of an accident.
Use this device only when the vehicle is sta-
tionary.
i You must observe the legal requirements for
the country in which you are currently driving
when operating mobile communications
equipment in the vehicle.
If it is permitted by law to operate communi-
cations equipment while the vehicle is in
motion, you may only do so if the traffic sit-
uation permits. You may otherwise be dis-
tracted from the traffic conditions, cause an
accident and injure yourself and others.
Excessive levels of electromagnetic radiation
may cause damage to your health and to the
health of others. The use of an exterior aerial
takes into consideration the scientific discus-
sion surrounding the possible health risk posed
by electromagnetic fields.
Mercedes-Benz recommends the use of an
approved exterior aerial. This ensures:
R optimal mobile phone reception quality in the
vehicle
R that mutual interference between the vehicle
electronics and mobile phones is minimised
An exterior aerial has the following advantages:
R it conducts the electromagnetic fields gener-
ated by a wireless device to the exterior
R the field strength in the vehicle interior is
lower than in a vehicle that does not have an
exterior aerial
Information on retrofitting two-way radios and
mobile phones (RF transmitters) (Y page 320).
General notes There are various mobile phone brackets that
may be fitted in your vehicle; in some cases,
these are country-specific.
You can connect a Bluetooth ®
-capable mobile
phone with COMAND Online through the Blue-
tooth ®
interface. This also applies if your vehicle
is equipped with convenience telephony. More information on suitable mobile phones,
mobile phone brackets and on connecting Blue-
tooth ®
-capable mobile phones with COMAND
Online can be obtained:
R at your Mercedes-Benz Service Centre
R on the Internet at https://www.mercedes-
benz.com/de/mercedes-me/
konnektivitaet/
i The functions and services available when
you use the phone depend on your mobile
phone model and service provider.
Using a mobile phone If the mobile phone is inserted in the mobile
phone bracket, the mobile phone will be
charged and connected with the exterior aerial.
X Open the telephone compartment
(Y page 262).
X Place the mobile phone bracket into the pre-
installed fitting; see the separate installation
instructions for the mobile phone fitting.
X Insert the mobile phone into the mobile phone
bracket; see the separate installation instruc-
tions for the mobile phone fitting.
Operating the mobile phone You can operate the telephone using the
6
and ~ buttons on the multifunction steering
wheel. You can operate other mobile phone
functions via the on-board computer
(Y page 205).
When you remove the key from the ignition lock,
the mobile phone is disconnected from the
hands-free system. Active calls will first be
transferred to the mobile phone directly. Garage door opener
General notes The HomeLink
®
garage door opener integrated
in the rear-view mirror allows you to operate up
to three different door and gate systems.
Once programmed, the integrated garage door
opener in the rear-view mirror will assume the
function of the garage door system's remote
control. Please also read the operating instruc-
tions for the garage door system. Features
269Stowing and features Z
Page 275 of 333
X
Turn the key to position 2in the ignition lock
(Y page 132).
X Press and hold buttons ;and ?.
The indicator lamp initially lights up yellow
and then green.
X Release buttons ;and ?.
The memory of the integrated garage door
opener in the rear-view mirror is cleared.
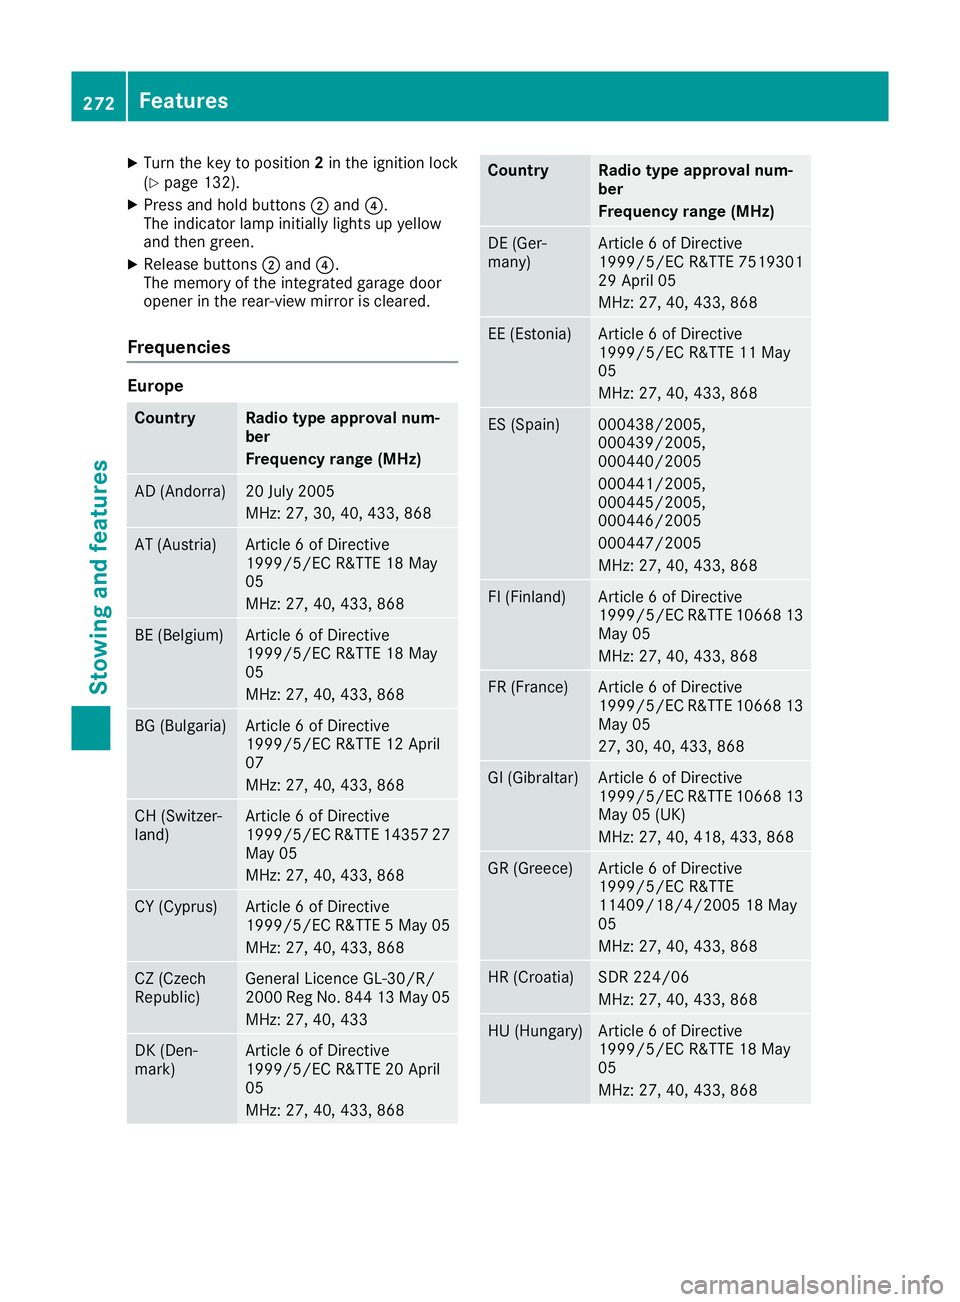
Frequencies Europe
Country Radio type approval num-
ber
Frequency range (MHz)
AD (Andorra) 20 July 2005
MHz: 27, 30, 40, 433, 868
AT (Austria) Article 6 of Directive
1999/5/EC R&TTE 18 May
05
MHz: 27, 40, 433, 868
BE (Belgium) Article 6 of Directive
1999/5/EC R&TTE 18 May
05
MHz: 27, 40, 433, 868
BG (Bulgaria) Article 6 of Directive
1999/5/EC R&TTE 12 April
07
MHz: 27, 40, 433, 868
CH (Switzer-
land) Article 6 of Directive
1999/5/EC R&TTE 14357 27
May 05
MHz: 27, 40, 433, 868 CY (Cyprus) Article 6 of Directive
1999/5/EC R&TTE 5 May 05
MHz: 27, 40, 433, 868 CZ (Czech
Republic) General Licence GL-30/R/
2000 Reg No. 844 13 May 05
MHz: 27, 40, 433 DK (Den-
mark) Article 6 of Directive
1999/5/EC R&TTE 20 April
05
MHz: 27, 40, 433, 868 Country Radio type approval num-
ber
Frequency range (MHz)
DE (Ger-
many) Article 6 of Directive
1999/5/EC R&TTE 7519301
29 April 05
MHz: 27, 40, 433, 868
EE (Estonia) Article 6 of Directive
1999/5/EC R&TTE 11 May
05
MHz: 27, 40, 433, 868
ES (Spain) 000438/2005,
000439/2005,
000440/2005
000441/2005,
000445/2005,
000446/2005
000447/2005
MHz: 27, 40, 433, 868
FI (Finland) Article 6 of Directive
1999/5/EC R&TTE 10668 13
May 05
MHz: 27, 40, 433, 868 FR (France) Article 6 of Directive
1999/5/EC R&TTE 10668 13
May 05
27, 30, 40, 433, 868 GI (Gibraltar) Article 6 of Directive
1999/5/EC R&TTE 10668 13
May 05 (UK)
MHz: 27, 40, 418, 433, 868 GR (Greece) Article 6 of Directive
1999/5/EC R&TTE
11409/18/4/2005 18 May
05
MHz: 27, 40, 433, 868
HR (Croatia) SDR 224/06
MHz: 27, 40, 433, 868
HU (Hungary) Article 6 of Directive
1999/5/EC R&TTE 18 May
05
MHz: 27, 40, 433, 868272
FeaturesStowing and features
Page 276 of 333
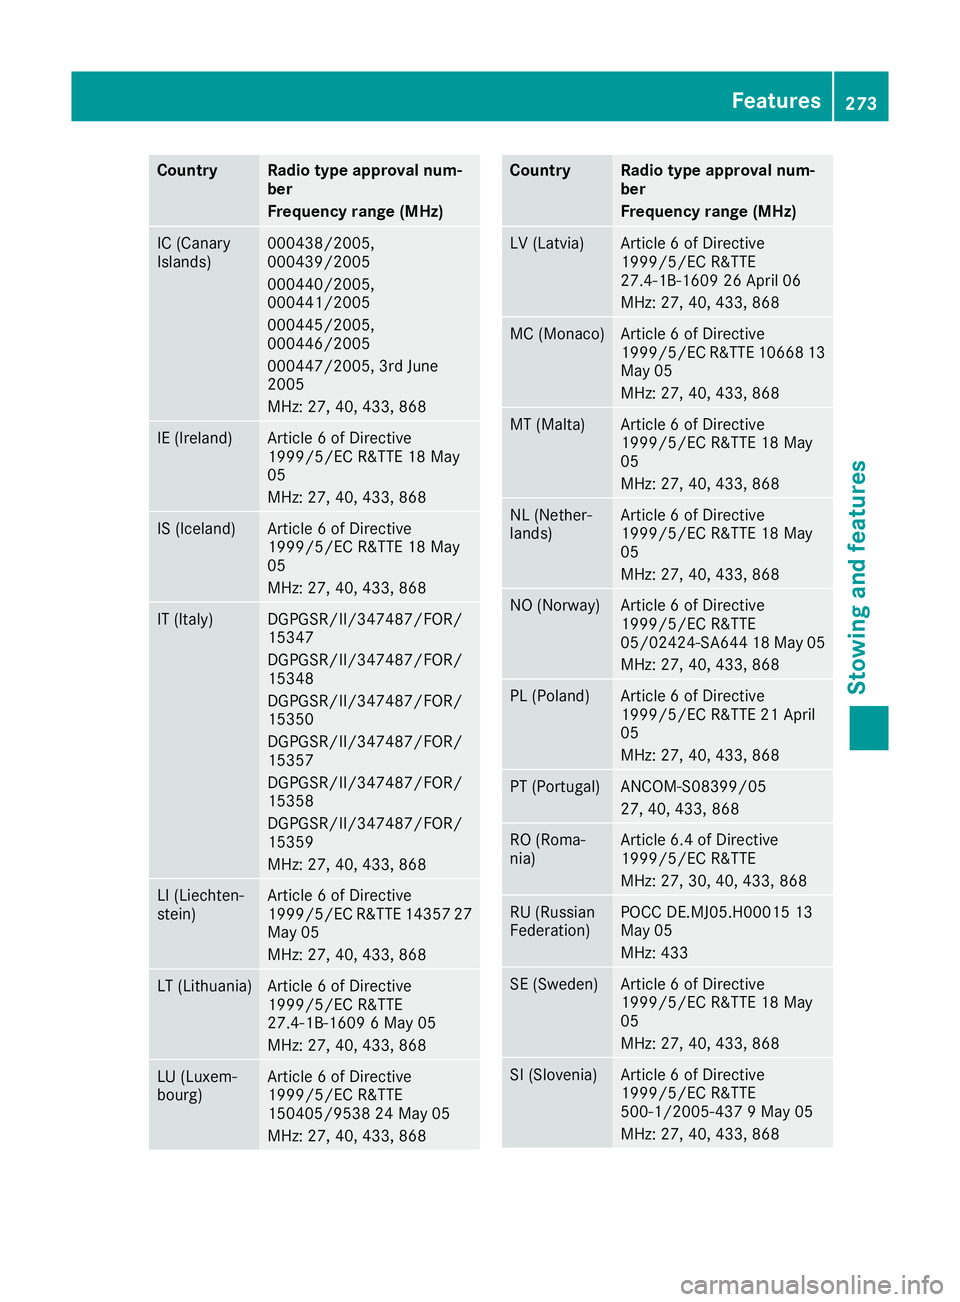
Country Radio type approval num-
ber
Frequency range (MHz)
IC (Canary
Islands) 000438/2005,
000439/2005
000440/2005,
000441/2005
000445/2005,
000446/2005
000447/2005, 3rd June
2005
MHz: 27, 40, 433, 868
IE (Ireland) Article 6 of Directive
1999/5/EC R&TTE 18 May
05
MHz: 27, 40, 433, 868
IS (Iceland) Article 6 of Directive
1999/5/EC R&TTE 18 May
05
MHz: 27, 40, 433, 868
IT (Italy) DGPGSR/II/347487/FOR/
15347
DGPGSR/II/347487/FOR/
15348
DGPGSR/II/347487/FOR/
15350
DGPGSR/II/347487/FOR/
15357
DGPGSR/II/347487/FOR/
15358
DGPGSR/II/347487/FOR/
15359
MHz: 27, 40, 433, 868 LI (Liechten-
stein) Article 6 of Directive
1999/5/EC R&TTE 14357 27
May 05
MHz: 27, 40, 433, 868 LT (Lithuania) Article 6 of Directive
1999/5/EC R&TTE
27.4-1B-1609 6 May 05
MHz: 27, 40, 433, 868
LU (Luxem-
bourg) Article 6 of Directive
1999/5/EC R&TTE
150405/9538 24 May 05
MHz: 27, 40, 433, 868 Country Radio type approval num-
ber
Frequency range (MHz)
LV (Latvia) Article 6 of Directive
1999/5/EC R&TTE
27.4-1B-1609 26 April 06
MHz: 27, 40, 433, 868
MC (Monaco) Article 6 of Directive
1999/5/EC R&TTE 10668 13
May 05
MHz: 27, 40, 433, 868 MT (Malta) Article 6 of Directive
1999/5/EC R&TTE 18 May
05
MHz: 27, 40, 433, 868
NL (Nether-
lands) Article 6 of Directive
1999/5/EC R&TTE 18 May
05
MHz: 27, 40, 433, 868
NO (Norway) Article 6 of Directive
1999/5/EC R&TTE
05/02424-SA644 18 May 05
MHz: 27, 40, 433, 868 PL (Poland) Article 6 of Directive
1999/5/EC R&TTE 21 April
05
MHz: 27, 40, 433, 868
PT (Portugal) ANCOM-S08399/05
27, 40, 433, 868
RO (Roma-
nia) Article 6.4 of Directive
1999/5/EC R&TTE
MHz: 27, 30, 40, 433, 868
RU (Russian
Federation) POCC DE.MJ05.H00015 13
May 05
MHz: 433
SE (Sweden) Article 6 of Directive
1999/5/EC R&TTE 18 May
05
MHz: 27, 40, 433, 868
SI (Slovenia) Article 6 of Directive
1999/5/EC R&TTE
500-1/2005-437 9 May 05
MHz: 27, 40, 433, 868 Features
273Stowing and features Z
Page 277 of 333
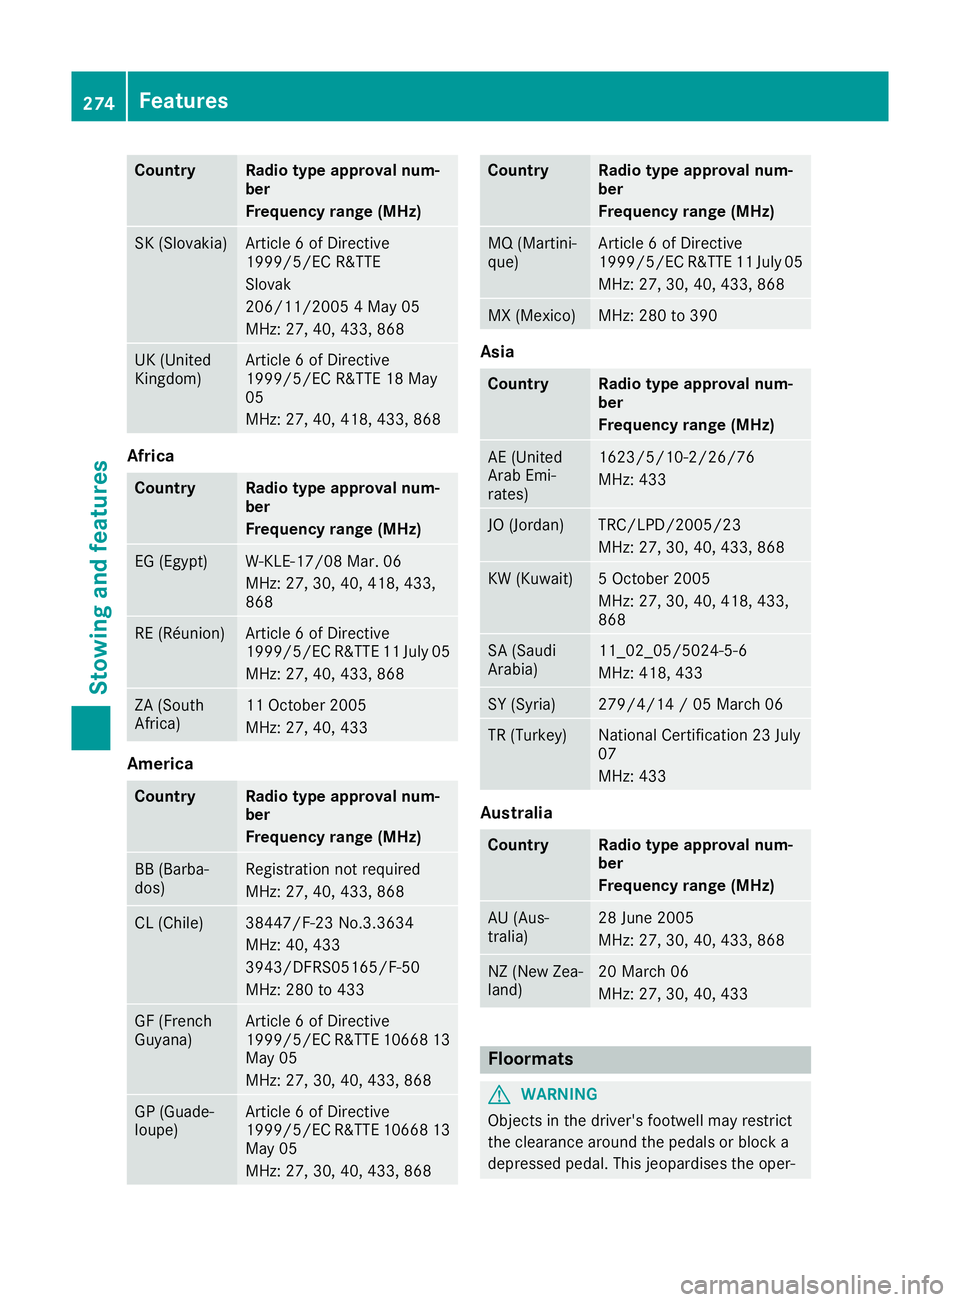
Country Radio type approval num-
ber
Frequency range (MHz)
SK (Slovakia) Article 6 of Directive
1999/5/EC R&TTE
Slovak
206/11/2005 4 May 05
MHz: 27, 40, 433, 868 UK (United
Kingdom) Article 6 of Directive
1999/5/EC R&TTE 18 May
05
MHz: 27, 40, 418, 433, 868
Africa
Country Radio type approval num-
ber
Frequency range (MHz)
EG (Egypt) W-KLE-17/08 Mar. 06
MHz: 27, 30, 40, 418, 433,
868
RE (Réunion) Article 6 of Directive
1999/5/EC R&TTE 11 July 05
MHz: 27, 40, 433, 868 ZA (South
Africa) 11 October 2005
MHz: 27, 40, 433
America
Country Radio type approval num-
ber
Frequency range (MHz)
BB (Barba-
dos) Registration not required
MHz: 27, 40, 433, 868
CL (Chile) 38447/F-23 No.3.3634
MHz: 40, 433
3943/DFRS05165/F-50
MHz: 280 to 433
GF (French
Guyana) Article 6 of Directive
1999/5/EC R&TTE 10668 13
May 05
MHz: 27, 30, 40, 433, 868 GP (Guade-
loupe) Article 6 of Directive
1999/5/EC R&TTE 10668 13
May 05
MHz: 27, 30, 40, 433, 868 Country Radio type approval num-
ber
Frequency range (MHz)
MQ (Martini-
que) Article 6 of Directive
1999/5/EC R&TTE 11 July 05
MHz: 27, 30, 40, 433, 868 MX (Mexico) MHz: 280 to 390
Asia
Country Radio type approval num-
ber
Frequency range (MHz)
AE (United
Arab Emi-
rates) 1623/5/10-2/26/76
MHz: 433
JO (Jordan) TRC/LPD/2005/23
MHz: 27, 30, 40, 433, 868
KW (Kuwait) 5 October 2005
MHz: 27, 30, 40, 418, 433,
868
SA (Saudi
Arabia) 11_02_05/5024-5-6
MHz: 418, 433
SY (Syria) 279/4/14 / 05 March 06
TR (Turkey) National Certification 23 July
07
MHz: 433
Australia
Country Radio type approval num-
ber
Frequency range (MHz)
AU (Aus-
tralia) 28 June 2005
MHz: 27, 30, 40, 433, 868
NZ (New Zea-
land) 20 March 06
MHz: 27, 30, 40, 433
Floormats
G
WARNING
Objects in the driver's footwell may restrict
the clearance around the pedals or block a
depressed pedal. This jeopardises the oper- 274
FeaturesStowing and features
Page 278 of 333
ating and road safety of the vehicle. There is a
risk of an accident.
Stow all objects securely in the vehicle so that
they do not get into the driver's footwell.
Always fit the floormats securely and as pre-
scribed in order to ensure that there is always sufficient room for the pedals. Do not use
loose floormats and do not place several floor-mats on top of one another. X
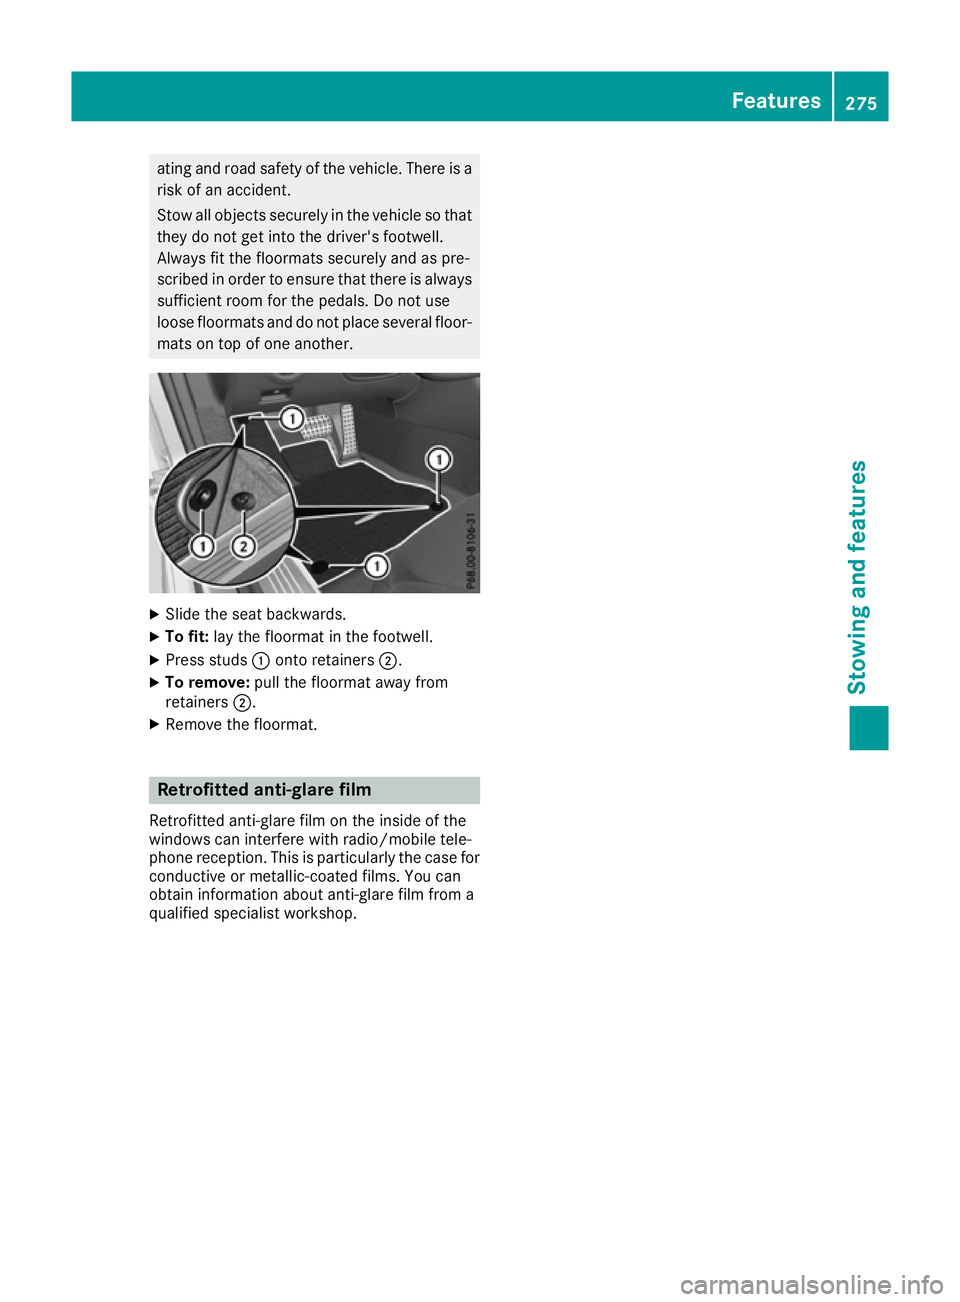
Slide the seat backwards.
X To fit: lay the floormat in the footwell.
X Press studs :onto retainers ;.
X To remove: pull the floormat away from
retainers ;.
X Remove the floormat. Retrofitted anti-glare film
Retrofitted anti-glare film on the inside of the
windows can interfere with radio/mobile tele-
phone reception. This is particularly the case for conductive or metallic-coated films. You can
obtain information about anti-glare film from a
qualified specialist workshop. Features
275Stowing and features Z
Page 313 of 333
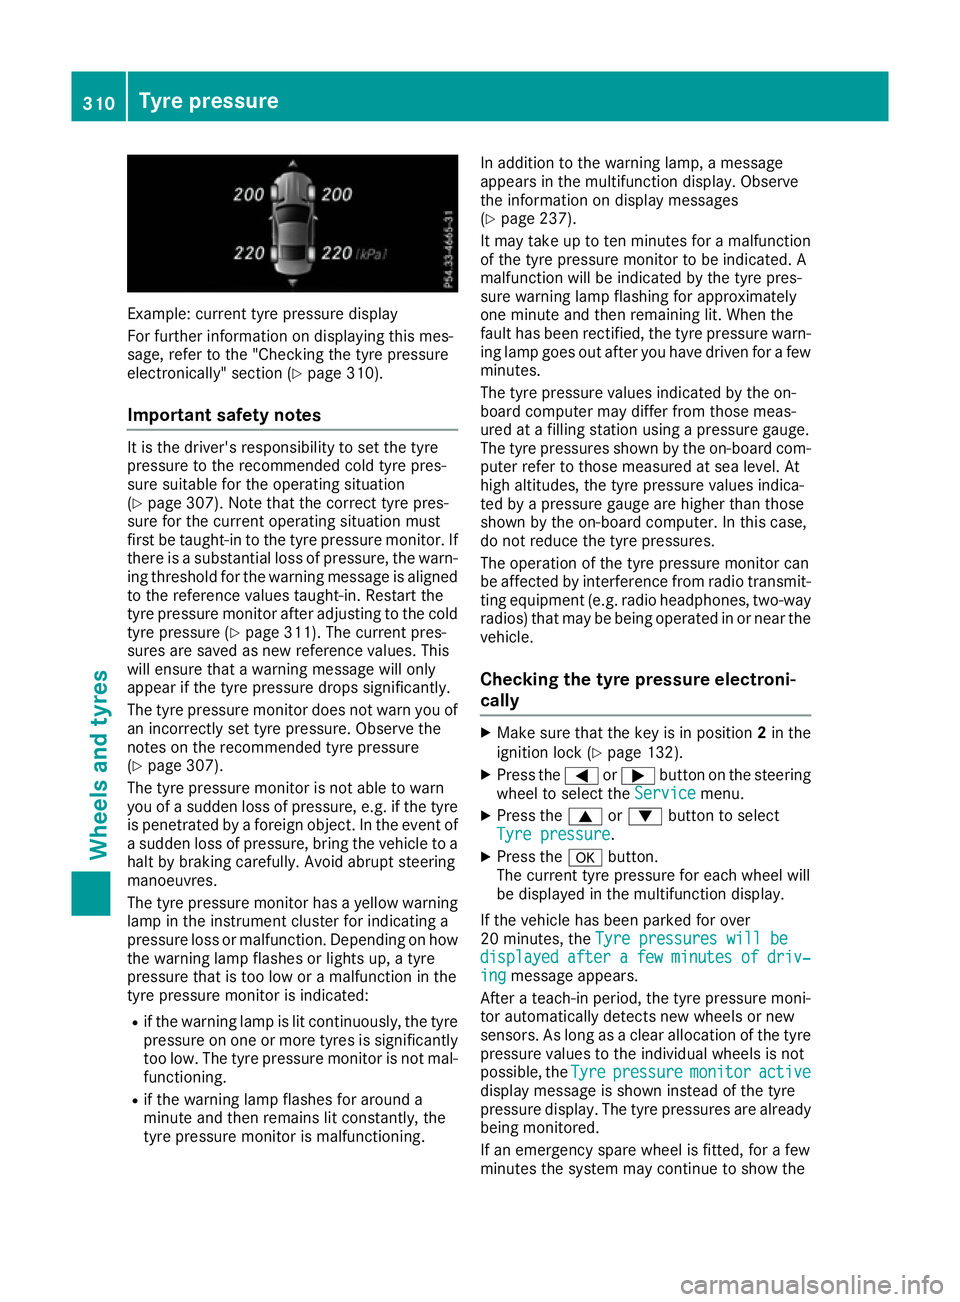
Example: current tyre pressure display
For further information on displaying this mes-
sage, refer to the "Checking the tyre pressure
electronically" section (Y page 310).
Important safety notes It is the driver's responsibility to set the tyre
pressure to the recommended cold tyre pres-
sure suitable for the operating situation
(Y page 307). Note that the correct tyre pres-
sure for the current operating situation must
first be taught-in to the tyre pressure monitor. If
there is a substantial loss of pressure, the warn- ing threshold for the warning message is aligned
to the reference values taught-in. Restart the
tyre pressure monitor after adjusting to the cold tyre pressure (Y page 311). The current pres-
sures are saved as new reference values. This
will ensure that a warning message will only
appear if the tyre pressure drops significantly.
The tyre pressure monitor does not warn you of
an incorrectly set tyre pressure. Observe the
notes on the recommended tyre pressure
(Y page 307).
The tyre pressure monitor is not able to warn
you of a sudden loss of pressure, e.g. if the tyre is penetrated by a foreign object. In the event of
a sudden loss of pressure, bring the vehicle to a halt by braking carefully. Avoid abrupt steering
manoeuvres.
The tyre pressure monitor has a yellow warning
lamp in the instrument cluster for indicating a
pressure loss or malfunction. Depending on how
the warning lamp flashes or lights up, a tyre
pressure that is too low or a malfunction in the
tyre pressure monitor is indicated:
R if the warning lamp is lit continuously, the tyre
pressure on one or more tyres is significantly
too low. The tyre pressure monitor is not mal- functioning.
R if the warning lamp flashes for around a
minute and then remains lit constantly, the
tyre pressure monitor is malfunctioning. In addition to the warning lamp, a message
appears in the multifunction display. Observe
the information on display messages
(Y page 237).
It may take up to ten minutes for a malfunction
of the tyre pressure monitor to be indicated. A
malfunction will be indicated by the tyre pres-
sure warning lamp flashing for approximately
one minute and then remaining lit. When the
fault has been rectified, the tyre pressure warn- ing lamp goes out after you have driven for a few
minutes.
The tyre pressure values indicated by the on-
board computer may differ from those meas-
ured at a filling station using a pressure gauge.
The tyre pressures shown by the on-board com- puter refer to those measured at sea level. At
high altitudes, the tyre pressure values indica-
ted by a pressure gauge are higher than those
shown by the on-board computer. In this case,
do not reduce the tyre pressures.
The operation of the tyre pressure monitor can
be affected by interference from radio transmit-
ting equipment (e.g. radio headphones, two-way radios) that may be being operated in or near the vehicle.
Checking the tyre pressure electroni-
cally X
Make sure that the key is in position 2in the
ignition lock (Y page 132).
X Press the =or; button on the steering
wheel to select the Service
Service menu.
X Press the 9or: button to select
Tyre pressure Tyre pressure.
X Press the abutton.
The current tyre pressure for each wheel will
be displayed in the multifunction display.
If the vehicle has been parked for over
20 minutes, the Tyre pressures will be Tyre pressures will be
displayed
displayed after
aftera
a few
few minutes
minutes of
ofdriv‐
driv‐
ing
ing message appears.
After a teach-in period, the tyre pressure moni-
tor automatically detects new wheels or new
sensors. As long as a clear allocation of the tyre pressure values to the individual wheels is not
possible, the Tyre Tyrepressure
pressure monitor
monitoractive
active
display message is shown instead of the tyre
pressure display. The tyre pressures are already being monitored.
If an emergency spare wheel is fitted, for a few
minutes the system may continue to show the 310
Tyre pressureWheels and tyres