2016 MERCEDES-BENZ SL-CLASS ROADSTER ignition
[x] Cancel search: ignitionPage 198 of 614
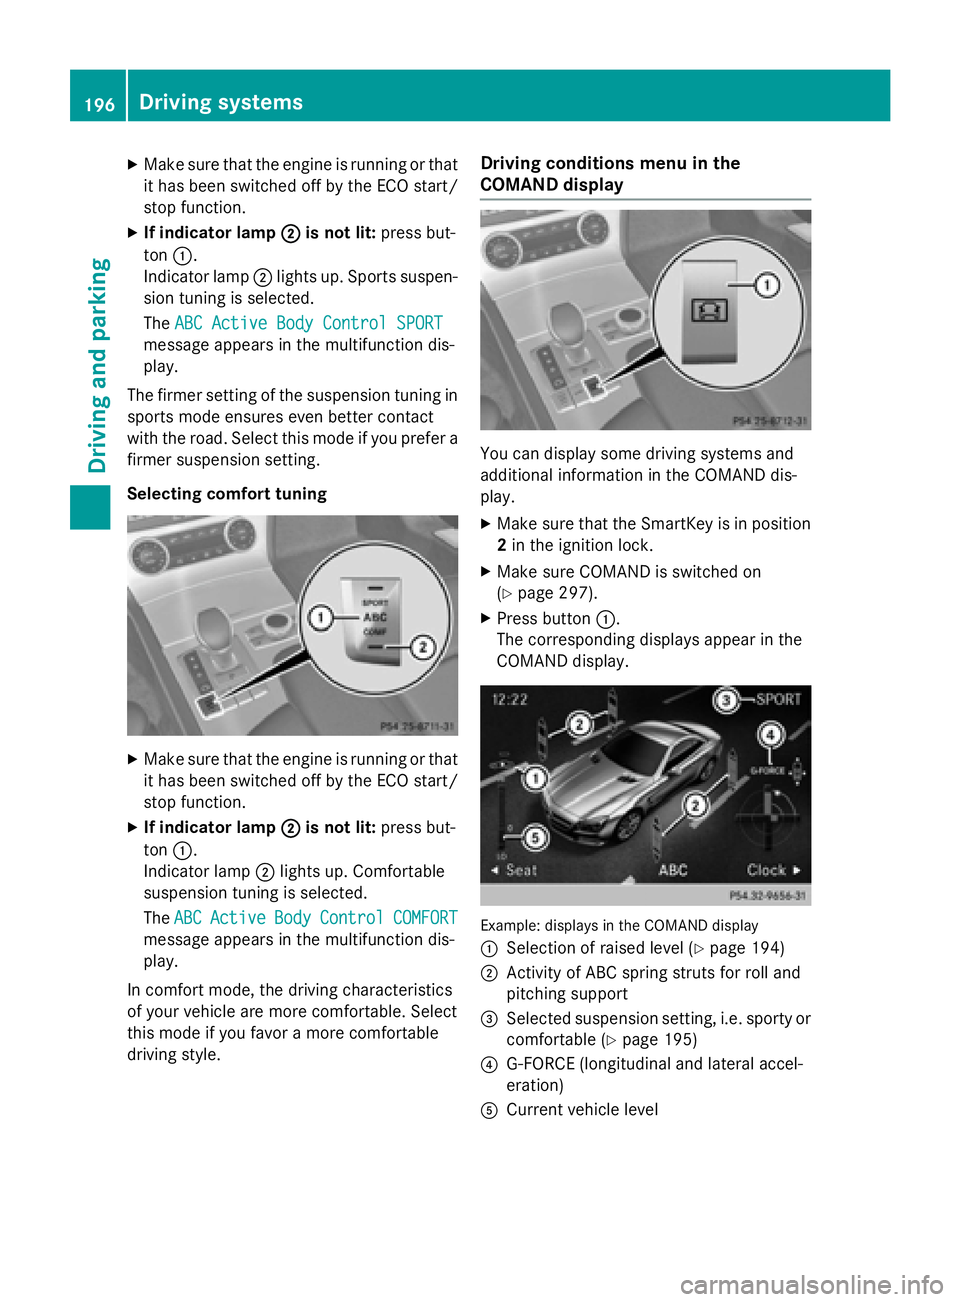
XMake sure that the engine is running or thatit has been switched off by the ECO start/
stop function.
XIf indicator lamp ;is not lit:press but-
ton :.
Indicator lamp ;lights up. Sports suspen-
sion tuning is selected.
The ABC Active Body Control SPORT
message appears in the multifunction dis-
play.
The firmer setting of the suspension tuning in
sports mode ensures even better contact
with the road. Select this mode if you prefer a
firmer suspension setting.
Selecting comfort tuning
XMake sure that the engine is running or that it has been switched off by the ECO start/
stop function.
XIf indicator lamp ;is not lit:press but-
ton :.
Indicator lamp ;lights up. Comfortable
suspension tuning is selected.
The ABC
ActiveBodyControlCOMFORT
message appears in the multifunction dis-
play.
In comfort mode, the driving characteristics
of your vehicle are more comfortable. Select
this mode if you favor a more comfortable
driving style.
Driving conditions menu in the
COMAND display
You can display some driving systems and
additional information in the COMAND dis-
play.
XMake sure that the SmartKey is in position
2 in the ignition lock.
XMake sure COMAND is switched on
(
Ypage 297).
XPress button :.
The corresponding displays appear in the
COMAND display.
Example: displays in the COMAND display
:
Selection of raised level (Ypage 194)
;Activity of ABC spring struts for roll and
pitching support
=Selected suspension setting, i.e. sporty or
comfortable (
Ypage 195)
?G-FORCE (longitudinal and lateral accel-
eration)
ACurrent vehicle level
196Driving systems
Driving and parking
Page 201 of 614

Example: displays in the COMAND display
:
Selection of raised level (Ypage 197)
;Activity of ABC spring struts for roll and
pitching support
=Selected suspension setting, i.e. sporty or
comfortable (
Ypage 198)
?G-FORCE (longitudinal and lateral accel-
eration)
ACurrent vehicle level
PARKTRONIC
Important safety notes
PARKTRONIC is an electronic parking aid with
ultrasonic sensors. It indicates visually and
audibly the distance between your vehicle
and an object.
PARKTRONIC is only an aid. It is not a replace-
ment for your attention to your immediate
surroundings. You are always responsible for
safe maneuvering, parking and exiting a park- ing space. When maneuvering, parking or
pulling out of a parking space, make sure that
there are no persons, animals or objects in
the area in which you are maneuvering.
!When parking, pay particular attention to
objects above or below the sensors, such
as flower pots or trailer drawbars.
PARKTRONIC does not detect such objects
when they are in the immediate vicinity of
the vehicle. You could damage the vehicle
or the objects.
The sensors may not detect snow and other
objects that absorb ultrasonic waves. Ultrasonic sources such as an automatic
car wash, the compressed-air brakes on a
truck or a pneumatic drill could cause
PARKTRONIC to malfunction.
PARKTRONIC may not function correctly on
uneven terrain.
PARKTRONIC is activated automatically when
you:
Rswitch on the ignition
Rshift the transmission to position D,R or N
Rrelease the electric parking brake.
PARKTRONIC is deactivated at speeds above
11 mph (18 km/h). It is reactivated at lower
speeds.
PARKTRONIC monitors the area around your
vehicle using six sensors in the front bumper
and four sensors in the rear bumper.
Range of the sensors
General notes
PARKTRONIC does not take objects into con-
sideration that are:
Rbelow the detection range, e.g. people, ani-
mals or objects.
Rabove the detection range, e.g. overhang-
ing loads, truck overhangs or loading
ramps.
:Sensors in the front bumper, left-hand
side (example)
Driving systems199
Driving an d parking
Z
Page 203 of 614
mine which warning display is active when the
engine is running.
Transmission
positionWarning display
DFront area activated
R,Nor the vehicle
is rolling back-
wardsRear and front areas
activated
PNo areas activated
One or more segments light up as the vehicle
approaches an obstacle, depending on the
vehicle's distance from the obstacle.
From the:
Rsixth segment onwards, you will hear an
intermittent warning tone for approx-
imately two seconds.
Rseventh segment onwards, you will hear a
warning tone for approximately two sec-
onds. This indicates that you have now
reached the minimum distance.
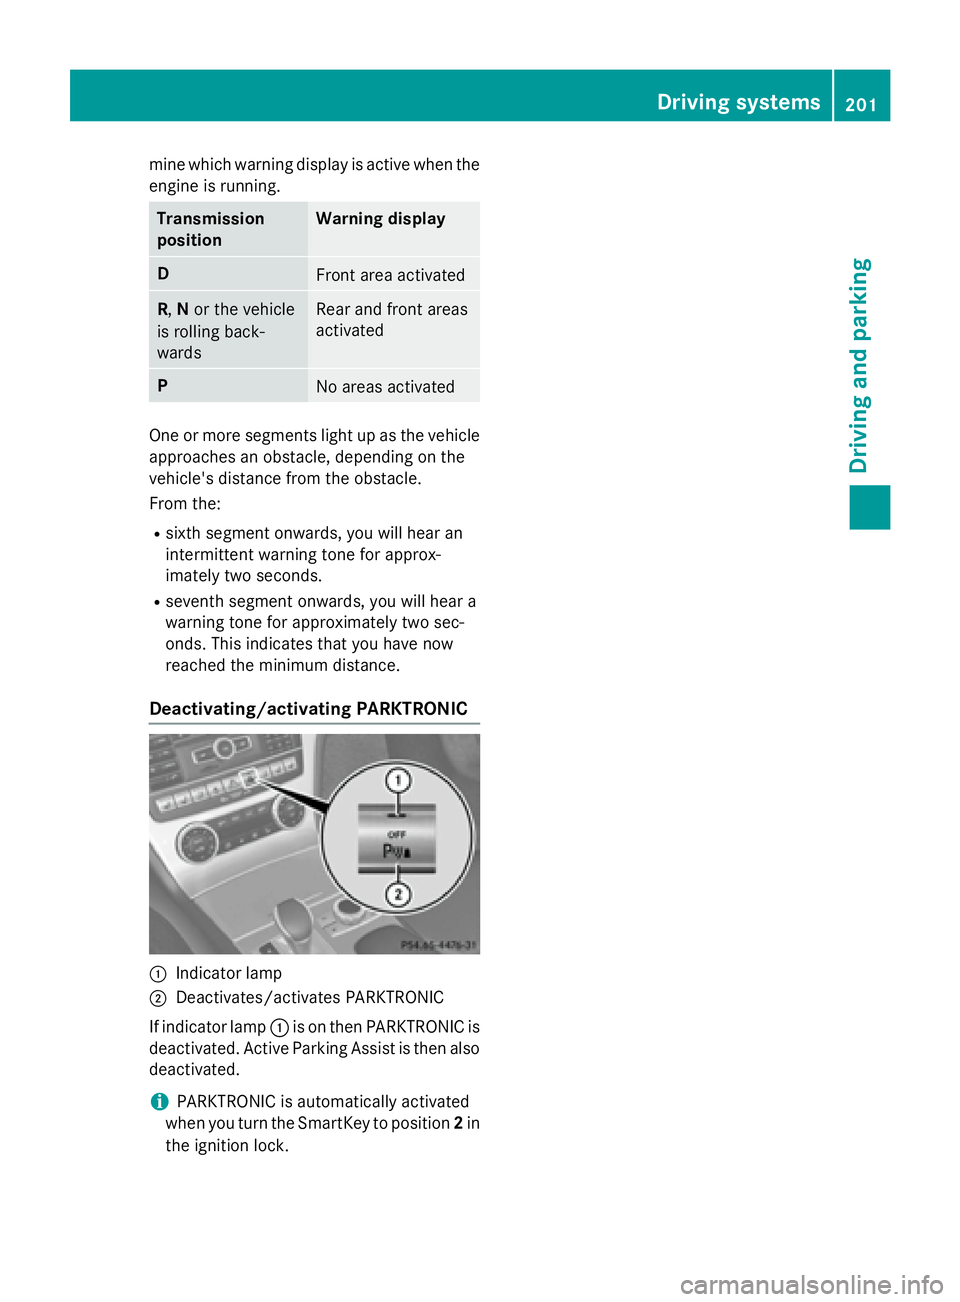
Deactivating/activating PARKTRONIC
:Indicator lamp
;Deactivates/activates PARKTRONIC
If indicator lamp :is on then PARKTRONIC is
deactivated. Active Parking Assist is then also
deactivated.
iPARKTRONIC is automatically activated
when you turn the SmartKey to position 2in
the ignition lock.
Driving systems201
Driving and parking
Z
Page 204 of 614

Problems with PARKTRONIC
ProblemPossible causes/consequences andMSolutions
Only the red segments
in the PARKTRONIC
warning displays are lit.
You also hear a warning
tone for approximately
two seconds.
PARKTRONIC is deacti-
vated after approx-
imately five seconds,
and the indicator lamp
in the PARKTRONIC
button lights up.PARKTRONIC has malfunctioned and has switched off.
XIf problems persist, have PARKTRONIC checked at a qualified
specialist workshop.
Only the red segments
in the PARKTRONIC
warning displays are lit.
PARKTRONIC is deacti-
vated after approx-
imately five seconds.The PARKTRONIC sensors are dirty or there is interference.
XClean the PARKTRONIC sensors (Ypage 546).
XSwitch the ignition back on.
The problem may be caused by an external source of radio or
ultrasound waves.
XSee if PARKTRONIC functions in a different location.
Active Parking Assist
General notes
Active Parking Assist is an electronic parking
aid with ultrasound. Ultrasound is used to
measure the road on both sides of the vehicle.
A suitable parking space is indicated by the
parking symbol. Active steering intervention
can assist you during parking.
You may also use PARKTRONIC (
Ypage 199).
When PARKTRONIC is switched off, Active
Parking Assist is also unavailable.
Use Active Parking Assist for parking spaces:
Rthat are parallel to the direction of travel
Rthat are on straight roads, not bends
Rthat are on the same level as the road, e.g.
not on the pavement
Important safety notes
Active Parking Assist is merely an aid. It is not
a replacement for your attention to your
immediate surroundings. You are always
responsible for safe maneuvering, parking
and exiting a parking space. When maneu-
vering, parking or pulling out of a parking
space, make sure that there are no persons,
animals or objects in the area in which you are
maneuvering.
GWARNING
The vehicle swings out when parking and in
doing so could cross into the opposite lane.
This could result in a collision with another
road user. There is a risk of an accident.
Pay attention to other road users when park-
ing. Stop the vehicle if necessary or cancel the Active Parking Assist parking procedure.
202Driving systems
Driving and parking
Page 209 of 614
Activating/deactivating the rear view
camera
XTo activate:makesur ethat th eSmartKey
is in position 2in th eignition lock.
XMak esur ethat th e"Show rear vie wcamera
display" function is selected in COMAND
(
Ypage 319).
XEngage revers egear .
The area behind th evehicl eis shown in th e
COMAND display wit hguide lines.
To deacti vate:therear vie wcamera deacti -
vates if you shif tth etransmission to Por after
driving forwards ashort distance.
Displays in the COMAND display
The rear vie wcamera may sho w adistorted
vie wof obstacles, sho wthem incorrectl yor
no tat all. The rear vie wcamera does no tsho w
objects in th efollowin gpositions:
Rver yclose to th erear bumper
Runder th erear bumper
Rin th earea immediately abov eth etailgat e
handle
!Objects no tat ground level may appear to
be further away than they actually are, e.g. :
Rthebumper of aparked vehicl e
Rthedrawbar of atrailer
Rth eball couplin gof atrailer to whitch
Rtherear section of an HGV
Raslante dpos t
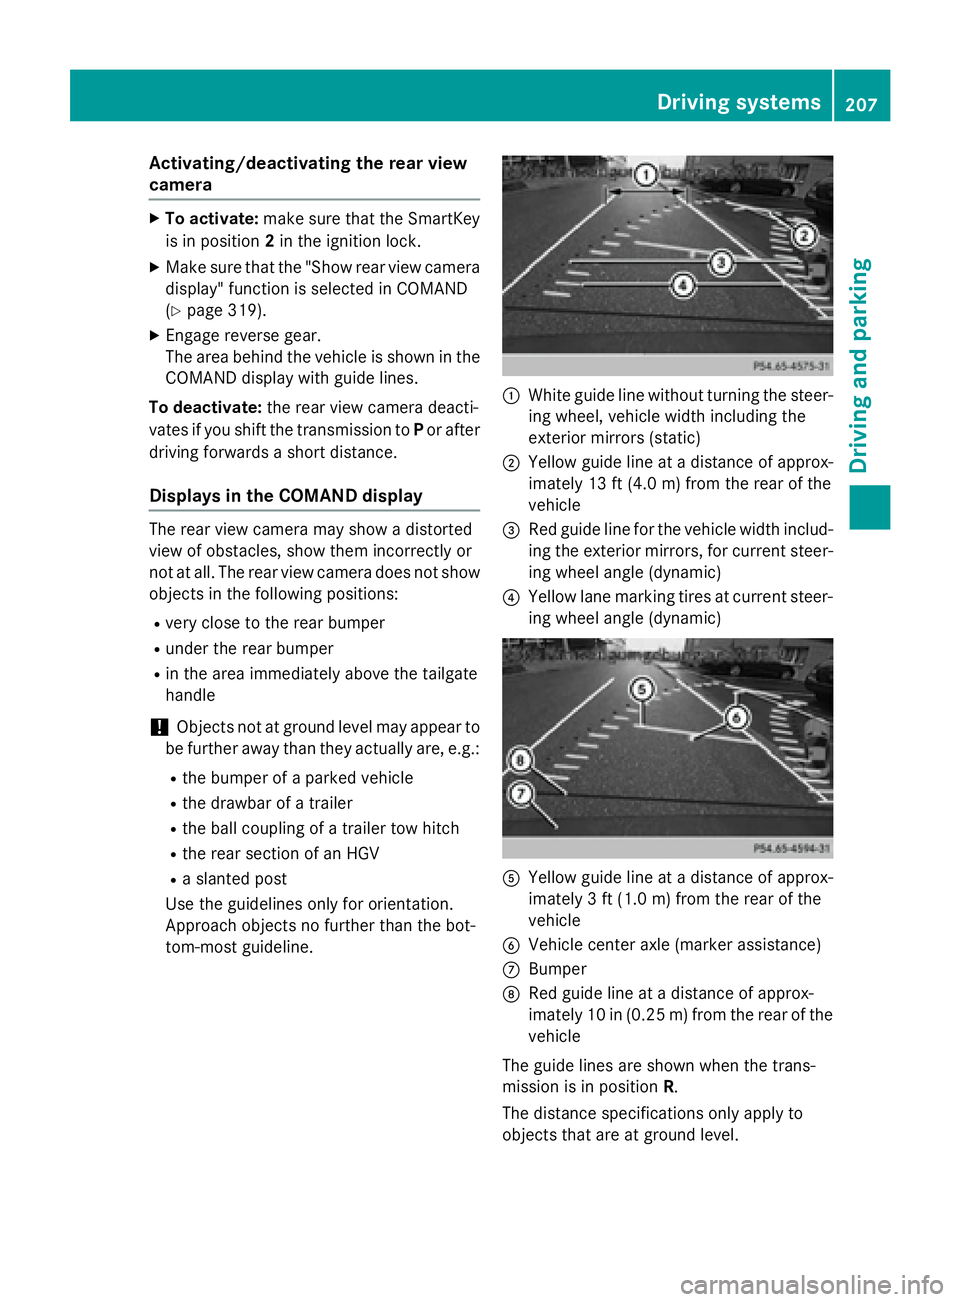
Use th eguidelines only for orientation .
Approach objects no further than th ebot -
tom-mos tguideline.
:Whit eguide lin ewithout turnin gth e steer -
ing wheel, vehicl ewidt hincludin gth e
exterio rmirror s (static)
;Yellowguide lin eat adistanc eof approx -
imately 13 ft (4.0m) from the rear of the
vehicle
=Red guide line for the vehicle width includ-
ing the exterior mirrors, for current steer-
ing wheel angle (dynamic)
?Yellow lane marking tires at current steer-
ing wheel angle (dynamic)
AYellow guide line at a distance of approx-
imately 3 ft (1.0 m) fromthe rear of the
vehicle
BVehicle center axle (marker assistance)
CBumper
DRed guide line at a distance of approx-
imately 10 in (0.25 m) fromthe rear of the
vehicle
The guide lines are shown when the trans-
mission is in position R.
The distance specifications only apply to
objects that are at ground level.
Driving system s207
Driving an d parking
Z
Page 225 of 614
The segments between the speed of the
vehicle in front and the stored speed light
up.
Tachometer
!
Do not drive in the overrevving range, as
this could damage the engine.
The red band in the tachometer indicates the
engine's overrevving range.
The fuel supply is interrupted to protect the
engine when the red band is reached.
Outside temperature display
You should pay special attention to road con-
ditions when temperatures are around freez-
ing point.
Bear in mind that the outside temperature
display indicates the temperature measured
and does not record the road temperature.
The outside temperature display is in the mul-
tifunction display (
Ypage 224).
A change in the outside temperature is shown
in the multifunction display after a delay.
Coolant temperature display
GWARNING
Opening the hood when the engine is over-
heated or when there is a fire in the engine
compartment could expose you to hot gases
or other service products. There is a risk of
injury.
Let an overheated engine cool down before
opening the hood. If there is a fire in the
engine compartment, keep the hood closed
and contact the fire department.
!A display message is shown if the coolant
temperature is too high.
If the coolant temperature is over 248 ‡
(120 †), do not continue driving. The
engine will otherwise be damaged. The coolant temperature gauge is in the
instrument cluster on the right-hand side
(
Ypage 41).
Under normal operating conditions and with
the specified coolant level, the coolant tem-
perature may rise to 248 ‡ (120 †).
Operating the on-board computer
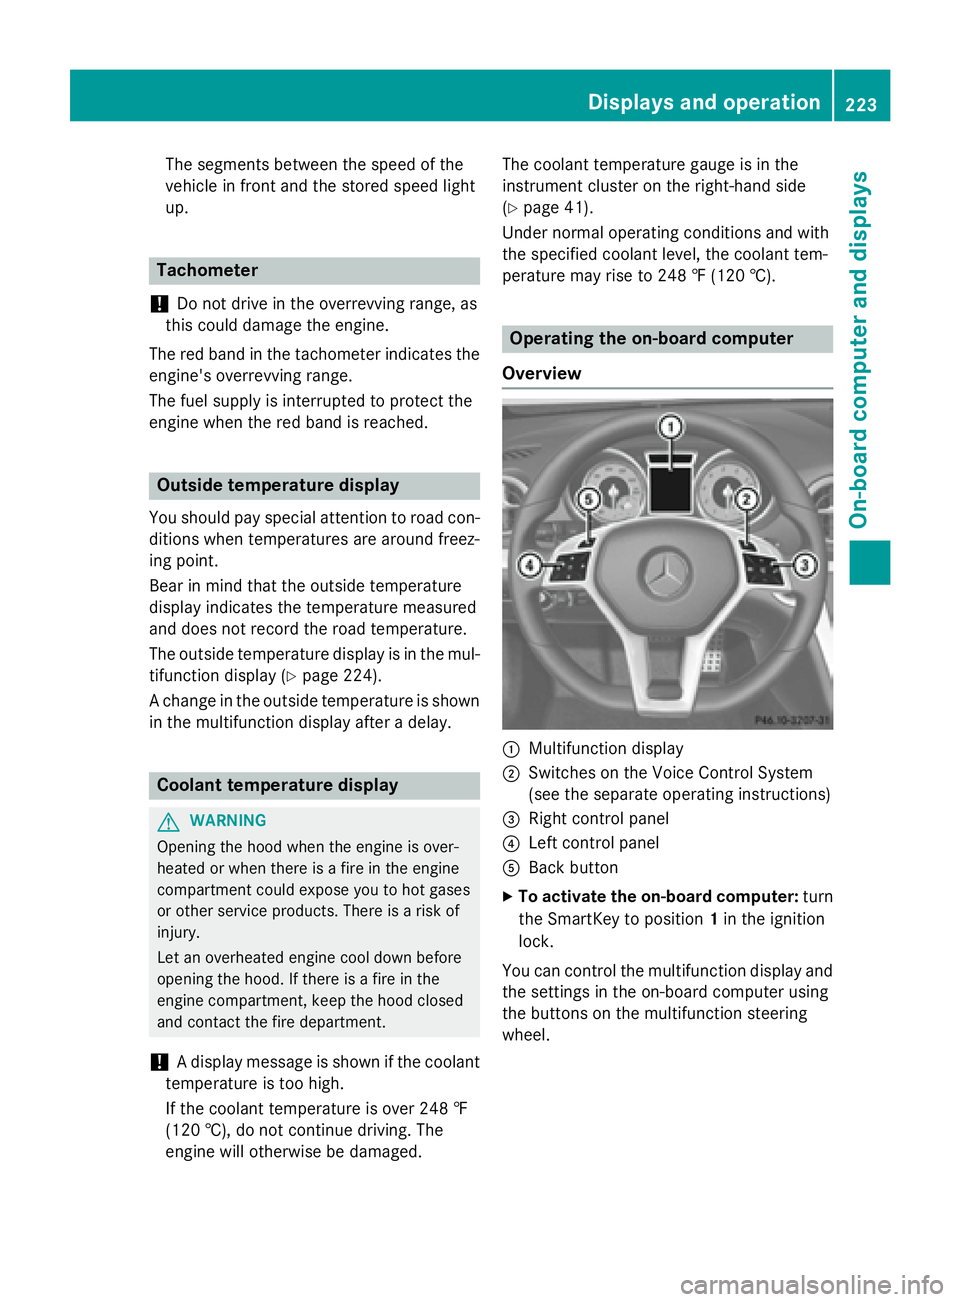
Overview
:Multifunction display
;Switches on the Voice Control System
(see the separate operating instructions)
=Right control panel
?Left control panel
ABack button
XTo activate the on-board computer: turn
the SmartKey to position 1in the ignition
lock.
You can control the multifunction display and
the settings in the on-board computer using
the buttons on the multifunction steering
wheel.
Displays and operation223
On-board computer and displays
Z
Page 228 of 614
Rthe ignition has been switched off for morethan four hours.
R999 hours have been exceeded.
R9,999 miles have been exceeded.
When 9,999 hours or 99,999 miles have been
exceeded, the trip computer is automatically
reset From Reset
.
ECO display
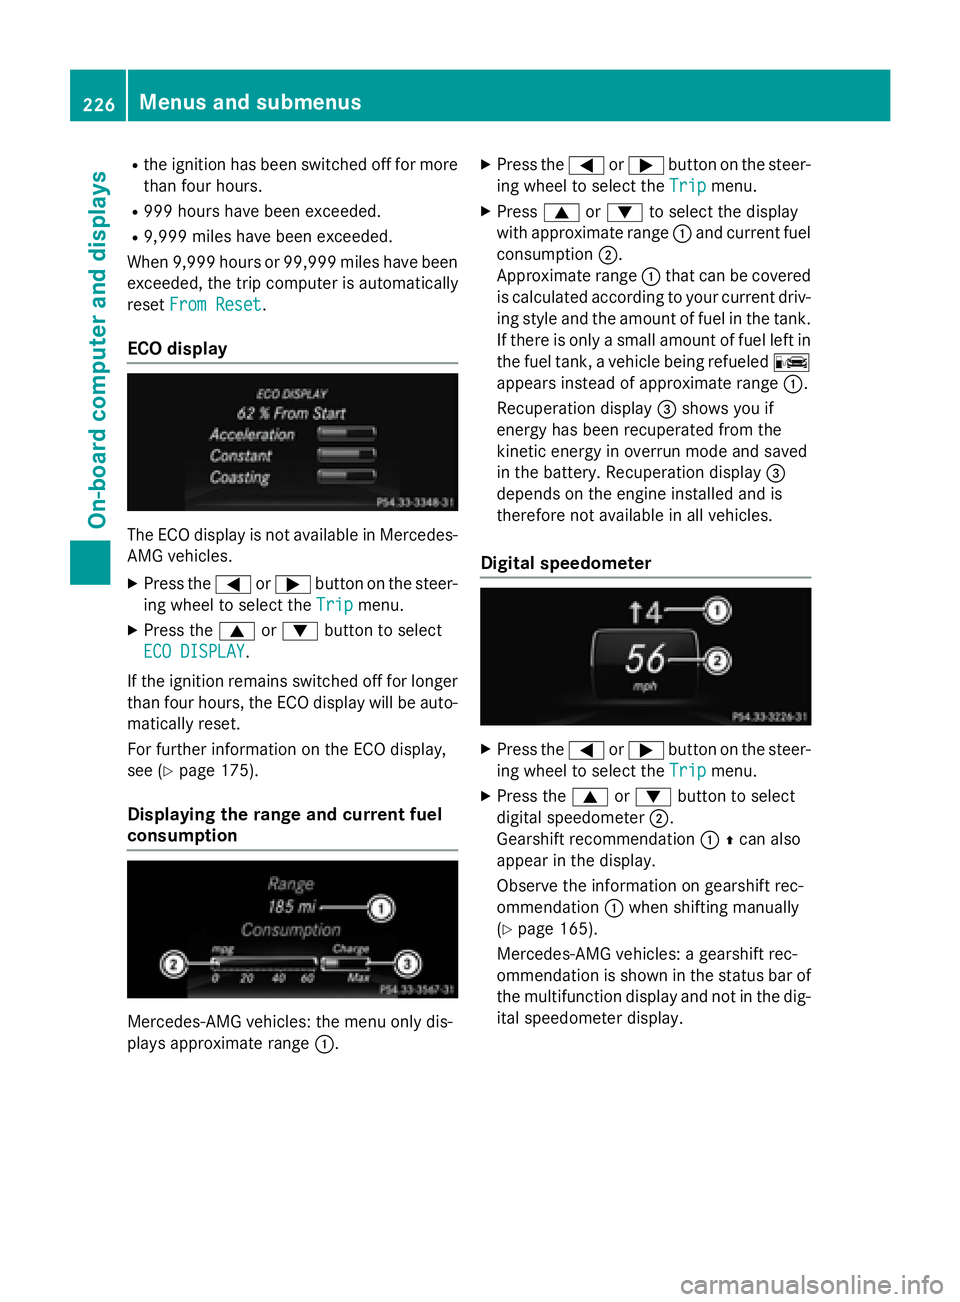
The ECO display is not available in Mercedes-
AMG vehicles.
XPress the =or; button on the steer-
ing wheel to select the Trip
menu.
XPress the9or: button to select
ECO DISPLAY
.
If the ignition remains switched off for longer
than four hours, the ECO display will be auto-
matically reset.
For further information on the ECO display,
see (
Ypage 175).
Displaying the range and current fuel
consumption
Mercedes-AMG vehicles: the menu only dis-
plays approximate range :.
XPress the=or; button on the steer-
ing wheel to select the Trip
menu.
XPress9or: to select the display
with approximate range :and current fuel
consumption ;.
Approximate range :that can be covered
is calculated according to your current driv-
ing style and the amount of fuel in the tank.
If there is only a small amount of fuel left in
the fuel tank, a vehicle being refueled C
appears instead of approximate range :.
Recuperation display =shows you if
energy has been recuperated from the
kinetic energy in overrun mode and saved
in the battery. Recuperation display =
depends on the engine installed and is
therefore not available in all vehicles.
Digital speedometer
XPress the =or; button on the steer-
ing wheel to select the Trip
menu.
XPress the9or: button to select
digital speedometer ;.
Gearshift recommendation :Zcan also
appear in the display.
Observe the information on gearshift rec-
ommendation :when shifting manually
(
Ypage 165).
Mercedes-AMG vehicles: a gearshift rec-
ommendation is shown in the status bar of
the multifunction display and not in the dig-
ital speedometer display.
226Menus and submenus
On-board computer and displays
Page 236 of 614
XPress the:or9 button to set the
color to SOLAR
,SOLAR Orangeor SOLAR
Red.
XPress the aor% button to save the
setting.
Activating/deactivating surround light-
ing and exterior lighting delayed switch-
off
XPress the =or; button on the steer-
ing wheel to select the Sett.
menu.
XPress the:or9 button to select the
Light
submenu.
XPress ato confirm.
XPress :or9 to select the Sur‐
round Lightingfunction.
If the Surround
Lightingfunction is acti-
vated, the multifunction display shows the
light cone and the area around the vehicle
in orange.
XPress the abutton to save the setting.
Deactivating delayed switch-off of the exte-
rior lighting temporarily:
XBefore leaving the vehicle, turn the Smart-
Key to position 0in the ignition lock.
XTurn the SmartKey to position 2in the igni-
tion lock.
The exterior lighting delayed switch-off is
deactivated.
Delayed switch-off of the exterior lighting is
reactivated the next time you start the
engine.
If you have activated the Surround Light‐
ingfunction and you turn the light switch to
Ã, the following functions are activated
when it is dark:
Rsurround lighting: the exterior lighting
remains lit for 40 seconds after unlocking
with the SmartKey. If you start the engine,
the surround lighting is switched off and
automatic headlamp mode is activated
(
Ypage 122).
Rexterior lighting delayed switch-off: the
exterior lighting remains lit for 60 seconds
after the engine is switched off. If you close all the doors and the trunk lid, the exterior
lighting goes off after 15 seconds.
iDepending on your vehicle's equipment,
when the surround lighting and delayed
switch-off exterior lighting are on, the fol-
lowing light up:
RParking lamps
RLow-beam headlamps
RDaytime running lamps
RSide marker lamps
RSurround lighting in the exterior mirrors
Activating/deactivating the interior light-
ing delayed switch-off
If you activate the Interior Lighting
Delayfunction, the interior lighting remains
on for 20 seconds after you remove the
SmartKey from the ignition lock.
XPress the =or; button on the steer-
ing wheel to select the Sett.
menu.
XPress the:or9 button to select the
Light
submenu.
XPress ato confirm.
XPress the :or9 button to select the
Interior Lighting Delay
function.
If the Interior
LightingDelayfunction
is activated, the multifunction display
shows the vehicle interior in orange.
XPress the abutton to save the setting.
Vehicle
Activating/deactivating the automatic
door locking mechanism
If you activate the Automatic Door Lock
function, the vehicle is centrally locked above
a speed of approximately 9 mph (15 km/h).
XPress the=or; button on the steer-
ing wheel to select the Sett.
menu.
XPress the:or9 button to select the
Vehicle
submenu.
XPress ato confirm.
234Menus and submenus
On-board computer and displays