2016 MERCEDES-BENZ SL-CLASS ROADSTER ECU
[x] Cancel search: ECUPage 310 of 614

Display settings
Setting th ebrightness
The brightness detecte dby th edisplay ligh t
sensor affects th esetting option sfo rthis
function .
XPressW.
XSelectSettingsby turnin gcVd the
COMAN Dcontroller and press Wto con-
firm.
XSelec tDispla yand press Wto confirm .
XSelectBrightnes sand pressWto con-
firm.
XAdjust th ebrightness by turnin gcVd the
COMAN Dcontroller and press Wto con-
firm.
Display design
Your COMAN Ddisplay feature soptimize d
design sfo roperation durin gdaytime and
night-time hours. You can customiz eth e
design by manually selecting day or night
design ,or opt fo ran automatic setting .
XPressW.
XSelectSettingsby turnin gcVd the
COMAN Dcontroller and press Wto con-
firm.
XSelec tDispla yand press Wto confirm .
XSelectDay Mod e,Night Mod eorAuto‐
maticby turnin gcVd theCOMAN Dcon-
trolle rand press Wto confirm .
A dot indicates th ecurren tsetting .
DesignExplanation
Day Mod eThe display is set perma-
nently to day design .
Night ModeThe display is set perma-
nently to night design .
AutomaticIf theAutomaticsetting
is selected, COMAN D
evaluates th ereadings
from th eautomatic vehi-
cl eligh tsensor and auto-
matically switches
between th edisplay
designs.
Time settings
General information
If COMAN Dis equipped wit h anavigation sys-
te m and has GPS reception ,COMAN Dauto-
matically set sth etime and date. You can
chang eth etime in minut eincrements. The
dat ecan also be changed.
iIf you adjust th etime in minut eincre-
ments ,any time zone setting sand setting s
fo rchangin gbetween summer and stand -
ard time are lost. Switchin gbetween sum -
mer and standard time (
Ypage 309).
iThe following navigation system function s
require th etime, time zone and summer /
standard time to be set correctl yin order to
wor kproperly:
Rrout eguidanc eon routes wit htime-
dependen ttraffic guidanc e
Rcalculation of expecte dtime of arrival
iWit hthis function ,you can set th etime fo r
every display in th evehicle.
Setting th etime/date forma t
XPress theW button.
XSelectTim eby turnin gcVd the COMAND
controller and press Wto confirm.
308System settings
COMAND
Page 339 of 614
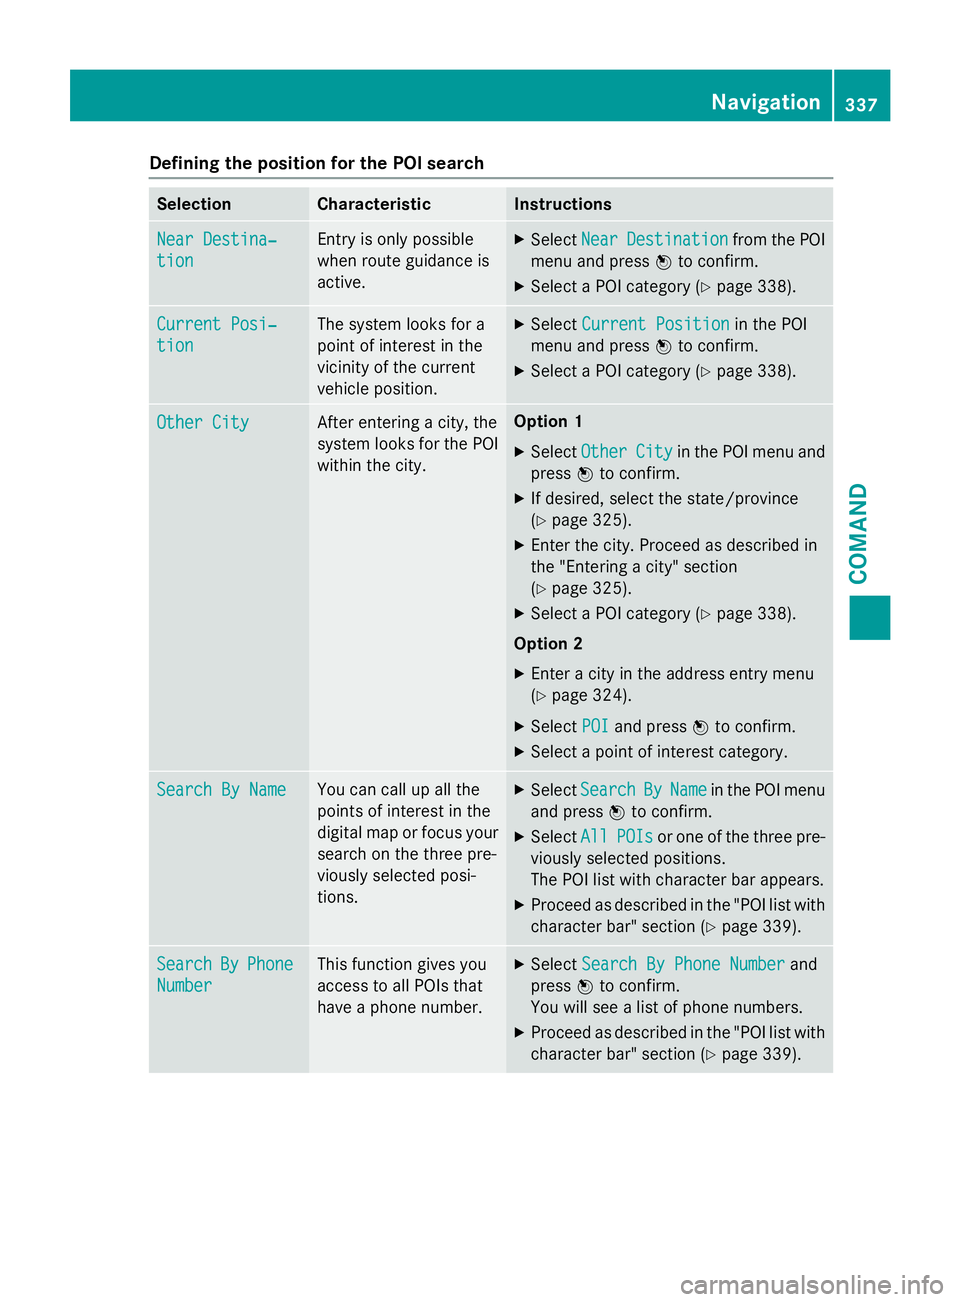
Defining theposition for th ePOI searc h
SelectionCharacteristicInstructions
NearDestina‐
tio n
Entr yis only possible
when rout eguidanc eis
active .XSelectNea rDestinationfrom th ePOI
men uand press Wto confirm .
XSelect aPOI category (Ypage 338).
CurrentPosi‐
tio n
The system looks fo r a
poin tof interes tin th e
vicinit yof th ecurren t
vehicle position .XSelectCurren tPositionin th ePOI
men uand press Wto confirm .
XSelect aPOI category (Ypage 338).
Other CityAfterenterin g acity, th e
system looks fo rth ePOI
within th ecity.Option 1
XSelectOtherCit yin th ePOI men uand
press Wto confirm .
XIf desired, selec tth estate/province
(
Ypage 325).
XEnte rth ecity. Proceed as described in
th e"Entering acity" section
(
Ypage 325).
XSelec t aPOI category (Ypage 338).
Option 2
XEnter acity in th eaddress entr ymen u
(
Ypage 324).
XSelec tPOIand press Wto confirm .
XSelect apoin tof interes tcategory.
Search By Nam eYou can callup all th e
points of interes tin th e
digita lmap or focus your
search on th ethree pre -
viously selecte dposi-
tions.XSelec tSearchByNam ein th ePOI men u
and press Wto confirm .
XSelectAllPOI sor on eof th ethree pre -
viously selecte dpositions.
The POI list wit hcharacte rbar appears .
XProceed as described in th e"POI list wit h
characte rbar "section (
Ypage 339).
SearchByPhone
Number
Thisfunction gives you
access to all POI sthat
hav e a phone number .XSelectSearch By Phone Numberand
press Wto confirm .
You will see alist of phone numbers.
XProceed as described in th e"POI list wit h
characte rbar "section (
Ypage 339).
Navigation337
COMAND
Z
Page 350 of 614
The distance announced before the next
change of direction depends on the type of
road and its permissible maximum speed.
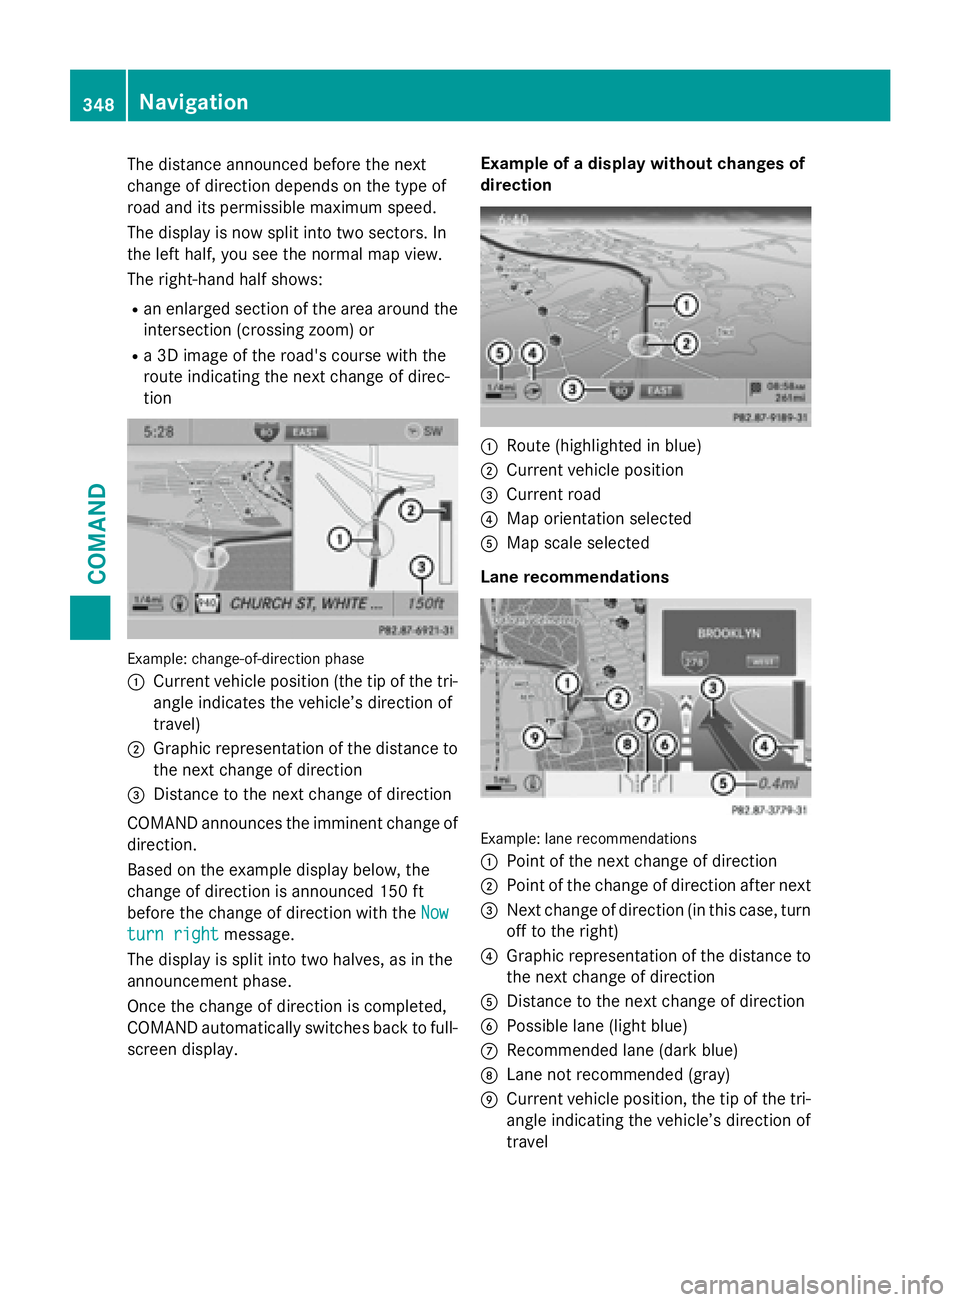
The display is now split into two sectors. In
the left half, you see the normal map view.
The right-hand half shows:
Ran enlarged section of the area around the
intersection (crossing zoom) or
Ra 3D image of the road's course with the
route indicating the next change of direc-
tion
Example: change-of-direction phase
:
Current vehicle position (the tip of the tri-
angle indicates the vehicle’s direction of
travel)
;Graphic representation of the distance to
the next change of direction
=Distance to the next change of direction
COMAND announces the imminent change of
direction.
Based on the example display below, the
change of direction is announced 150 ft
before the change of direction with the Now
turn rightmessage.
The display is split into two halves, as in the
announcement phase.
Once the change of direction is completed,
COMAND automatically switches back to full-
screen display. Example of a display without changes of
direction
:Route (highlighted in blue)
;Current vehicle position
=Current road
?Map orientation selected
AMap scale selected
Lane recommendations
Example: lane recommendations
:
Point of the next change of direction
;Point of the change of direction after next
=Next change of direction (in this case, turn
off to the right)
?Graphic representation of the distance to
the next change of direction
ADistance to the next change of direction
BPossible lane (light blue)
CRecommended lane (dark blue)
DLane not recommended (gray)
ECurrent vehicle position, the tip of the tri- angle indicating the vehicle’s direction of
travel
348Navigation
COMAND
Page 363 of 614
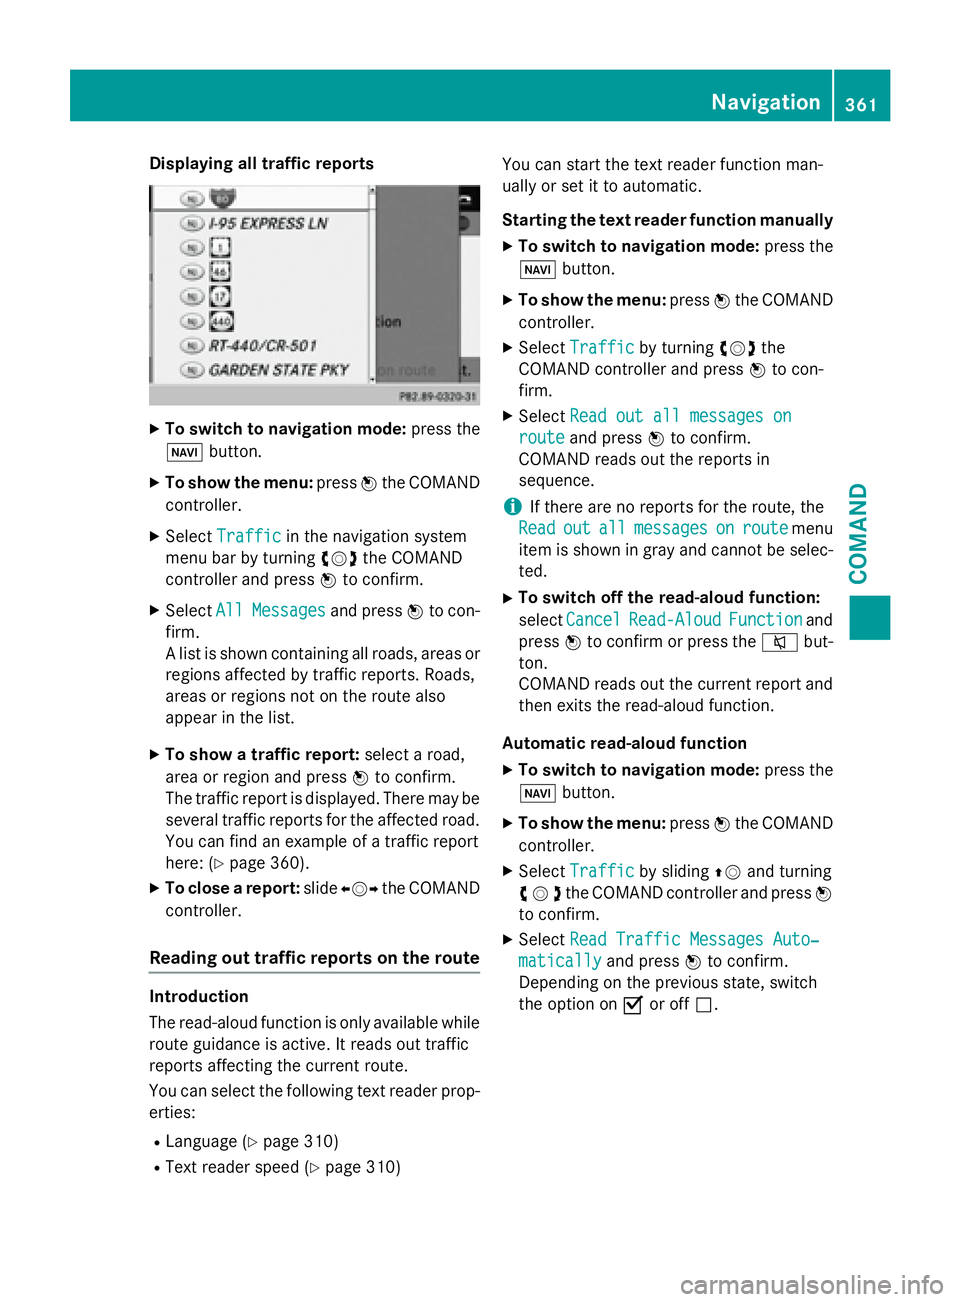
Displaying all traffic reports
XTo switch to navigation mode:press the
Ø button.
XTo sho wthemenu: pressWtheCOMAND
controller .
XSelectTraffi cin thenavigation system
men ubar by turning cVdtheCOMAND
controller and press Wto confirm .
XSelectAllMessagesand press Wto con-
firm.
A list is shown containin gall roads, area sor
region saffecte dby traffic reports. Roads ,
area sor region sno ton th eroute also
appea rin th elist .
XTo sho w atraffic report: selectaroad,
area or region and press Wto confirm .
The traffic report is displayed. There may be
several traffic report sfo rth eaffecte droad.
You can fin dan exampl eof atraffic report
here: (
Ypage 360).
XTo close areport: slideXVY theCOMAND
controller .
Reading out traffic reports on th erout e
Introduction
The read-aloud function is only available while
route guidance is active .It read sout traffic
report saffecting th ecurren troute .
You can select th efollowing text reader prop-
erties:
RLanguage (Ypage 310)
RTextreader speed (Ypage 310) You can start th
etext reader function man -
ually or set it to automatic.
Starting th etext reader function manually
XTo switch to navigation mode: press the
Ø button.
XTo sho wthemenu: pressWtheCOMAND
controller .
XSelectTraffi cby turning cVdthe
COMAND controller and press Wto con-
firm.
XSelec tRea dout all messages on
routeand press Wto confirm .
COMAND read sout th ereport sin
sequence .
iIf there are no report sfo rth eroute ,th e
Rea d
outallmessagesonroutemen u
item is shown in gra yand canno tbe selec-
ted.
XTo switch off th eread-aloud function:
select Cancel
Read-Alou dFunctionand
press Wto confirm or press th e8 but-
ton.
COMAND read sout th ecurren treport and
then exit sth eread-aloud function .
Automatic read-aloud function
XTo switch to navigation mode: press the
Ø button.
XTo sho wthemenu: pressWtheCOMAND
controller .
XSelectTraffi cby slidin gZV and turning
cVd the COMAND controller and press W
to confirm.
XSelect Read Traffic Messages Auto‐
maticallyand press Wto confirm.
Depending on the previous state, switch
the option on Oor off ª.
Navigation361
COMAND
Z
Page 383 of 614
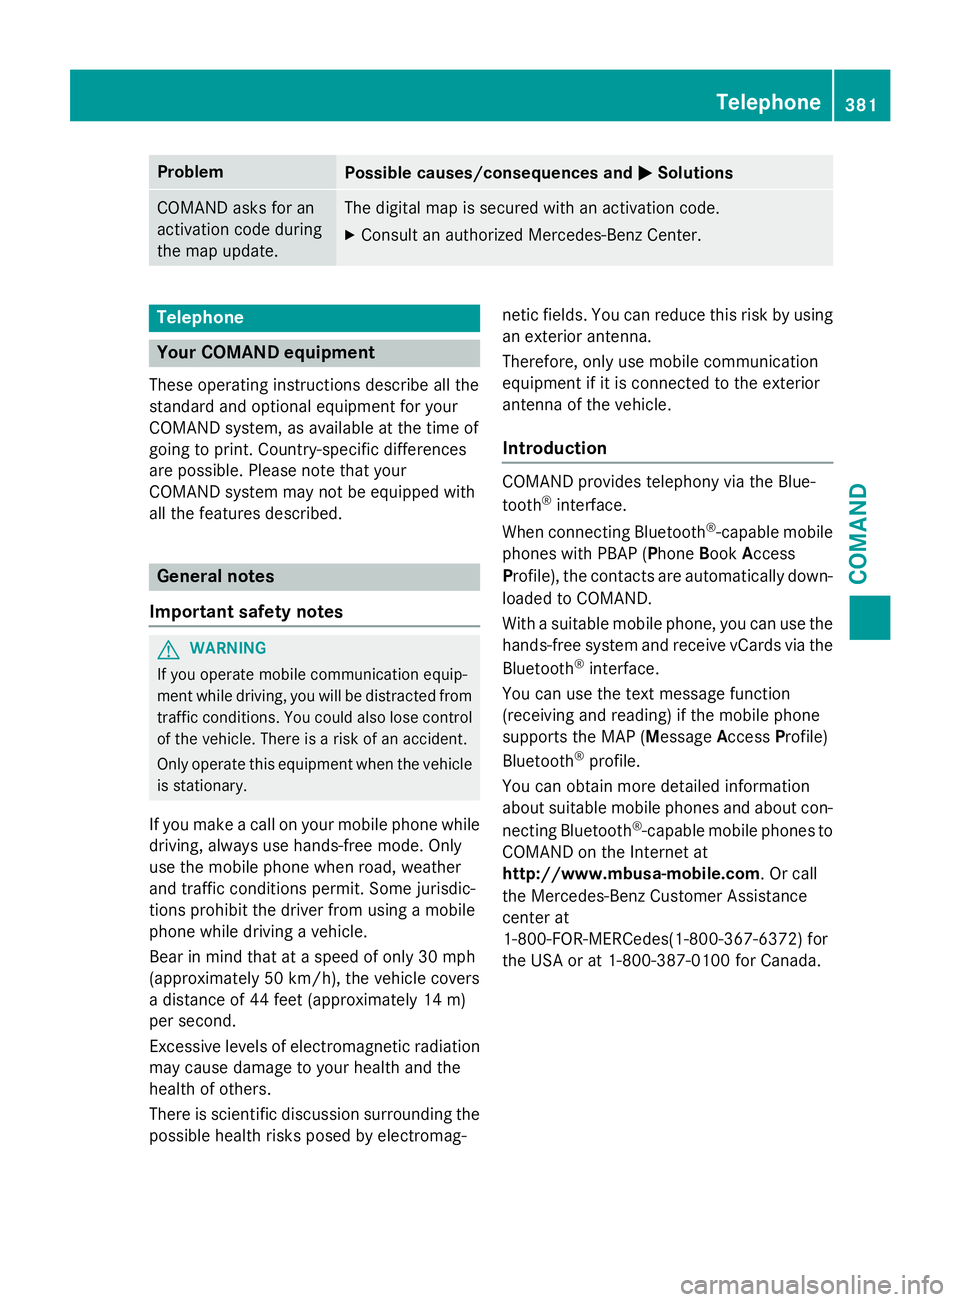
ProblemPossible causes/consequences andMSolutions
COMAND asks for an
activation code during
the map update.The digital map is secured with an activation code.
XConsult an authorized Mercedes-Benz Center.
Telephone
Your COMAND equipment
These operating instructions describe all the
standard and optional equipment for your
COMAND system, as available at the time of
going to print. Country-specific differences
are possible. Please note that your
COMAND system may not be equipped with
all the features described.
General notes
Important safety notes
GWARNING
If you operate mobile communication equip-
ment while driving, you will be distracted from traffic conditions. You could also lose control
of the vehicle. There is a risk of an accident.
Only operate this equipment when the vehicle
is stationary.
If you make a call on your mobile phone while
driving, always use hands-free mode. Only
use the mobile phone when road, weather
and traffic conditions permit. Some jurisdic-
tions prohibit the driver from using a mobile
phone while driving a vehicle.
Bear in mind that at a speed of only 30 mph
(approximately 50 km/h), the vehicle covers
a distance of 44 feet (approximately 14 m)
per second.
Excessive levels of electromagnetic radiation
may cause damage to your health and the
health of others.
There is scientific discussion surrounding thepossible health risks posed by electromag- netic fields. You can reduce this risk by using
an exterior antenna.
Therefore, only use mobile communication
equipment if it is connected to the exterior
antenna of the vehicle.
Introduction
COMAND provides telephony via the Blue-
tooth®interface.
When connecting Bluetooth
®-capable mobile
phones with PBAP (Phone BookAccess
Profile), the contacts are automatically down-
loaded to COMAND.
With a suitable mobile phone, you can use the
hands-free system and receive vCards via the
Bluetooth
®interface.
You can use the text message function
(receiving and reading) if the mobile phone
supports the MAP (Message AccessProfile)
Bluetooth
®profile.
You can obtain more detailed information
about suitable mobile phones and about con-
necting Bluetooth
®-capable mobile phones to
COMAND on the Internet at
http://www.mbusa-mobile.com. Or call
the Mercedes-Benz Customer Assistance
center at
1-800-FOR-MERCedes(1-800-367-6372) for
the USA or at 1-800-387-0100 for Canada.
Telephone381
COMAND
Z
Page 388 of 614
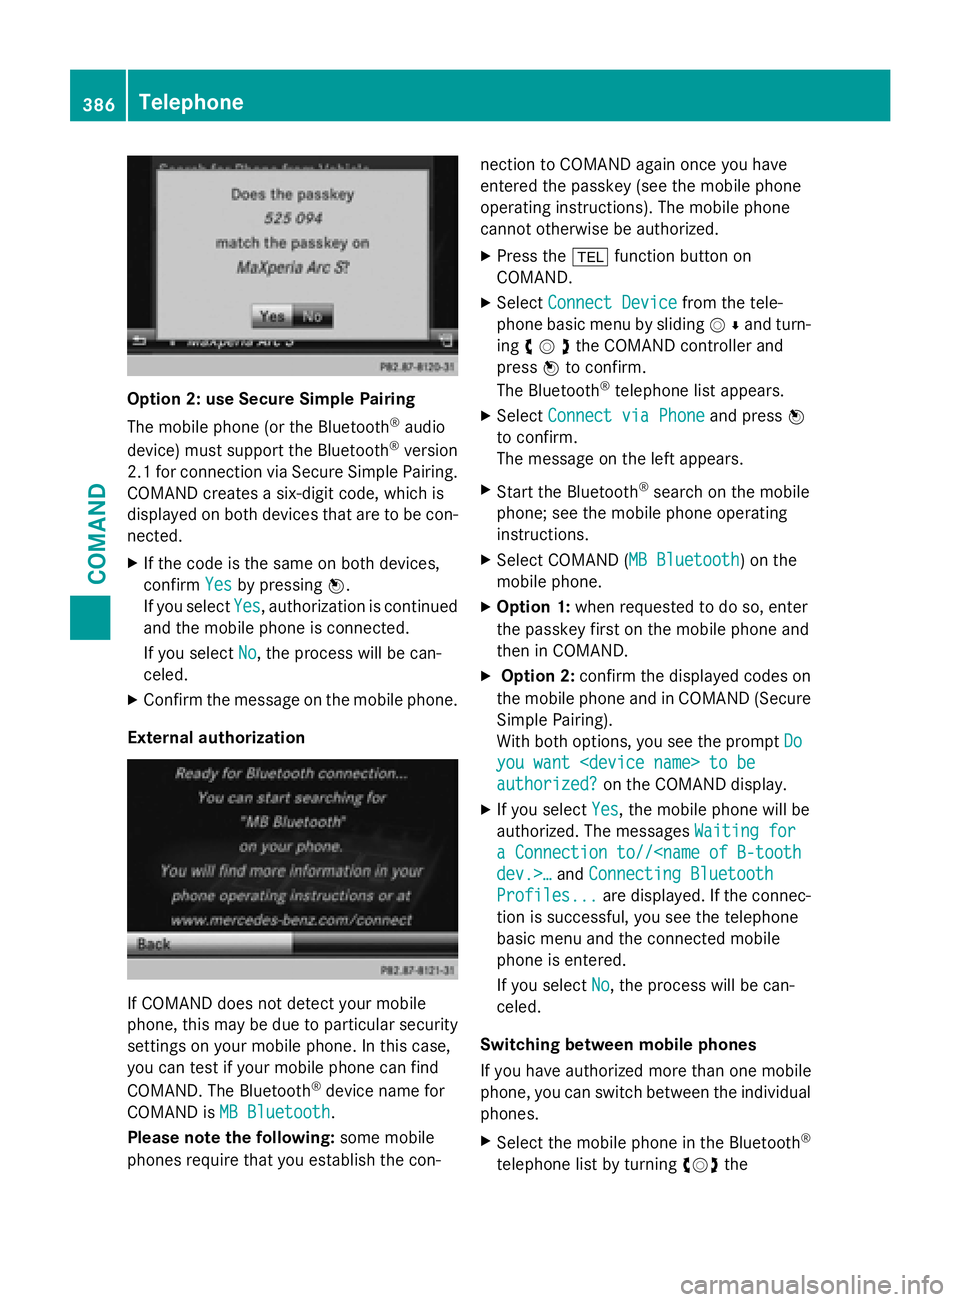
Option 2: use Secure Simple Pairing
The mobile phone (or the Bluetooth
®audio
device) must support the Bluetooth®version
2.1 for connection via Secure Simple Pairing.
COMAND creates a six-digit code, which is
displayed on both devices that are to be con-
nected.
XIf the code is the same on both devices,
confirm Yes
by pressing W.
If you select Yes
, authorization is continued
and the mobile phone is connected.
If you select No
, the process will be can-
celed.
XConfirm the message on the mobile phone.
External authorization
If COMAND does not detect your mobile
phone, this may be due to particular security
settings on your mobile phone. In this case,
you can test if your mobile phone can find
COMAND. The Bluetooth
®device name for
COMAND is MB Bluetooth
.
Please note the following: some mobile
phones require that you establish the con- nection to COMAND again once you have
entered the passkey (see the mobile phone
operating instructions). The mobile phone
cannot otherwise be authorized.
XPress the
%function button on
COMAND.
XSelect Connect Devicefrom the tele-
phone basic menu by sliding VÆand turn-
ing cVdthe COMAND controller and
press Wto confirm.
The Bluetooth
®telephone list appears.
XSelect Connect via Phoneand press W
to confirm.
The message on the left appears.
XStart the Bluetooth®search on the mobile
phone; see the mobile phone operating
instructions.
XSelect COMAND (MB Bluetooth) on the
mobile phone.
XOption 1: when requested to do so, enter
the passkey first on the mobile phone and
then in COMAND.
XOption 2: confirm the displayed codes on
the mobile phone and in COMAND (Secure
Simple Pairing).
With both options, you see the prompt Do
you want
authorized?on the COMAND display.
XIf you selectYes, the mobile phone will be
authorized. The messages Waiting for
a Connection to//
Profiles...are displayed. If the connec-
tion is successful, you see the telephone
basic menu and the connected mobile
phone is entered.
If you select No
, the process will be can-
celed.
Switching between mobile phones
If you have authorized more than one mobile
phone, you can switch between the individual
phones.
XSelect the mobile phone in the Bluetooth®
telephone list by turning cVdthe
386Telephone
COMAND
Page 449 of 614

iIf a medium contains other files in addi-
tion to music files, the loading time before
the first track starts to play may be longer.
Inserting
XPress the 8button.
If there is a disc already inserted, it will be
ejected.
XTake the disc out of the slot.
XInsert a disc into the slot.
When a suitable data carrier is correctly
inserted, the drive draws it in and plays it.
Removing
XPress the 8button.
XTake the disc out of the slot.
If you do not take the disc out of the slot, it
is drawn in again automatically after a short
while and reloaded.
Inserting and ejecting an SD memory
card
General information
COMAND supports SD memory cards
(Secure Digital), SDHC memory cards
(Secure Digital HighCapacity) and SDXC
memory cards (Secure Digital eXtended
Capacity.
iNot all memory cards available on the
market are designed for the temperatures
which may be reached in the vehicle.
If the SD memory card is no longer in use,
you should remove it from COMAND. High
temperatures can damage the card.
Due to the wide range of SD memory cards
available on the market, playback cannot
be guaranteed for all brands of SD memory
card.
The readable storage capacity depends on
the memory card used. You can obtain fur-
ther information at any authorized
Mercedes-Benz Center. Inserting an SD memory card
XInsert the memory card into the slot on the
control panel until it engages in place. The
side with the contacts must face down-
wards and point towards the slot.
If no MP3 tracks can be found, you will see
a message to this effect.
The first 100 MP3 tracks are loaded. The
first MP3 track is then played. Further
tracks are loaded in the background; this is
indicated by an hourglass symbol.
Ejecting an SD memory card
XPress the memory card.
The memory card is ejected.
XRemove the memory card from slot.
Connecting a USB device
The USB port is located in the stowage com-
partment in the center console.
Electrical consumption at this connection
must not exceed a continuous current of
500 mA. If the electrical consumption is
higher, use a separate source to provide
power for the USB device (e.g.
12 V power supply).
XConnect the USB device (e.g. USB stick) to
the USB port.
If no MP3 tracks can be found, you will see
a message to this effect.
The first 100 MP3 tracks are loaded. The
first MP3 track is then played. Further
tracks are loaded in the background; this is
indicated by an hourglass symbol.
iDue to the wide range of USB devices
available on the market, playback cannot
be guaranteed for all brands of USB device.
Information about suitable USB devices
can be obtained from an authorized
Mercedes-Benz Center.
MP3 players must support Media Transfer
Protocol (MTP). The MTP mode must be
active.
Audio447
COMAND
Z
Page 459 of 614
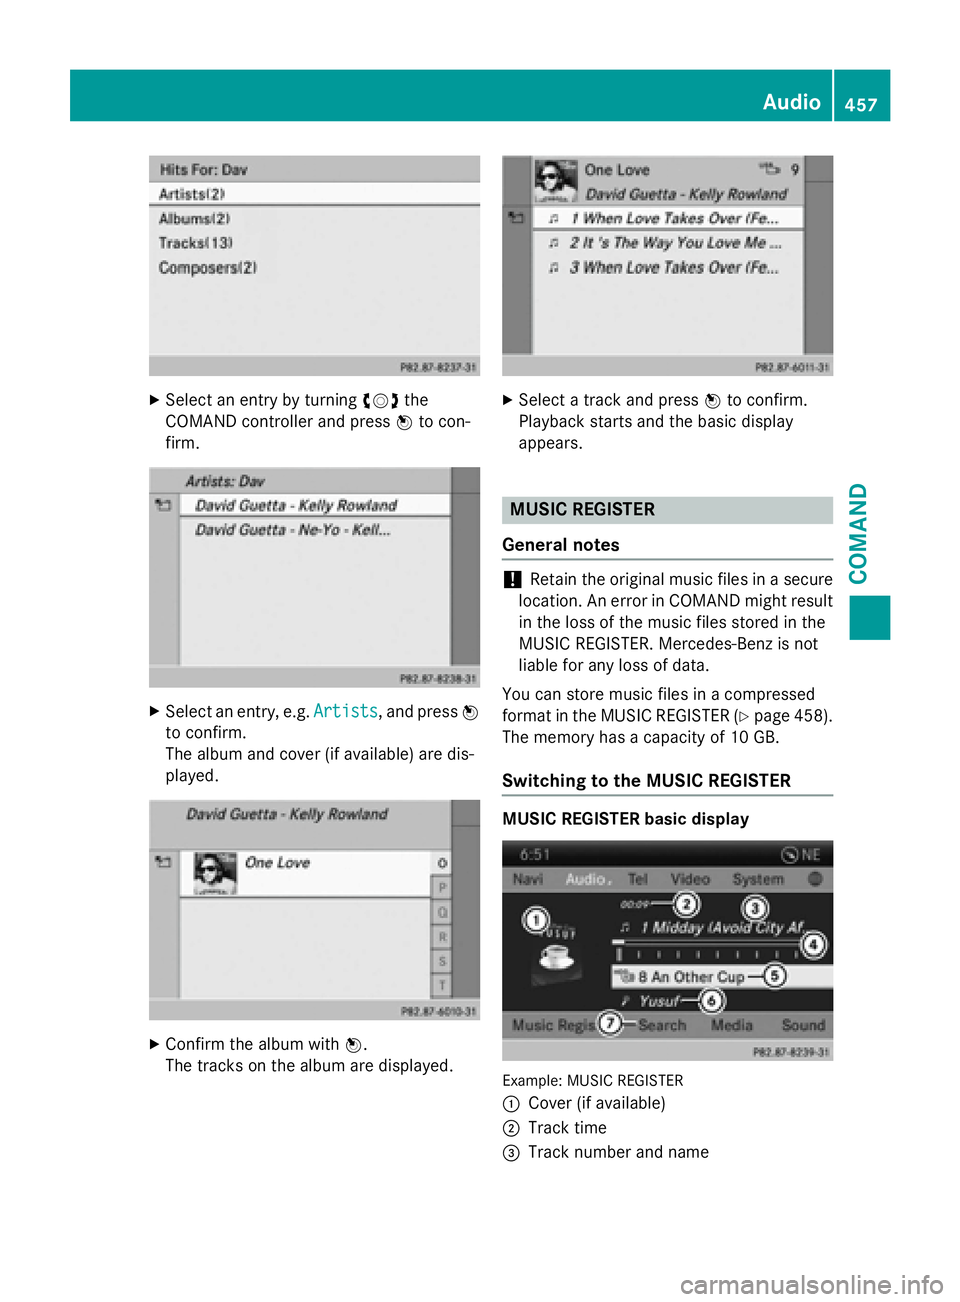
XSelect an entry by turningcVdthe
COMAND controller and press Wto con-
firm.
XSelect an entry, e.g. Artists, and pressW
to confirm.
The album and cover (if available) are dis-
played.
XConfirm the album with W.
The tracks on the album are displayed.
XSelect a track and press Wto confirm.
Playback starts and the basic display
appears.
MUSIC REGISTER
General notes
!Retain the original music files in a secure
location. An error in COMAND might result
in the loss of the music files stored in the
MUSIC REGISTER. Mercedes-Benz is not
liable for any loss of data.
You can store music files in a compressed
format in the MUSIC REGISTER (
Ypage 458).
The memory has a capacity of 10 GB.
Switching to the MUSIC REGISTER
MUSIC REGISTER basic display
Example: MUSIC REGISTER
:
Cover (if available)
;Track time
=Track number and name
Audio457
COMAND
Z