2016 MERCEDES-BENZ SL-CLASS ROADSTER ECU
[x] Cancel search: ECUPage 465 of 614

XOption 1:enter the passkey (Ypage 385).
After successful authorization, the Blue-
tooth
®audio device is connected and
starts playing.
XOption 2 (Secure Simple Pairing): if the
digit codes displayed in COMAND and on
the Bluetooth
®audio device are the same,
confirm Yes
by pressing W.
If you select Yes
, authorization continues
and the Bluetooth®audio device is connec-
ted. Playback starts.
If you select No
, authorization will be can-
celed.
iThe Bluetooth®audio device must sup-
port Bluetooth®version 2.1 for connection
via Secure Simple Pairing. COMAND cre-
ates a six-digit code, which is displayed on
both devices that are to be connected
External authorization
If COMAND does not find your Bluetooth®
audio device, this may be due to particular
security settings on your Bluetooth®audio
device. In this case, check whether your Blue-
tooth
®audio device can locate COMAND. The
Bluetooth®device name of COMAND is MB
Bluetooth.
XSwitch on Bluetooth®audio mode
(
Ypage 465).
XSelect BTAudioby sliding VÆand turning
cVd the COMAND controller and press W
to confirm.
XConfirm Bluetooth Audio Device List
by pressing Wthe COMAND controller.
XTo search: confirmConnect via BT
Audio Deviceby pressing the COMAND
controller W.
The duration of the search depends on the
number of Bluetooth
®audio devices within
range and their characteristics.
XTo authorize: start the authorization on
the Bluetooth®audio device, see the oper-
ating instructions of the Bluetooth®audio
device.
After successful authorization, the Blue-
tooth
®audio device is connected and
starts playing.
iWith some Bluetooth®audio devices,
playback must first be started on the device
itself so that COMAND can play the audio
files.
Reconnecting a Bluetooth
®audio device
The Bluetooth
®audio profiles are connected
automatically under the following circum-
stances:
Rone of the last two mobile phones to have
been connected has also been used as a
Bluetooth
®audio player (if this function is
supported by the mobile phone).
Rthe mobile phone takes over the automatic
connection itself.
A Bluetooth
®audio player without telephone
functions is not automatically reconnected,
even if it was the last device connected.
If the No Bluetooth Audio Device Con‐
nectedmessage appears, you have two
options to connect a Bluetooth®audio
device:
Connecting last device
XConfirm Connect Last Devicein the
basic display by pressing Wthe COMAND
controller.
If COMAND can locate the Bluetooth
®
audio device, it will be connected and start
playing.
iWith some Bluetooth®audio devices,
playback must first be started on the device
Audio463
COMAND
Z
Page 485 of 614
Overview
Important safety notes
GWARNING
The CD/DVD drive is a class 1 laser product.
If you open the housing of the CD/DVD drive,
there is a risk of exposure to invisible laser
radiation. This laser radiation could damage
your retina. There is a risk of injury.
Never open the housing. Always have main-
tenance and repair work carried out at a quali- fied specialist workshop.
GWARNING
If objects such as headphones/headsets or
external audio/video sources are not secured
in the passenger compartment, they can be
flung around and hit vehicle occupants. There
is a risk of injury, for example in the event of
sudden braking or a sudden change in direc-
tion.
Always stow these items or similar objects
carefully so that they cannot be flung around,
for example in a lockable vehicle stowage
compartment.
equipment
Observe that a range of Rear Seat Entertain-
ment Systems are available for Mercedes-
Benz vehicles. In this Operator's Manual, the
Rear Seat Entertainment System Code 864 is
used for illustration purposes. If you have a
different Rear Seat Entertainment System in
your vehicle, please refer to the separate prin-
ted operating instructions .
Components
The Rear Seat Entertainment System
includes:
Rtwo screens for the rear behind the front-
seat head restraints
Rtwo remote controls
Ra CD/DVD drive
RAUX jacks on both screens (AUX display)
and on the CD/DVD drive (AUX drive)
Rtwo sets of cordless headphones
Rear Seat Entertainment System483
COMAND
Z
Page 500 of 614
Back to the film
XPress thekbutton repeatedly until you
see the movie.
or
XSelect any menu item in the DVD menu and
press 9to confirm.
XSelect the Back (to the movie)menu
item in the menu and press the 9button to
confirm.
Setting the audio format
This function is not available on all DVDs. If it
is available, you can set the audio language or
the audio format. The number of settings is
determined by the DVD content. It may also
be possible to access the settings from the
DVD menu.
XPress the 9button on the remote control
and show the menu.
XSelect DVD-Videoand press the 9button
on the remote control to confirm.
XSelect DVD Functionsand press the 9
button to confirm.
XSelect Audio Languageand press the 9
button to confirm.
A menu appears after a short while. The #
dot in front of an entry indicates the cur-
rently selected language.
XSelect a language using the 9:but-
tons and press the 9button to confirm.
XTo exit the menu: press the=or;
button.
Subtitles and camera angle
These functions are not available on all DVDs.
The number of subtitle languages and camera
angles available depends on the content of
the DVD. It may also be possible to access the
settings from the DVD menu.
XPress the 9button on the remote control
and show the menu.
XSelect DVD-Videoand press the 9button
on the remote control to confirm.
XSelect DVD Functionsand press the 9
button to confirm.
XSelect SubtitlesorCamera Angleand
press the 9button to confirm.
In both cases, a menu appears after a few
seconds. The #dot in front of an entry
indicates the current setting.
XSelect a setting using the 9:but-
tons and press the 9button to confirm.
XTo exit the menu: press the=or;
button.
Interactive content
DVDs can also contain interactive content
(e.g. a video game). In a video game, you may
be able to influence events by selecting and
triggering actions. The type and number of
actions depend on the DVD.
XSelect an action using the
9;:= buttons on the
remote control and press the 9button to
execute it.
A menu appears and the first entry, Select
,
is highlighted.
XPress the 9button.
Operation with an active COMAND
source
Switching the function on/off in
COMAND
You can transfer an audio or video source
selected in COMAND to the Rear Seat Enter-
tainment System. If you subsequently switch
modes in COMAND, the new source will not
be transmitted to the Rear Seat Entertain-
ment System.
XTo switch on the function in COMAND:
switch to the desired audio mode in
COMAND, e.g. CD mode (
Ypage 448), or
show the menu in video DVD mode
(
Ypage 476).
XSelect the menu item at the bottom left,
e.g. CD
in audio CD mode, by sliding VÆ
498Rear Seat Entertainment System
COMAND
Page 503 of 614
Displaying AUX
XSelectth escree nby turning th escrol l
whee lon th eremot econtrol (
Ypage 484)
until "L REA R "(leftscreen) or "REA RR"
(right screen) is highlighte din th ewindow.
XSelec tAuxin th emen uusin gth e
9=; buttons on theremot e
control and press th e9 butto nto confirm .
XSelectSourcefrom th eAU Xmen uand
press th e9 butto nto confirm .
XSelectDispla yAuxand press th e9 but-
to nto confirm .
You will see and hear th econten tof th e
video source if it is switched to playback. If
no video imag eis available from th eAU X
source connected, you will see an audio
menu.
Adjusting treble and bas s
XSelectTrebleor Bas sin th eAU Xmen u
and press th e9 butto non th eremot e
control to confirm .
An adjustmen tscale appears .
XSelect asetting usin gth e9 or:
butto nand press th e9 butto nto confirm .
Adjusting th ebrightness, contrast or
color
XSelec tDispla yAuxorDis cDriveAuxin
th eAU Xmen uand press th e9 butto nto
confirm .
XSelectBrightnes s,Contrastor Color
and press th e9 butto nto confirm .
An adjustmen tscale appears .
XSelect asetting usin gth e9 or:
butto nand press th e9 butto nto confirm .
Changingth epicture forma t
XSelectDispla yAuxorDis cDriveAuxin
th eAU Xmen uand press th e9 butto nto
confirm .
XSelect16: 9Optimized,4:3or Wide‐
screenusin gth e9: buttons and
press th e9 butto nto confirm .
The dot in fron tof amen uitem indicate s
th ecurren tsetting .
SIRIUS Weather
Your COMAND equipment
These operating instruction sdescribe all th e
standard and optional equipmen tfo ryour
COMAND system, as available at th etime of
goin gto print .Country-specifi cdifference s
are possible. Pleas enote that your
COMAND system may no tbe equipped wit h
all th efeatures described .
Introduction
i
This function is currentl yno tavailable fo r
Canada.
Fo rth ereception of weather forecast svia
satellit eradio, you will need aSIRIU SXM Sat -
ellit eWeather subscription .
Whe nth eCal l
SIRIUStoactivatesys‐
tem at 888-539-7474message wit hth e
SIRIU Sdevice identification number appears ,
you will first hav eto obtain access to th e
weather service. Adescription of th eproce -
dure can be found in th e"Registerin gsatellit e
radio" section (
Ypage 442).
COMAND can receiv eweather forecast svia
satellit eradi ofo rth eentire US A(includin g
Alask aand Hawaii). The received weather
dat acan be displayed as an information chart
(daily forecast ,five-day forecast ,detailed
information )or on th eweather map.
The weather dat areceived from aweather
station is store din COMAND fo ron ehour .It
can therefore be displayed again immediately
SIRIUS Weather501
COMAND
Z
Page 516 of 614
Useful information
i
This Operator's Manual describes all
models and all standard and optional equip-
ment of your vehicle available at the time of
publication of the Operator's Manual.
Country-specific differences are possible.
Please note that your vehicle may not be
equipped with all features described. This
also applies to safety-related systems and
functions.
iRead the information on qualified special-
ist workshops (
Ypage 34).
Stowage areas
Stowage spaces
Important safety notes
GWARNING
If you do not correctly store objects in the
vehicle interior, they can slip or be flung
around, thus striking vehicle occupants.
There is a risk of injury, especially when brak- ing or abruptly changing directions.
RAlways store objects so that they cannot be
flung around in these or in similar situa-
tions.
RAlways make sure that objects do not pro-
trude from stowage compartments, parcel
nets or stowage nets.
RClose lockable stowage compartments
while driving.
RStow and secure objects that are heavy,
hard, pointy, sharp-edged, fragile or too
large in the trunk.
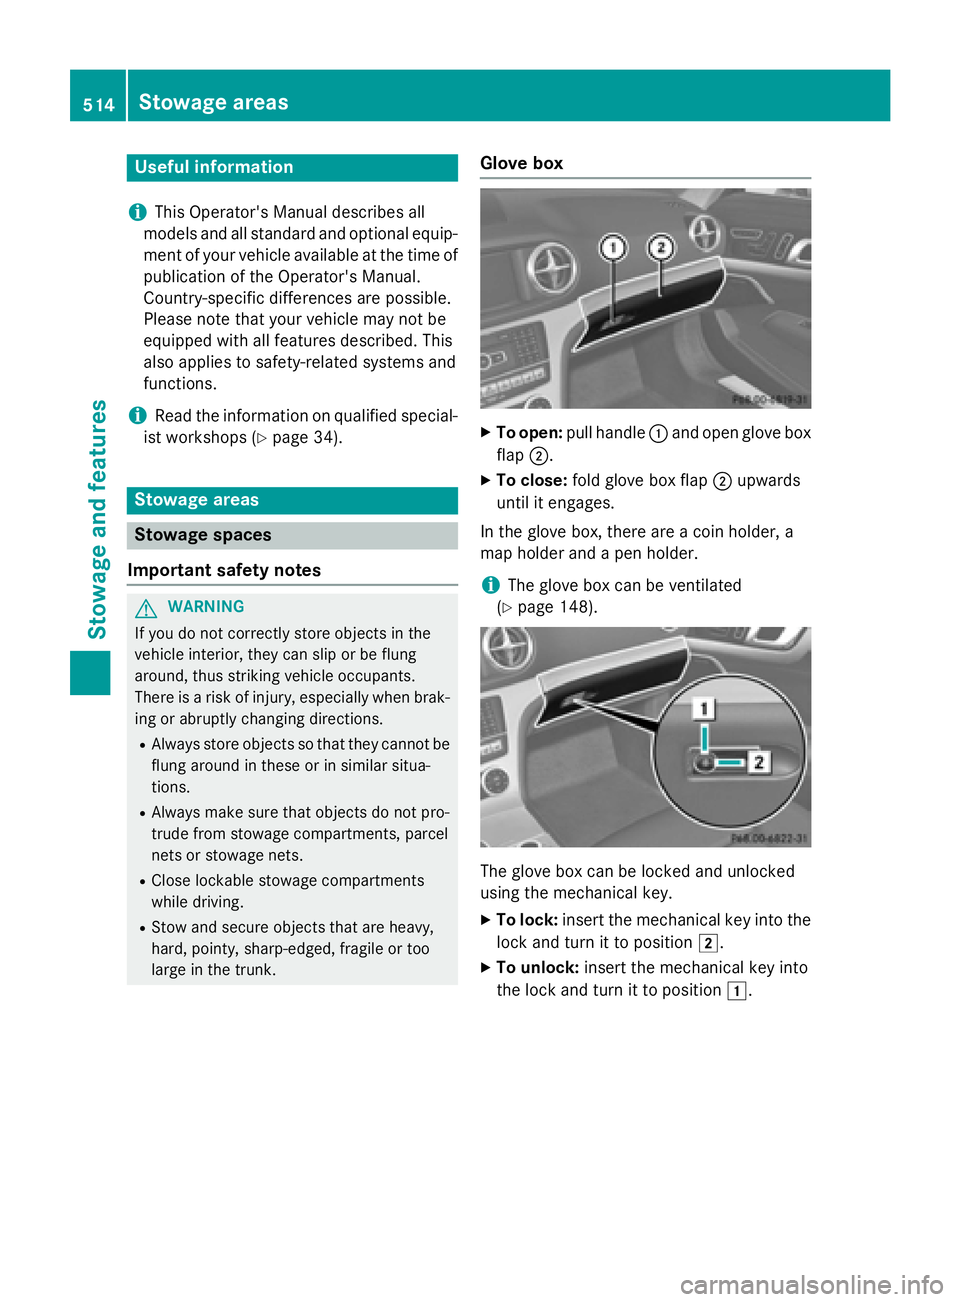
Glove box
XTo open: pull handle :and open glove box
flap ;.
XTo close: fold glove box flap ;upwards
until it engages.
In the glove box, there are a coin holder, a
map holder and a pen holder.
iThe glove box can be ventilated
(
Ypage 148).
The glove box can be locked and unlocked
using the mechanical key.
XTo lock: insert the mechanical key into the
lock and turn it to position 2.
XTo unlock:insert the mechanical key into
the lock and turn it to position 1.
514Stowage areas
Stowage and features
Page 520 of 614
Problems with the loading aid
ProblemPossible causes/consequences andMSolutions
It is no longer possible
to lower the stowed
roof in the trunk using
the loading aid.You cannot close the trunk any more.
XCall a qualified specialist workshop.
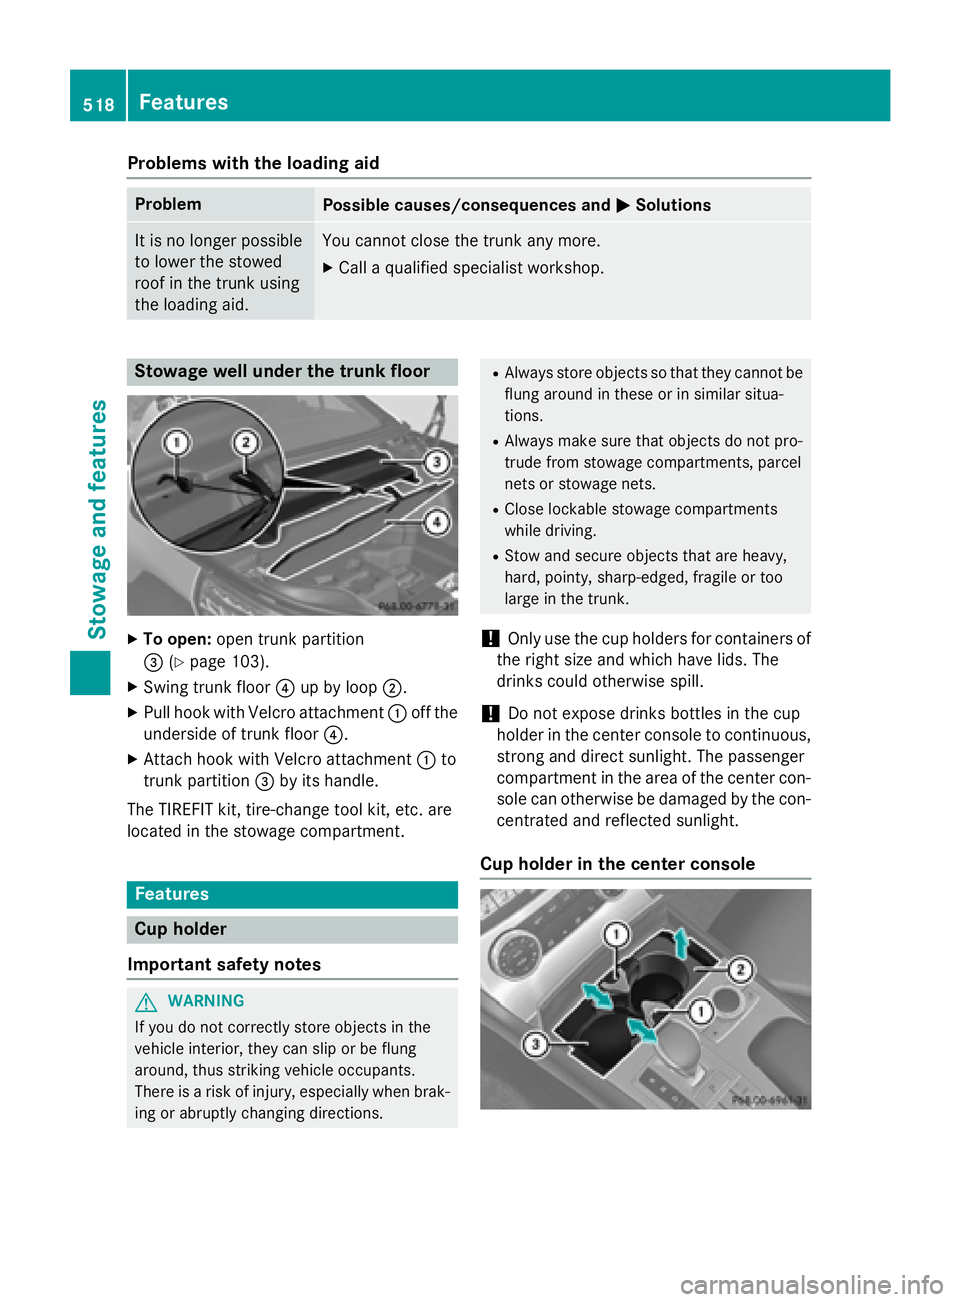
Stowage well under the trunk floor
XTo open:open trunk partition
= (
Ypage 103).
XSwing trunk floor ?up by loop ;.
XPull hook with Velcro attachment :off the
underside of trunk floor ?.
XAttach hook with Velcro attachment :to
trunk partition =by its handle.
The TIREFIT kit, tire-change tool kit, etc. are
located in the stowage compartment.
Features
Cup holder
Important safety notes
GWARNING
If you do not correctly store objects in the
vehicle interior, they can slip or be flung
around, thus striking vehicle occupants.
There is a risk of injury, especially when brak- ing or abruptly changing directions.
RAlways store objects so that they cannot be
flung around in these or in similar situa-
tions.
RAlways make sure that objects do not pro-
trude from stowage compartments, parcel
nets or stowage nets.
RClose lockable stowage compartments
while driving.
RStow and secure objects that are heavy,
hard, pointy, sharp-edged, fragile or too
large in the trunk.
!Only use the cup holders for containers of
the right size and which have lids. The
drinks could otherwise spill.
!Do not expose drinks bottles in the cup
holder in the center console to continuous,
strong and direct sunlight. The passenger
compartment in the area of the center con- sole can otherwise be damaged by the con-
centrated and reflected sunlight.
Cup holder in the center console
518Features
Stowage and features
Page 521 of 614
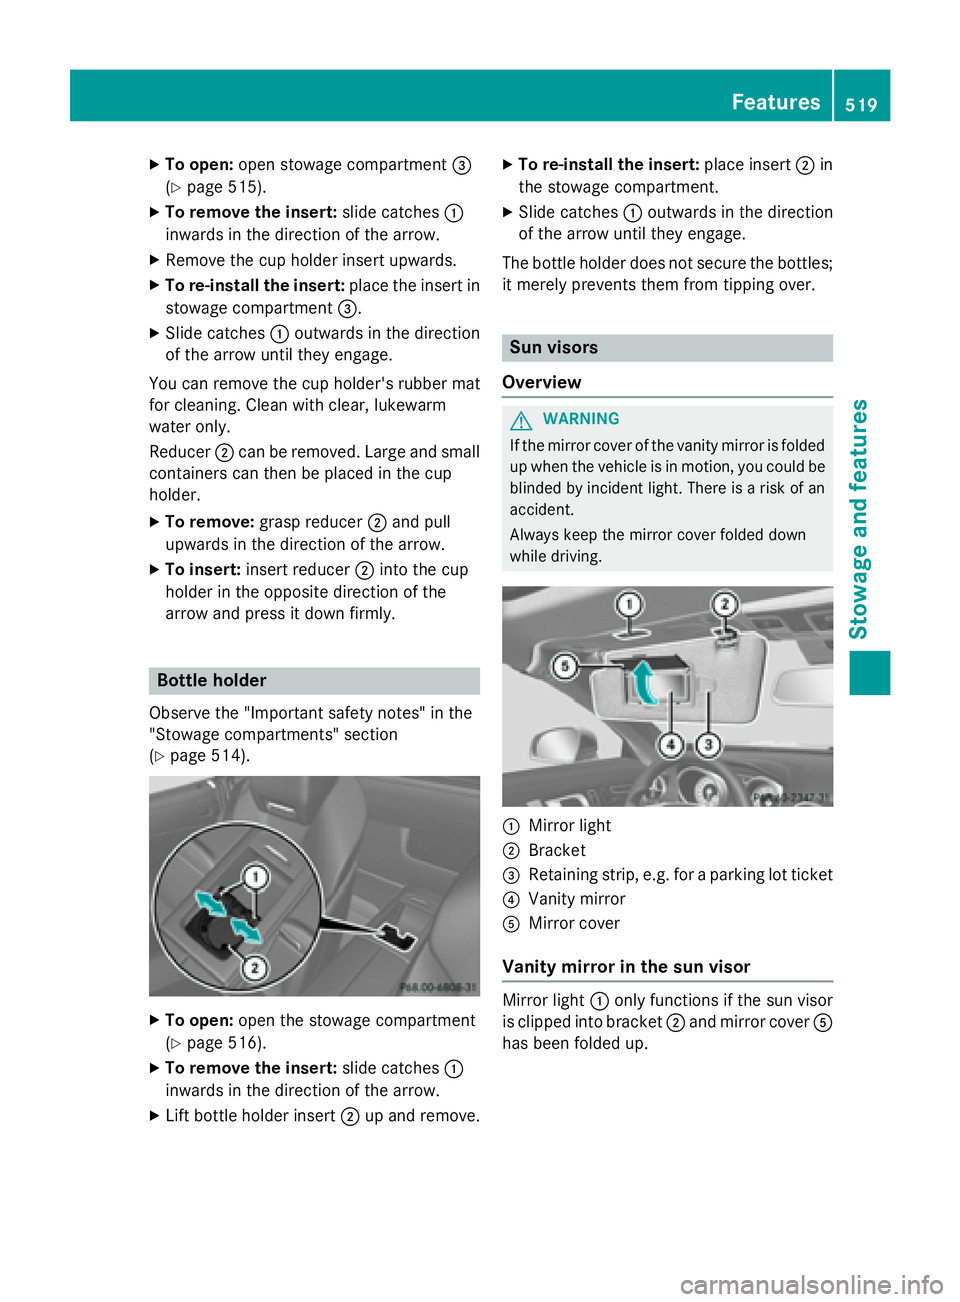
XTo open:open stowage compartment =
(
Ypage 515).
XTo remove the insert: slide catches:
inwards in the direction of the arrow.
XRemove the cup holder insert upwards.
XTo re-install the insert: place the insert in
stowage compartment =.
XSlide catches:outwards in the direction
of the arrow until they engage.
You can remove the cup holder's rubber mat
for cleaning. Clean with clear, lukewarm
water only.
Reducer ;can be removed. Large and small
containers can then be placed in the cup
holder.
XTo remove: grasp reducer ;and pull
upwards in the direction of the arrow.
XTo insert: insert reducer ;into the cup
holder in the opposite direction of the
arrow and press it down firmly.
Bottle holder
Observe the "Important safety notes" in the
"Stowage compartments" section
(
Ypage 514).
XTo open: open the stowage compartment
(
Ypage 516).
XTo remove the insert: slide catches:
inwards in the direction of the arrow.
XLift bottle holder insert ;up and remove.
XTo re-install the insert: place insert;in
the stowage compartment.
XSlide catches :outwards in the direction
of the arrow until they engage.
The bottle holder does not secure the bottles;
it merely prevents them from tipping over.
Sun visors
Overview
GWARNING
If the mirror cover of the vanity mirror is folded
up when the vehicle is in motion, you could be
blinded by incident light. There is a risk of an
accident.
Always keep the mirror cover folded down
while driving.
:Mirror light
;Bracket
=Retaining strip, e.g. for a parking lot ticket
?Vanity mirror
AMirror cover
Vanity mirror in the sun visor
Mirror light :only functions if the sun visor
is clipped into bracket ;and mirror cover A
has been folded up.
Features519
Stowag ean d features
Z
Page 524 of 614
iDetermining the location of the vehicle on
a map is only possible if:
RGPS reception is available.
Rthe vehicle position can be forwarded to the Customer Assistance Center.
The mbrace system
To adjust the volume during a call, proceed as
follows:
XPress the WorX button on the mul-
tifunction steering wheel.
or
XUse the volume controller of COMAND.
The system offers various services, e.g.:
RAutomatic and manual emergency call
RRoadside Assistance call
RMB Info call
USA only: you can find information and a
description of all available features under
"Owners Online" at http://www.mbusa.com.
System self-test
After you have switched on the ignition, the
system carries out a self-diagnosis.
A malfunction in the system has been detec-
ted if one of the following occurs:
RThe indicator lamp in the SOS button does not come on during the system self-test.
RThe indicator lamp in the FRoadside
Assistance button does not light up during
self-diagnosis of the system.
RThe indicator lamp in the ïMB Info call
button does not light up during self-diag-
nosis of the system.
RThe indicator lamp in one or more of the
following buttons continues to light up red
after the system self-diagnosis:
-SOS button
-F Roadside Assistance call button
-ïMB Info call button
RAfter the system self-diagnosis, the Inop‐
erativeorService Not Activated
message appears in the multifunction dis-
play.
If a malfunction is indicated as outlined
above, the system may not operate as expec-
ted. In the event of an emergency, help will
have to be summoned by other means.
Have the system checked at the nearest
authorized Mercedes-Benz Center or contact the following service hotlines:
RUSA: Mercedes-Benz Customer Assistance
Center at 1-800-FOR-MERCedes
(1-800-367-6372) or 1-866-990-9007
RCanada: Customer Service at
1-888-923-8367
Emergency call
Important safety notes
GWARNING
It can be dangerous to remain in the vehicle,
even if you have pressed the SOS button in an emergency if:
Ryou see smoke inside or outside of the vehi-
cle, e.g. if there is a fire after an accident
Rthe vehicle is on a dangerous section of
road
Rthe vehicle is not visible or cannot easily beseen by other road users, particularly when
dark or in poor visibility conditions
There is a risk of an accident and injury.
Leave the vehicle immediately in this or simi-
lar situations as soon as it is safe to do so.
Move to a safe location along with other vehi-
cle occupants. In such situations, secure the
vehicle in accordance with national regula-
tions, e. g. with a warning triangle.
You must have a license agreement to acti-
vate the mbrace service. Make sure that your
system is activated and operational. To reg-
ister, press the ïMB Info call button. If
any of the steps mentioned are not carried
out, the system may not be activated.
522Features
Stowag ean d features