2016 MERCEDES-BENZ SL-CLASS ROADSTER center console
[x] Cancel search: center consolePage 469 of 614

Increasing the volume on COMAND
XSelect BTAudioby sliding VÆand turning
cVd the COMAND controller and press W
to confirm.
XSe lect Volumeand press Wto confirm.
A menu appears. The #dot indicates the
current setting.
XSe lect StandardorBoostand press Wto
confirm.
In formation about sound settings
(
Ypage 298)
You willfind further information inthe "Audio
AUX mode" section (
Ypage 473)
Operation with the Media Interface
Connection options
Overview
You willfind the connection sockets in the
center console stowage compartment.
Device-specific adapter cables are required
to connect external devices to the Media
In terface. Country-specific versions are sup-
plied wit h the Media Interface (
Ypage 467).
You can connect the following data carriers to
COMAND via the Media Interface:
RiPod®
RiPhone®
Rcertain MP3 players
iSt ore ind ividual parts ina safe place.
Only use genuine Mercedes-Benz connec-
tion cables.
iiPod®and iPhone®are registered trade-
marks of Ap ple Inc., Cupertino, California,
USA.
iMP3 players that support MTP ( Med ia
T ransfer Protoco l)can beused.
This allows the MP3 player to beeasily con-
nected to the Media Interface and removed
after use. Aud iodata isplayed without
problem.
On some MP3 players, you have to act ivate
the relevant function; see the MP3 player
operating instructions.
Supported devices
For details and a listof supported devices,
vis itht tp://www.mbusa- mobile.com . Or
call the Mercedes-Benz Customer Assistance
Center at 1-800-FOR-MERCedes
(1-800-367-6372 )(for the USA) or Customer
Relations at 1-800-387-0100 (for Canada).
Connecting an external device
Do not leave external devices in the vehicle.
They may malfunction in extreme tempera-
tures; see the operating instructions for the
respective device. Examples of extreme tem-
peratures are direct sunlight or very low out-
side temperatures. Mercedes-Benz USA, LLC
accepts no liability for damage to external
devices.
iNever connect more than one device at a
time. You will otherwise not be able to play back from the external device.
USB hubs (devices with several USB con-
nections) are not supported.
Audio467
COMAND
Z
Page 475 of 614
Dataformats
MP3 and WMA are supported as dat aformats
wit hfixed and variable bit rates (up to
32 0kbits/s).
Specia lconsiderations when using MP 3
player s
Up to eigh tdirectory levels wit hup to 1,000
track sper directory are supported.
Do no tuse US Bextension leads or adapters .
The ycan impair functionality.
iDRM (Digital Rights Management) protec-
te dfiles are no tsupported by th eMedia
Interface .
Audio AUX mode
Note son audi oAUX mode
External audio source smay hav edifferen t
volumes ,whic hcan mean that system mes -
sage ssuc has traffic announcements and
navigation system announcements are muc h
louder. If necessary, deactivat eth esystem
message sor adjust their volume manually.
You can connec tan external audio source
(AUX) to COMAND .
Dependin gon th evehicl emodel series, th e
connection is made usin g ajackin th estow-
age compartmen tin th ecenter console or a
US Bpor t (
Ypage 447).
If COMAND is equipped wit hth eMedia Inter-
face, external audio source sare connecte d
usin gth ecable set provided. An AU Xsocke t
is no tprovided. The connection sfo rth e
Media Interface are locate din th estowage
compartmen tin th ecenter console.
iYou will fin dfurther information onlin eat
http://www.mbusa-mobile.co m.Or cal l
th eMercedes-Ben zCustome rAssistance
Cente rat 1-800-FOR-MERCedes
(1-800-367-6372 ) (for the USA) or Cus-
tomer Relations at 1-800-387-0100 (for
Canada).
Switching to audio AUX mode
Switching on using the DISC button
The external device is connected to the audio
AUX input.
XPress the hbutton one or more times.
By pressing the function button repeatedly,
you can change the operating mode in the
following order:
RCD/MP3 (disc)
RMemory card mode
RMUSIC REGISTER
RUSB storage device
RMedia Interface or audio AUX mode
RBluetooth®audio mode
Switching modes via the audio menu
When you connect an external audio source,
audio AUX is not selected automatically.
XSelect Audioin the main function bar by
sliding ZVand turning cVdthe COMAND
controller and press Wto confirm.
If AUX mode was the last mode selected, it
will now be active.
If another audio source is switched on, you
can now switch to audio AUX mode in the
audio menu.
XSelect AudiousingZVand press Wto
confirm.
The audio menu appears.
XSelect Auxby turning cVdand press Wto
confirm.
The audio AUX menu appears. The medium
in the external audio source is played if the
source is connected and playback selec-
ted.
Audio473
COMAND
Z
Page 482 of 614
XSelectMenu LanguageorAudio Lan‐
guageand press Wto confirm.
In both cases, a menu appears after a few
seconds. The #dot in front of an entry indi-
cates the currently selected language.
XSelect a setting by turning cVdthe
COMAND controller and press Wto con-
firm.
Subtitles and camera angle
These functions are not available on all DVDs.
The number of subtitle languages and camera
angles available depends on the content of
the DVD. It may also be possible to access the
settings from the DVD menu.
XShow the DVD menu (Ypage 478).
XSelect DVD-Videoin the menu by turning
cVd the COMAND controller and press W
to confirm.
XSelect DVD Functionsand press Wto
confirm.
XSelect SubtitlesorCamera Angleand
press Wto confirm.
In both cases, a menu appears. The #dot in
front of an entry indicates the current set-
ting.
XSelect a setting by turning cVdthe
COMAND controller and press Wto con-
firm.
Interactive content
DVDs can contain interactive content (e.g. a
video game). In a video game, for example,
you may be able to influence events by select-
ing and triggering actions. The type and num-
ber of actions depend on the DVD.
XSelect an action by sliding ZVÆorXVY the
COMAND controller and press Wto exe-
cute it.
A menu appears and the first entry, Select
,
is highlighted.
XPress Wthe COMAND controller.
Video AUX mode
Connecting external video sources
External video sources may have different
volumes, which can mean that system mes-
sages such as traffic announcements and
navigation system announcements are much
louder. If necessary, deactivate the system
messages or adjust their volume manually.
If your vehicle is equipped with Media Inter-
face, you can connect an external video
source (AUX video) (
Ypage 467).
The 1/8 inch audio/video jacks are in the
center console stowage compartment.
iIn vehicles with a rear view camera, the
AUX video jack cannot be used for external
video sources.
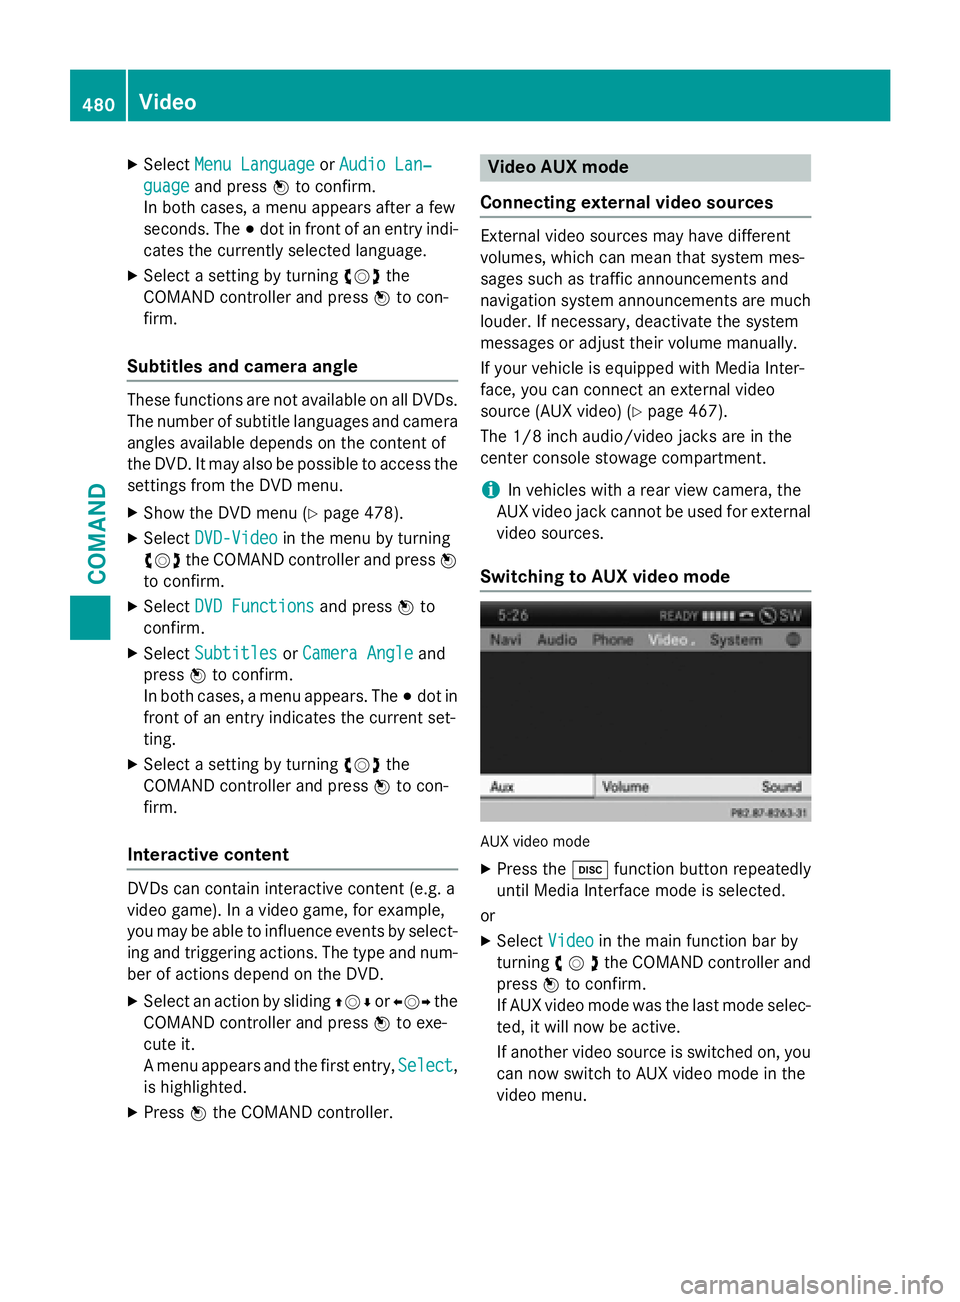
Switching to AUX video mode
AUX video mode
XPress the hfunction button repeatedly
until Media Interface mode is selected.
or
XSelect Videoin the main function bar by
turning cVdthe COMAND controller and
press Wto confirm.
If AUX video mode was the last mode selec-
ted, it will now be active.
If another video source is switched on, you can now switch to AUX video mode in the
video menu.
480Video
COMAND
Page 493 of 614
Showing/hiding the picture
XTo hide the picture:selectDisplay Off
in the system menu using the :;
buttons on the remote control and press
the 9button to confirm.
The picture is hidden.
XTo display the picture: press the9but-
ton.
CD/audio DVD and MP3 mode
Important safety notes
GWARNING
The CD/DVD drive is a class 1 laser product.
If you open the housing of the CD/DVD drive,
there is a risk of exposure to invisible laser
radiation. This laser radiation could damage
your retina. There is a risk of injury.
Never open the housing. Always have main-
tenance and repair work carried out at a quali- fied specialist workshop.
General notes
You will find information on the following top-
ics in the Audio section:
Rnotes on CDs/DVDs (Ypage 454)
Rnotes on MP3 mode (Ypage 453)
Rnotes on copyright (Ypage 454)
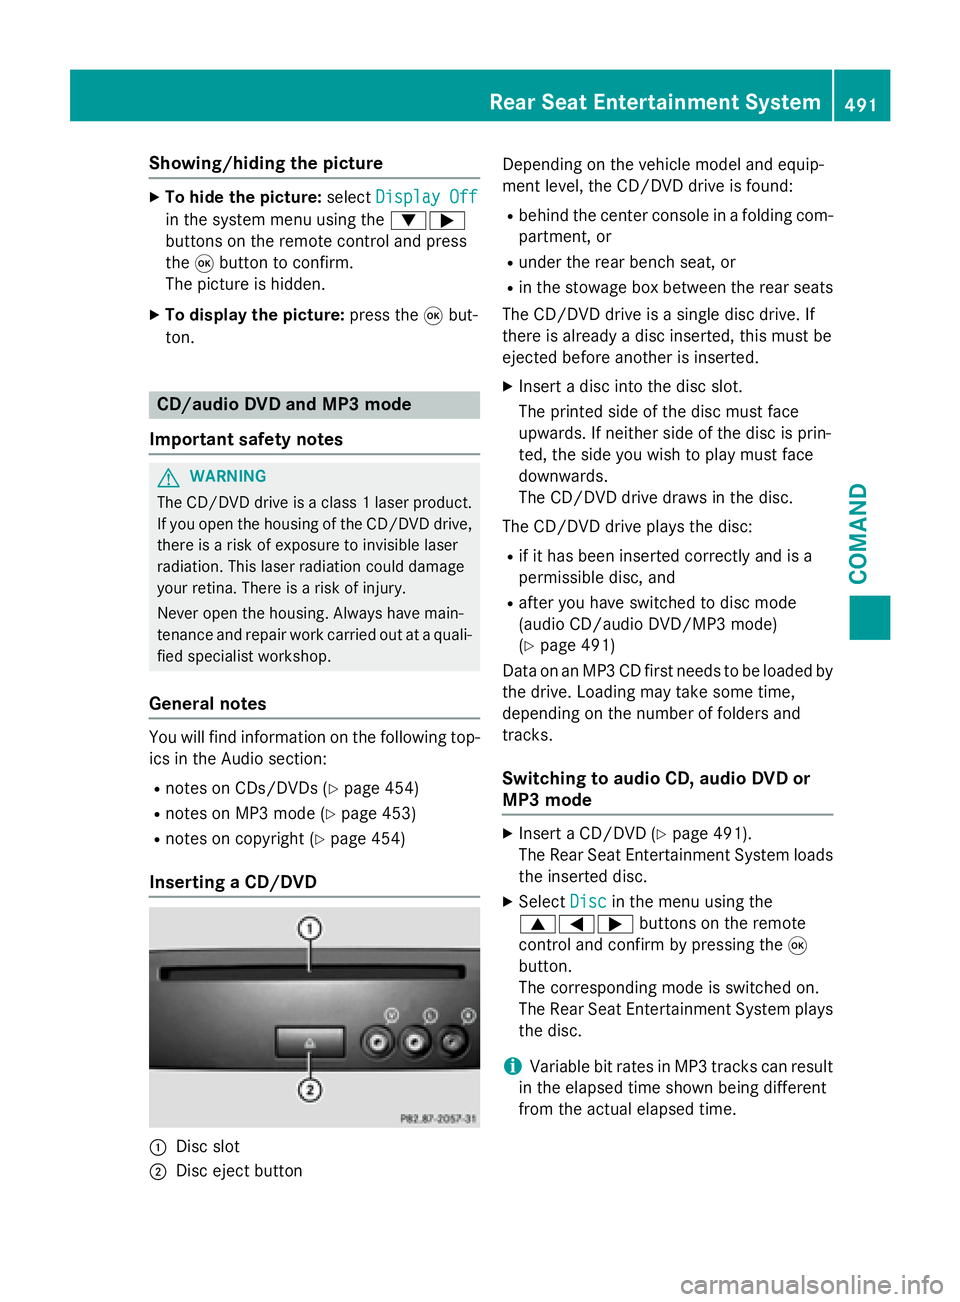
Inserting a CD/DVD
:Disc slot
;Disc eject button Depending on the vehicle model and equip-
ment level, the CD/DVD drive is found:
Rbehind the center console in a folding com-
partment, or
Runder the rear bench seat, or
Rin the stowage box between the rear seats
The CD/DVD drive is a single disc drive. If
there is already a disc inserted, this must be
ejected before another is inserted.
XInsert a disc into the disc slot.
The printed side of the disc must face
upwards. If neither side of the disc is prin-
ted, the side you wish to play must face
downwards.
The CD/DVD drive draws in the disc.
The CD/DVD drive plays the disc:
Rif it has been inserted correctly and is a
permissible disc, and
Rafter you have switched to disc mode
(audio CD/audio DVD/MP3 mode)
(
Ypage 491)
Data on an MP3 CD first needs to be loaded by
the drive. Loading may take some time,
depending on the number of folders and
tracks.
Switching to audio CD, audio DVD or
MP3 mode
XInsert a CD/DVD (Ypage 491).
The Rear Seat Entertainment System loads
the inserted disc.
XSelect Discin the menu using the
9=; buttons on the remote
control and confirm by pressing the 9
button.
The corresponding mode is switched on.
The Rear Seat Entertainment System plays
the disc.
iVariable bit rates in MP3 tracks can result
in the elapsed time shown being different
from the actual elapsed time.
Rear Seat Entertainment System491
COMAND
Z
Page 517 of 614
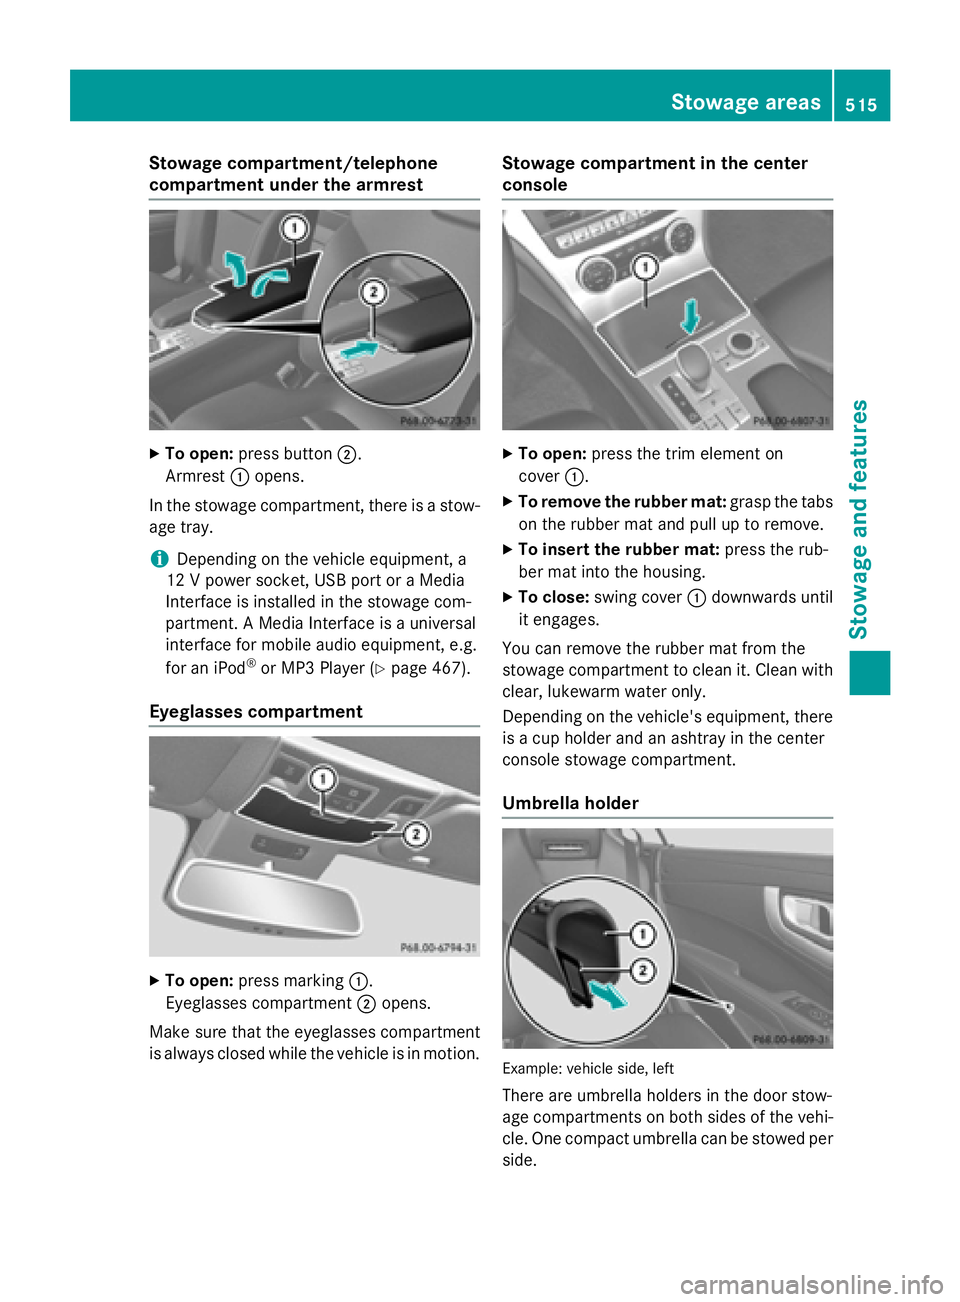
Stowage compartment/telephone
compartment under the armrest
XTo open:press button ;.
Armrest :opens.
In the stowage compartment, there is a stow-
age tray.
iDepending on the vehicle equipment, a
12 V power socket, USB port or a Media
Interface is installed in the stowage com-
partment. A Media Interface is a universal
interface for mobile audio equipment, e.g.
for an iPod
®or MP3 Player (Ypage 467).
Eyeglasses compartment
XTo open: press marking :.
Eyeglasses compartment ;opens.
Make sure that the eyeglasses compartment
is always closed while the vehicle is in motion.
Stowage compartment in the center
console
XTo open: press the trim element on
cover :.
XTo remove the rubber mat: grasp the tabs
on the rubber mat and pull up to remove.
XTo insert the rubber mat: press the rub-
ber mat into the housing.
XTo close: swing cover :downwards until
it engages.
You can remove the rubber mat from the
stowage compartment to clean it. Clean with
clear, lukewarm water only.
Depending on the vehicle's equipment, there
is a cup holder and an ashtray in the center
console stowage compartment.
Umbrella holder
Example: vehicle side, left
There are umbrella holders in the door stow-
age compartments on both sides of the vehi-
cle. One compact umbrella can be stowed per
side.
Stowage areas515
Stowage and features
Z
Page 520 of 614
Problems with the loading aid
ProblemPossible causes/consequences andMSolutions
It is no longer possible
to lower the stowed
roof in the trunk using
the loading aid.You cannot close the trunk any more.
XCall a qualified specialist workshop.
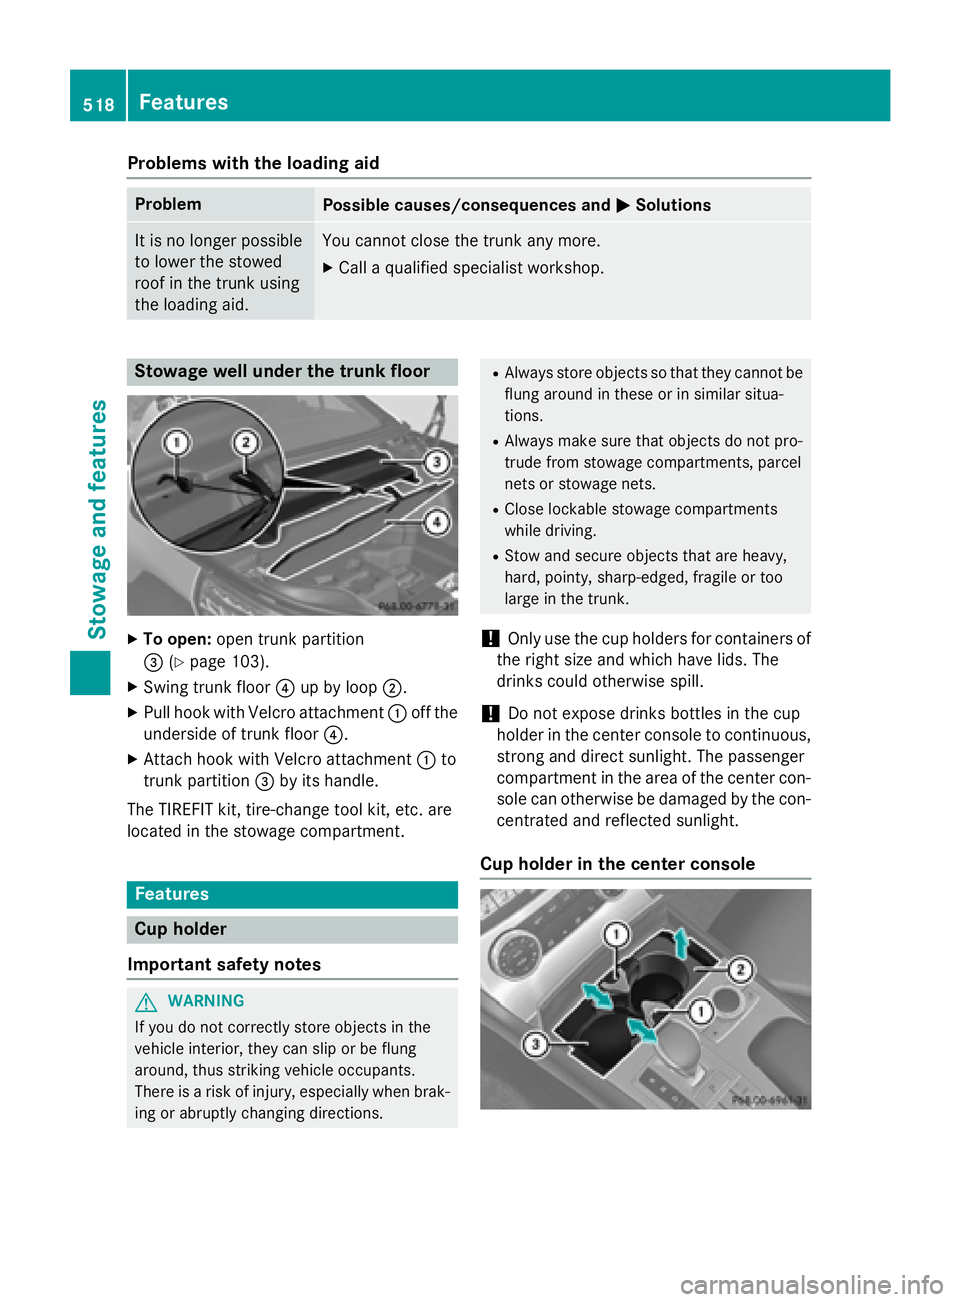
Stowage well under the trunk floor
XTo open:open trunk partition
= (
Ypage 103).
XSwing trunk floor ?up by loop ;.
XPull hook with Velcro attachment :off the
underside of trunk floor ?.
XAttach hook with Velcro attachment :to
trunk partition =by its handle.
The TIREFIT kit, tire-change tool kit, etc. are
located in the stowage compartment.
Features
Cup holder
Important safety notes
GWARNING
If you do not correctly store objects in the
vehicle interior, they can slip or be flung
around, thus striking vehicle occupants.
There is a risk of injury, especially when brak- ing or abruptly changing directions.
RAlways store objects so that they cannot be
flung around in these or in similar situa-
tions.
RAlways make sure that objects do not pro-
trude from stowage compartments, parcel
nets or stowage nets.
RClose lockable stowage compartments
while driving.
RStow and secure objects that are heavy,
hard, pointy, sharp-edged, fragile or too
large in the trunk.
!Only use the cup holders for containers of
the right size and which have lids. The
drinks could otherwise spill.
!Do not expose drinks bottles in the cup
holder in the center console to continuous,
strong and direct sunlight. The passenger
compartment in the area of the center con- sole can otherwise be damaged by the con-
centrated and reflected sunlight.
Cup holder in the center console
518Features
Stowage and features