2016 MERCEDES-BENZ SL-CLASS ROADSTER fuel cap
[x] Cancel search: fuel capPage 280 of 614

Engine
ProblemPossible causes/consequences andMSolutions
;
The yellow Check
Engine warning lamp
lights up while the
engine is running.There may be a malfunction, for example:
Rin the engine management
Rin the fuel injection system
Rin the exhaust system
Rin the ignition system
Rin the fuel system
The emission limit values may be exceeded and the engine may be
in emergency mode.
XHave the vehicle checked as soon as possible at a qualified
specialist workshop.
iIn some states, you must immediately visit a qualified special-
ist workshop as soon as the yellow Check Engine warning lamp
lights up. This is due to the legal requirements in effect in these
states. If in doubt, check whether such legal regulations apply in the state in which you are currently driving.
8
The yellow reserve fuel
warning lamp lights up
while the engine is run-
ning.The fuel level has dropped into the reserve range.
XRefuel at the nearest gas station.
8
The yellow reserve fuel
warning lamp flashes
while the vehicle is in
motion.
In addition, the ;
Check Engine warning
lamp may light up.The fuel system pressure is too low. The fuel filler cap is not closed
correctly or the fuel system is leaking.
XCheck that the fuel filler cap is correctly closed.
XIf the fuel filler cap is not correctly closed: close the fuel filler
cap.
XIf the fuel filler cap is closed: visit a qualified specialist work-
shop.
?
The red coolant warn-
ing lamp lights up while
the engine is running
and the coolant tem-
perature gage is at the
start of the scale.The temperature sensor for the coolant temperature gage is defec-
tive.
The coolant temperature is no longer being monitored. There is a
risk of engine damage if the coolant temperature is too high.
XPull over and stop the vehicle safely and switch off the engine,
paying attention to road and traffic conditions. Do not continue
driving under any circumstances.
XSecure the vehicle against rolling away (Ypage 171).
XConsult a qualified specialist workshop.
278Warning and indicator lamps
On-board computer and displays
Page 541 of 614
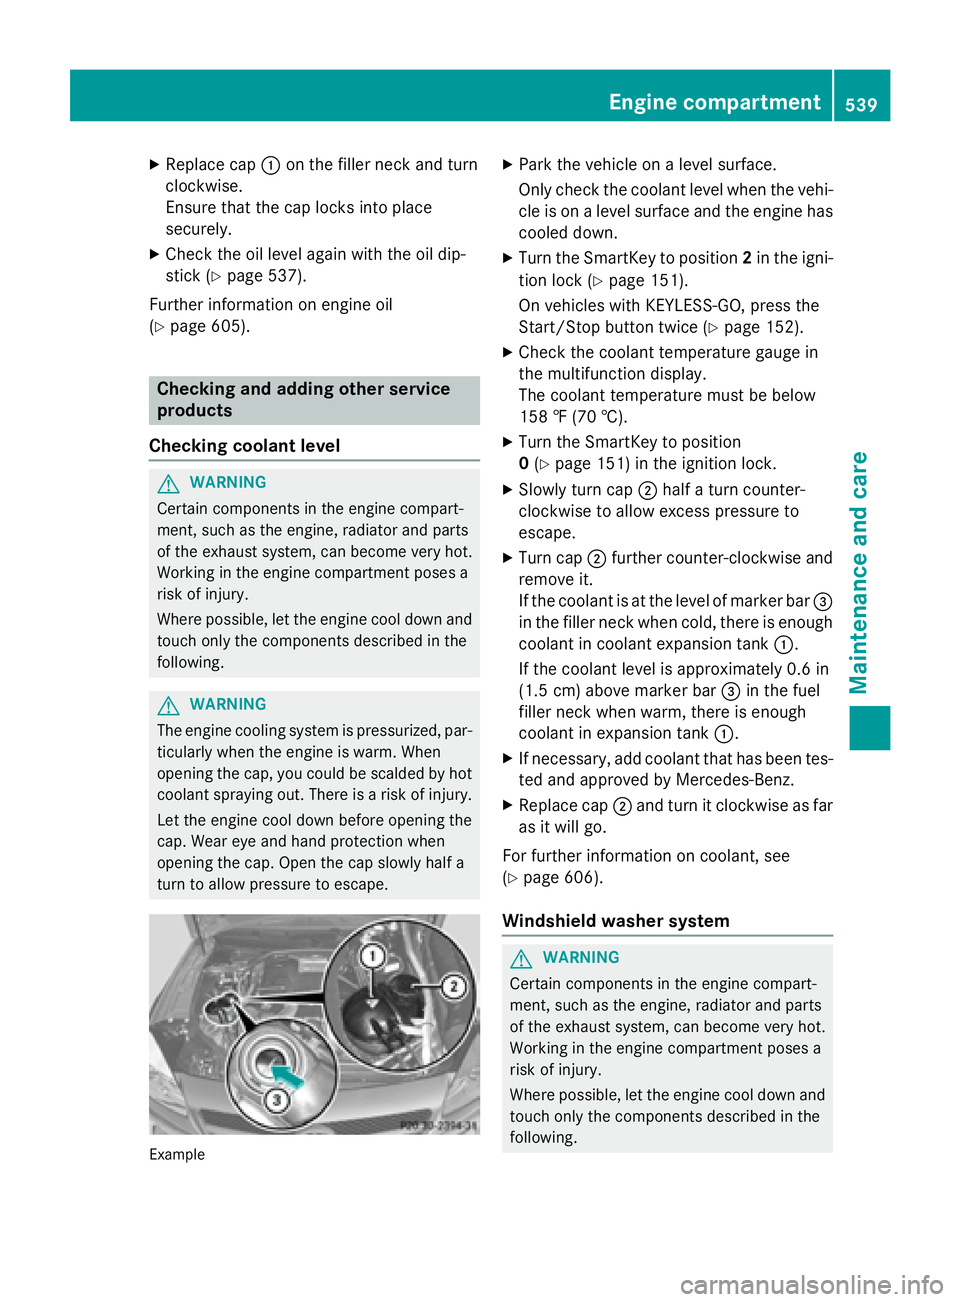
XReplacecap :on th efiller neck and tur n
clockwise .
Ensur ethat th ecap locks into plac e
securely.
XChec kth eoil level again wit hth eoil dip-
stick (
Ypage 537).
Further information on engin eoil
(
Ypage 605).
Checking and addin gother service
products
Checking coolant level
GWARNIN G
Certain component sin th eengin ecompart-
ment, suc has th eengine, radiato rand part s
of th eexhaust system, can become ver yhot .
Working in th eengin ecompartmen tposes a
ris kof injury.
Where possible, let th eengin ecool down and
touch only th ecomponent sdescribed in th e
following.
GWARNIN G
The engin ecoolin gsystem is pressurized, par-
ticularly when th eengin eis warm .Whe n
openin gth ecap ,you could be scalded by hot
coolan tsprayin gout .There is aris kof injury.
Let th eengin ecool down before openin gth e
cap .Wear eye and han dprotection when
openin gth ecap .Ope nth ecap slowly half a
tur nto allow pressur eto escape.
Exampl e
XPark thevehicl eon alevel surface.
Only chec kth ecoolan tlevel when th evehi-
cle is on alevel surfac eand th eengin ehas
cooled down .
XTurn theSmartKey to position 2in th eigni-
tion loc k (
Ypage 151).
On vehicles wit hKEYLESS-GO ,press th e
Start/Sto pbutto ntwice (
Ypage 152).
XCheckth ecoolan ttemperature gauge in
th emultifunction display.
The coolan ttemperature mus tbe belo w
15 8 ‡ (70 †).
XTurn th eSmartKey to position
0 (
Ypage 151) in th eignition lock.
XSlowly tur ncap ;half atur ncounter-
clockwise to allow excess pressur eto
escape.
XTurn cap ;further counter-clockwise and
remove it .
If th ecoolan tis at th elevel of marke rbar =
in th efiller neck when cold, there is enough
coolan tin coolan texpansion tan k:.
If th ecoolan tlevel is approximately 0. 6in
(1.5 cm ) above marker bar =in the fuel
filler neck when warm, there is enough
coolant in expansion tank :.
XIf necessary, add coolant that has been tes-
ted and approved by Mercedes-Benz.
XReplace cap;and turn it clockwise as far
as it will go.
For further information on coolant, see
(
Ypage 606).
Windshield washer system
GWARNING
Certain components in the engine compart-
ment, such as the engine, radiator and parts
of the exhaust system, can become very hot.
Working in the engine compartment poses a
risk of injury.
Where possible, let the engine cool downand
touch only the components describe d in the
foll owin g.
Engine compartment539
Maintenance and care
Z
Page 557 of 614

Do not continue driving. Contact a qualified
specialist workshop.
iIn cases such as the one mentioned
above, contact an authorized Mercedes-
Benz Center. Or call 1-800-FOR-MERCedes (in the USA) or 1-800-387-0100 (in Can-
ada).
XCorrect the tire pressure if it is still at least
130 kPa (1.3 bar/19 psi). See the Tire andLoading Information placard on the driver's
side B-pillar or the tire pressure table in the
fuel filler flap for values.
XTo increase the tire pressure: switch on
the tire inflation compressor.
XTo reduce the tire pressure: depress
pressure release button :next to pres-
sure gauge ;.
XWhen the tire pressure is correct, unscrew
the filler hose from the valve of the sealed
tire.
XScrew the valve cap onto the tire valve of
the sealed tire.
XPull the tire sealant bottle out of the tire
inflation compressor.
The filler hose remains attached to the tire
sealant bottle.
XDrive to the nearest qualified specialist
workshop and have the tire changed there.
XHave the tire sealant bottle replaced as
soon as possible at a qualified specialist
workshop.
XHave the tire sealant bottle replaced every
four years at a qualified specialist work-
shop.
Battery (vehicle)
Important safety notes
Special tools and expert knowledge are
required when working on the battery, e.g.
removal and installation. You should there-
fore have all work involving the battery car-
ried out at a qualified specialist workshop.
GWARNING
Work carried out incorrectly on the battery
can lead, for example, to a short circuit and
thus damage the vehicle electronics. This can
lead to function restrictions applying to
safety-relevant systems, e.g the lighting sys-
tem, the ABS (anti-lock braking system) or the
ESP
®(Electronic Stability Program). The oper-
ating safety of your vehicle may be restricted.
You could lose control of the vehicle, for
example:
Rwhen braking
Rin the event of abrupt steering maneuvers
and/or when the vehicle's speed is not
adapted to the road conditions
There is a risk of an accident.
In the event of a short circuit or a similar inci-
dent, contact a qualified specialist workshop
immediately. Do not drive any further. You
should have all work involving the battery car- ried out at a qualified specialist workshop.
For further information about ABS and ESP®,
see (
Ypage 72) and (Ypage 74).
GWARNING
Electrostatic build-up can lead to the creation of sparks, which could ignite the highly explo-
sive gases of a battery. There is a risk of an
explosion.
Battery (vehicle)555
Breakdown assistance
Z
Page 561 of 614

Jump-starting
For the jump-starting procedure, use only the jump-starting connection point, consisting of a
positive terminal and an earth point, in the engine compartment.
GWARNING
Battery acid is caustic. There is a risk of injury.
Avoid contact with skin, eyes or clothing. Do not inhale any battery gases. Do not lean over the
battery. Keep children away from batteries. Wash away battery acid immediately with plenty of
clean water and seek medical attention.
GWARNING
During charging and jump-starting, explosive gases can escape from the battery. There is a risk of an explosion.
Particularly avoid fire, open flames, creating sparks and smoking. Ensure there is sufficient ven-
tilation while charging and jump-starting. Do not lean over a battery.
GWARNING
During the charging process, a battery produces hydrogen gas. If a short circuit occurs or sparks
are created, the hydrogen gas can ignite. There is a risk of an explosion.
RMake sure that the positive terminal of a connected battery does not come into contact with
vehicle parts.
RNever place metal objects or tools on a battery.
RIt is important that you observe the described order of the battery terminals when connecting
and disconnecting a battery.
RWhen jump-starting, make sure that the battery poles with identical polarity are connected.
RIt is particularly important to observe the described order when connecting and disconnecting
the jumper cables.
RNever connect or disconnect the battery terminals while the engine is running.
GWARNING
A discharged battery can freeze at temperatures below freezing point. When jump-starting the
vehicle or charging the battery, gases can escape from the battery. There is a risk of an explosion. Allow the frozen battery to thaw out before charging it or jump-starting.
!Avoid repeated and lengthy starting attempts. Otherwise, the catalytic converter could be
damaged by the non-combusted fuel.
If the indicator/warning lamps do not light up at low temperatures, it is very likely that the
discharged battery has frozen. In this case, you may neither charge the battery nor jump-start
the vehicle. The service life of a thawed-out battery may be shorter. The starting characteristics
can be impaired, particularly at low temperatures. Have the thawed-out battery checked at a
qualified specialist workshop.
Jump-starting559
Breakdown assistance
Z
Page 577 of 614

Checking tire pressures manually
To determine and set the correct tire pres-
sure, proceed as follows:
XRemove the valve cap of the tire that is to
be checked.
XPress the tire pressure gauge securely onto
the valve.
XRead the tire pressure and compare it to
the recommended value on the Tire and
Loading Information placard or the tire
pressure table (
Ypage 571).
XIf the tire pressure is too low, increase the
tire pressure to the recommended value.
XIf the tire pressure is too high, release air.
To do so, press down the metal pin in the
valve, using the tip of a pen for example.
Then check the tire pressure again using
the tire pressure checker.
XScrew the valve cap onto the valve.
XRepeat these steps for the other tires.
Tire pressure monitor
General notes
If a tire pressure monitor is installed, the vehi-
cle's wheels have sensors that monitor the
tire pressures in all four tires. The tire pres-
sure monitor warns you if the pressure drops
in one or more of the tires. The tire pressure
monitor only functions if the corresponding
sensors are installed in all wheels.
Information on tire pressures is displayed in
the multifunction display. After a few minutes
of driving, the current tire pressure of each
tire is shown in the Serv.
menu of the multi-
function display.
Example :curren ttir epressur edisplay
For information on the message display, refer
to the "Checking the tire pressure electroni-
cally" section (
Ypage 577).
Important safety notes
GWARNING
Each tire, including the spare (if provided),
should be checked at least once a month
when cold and inflated to the pressure rec-
ommended by the vehicle manufacturer on
the Tire and Loading Information placard on
the driver's door B-pillar or the tire pressure
label on the inside of the fuel filler flap. If your
vehicle has tires of a different size than the
size indicated on the Tire and Loading Infor-
mation placard or the tire pressure label, you
should determine the proper tire pressure for
those tires.
As an added safety feature, your vehicle has
been equipped with a tire pressure monitoring
system (TPMS) that illuminates a low tire pres-
sure telltale when one or more of your tires
are significantly underinflated. Accordingly,
when the low tire pressure telltale illuminates,
you should stop and check your tires as soon
as possible, and inflate them to the proper
pressure. Driving on a significantly underin-
flated tire causes the tire to overheat and can lead to tire failure. Underinflation also
reduces fuel efficiency and tire tread life, and
may affect the vehicle's handling and stop-
ping ability.
Please note that the TPMS is not a substitute
for proper tire maintenance, and it is the driv-
er's responsibility to maintain correct tire
pressure, even if unde rinf
lation has not
reached the level to trigger illumination of the
TPMS low tire pressure telltale.
USA only:
Your vehicle has also been equipped with a
TPMS malfunction indicator to indicate if the
system is not operating properly. The TPMS
malfunction indicator is combined with the
low tire pressure telltale. When the system
detects a malfunction, the warning lamp will
flash for approximately a minute and then
Tire pressure575
Wheels and tires
Z
Page 589 of 614

Increased vehicle weight due to optional
equipment
This is the combined weight of all standard
and optional equipment available for the vehi-
cle, regardless of whether it is actually instal-
led on the vehicle or not.
Rim
This is the part of the wheel on which the tire
is mounted.
GAWR (Gross Axle Weight Rating)
The GAWR is the maximum permissible axle
weight. The actual load on an axle must neverexceed the gross axle weight rating. The
gross axle weight rating can be found on the
vehicle identification plate on the B-pillar on
the driver's side.
Speed rating
The speed rating is part of the tire identifica-
tion. It specifies the speed range for which the
tire is approved.
GVW (Gross Vehicle Weight)
The gross vehicle weight includes the weight
of the vehicle including fuel, tools, the spare
wheel, accessories installed, occupants, lug-
gage and the drawbar noseweight, if applica-
ble. The gross vehicle weight must not exceedthe gross vehicle weight rating GVWR as
specified on the vehicle identification plate on
the B pillar on the driver's side.
GVWR (Gross Vehicle Weight Rating)
The GVWR is the maximum permissible gross
weight of a fully loaded vehicle (the weight of
the vehicle including all accessories, occu-
pants, fuel, luggage and the drawbar nose-
weight, if applicable). The gross vehicle
weight r
ating is specified on the vehicle iden-
tification plate on the B-pillar on the driver's
side.
Maximum loaded vehicle weight
The maximum weight is the sum of:
Rthe curb weight of the vehicle
Rthe weight of the accessories
Rthe load limit
Rthe weight of the factory installed optional
equipment
Kilopascal (kPa)
Metric unit for tire pressure. 6.9 kPa corre-
sponds to 1 psi. Another unit for tire pressure is bar. There are 100 kilopascals (kPa) to
1 bar.
Load index
In addition to the load-bearing index, the load
index may also be imprinted on the sidewall of
the tire. This specifies the load-bearing capa-
city more precisely.
Curb weight
The weight of a vehicle with standard equip-
ment including the maximum capacity of fuel,
oil and coolant. It also includes the air-condi-
tioning system and optional equipment if
these are installed in the vehicle, but does not
include passengers or luggage.
Maximum load rating
The maximum tire load is the maximum per-
missible weight in kilograms or lbs for which a
tire is approved.
Maximum permissible tire pressure
Maximum permissible tire pressure for one
tire.
Maximum load on one tire
Maximum load on one tire. This is calculated
by dividing the maximum axle load of one axle
by two.
PSI (pounds per square inch)
A st
andard unit of measure for tire pressure.
Aspect ratio
Relationship between tire height and tire
width in percent.
Tire pressure
This is pressure inside the tire applying an
outward force to each square inch of the tire's
surface. The tire pressure is specified in
All about wheels and tires587
Wheels and tires
Z
Page 605 of 614

Service products and filling capaci-
ties
Important safety notes
GWARNING
Service products may be poisonous and haz-
ardous to health. There is a risk of injury.
Comply with instructions on the use, storage
and disposal of service products on the labels
of the respective original containers. Always
store service products sealed in their original
containers. Always keep service products out
of the reach of children.
HEnvironmental note
Dispose of service products in an environ-
mentally responsible manner.
Service products include the following:
RFuels
RLubricants (e.g. engine oil, transmission oil)
RCoolant
RBrake fluid
RWindshield washer fluid
RClimate control system refrigerant
Comply with all valid regulations with respect
to handling, storing, and disposing of service
fluids.
Components and service products must be
matched. You should therefore only use prod-
ucts that have been tested and approved by
Mercedes-Benz.
Information about tested and approved prod-
ucts can be obtained from an authorized
Mercedes-Benz Center or on the Internet at
http://bevo.mercedes-benz.com.
You can recognize service products approved
by Mercedes-Benz by the following inscrip-
tion on the containers:
RMB-Freigabe (e.g. MB-Freigabe 229.51)
RMB-Approval (e.g. MB-Approval 229.51)
Other designations or recommendations indi-
cate a level of quality or a specification in
accordance with an MB Sheet Number (e.g. MB 229.51). They have not necessarily been
approved by Mercedes-Benz.
Fuel
Important safety notes
GWARNING
Fuel is highly flammable. If you handle fuel
incorrectly, there is a risk of fire and explo-
sion.
You must avoid fire, open flames, creating
sparks and smoking. Switch off the engine
and, if applicable, the auxiliary heating before refueling.
GWARNING
Fuel is poisonous and hazardous to health.
There is a risk of injury.
You must make sure that fuel does not come into contact with your skin, eyes or clothing
and that it is not swallowed. Do not inhale fuel
vapors. Keep fuel away from children.
If you or others come into contact with fuel,
observe the following:
RWash away fuel from skin immediately
using soap and water.
RIf fuel comes into contact with your eyes,
immediately rinse them thoroughly with
clean water. Seek medical assistance with-
out delay.
RIf fuel is swallowed, seek medical assis-
tance without delay. Do not induce vomit-
ing.
RImmediately change out of clothing which
has come into contact with fuel.
Tank capacity
ModelTotal capa- city
All models19.8 US gal(75.0 l)
Service products and filling capacities603
Technical data
Z
Page 606 of 614

ModelOf whichreserve
Mercedes‑AMG vehiclesApprox.
3.7 US gal (14.0 l)
Allot her modelsApprox.
2.4 US gal (9.0 l)
Gasoline
Fuel grade
!Do not use diesel to refuel vehicles with a
gasoline engine. Do not switch on the igni-
tion if you accidentally refuel with the
wrong fuel. Otherwise, the fuel will enter
the fuel system. Even small amounts of the
wrong fuel could result in damage to the
fuel system and the engine. Notify a quali-
fied specialist workshop and have the fuel
tank and fuel lines drained completely.
!Only refuel using unleaded premium
grade gasoline with at least 91 AKI/
95 RON.
!Only use the fuel recommended. Operat-
ing the vehicle with other fuels can lead to
engine failure.
!Do not use the following:
RE85 (gasoline with 85% ethanol)
RE100 (100% ethanol)
RM15 (gasoline with 15% methanol)
RM30 (gasoline with 30% methanol)
RM85 (gasoline with 85% methanol)
RM100 (100% methanol)
RGasoline with metalliferous additives
RDiesel
Do not mix such fuels with the fuel recom-
mended for your vehicle. Do not use addi-
tives. Otherwise, engine damage may
occur. This does not include cleaning addi-
tives for the removal and prevention of res- idue build-up. Gasoline may only be mixed
with cleaning additives recommended by Mercedes-Benz; see "Additives". You can
obtain further information from any author-
ized Mercedes-Benz Center.
!To ensure the longevity and full perform-
ance of the engine, only premium-grade
unleaded gasoline must be used.
If standard unleaded gasoline is unavaila-
ble and you have to refuel with unleaded
gasoline of a lower grade, observe the fol-
lowing precautions:
ROnly fill the fuel tank to half full with reg-
ula
r unleaded gasoline and fill the rest
with premium-grade unleaded gasoline
as soon as possible.
RDo not drive at the maximum speed.
RAvoid sudden acceleration and engine
speeds over 3,000 rpm.
You will usually find information about the fuel
grade on the pump. If you cannot find the
label on the pump, ask the staff for assis-
tance.
iFor further information, consult a quali-
fied specialist workshop or visit
http://www.mbusa.com (USA only).
iE10 fuel contains up to 10% bioethanol.
Your vehicle is E10-compatible. You can
refuel your vehicle using E10 fuel.
As a temporary measure, if the recommended
fuel is not available, you may also use regular
unleaded gasoline with an octane rating of
87 AKI/91 RON. This may reduce engine per-
formance and increase fuel consumption.
Avoid driving at full throttle and sudden accel- eration. Never refuel using fuel with a lower
AKI.
Information on refueling (
Ypage 169).
Additives in gasoline
!Operating the engine with fuel additives
added later can lead to engine failure. Do
not mix fuel additives with fuel. This does
not include additives for the removal and
prevention of residue buildup. gasoline
must only be mixed with additives recom-
mended by Mercedes-Benz. Comply with
604Service products and filling capacities
Technical data