2016 MERCEDES-BENZ S-COUPE stop start
[x] Cancel search: stop startPage 345 of 410
XSecure the vehicle against rolling away
(
Ypage 170).
XIf possible, bring the front wheels into the
straight-ahead position.
XSwitch off the engine.
XOpen the driver's door.
The on-board electronics now have status
0. This is the same as the SmartKey having
been removed.
XRemove the Start/Stop button from the
ignition lock (
Ypage 151).
or, if the SmartKey is inserted in the ignition
lock:
XRemove the SmartKey from the ignition
lock.
XMake sure that the engine cannot be star-
ted via your smartphone (
Ypage 154).
XMake sure that the passengers are not
endangered as they do so. Make sure that
no one is near the danger area while a
wheel is being changed. Anyone who is not directly assisting in the wheel change
should, for example, stand behind the bar-
rier.
XGet out of the vehicle. Pay attention to traf-
fic conditions when doing so.
XClose the driver's door.
MOExtended tires (tires with run-flat
properties)
General notes
With MOExtended tires (tires with run flat
characteristics), you can continue to drive
your vehicle even if there is a total loss of
pressure in one or more tires. The affected
tire must not show any clearly visible damage.
You can recognize MOExtended tires by the
MOExtended marking which appears on the
sidewall of the tire. You will find this marking next to the tire size designation, the load-
bearing capacity and the speed index
(
Ypage 377). MOExtended tires may only be used in con-
junction with an active tire pressure monitor.
If a pressure loss warning message
appears in the multifunction display:
Robserve the instructions in the display mes-
sages (
Ypage 279).
Rcheck the tire for damage.
Rif driving on, observe the following notes.
The driving distance possible in run-flat mode
is approximately 50 miles (80 km) when the
vehicle is partially laden and approximately
18 miles (30 km) when the vehicle is fully
laden.
In addition to the vehicle load, the driving dis-
tance possible depends upon:
Rvehicle speed
Rroad condition
Routside temperature
The driving distance possible in run-flat mode
may be reduced by extreme driving condi-
tions/maneuver, or it can be increased
through a moderate style of driving.
The driving distance possible in run-flat mode
i
s counted from the moment the tire pressure
loss warning appears in the multifunction dis-
play.
You must not exceed a maximum speed of
50 mph (80 km/h).
iWhen replacing one or all tires, please
observe the following specifications for
your vehicle's tires:
Rsize
Rthe type and
Rthe "MOExtended" mark
If a tire has gone flat and cannot be
replaced with a MOExtended tire, a stand-
ard tire may be used as a temporary meas-
ure. Make sure that you use the proper size
and type (summer or winter tire).
iVehicles equipped with MOExtended tires
are not equipped with a TIREFIT kit at the
factory. It is therefore recommended that
you additionally equip your vehicle with a
Flat tire343
Breakdown assistance
Page 346 of 410
TIREFIT kit if you mount tires that do not
feature run-flat properties, e.g. winter tires.
A TIREFIT kit may be obtained from a quali-
fied specialist workshop.
Important safety notes
GWARNING
When driving in emergency mode, the driving
characteristics deteriorate, e.g. when corner-
ing, accelerating quickly and when braking.
There is a risk of an accident.
Do not exceed the stated maximum speed.
Avoid abrupt steering and driving maneuvers,
and driving over obstacles (curbs, potholes,
off-road). This applies in particular to a laden
vehicle.
Stop driving in emergency mode if:
Ryou hear banging noises.
Rthe vehicle starts to shake.
Ryou see smoke and smell rubber.
RESP®is intervening constantly.
Rthere are tears in the sidewalls of the tire.
After driving in emergency mode, have the
wheel rims checked at a qualified specialist
workshop with regard to their further use. The
defective tire must be replaced in every case.
TIREFIT kit
Important safety notes
TIREFIT is a tire sealant.
You can use TIREFIT to seal punctures of up to
0.16 in (4 mm), particularly those in the tire
tread. You can use TIREFIT at outside tem-
peratures down to Ò4 ‡ (Ò20 †).
GWARNING
In the following situations, the tire sealant is
unable to provide sufficient breakdown assis-
tance, as it is unable to seal the tire properly:
Rthere are cuts or punctures in the tire larger
than those mentioned above.
Rthe wheel rim is damaged.
Ryou have driven at very low tire pressures or on a flat tire.
There is a risk of an accident.
Do not drive the vehicle. Contact a qualified
specialist workshop.
GWARNING
The tire sealant is harmful and causes irrita-
tion. It must not come into contact with your
skin, eyes or clothing or be swallowed. Do not inhale TIREFIT fumes. Keep tire sealant away
from children. There is a risk of injury.
If you come into contact with the tire sealant,
observe the following:
RRinse off the tire sealant from your skin
immediately with water.
RIf the tire sealant comes into contact with
your eyes, immediately rinse them thor-
oughly with clean water.
RIf tire sealant is swallowed, immediately
rinse your mouth out thoroughly and drink
plenty of water. Do not induce vomiting,
and seek medical attention immediately.
RImmediately change out of clothing which
has come into contact with tire sealant.
RIf an allergic reaction occurs, seek medical
attention immediately.
!Do not operate the tire inflation compres-
sor for longer than eight minutes at a time
without a break. It may otherwise overheat.
The tire inflation compressor can be oper-
ated again once it has cooled down.
Comply with the manufacturer’s safety
instructions on the sticker on the tire inflation
compressor.
344Flat tire
Breakdown assistance
Page 357 of 410
If the automatic transmission cannot be shif-
ted to positionN, have the vehicle transpor-
ted on a transporter or trailer.
The battery must be connected and charged.
Otherwise, you:
Rcannot turn the SmartKey to position 2in
the ignition lock
Rcannot release the electric parking brake
Rcannot shift the automatic transmission to position N
iDeactivate the automatic locking feature
(
Ypage 90). You could otherwise be locked
out when pushing or towing the vehicle.
Installing/removing the towing eye
Installing the towing eye
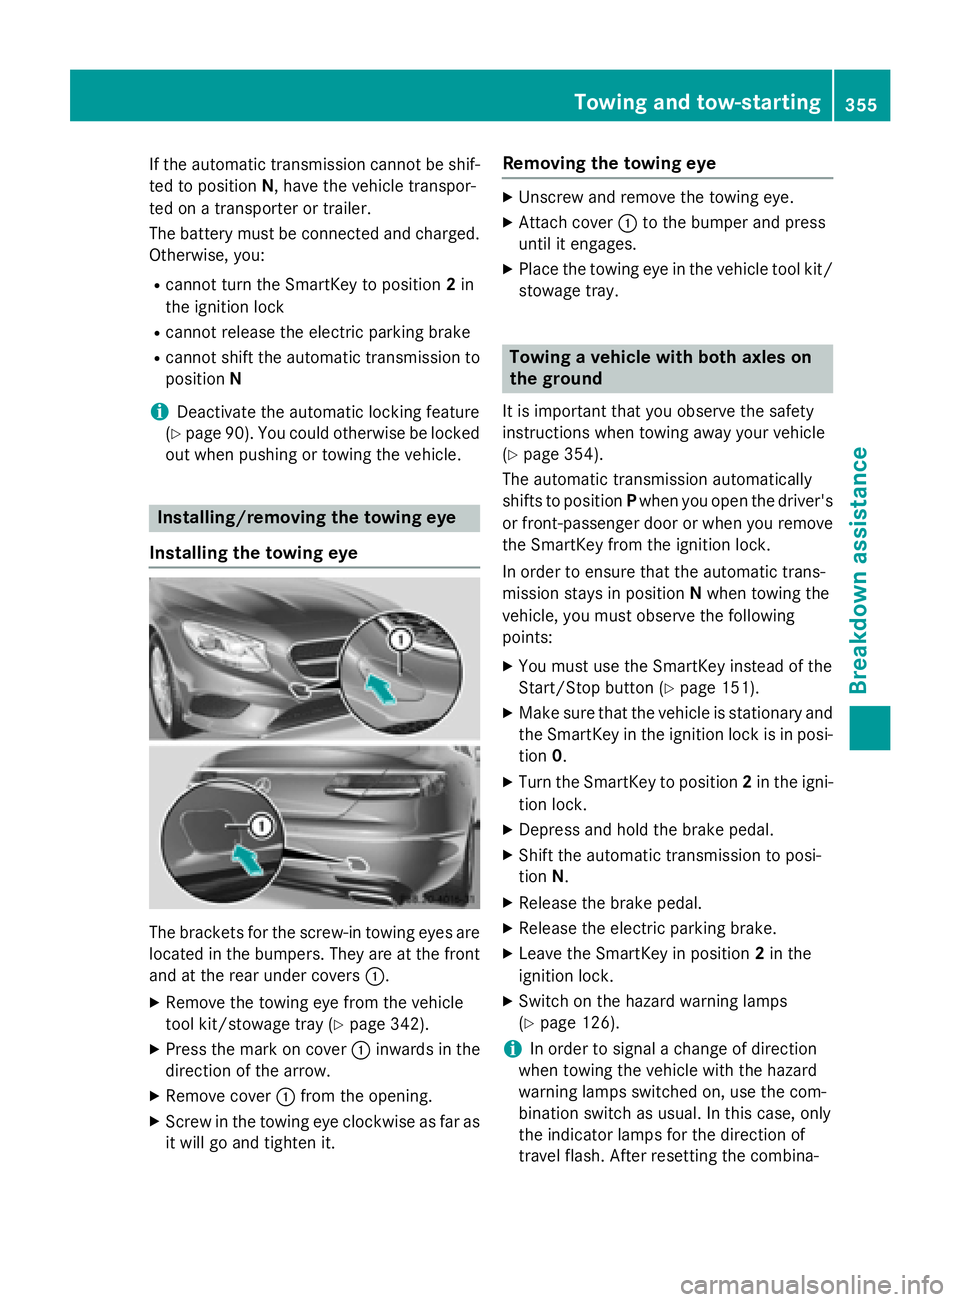
The brackets for the screw-in towing eyes are
located in the bumpers. They are at the front
and at the rear under covers :.
XRemove the towing eye from the vehicle
tool kit/stowage tray (
Ypage 342).
XPress the mark on cover:inwards in the
direction of the arrow.
XRemove cover :from the opening.
XScrew in the towing eye clockwise as far as
it will go and tighten it.
Removing the towing eye
XUnscrew and remove the towing eye.
XAttach cover :to the bumper and press
until it engages.
XPlace the towing eye in the vehicle tool kit/
stowage tray.
Towing a vehicle with both axles on
the ground
It is important that you observe the safety
instructions when towing away your vehicle
(
Ypage 354).
The automatic transmission automatically
shifts to position Pwhen you open the driver's
or front-passenger door or when you remove
the SmartKey from the ignition lock.
In order to ensure that the automatic trans-
mission stays in position Nwhen towing the
vehicle, you must observe the following
points:
XYou must use the SmartKey instead of the
Start/Stop button (
Ypage 151).
XMake sure that the vehicle is stationary and
the SmartKey in the ignition lock is in posi-
tion 0.
XTurn the SmartKey to position 2in the igni-
tion lock.
XDepress and hold the brake pedal.
XShift the automatic transmission to posi-
tion N.
XRelease the brake pedal.
XRelease the electric parking brake.
XLeave the SmartKey in position 2in the
ignition lock.
XSwitch on the hazard warning lamps
(
Ypage 126).
iIn order to signal a change of direction
when towing the vehicle with the hazard
warning lamps switched on, use the com-
bination switch as usual. In this case, only
the indicator lamps for the direction of
travel flash. After resetting the combina-
Towing and tow-starting355
Breakdown assistance
Z
Page 371 of 410
XRead thetire pressur eand compar eit to
th erecommended value on th eTir eand
Loadin gInformation placard or th etire
pressur etable (
Ypage 365).
XIf thetire pressur eis to olow, increase th e
tire pressur eto th erecommended value .
XIf thetire pressur eis to ohigh ,release air.
To do so, press down th emetal pin in th e
valve, usin gth etip of apen for example.
The nchec kth etire pressur eagain usin g
th etire pressur echecker.
XScrew th evalv ecap onto th evalve.
XRepeat these steps for th eother tires .
Tire pressure monitor
Genera lnotes
If atire pressur emonitor is installed, th evehi-
cle's wheels hav esensor sthat monitor th e
tire pressures in all fou rtires .The tire pres-
sur emonitor warn syou if th epressur edrops
in on eor mor eof th etires .The tire pressur e
monitor only function sif th ecorrespondin g
sensor sare installed in all wheels.
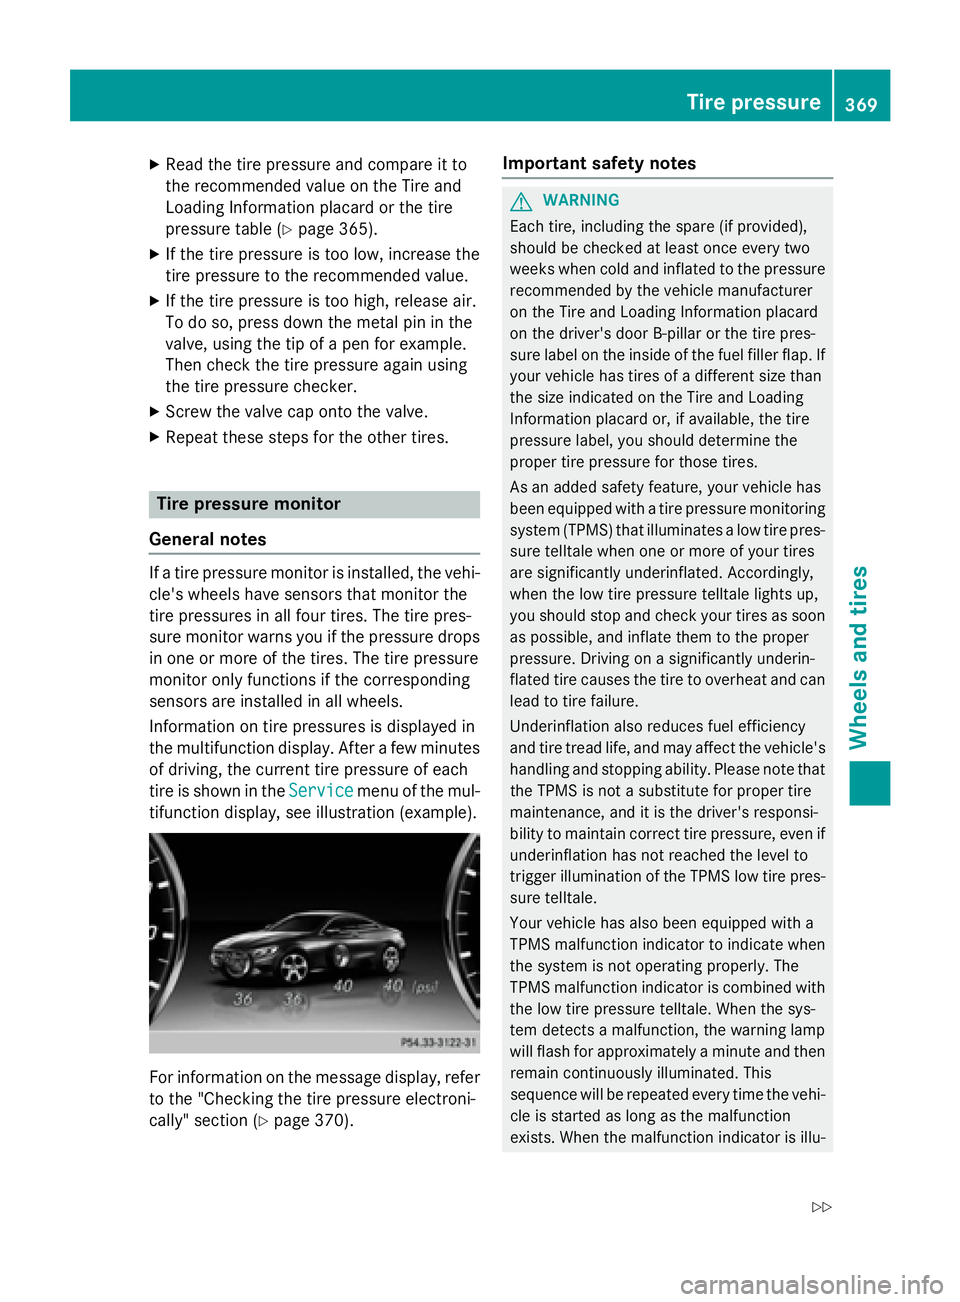
Information on tire pressures is displayed in
th emultifunction display. Afte r afew minute s
of driving, th ecurren ttire pressur eof eac h
tire is shown in th eServic e
menuof th emul-
tifunction display, see illustration (example).
Fo rinformation on th emessage display, refer
to th e"Checking th etire pressur eelectroni-
cally" section (
Ypage 370).
Important safety notes
GWARNING
Eac htire, includin gth espar e(if provided),
should be checke dat leas tonce every tw o
week swhen cold and inflated to th epressur e
recommended by th evehicl emanufacturer
on th eTir eand Loadin gInformation placard
on th edriver's doo rB-pillar or th etire pres-
sur elabel on th einside of th efuel filler flap .If
your vehicl ehas tires of adifferen tsiz ethan
th esiz eindicate don th eTir eand Loadin g
Information placard or, if available, th etire
pressur elabel ,you should determin eth e
proper tire pressur efor those tires .
As an added safet yfeature, your vehicl ehas
been equipped wit h atire pressur emonitoring
system (TPMS) that illuminate s alow tire pres-
sur etelltale when on eor mor eof your tires
are significantly underinflated. Accordingly,
when th elow tire pressur etelltale lights up,
you should stop and chec kyour tires as soo n
as possible, and inflat ethem to th eproper
pressure. Drivin gon asignificantly underin-
flated tire causes th etire to overheat and can
lead to tire failure.
Underinflation also reduce sfuel efficiency
and tire tread life ,and may affec tth evehicle's
handlin gand stopping ability. Pleas enote that
th eTPM Sis no t a
substitu
t efor proper tire
maintenance ,and it is th edriver's responsi-
bilit yto maintai ncorrec ttire pressure, eve nif
underinflation has no treached th elevel to
trigge rillumination of th eTPM Slow tire pres-
sur etelltale.
Your vehicl ehas also been equipped wit h a
TPM Smalfunction indicato rto indicate when
th esystem is no toperating properly. The
TPM Smalfunction indicato ris combine dwit h
th elow tire pressur etelltale. Whe nth esys-
te m detects amalfunction ,th ewarnin glamp
will flas hfor approximately aminute and then
remain continuousl yilluminated. This
sequence will be repeated every time th evehi-
cle is started as lon gas th emalfunction
exists. Whe nth emalfunction indicato ris illu-
Tire pressure36 9
Wheels and tires
Z
Page 386 of 410
Direction of rotation
Tires with aspecifie ddirection of rotation
hav eadditional benefits, e.g. if there is aris k
of hydroplaning .These advantages can only
be gained if th etires are installed correspond-
in g to th edirection of rotation .
An arrow on th esidewall of th etire indicates
it s correc tdirection of rotation .
Storing wheels
Storewheels that are no tbein gused in acool,
dry and preferably dar kplace. Protec tth e
tires from oil, grease ,gasolin eand diesel.
Mounting awheel
Preparing th evehicle
XStop th evehicle on solid, non-slipper yand
level ground.
XApply th eelectric parking brake manually.
XBrin gth efron twheels into th estraight -
ahead position .
XShift thetransmissio nto position P.
XMakesur ethat "normal" level is selecte d
fo rAIRMATIC (
Ypage 197).
XSwitchof fth eengine.
XOpe nth edriver's door.
The on-boar delectronic sno whav estatus
0. Thi sis th esam eas th eSmartKey havin g
been removed.
XRemov eStart/Sto pbutto nfrom ignition
loc k (
Ypage 151).
or ,if th eSmartKey is inserte din th eignition
lock:
XRemov eth eSmartKey from th eignition
lock.
XMak esur ethat th eengin ecanno tbe star-
te dvia your smartphone (
Ypage 154).
XIf included in thevehicle equipment,
remov eth etire-chang etool ki tfrom th e
vehicle.
XSafeguar dth evehicle against rollin gaway.
Securing th evehicle to preven tit from
rollin gawa y
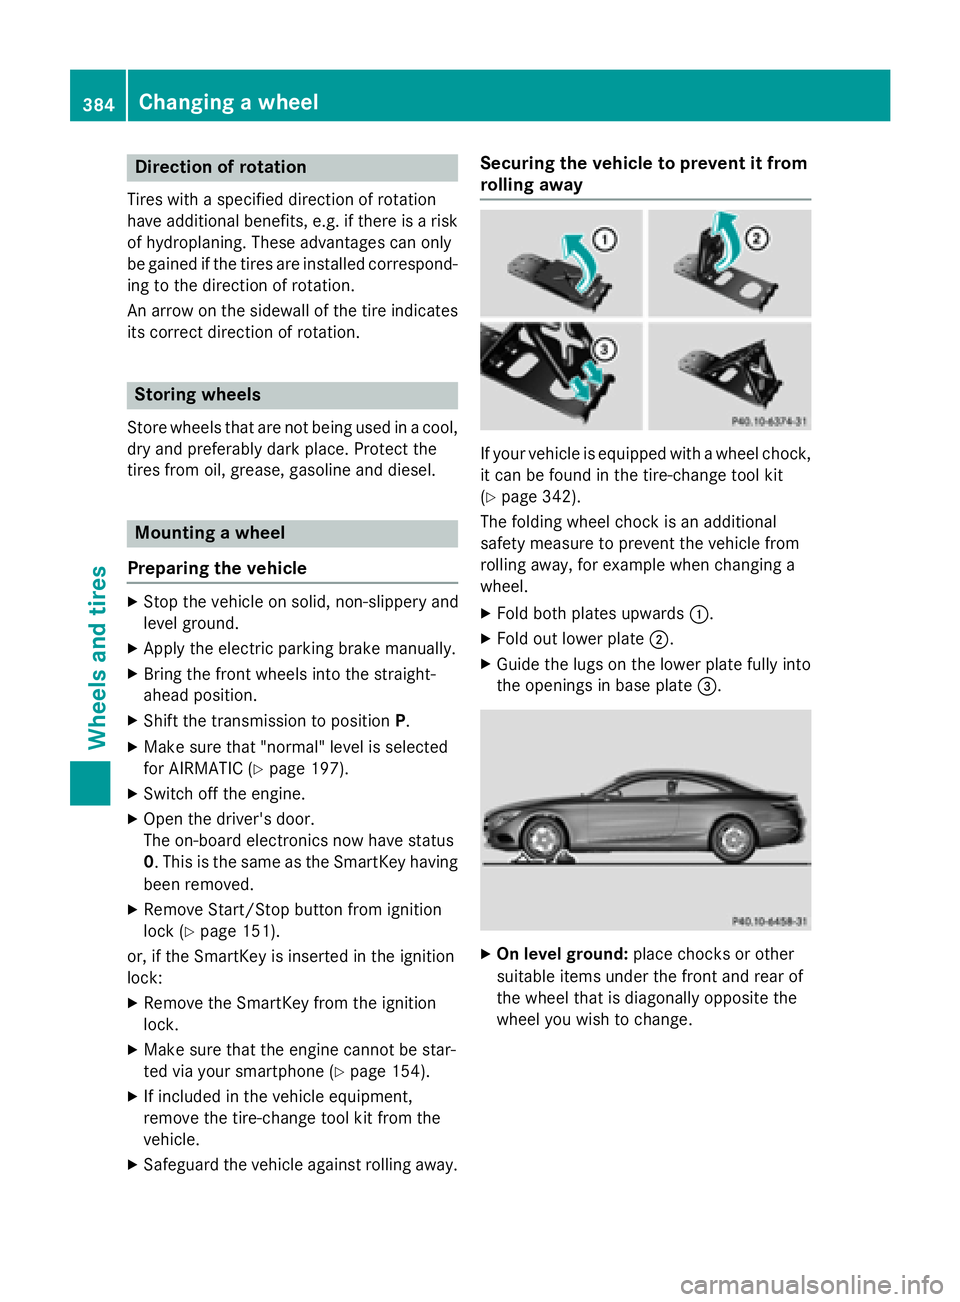
If your vehicle is equipped wit h awhee lchock,
it can be found in th etire-chang etool ki t
(
Ypage 342).
The foldin gwhee lchoc kis an additional
safet ymeasur eto preven tth evehicle from
rollin gaway, fo rexample when changin g a
wheel.
XFold bot hplates upwards :.
XFold out lowerplat e;.
XGuide th elugs on th elowe rplat efull yinto
th eopening sin base plat e=.
XOn leve lground: placechocks or other
suitable items under th efron tand rea rof
th ewhee lthat is diagonally opposite th e
whee lyou wish to change.
384Changing a wheel
Wheels and tires