2016 MERCEDES-BENZ S-Class SEDAN drive 2
[x] Cancel search: drive 2Page 91 of 438
over or be flung around and thereby hit vehicleoccupants. There is a risk of injury, particu-
larly in the event of sudden braking or a sud-
den change in direction.
Always store objects so that they cannot be
flung around. Secure objects, luggage or
loads against slipping or tipping before the
journey.
!The trunk lid swings upwards when opened.
Therefore, make sure that there is sufficient
clearance above the trunk lid.
The opening dimensions of the trunk lid can be
found in the "Vehicle data" section
(
Ypage 433).
Do not leave the SmartKey in the trunk. You
could otherwise lock yourself out.
You should preferably place luggage or loads in
the trunk. Observe the loading guidelines
(
Ypage 325).
Obstruction detection with reversing
feature for the trunk lid
Vehicles with trunk lid remote closing fea-
ture: the trunk lid is equipped with automatic
obstacle recognition with reversing feature. If a
solid object blocks or restricts the trunk lid
when automatically opening or closing, this pro-
cedure is stopped. If the trunk lid is stopped
during the closing procedure, it will open again
automatically. The automatic obstacle recogni-
tion with reversing feature is only an aid. It is not a substitute for your attentiveness when open-
ing and closing the trunk lid.
GWARNING
The reversing feature does not react:
Rto soft, light and thin objects, e.g. small fin-
gers
Rover the last 1/3 in (8 mm) of the closing
movement
This means that the reversing feature cannot
prevent someone being trapped in these sit-
uations. There is a risk of injury.
Make sure that no body parts are in close
proximity during the closing procedure.
If somebody becomes trapped:
Rpress the Fbutton on the SmartKey, or
Rpull or press the remote operating switch
on the driver's door or
Rpress the closing or locking button on the
trunk lid, or
Rpull on the trunk lid handle
Vehicles with HANDS-FREE ACCESS: it is also
possible to stop the closing process by perform-
ing a kicking movement under the rear bumper.
Opening and closing manually
Opening
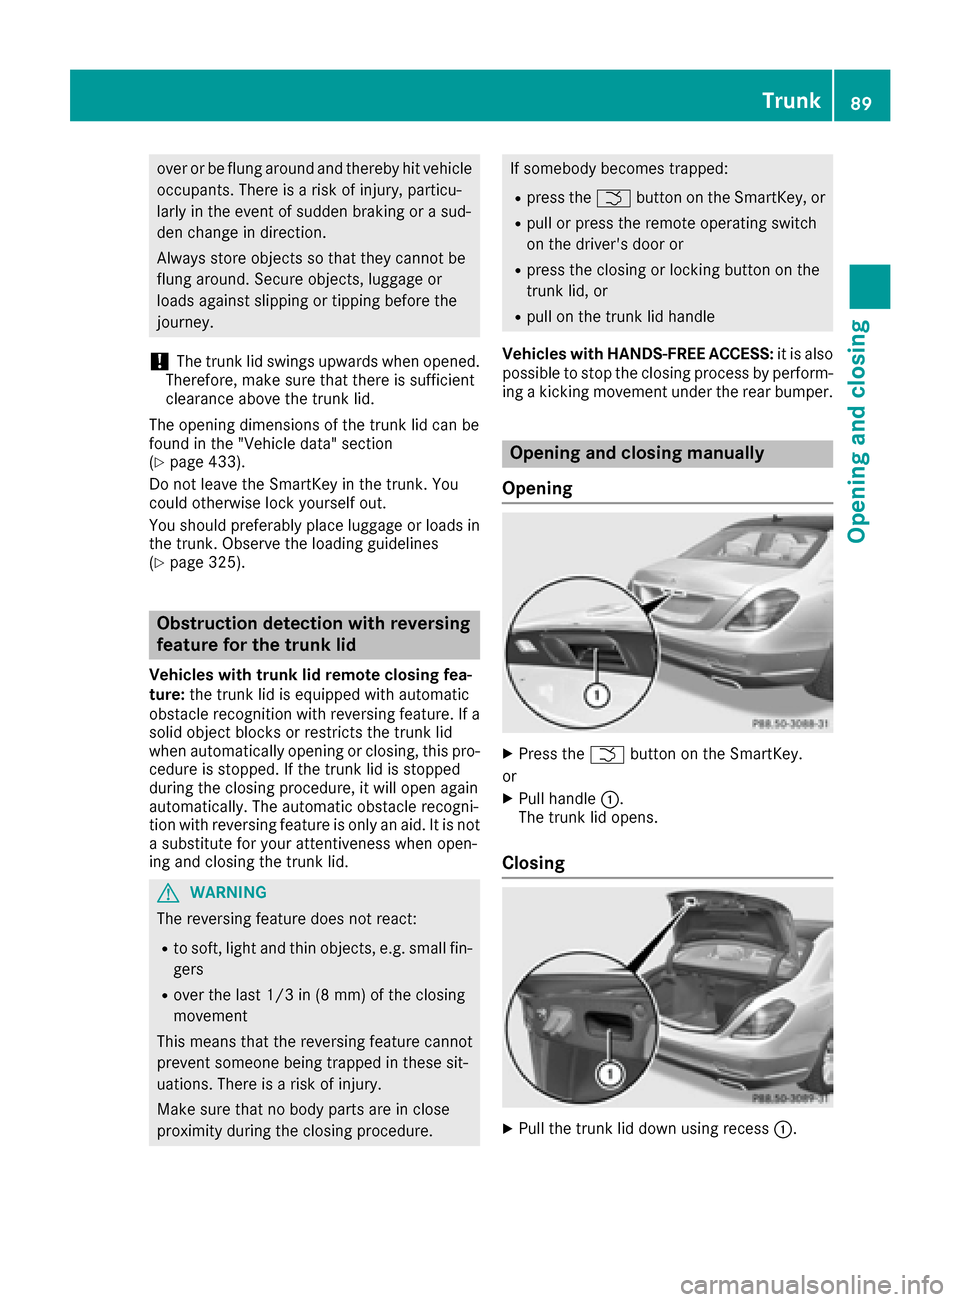
XPress the Fbutton on the SmartKey.
or
XPull handle :.
The trunk lid opens.
Closing
XPull the trunk lid down using recess :.
Trunk89
Opening and closing
Z
Page 92 of 438

Vehicles with trunk lid remote closing fea-
ture or power closing:
XLightly push the trunk lid closed.
The power closing function pulls the trunk lid
closed.
XLock the vehicle if necessary with the&
button on the SmartKey or with KEYLESS-GO
(
Ypage 80).
iIf KEYLESS-GO detects a SmartKey in the
trunk, the trunk lid cannot be locked. It then
opens again.
Opening/closing automatically from
outside
Important safety notes
GWARNING
Parts of the body could become trapped dur-
ing automatic closing of the trunk lid. More-
over, people, e.g. children, may be standing in the closing area or may enter the closing area
during the closing process. There is a risk of
injury.
Make sure that nobody is in the vicinity of the
closing area during the closing process.
Use one of the following options to stop the
closing process:
Rpress the Fbutton on the SmartKey.
Rpull or press the remote operating switch
on the driver's door.
Rpress the closing or locking button on the
trunk lid.
Rpull the trunk lid handle
Vehicles with HANDS-FREE ACCESS: it is also
possible to stop the closing process by perform-
ing a kicking movement under the rear bumper.
GWARNING
Combustion engines emit poisonous exhaust
gases such as carbon monoxide. Exhaust
gases can enter the vehicle interior if the
trunk lid is open when the engine is running,
especially if the vehicle is in motion. There is a
risk of poisoning.
Always switch off the engine before opening
the trunk lid. Never drive with the trunk lid
open.
!The trunk lid swings upwards when opened.
Therefore, make sure that there is sufficient
clearance above the trunk lid.
The opening dimensions of the trunk lid can be
found in the "Vehicle data" section
(
Ypage 433).
Opening
You can open the trunk lid automatically using
the SmartKey or the handle in the trunk lid.
XPress and hold the Fbutton on the Smart-
Key until the trunk lid opens.
or
XIf the trunk lid is unlocked, pull the trunk lid
handle and let it go again immediately.
Closing
You can close the trunk lid automatically using
the SmartKey or the closing button in the trunk
lid.
XPress closing button :on the trunk lid.
or
XIf the SmartKey is located in the immediate
vicinity of the vehicle: press the Fbutton
on the SmartKey.
You can release the button as soon as the
trunk lid starts to close.
XTo stop the closing process:
RPress the Fbutton on the SmartKey or
RPull the trunk lid handle, or
RPress closing button :or locking but-
ton ;on the trunk lid, or
90Trunk
Opening and closing
Page 93 of 438

RPress the remote operating switch on the
driver's door, or
RIn vehicles with HANDS-FREE ACCESS:
kick into the sensor detection range under
the bumper with your foot.
iIf theF button on the SmartKey is
pressed or HANDS-FREE ACCESS is initiated
after the closing process is stopped, the trunk
lid opens.
Vehicles with trunk lid remote closing fea-
ture and KEYLESS-GO: when all the doors are
closed, you can simultaneously close the trunk
lid and lock the vehicle. The SmartKey must be
located to the rear of the vehicle.
XPress and release locking button ;on the
trunk lid.
If a KEYLESS-GO key is detected outside the
vehicle, the trunk lid closes and the vehicle
locks.
If KEYLESS-GO detects a second SmartKey out- side the vehicle, the trunk lid remains closed.
If KEYLESS-GO detects a SmartKey in the trunk,
the trunk lid opens again after it is closed.
HANDS-FREE ACCESS
Important safety notes
GWARNING
The vehicle's exhaust system may be very hot. You could burn yourself by touching the
exhaust system if you use HANDS-FREE
ACCESS. There is a risk of injury. Always
ensure that you only make the kicking move-
ment within the detection range of sensors.
!If the SmartKey is within the rear detection
range of KEYLESS-GO, the following situa-
tions, for example, could lead to the uninten-
tional opening of the trunk:
Rusing a car wash
Rusing a power washer
Make sure that the SmartKey is at least 10 ft
(3 m) away from the vehicle.
General notes
With KEYLESS-GO and HANDS-FREE ACCESS,
you can open or close the trunk lid or stop the
procedure without using your hands. This is use- ful if you have your hands full. To do this, make
a kicking movement under the bumper with your
foot.
Observe the following points:
RCarry your KEYLESS-GO key about your per-
son. The KEYLESS-GO key must be in the rear
detection range of the vehicle.
RWhen making the kicking movement, make
sure that you are standing firmly on the
ground and that there is sufficient clearance
to the rear of the vehicle. You could otherwise
lose your balance e.g. on ice.
RAlways ensure that you only make the kicking
movement within the detection range of sen-
sors
:.
RStand at least 12 in (30 cm) away from the
rear area while doing so.
RDo not come into contact with the bumper
while making the kicking movement. Other-
wise, the sensors may not function correctly.
RHANDS-FREE ACCESS does not function
when the engine is started.
RDirt caused by road salt around sensors :
may restrict functionality.
RUsing the HANDS-FREE ACCESS with a pros-
thetic leg may restrict functionality.
RIf a KEYLESS-GO key is within the rear detec-
tion range of KEYLESS-GO, HAND-FREE
ACCESS could be triggered. The trunk lid
could thus be opened or closed unintention-
ally, for example, if you:
-sit on the edge of the trunk.
-set something down or lift something up
behind the vehicle.
-move the charging cable through the detec-
tion range of the sensors.
-polish the rear of the vehicle.
Do not carry the KEYLESS-GO key about your
person in these situations or in situations sim-
Trunk91
Opening and closing
Z
Page 94 of 438

ilar to these. This will prevent the uninten-
tional opening/closing of the trunk.
Operation
XTo open/close:kick into sensor detection
range :under the bumper with your foot.
A warning tone will sound while the trunk lid is
opening or closing.
XIf the trunk lid does not open/close after
several attempts: wait at least ten seconds
and then using your foot kick under the
bumper again.
If you hold your foot under the bumper for too
long, the trunk lid does not open or close.
Repeat the leg movement more quickly if this
occurs.
To stop the opening or closing procedure:
Rkick with your leg in the sensor detection
range :under the bumper or
Rpull the handle on the outside of the trunk lid
or
Rpress the closing button on the trunk lid, or
Rpress the Fbutton on the SmartKey
If the trunk lid closing procedure has been stop-
ped:
Rmove your foot under the bumper again and
the trunk lid will open
If the trunk lid opening procedure has been
stopped:
Rmove your foot under the bumper again and
the trunk lid will close
Opening/closing automatically from
inside
Important safety notes
GWARNING
The reversing feature does not react:
Rto soft, light and thin objects, e.g. small fin-
gers
Rover the last 1/3 in (8 mm) of the closing
movement
This means that the reversing feature cannot
prevent someone being trapped in these sit-
uations. There is a risk of injury.
Make sure that no body parts are in close
proximity during the closing procedure.
If somebody becomes trapped:
Rpress the Fbutton on the SmartKey, or
Rpull or press the remote operating switch
on the driver's door or
Rpress the closing or locking button on the
trunk lid, or
Rpull on the trunk lid handle
Vehicles with HANDS-FREE ACCESS: it is also
possible to stop the closing process by perform-
ing a kicking movement under the rear bumper.
GWARNING
Combustion engines emit poisonous exhaust
gases such as carbon monoxide. Exhaust
gases can enter the vehicle interior if the
trunk lid is open when the engine is running,
especially if the vehicle is in motion. There is a
risk of poisoning.
Always switch off the engine before opening
the trunk lid. Never drive with the trunk lid
open.
!The trunk lid swings upwards when opened.
Therefore, make sure that there is sufficient
clearance above the trunk lid.
The opening dimensions of the trunk lid can be
found in the "Vehicle data" section
(
Ypage 433).
92Trunk
Opening and closing
Page 95 of 438
Opening and closing
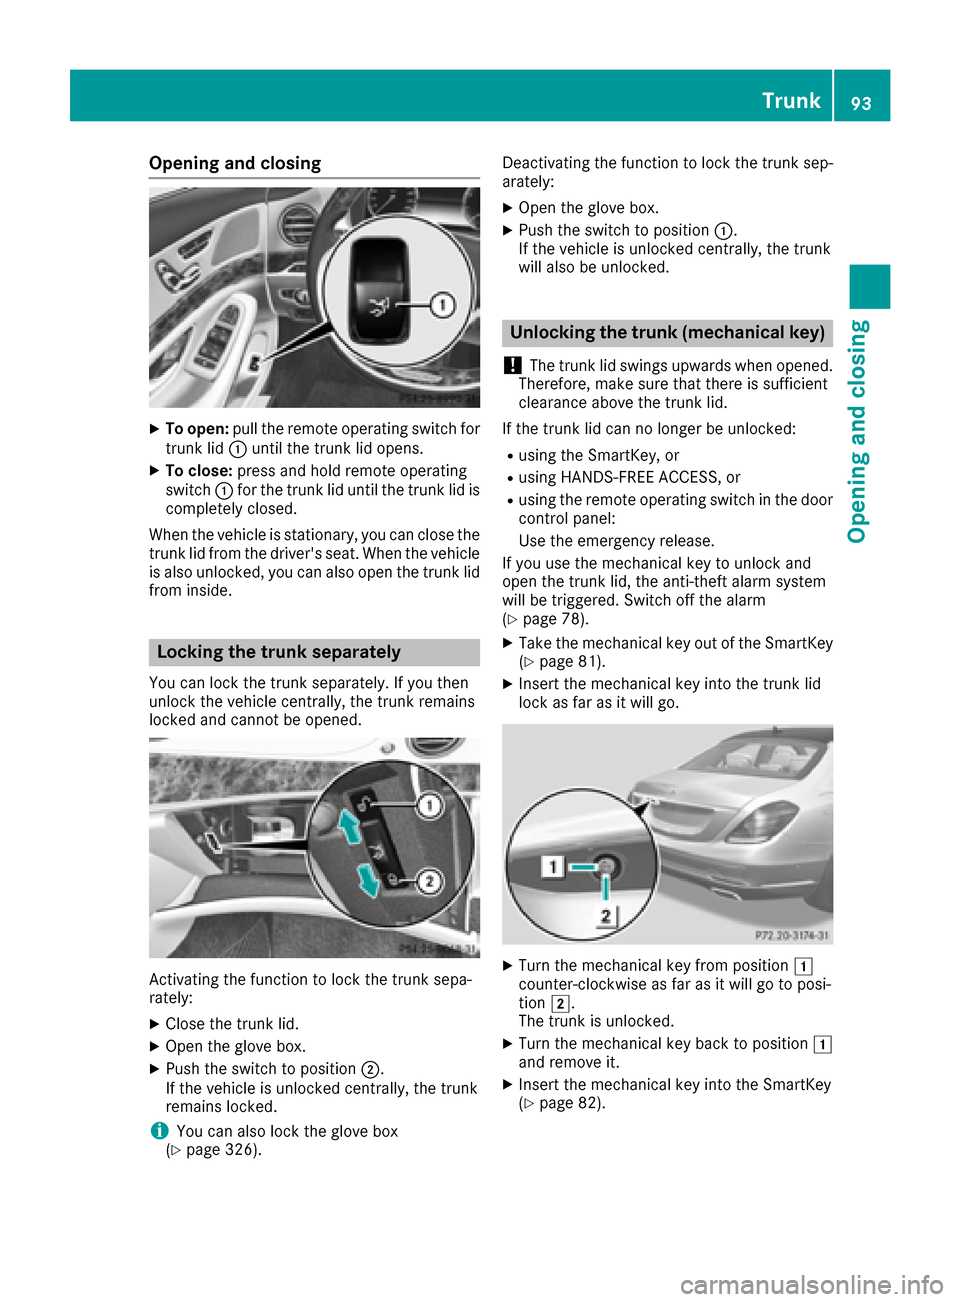
XTo open:pull the remote operating switch for
trunk lid :until the trunk lid opens.
XTo close: press and hold remote operating
switch :for the trunk lid until the trunk lid is
completely closed.
When the vehicle is stationary, you can close the
trunk lid from the driver's seat. When the vehicle
is also unlocked, you can also open the trunk lid
from inside.
Locking the trunk separately
You can lock the trunk separately. If you then
unlock the vehicle centrally, the trunk remains
locked and cannot be opened.
Activating the function to lock the trunk sepa-
rately:
XClose the trunk lid.
XOpen the glove box.
XPush the switch to position ;.
If the vehicle is unlocked centrally, the trunk
remains locked.
iYou can also lock the glove box
(Ypage 326). Deactivating the function to lock the trunk sep-
arately:
XOpen the glove box.
XPush the switch to position
:.
If the vehicle is unlocked centrally, the trunk
will also be unlocked.
Unlocking the trunk (mechanical key)
!
The trunk lid swings upwards when opened.
Therefore, make sure that there is sufficient
clearance above the trunk lid.
If the trunk lid can no longer be unlocked:
Rusing the SmartKey, or
Rusing HANDS-FREE ACCESS, or
Rusing the remote operating switch in the door
control panel:
Use the emergency release.
If you use the mechanical key to unlock and
open the trunk lid, the anti-theft alarm system
will be triggered. Switch off the alarm
(
Ypage 78).
XTake the mechanical key out of the SmartKey
(Ypage 81).
XInsert the mechanical key into the trunk lid
lock as far as it will go.
XTurn the mechanical key from position 1
counter-clockwise as far as it will go to posi-
tion 2.
The trunk is unlocked.
XTurn the mechanical key back to position 1
and remove it.
XInsert the mechanical key into the SmartKey
(Ypage 82).
Trunk93
Opening and closing
Z
Page 97 of 438
Opening and closing the side win-
dows
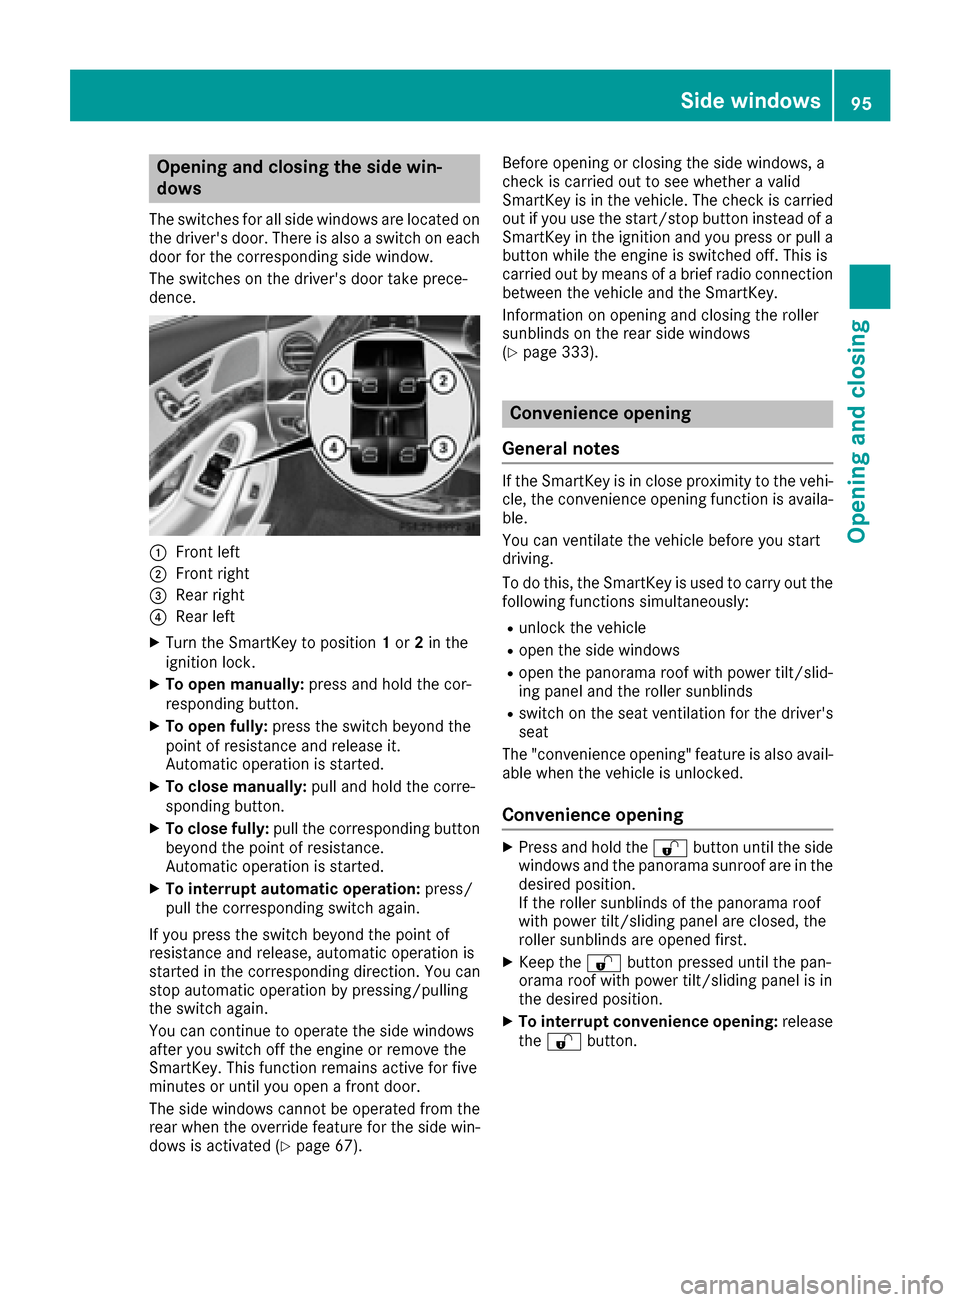
The switches for all side windows are located on
the driver's door. There is also a switch on each
door for the corresponding side window.
The switches on the driver's door take prece-
dence.
:Front left
;Front right
=Rear right
?Rear left
XTurn the SmartKey to position1or 2in the
ignition lock.
XTo open manually: press and hold the cor-
responding button.
XTo open fully: press the switch beyond the
point of resistance and release it.
Automatic operation is started.
XTo close manually: pull and hold the corre-
sponding button.
XTo close fully: pull the corresponding button
beyond the point of resistance.
Automatic operation is started.
XTo interrupt automatic operation: press/
pull the corresponding switch again.
If you press the switch beyond the point of
resistance and release, automatic operation is
started in the corresponding direction. You can
stop automatic operation by pressing/pulling
the switch again.
You can continue to operate the side windows
after you switch off the engine or remove the
SmartKey. This function remains active for five
minutes or until you open a front door.
The side windows cannot be operated from the
rear when the override feature for the side win-
dows is activated (
Ypage 67). Before opening or closing the side windows, a
check is carried out to see whether a valid
SmartKey is in the vehicle. The check is carried
out if you use the start/stop button instead of a
SmartKey in the ignition and you press or pull a
button while the engine is switched off. This is
carried out by means of a brief radio connection
between the vehicle and the SmartKey.
Information on opening and closing the roller
sunblinds on the rear side windows
(
Ypage 333).
Convenience opening
General notes
If the SmartKey is in close proximity to the vehi-
cle, the convenience opening function is availa-
ble.
You can ventilate the vehicle before you start
driving.
To do this, the SmartKey is used to carry out the following functions simultaneously:
Runlock the vehicle
Ropen the side windows
Ropen the panorama roof with power tilt/slid-
ing panel and the roller sunblinds
Rswitch on the seat ventilation for the driver's
seat
The "convenience opening" feature is also avail-
able when the vehicle is unlocked.
Convenience opening
XPress and hold the %button until the side
windows and the panorama sunroof are in the
desired position.
If the roller sunblinds of the panorama roof
with power tilt/sliding panel are closed, the
roller sunblinds are opened first.
XKeep the %button pressed until the pan-
orama roof with power tilt/sliding panel is in
the desired position.
XTo interrupt convenience opening: release
the % button.
Side windows95
Opening and closing
Z
Page 106 of 438
Useful information
i
This Operator's Manual describes all models
and all standard and optional equipment of
your vehicle available at the time of publica-
tion of the Operator's Manual. Country-spe-
cific differences are possible. Please note
that your vehicle may not be equipped with all
features described. This also applies to
safety-related systems and functions.
iRead the information on qualified specialist
workshops (Ypage 28).
Correct driver's seat position
GWARNING
You could lose control of your vehicle if you do the following while driving:
Radjust the driver's seat, head restraint,
steering wheel or mirrors
Rfasten the seat belt
There is a risk of an accident.
Adjust the driver's seat, head restraint, steer-
ing wheel and mirror and fasten your seat belt before starting the engine.
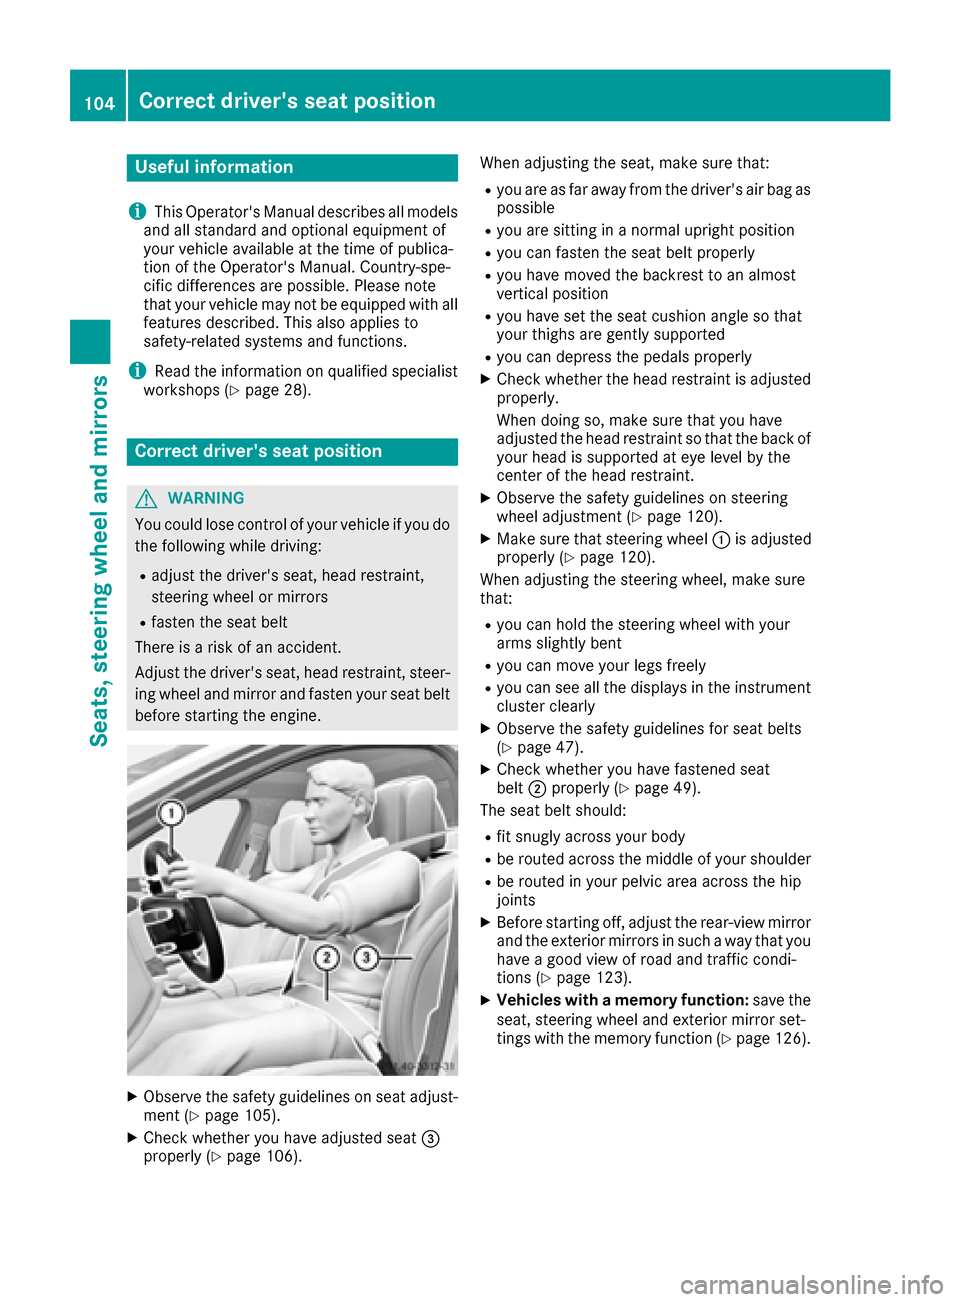
XObserve the safety guidelines on seat adjust-
ment (Ypage 105).
XCheck whether you have adjusted seat =
properly (Ypage 106). When adjusting the seat, make sure that:
Ryou are as far away from the driver's air bag as
possible
Ryou are sitting in a normal upright position
Ryou can fasten the seat belt properly
Ryou have moved the backrest to an almost
vertical position
Ryou have set the seat cushion angle so that
your thighs are gently supported
Ryou can depress the pedals properly
XCheck whether the head restraint is adjusted
properly.
When doing so, make sure that you have
adjusted the head restraint so that the back of
your head is supported at eye level by the
center of the head restraint.
XObserve the safety guidelines on steering
wheel adjustment (Ypage 120).
XMake sure that steering wheel
:is adjusted
properly (Ypage 120).
When adjusting the steering wheel, make sure
that:
Ryou can hold the steering wheel with your
arms slightly bent
Ryou can move your legs freely
Ryou can see all the displays in the instrument cluster clearly
XObserve the safety guidelines for seat belts
(Ypage 47).
XCheck whether you have fastened seat
belt ;properly (Ypage 49).
The seat belt should:
Rfit snugly across your body
Rbe routed across the middle of your shoulder
Rbe routed in your pelvic area across the hip
joints
XBefore starting off, adjust the rear-view mirror
and the exterior mirrors in such a way that you
have a good view of road and traffic condi-
tions (
Ypage 123).
XVehicles with a memory function: save the
seat, steering wheel and exterior mirror set-
tings with the memory function (
Ypage 126).
104Correct driver's seat position
Seats, steering wheel and mirrors
Page 107 of 438
Seats
Important safety notes
GWARNING
Children could become trapped if they adjust
the seats, particularly when unattended.
There is a risk of injury.
When leaving the vehicle, always take the
SmartKey with you and lock the vehicle. Never
leave children unsupervised in the vehicle.
The seats can still be adjusted when there is no
SmartKey in the ignition lock.
GWARNING
When you adjust a seat, you or other vehicle
occupants could become trapped, e.g. on the seat guide rail. There is a risk of injury.
Make sure when adjusting a seat that no one
has any body parts in the sweep of the seat.
Observe the safety notes on "Air bags"
(
Ypage 50) and "Children in the Vehicle"
(Ypage 61).
GWARNING
You could lose control of your vehicle if you do the following while driving:
Radjust the driver's seat, head restraint,
steering wheel or mirrors
Rfasten the seat belt
There is a risk of an accident.
Adjust the driver's seat, head restraint, steer-
ing wheel and mirror and fasten your seat belt before starting the engine.
GWARNING
If you adjust the seat height carelessly, you or
other vehicle occupants could be trapped and
thereby injured. Children in particular could
accidentally press the electrical seat adjust-
ment buttons and become trapped. There is a
risk of injury.
While moving the seats, make sure that your
hands or other body parts do not get under the
lever assembly of the seat adjustment sys-
tem.
GWARNING
If the head restraints are not installed or not
adjusted correctly, they cannot provide pro-
tection as intended. There is an increased risk
of injury in the head and neck area, e.g. in the event of an accident or when braking.
Always drive with the head restraints instal-
led. Before driving off, make sure for every
vehicle occupant that the center of the head
restraint supports the back of the head at
about eye level.
GWARNING
The seat belt does not offer the intended level of protection if you have not moved the back-
rest to an almost vertical position. When brak-
ing or in the event of an accident, you could
slide underneath the seat belt and sustain
abdomen or neck injuries, for example. This
poses an increased risk of injury or even fatal injury.
Adjust the seat properly before beginning
your journey. Always ensure that the backrest
is in an almost vertical position and that the
shoulder section of your seat belt is routed
across the center of your shoulder.
!To avoid damage to the seats and the seat
heating, observe the following information:
Rkeep liquids from spilling on the seats. If
liquid is spilled on the seats, dry them as
soon as possible.
Rif the seat covers are damp or wet, do not
switch on the seat heating. The seat heat-
ing should also not be used to dry the seats.
Rclean the seat covers as recommended;
see "Interior care".
Rdo not transport heavy loads on the seats.
Do not place sharp objects on the seat
cushions, e.g. knives, nails or tools. The
seats should only be occupied by passen-
gers, if possible.
Rwhen the seat heating is in operation, do
not cover the seats with insulating materi-
als, e.g. blankets, coats, bags, seat covers,
child seats or booster seats.
!Make sure that there are no objects in the
footwell under or behind the seats when mov-
Seats105
Seats, steering wheel and mirrors
Z