2016 MERCEDES-BENZ S-Class SEDAN Multimedia
[x] Cancel search: MultimediaPage 255 of 438

Automa tic engine start
The automatically switched-off internal combus -
tio nengin estart sautomatically in certai nsitua-
tions ,if:
Rth epower demand from th edriver via th e
accelerato rpedal is greate rthan th eelectric
motor alon ecan provide
Rth edriver switches to driv eprogram Sor M
Rthecondition of charge of th ehigh-voltage
battery has reached th elower limit
Rth esettings of th eautomatic climat econtrol
require it, e.g. at external temperatures abov e
30 †
Overru nmod e
In overrun mode, th ecombustio nengin eis
switched off and is disconnected from th edriv e
train. The electric motor:
Rgenerates low thrust ,whic hcorrespond sto
th eoverrun mod eof an active combustio n
engin e
Rfunction sas agenerator and produce sth e
necessary energ yfor th eauxiliary consumer s
and charge sth ehigh-voltage battery
Ove rrun mod eis possible in th efollowin gspee d
range:
Rin driv eprogram Ebelow 81 mph (13 0km/h)
Rin driv eprogram E+below 11 2mph
(18 0km/h)
In driv eprogram E+,after th eaccelerato rpedal
has been released th ecoasting characteristic s
of th evehicl eare adapted to th etraffic condi-
tions .Further information about th ehaptic
accelerato r
p
edal (Ypage 251).
Route-based operating strategy
Forth eroute-based operating strategy, th esys-
te m factors in information about th eexpecte d
rout ewhen rout eguidance is active.
The information on th erout eis provide dby th e
multimedia system and includes th efollowing:
Rroad categories
Rspee dlimitation s
Rdataon downhill gradients The use of electric energ
yis automatically opti-
mally distributed from th ebeginnin gto th een d
of th ejourney, usin ginformation about th e
route. The distribution is pre-emptive and takes
int oconsideration :
Rthesections of th ejourney ahead
Rth eenerg yconsumption on th ewhole rout e
The condition of charge of th ehigh-voltage bat -
tery is thus systematically controlled. In addi-
tion, th econtrol function takes int oaccoun t
that:
Rth efuel saving sthroug hth euse of electrical
energ ycan vary, depending on th erout e(e.g.
urban ,interurban or highway)
Rth euse of electrical energ yis held available in
particular for electric operation (e.g. urban
routes)
The vehicl ethus automatically select sth eopti-
mum driving mod efor th erespectiv esectio nof
th eroute.
The route-based operating strategy is available
under th efollowin gconditions:
Rdriv eprogram E+is selected
RHYBRID driving mod eis selected
Ractive rout eguidance is activated
Rsuitable map dat ais available
When th eroute-based operating strategy is
bein gused, th earea in fron tof th evehicl eis
shown as green in th emultifunction display.
Parking
XApply th eelectric parking brake.
The red !indicator lamp in th einstrumen t
cluste rlight sup.
XUse th eDIRECT SELECT leve rto shif tth e
automatic transmission to P.
XSwitch theignition off .
The READY indicator in th einstrumen tcluste r
goes out .
Further information on parking and switching off
th einternal combustio nengin e (
Ypage 190).
PLUG‑ IN HYBRID operation253
Driving and parking
Z
Page 258 of 438

Useful information
i
This Operator's Manual describes all models
and all standard and optional equipment of
your vehicle available at the time of publica-
tion of the Operator's Manual. Country-spe-
cific differences are possible. Please note
that your vehicle may not be equipped with all
features described. This also applies to
safety-related systems and functions.
iRead the information on qualified specialist
workshops (Ypage 28).
Important safety notes
GWARNING
If you operate information systems and com-
munication equipment integrated in the vehi-
cle while driving, you will be distracted from
traffic conditions. You could also lose control
of the vehicle. There is a risk of an accident.
Only operate the equipment when the traffic
situation permits. If you are not sure that this
is possible, park the vehicle paying attention
to traffic conditions and operate the equip-
ment when the vehicle is stationary.
You must observe the legal requirements for the
country in which you are currently driving when
operating the on-board computer.
PLUG-IN HYBRID vehicles only:
GWARNING
If the instrument cluster has failed or mal-
functioned, you may not recognize function
restrictions in systems relevant to safety. The
operating safety of your vehicle may be
impaired. There is a risk of an accident.
Pull over as soon as it is safe to do so and
consult a qualified specialist workshop.
All vehicles, except PLUG-IN HYBRID vehi-
cles:
GWARNING
If the instrument cluster has failed or mal-
functioned, you may not recognize function
restrictions in systems relevant to safety. The
operating safety of your vehicle may be
impaired. There is a risk of an accident.
Drive on carefully. Have the vehicle checked
at a qualified specialist workshop immedi-
ately.
If the operating safety of your vehicle is
impaired, pull over as soon as it is safe to do so.
Contact a qualified specialist workshop.
The on-board computer only shows messages or
warnings from certain systems in the multifunc-
tion display. You should therefore make sure
your vehicle is operating safely at all times.
For an overview, see the instrument panel illus- tration (
Ypage 33).
Displays and operation
Instrument cluster lighting
The light sensor in the instrument cluster auto-
matically controls the brightness of the multi-
function display. In daylight, the displays in the
instrument cluster are illuminated. A dimming
function is not possible in daylight.
The lighting in the instrument cluster, in the dis-plays and the controls in the vehicle interior can
be adjusted using the brightness control knob.
The brightness control is located between the
instrument cluster and the multimedia system
display (
Ypage 35).
XTurn the brightness control knob clockwise or
counter-clockwise.
If you turn the light switch (
Ypage 130) to the
T, ÃorL position, the brightness
will depend upon the brightness of the ambi-
ent light.
Tachometer
!
Do not drive in the overrevving range, as this
could damage the engine.
The red band in the tachometer indicates the
engine's overrevving range.
The fuel supply is interrupted to protect the
engine when the red band is reached.
PLUG-IN HYBRID vehicles: if you select the oper-
ating mode E-MODE, the display in the instru-
ment cluster changes from tachometer to power
meter (
Ypage 242).
256Displays and operation
On-board computer and displays
Page 265 of 438

Digital speedometer
XPress theò buttonon th esteerin gwhee l
to ope nth emen ulist .
XPress :or9 on thesteerin gwhee lto
selec tth eTri pmenu.
XConfir mby pressing aon thesteerin g
wheel.
XPress th e: or9 buttonto selec tth e
digita lspeedometer.
Resetting value s
XPress theò buttonon th esteerin gwhee l
to ope nth emen ulist .
XPress :or9 on thesteerin gwhee lto
selec tth eTri pmenu.
XConfir mby pressing aon thesteerin g
wheel.
XPress th e: or9 buttonto selec tth e
function that you wish to reset .
XPressato confirm your selection .
XPress:to selec tYesand confirm wit h
a.
You can reset th evalues of th efollowin gfunc-
tions:
RTrip odometer
R"From Start "trip compute r
R"From Reset" trip compute r
RECOdisplay
If you reset th evalues in th eEC Odisplay, th e
values in th e"From Start "trip compute rare
also reset .If you reset th evalues in th e"From
Start "trip computer, th evalues in th eEC O
display are also reset .
Navigation systemmenu
Displaying navigation instructions
In th eNav imenu, th emultifunction display
shows navigation instructions. You can fin dfur -
ther information on navigation instruction sin
th eseparat eoperatin ginstructions.
XSwitc hon th emultimedia system (se esepa-
rat eoperatin ginstructions).
XPress th eò buttonon th esteerin gwhee l
to ope nth emen ulist .
XPress :or9 on thesteerin gwhee lto
selec tth eNav imenu.
XConfir mby pressing aon thesteerin g
wheel.
Route guidance not active
:Direction of trave l
;Currentroad
Menus and submenus263
On-board computer and displays
Z
Page 267 of 438

Other status indicators of the naviga-
tion system
:Additional information
Other possible additional information:
RNew Route...orCalculating Route...
A new route is calculated.
RRoad Not Mapped
The vehicle position is inside the area of the
digital map but the road is not recognized, e.g. newly built streets, car parks or private land.
RNo Route
No route could be calculated to the selected
destination.
RO
You have reached the destination or an inter-
mediate destination.
Radio menu
:Frequency range
;Station frequency with memory position
=Name of artist
?Name of track
AGenre The multifunction display shows station
;with
station frequency or station name. The preset
position is only displayed along with station ;if
this has been stored. You can store radio sta-
tions in the multimedia system.
XSwitch on the multimedia system (see sepa-
rate operating instructions).
XPress the òbutton on the steering wheel
to open the menu list.
XPress :or9 on the steering wheel to
select the Radiomenu.
XConfirm by pressing aon the steering
wheel.
Currently set station ;appears in the multi-
function display.
XTo open the station list: press the:or
9 button briefly.
XTo select a station in the station list: press
the : or9 button briefly.
XTo select a station in the station list using
rapid scrolling: press and hold the :or
9 button.
XTo select the frequency range or station
memory: pressabriefly.
XPress :or9 to select the frequency
range or station memory.
XPress ato confirm the selection.
iSIRIUS XM satellite radio functions like a
normal radio.
Further information on radio operation can be
found in the multimedia system (see the sep-
arate operating instructions).
Media menu
Changing the media source
Menus and submenus265
On-board computer and displays
Z
Page 268 of 438

You can change the media source and playback
mode (audio, video or TV) at any time in the
Media
menu.
XSwitch on the multimedia system (see sepa-
rate operating instructions).
XPress theòbutton on the steering wheel
to open the menu list.
XPress :or9 on the steering wheel to
select the Mediamenu.
XConfirm by pressing aon the steering
wheel.
XTo open/close the media sources list:
press abriefly.
The list shows the following media sources,
for example:
RDisc (CD/DVD)
RSD memory card
RMedia Register
RUSB storage device
RBluetooth®capable audio device
Please observe further information on media
support and media operation in the multimedia
system (see separate operating instructions).
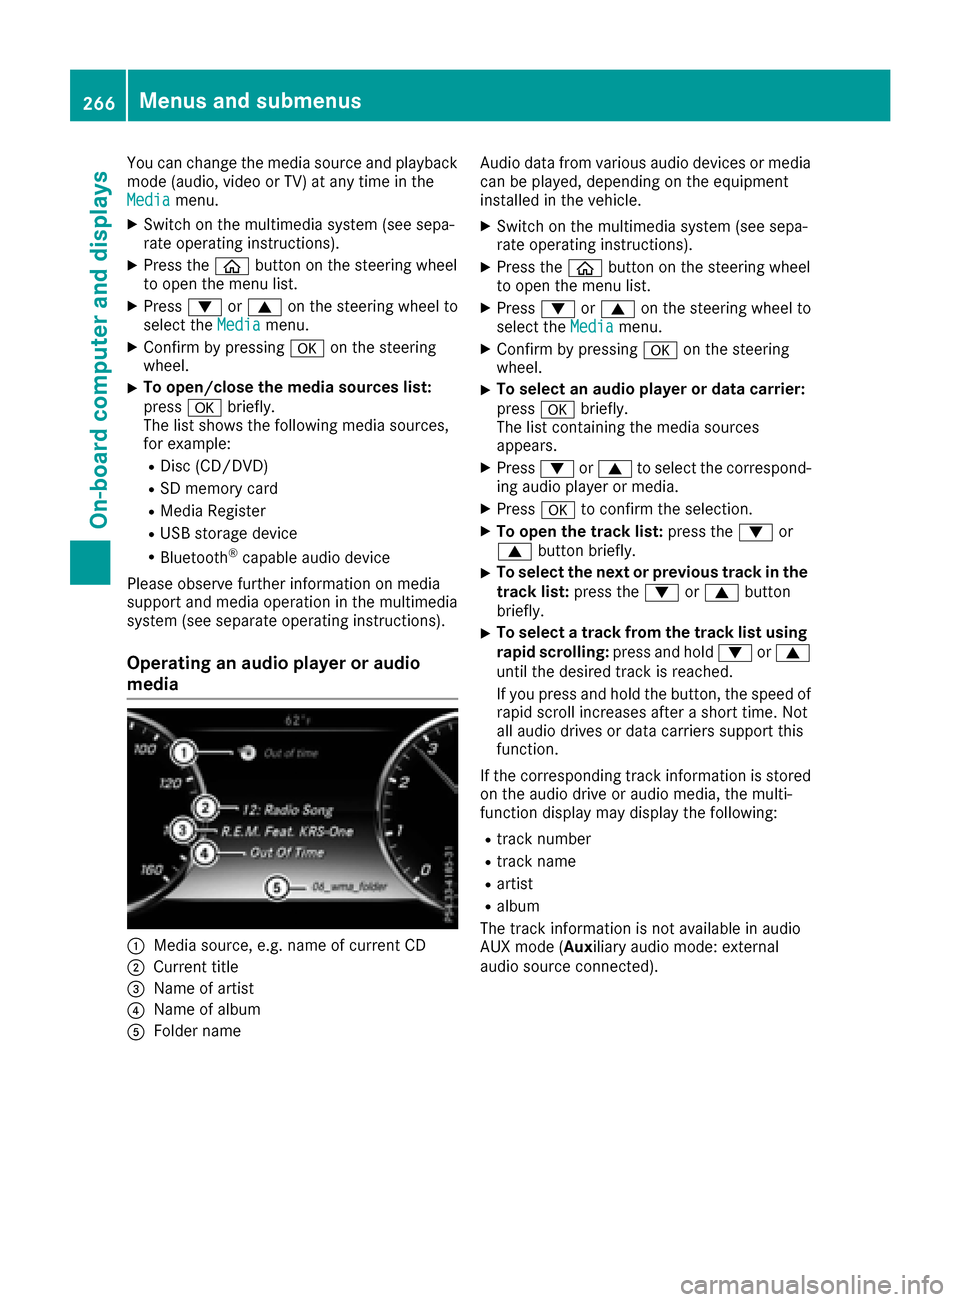
Operating an audio player or audio
media
:Media source, e.g. name of current CD
;Current title
=Name of artist
?Name of album
AFolder name Audio data from various audio devices or media
can be played, depending on the equipment
installed in the vehicle.
XSwitch on the multimedia system (see sepa-
rate operating instructions).
XPress the
òbutton on the steering wheel
to open the menu list.
XPress :or9 on the steering wheel to
select the Mediamenu.
XConfirm by pressing aon the steering
wheel.
XTo select an audio player or data carrier:
press abriefly.
The list containing the media sources
appears.
XPress :or9 to select the correspond-
ing audio player or media.
XPress ato confirm the selection.
XTo open the track list: press the:or
9 button briefly.
XTo select the next or previous track in the
track list: press the:or9 button
briefly.
XTo select a track from the track list using rapid scrolling: press and hold:or9
until the desired track is reached.
If you press and hold the button, the speed of
rapid scroll increases after a short time. Not
all audio drives or data carriers support this
function.
If the corresponding track information is stored
on the audio drive or audio media, the multi-
function display may display the following:
Rtrack number
Rtrack name
Rartist
Ralbum
The track information is not available in audio
AUX mode (Auxiliary audio mode: external
audio source connected).
266Menus and submenus
On-board computer and displays
Page 269 of 438

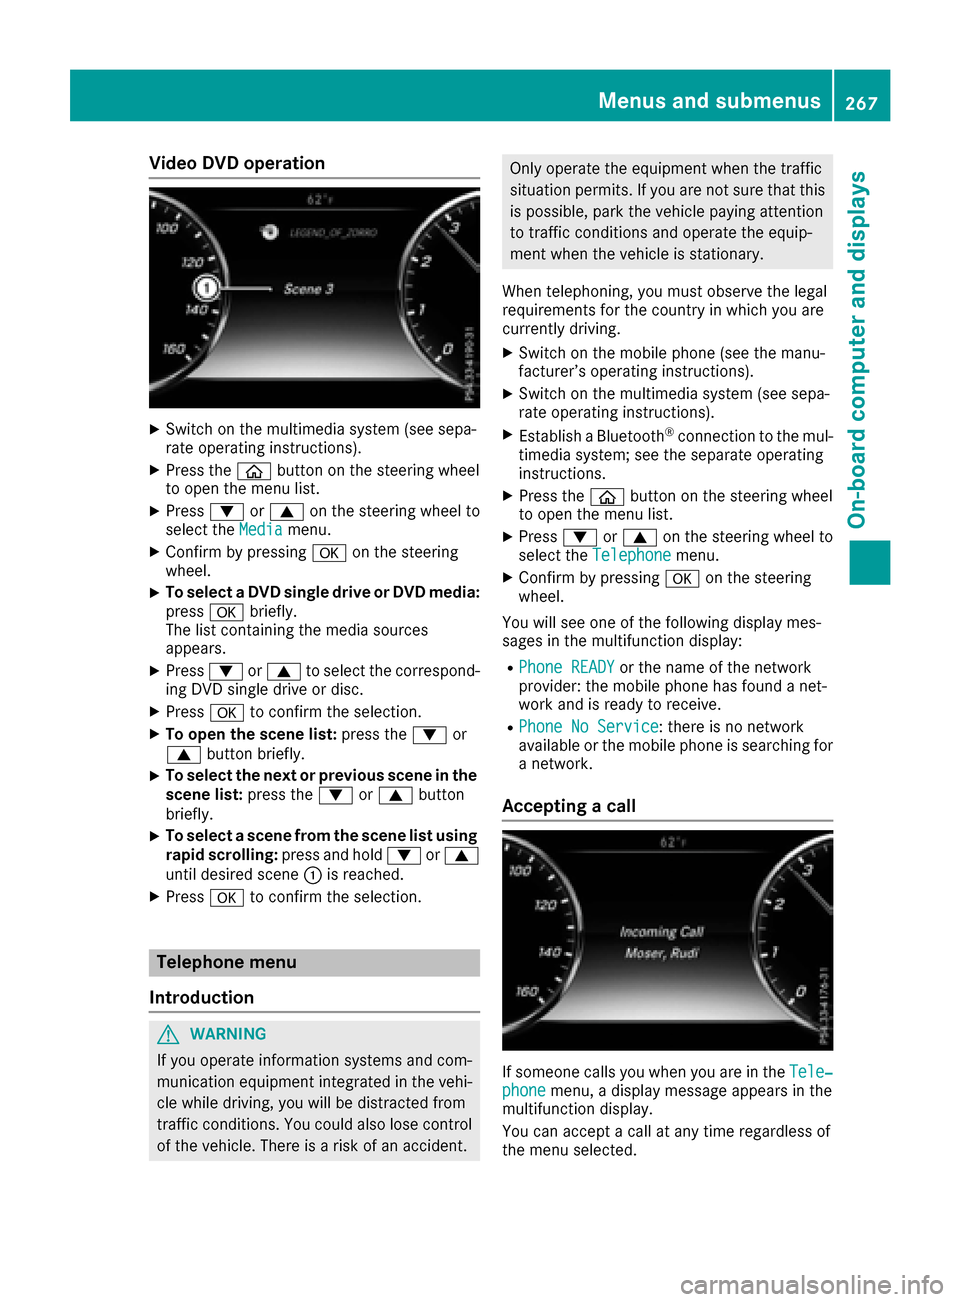
Video DVD operation
XSwitch on the multimedia system (see sepa-
rate operating instructions).
XPress theòbutton on the steering wheel
to open the menu list.
XPress :or9 on the steering wheel to
select the Mediamenu.
XConfirm by pressing aon the steering
wheel.
XTo select a DVD single drive or DVD media:
press abriefly.
The list containing the media sources
appears.
XPress :or9 to select the correspond-
ing DVD single drive or disc.
XPress ato confirm the selection.
XTo open the scene list: press the:or
9 button briefly.
XTo select the next or previous scene in the
scene list: press the:or9 button
briefly.
XTo select a scene from the scene list using
rapid scrolling: press and hold:or9
until desired scene :is reached.
XPress ato confirm the selection.
Telephone menu
Introduction
GWARNING
If you operate information systems and com-
munication equipment integrated in the vehi-
cle while driving, you will be distracted from
traffic conditions. You could also lose control
of the vehicle. There is a risk of an accident.
Only operate the equipment when the traffic
situation permits. If you are not sure that this is possible, park the vehicle paying attention
to traffic conditions and operate the equip-
ment when the vehicle is stationary.
When telephoning, you must observe the legal
requirements for the country in which you are
currently driving.
XSwitch on the mobile phone (see the manu-
facturer’s operating instructions).
XSwitch on the multimedia system (see sepa-
rate operating instructions).
XEstablish a Bluetooth®connection to the mul-
timedia system; see the separate operating
instructions.
XPress the òbutton on the steering wheel
to open the menu list.
XPress :or9 on the steering wheel to
select the Telephonemenu.
XConfirm by pressing aon the steering
wheel.
You will see one of the following display mes-
sages in the multifunction display:
RPhone READYor the name of the network
provider: the mobile phone has found a net-
work and is ready to receive.
RPhone No Service: there is no network
available or the mobile phone is searching for
a network.
Accepting a call
If someone calls you when you are in the Tele‐phonemenu, a display message appears in the
multifunction display.
You can accept a call at any time regardless of
the menu selected.
Menus and submenus267
On-board computer and displays
Z
Page 275 of 438

condition of charge of the high-voltage bat-
tery for the departure time set.
Further information on charging the high-volt-
age battery (PLUG-IN HYBRID vehicles)
(
Ypage 181).
Head-up display submenu
Selecting other displays
:Vehicle speed display
;Vehicle speed and navigation instruction
display
=Vehicle speed display and Traffic Sign Assist
Using the Display Content
function, you can
choose from up to four display options depend-
ing on the vehicle's equipment. The selected
contents appear in the head-up display.
In Mercedes-AMG vehicles, you can also choose
between two AMG displays. If you select an
AMG display, the head-up display shows AMG-
specific contents.
XPress the òbutton on the steering wheel
to open the menu list.
XPress :or9 on the steering wheel to
select the Settingsmenu.
XConfirm by pressing aon the steering
wheel.
XPress :or9 to select the Head-upDisplaysubmenu.
XPressato confirm.
XPress :or9 to select Display Con‐tent.
XPressato confirm.
A graphic selection list appears.
XPress :or9 to select the desired dis-
play.
XPress the abutton to confirm the selec-
tion. For further information about the traffic sign
displays, see Traffic Sign Assist (
Ypage 229).
Further information on navigation displays can
be found in the multimedia system; see the sep-
arate operating instructions.
Setting the position
You can adjust the position of the head-up dis-
play on the windshield. You can compensate for
height differences if the seat positions are
changed, for example.
XSwitch on the head-up display (Ypage 259).
XPress the òbutton on the steering wheel
to open the menu list.
XPress the :or9 button on the steering
wheel to select the Settingsmenu.
XConfirm by pressing aon the steering
wheel.
XPress :or9 to select the Head-upDisplaysubmenu.
XPressato confirm.
XPress :or9 to select the Positionfunction.
XPress theabutton to save the setting.
XPress :or9 to adjust the position to a
level from Level+5(up) toLevel-5(down).
XPress the aor% button to save the
setting.
Using the Memory function, you can save and
call up the set position of the head-up display as
a single memory preset (
Ypage 126).
Setting the brightness
The brightness of the head-up display is auto-
matically adjusted to the surrounding ambient
light. You can also individually adjust the bright-
ness of the head-up display.
XSwitch on the head-up display (Ypage 259).
XPress òon the steering wheel to open the
menu list.
XPress the :or9 button on the steering
wheel to select the Settingsmenu.
XConfirm by pressing aon the steering
wheel.
XUse : or9 to select the Head-upDisplaysubmenu.
XPressato confirm.
XPress :or9 to select the Brightnessfunction.
XPress theabutton to save the setting.
Menus and submenus273
On-board computer and displays
Z
Page 328 of 438

RClose the lockablestowage spaces before
starting a journey.
RAlwa ys stow and secure heavy, hard, poin-
te d, sharp-edged, fragile or bulky objects in
the trunk.
Observe the loading guidelines (
Ypage 325).
Stowage compartments in the front
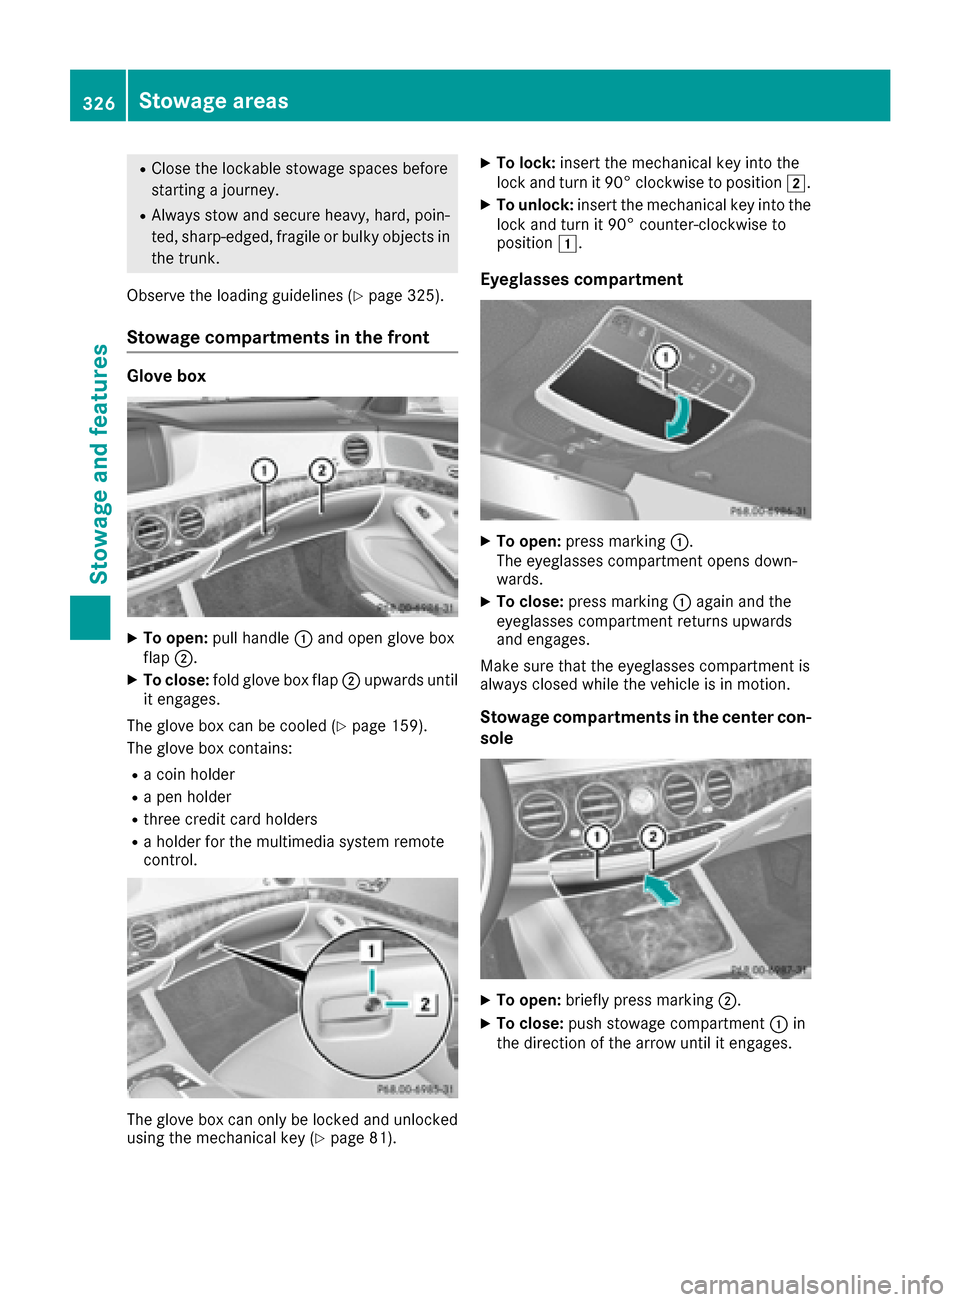
Glove box
XTo open: pullhandle :and open glove box
flap ;.
XTo close: fold glove box flap ;upwards unt il
it engages.
The glove box can becooled (
Ypage 159).
The glove box contains:
Ra co inholder
Ra pen holder
Rthree cr editcard holders
Ra holder for the multimedia system remote
control.
The glove box can only be locked and unlocked
using the mechanical key (Ypage 81).
XTo lock: insert the mechanical key into the
lock and turn it 90° clockwise to position 2.
XTo unlock:insert the mechanical key into the
lock and turn it90° counter-clockwise to
position 1.
Eyeglasses compartment
XTo open: press marking :.
The eyeglasses compartment opens down-
wards.
XTo close: press marking :again and the
eyeglasses compartment returns upwards
and engages.
Make sure that the eyeglasses compartment is
always closed while the vehicle isin motion.
Stowage compartments in the center con-
sole
XTo open: briefly press marking ;.
XTo close:push stowage compartment :in
the direction of the arrow until it engages.
326Stowage areas
Stowage and features