2016 MERCEDES-BENZ S-Class SEDAN mirror
[x] Cancel search: mirrorPage 129 of 438
XAdjust the seat accordingly (Ypage 106).
XOn the driver's side, adjust the steering wheel
(Ypage 120) and the exterior mirrors
(Ypage 123).
XPress memory button Mand one of the stor-
age position buttons 1,2 or 3within three
seconds.
The settings are stored in the selected preset
position. A tone sounds when the settings
have been completed.
Calling up a stored setting
XPress and hold the relevant storage position
button 1,2 or 3until the:
RSeat
RSteering wheel
RExterior mirrors
are in the stored position.
iIf you release the storage position button,
the seat, steering wheel and mirror setting
functions stop immediately. The multicontour
seat setting or the 4-way lumbar support is
still carried out.
Memory function in the rear compart-
ment
Important safety notes
GWARNING
When the memory function adjusts the seat or steering wheel, you and other vehicle occu-
pants – particularly children – could become
trapped. There is a risk of injury.
While the memory function is making adjust-
ments, make sure that no one has any body
parts in the sweep of the seat or steering
wheel. If somebody becomes trapped, imme-
diately release the memory function position
button. The adjustment process is stopped.
GWARNING
Children could become trapped if they acti-
vate the memory function, particularly when
unattended. There is a risk of injury.
When leaving the vehicle, always take the
SmartKey with you and lock the vehicle. Never
leave children unsupervised in the vehicle.
General notes
The settings for the rear seat and the front-
passenger seat can be stored using the rear-
compartment memory function.
RIf the indicator lamp in the vbutton is not
lit, store the rear seat settings.
RIf the indicator lamp in the vbutton lights
up, store the front-passenger seat and rear
seat settings. Both the front-passenger and
rear seat are taken into account with this set-
ting. Depending on the equipment in the vehi-
cle, two or three memory positions can be
stored for the front-passenger and rear seats.
Storing settings
General notes
With the memory function in the rear, you can
store up to three different settings, e.g. for three
different people.
The following settings are stored as a single
memory preset:
Rposition of the seat, backrest and head
restraint
Rmulticontour seat: the seat cushions of the
backrest as well as the contour of the back-
rest in the lumbar and shoulder regions
Rseat heating: distribution of the heated sec-
tions of the seat cushion and backrest if the
indicator lamp in the vbutton is not lit
The following settings are stored to a memory
position, if the indicator lamp in the vbutton
lights up:
Rposition of the footrest for the front-
passenger seat, if available
Rposition of the screen, if available
Memory function in the rear compartment127
Seats, steering wheel and mirrors
Z
Page 130 of 438
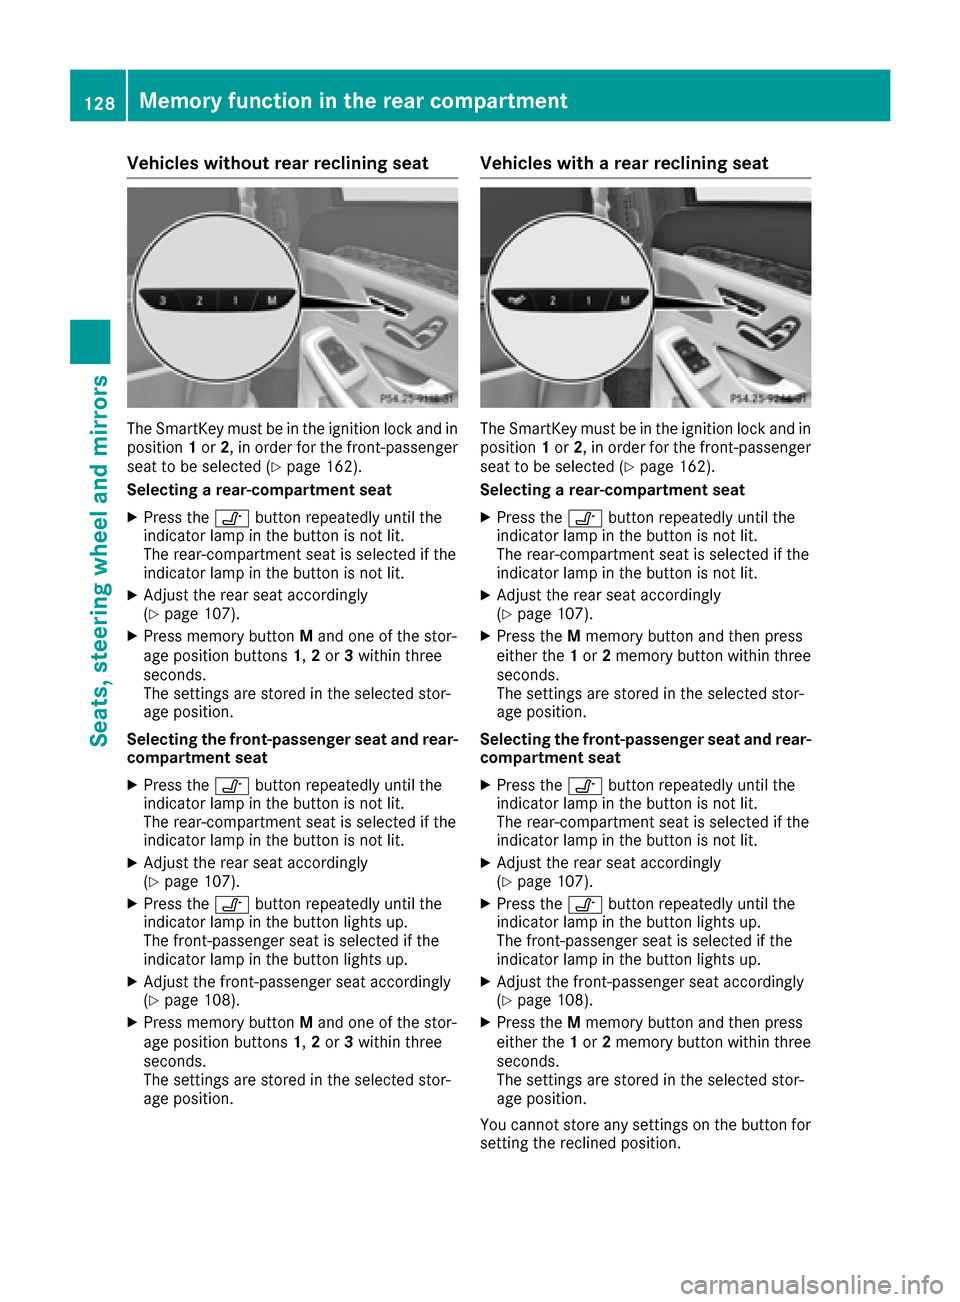
Vehicles without rear reclining seat
The SmartKey must be in the ignition lock and in
position1or 2, in order for the front-passenger
seat to be selected (
Ypage 162).
Selecting a rear-compartment seat
XPress the vbutton repeatedly until the
indicator lamp in the button is not lit.
The rear-compartment seat is selected if the
indicator lamp in the button is not lit.
XAdjust the rear seat accordingly
(Ypage 107).
XPress memory button Mand one of the stor-
age position buttons 1,2 or 3within three
seconds.
The settings are stored in the selected stor-
age position.
Selecting the front-passenger seat and rear-
compartment seat
XPress the vbutton repeatedly until the
indicator lamp in the button is not lit.
The rear-compartment seat is selected if the
indicator lamp in the button is not lit.
XAdjust the rear seat accordingly
(Ypage 107).
XPress the vbutton repeatedly until the
indicator lamp in the button lights up.
The front-passenger seat is selected if the
indicator lamp in the button lights up.
XAdjust the front-passenger seat accordingly
(Ypage 108).
XPress memory button Mand one of the stor-
age position buttons 1,2 or 3within three
seconds.
The settings are stored in the selected stor-
age position.
Vehicles with a rear reclining seat
The SmartKey must be in the ignition lock and in
position 1or 2, in order for the front-passenger
seat to be selected (
Ypage 162).
Selecting a rear-compartment seat
XPress the vbutton repeatedly until the
indicator lamp in the button is not lit.
The rear-compartment seat is selected if the
indicator lamp in the button is not lit.
XAdjust the rear seat accordingly
(Ypage 107).
XPress the Mmemory button and then press
either the 1or 2memory button within three
seconds.
The settings are stored in the selected stor-
age position.
Selecting the front-passenger seat and rear-
compartment seat
XPress the vbutton repeatedly until the
indicator lamp in the button is not lit.
The rear-compartment seat is selected if the
indicator lamp in the button is not lit.
XAdjust the rear seat accordingly
(Ypage 107).
XPress the vbutton repeatedly until the
indicator lamp in the button lights up.
The front-passenger seat is selected if the
indicator lamp in the button lights up.
XAdjust the front-passenger seat accordingly
(Ypage 108).
XPress the Mmemory button and then press
either the 1or 2memory button within three
seconds.
The settings are stored in the selected stor-
age position.
You cannot store any settings on the button for
se
tting the reclined position.
128Memory function in the rear compartment
Seats, steering wheel and mirrors
Page 131 of 438
Calling up a stored setting
General notes
The memory positions in the area for the chauf-
feur mode can only be set when the conditions
for the chauffeur mode are fulfilled
(
Ypage 111).
Vehicles without rear reclining seat
The SmartKey must be in the ignition lock and in
position 1or 2, in order for the front-passenger
seat to be selected (
Ypage 162).
XTo call up the stored rear seat setting:
press the vbutton repeatedly until the
indicator lamp in the button is not lit.
XTo call up the stored front-passenger seat
and rear seat settings: press thevbut-
ton repeatedly until the indicator lamp in the
button lights up.
XPress and hold the relevant storage position
button 1,2or 3until the rear seat or the front-
passenger seat are in the stored position.
iSeat adjustment is interrupted as soon as
you release the storage position button. The
adjustment of the multicontour seat is still
carried out.
Vehicles with a rear reclining seat
The SmartKey must be in the ignition lock and in
position 1or 2, in order for the front-passenger
seat to be selected (
Ypage 162).
XTo call up the stored rear seat setting:
press the vbutton repeatedly until the
indicator lamp in the button is not lit.
XTo call up the stored front-passenger seat
and rear seat settings: press thevbut-
ton repeatedly until the indicator lamp in the
button lights up.
XPress and hold the relevant storage position
button 1or 2until the rear seat or the front-
passenger seat is in the stored position.
iSeat adjustment is interrupted as soon as
you release the storage position button. The
adjustment of the multicontour seat is still
carried out.
Memory function in the rear compartment129
Seats, steering wheel and mirrors
Z
Page 157 of 438
Problems with the perfume atomizer
ProblemPossible causes/consequences andMSolutions
The vehicle interior is not
perfumed although the
perfume atomizer is acti-
vated.The perfume vial has not been pushed into the holder as far as it will
go.
XSlide the perfume vial into the holder as far as it will go.
The perfume vial is not filled sufficiently.
XPre-filled vials:dispose of the empty vial.
XUse a new pre-filled vial.
XRefillable vials: fill the perfume vial with a maximum of 0.5 fl. oz.
(15 ml) of the same perfume.
The perfume atomizer is faulty.
XHave the perfume atomizer checked at a qualified specialist work-
shop.
Ionization
You can use the "Ionization" function to purify
the air in the vehicle interior and attain an
improved interior climate.
The ionization of the interior air is odorless and
cannot be perceived directly in the vehicle inte-
rior.
You can switch ionization on or off using the
multimedia system (see the separate operating
instructions).
Ionization can only be switched on if the front
climate control system is activated. The side air
vent on the driver's side must be open.
Pre-entry climate control via Smart-
Key
General notes
The "Pre-entry climate control via SmartKey"
function is only available in PLUG-IN HYBRID
vehicles.
Before getting in, the driver's seat area or the
whole interior can be briefly warmed or ventila-
ted in advance with the air from the air vents
being pre-cooled.
The high-voltage battery must be sufficiently
charged before "Pre-entry climate control via
SmartKey" can be activated. When the vehicle is pre-cooled, the following
functions are activated if required:
RClimate control system
RBlower
RSeat ventilation
When the vehicle is pre-heated, the following
functions are activated if required:
RClimate control system
RBlower
RSeat heating
RSteering wheel heating
RExterior mirror heating
RRear window defroster
If you have activated the following functions
using the multimedia system, they are activated
together with the "Pre-entry climate control via
SmartKey" function:
RArmrest heating
RPerfume atomizer
RIonization
Activating the perfume atomizer or ionization
(see separate operating instructions).
Activating or deactivating "Pre-entry
climate control via SmartKey"
Before "Pre-entry climate control via SmartKey"
can be activated, you must activate the function
via the multimedia system (see separate oper-
ating instructions).
Operating the climate control systems155
Climate control
Z
Page 159 of 438
Problems with "Pre-entry climate control via SmartKey"
ProblemPossible causes/consequences andMSolutions
"Pre-entry climate con-
trol via SmartKey" can-
not be switched on or
has switched itself off.The condition of charge of the high-voltage battery is under the speci-
fied minimum condition of charge.
XStart the engine when the vehicle is at a standstill.
The engine powers the electric motor. The electric motor operates
as a generator. The high-voltage battery is being charged.
Further information on charging the high-voltage battery via:
Ra mains socket (Ypage 183)
Ra charging station (Ypage 186)
Ra wallbox (Ypage 185)
"Pre-entry climate control via SmartKey" has been started more than
twice with the engine switched off.
XSwitch on the engine and let it run for more than ten seconds.
XTry again to switch on "Pre-entry climate control via SmartKey".
Pre-entry climate control at time of
departure
Important safety notes
GWARNING
If persons, particularly children are subjected to prolonged exposure to extreme heat or
cold, there is a risk of injury, possibly even
fatal. Never leave children unattended in the
vehicle.
General notes
The "Pre-entry climate control at departure
time" function is only available in PLUG-IN
HYBRID vehicles.
You can use the "Pre-entry climate control at
departure time" function to cool or heat the
vehicle interior if the engine is not running.
The "Pre-entry climate control at departure
time" function can be activated regardless of
whether or not the vehicle is connected to an
electric power supply. The condition of charge of
the high-voltage battery must be higher than the
specified minimum condition of charge, how-
ever.
When the vehicle is connected to an electric
power supply, priority is given to charging the
high-voltage battery to the specified minimum charge. "Pre-entry climate control at departure
time" is only activated subsequently.
The running time of the "Pre-entry climate con-
trol at departure time" function may be reduced
if:
Rthe vehicle is not connected to an electric
power supply and
Rthe high-voltage battery is not fully charged
With active "Pre-entry climate control at depar-
ture time" the condition of charge of the high-
voltage battery can be reduced, even if the
charge cable connector is connected.
When the vehicle is cooled, the following func-
tions are activated if required:
RClimate control system
RBlower
RSeat ventilation
When the vehicle is heated, the following func-
tions are activated if required:
RClimate control system
RBlower
RSeat heating
RSteering wheel heating
RArmrest heating
RExterior mirror heating
RRear window defroster
If you have switched on the perfume atomizer or the ionization using the multimedia system,
Operating the climate control systems157
Climate control
Z
Page 222 of 438
example when you recognize that it is already
possible to pull out of the parking space.
Canceling Active Parking Assist
XStop the movement of the multifunction
steering wheel or steer yourself.
Active Parking Assist will be canceled at once.
ThePark Assist Canceled
message
appears in the multifunction display.
or
XPress the PARKTRONIC button (Ypage 215).
PARKTRONIC is switched off and Active Park-
ing Assist is immediately canceled. The Park
Assist Canceledmessage appears in the
multifunction display.
Active Parking Assist is canceled automatically
if:
Rthe electric parking brake is engaged
Rtransmission position Pis selected
Rparking using Active Parking Assist is no lon-
ger possible
Ryou are driving faster than 6 mph (10 km/ h)
Ra wheel spins, ESP®intervenes or fails. The
÷ warning lamp lights up in the instrument
cluster
A warning tone sounds. The parking symbol dis-
appears and the multifunction display shows the
Park Assist Canceled
message.
When Active Parking Assist is canceled, you
must steer and brake again yourself.
If a system malfunction occurs, the vehicle is
braked to a standstill. To drive on, depress the
accelerator again.
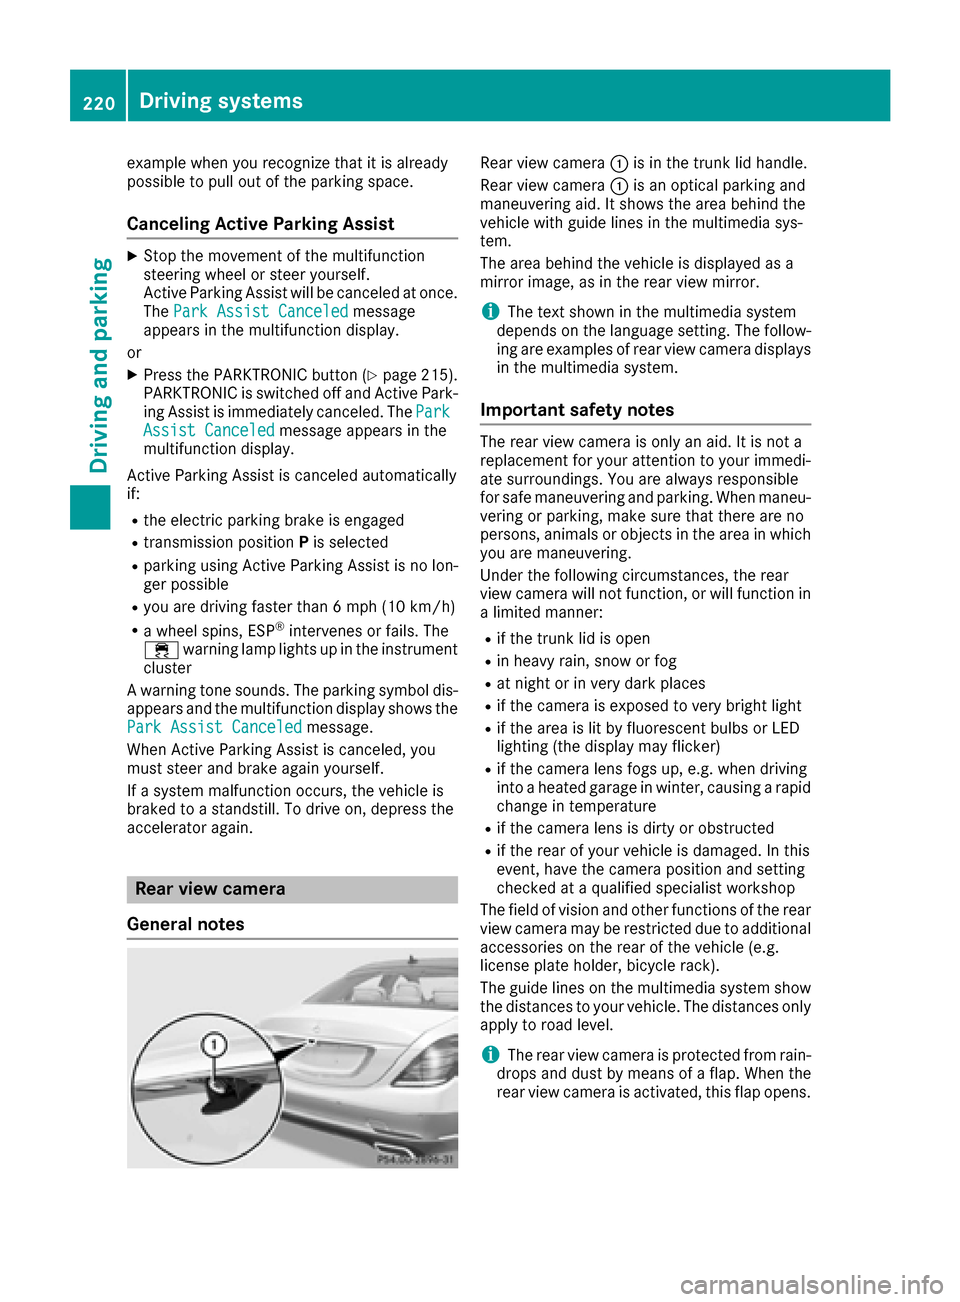
Rear view camera
General notes
Rear view camera :is in the trunk lid handle.
Rear view camera :is an optical parking and
maneuvering aid. It shows the area behind the
vehicle with guide lines in the multimedia sys-
tem.
The area behind the vehicle is displayed as a
mirror image, as in the rear view mirror.
iThe text shown in the multimedia system
depends on the language setting. The follow- ing are examples of rear view camera displays
in the multimedia system.
Important safety notes
The rear view camera is only an aid. It is not a
replacement for your attention to your immedi-
ate surroundings. You are always responsible
for safe maneuvering and parking. When maneu-
vering or parking, make sure that there are no
persons, animals or objects in the area in whichyou are maneuvering.
Under the following circumstances, the rear
view camera will not function, or will function in
a limited manner:
Rif the trunk lid is open
Rin heavy rain, snow or fog
Rat night or in very dark places
Rif the camera is exposed to very bright light
Rif the area is lit by fluorescent bulbs or LED
lighting (the display may flicker)
Rif the camera lens fogs up, e.g. when driving
into a heated garage in winter, causing a rapid
change in temperature
Rif the camera lens is dirty or obstructed
Rif the rear of your vehicle is damaged. In this
event, have the camera position and setting
checked at a qualified specialist workshop
The field of vision and other functions of the rear view camera may be restricted due to additional
accessories on the rear of the vehicle (e.g.
license plate holder, bicycle rack).
The guide lines on the multimedia system show
the distances to your vehicle. The distances only
apply to road level.
iThe rear view camera is protected from rain-
drops and dust by means of a flap. When the
r
ear view camera is activated, this flap opens.
220Driving systems
Driving and parking
Page 223 of 438

The flap closes again when:
Ryou have finished the maneuvering process
Ryou switch off the engine
Ryou open the trunk
Observe the notes on cleaning (
Ypage 363).
For technical reasons, the flap may remain
open briefly after the rear view camera has
been deactivated.
Activating/deactivating the rear view
camera
XTo activate: make sure that the SmartKey is
in position 2in the ignition lock.
XMake sure that the Activation by R gearfunction is selected in the multimedia system
(see the separate operating instructions).
XEngage reverse gear.
The rear view camera flap opens. The multi-
media system shows the area behind the vehi-
cle with guide lines.
The image from the rear view camera is avail-
able throughout the maneuvering process.
To deactivate: the rear view camera deacti-
vates if you shift the transmission to Por after
driving forwards a short distance.
Displays in the multimedia system
The rear view camera may show a distorted view
of obstacles, show them incorrectly or not at all.
The rear view camera does not show objects in
the following positions:
Rvery close to the rear bumper
Runder the rear bumper
Rin the area immediately above the handle in
the trunk lid
!Objects not at ground level may appear to
be further away than they actually are, e.g.:
Rthe bumper of a parked vehicle
Rthe drawbar of a trailer
Rthe ball coupling of a trailer tow hitch
Rthe rear section of an HGV
Ra slanted post
Use the guidelines only for orientation.
Approach objects no further than the bottom-
most guideline.
:Yellow guide line at a distance of approx-
imately 13 ft (4.0 m) from the rear of the
vehicle
;White guide line without turning the steering
wheel, vehicle width including the exterior
mirrors (static)
=Yellow guide line for the vehicle width
including the exterior mirrors, for current
steering wheel angle (dynamic)
?Yellow lane marking tires at current steering
wheel angle (dynamic)
AYellow guide line at a distance of approx-
imately 3 ft (1.0 m) from the rear of the vehi-
cle
BVehicle center axle (marker assistance)
CBumper
DRed guide line at a distance of approximately
12 in (0.30 m) from the rear of the vehicle
The guide lines are shown when the transmis-
sion is in position R.
The distance specifications only apply to
objects that are at ground level.
Driving systems221
Driving and parking
Z
Page 224 of 438
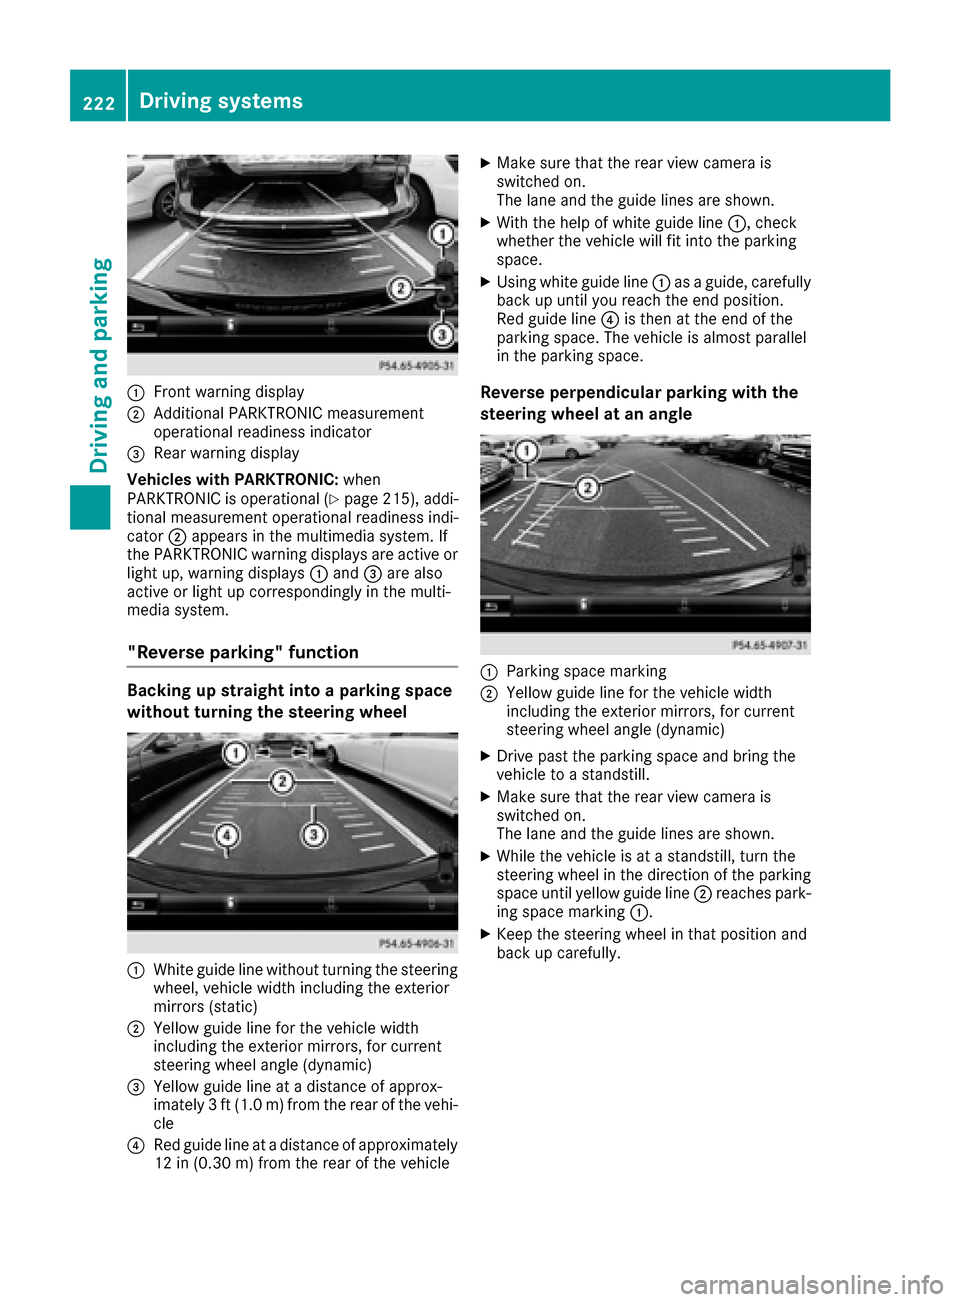
:Front warning display
;Additional PARKTRONIC measurement
operational readiness indicator
=Rear warning display
Vehicles with PARKTRONIC: when
PARKTRONIC is operational (
Ypage 215), addi-
tional measurement operational readiness indi-
cator ;appears in the multimedia system. If
the PARKTRONIC warning displays are active or
light up, warning displays :and =are also
active or light up correspondingly in the multi-
media system.
"Reverse parking" function
Backing up straight into a parking space
without turning the steering wheel
:White guide line without turning the steering
wheel, vehicle width including the exterior
mirrors (static)
;Yellow guide line for the vehicle width
including the exterior mirrors, for current
steering wheel angle (dynamic)
=Yellow guide line at a distance of approx-
imately 3 ft (1.0 m) from the rear of the vehi-
cle
?Red guide line at a distance of approximately
12 in (0.30 m) fromthe rear of the vehicle
XMake sure that the rear view camera is
switched on.
The lane and the guide lines are shown.
XWith the help of white guide line :, check
whether the vehicle will fit into the parking
space.
XUsing white guide line :as a guide, carefully
back up until you reach the end position.
Red guide line ?is then at the end of the
parking space. The vehicle is almost parallel
in the parking space.
Reverse perpendicular parking with the
steering wheel at an angle
:Parking space marking
;Yellow guide line for the vehicle width
including the exterior mirrors, for current
steering wheel angle (dynamic)
XDrive past the parking space and bring the
vehicle to a standstill.
XMake sure that the rear view camera is
switched on.
The lane and the guide lines are shown.
XWhile the vehicle is at a standstill, turn the
steering wheel in the direction of the parking
space until yellow guide line ;reaches park-
ing space marking :.
XKeep the steering wheel in that position and
back up carefully.
222Driving systems
Driving an d parking