2016 MERCEDES-BENZ S-Class SEDAN mirror
[x] Cancel search: mirrorPage 225 of 438
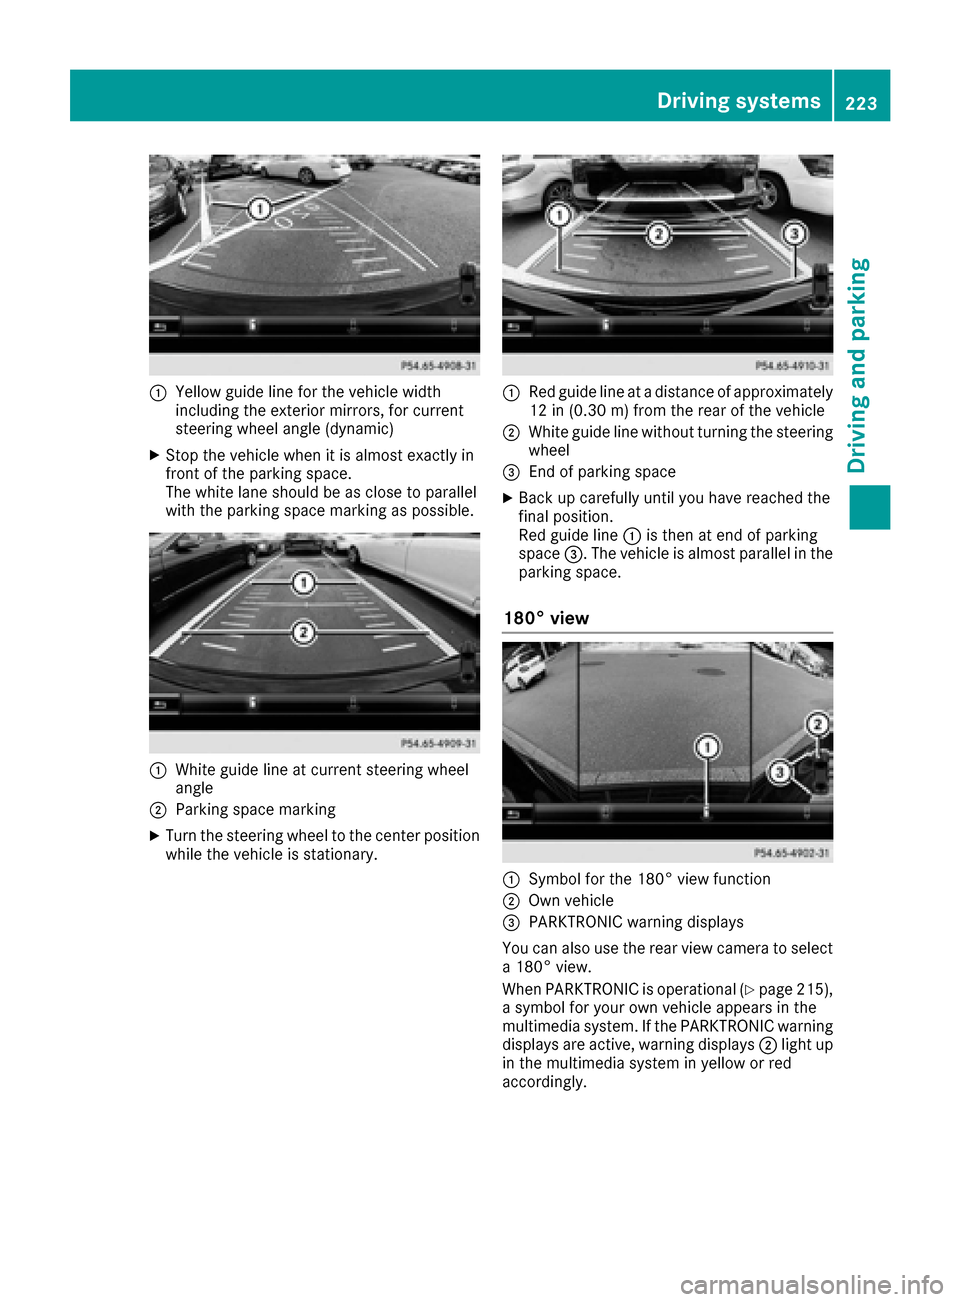
:Yellow guide line for the vehicle width
including the exterior mirrors, for current
steering wheel angle (dynamic)
XStop the vehicle when it is almost exactly in
front of the parking space.
The white lane should be as close to parallel
with the parking space marking as possible.
:White guide line at current steering wheel
angle
;Parking space marking
XTurn the steering wheel to the center position
while the vehicle is stationary.
:Red guide line at a distance of approximately
12 in (0.30 m) from the rear of the vehicle
;White guide line without turning the steering
wheel
=End of parking space
XBack up carefully until you have reached the
final position.
Red guide line:is then at end of parking
space =. The vehicle is almost parallel in the
parking space.
180° view
:Symbol for the 180° view function
;Own vehicle
=PARKTRONIC warning displays
You can also use the rear view camera to select
a 180° view.
When PARKTRONIC is operational (
Ypage 215),
a symbol for your own vehicle appears in the
multimedia system. If the PARKTRONIC warning
displays are active, warning displays ;light up
in the multimedia system in yellow or red
accordingly.
Driving systems223
Driving and parking
Z
Page 226 of 438
Object detection
The rear view camera can detect moving and
stationary objects. If, for example, a pedestrian
or another vehicle is detected, these objects are
marked with bars. The system is only able to
detect and mark stationary objects when your
vehicle is moving. When the vehicle is station-
ary, moving objects can be detected and
marked.
To ensure that you can use the function, it must
be switched on in the multimedia system (see
the separate operating instructions).
360° camera (surround view)
General notes
The 360° camera is a system consisting of four
cameras.
The system processes images from the follow-
ing cameras:
RRear view camera
RFront camera
RTwo side cameras in the exterior mirrors
The cameras capture the immediate surround-
ings of the vehicle. The 360° camera assists
you, for instance when parking or at exits with
reduced visibility.
You can show images from the 360° camera in
full-screen mode or in six different split-screen
views on the multimedia system. A split-screen
view also includes a top view of the vehicle. This
view is calculated from the data supplied by the installed cameras (virtual camera).
The six split-screen views are:
Rtop view and picture from the rear view cam-
era (130° viewing angle)
Rtop view and image from the front camera
(130° viewing angle without displaying the
maximum steering wheel angle)
Rtop view and enlarged rear view
Rtop view and enlarged front view
Rtop view and images from the rear-facing side
cameras (rear wheel view)
Rtop view and images from the forward-facing
side cameras (front wheel view)
When the function is active and you shift the
transmission from Dor Rto N, the guide lines
are hidden in the multimedia system. When you change between transmission posi-
tions
Dand R, you see the previously selected
front or rear view.
Distances measured by PARKTRONIC will also
be optically displayed:
Rin split screen view as red or yellow brackets around the vehicle icon in the top view, or
Rat the bottom right as red or yellow brackets
around the vehicle symbol in full-screen mode
The line thickness and color of the brackets
show how far the vehicle is from an object.
Ryellow brackets with thin lines: PARKTRONIC
is active
Ryellow brackets with normal lines: an object is present in close range of the vehicle
Rred line: an object is present in the immediate
close range of the vehicle
Important safety notes
The 360°camera is only an aid and may show a
distorted view of obstacles, show them incor-
rectly or not at all. The 360°camera is not a
substitute for attentive driving.
You are always responsible for safe maneuver-
ing and parking. When maneuvering or parking,
make sure that there are no persons, animals or
objects in the area in which you are maneuver-
ing.
You are always responsible for safety, and must
always pay attention to your surroundings when
parking and maneuvering. This applies to the
areas behind, in front of and beside the vehicle.
You could otherwise endanger yourself and oth-
ers.
The 360° camera will not function or will func-
tion in a limited manner:
Rif the doors are open
Rif the exterior mirrors are folded in
Rif the trunk lid is open
Rin heavy rain, snow or fog
Rat night or in very dark places
Rif the cameras are exposed to very bright light
Rif the area is lit by fluorescent bulbs or LED
lighting (the display may flicker)
Rif the camera lenses fog up, e.g. when driving
into a heated garage in winter, causing a rapid
change in temperature
224Driving systems
Driving and parking
Page 228 of 438
see the top view of the vehicle and the image
from the rear view camera.
Selecting the split-screen and full
screen displays
Switching between split screen views:
XTo switch to the line with the vehicle icons:
slide5the controller.
XTo select a vehicle icon: turn the controller.
Switching to full screen mode:
X180° ViewTurn and press the controller.
iThe 180° option is only available in the fol-
lowing views:
RTop view with picture from the rear view
camera
RTop view with picture from the front camera
Displays in the multimedia system
Important safety notes
The camera system may show a distorted view
of obstacles, show them incorrectly or not at all.
Obstacles are not shown by the system in the
following locations:
Runder the front and rear bumpers
Rvery close to the front and rear bumpers
Rin close range above the handle on the trunk
lid
Rvery close to the exterior mirrors
Rin the transitional areas between the various
cameras in the virtual top view
!Objects not at ground level may appear to
be further away than they actually are, e.g.:
Rthe bumper of a parked vehicle
Rthe drawbar of a trailer
Rthe ball coupling of a trailer tow hitch
Rthe rear section of an HGV
Ra slanted post
Use the guidelines only for orientation.
Approach objects no further than the bottom-
most guideline.
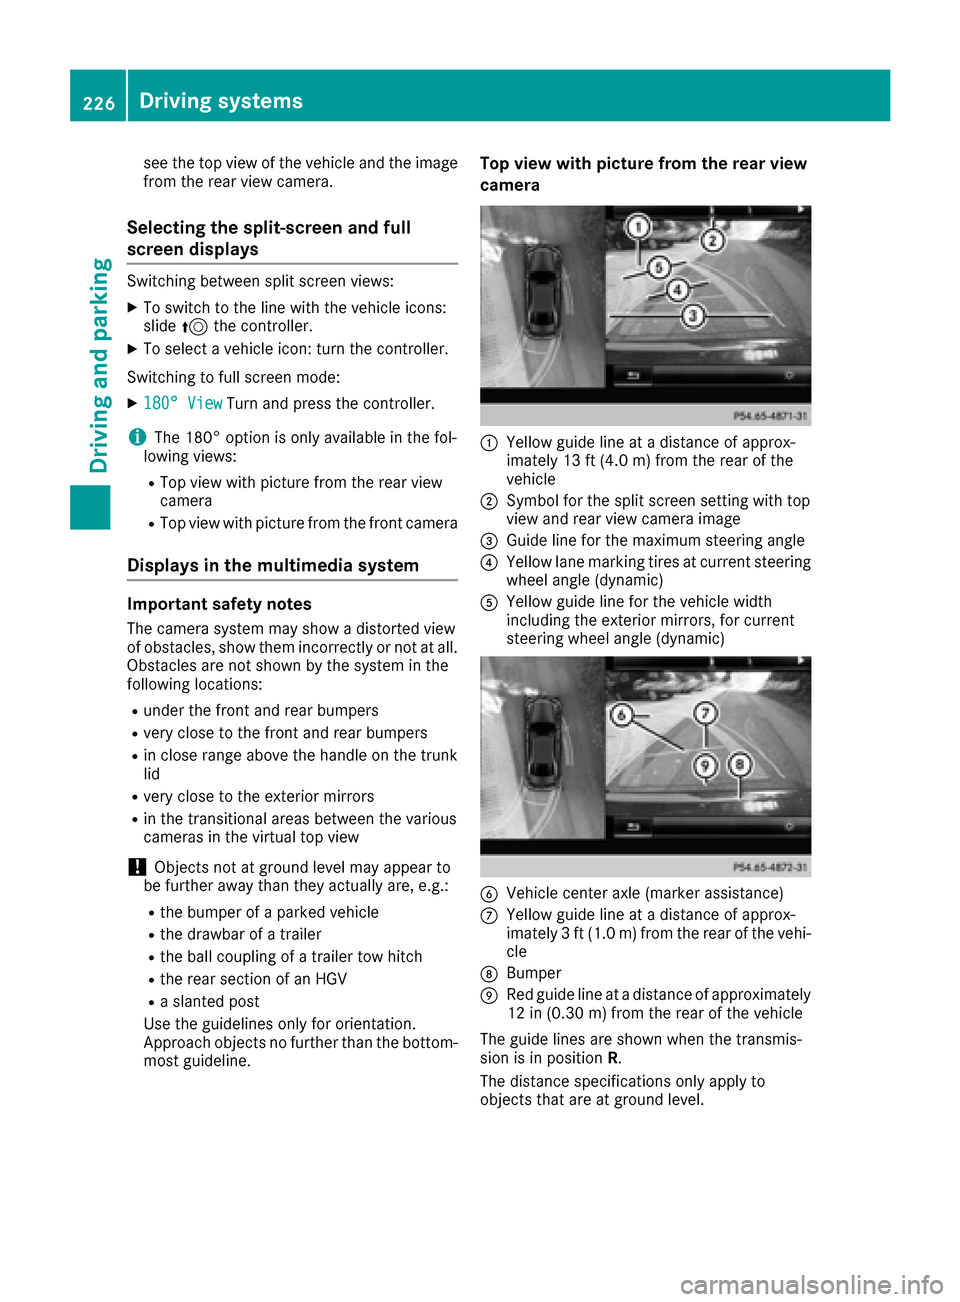
Top view with picture from the rear view
camera
:Yellow guide line at a distance of approx-
imately 13 ft (4.0 m) from the rear of the
vehicle
;Symbol for the split screen setting with top
view and rear view camera image
=Guide line for the maximum steering angle
?Yellow lane marking tires at current steering
wheel angle (dynamic)
AYellow guide line for the vehicle width
including the exterior mirrors, for current
steering wheel angle (dynamic)
BVehicle center axle (marker assistance)
CYellow guide line at a distance of approx-
imately 3 ft (1.0 m) from the rear of the vehi-
cle
DBumper
ERed guide line at a distance of approximately
12 in (0.30 m) from the rear of the vehicle
The guide lines are shown when the transmis-
sion is in position R.
The distance specifications only apply to
objects that are at ground level.
226Driving systems
Driving and parking
Page 229 of 438
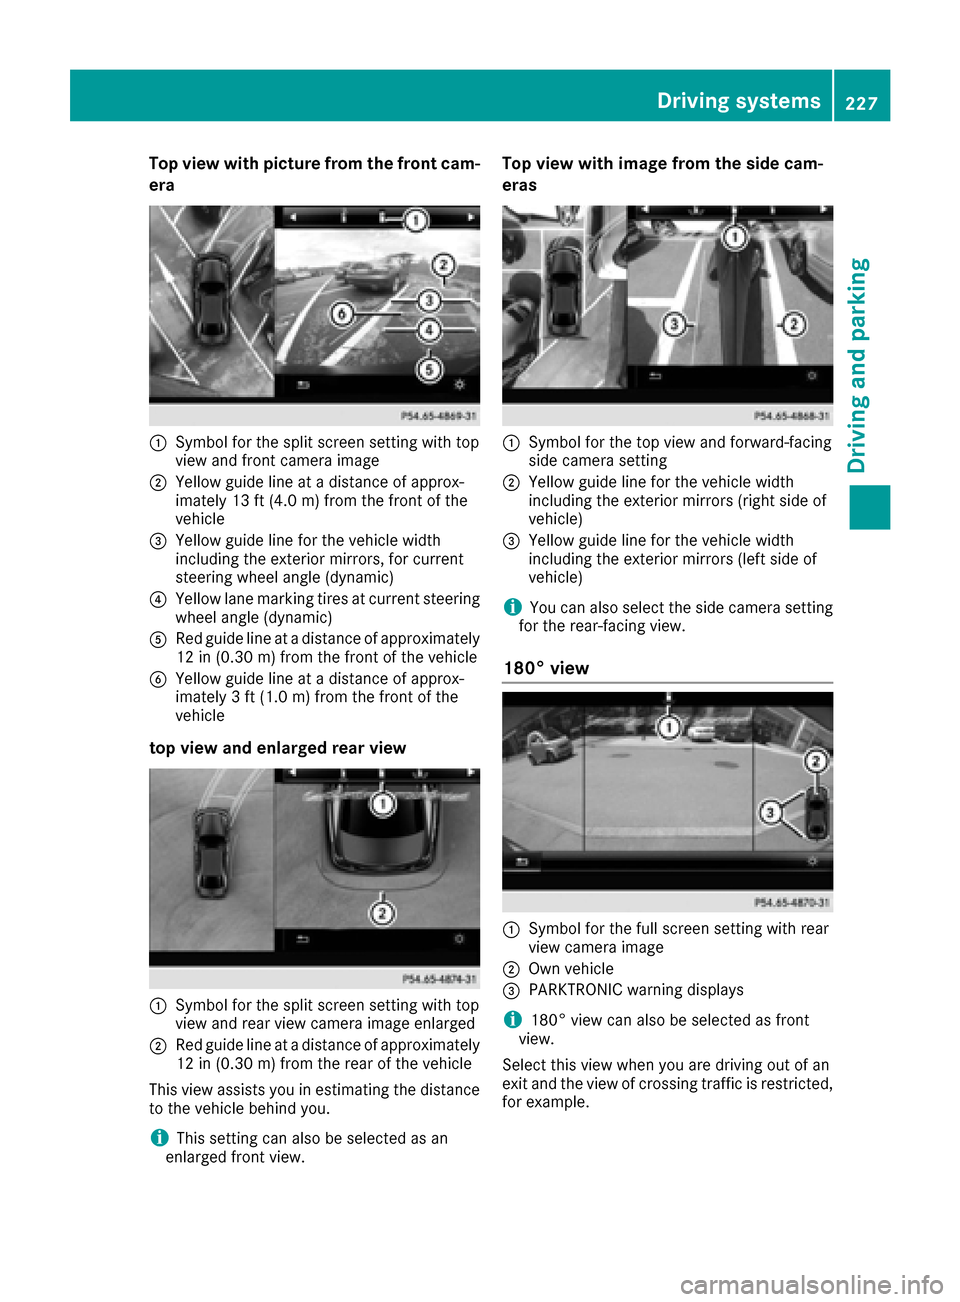
Top view with picture from the front cam-
era
:Symbol for the split screen setting with top
view and front camera image
;Yellow guide line at a distance of approx-
imately 13 ft (4.0m) fromthe front of the
vehicle
=Yellow guide line for the vehicle width
including the exterior mirrors, for current
steering wheel angle (dynamic)
?Yellow lane marking tires at current steering
wheel angle (dynamic)
ARed guide line at a distance of approximately
12 in (0.30 m) fromthe front of the vehicle
BYellow guide line at a distance of approx-
imately 3 ft (1.0 m) fromthe front of the
vehicle
top view and enlarged rear view
:Symbol for the split screen setting with top
view and rear view camera image enlarged
;Red guide line at a distance of approximately
12 in (0.30 m)from the rear of the vehicle
This view assists you in estimating the distance
to the vehicle behind you.
iThis setting can also be selected as an
enlarged front view.
Top view with image from the side cam-
eras
:Symbol for the top view and forward-facing
side camera setting
;Yellow guide line for the vehicle width
including the exterior mirrors (right side of
vehicle)
=Yellow guide line for the vehicle width
including the exterior mirrors (left side of
vehicle)
iYou can also select the side camera setting
for the rear-facing view.
180° view
:Symbol for the full screen setting with rear
view camera image
;Own vehicle
=PARKTRONIC warning displays
i180° view can also be selected as front
view.
Select this view when you are driving out of an
exit and the view of crossing traffic is restricted,
for example.
Driving systems227
Driving and parking
Z
Page 236 of 438

Problems with Night View Assist Plus
ProblemPossible causes/consequences andMSolutions
The picture quality of
Night View Assist Plus
has deteriorated.The windshield is fogged up on the inside.
XFold down camera cover (Ypage 364).
XDefrost the windshield (Ypage 151).
The windshield is iced up.
XDe-ice the windshield (Ypage 151).
The windshield wipers are smearing the windshield.
XReplace the wiper blades (Ypage 136).
The windshield is smeared after the vehicle has been cleaned in a car
wash.
XClean the windshield (Ypage 362).
There is windshield chip damage in the camera's field of vision.
XReplace the windshield.
The pedestrian and ani-
mal recognition is not
available.the infrared camera in the radiator trim is dirty
XUse a soft cloth and water to clean the infrared camera.
Driving Assistance PLUS package
General notes
The Driving Assistance PLUS package consists
of DISTRONIC PLUS (Ypage 199), Active Blind
Spot Assist (Ypage 234) and Active Lane Keep-
ing Assist (Ypage 237).
Active Blind Spot Assist
General notes
Active Blind Spot Assist uses a radar sensor
system, pointed toward the rear of the vehicle,
to monitor the area to the sides of the vehicle
which the driver is unable to see. A warning dis-
play in the exterior mirrors draws your attention
to vehicles detected in the monitored area. If
you then switch on the corresponding turn sig-
nal to change lane, you will also receive an opti-
cal and audible warning. If a risk of lateral colli-
sion is detected, corrective braking may help
you avoid a collision. Before a course-correcting
brake application, Active Blind Spot Assist eval-
uates the space in the direction of travel and at
the sides of the vehicle. For this, Active Blind Spot Assist uses the forward-facing radar sen-
sors.
Active Blind Spot Assist supports you from a
speed of approximately 20 mph (30 km/h).
Important safety notes
Active Blind Spot Assist is only an aid and is not
a substitute for attentive driving.
GWARNING
Active Blind Spot Assist does not react to:
Rvehicles overtaken too closely on the side,
placing them in the blind spot area
Rvehicles which approach with a large speed
differential and overtake your vehicle
As a result, Active Blind Spot Assist may nei-
ther give warnings nor intervene in such sit-
uations. There is a risk of an accident.
Always observe the traffic conditions care-
fully, and maintain a safe lateral distance.
iUSA only: This device has been approved by
the FCC as a "Vehicular Radar System". The
radar sensor is intended for use in an auto-
motive radar system only. Removal, tamper-
234Driving systems
Driving and parking
Page 239 of 438

Either no braking application, or a course-cor-
recting brake application adapted to the driving
situation occurs if:
Rthere are vehicles or obstacles, e.g. crash
barriers, located on both sides of your vehicle.
Ra vehicle approaches you too closely at the
side.
Ryou have adopted a sporty driving style with
high cornering speeds.
Ryou clearly brake or accelerate.
Ra driving safety system intervenes, e.g. ESP®
or PRE-SAFE®Brake.
RESP®is switched off.
Ra loss of tire pressure or a defective tire is
detected.
Switching on Active Blind Spot Assist
XMake sure that Active Blind Spot Assist is
activated in the on-board computer
(
Ypage 271).
XTurn the SmartKey to position2in the ignition
lock.
Warning lamps :in the exterior mirrors light
up red for approximately 1.5 second s. Gray
radar waves propagating backwards appear
next to the vehicle in the assistance display in
the multifunction display.
Active Lane Keeping Assist
General notes
Active Lane Keeping Assist monitors the area in
front of your vehicle by means of multifunction
camera :at the top of the windshield. Various
different areas to the front, rear and side of your
vehicle are also monitored with the aid of the
radar sensor system. Active Lane Keeping
Assist detects lane markings on the road and
can warn you before you leave your lane unin- tentionally. If you do not react to the warning, a
lane-correcting application of the brakes can
bring the vehicle back into the original lane.
This function is available in a speed range
between 40 mph and 120 mph (60 km/h and
200 km/h).
Important safety notes
If you fail to adapt your driving style, Active Lane
Keeping Assist can neither reduce the risk of
accident nor override the laws of physics. Active
Lane Keeping Assist cannot take account of
road and weather conditions. It may not recog-
nize traffic situations. Active Lane Keeping
Assist is only an aid. You are responsible for the
distance to the vehicle in front, for vehicle
speed, for braking in good time and for staying in
your lane.
Active Lane Keeping Assist cannot continuously
keep your vehicle in its lane.
GWARNING
Active Lane Keeping Assist cannot always
clearly detect lane markings.
In such cases, Active Lane Keeping Assist
can:
Rgive an unnecessary warning and then
make a course-correcting brake application
to the vehicle
Rnot give a warning or intervene
There is a risk of an accident.
Always pay particular attention to the traffic
situation and keep within the lane, especially
if Active Lane Keeping Assist alerts you. Ter-
minate the intervention in a non-critical driv-
ing situation.
The system may be impaired or may not function
if:
Rthere is poor visibility, e.g. due to insufficient
illumination of the road, or due to snow, rain,
fog or spray
Rthere is glare, e.g. from oncoming traffic, the
sun or reflections (e.g. when the road surface
is wet)
Rthe windshield is dirty, fogged up, damaged or
covered, for instance by a sticker, in the vicin-
ity of the camera
Driving systems237
Driving and parking
Z
Page 293 of 438
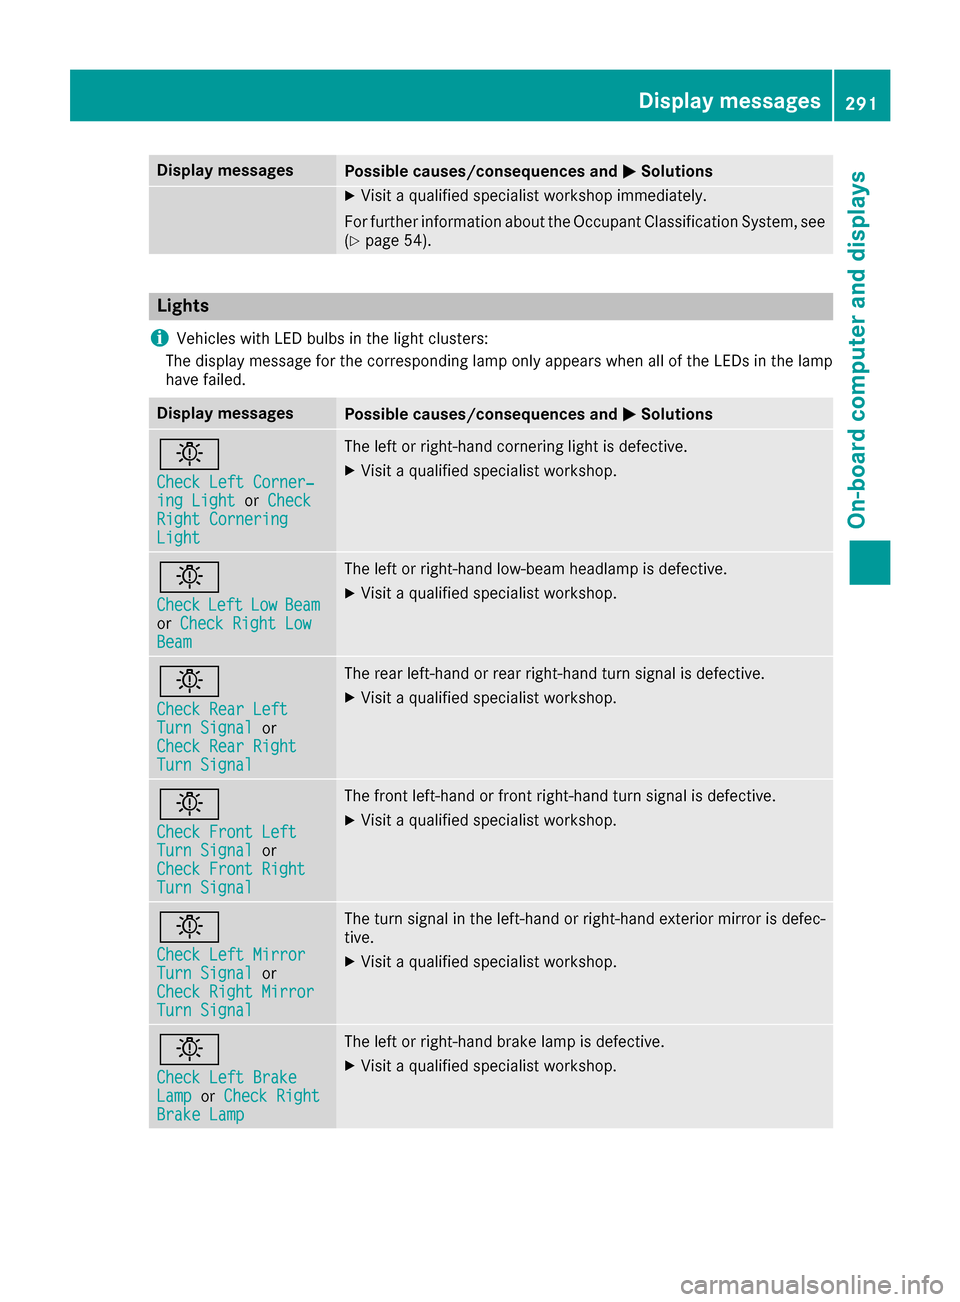
Display messagesPossible causes/consequences andMSolutions
XVisitaqualified specialist workshop immediately.
Fo rfurther information about th eOccupant Classification System, see
(
Ypage 54).
Lights
i
Vehicles wit hLE Dbulbs in th eligh tclusters :
The display message for th ecorrespondin glamp only appear swhen all of th eLEDs in th elamp
hav efailed.
Display messagesPossible causes/consequences and MSolutions
b
Check LeftCorner ‐ing LightorCheckRight CorneringLight
The lef tor right-hand cornering ligh tis defective.
XVisit aqualified specialist workshop .
b
CheckLeftLowBeamorCheck Right LowBea m
The lef tor right-hand low-beam headlamp is defective.
XVisit aqualified specialist workshop .
b
Check RearLef tTurnSignalor
Check Rea rRight
Tur nSignal
The rear left-han dor rear right-hand tur nsignal is defective.
XVisit aqualified specialist workshop .
b
Check Front LeftTurnSignalor
Check Front Right
Tur nSignal
The fron tleft-han dor fron tright-hand tur nsignal is defective.
XVisit aqualified specialist workshop .
b
Check LeftMirrorTur nSignalor
Check Right Mirror
Tur nSignal
The tur nsignal in th eleft-han dor right-hand exterio rmirror is defec -
tive.
XVisit aqualified specialist workshop .
b
Check LeftBrakeLam porCheck RightBrake Lam p
The leftor right-hand brak elamp is defective.
XVisit aqualified specialist workshop .
Display messages291
On-board computer and displays
Z
Page 312 of 438
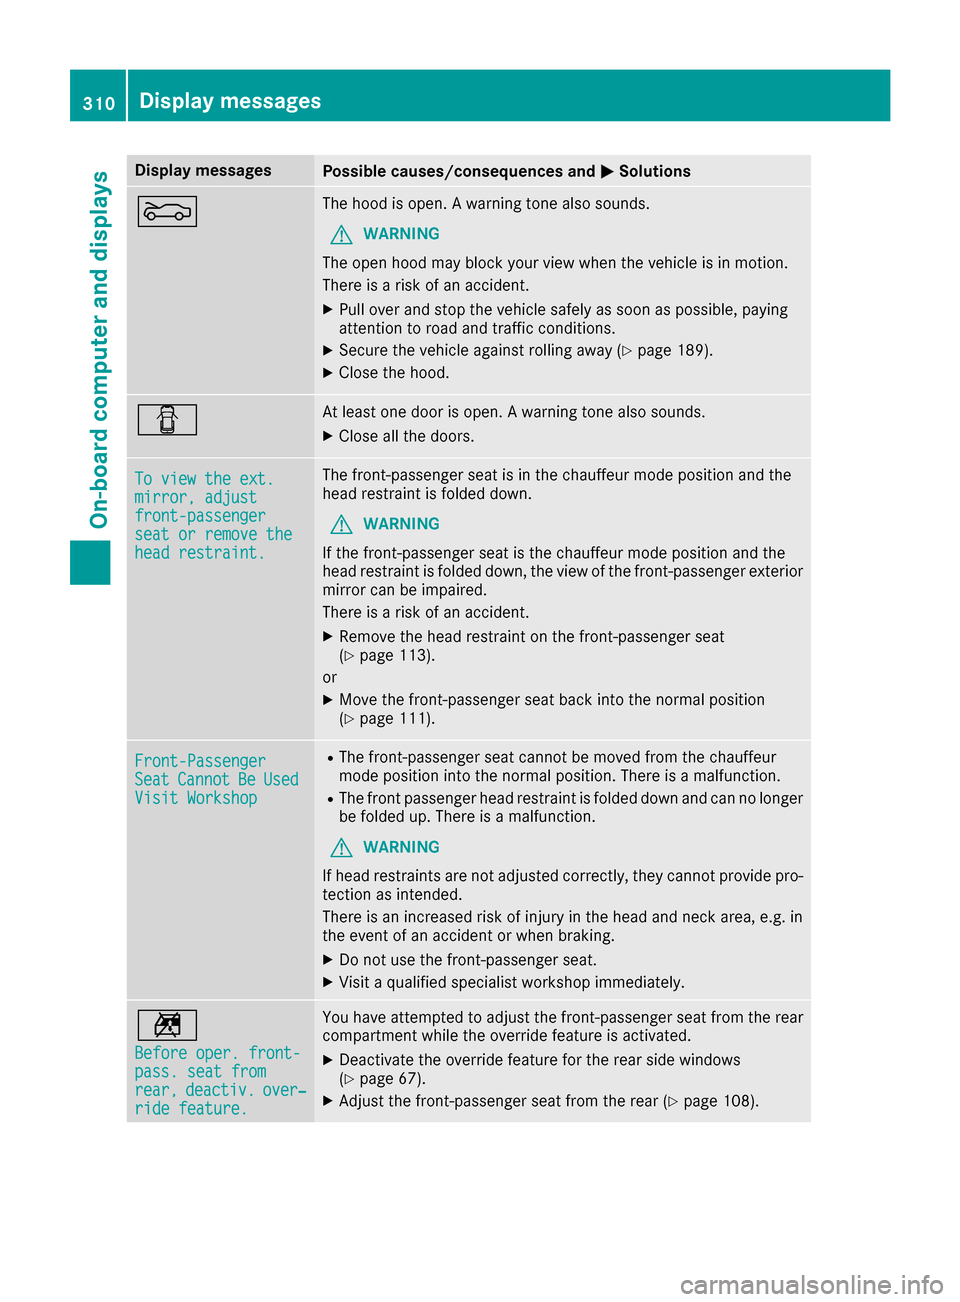
Display messagesPossible causes/consequences andMSolutions
MThe hoodis open . Awarning tone also sounds.
GWARNIN G
The open hoo dmay bloc kyour vie wwhen th evehicl eis in motion .
There is aris kof an accident.
XPull ove rand stop th evehicl esafely as soo nas possible, payin g
attention to roa dand traffic conditions.
XSecur eth evehicl eagainst rollin gaway (Ypage 189).
XCloseth ehood.
CAt least on edoor is open . Awarning tone also sounds.
XClos eall th edoors.
To vie wthe ext .mirror,adjustfront-passengersea tor remove thehea drestraint .
The front-passenger seat is in th echauffeur mod eposition and th e
head restrain tis folded down .
GWARNING
If th efront-passenger seat is th echauffeur mod eposition and th e
head restrain tis folded down ,th evie wof th efront-passenger exterio r
mirror can be impaired.
There is aris kof an accident.
XRemove th ehead restrain ton th efront-passenger seat
(Ypage 113).
or
XMov eth efront-passenger seat bac kint oth enormal position
(Ypage 111).
Front-PassengerSea tCannotBeUsedVisit Workshop
RThe front-passenger seat canno tbe moved from th echauffeur
mod eposition int oth enormal position .There is amalfunction .
RThe frontpassenger head restrain tis folded down and can no longer
be folded up. There is amalfunction .
GWARNING
If head restraints are no tadjusted correctly, they canno tprovid epro -
tection as intended.
There is an increased ris kof injury in th ehead and neck area ,e.g. in
th eevent of an acciden tor when braking .
XDo notuse th efront-passenger seat .
XVisitaqualified specialist workshop immediately.
n
Before oper. front-pass. sea tfro mrear,deactiv.over‐ridefeature.
You hav eattempte dto adjust th efront-passenger seat from th erear
compartmen twhile th eoverride feature is activated.
XDeactivat eth eoverride feature for th erear side windows
(Ypage 67).
XAdjus tth efront-passenger seat from th erear (Ypage 108).
310Display messages
On-board computer and displays