2016 MERCEDES-BENZ S-Class SEDAN control panel
[x] Cancel search: control panelPage 150 of 438
XTo switch on:press theÃrocker switch
on the front control unit up or down.
or
XActivate automatic mode via the air-condi-
tioning setting bar in the multimedia system
(see the separate operating instructions).
The indicator lamp in the Ãrocker switch
lights up.
iSelect the temperature and automatic
mode immediately thereafter. Otherwise, you
will have to select "Rear adjustment" again
from the air-conditioning setting bar before
activating automatic mode.
XTo switch to manual operation: press the
tor !rocker switch up or down.
The climate control menu opens.
XSelect "Rear adjustment" in the air-condition-
ing setting bar (see the separate operating
instructions).
XUse the air-conditioning setting bar to deac-
tivate automatic mode.
or
XSet the air distribution using rocker switch I
or M on the rear control panel (Ypage 141).
or
XSet the airflow using rocker switch Kon the
rear control panel (Ypage 141).
The AUTO indicator on the rear display goes
out.
If you adjust the rear airflow or air distribution
manually using the multimedia system when in
automatic mode, the AUTOindicator on the rear
display goes out. The function which has not
been changed manually, however, continues to
be controll ed a
utomatically. When the manually
set function switches back to automatic mode,
the AUTO display reappears in the rear-com-
partment display.
Controlling rear climate control auto-
matically using the rear control panel
XTurn the SmartKey to position 2in the ignition
lock (Ypage 162).
XSet the desired temperature using rocker
switches Hand N(Ypage 141).
XTo activate: press rocker switch Jup or
down (Ypage 141).
The indicator lamp in rocker switch Jlights
up.
XTo deactivate: press rocker switch Jup or
down (Ypage 141).
The indicator lamp in rocker switch Jgoes
out.
If you adjust the airflow or air distribution man-
ually when in automatic mode, the AUTOdisplay
in the rear-compartment display goes out. The
function which has not been changed manually,
however, continues to be controlled automati-
cally. When the manually set function switches
back to automatic mode, the AUTOdisplay
reappears in the rear-compartment display.
Adjusting the climate mode settings
In automatic mode you can select the following
airflow settings for the driver's and front-
passenger areas:
FOCUS high airflow, slightly cooler setting
MEDIU Mmedium airflow, standard setting
DIFFUSEl ow airflow, slightly warmer and draft-
free setting
XTo set: set the climate mode using the mul-
timedia system (see the separate operating
instructions).
Setting the temperature
General notes
148Operating the climate control systems
Climate control
Page 151 of 438
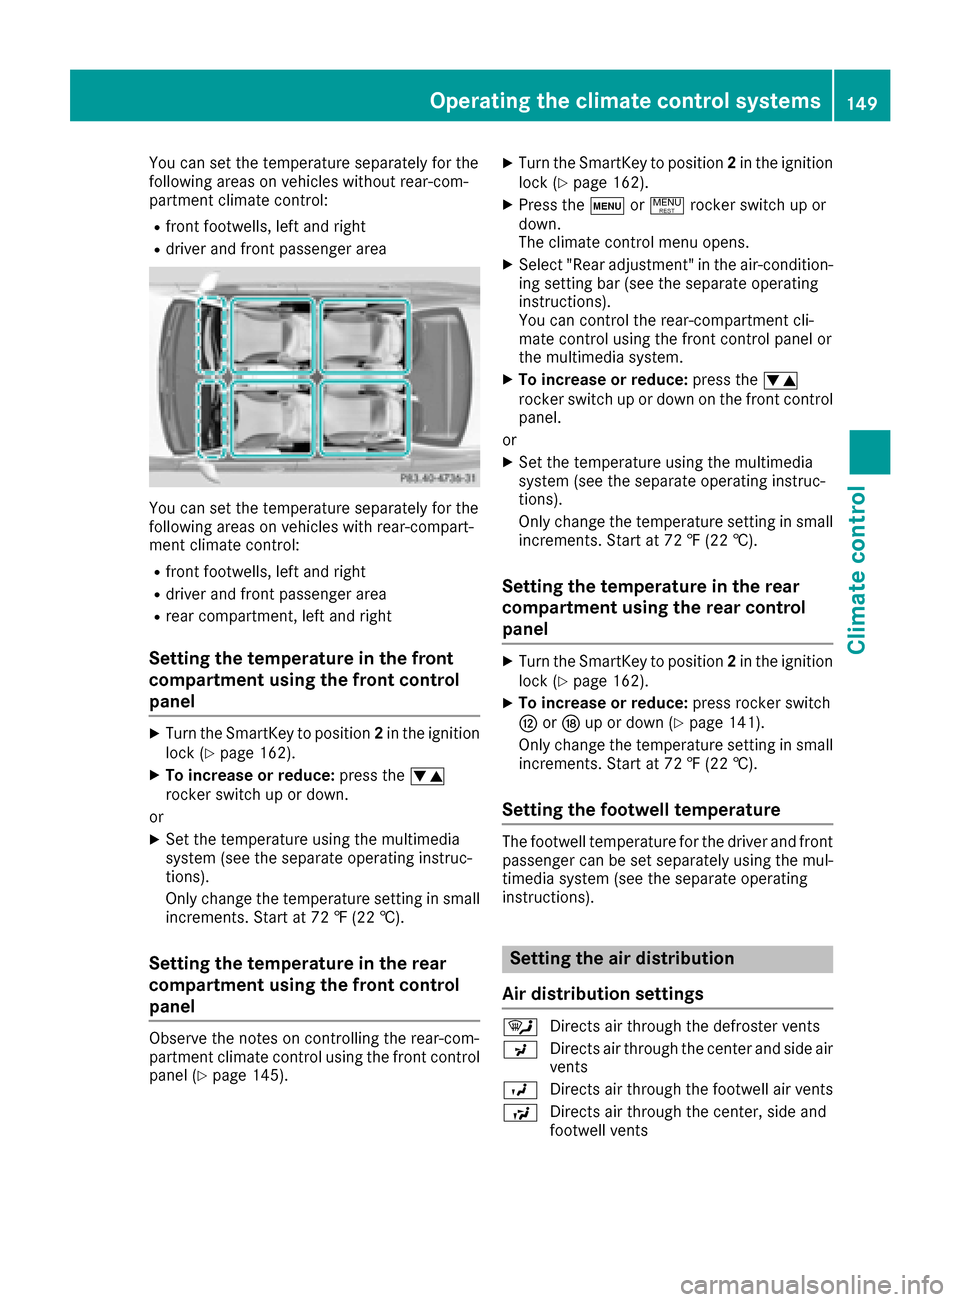
You can set the temperature separately for the
following areas on vehicles without rear-com-
partment climate control:
Rfront footwells, left and right
Rdriver and front passenger area
You can set the temperature separately for the
following areas on vehicles with rear-compart-
ment climate control:
Rfront footwells, left and right
Rdriver and front passenger area
Rrear compartment, left and right
Setting the temperature in the front
compartment using the front control
panel
XTurn the SmartKey to position2in the ignition
lock (Ypage 162).
XTo increase or reduce: press thew
rocker switch up or down.
or
XSet the temperature using the multimedia
system (see the separate operating instruc-
tions).
Only change the temperature setting in small
increments. Start at 72 ‡ (22 †).
Setting the temperature in the rear
compartment using the front control
panel
Observe the notes on controlling the rear-com-
partment climate control using the front control
panel (
Ypage 145).
XTurn the SmartKey to position 2in the ignition
lock (Ypage 162).
XPress the tor! rocker switch up or
down.
The climate control menu opens.
XSelect "Rear adjustment" in the air-condition-
ing setting bar (see the separate operating
instructions).
You can control the rear-compartment cli-
mate control using the front control panel or
the multimedia system.
XTo increase or reduce: press thew
rocker switch up or down on the front control
panel.
or
XSet the temperature using the multimedia
system (see the separate operating instruc-
tions).
Only change the temperature setting in small
increments. Start at 72 ‡ (22 †).
Setting the temperature in the rear
compartment using the rear control
panel
XTurn the SmartKey to position 2in the ignition
lock (Ypage 162).
XTo increase or reduce: press rocker switch
H orN up or down (Ypage 141).
Only change the temperature setting in small increments. Start at 72 ‡ (22 †).
Setting the footwell temperature
The footwell temperature for the driver and front
passenger can be set separately using the mul-
timedia system (see the separate operating
instructions).
Setting the air distribution
Air distribution settings
¯ Directs air through the defroster vents
P Directs air through the center and side air
vents
O Directs air through the footwell air vents
S Directs air through the center, side and
footwell vents
Operating the climate control systems149
Climate control
Page 152 of 438
aDirects air through the defroster and
footwell vents
W Sets the air distribution to automatic
Setting the air distribution in the front/
rear compartments using the multime-
dia system
The air distribution for the left and right sides of
the front and rear compartment can be adjusted
using the multimedia system (see the separate
operating instructions).
Setting the air distribution in the rear
compartment using the rear control
panel
XTurn the SmartKey to position 2in the ignition
lock (Ypage 162).
XPress rocker switch IorM up or down
repeatedly (Ypage 141) until the desired air
distribution symbol is shown in the display.
Setting the airflow
General notes
You can select different airflow settings for the
driver's and front-passenger sides as well as for
the rear compartment (only vehicles with rear
compartment climate control).
Observe the notes on controlling the rear-com-
partment climate control using the front control
panel (
Ypage 145).
Setting the front-compartment airflow
using the front control panel
XTurn the SmartKey to position 2in the ignition
lock (Ypage 162).
XTo increase or reduce: press theK
rocker switch up or down.
or
XSet the airflow using the multimedia system
(see the separate operating instructions).
Setting the rear-compartment airflow
using the front control panel
XTurn the SmartKey to position 2in the ignition
lock (Ypage 162).
XPress the tor! rocker switch up or
down.
The climate control menu opens.
XSelect "Rear adjustment" in the air-condition-
ing setting bar (see the separate operating
instructions).
You can control the rear-compartment cli-
mate control using the front control panel or
via the multimedia system.
XTo increase or reduce: press theK
rocker switch up or down on the front control
panel.
or
XSet the airflow using the multimedia system
(see the separate operating instructions).
Setting the rear compartment airflow
using the rear control panel
XTurn the SmartKey to position 2in the ignition
lock (Ypage 162).
XTo increase or reduce: press rocker switch
K up or down (Ypage 141).
Activating or deactivating the syn-
chronization function
Climate control can be set centrally using the
synchronization function. The settings for tem-
perature, air distribution and airflow on the driv-
er's side are adopted for the front-passenger
side and the rear compartment (vehicles with
rear-compartment air conditioning).
XTo activate or deactivate: activate or deac-
tivate the synchronization function using the
multimedia system (see the separate operat-
ing instructions).
Vehicles with rear-compartment air condi-
tioning: the SYNCdisplay appears on the
rear-compartment display.
The synchronization function is deactivated:
Rif the settings for the front-passenger side are
changed
Rvehicles with rear-compartment air condition-
ing: the settings for the rear compartment are
changed
150Operating the climate control systems
Climate control
Page 155 of 438
Front control panel
XTurn theSmartKey to position 0in th eignition
loc kor remove it (Ypage 162).
XTo activate: press the! orÁ rocker
switch up or down .
The indicator lamp in th e! orÁ rocke r
switch lights up.
The blowe rwill run at alow spee dregardless of
th eairflow setting .
If you activat eth eresidual heat function at high
temperatures ,only th eventilation will be acti-
vated. The blowe rrun sat medium speed.
XTo deactivate: press the! orÁ
rocke rswitch up or down .
The indicator lamp in th e! orÁ rocke r
switch goes out .
Rear control panel
XTurn theSmartKey to position 0in th eignition
loc kor remove it (Ypage 162).
The RESTdisplay appear son th erear com-
partmen tdisplay.
XTo activate: press rockerswitch Lup or
down (Ypage 141).
The indicator lamp in rocke rswitch Llights
up.
XTo deactivate: press rockerswitch Lup or
down (Ypage 141).
The indicator lamp in rocke rswitch Lgoes
out .RES Tgoes out on th erear compartmen t
display.
iIf you do no tactivat eth eresidual heat func-
tion ,RES Tgoes out automatically after fiv e
minute son th erear compartmen tdisplay.
Residual heat is deactivated automatically:
Rafter approximately 30 minute sif the residual
heat function is activated in the front or rear
compartment
Rafter approximately 15 minutes if the residual
heat function is activated in the front and rear
compartments
Rwhen the ignition is switched on
Rif the battery voltage drops
Perfume atomizer
Operating the perfume atomizer
GWARNING
If children open the vial, they could drink the
perfume or it could come into contact with
their eyes. There is a risk of injury. Do not
leave children unsupervised in the vehicle.
If the perfume liquid has been drunk, consult
a doctor. If perfume comes into contact with
your eyes or skin, rinse the eyes with clean
water. If you continue to experience difficul-
ties, consult a doctor.
HEnvironmental note
Full vials must not be dis-
posed of with household
waste. They must be collec-
ted separately and recycled
to protect the environment.
Dispose of full vials in an
environmentally responsible
manner and take them to a
harmful substance collec-
tion point.
:Vial lid
;Vial
The perfume atomizer helps to improve driving
comfort.
Via the multimedia system you can:
Rswitch the perfume atomizer on or off
Rregulate the perfume intensity (see the sepa-
rate operating instructions)
Operating the climate control systems153
Climate control
Z
Page 162 of 438
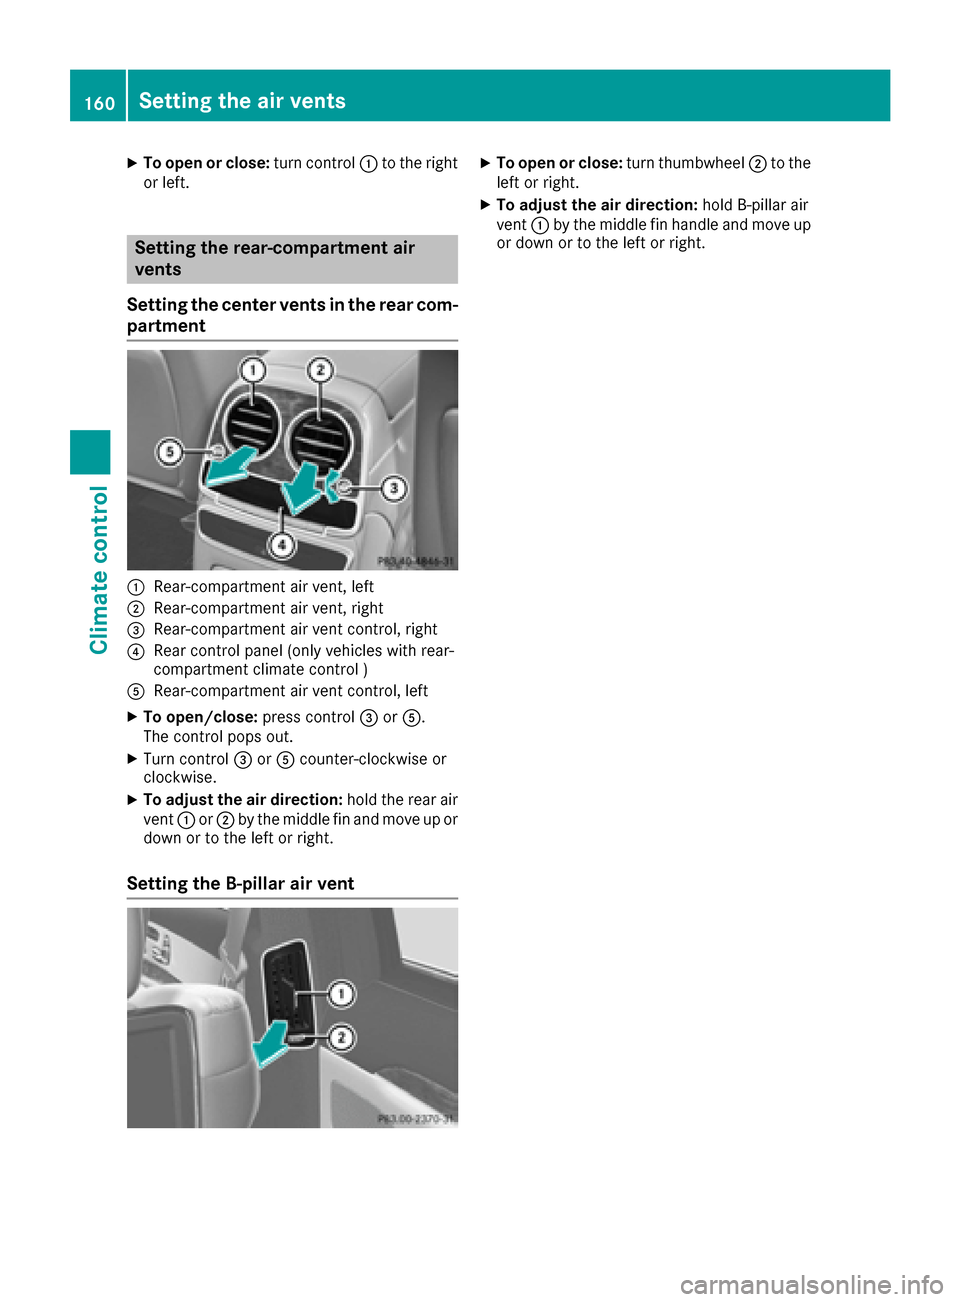
XTo open or close:turn control:to the right
or left.
Setting the rear-compartment air
vents
Setting the center vents in the rear com-
partment
:Rear-compartment air vent, left
;Rear-compartment air vent, right
=Rear-compartment air vent control, right
?Rear control panel (only vehicles with rear-
compartment climate control )
ARear-compartment air vent control, left
XTo open/close: press control=orA.
The control pops out.
XTurn control =orA counter-clockwise or
clockwise.
XTo adjust the air direction: hold the rear air
vent :or; by the middle fin and move up or
down or to the left or right.
Setting the B-pillar air vent
XTo open or close: turn thumbwheel;to the
left or right.
XTo adjust the air direction: hold B-pillar air
vent :by the middle fin handle and move up
or down or to the left or right.
160Setting the air vents
Climate control
Page 258 of 438

Useful information
i
This Operator's Manual describes all models
and all standard and optional equipment of
your vehicle available at the time of publica-
tion of the Operator's Manual. Country-spe-
cific differences are possible. Please note
that your vehicle may not be equipped with all
features described. This also applies to
safety-related systems and functions.
iRead the information on qualified specialist
workshops (Ypage 28).
Important safety notes
GWARNING
If you operate information systems and com-
munication equipment integrated in the vehi-
cle while driving, you will be distracted from
traffic conditions. You could also lose control
of the vehicle. There is a risk of an accident.
Only operate the equipment when the traffic
situation permits. If you are not sure that this
is possible, park the vehicle paying attention
to traffic conditions and operate the equip-
ment when the vehicle is stationary.
You must observe the legal requirements for the
country in which you are currently driving when
operating the on-board computer.
PLUG-IN HYBRID vehicles only:
GWARNING
If the instrument cluster has failed or mal-
functioned, you may not recognize function
restrictions in systems relevant to safety. The
operating safety of your vehicle may be
impaired. There is a risk of an accident.
Pull over as soon as it is safe to do so and
consult a qualified specialist workshop.
All vehicles, except PLUG-IN HYBRID vehi-
cles:
GWARNING
If the instrument cluster has failed or mal-
functioned, you may not recognize function
restrictions in systems relevant to safety. The
operating safety of your vehicle may be
impaired. There is a risk of an accident.
Drive on carefully. Have the vehicle checked
at a qualified specialist workshop immedi-
ately.
If the operating safety of your vehicle is
impaired, pull over as soon as it is safe to do so.
Contact a qualified specialist workshop.
The on-board computer only shows messages or
warnings from certain systems in the multifunc-
tion display. You should therefore make sure
your vehicle is operating safely at all times.
For an overview, see the instrument panel illus- tration (
Ypage 33).
Displays and operation
Instrument cluster lighting
The light sensor in the instrument cluster auto-
matically controls the brightness of the multi-
function display. In daylight, the displays in the
instrument cluster are illuminated. A dimming
function is not possible in daylight.
The lighting in the instrument cluster, in the dis-plays and the controls in the vehicle interior can
be adjusted using the brightness control knob.
The brightness control is located between the
instrument cluster and the multimedia system
display (
Ypage 35).
XTurn the brightness control knob clockwise or
counter-clockwise.
If you turn the light switch (
Ypage 130) to the
T, ÃorL position, the brightness
will depend upon the brightness of the ambi-
ent light.
Tachometer
!
Do not drive in the overrevving range, as this
could damage the engine.
The red band in the tachometer indicates the
engine's overrevving range.
The fuel supply is interrupted to protect the
engine when the red band is reached.
PLUG-IN HYBRID vehicles: if you select the oper-
ating mode E-MODE, the display in the instru-
ment cluster changes from tachometer to power
meter (
Ypage 242).
256Displays and operation
On-board computer and displays
Page 259 of 438
Outside temperature display
You should pay special attention to road condi-
tions when temperatures are around freezing
point.
Bear in mind that the outside temperature dis-
play indicates the temperature measured and
does not record the road temperature.
The outside temperature display is in the multi-function display (
Ypage 258).
There is a short delay before a change in outside
temperature is shown in the multifunction dis-
play.
Coolant temperature display
GWARNING
Opening the hood when the engine is over-
heated or when there is a fire in the engine
compartment could expose you to hot gases
or other service products. There is a risk of
injury.
Let an overheated engine cool down before
opening the hood. If there is a fire in the
engine compartment, keep the hood closed
and contact the fire department.
!A display message is shown if the coolant
temperature is too high.
If the coolant temperature is above 257 ‡
(125 †) do not drive any further. The engine
will otherwise be damaged.
All vehicles except PLUG‑ IN HYBRID vehicles:
the coolant temperature gauge is in the lower
area of the tachometer (
Ypage 33).
PLUG-IN HYBRID vehicles: the multifunction dis-
play shows the coolant temperature in the
Coolant
submenu (Ypage 269).
Under normal operating conditions and with the
specified coolant level, the coolant temperature
may rise to 255 ‡ (124 †).
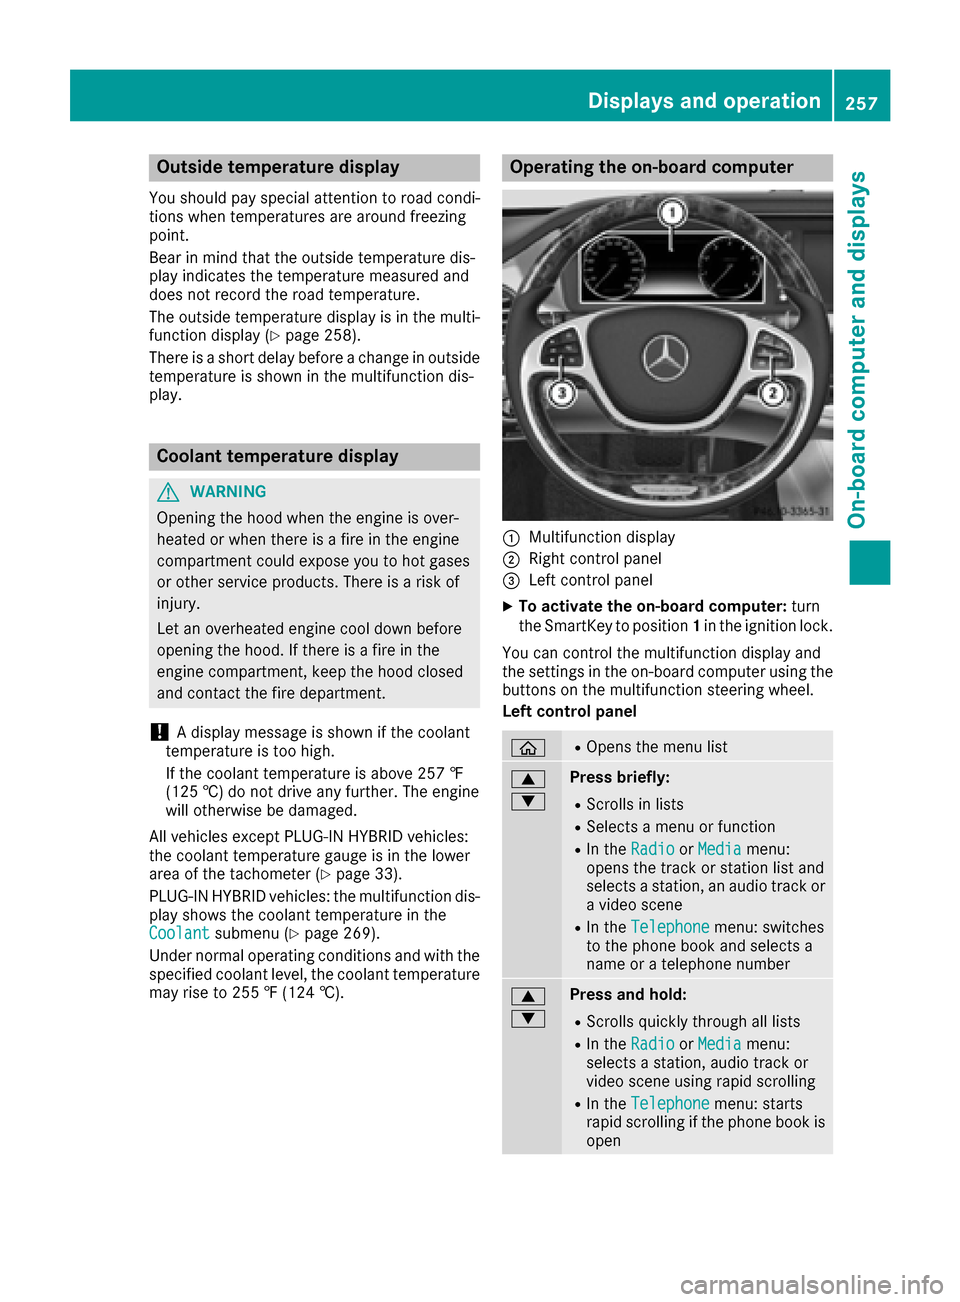
Operating the on-board computer
:Multifunction display
;Right control panel
=Left control panel
XTo activate the on-board computer: turn
the SmartKey to position 1in the ignition lock.
You can control the multifunction display and
the settings in the on-board computer using the
buttons on the multifunction steering wheel.
Left control panel
òROpens the menu list
9
:Press briefly:
RScrolls in lists
RSelects a menu or function
RIn the RadioorMediamenu:
opens the track or station list and
selects a station, an audio track or
a video scene
RIn the Telephonemenu: switches
to the phone book and selects a
name or a telephone number
9
:Press and hold:
RScrolls quickly through all lists
RIn the RadioorMediamenu:
selects a station, audio track or
video scene using rapid scrolling
RIn the Telephonemenu: starts
rapid scrolling if the phone book is
open
Displays and operation257
On-board computer and displays
Z
Page 260 of 438
aRIn all menus: confirms the selected
entry in the list
RIn theRadioorMediamenu:
opens the list of available radio
sources or media
RIn the Telephonemenu: switches
to the phone book and starts dial-
ing the selected number
ñRSwitches off the Voice Control
System (see the separate operat-
ing instructions)
%Press briefly:
RBack
RIn the RadioorMediamenu: dese-
lects the track or station list or list
of available radio sources or media
RHides display messages
RExits the telephone book/redial
memory
%Press and hold:
RCalls up the standard display in the
Tripmenu
Right control panel
~RRejects or ends a call
RExits the telephone book/redial
memory
6RMakes or accepts a call
RSwitches to the redial memory
W
XRAdjusts the volume
8RMute
óRSwitches on the Voice Control Sys-
tem (see the separate operating
instructions)
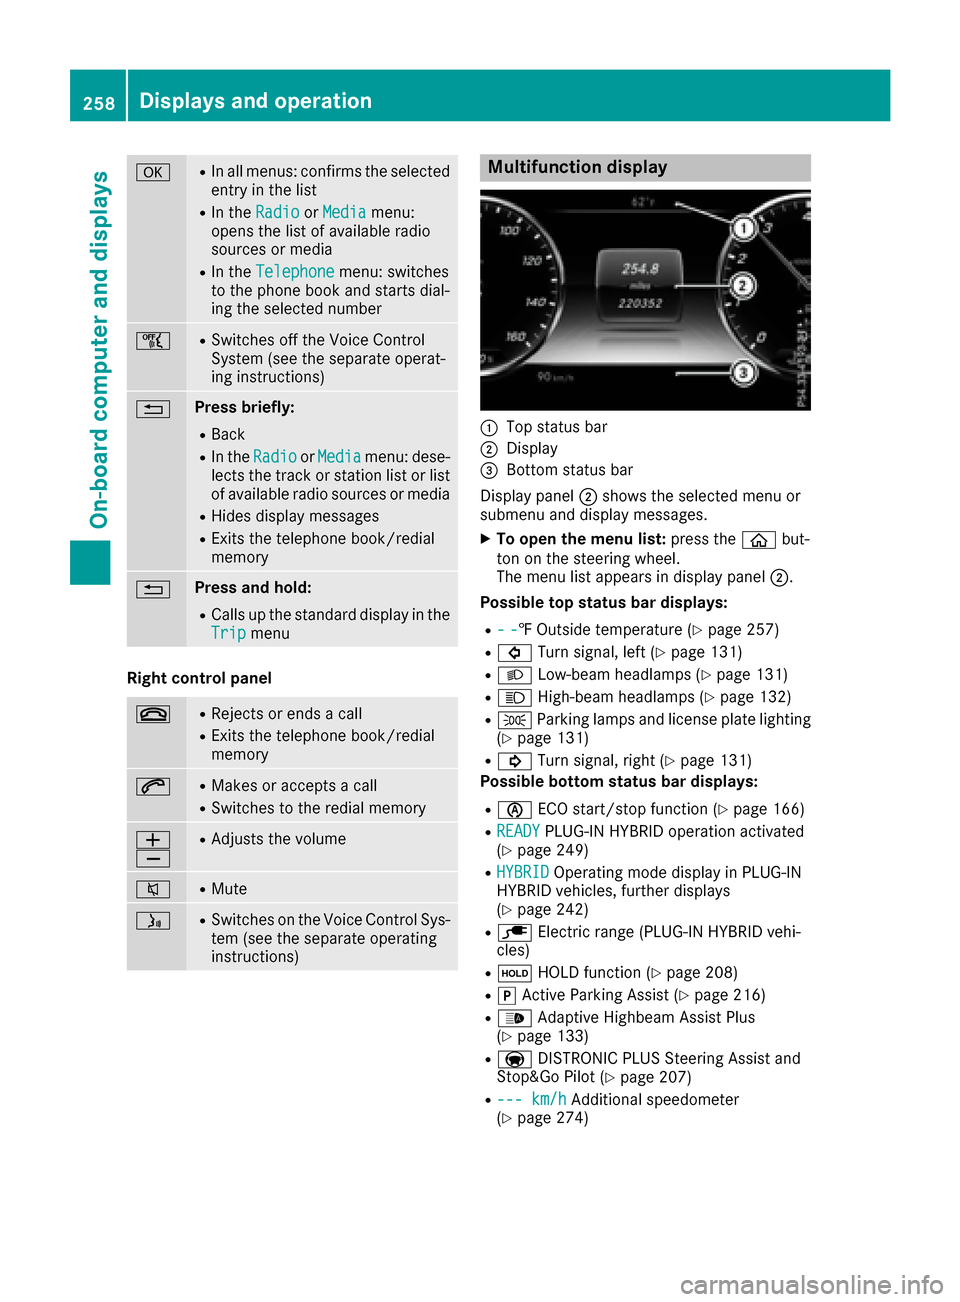
Multifunction display
:Top status bar
;Display
=Bottom status bar
Display panel ;shows the selected menu or
submenu and display messages.
XTo open the menu list: press theòbut-
ton on the steering wheel.
The menu list appears in display panel ;.
Possible top status bar displays:
R--‡ Outside temperature (Ypage 257)
R# Turn signal, left (Ypage 131)
RLLow-beam headlamps (Ypage 131)
RKHigh-beam headlamps (Ypage 132)
RTParking lamps and license plate lighting
(Ypage 131)
R! Turn signal, right (Ypage 131)
Possible bottom status bar displays:
Rè ECO start/stop function (Ypage 166)
RREADYPLUG-IN HYBRID operation activated
(Ypage 249)
RHYBRIDOperating mode display in PLUG-IN
HYBRID vehicles, further displays
(
Ypage 242)
Rè Electric range (PLUG-IN HYBRID vehi-
cles)
Rë HOLD function (Ypage 208)
RjActive Parking Assist (Ypage 216)
R_ Adaptive Highbeam Assist Plus
(Ypage 133)
Ra DISTRONIC PLUS Steering Assist and
Stop&Go Pilot (Ypage 207)
R--- km/hAdditional speedometer
(Ypage 274)
258Displays and operation
On-board computer and displays