2016 MERCEDES-BENZ S-Class SEDAN control panel
[x] Cancel search: control panelPage 45 of 438
Deactivate the hybrid system manually if:
Rthe6 restraint system warning lamp in the
instrument cluster lights up after an accident
Rthe vehicle is badly damaged, e.g. after an
accident, and the restraint system compo-
nents were not activated
Rthe vehicle is badly damaged and has to be
towed or transported
XIf possible, move the vehicle out of the
danger zone: shift the automatic transmis-
sion into position N.
XRelease the electric parking brake.
XRoll the vehicle to a safe place and park it
safely.
Get assistance from others if necessary.
iThe vehicle is locked automatically when
the ignition is switched on and the wheels are
turning. There is therefore a risk of being
locked out if the vehicle is being pushed or
tested on a dynamometer.
XSwitch the ignition off.
XShift the automatic transmission to park posi-
tion P(Ypage 170).
Depress the electric parking brake
(
Ypage 190).
Secure the vehicle against rolling away
(
Ypage 406).
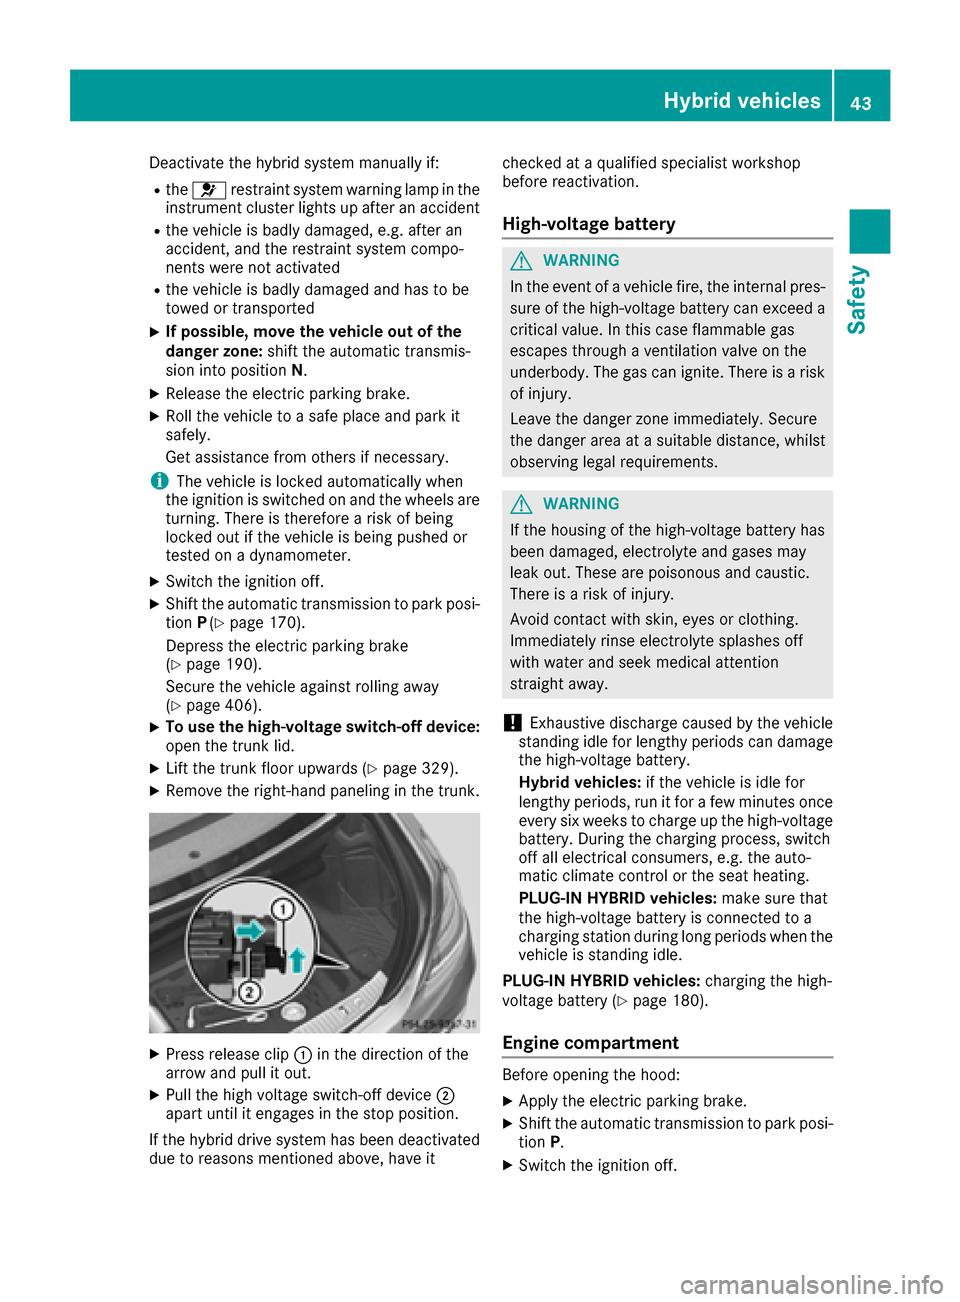
XTo use the high-voltage switch-off device:
open the trunk lid.
XLift the trunk floor upwards (Ypage 329).
XRemove the right-hand paneling in the trunk.
XPress release clip :in the direction of the
arrow and pull it out.
XPull the high voltage switch-off device ;
apart until it engages in the stop position.
If the hybrid drive system has been deactivated
due to reasons mentioned above, have it checked at a qualified specialist workshop
before reactivation.
High-voltage battery
GWARNING
In the event of a vehicle fire, the internal pres- sure of the high-voltage battery can exceed a
critical value. In this case flammable gas
escapes through a ventilation valve on the
underbody. The gas can ignite. There is a risk
of injury.
Leave the danger zone immediately. Secure
the danger area at a suitable distance, whilst
observing legal requirements.
GWARNING
If the housing of the high-voltage battery has
been damaged, electrolyte and gases may
leak out. These are poisonous and caustic.
There is a risk of injury.
Avoid contact with skin, eyes or clothing.
Immediately rinse electrolyte splashes off
with water and seek medical attention
straight away.
!Exhaustive discharge caused by the vehicle
standing idle for lengthy periods can damage
the high-voltage battery.
Hybrid vehicles: if the vehicle is idle for
lengthy periods, run it for a few minutes once every six weeks to charge up the high-voltage
battery. During the charging process, switch
off all electrical consumers, e.g. the auto-
matic climate control or the seat heating.
PLUG-IN HYBRID vehicles: make sure that
the high-voltage battery is connected to a
charging station during long periods when the
vehicle is standing idle.
PLUG-IN HYBRID vehicles: charging the high-
voltage battery (
Ypage 180).
Engine compartment
Before opening the hood:
XApply the electric parking brake.
XShift the automatic transmission to park posi-
tion P.
XSwitch the ignition off.
Hybrid vehicles43
Safety
Z
Page 53 of 438

To avoid hazardous situations, always make
sure that all of the vehicle's occupants:
Rhave fastened their seat belts correctly,
including pregnant women
Rare sitting correctly and maintain the great-
est possible distance to the air bags
Rfollow the following instructions
Always make sure that there are no objects
between the air bag and the vehicle's occu-
pants.
RAdjust the seats properly before beginning
your journey. Always make sure that the seat
is in an almost upright position. The center of
the head restraint must support the head at
about eye level.
RMove the driver's and front-passenger seats
as far back as possible. The driver's seat posi-
tion must allow the vehicle to be driven safely.
ROnly hold the steering wheel on the outside.
This allows the air bag to be fully deployed.
RAlways lean against the backrest while driv-
ing. Do not lean forwards or lean against the
door or side window. You may otherwise be in
the deployment area of the air bags.
RAlways keep your feet in the footwell in front
of the seat. Do not put your feet on the dash-
board, for example. Your feet may otherwise
be in the deployment area of the air bag.
RFor this reason, always secure persons less
than 5 ft (1.50 m) tall in suitable restraint sys-
tems. Up to this height, the seat belt cannot
be worn correctly.
If a child is traveling in your vehicle, also
observe the following notes:
RAlways secure children under twelve years of
age and less than 5 ft (1.50 m)tall in suitable
child restraint systems.
RChild restraint systems should be installed on
the rear seats.
ROnly secure a child in a rearward-facing child
restraint system on the front-passenger seat
when the front-passenger front air bag is
deactivated. If the PASSENGER AIR BAG OFF
indicator lamp is permanently lit, the fro nt-
p
assenger front air bag is deactivated
(
Ypage 46).
RAlways observe the instructions and safety
notes on the "Occupant Classification System
(OCS)" (
Ypage 53) and on "Children in the vehicle" (
Ypage 61
)in addition to the child
restraint system manufacturer's installation
and operating instructions.
Objects in the vehicle interior may prevent
an air bag from functioning correctly. Before
starting your journey and to avoid risks resulting from the speed of the air bag as it deploys, make
sure that:
Rthere are no people, animals or objects
between the vehicle occupants and an air
bag.
Rthere are no objects between the seat, door
and B-pillar.
Rno hard objects, e.g. coat hangers, hang on
the grab handles or coat hooks.
Rno accessories, such as cup holders, are
attached to the vehicle within the deployment
area of an air bag, e.g. to doors, side windows,
rear side trim or side walls.
Rno heavy, sharp-edged or fragile objects are in
the pockets of your clothing. Store such
objects in a suitable place.
GWARNING
If you modify the air bag cover or affix objects
such as stickers to it, the air bag can no longer
function correctly. There is an increased risk
of injury.
Never modify an air bag cover or affix objects
to it.
GWARNING
Sensors to control the air bags are located in
the doors. Modifications or work not per-
formed correctly to the doors or door panel-
ing, as well as damaged doors, can lead to the
function of the sensors being impaired. The air
bags might therefore not function properly
anymore. Consequently, the air bags cannot
protect vehicle occupants as they are
designed to do. There is an increased risk of
injury.
Never modify the doors or parts of the doors.
Always have work on the doors or door pan-
eling carried out at a qualified specialist work-
shop.
Occupant safety51
Safety
Z
Page 95 of 438
Opening and closing
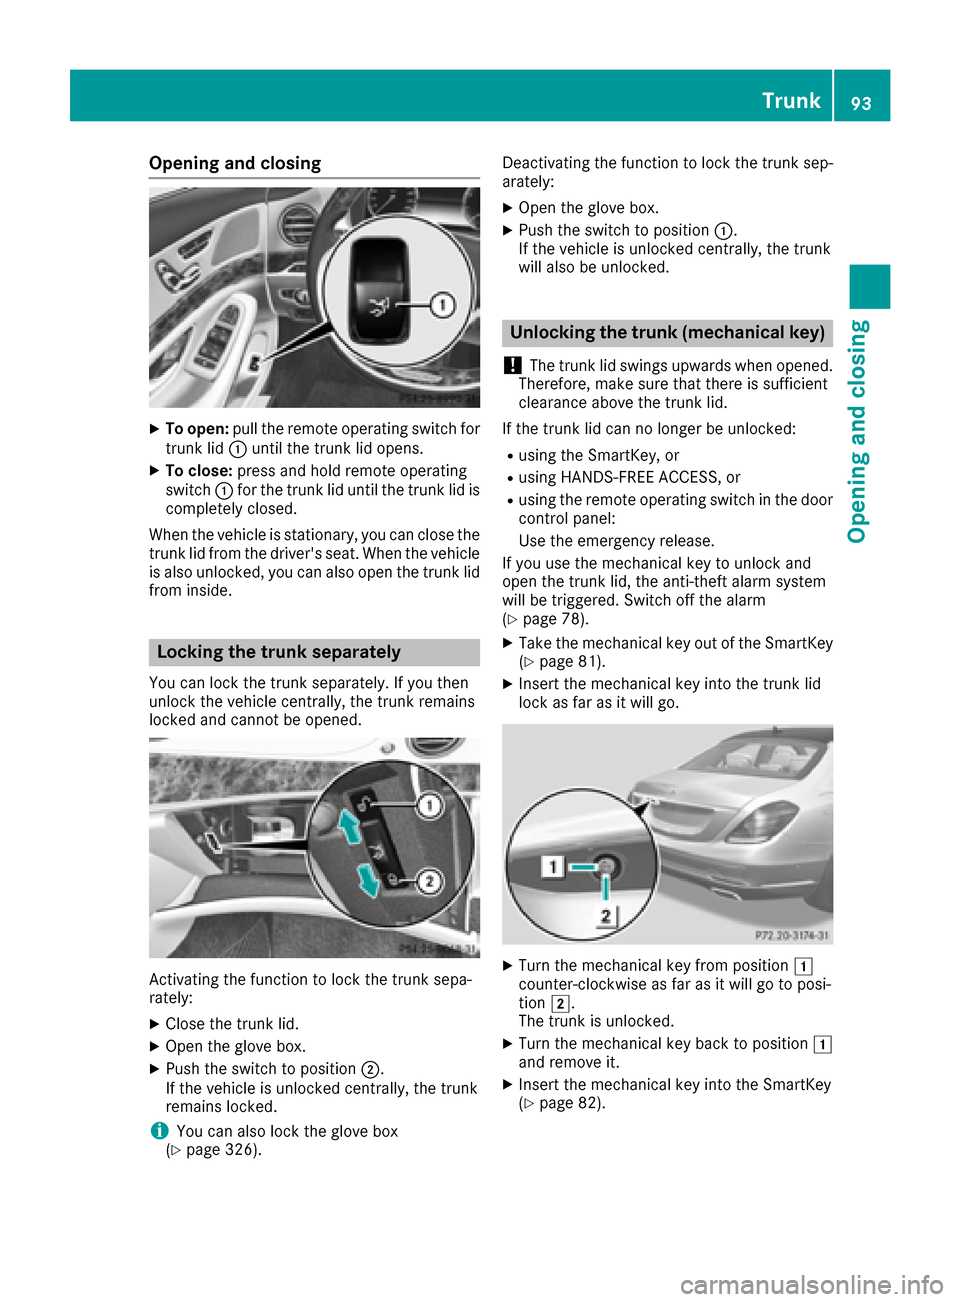
XTo open:pull the remote operating switch for
trunk lid :until the trunk lid opens.
XTo close: press and hold remote operating
switch :for the trunk lid until the trunk lid is
completely closed.
When the vehicle is stationary, you can close the
trunk lid from the driver's seat. When the vehicle
is also unlocked, you can also open the trunk lid
from inside.
Locking the trunk separately
You can lock the trunk separately. If you then
unlock the vehicle centrally, the trunk remains
locked and cannot be opened.
Activating the function to lock the trunk sepa-
rately:
XClose the trunk lid.
XOpen the glove box.
XPush the switch to position ;.
If the vehicle is unlocked centrally, the trunk
remains locked.
iYou can also lock the glove box
(Ypage 326). Deactivating the function to lock the trunk sep-
arately:
XOpen the glove box.
XPush the switch to position
:.
If the vehicle is unlocked centrally, the trunk
will also be unlocked.
Unlocking the trunk (mechanical key)
!
The trunk lid swings upwards when opened.
Therefore, make sure that there is sufficient
clearance above the trunk lid.
If the trunk lid can no longer be unlocked:
Rusing the SmartKey, or
Rusing HANDS-FREE ACCESS, or
Rusing the remote operating switch in the door
control panel:
Use the emergency release.
If you use the mechanical key to unlock and
open the trunk lid, the anti-theft alarm system
will be triggered. Switch off the alarm
(
Ypage 78).
XTake the mechanical key out of the SmartKey
(Ypage 81).
XInsert the mechanical key into the trunk lid
lock as far as it will go.
XTurn the mechanical key from position 1
counter-clockwise as far as it will go to posi-
tion 2.
The trunk is unlocked.
XTurn the mechanical key back to position 1
and remove it.
XInsert the mechanical key into the SmartKey
(Ypage 82).
Trunk93
Opening and closing
Z
Page 98 of 438

Convenience closing feature
Important safety notes
GWARNING
When the convenience closing feature is oper- ating, parts of the body could become trapped
in the closing area of the side window and the
sliding sunroof. There is a risk of injury.
Observe the complete closing procedure
when the convenience closing feature is oper-
ating. Make sure that no body parts are in
close proximity during the closing procedure.
When you lock the vehicle, you can simultane-
ously:
Rclose the side windows
Rclose the panorama roof with power tilt/slid-
ing panel
On vehicles with a panorama roof with power
tilt/sliding panel, you can then close the roller
sunblinds.
iNotes on the automatic reversing feature
for:
Rthe side window (Ypage 94)
Rthe panorama roof with power tilt/sliding
panel (Ypage 98)
Rthe roller sunblinds (Ypage 99)
Using the SmartKey
XPress and hold the &button until the side
windows and the panorama roof with power
tilt/sliding panel are fully closed.
XMake sure that all the side windows and the
panorama roof with power tilt/sliding panel
are closed.
XOn vehicles with a panorama roof with
power tilt/sliding panel: press and hold the
& button again until the roller sunblinds of
the panorama roof with power tilt/sliding
panel close.
XTo interrupt convenience closing: release
the & button.
Using KEYLESS-GO
The SmartKey must be outside the vehicle. All
the doors must be closed.
XTouch recessed sensor surface :on the
door handle until the side windows and the
panorama roof with power tilt/sliding panel
are fully closed.
iMake sure you only touch recessed sensor
surface :.
XMake sure that all the side windows and the
panorama roof with power tilt/sliding panel
are closed.
XVehicles with a panorama roof with
power tilt/sliding panel: touch recessed
sensor surface :on the door handle again
until the roller sunblinds of the panorama roof
with power tilt/sliding panel close.
XTo interrupt convenience closing: release
recessed sensor surface :on the door han-
dle.
Resetting the side windows
If a side window can no longer be closed fully,
you must reset it.
XClose all the doors.
XTurn the SmartKey to position 1or 2in the
ignition lock.
XPull the corresponding switch on the door
control panel until the side window is com-
pletely closed (
Ypage 95).
XHold the switch for an additional second.
If the side window opens again slightly:
XImmediately pull the corresponding switch on
the door control panel until the side window is
completely closed (
Ypage 95).
XHold the switch for an additional second.
XIf the respective side window remains closed
after the button is released, then it has been
set correctly. If this is not the case, repeat the
steps above.
96Side windows
Opening and closing
Page 102 of 438
Opening and closing the front roller sun-
blind
The front roller sunblind can only be closed
when the sliding sunroof is closed.
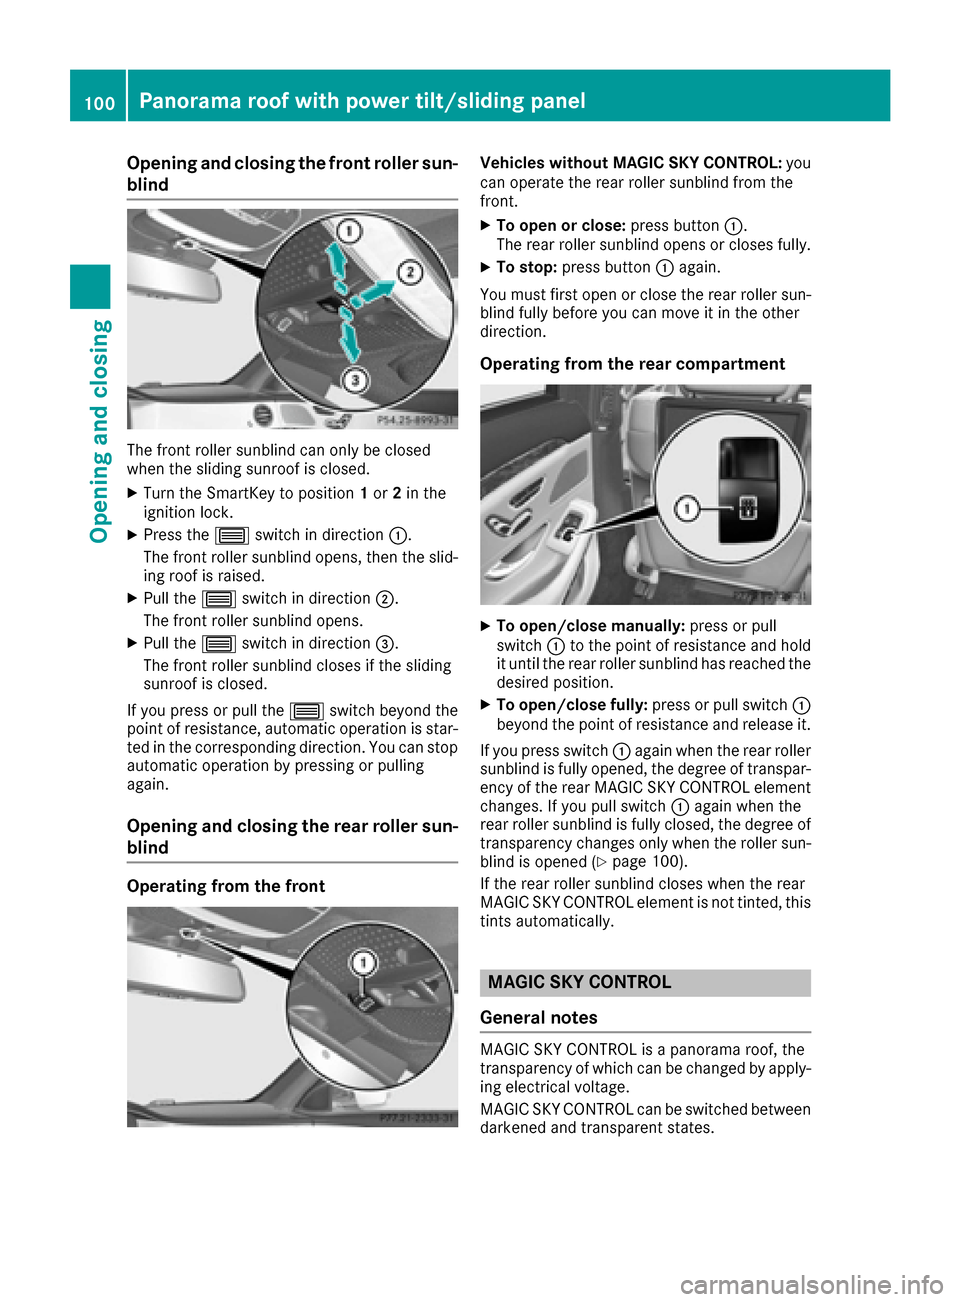
XTurn the SmartKey to position1or 2in the
ignition lock.
XPress the 3switch in direction :.
The front roller sunblind opens, then the slid-
ing roof is raised.
XPull the 3switch in direction ;.
The front roller sunblind opens.
XPull the 3switch in direction =.
The front roller sunblind closes if the sliding
sunroof is closed.
If you press or pull the 3switch beyond the
point of resistance, automatic operation is star-
ted in the corresponding direction. You can stop
automatic operation by pressing or pulling
again.
Opening and closing the rear roller sun-
blind
Operating from the front
Vehicles without MAGIC SKY CONTROL: you
can operate the rear roller sunblind from the
front.
XTo open or close: press button:.
The rear roller sunblind opens or closes fully.
XTo stop: press button :again.
You must first open or close the rear roller sun-
blind fully before you can move it in the other
direction.
Operating from the rear compartment
XTo open/close manually: press or pull
switch :to the point of resistance and hold
it until the rear roller sunblind has reached the
desired position.
XTo open/close fully: press or pull switch:
beyond the point of resistance and release it.
If you press switch :again when the rear roller
sunblind is fully opened, the degree of transpar-
ency of the rear MAGIC SKY CONTROL element
changes. If you pull switch :again when the
rear roller sunblind is fully closed, the degree of transparency changes only when the roller sun-
blind is opened (
Ypage 100).
If the rear roller sunblind closes when the rear
MAGIC SKY CONTROL element is not tinted, this
tints automatically.
MAGIC SKY CONTROL
General notes
MAGIC SKY CONTROL is a panorama roof, the
transparency of which can be changed by apply- ing electrical voltage.
MAGIC SKY CONTROL can be switched between
darkened and transparent states.
100Panorama roof with power tilt/sliding panel
Opening and closing
Page 103 of 438
MAGIC SKY CONTROL darkens automatically
after a short period when you turn the SmartKey
to position0or remove the SmartKey.
Risk of electric shock
GDANGER
MAGIC SKY CONTROL operates using high
voltage. If the headliner is damaged or
removed, electrical components will be
exposed. If you touch these components, you
could get an electric shock. There is a risk of
fatal injury.
RNever remove the headliner.
RIf the headliner is damaged, never touch the
electrical components behind it.
RAlways have work on the MAGIC SKY CON-
TROL carried out at a qualified specialist
workshop.
The high-voltage components of MAGIC SKY
CONTROL are protected behind the headliner.
These are in the hidden portion of the movable
roof element of the panorama roof with power
tilt/sliding panel and above the left rear door.
The MAGIC SKY CONTROL voltage transformer
is stamped with a high-voltage symbol, warning
you about the high voltage. The electric cables
of the high-voltage section are color orange.
Operating MAGIC SKY CONTROL from
the front
XTurn the SmartKey to position 1or 2in the
ignition lock.
MAGIC SKY CONTROL switches to the status
it was set to before the engine was switched
off.
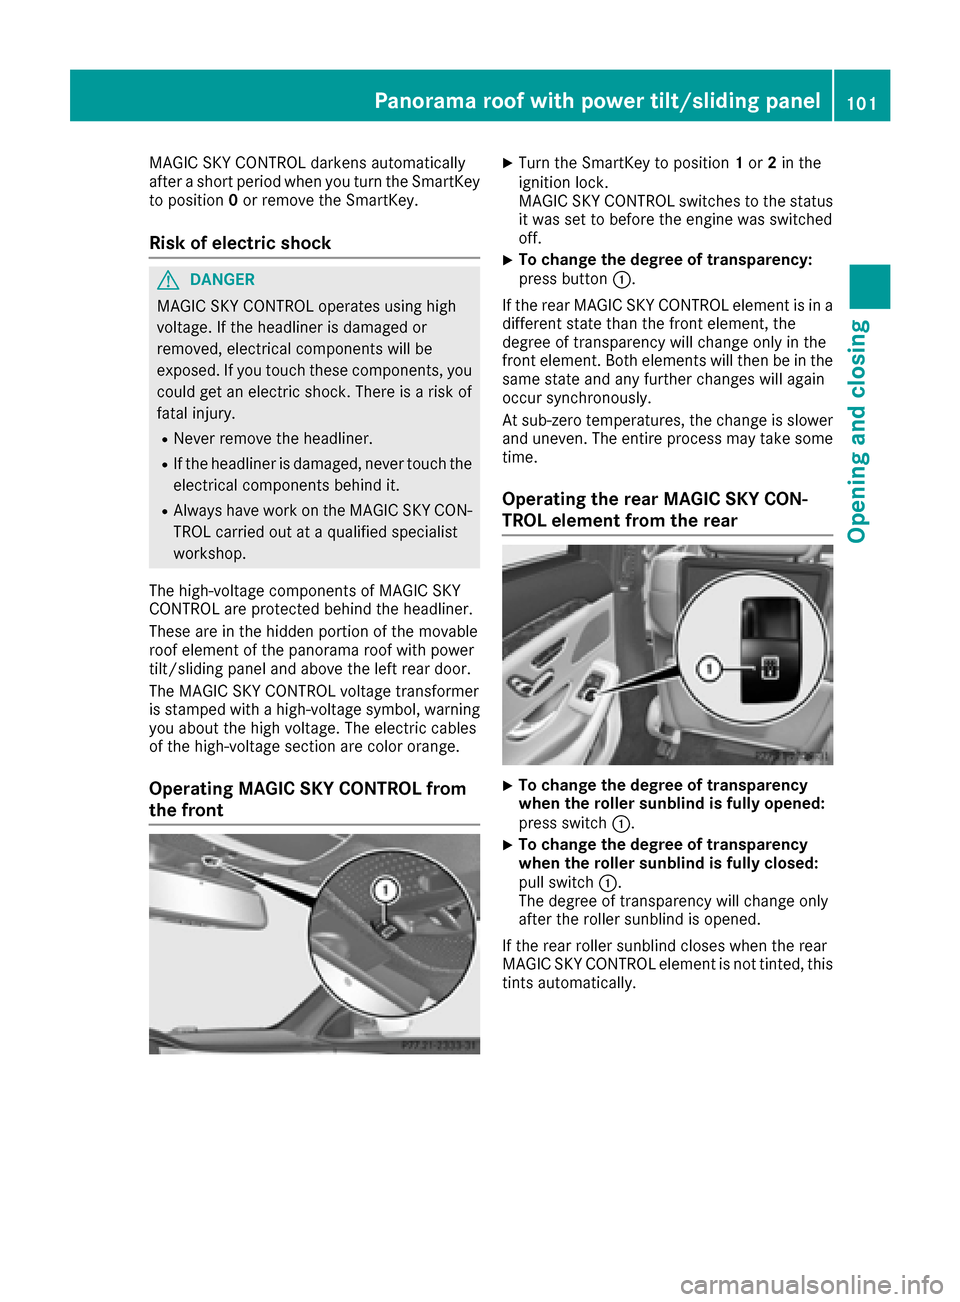
XTo change the degree of transparency:
press button :.
If the rear MAGIC SKY CONTROL element is in a
different state than the front element, the
degree of transparency will change only in the
front element. Both elements will then be in the
same state and any further changes will again
occur synchronously.
At sub-zero temperatures, the change is slower
and uneven. The entire process may take some time.
Operating the rear MAGIC SKY CON-
TROL element from the rear
XTo change the degree of transparency
when the roller sunblind is fully opened:
press switch :.
XTo change the degree of transparency
when the roller sunblind is fully closed:
pull switch:.
The degree of transparency will change only
after the roller sunblind is opened.
If the rear roller sunblind closes when the rear
MAGIC SKY CONTROL element is not tinted, this
tints automatically.
Panorama roof with power tilt/sliding panel101
Opening and closing
Z
Page 135 of 438

Adaptive Highbeam Assist Plus
Gene ral notes
Wit hAdaptive Highbea mAssis tPlus, you can
automatically switch between low-beam ,partial
high-beam and high-beam headlamps.
Partial high-beam is afor mof illumination
whereby th ehigh-beam is directe dpast other
road users. Other road user sare kept out of th e
high-beam. This prevents glare. When there is a
vehicl ein front, for example, th ehigh-beam
headlamp silluminate th eareas to it sright and
left, and th evehicl ein fron tis illuminate dby th e
low-beam headlamps.
The system automatically adapt sth elow-beam
headlamp range depending on th edistanc eto
th eother vehicle. Once th esystem no longer
detects any other vehicles, it reactivates th e
high-beam headlamps.
If th ehigh-beam or partial high-beam are caus -
ing to omuc hreflection from traffic signs, th e
lights are automatically dimmed and glar efor
th edriver caused by th ereflection sis thus avoi -
ded.
The system' soptical sensor is locate dbehind
th ewindshield near th eoverhead control panel.
Import ant safety notes
GWARNIN G
Adaptive Highbea mAssis tPlus does no trec -
ogniz eroad users:
Rwho hav eno lights ,e.g. pedestrian s
Rwho havepoor lighting ,e.g. cyclist s
Rwhoselighting is blocked, e.g. by abarrier
In ver yrar ecases, Adaptive Highbea mAssis t
Plus may no trecogniz eroad user swho do
hav elights ,or may recogniz ethem to olate. In
this or similar situations, th eautomatic high -
beam headlamp swill no tbe deactivated or
will be activated regardless .There is aris kof
an accident.
Always carefully observ eth etraffic condition s
and switch off th ehigh-beam headlamp sin
goo dtime.
Adaptive Highbea mAssis tPlus canno ttak eint o
accoun troad ,weather or traffic conditions.
Adaptive Highbea mAssis tPlus is only an aid.
You are responsibl efor adjusting th evehicle's
lighting to th eprevailing light, visibilit yand traf-
fic conditions.
In particular, th edetection of obstacles can be
restricted if there is:
Rpoor visibility, e.g. due to fog ,heav yrain or
snow
Rdir ton th esensor sor th esensor sare
obscured
Switching Adaptive Highbeam Assist
PLUS on/off
:High-beam headlamp s
;Turn signal, right
Exterior lighting133
Lights and windshield wipers
Z
Page 136 of 438
=High-beam flasher
?Turn signal, left
XTo switch on:turn the light switch to Ã.
XPress the combination switch beyond the
pressure point in the direction of arrow :.
The _ indicator lamp in the multifunction
display lights up if it is dark and the light sen-
sor activates the low-beam headlamps.
At speeds above approx. 16 mph
(25 km/h): the headlamp range is set auto-
matically depending on the distance between
the vehicle and other road users.
At speeds above approx. 19 mph
(30 km/h):
RIf no other road users are detected, the
high-beam headlamps are automatically
switched on.
RIf other road users are detected, the partial
high-beam headlamps are automatically
switched on.
The K indicator lamp in the instrument
cluster also lights up.
At speeds below approx. 16 mph
(25 km/h) or when there is sufficient
street lighting:
RThe partial high-beam headlamps are
switched off automatically.
RThe high-beam headlamps are switched off
automatically.
The K indicator lamp in the instrument
cluster goes out. The _indicator lamp in
the multifunction display remains lit.
XTo switch off: move the combination switch
back to its normal position or move the light
switch to another position.
The _ indicator lamp in the multifunction
display goes out.
Headlamps fogged up on the inside
Certain climatic and physical conditions may
cause moisture to form in the headlamp. This
moisture does not affect the functionality of the
headlamp.
Interior lighting
Overview of interior lighting
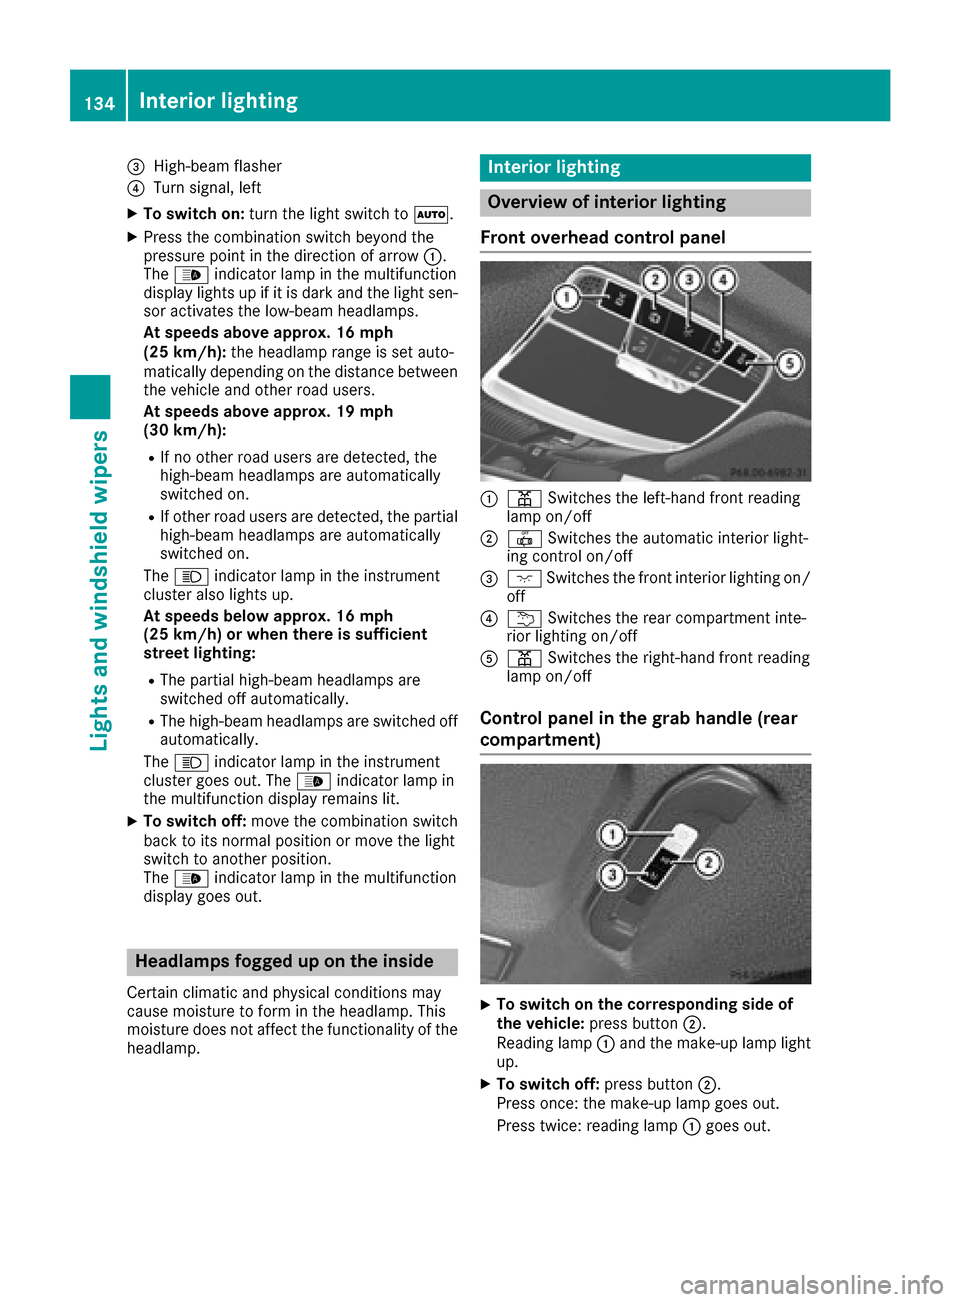
Front overhead control panel
:p Switches the left-hand front reading
lamp on/off
;| Switches the automatic interior light-
ing control on/off
=c Switches the front interior lighting on/
off
?u Switches the rear compartment inte-
rior lighting on/off
Ap Switches the right-hand front reading
lamp on/off
Control panel in the grab handle (rear
compartment)
XTo switch on the corresponding side of
the vehicle: press button ;.
Reading lamp :and the make-up lamp light
up.
XTo switch off: press button;.
Press once: the make-up lamp goes out.
Press twice: reading lamp :goes out.
134Interior lighting
Lights and windshield wipers