2016 MERCEDES-BENZ S-Class SEDAN gear
[x] Cancel search: gearPage 179 of 438
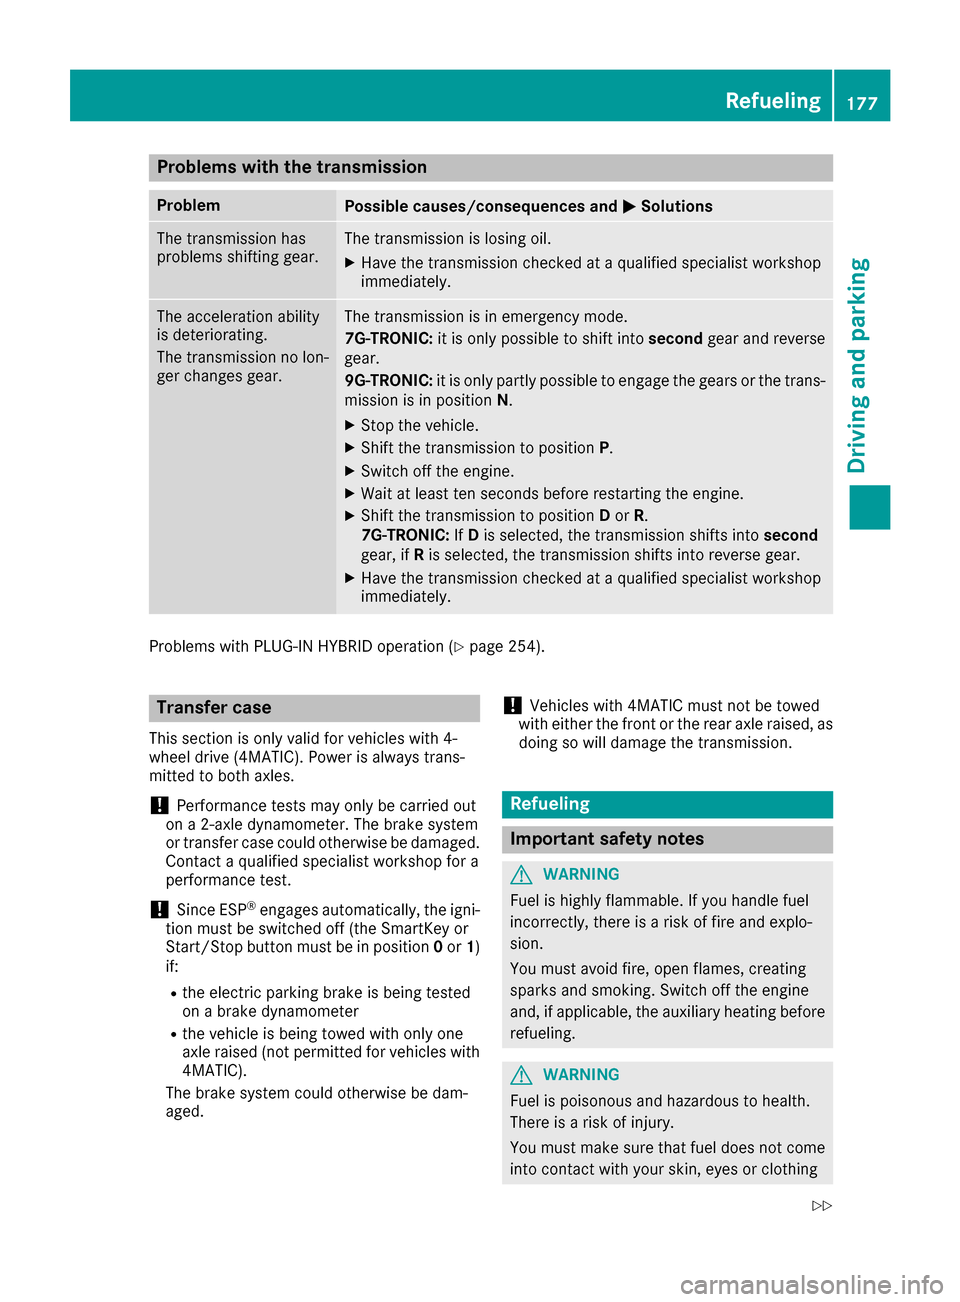
Problems with the transmission
ProblemPossible causes/consequences andMSolutions
The transmission has
problems shifting gear.The transmission is losing oil.
XHave the transmission checked at a qualified specialist workshop
immediately.
The acceleration ability
is deteriorating.
The transmission no lon-
ger changes gear.The transmission is in emergency mode.
7G-TRONIC:it is only possible to shift into secondgear and reverse
gear.
9G-TRONIC: it is only partly possible to engage the gears or the trans-
mission is in position N.
XStop the vehicle.
XShift the transmission to position P.
XSwitch off the engine.
XWait at least ten seconds before restarting the engine.
XShift the transmission to positionDor R.
7G-TRONIC: IfD is selected, the transmission shifts into second
gear, if Ris selected, the transmission shifts into reverse gear.
XHave the transmission checked at a qualified specialist workshop
immediately.
Problems with PLUG-IN HYBRID operation (Ypage 254).
Transfer case
This section is only valid for vehicles with 4-
wheel drive (4MATIC). Power is always trans-
mitted to both axles.
!Performance tests may only be carried out
on a 2-axle dynamometer. The brake system
or transfer case could otherwise be damaged. Contact a qualified specialist workshop for a
performance test.
!Since ESP®engages automatically, the igni-
tion must be switched off (the SmartKey or
Start/Stop button must be in position 0or 1)
if:
Rthe electric parking brake is being tested
on a brake dynamometer
Rthe vehicle is being towed with only one
axle raised (not permitted for vehicles with
4MATIC).
The brake system could otherwise be dam-
aged.
!Vehicles with 4MATIC must not be towed
with either the front or the rear axle raised, as doing so will damage the transmission.
Refueling
Important safety notes
GWARNING
Fuel is highly flammable. If you handle fuel
incorrectly, there is a risk of fire and explo-
sion.
You must avoid fire, open flames, creating
sparks and smoking. Switch off the engine
and, if applicable, the auxiliary heating before refueling.
GWARNING
Fuel is poisonous and hazardous to health.
There is a risk of injury.
You must make sure that fuel does not come into contact with your skin, eyes or clothing
Refueling177
Driving and parking
Z
Page 196 of 438
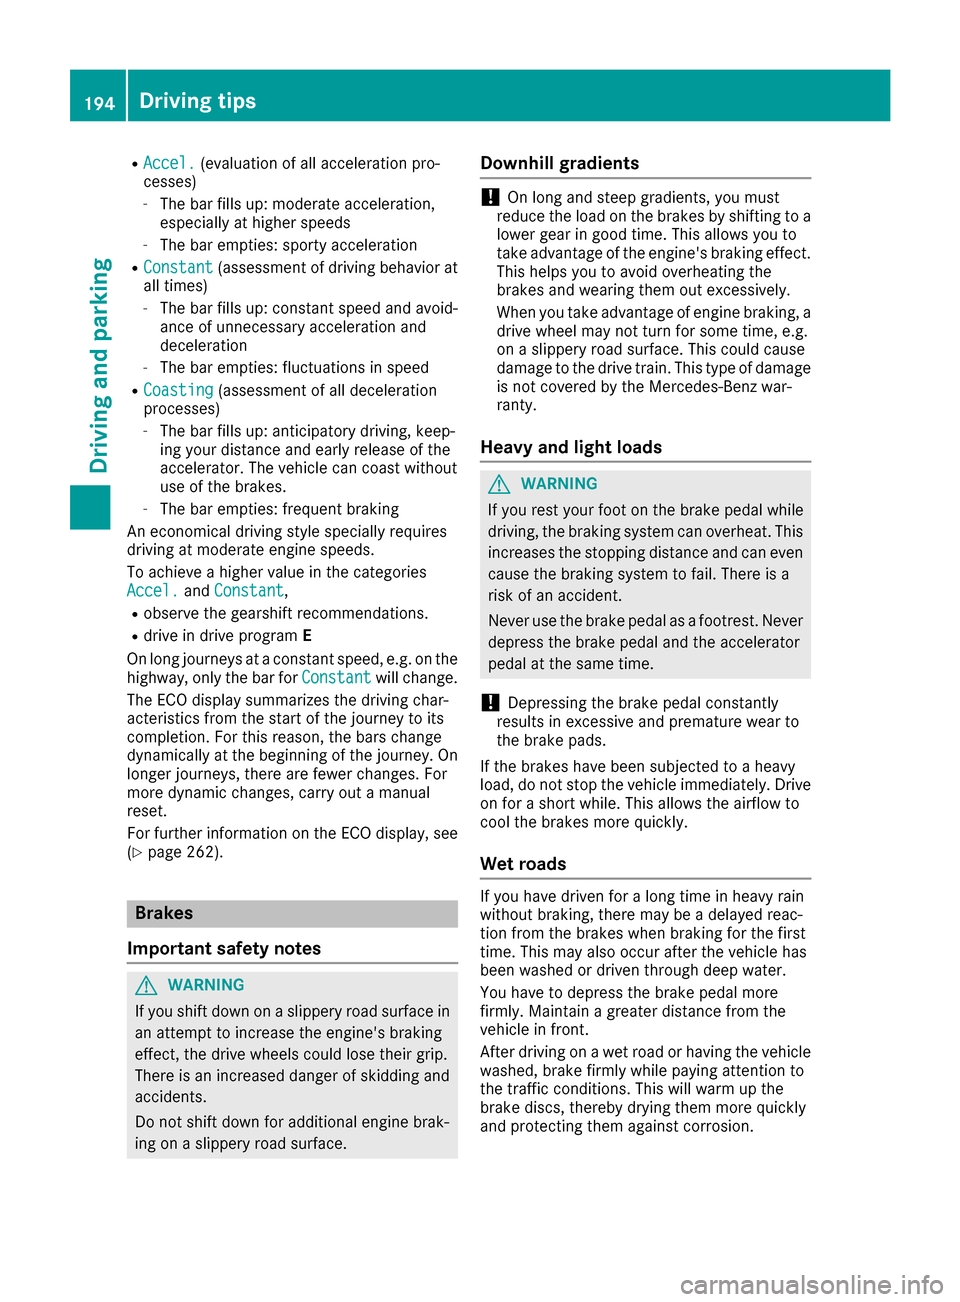
RAccel.(evaluation of all acceleration pro-
cesses)
-The bar fills up: moderate acceleration,
especially at higher speeds
-The bar empties: sporty acceleration
RConstant(assessment of driving behavior at
all times)
-The bar fills up: constant speed and avoid-
ance of unnecessary acceleration and
deceleration
-The bar empties: fluctuations in speed
RCoasting(assessment of all deceleration
processes)
-The bar fills up: anticipatory driving, keep-
ing your distance and early release of the
accelerator. The vehicle can coast without
use of the brakes.
-The bar empties: frequent braking
An economical driving style specially requires
driving at moderate engine speeds.
To achieve a higher value in the categories
Accel.
and Constant,
Robserve the gearshift recommendations.
Rdrive in drive program E
On long journeys at a constant speed, e.g. on the
highway, only the bar for Constant
will change.
The ECO display summarizes the driving char-
acteristics from the start of the journey to its
completion. For this reason, the bars change
dynamically at the beginning of the journey. On
longer journeys, there are fewer changes. For
more dynamic changes, carry out a manual
reset.
For further information on the ECO display, see
(
Ypage 262).
Brakes
Important safety notes
GWARNING
If you shift down on a slippery road surface in an attempt to increase the engine's braking
effect, the drive wheels could lose their grip.
There is an increased danger of skidding and
accidents.
Do not shift down for additional engine brak-
ing on a slippery road surface.
Downhill gradients
!On long and steep gradients, you must
reduce the load on the brakes by shifting to a
lower gear in good time. This allows you to
take advantage of the engine's braking effect.
This helps you to avoid overheating the
brakes and wearing them out excessively.
When you take advantage of engine braking, a
drive wheel may not turn for some time, e.g.
on a slippery road surface. This could cause
damage to the drive train. This type of damage
is not covered by the Mercedes-Benz war-
ranty.
Heavy and light loads
GWARNING
If you rest your foot on the brake pedal while
driving, the braking system can overheat. This increases the stopping distance and can even
cause the braking system to fail. There is a
risk of an accident.
Never use the brake pedal as a footrest. Never
depress the brake pedal and the accelerator
pedal at the same time.
!Depressing the brake pedal constantly
results in excessive and premature wear to
the brake pads.
If the brakes have been subjected to a heavy
load, do not stop the vehicle immediately. Drive
on for a short while. This allows the airflow to
cool the brakes more quickly.
Wet roads
If you have driven for a long time in heavy rain
without braking, there may be a delayed reac-
tion from the brakes when braking for the first
time. This may also occur after the vehicle has
been washed or driven through deep water.
You have to depress the brake pedal more
firmly. Maintain a greater distance from the
vehicle in front.
After driving on a wet road or having the vehicle
washed, brake firmly while paying attention to
the traffic conditions. This will warm up the
brake discs, thereby drying them more quickly
and protecting them against corrosion.
194Driving tips
Driving and parking
Page 199 of 438
Drive particularly carefully on slippery road sur-
faces. Avoid sudden acceleration, steering and
braking maneuvers. Do not use the cruise con-
trol or DISTRONIC PLUS.
If the vehicle threatens to skid or cannot be
stopped when moving at low speed:
XShift the transmission to positionN.
The outside temperature indicator is not
designed to serve as an ice-warning device and is therefore unsuitable for that purpose.
Changes in the outside temperature are dis-
played after a short delay.
Indicated temperatures just above the freezing
point do not guarantee that the road surface is
free of ice. The road may still be icy, especially in
wooded areas or on bridges.
You should pay special attention to road condi-
tions when temperatures are around freezing
point.
For more information on driving with snow
chains, see (
Ypage 386).
For more information on driving with summer
tires, see (
Ypage 386).
Observe the notes in the "Winter operation" sec-
tion (
Ypage 386).
Driving systems
Mercedes-Benz Intelligent Drive
Mercedes-Benz Intelligent Drive stands for inno-
vative driver assistance and safety systems
which enhance comfort and support the driver in
critical situations. With these intelligent co-ordi- nated systems Mercedes-Benz has set a mile-
stone on the path towards autonomous driving.
Mercedes-Benz Intelligent Drive embraces all
elements of active and passive safety in one well
thought out system – for the safety of the vehi-
cle occupants and that of other road users.
Further information on driving safety systems
(
Ypage 68).
Cruise control
General notes
Cruise control maintains a constant road speed
for you. It brakes automatically in order to avoid
exceeding the set speed. Change into a lower
gear in good time on long and steep downhill gradients. This is especially important if the
vehicle is laden. By doing so, you will make use
of the braking effect of the engine. This relieves
the load on the brake system and prevents the
brakes from overheating and wearing too
quickly.
You can use cruise control if you want to drive at
a steady speed for a prolonged period of time.
You can store any road speed above 20 mph
(30 km/h).
Important safety notes
If you fail to adapt your driving style, cruise con-
trol can neither reduce the risk of an accident
nor override the laws of physics. Cruise control
cannot take into account the road, traffic and
weather conditions. Cruise control is only an
aid. You are responsible for the distance to the
vehicle in front, for vehicle speed, for braking in
good time and for staying in your lane.
Do not use cruise control:
Rin road and traffic conditions which do not
allow you to maintain a constant speed, e.g. in
heavy traffic or on winding roads
Ron slippery road surfaces. Braking or accel-
erating could cause the drive wheels to lose
traction and the vehicle could then skid
Rwhen there is poor visibility, e.g. due to fog,
heavy rain or snow
If there is a change of drivers, advise the new
driver of the speed stored.
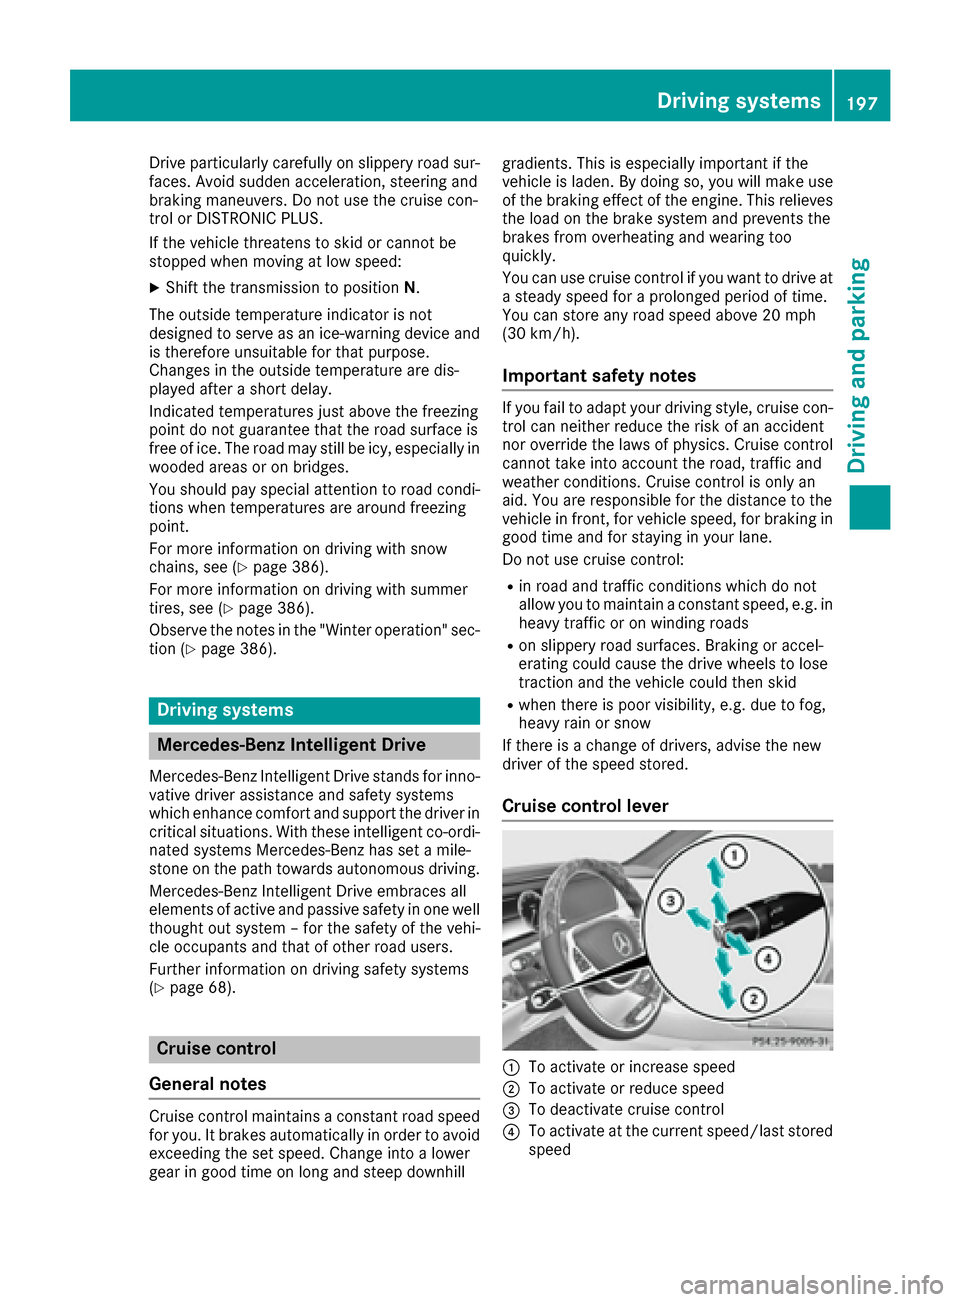
Cruise control lever
:To activate or increase speed
;To activate or reduce speed
=To deactivate cruise control
?To activate at the current speed/last stored
speed
Driving system s197
Driving an d parking
Z
Page 201 of 438

iCruise controlisnot deactivated ifyou
depr ess the accelerator pedal. Ifyou acceler-
ate to overtake, cruise control adjusts the
veh icle's speed to the last speed stored after
you have finished overtaking.
Deactivating cruise control
There are several ways to deactivate cruise con-
trol:
XBriefly press cruise the control lever for-
wards :.
or
XBrake.
Cruise control isautomatically deactivated if:
Ryou engage the electr icparking brake
Ryou are driving at less than 20 mph (30 km/h)
RESP®intervenes or you deactivate ESP®
Ryou shift the transmission to position Nwhile
driv ing
If cruise control isdeactivate d,you willhear a
warning tone. You willsee the Cruise Con‐
trol Offmessage inthe multifunction display
for approximate lyfive seconds.
iWhen you switch off the engine, the last
speed stored iscleared.
DISTRONIC PLUS
General notes
DI ST RONIC PLUS regulates the speed and auto-
matically helps you maintain the distance to the
veh icle detected infront. Vehicle s are detected
wit h the aid of the radar sensor system.
DI ST RONIC PLUS brakes automatically so that
the set speed is not excee ded.Change into a lower gear in good time on long
and steep
downhillgradients. This isespecially
important ifthe vehicle is laden. By doing so, you
will make use of the braking effect of the engine.
This relieves the load on the brake system and
prevents the brakes from overheating and wear-
ing too quickly.
If DI ST RONIC PLUS detects that there isa risk of
a collision, you will bewarned visually and
acoustically. DI STRONIC PLUS cannot prevent a
collision without your intervention. An intermit-
tent warning tone will then sound and the dis-
tance warning lamp willlight up in the instru-
ment cluster. Brake immediately inorder to
increase the distance to the vehicle in front or
take evasive action provided it issafe to doso.
DISTRONIC PLUS operates inrange between
0 mph (0 km/ h)and 120 mph (200km/ h).
Do not use DISTRONIC PLUS while driving on
roads with steep gradients.
As DISTRONIC PLUS transmits radar waves, it
can resemble the radar de tectors o
f the respon-
sible authorities. You can refer to the relevant
chapter in the Operator's Manual if questions
are asked about this.
iUSA only: This device has been approved by
the FCC as a "Vehicular Radar System". The
radar sensor is intended for use in an auto-
motive radar system only. Removal, tamper-
ing, or altering of the device will void any war-
ranties, and is not permitted by the FCC. Do
not tamper with, alter, or use in any non-
approved way.
Any unauthorized modification to this device
could void the user's authority to operate the
equipment.
iCanada only: This device complies with
RSS-210 of Industry Canada. Operation is
subject to the following two conditions:
1. This device may not cause harmful inter-
ference, and
2. This device must accept any interference
received, including interference that may
cause undesired operation of the device.
Removal, tampering, or altering of the device
will void any warranties, and is not permitted.
Do not tamper with, alter, or use in any non-
approved way.
Any unauthorized modification to this device
could void the user's authority to operate the equipment.
Driving system s199
Driving an d parking
Z
Page 223 of 438

The flap closes again when:
Ryou have finished the maneuvering process
Ryou switch off the engine
Ryou open the trunk
Observe the notes on cleaning (
Ypage 363).
For technical reasons, the flap may remain
open briefly after the rear view camera has
been deactivated.
Activating/deactivating the rear view
camera
XTo activate: make sure that the SmartKey is
in position 2in the ignition lock.
XMake sure that the Activation by R gearfunction is selected in the multimedia system
(see the separate operating instructions).
XEngage reverse gear.
The rear view camera flap opens. The multi-
media system shows the area behind the vehi-
cle with guide lines.
The image from the rear view camera is avail-
able throughout the maneuvering process.
To deactivate: the rear view camera deacti-
vates if you shift the transmission to Por after
driving forwards a short distance.
Displays in the multimedia system
The rear view camera may show a distorted view
of obstacles, show them incorrectly or not at all.
The rear view camera does not show objects in
the following positions:
Rvery close to the rear bumper
Runder the rear bumper
Rin the area immediately above the handle in
the trunk lid
!Objects not at ground level may appear to
be further away than they actually are, e.g.:
Rthe bumper of a parked vehicle
Rthe drawbar of a trailer
Rthe ball coupling of a trailer tow hitch
Rthe rear section of an HGV
Ra slanted post
Use the guidelines only for orientation.
Approach objects no further than the bottom-
most guideline.
:Yellow guide line at a distance of approx-
imately 13 ft (4.0 m) from the rear of the
vehicle
;White guide line without turning the steering
wheel, vehicle width including the exterior
mirrors (static)
=Yellow guide line for the vehicle width
including the exterior mirrors, for current
steering wheel angle (dynamic)
?Yellow lane marking tires at current steering
wheel angle (dynamic)
AYellow guide line at a distance of approx-
imately 3 ft (1.0 m) from the rear of the vehi-
cle
BVehicle center axle (marker assistance)
CBumper
DRed guide line at a distance of approximately
12 in (0.30 m) from the rear of the vehicle
The guide lines are shown when the transmis-
sion is in position R.
The distance specifications only apply to
objects that are at ground level.
Driving systems221
Driving and parking
Z
Page 227 of 438
Rif the camera lenses are dirty or covered.
Observe the notes on cleaning
(
Ypage 363)
Rif the vehicle components in which the cam-
eras are installed are damaged. In this event,
have the camera position and setting checked
at a qualified specialist workshop
Do not use the 360° camera in this case. You
can otherwise injure others or cause damage to
objects or the vehicle.
The guide lines on the multimedia system show
the distances to your vehicle. The distances only
apply to road level.
The cameras in the front and in the rear area are
each protected by a flap. These flaps are opened
when the 360° camera is activated. Observe the
notes on cleaning (
Ypage 363). For technical
reasons, the flaps may remain open briefly after
the 360° camera has been deactivated.
The field of vision and other functions of the
camera system may be restricted due to addi-
tional accessories on the rear of the vehicle (e.g. license plate holder, bicycle rack).
On vehicles with height-adjustable chassis,
depending on technical conditions, leaving the
standard height can result in:
Rinaccuracies in the guide lines
Rinaccuracies in the display of generated
images (top view)
Activation conditions
The 360° camera image can be displayed if:
Rthe multimedia system is switched on
Rthe 360° Camerafunction is switched on
iIf the 360° camera is activated at speeds
above approximately 19 mph (30 km/h), a
warning message appears.
The warning message disappears if:
Rthe vehicle's speed falls below approx-
imately 19 mph (30 km/h). The 360° cam- era is then activated.
Rthe message is confirmed with the %
button.
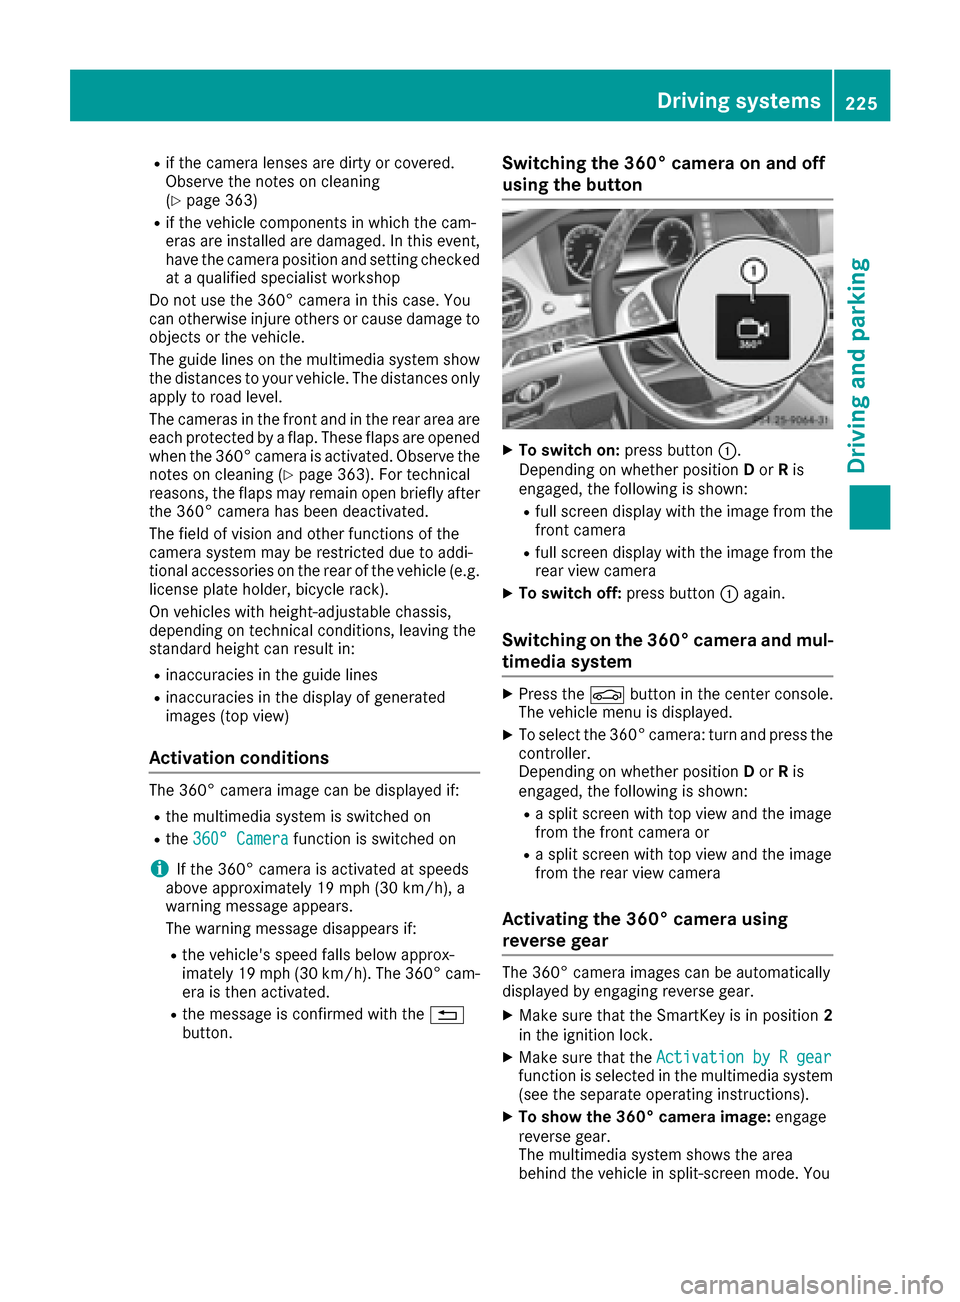
Switching the 360° camera on and off
using the button
XTo switch on: press button:.
Depending on whether position Dor Ris
engaged, the following is shown:
Rfull screen display with the image from the
front camera
Rfull screen display with the image from the
rear view camera
XTo switch off: press button:again.
Switching on the 360° camera and mul-
timedia system
XPress the Øbutton in the center console.
The vehicle menu is displayed.
XTo select the 360° camera: turn and press the
controller.
Depending on whether position Dor Ris
engaged, the following is shown:
Ra split screen with top view and the image
from the front camera or
Ra split screen with top view and the image
from the rear view camera
Activating the 360° camera using
reverse gear
The 360° camera images can be automatically
displayed by engaging reverse gear.
XMake sure that the SmartKey is in position 2
in the ignition lock.
XMake sure that the Activation by R gearfunction is selected in the multimedia system
(see the separate operating instructions).
XTo show the 360° camera image: engage
reverse gear.
The multimedia system shows the area
behind the vehicle in split-screen mode. You
Driving systems225
Driving and parking
Z
Page 234 of 438

Animal recognition
Animals can be recognizedin th efollowin gsit -
uations:
Rdarkness
Routside built-up areas
Rbelow an ambient temperature of 90 ‡
(32 †).
Nigh tView Assist Plus can recognize larger ani-
mals suc has deer ,cows or horses usin gtypical
characteristics.
The system does no tdetect :
Rsmaller animals, e.g. dogs and cat s
Ranimals whosesilhouette is no tclearly rec -
ognizable
When detected, animals are marke dwit hsmal l
color frame corners .In contrast to pedestrian
recognition ,there is no separate readiness sym-
bol in th emultifunction display.
Activating/deactivating Night View
Assist Plus
Activation conditions
You can only activat eNigh tView Assist Plus if all
of th efollowin gcondition sare met :
Rtheignition is switched on (Ypage 162) or the
engin ehas been started.
Rth eligh tswitch is in th eà orL posi-
tion.
Rrevers egear has no tbeen engaged .
Activating Night View Assist Plus
XPress button:.
The Nigh tView Assist Plus display appear sin
th emultifunction display.
iThe infrared headlamps only switch on in th e
dark from speeds of approximately 6mph
(10 km/h). This mean sthat you do no thave th
efull visual range while th evehicl eis sta-
tionar yand canno tcheck whether Nigh tView
Assist Plus is working .The infrared head-
lamps are deactivate dat speeds below 3mph
(5 km/h). The Nigh tView imag econtinue sto
be displayed until you deactivate it by press-
ing butto n:.
Automatic activation
You can select th eNightVie wAssistAuto‐matic Activatio noption via theNigh tView
Assist menu. The pedestrian and animal search function remains active eve nwhen th eNigh t
View imag eis no tdisplayed. In th edark ,in unli t
surroundings and at speeds of mor ethan
60 km/h, th eNigh tView imag eis automatically
displayed in th emultifunction display as soo nas
pedestrian sor animals are detected.
XIn th eassistanc emenu, select automatic acti-
vation of Nigh tView Assist Plus
(
Ypage 270).
Deactivating Night View Assist Plus
XPress butto n:.
The Nigh tView Assist Plus display disappear s
from th emultifunction display. Nigh tView
Assist is deactivated.
Spotlight function
General notes
Under certai nconditions, th espotligh tfunction
uses th eheadlamps to flas hat detected pedes-
trians .
The spotligh tfunction is only active if:
Rpedestrian recognition is active
Rth eroad surface is no tlit
Rth edriving spee dis at least 40 mph
(60 km/ h)
Rthe "Adaptive Highbeam Assist PLUS" func-
tion is activated (Ypage 133)
The spotlight function is not active or is active
only to a limited extent if:
Ryou are driving in city traffic
Rthere are pedestrians located in the area of an
oncoming vehicle or a vehicle in front
Activating the spotlight function
The pedestrian detection with spotlight function is running the background. If the prerequisites
are met, the spotlight function uses the head-
232Driving system s
Driving an d parking
Page 238 of 438
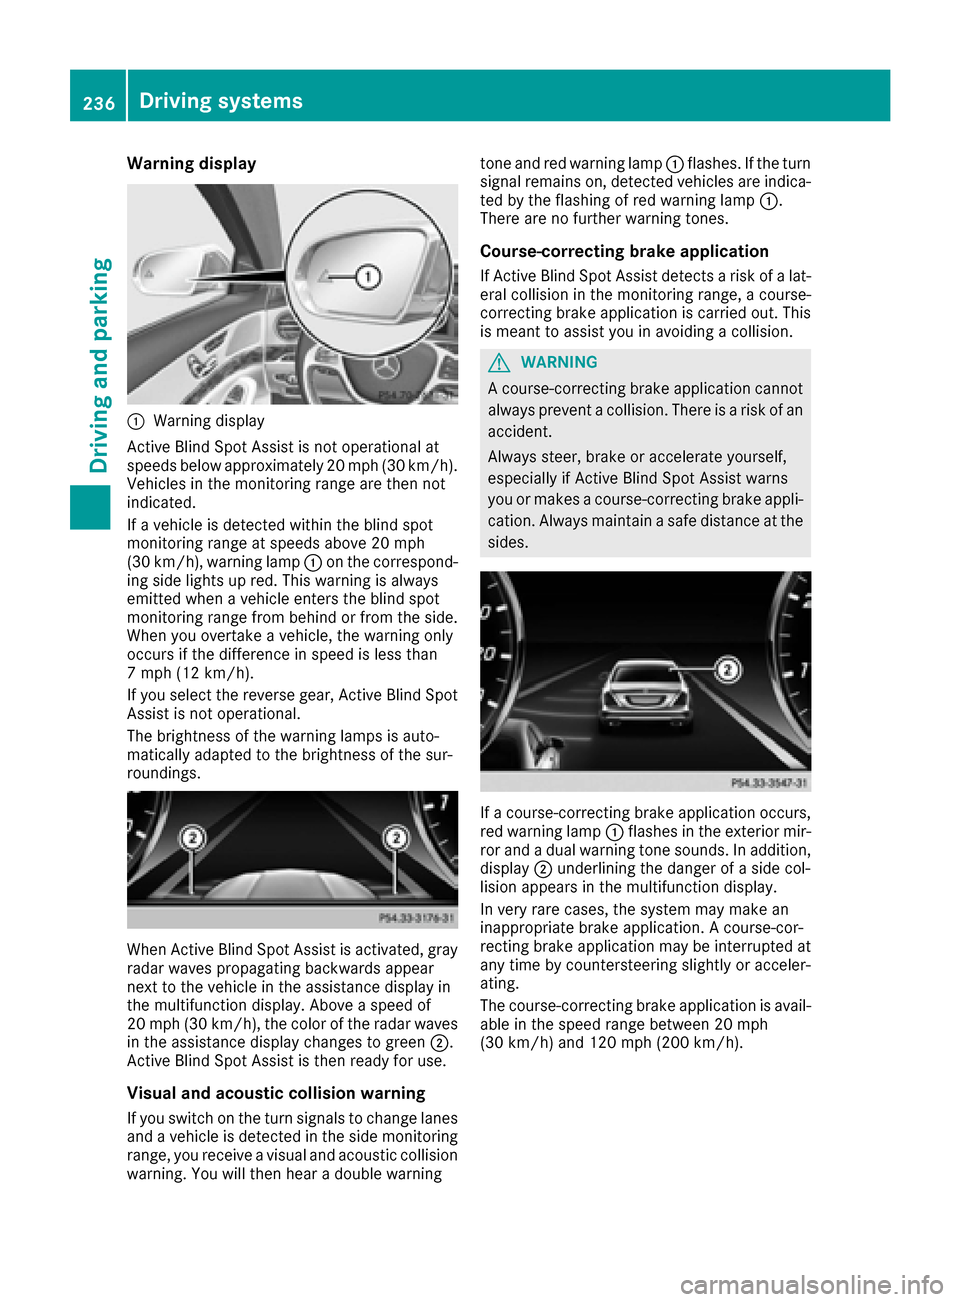
Warning display
:Warning display
Active Blind Spot Assist is not operational at
speeds below approximately 20 mph (30 km/h).
Vehicles in the monitoring range are then not
indicated.
If a vehicle is detected within the blind spot
monitoring range at speeds above 20 mph
(30 km/h), warning lamp :on the correspond-
ing side lights up red. This warning is always
emitted when a vehicle enters the blind spot
monitoring range from behind or from the side.
When you overtake a vehicle, the warning only
occurs if the difference in speed is less than
7 mph (12 km/h).
If you select the reverse gear, Active Blind Spot
Assist is not operational.
The brightness of the warning lamps is auto-
matically adapted to the brightness of the sur-
roundings.
When Active Blind Spot Assist is activated, gray
radar waves propagating backwards appear
next to the vehicle in the assistance display in
the multifunction display. Above a speed of
20 mph (30 km/h), the color of the radar waves
in the assistance display changes to green ;.
Active Blind Spot Assist is then ready for use.
Visual and acoustic collision warning
If you switch on the turn signals to change lanes and a vehicle is detected in the side monitoring
range, you receive a visual and acoustic collision warning. You will then hear a double warning tone and red warning lamp
:flashes. If the turn
signal remains on, detected vehicles are indica-
ted by the flashing of red warning lamp :.
There are no further warning tones.
Course-correcting brake application
If Active Blind Spot Assist detects a risk of a lat-
eral collision in the monitoring range, a course-
correcting brake application is carried out. This
is meant to assist you in avoiding a collision.
GWARNING
A course-correcting brake application cannot always prevent a collision. There is a risk of an
accident.
Always steer, brake or accelerate yourself,
especially if Active Blind Spot Assist warns
you or makes a course-correcting brake appli-
cation. Always maintain a safe distance at the
sides.
If a course-correcting brake application occurs,
red warning lamp :flashes in the exterior mir-
ror and a dual warning tone sounds. In addition,
display ;underlining the danger of a side col-
lision appears in the multifunction display.
In very rare cases, the system may make an
inappropriate brake application. A course-cor-
recting brake application may be interrupted at
any time by countersteering slightly or acceler-
ating.
The course-correcting brake application is avail-
able in the speed range between 20 mph
(30 km/h) and 120 mph (200 km/h).
236Driving systems
Driving and parking