2016 MERCEDES-BENZ S-Class SEDAN Esp off
[x] Cancel search: Esp offPage 76 of 438

If ESP®intervenes:
XDo not deactivate ESP®under any circum-
stances.
XOnly depress the accelerator pedal as far as
necessary when pulling away.
XAdapt your driving style to suit the prevailing
road and weather conditions.
ECO start/stop function
The ECO start/stop function is not available for
PLUG-IN HYBRID vehicles.
The ECO start/stop function switches the
engine off automatically when the vehicle stops
moving. The engine starts automatically when
the driver wants to pull away again. ESP
®
remains in its previously selected status. Exam-
ple: if ESP®was deactivated before the engine
was switched off, ESP®remains deactivated
when the engine is switched on again.
Deactivating/activating ESP®
Important safety notes
iObserve the "Important safety notes" sec-
tion (Ypage 68).
You can select between the following states of
ESP
®:
RESP®is activated.
RESP®is deactivated.
GWARNING
If you deactivate ESP
®, ESP®no longer sta-
bilizes the vehicle. There is an increased risk
of skidding and an accident.
Only deactivate ESP
®in the situations descri-
bed in the following.
It may be best to deactivate ESP
®in the follow-
ing situations:
Rwhen using snow chains
Rin deep snow
Ron sand or gravel
iActivate ESP®as soon as the situations
described above no longer apply. ESP®will
otherwise not be able to stabilize the vehicle if
the vehicle starts to skid or a wheel starts to
spin.
!Avoid spinning the driven wheels for an
extended period with ESP®deactivated. You
could otherwise damage the drivetrain.
Deactivating/activating ESP®
You can deactivate or activate ESP®via the on-
board computer (Ypage 269).
ESP®deactivated:
The å ESP®OFF warning lamp in the instru-
ment cluster lights up.
ESP
®activated:
The å ESP®OFF warning lamp in the instru-
ment cluster goes out.
Characteristics when ESP®is deactivated
If ESP®is deactivated and one or more wheels
start to spin, the ÷ESP®warning lamp in the
instrument cluster flashes. In such situations,
ESP
®will not stabilize the vehicle.
If you deactivate ESP®:
RESP®no longer improves driving stability.
REngine torque is no longer limited and the
drive wheels are able to spin.
The spinning of the wheels results in a cutting
action for better traction on loose surfaces.
RTraction control is still activated.
RCOLLISION PREVENTION ASSIST is no longer
available; nor is it activated if you brake firmly
with assistance from ESP
®.
RPRE-SAFE®is no longer available, nor is it
activated if you brake firmly and ESP®inter-
venes.
RPRE-SAFE®Brake is no longer available, it is
also not activated if you brake firmly and ESP®
intervenes.
RESP®still provides support when you brake
firmly.
ESP®trailer stabilization
General information
ESP®trailer stabilization is not available in
Mercedes-AMG vehicles.
If your vehicle/trailer combination begins to
swerve, ESP
®assists you in this situation. ESP®
slows the vehicle down by braking and limiting
the engine output until the vehicle/trailer com-
bination has stabilized.
74Driving safety systems
Safety
Page 77 of 438

Important safety notes
GWARNING
If road and weather conditions are poor,
trailer stabiliz ationwillnotbe able to prevent
the veh icle/trailer co mbination from swerv-
ing. Trailers with a high center of gravity can
tip over before ESP
®can detect this. There is
a risk of an acc ident.
Always adapt your driving style to the prevail-
ing road and weather conditions.
If your veh icle with trailer (veh icle/trailer com-
bin ation) begins to lurch, you can only stabilize
the veh icle/trailer co mbination by depr essing
the brake firmly.
ESP
®trailer stabiliz ationisactive above speeds
of about 65 km/h.
ESP
®trailer stabiliz ation does not work ifESP®
is deactivated or disabled because of a malfunc-
tion.
Crosswind Assist (vehicles without
MAGIC BODY CONTROL)
General information
Vehicle swit h MAGIC BODY CONTROL: informa-
tion on stabiliz ing the vehicle inthe event of
crosswin d (
Ypage 210).
St rong crosswinds can cause your veh icleto
deviate from a straight course. The crosswin d
driv ing assistance function integrated inESP
®
noticeably reduces these impairments.
ESP®intervenes automatical lyaccording to the
dire ction and intensity of the crosswinds affect-
ing your veh icle.
ESP intervenes with stabiliz ing braking to assist
you inkeepin g the veh icle inthe lane.
Cros swind Assist isactive at veh iclespeeds
above 50 mph (80 km/h) when driving straight
ahead or cornering gently.
Important safety notes
Cros swind Assist does not work ifESP®is
swit ched off or deactivated because of a mal-
function.
EBD (electronic brake force distribu-
tion)
General information
EBD monitors and controls the brake pressure
on the rear wheels to improve driving stability
while braking.
Important safety notes
iObserve the "Important safety notes" sec-
tion (Ypage 68).
GWARNING
If EBD ismalfunctioning, the rear wheels can
lock, e.g. under full braking. This increases the
risk of skidding and an accident.
You should therefore adapt your driving style
to the different handlin g characteristics. Have
the brake system checked at a qualified spe-
cialist workshop.
Observe information regarding indicator and
warning lamps (
Ypage 316) as wellas display
messages (Ypage 280).
ADAPTIVE BRAKE
ADAPTIVE BRAKE enhances braking safety and
offers increased braking comfort. In addition to
the braking function, ADAPTIVE BRAKE also has
the HOLD function (
Ypage 208) and hillstart
assist (Ypage 165).
PRE-SAFE®Brake
General information
PRE-SAFE®Brake can help you to minimize the
risk of a collision with a vehicle ahead or a
pedestrian, and reduce the effects of such a
collision. If PRE-SAFE
®Brake has detected a risk
of collision, you willbe warned visually and
acoustically as wellas by automatic braking.
iPay attention to the important safety notes
in the "Driving safety systems" section
(
Ypage 68).
PRE‑ SAFE
®Brake isonly availab le invehicles
wit h the Driving Assistance Plus package.
Driving safety systems75
Safety
Z
Page 90 of 438

firmly. Do not pull the door handle when doing
so.
If you use the mechanical key to unlock and
open the driver's door, the anti-theft alarm sys-
tem will be triggered. Switch off the alarm
(
Ypage 78).
Locking the vehicle (mechanical key)
If the vehicle can no longer be locked with the
SmartKey or KEYLESS-GO, use the mechanical
key.
XOpen the driver's door.
XClose the front-passenger door, the rear
doors and the trunk lid.
XPress the locking button (Ypage 86).
XCheck whether the locking knobs on the
front-passenger door and the rear doors are
still visible. Press down the locking knobs by
hand, if necessary.
XClose the driver's door.
XTake the mechanical key out of the SmartKey
(Ypage 81).
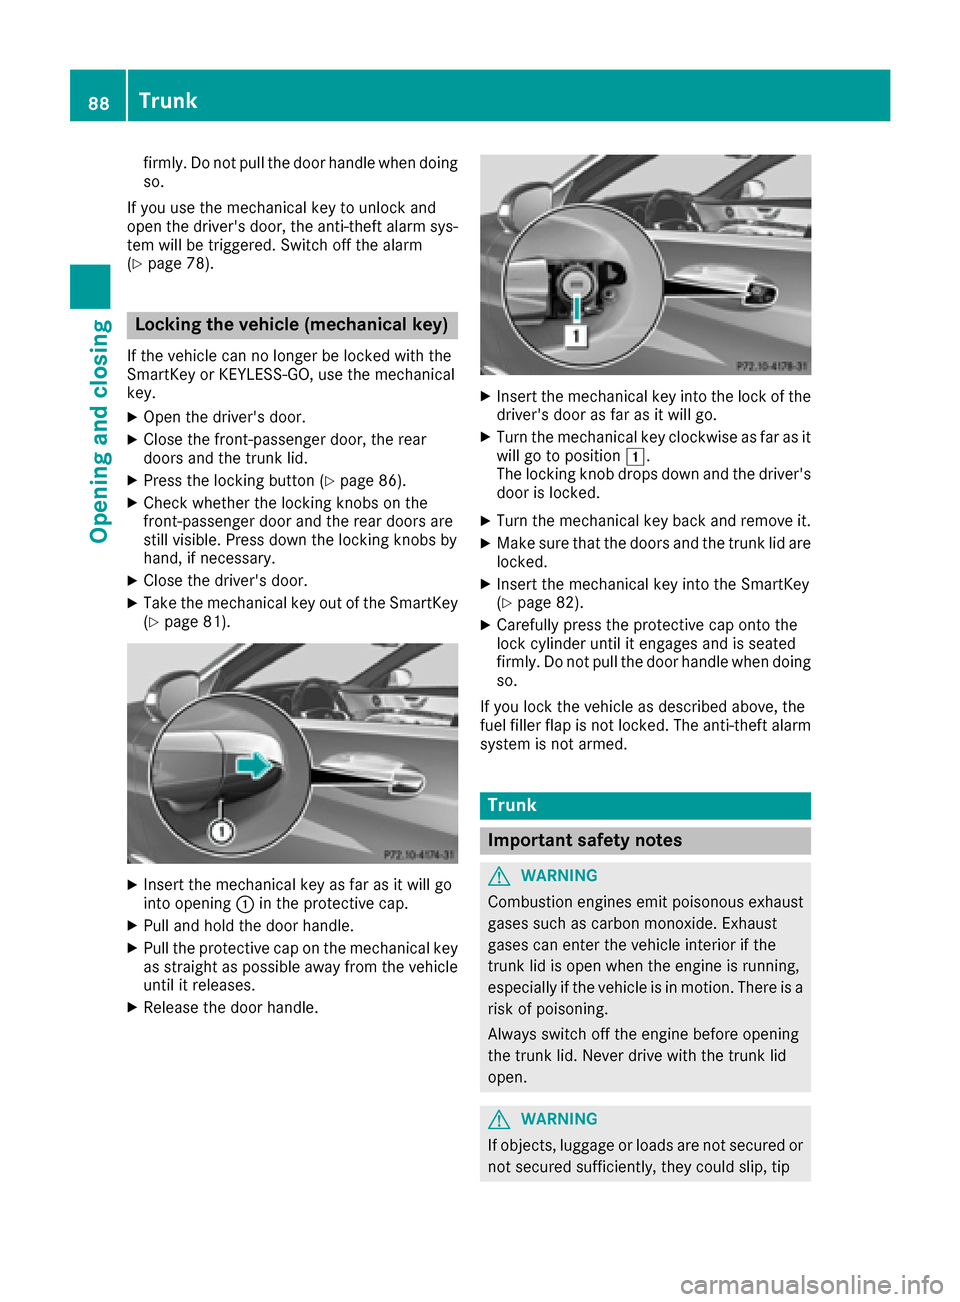
XInsert the mechanical key as far as it will go
into opening :in the protective cap.
XPull and hold the door handle.
XPull the protective cap on the mechanical key
as straight as possible away from the vehicle
until it releases.
XRelease the door handle.
XInsert the mechanical key into the lock of the
driver's door as far as it will go.
XTurn the mechanical key clockwise as far as it
will go to position 1.
The locking knob drops down and the driver's
door is locked.
XTurn the mechanical key back and remove it.
XMake sure that the doors and the trunk lid are locked.
XInsert the mechanical key into the SmartKey
(Ypage 82).
XCarefully press the protective cap onto the
lock cylinder until it engages and is seated
firmly. Do not pull the door handle when doing
so.
If you lock the vehicle as described above, the
fuel filler flap is not locked. The anti-theft alarm system is not armed.
Trunk
Important safety notes
GWARNING
Combustion engines emit poisonous exhaust
gases such as carbon monoxide. Exhaust
gases can enter the vehicle interior if the
trunk lid is open when the engine is running,
especially if the vehicle is in motion. There is a
risk of poisoning.
Always switch off the engine before opening
the trunk lid. Never drive with the trunk lid
open.
GWARNING
If objects, luggage or loads are not secured or
not secured sufficiently, they could slip, tip
88Trunk
Opening and closing
Page 92 of 438

Vehicles with trunk lid remote closing fea-
ture or power closing:
XLightly push the trunk lid closed.
The power closing function pulls the trunk lid
closed.
XLock the vehicle if necessary with the&
button on the SmartKey or with KEYLESS-GO
(
Ypage 80).
iIf KEYLESS-GO detects a SmartKey in the
trunk, the trunk lid cannot be locked. It then
opens again.
Opening/closing automatically from
outside
Important safety notes
GWARNING
Parts of the body could become trapped dur-
ing automatic closing of the trunk lid. More-
over, people, e.g. children, may be standing in the closing area or may enter the closing area
during the closing process. There is a risk of
injury.
Make sure that nobody is in the vicinity of the
closing area during the closing process.
Use one of the following options to stop the
closing process:
Rpress the Fbutton on the SmartKey.
Rpull or press the remote operating switch
on the driver's door.
Rpress the closing or locking button on the
trunk lid.
Rpull the trunk lid handle
Vehicles with HANDS-FREE ACCESS: it is also
possible to stop the closing process by perform-
ing a kicking movement under the rear bumper.
GWARNING
Combustion engines emit poisonous exhaust
gases such as carbon monoxide. Exhaust
gases can enter the vehicle interior if the
trunk lid is open when the engine is running,
especially if the vehicle is in motion. There is a
risk of poisoning.
Always switch off the engine before opening
the trunk lid. Never drive with the trunk lid
open.
!The trunk lid swings upwards when opened.
Therefore, make sure that there is sufficient
clearance above the trunk lid.
The opening dimensions of the trunk lid can be
found in the "Vehicle data" section
(
Ypage 433).
Opening
You can open the trunk lid automatically using
the SmartKey or the handle in the trunk lid.
XPress and hold the Fbutton on the Smart-
Key until the trunk lid opens.
or
XIf the trunk lid is unlocked, pull the trunk lid
handle and let it go again immediately.
Closing
You can close the trunk lid automatically using
the SmartKey or the closing button in the trunk
lid.
XPress closing button :on the trunk lid.
or
XIf the SmartKey is located in the immediate
vicinity of the vehicle: press the Fbutton
on the SmartKey.
You can release the button as soon as the
trunk lid starts to close.
XTo stop the closing process:
RPress the Fbutton on the SmartKey or
RPull the trunk lid handle, or
RPress closing button :or locking but-
ton ;on the trunk lid, or
90Trunk
Opening and closing
Page 94 of 438

ilar to these. This will prevent the uninten-
tional opening/closing of the trunk.
Operation
XTo open/close:kick into sensor detection
range :under the bumper with your foot.
A warning tone will sound while the trunk lid is
opening or closing.
XIf the trunk lid does not open/close after
several attempts: wait at least ten seconds
and then using your foot kick under the
bumper again.
If you hold your foot under the bumper for too
long, the trunk lid does not open or close.
Repeat the leg movement more quickly if this
occurs.
To stop the opening or closing procedure:
Rkick with your leg in the sensor detection
range :under the bumper or
Rpull the handle on the outside of the trunk lid
or
Rpress the closing button on the trunk lid, or
Rpress the Fbutton on the SmartKey
If the trunk lid closing procedure has been stop-
ped:
Rmove your foot under the bumper again and
the trunk lid will open
If the trunk lid opening procedure has been
stopped:
Rmove your foot under the bumper again and
the trunk lid will close
Opening/closing automatically from
inside
Important safety notes
GWARNING
The reversing feature does not react:
Rto soft, light and thin objects, e.g. small fin-
gers
Rover the last 1/3 in (8 mm) of the closing
movement
This means that the reversing feature cannot
prevent someone being trapped in these sit-
uations. There is a risk of injury.
Make sure that no body parts are in close
proximity during the closing procedure.
If somebody becomes trapped:
Rpress the Fbutton on the SmartKey, or
Rpull or press the remote operating switch
on the driver's door or
Rpress the closing or locking button on the
trunk lid, or
Rpull on the trunk lid handle
Vehicles with HANDS-FREE ACCESS: it is also
possible to stop the closing process by perform-
ing a kicking movement under the rear bumper.
GWARNING
Combustion engines emit poisonous exhaust
gases such as carbon monoxide. Exhaust
gases can enter the vehicle interior if the
trunk lid is open when the engine is running,
especially if the vehicle is in motion. There is a
risk of poisoning.
Always switch off the engine before opening
the trunk lid. Never drive with the trunk lid
open.
!The trunk lid swings upwards when opened.
Therefore, make sure that there is sufficient
clearance above the trunk lid.
The opening dimensions of the trunk lid can be
found in the "Vehicle data" section
(
Ypage 433).
92Trunk
Opening and closing
Page 97 of 438

Opening and closing the side win-
dows
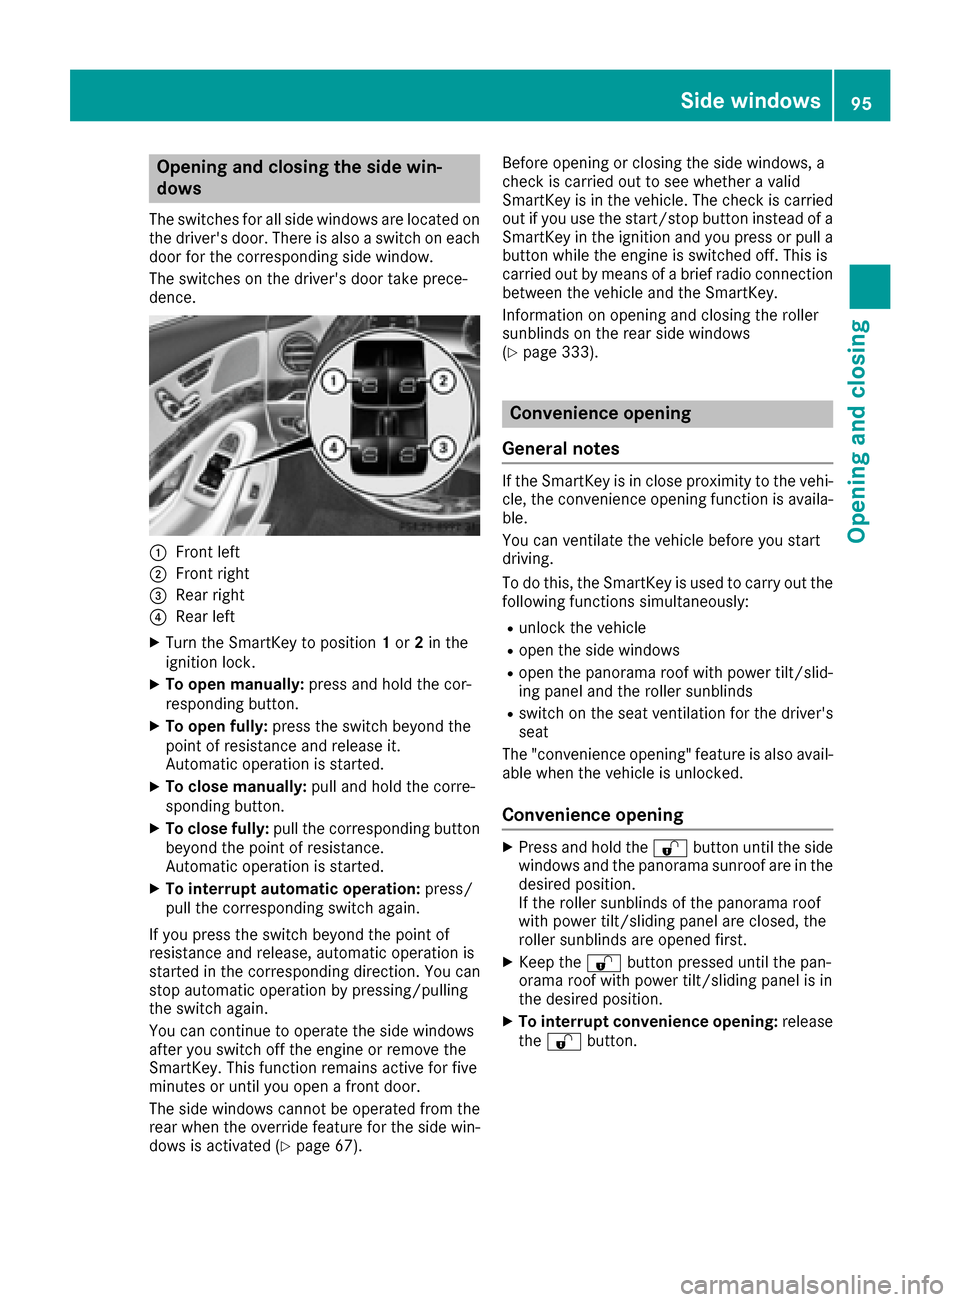
The switches for all side windows are located on
the driver's door. There is also a switch on each
door for the corresponding side window.
The switches on the driver's door take prece-
dence.
:Front left
;Front right
=Rear right
?Rear left
XTurn the SmartKey to position1or 2in the
ignition lock.
XTo open manually: press and hold the cor-
responding button.
XTo open fully: press the switch beyond the
point of resistance and release it.
Automatic operation is started.
XTo close manually: pull and hold the corre-
sponding button.
XTo close fully: pull the corresponding button
beyond the point of resistance.
Automatic operation is started.
XTo interrupt automatic operation: press/
pull the corresponding switch again.
If you press the switch beyond the point of
resistance and release, automatic operation is
started in the corresponding direction. You can
stop automatic operation by pressing/pulling
the switch again.
You can continue to operate the side windows
after you switch off the engine or remove the
SmartKey. This function remains active for five
minutes or until you open a front door.
The side windows cannot be operated from the
rear when the override feature for the side win-
dows is activated (
Ypage 67). Before opening or closing the side windows, a
check is carried out to see whether a valid
SmartKey is in the vehicle. The check is carried
out if you use the start/stop button instead of a
SmartKey in the ignition and you press or pull a
button while the engine is switched off. This is
carried out by means of a brief radio connection
between the vehicle and the SmartKey.
Information on opening and closing the roller
sunblinds on the rear side windows
(
Ypage 333).
Convenience opening
General notes
If the SmartKey is in close proximity to the vehi-
cle, the convenience opening function is availa-
ble.
You can ventilate the vehicle before you start
driving.
To do this, the SmartKey is used to carry out the following functions simultaneously:
Runlock the vehicle
Ropen the side windows
Ropen the panorama roof with power tilt/slid-
ing panel and the roller sunblinds
Rswitch on the seat ventilation for the driver's
seat
The "convenience opening" feature is also avail-
able when the vehicle is unlocked.
Convenience opening
XPress and hold the %button until the side
windows and the panorama sunroof are in the
desired position.
If the roller sunblinds of the panorama roof
with power tilt/sliding panel are closed, the
roller sunblinds are opened first.
XKeep the %button pressed until the pan-
orama roof with power tilt/sliding panel is in
the desired position.
XTo interrupt convenience opening: release
the % button.
Side windows95
Opening and closing
Z
Page 125 of 438

Position of the steering wheel and the
driver's seat for driving
The steering wheel and the driver's seat are
moved to the previously set position if:
Rthe driver's door is closed and you insert the
SmartKey into the ignition lock
Ryou close the driver's door when the ignition
is switched on
Ryou press the Start/Stop button once on vehi-
cles with KEYLESS-GO
iThe steering wheel and the driver's seat only
return to the last set position when the driving
position is stored after seat or steering wheel
adjustment.
The last position of the steering wheel or seat is
stored if:
Rthe ignition is switched off
Rthe setting is stored with the memory function
(Ypage 126).
Crash-responsive EASY-EXIT feature
If the crash-responsive EASY-EXIT feature is trig-
gered in an accident, the steering column will
move upwards when the driver's door is opened
or the SmartKey is removed from the ignition
lock. This makes it easier to exit the vehicle and
rescue the occupants.
The crash-responsive EASY-EXIT feature is only
operational if the EASY-EXIT/ENTRY feature is
activated in the multimedia system (see the sep-
arate operating instructions).
Mirrors
Rear-view mirror
XAnti-glare mode: flick anti-glare lever :for-
wards or back.
Exterior mirrors
Important safety notes
GWARNING
You could lose control of your vehicle if you do the following while driving:
Radjust the driver's seat, head restraint,
steering wheel or mirrors
Rfasten the seat belt
There is a risk of an accident.
Adjust the driver's seat, head restraint, steer-
ing wheel and mirror and fasten your seat belt before starting the engine.
GWARNING
The exterior mirror on the front-passenger
side reduces the size of the image. Visible
objects are actually closer than they appear.
This means that you could misjudge the dis-
tance from road users traveling behind, e.g.
when changing lane. There is a risk of an acci-
dent.
For this reason, always make sure of the
actual distance from the road users traveling
behind by glancing over your shoulder.
Adjusting the exterior mirrors
Mirrors123
Seats, steering wheel and mirrors
Z
Page 132 of 438

Useful information
i
This Operator's Manual describes all models
and all standard and optional equipment of
your vehicle available at the time of publica-
tion of the Operator's Manual. Country-spe-
cific differences are possible. Please note
that your vehicle may not be equipped with all
features described. This also applies to
safety-related systems and functions.
iRead the information on qualified specialist
workshops (Ypage 28).
Exterior lighting
General notes
For reasons of safety, Mercedes-Benz recom-
mends that you drive with the lights switched on
even during the daytime. In some countries,
operation of the headlamps varies due to legal
requirements and self-imposed obligations.
Setting the exterior lighting
Setting options
Exterior lighting can be set using:
Rthe light switch
Rthe combination switch (Ypage 131)
Rthe on-board computer (Ypage 274)
Light switch
Operation
1 WLeft-hand standing lamps
2XRight-hand standing lamps
3TParking lamps, license plate and
instrument cluster lighting
4ÃAutomatic headlamp mode, controlled
by the light sensor
5 LLow-beam/high-beam headlamps
If you hear a warning tone when you leave the
vehicle, the lights may still be switched on.
XTurn the light switch to the Ãposition.
The exterior lighting (except the parking/stand-
ing lamps) switches off automatically if you:
Rremove the SmartKey from the ignition lock
Ropen the driver's door with the SmartKey in
position 0in the ignition lock
Automatic headlamp mode
GWARNING
When the light switch is set to Ã, the low-
beam headlamps may not be switched on
automatically if there is fog, snow or other
causes of poor visibility due to the weather
conditions such as spray. There is a risk of an
accident.
In such situations, turn the light switch to
L.
The automatic headlamp feature is only an aid.
The driver is responsible for the vehicle's light-
ing at all times.
Canada only:
The daytime running lamps improve the visibility
of your vehicle during the day. The daytime run-
ning lamps function is required by law in Can-
ada. It cannot therefore be deactivated.
When the engine is running and the vehicle is
stationary: if you move the selector lever from a
drive position to P, the daytime running lamps/
low-beam headlamps go out after three
minutes.
When the engine is running, the vehicle is sta-
tionary and in bright ambient light: if you turn the
light switch to the Tposition, the daytime
running lamps and parking lamps switch on.
If the engine is running and you turn the light
switch to the Lposition, the manual settings
take precedence over the daytime running
lamps.
USA only:
The daytime running lamps improve the visibility
of your vehicle during the day. Here, the Day‐
130Exterior lighting
Lights and windshield wipers