2016 MERCEDES-BENZ S-Class SEDAN air ma
[x] Cancel search: air maPage 407 of 438

Load bearing index
The load bearing index (also load index) is a code
that contains the maximum load bearing capa-
city of a tire.
Traction
Traction is the result of friction between the tires
and the road surface.
Treadwear indicators
Narrow bars (tread wear bars) that are distrib-
uted over the tire tread. If the tire tread is level
with the bars, the wear limit ofáin (1.6 mm)
has been reached.
Occupant distribution
The distribution of occupants in a vehicle at their
designated seating positions.
Total load limit
Nominal load and luggage load plus 68 kg
(15 0lbs) multiplied by the number of seats in
the vehicle.
Changing a wheel
Flat tire
The "Breakdown assistance" section
(Ypage 367) contains information and notes on
how to deal with a flat tire. Information on driv-
ing with MOExtended tires in the event of a flat
tire can be found under "MOExtended tires (tires
with run-flat characteristics" (
Ypage 368).
Rotating the wheels
GWARNING
Interchanging the front and rear wheels may
severely impair the driving characteristics if
the wheels or tires have different dimensions. The wheel brakes or suspension components
may also be damaged. There is a risk of acci-
dent.
Rotate front and rear wheels only if the wheels and tires are of the same dimensions.
!On vehicles equipped with a tire pressure
monitor, electronic components are located
in the wheel. Tire-mounting tools should not be used near
the valve. This could damage the electronic
components.
Only have tires changed at a qualified spe-
cialist workshop.
Always observe the instructions and safety
notes in the "Mounting a wheel" section
(
Ypage 406).
The wear patterns on the front and rear tires
differ, depending on the operating conditions.
Rotate the wheels before a clear wear pattern
has formed on the tires. Front tires typically
wear more on the shoulders and the rear tires in
the center.
On vehicles that have the same size front and
rear wheels, you can rotate the wheels accord-
ing to the intervals in the tire manufacturer's
warranty book in your vehicle documents. If no
warranty book is available, the tires should be
rotate every 3,000 to 6,000 miles (5,000 to
10,000 km). Earlier may be necessary, depend-
ing on the degree of tire wear. Do not change the
direction of wheel rotation.
Clean the contact surfaces of the wheel and the
brake disc thoroughly every time a wheel is rota-
ted. Check the tire pressure and, if necessary,
restart the tire pressure loss warning system
(
Ypage 394) or the tire pressure monitor
(Ypage 392).
Direction of rotation
Tires with a specified direction of rotation have
additional benefits, e.g. if there is a risk of hydro- planing. These advantages can only be gained if
the tires are installed corresponding to the
direction of rotation.
An arrow on the sidewall of the tire indicates its
correct direction of rotation.
Storing wheels
Store wheels that are not being used in a cool,
dry and preferably dark place. Protect the tires
from oil, grease, gasoline and diesel.
Changing a wheel405
Wheels and tires
Z
Page 408 of 438

Mounting a wheel
Preparing the vehicle
XStop the vehicle on solid, non-slippery and
level ground.
XApply the electric parking brake manually.
XBring the front wheels into the straight-ahead position.
XShift the transmission to position P.
XMake sure that "normal" level is selected for
AIRMATIC (Ypage 212) or Active Body Con-
trol (ABC) (Ypage 210).
XSwitch off the engine.
XOpen the driver's door.
The on-board electronics now have status 0.
This is the same as the SmartKey having been
removed.
XRemove Start/Stop button from ignition lock (Ypage 162).
or, if the SmartKey is inserted in the ignition
lock:
XRemove the SmartKey from the ignition lock.
XMake sure that the engine cannot be started
via your smartphone (Ypage 164).
XIf included in the vehicle equipment, remove
the tire-change tool kit from the vehicle.
XSafeguard the vehicle against rolling away.
Securing the vehicle to prevent it from
rolling away
If your vehicle is equipped with a wheel chock, it can be found in the tire-change tool kit
(
Ypage 367).
The folding wheel chock is an additional safety
measure to prevent the vehicle from rolling
away, for example when changing a wheel.
XFold both plates upwards :.
XFold out lower plate;.
XGuide the lugs on the lower plate fully into the
openings in base plate =.
XPlace chocks or other suitable items under
the front and rear of the wheel that is diago-
nally opposite the wheel you wish to change.
Raising the vehicle
GWARNING
If you do not position the jack correctly at the
appropriate jacking point of the vehicle, the
jack could tip over with the vehicle raised.
There is a risk of injury.
Only position the jack at the appropriate jack-
ing point of the vehicle. The base of the jack
must be positioned vertically, directly under
the jacking point of the vehicle.
!The jack is designed exclusively for jacking
up the vehicle at the jacking points. Other-
wise, your vehicle could be damaged.
Observe the following when raising the vehi-
cle:
RTo raise the vehicle, only use the vehicle-spe-
cific jack that has been tested and approved
by Mercedes-Benz. If used incorrectly, the
jack could tip over with the vehicle raised.
RThe jack is designed only to raise and hold the
vehicle for a short time while a wheel is being
changed. It must not be used for performing
maintenance work under the vehicle.
RAvoid changing the wheel on uphill and down- hill slopes.
RBefore raising the vehicle, secure it from roll-
ing away by applying the parking brake and
406Changing a wheel
Wheels and tires
Page 410 of 438

The jacking points are located just behind the
front wheel housings and just in front of the rear
wheel housings (arrows).
XTake the ratchet wrench out of the vehicle
tool kit and place it on the hexagon nut of the
jack so that the letters AUFare visible.
Mercedes-AMG vehicles and vehicles with
AMG equipment: to protect the vehicle body,
the vehicle has covers installed next to the jack-
ing points on the outer sills.
XMercedes-AMG vehicles and vehicles
with AMG equipment: fold cover?
upwards.
XPosition jack Bat jacking point A.
XMake sure the foot of the jack is directly
beneath the jacking point.
XTurn ratchet wrench Cuntil jack Bsits
completely on jacking point Aand the base
of the jack lies evenly on the ground.
XTurn ratchet wrench Cuntil the tire is raised
a maximum of 1.2 in (3 cm) from the ground.
Removing a wheel
!Mercedes-AMG vehicles: during removal
and repositioning of the wheel, the wheel rim
can strike the ceramic-brake disc and dam-
age it. Therefore, you should proceed care-
fully and get a second person assist to you.
Alternatively, you can use a second alignment
bolt.
!Do not place wheel bolts in sand or on a dirty
surface. The bolt and wheel hub threads could
otherwise be damaged when you screw them
in.
When mounting/removing wheels, and for as
long as the wheels are removed, avoid applying
any external force on the brake disks. This could
impair the level of comfort when braking.
408Changing a wheel
Wheels and tires
Page 432 of 438

ModelMB-Freigabe orMB-Approval
All models229.5
Use only SAE 0W-40 or SAE 5W-40 engine oils
for Mercedes-AMG vehicles.
iMB approval is indicated on the oil contain-
ers.
Filling capacities
The following values refer to an oil change
including the oil filter.
Missing values were not available at time of
going to print.
ModelCapacity
S 400 4MATIC
S 550 e6.9 US qt (6.5 l)
S 600
Mercedes‑May-
bach S 600
Mercedes‑AMG
S 6511.1 US qt (10.5 l)
Mercedes‑AMG
S 63 4MATIC9.0 US qt (8.5l)
Allot her models8.5 US qt (8.0 l)
Additives
!Do not use any additives in the engine oil.
This could damage the engine.
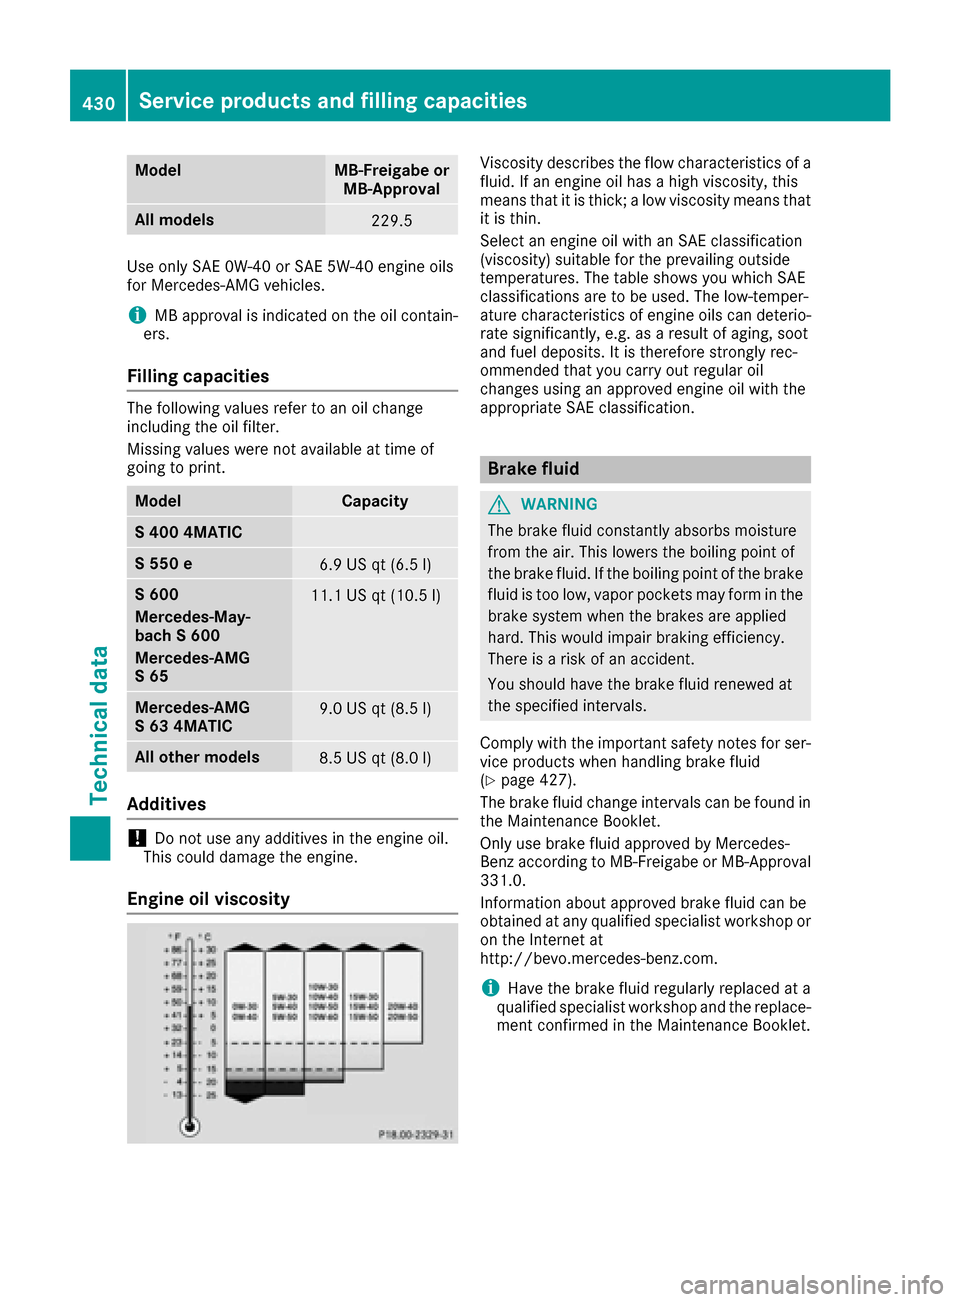
Engine oil viscosity
Viscosity describes the flow characteristics of a
fluid. If an engine oil has a high viscosity, this
means that it is thick; a low viscosity means that it is thin.
Select an engine oil with an SAE classification
(viscosity) suitable for the prevailing outside
temperatures. The table shows you which SAE
classifications are to be used. The low-temper-
ature characteristics of engine oils can deterio-
rate significantly, e.g. as a result of aging, soot
and fuel deposits. It is therefore strongly rec-
ommended that you carry out regular oil
changes using an approved engine oil with the
appropriate SAE classification.
Brake fluid
GWARNING
The brake fluid constantly absorbs moisture
from the air. This lowers the boiling point of
the brake fluid. If the boiling point of the brake
fluid is too low, vapor pockets may form in the
brake system when the brakes are applied
hard. This would impair braking efficiency.
There is a risk of an accident.
You should have the brake fluid renewed at
the specified intervals.
Comply with the important safety notes for ser-
vice products when handling brake fluid
(
Ypage 427).
The brake fluid change intervals can be found in
the Maintenance Booklet.
Only use brake fluid approved by Mercedes-
Benz according to MB-Freigabe or MB-Approval
331.0.
Information about approved brake fluid can be
obtained at any qualified specialist workshop or on the Internet at
http://bevo.mercedes-benz.co m.
iHave the brake fluid regularly replaced at a
qualified specialist workshop and the replace-
ment confirmed in the Maintenance Booklet.
430Service products and filling capacities
Technical data
Page 434 of 438

spray nozzles may otherwise become
blocked.
At temperatures above freezing:
XFill the washer fluid reservoir with a mixture of
water and windshield washer fluid, e.g. MB
SummerFit.
Add 1 part MB SummerFit to 100 parts water.
At temperatures below freezing:
XFill the washer fluid reservoir with a mixture of
water and washer fluid, e.g. MB WinterFit.
For the correct mixing ratio refer to the infor-
mation on the antifreeze reservoir.
iAdd windshield washer fluid, e.g. MB Sum-
merFit or MB WinterFit, to the washer fluid all
year round.
Climate control system refrigerant
Important safety notes
The climate control system of your vehicle is fil-
led with refrigerant R‑134a.
The instruction label regarding the refrigerant
type used can be found on the radiator cross
member.
!Only the refrigerant R‑134a and the PAG oil
approved by Mercedes-Benz may be used.
The approved PAG oil may not be mixed with
any other PAG oil that is not approved for
R-134a refrigerant. Otherwise, the climate
control system may be damaged.
Service work, such as topping up refrigerant or
replacing components, may only be carried out
by a qualified specialist workshop. All applicable
regulations, as well as SAE standard J639, must
be adhered to.
Always have work on the climate control system
carried out at a qualified specialist workshop.
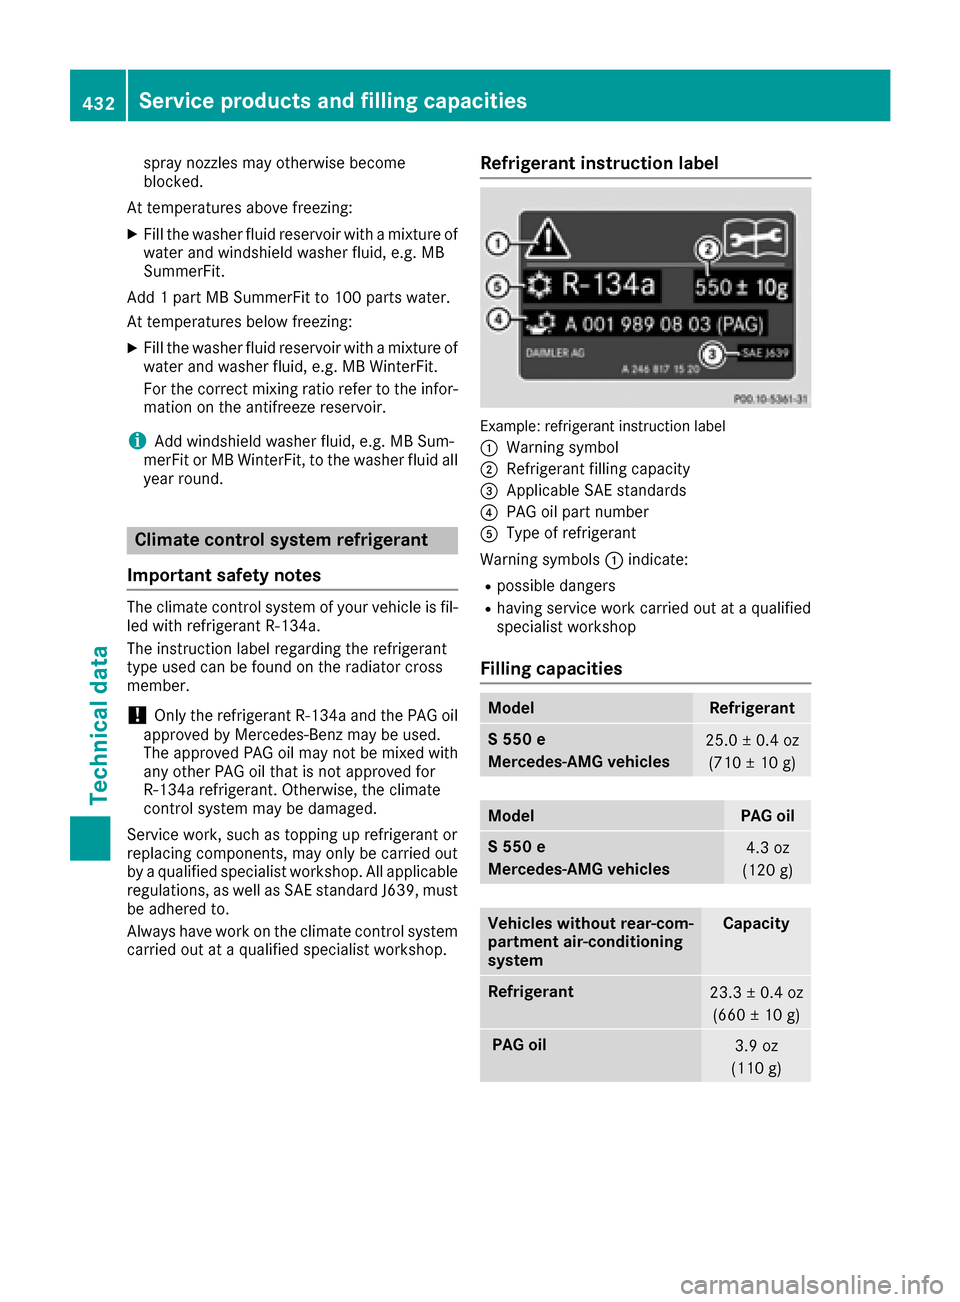
Refrigerant instruction label
Example: refrigerant instruction label
:
Warning symbol
;Refrigerant filling capacity
=Applicable SAE standards
?PAG oil part number
AType of refrigerant
Warning symbols :indicate:
Rpossible dangers
Rhaving service work carried out at a qualified
specialist workshop
Filling capacities
ModelRefrigerant
S 550 e
Mercedes‑AMG vehicles25.0 ± 0.4 oz
(710 ± 10 g)
ModelPAG oil
S 550 e
Mercedes‑AMG vehicles4.3 oz
(120 g)
Vehicles without rear-com-
partment air-conditioning
systemCapacity
Refrigerant23.3 ± 0.4 oz (660 ± 10 g)
PAG oil3.9 oz
(110 g)
432Service products and filling capacities
Technical data
Page 435 of 438

Vehicles with rear-com-
partment air-conditioning
systemCapacity
Refrigerant27.1 ± 0.4 oz(770 ± 10 g)
PAG oil4.2 oz
(120 g)
Vehicle data
General notes
Please note that for the specified vehicle data:
Rthe heights specified may vary as a result of:
-tires
-load
-condition of the suspension
-optional equipment
Roptional equipment reduces the maximum
payload.
Dimensions and weights
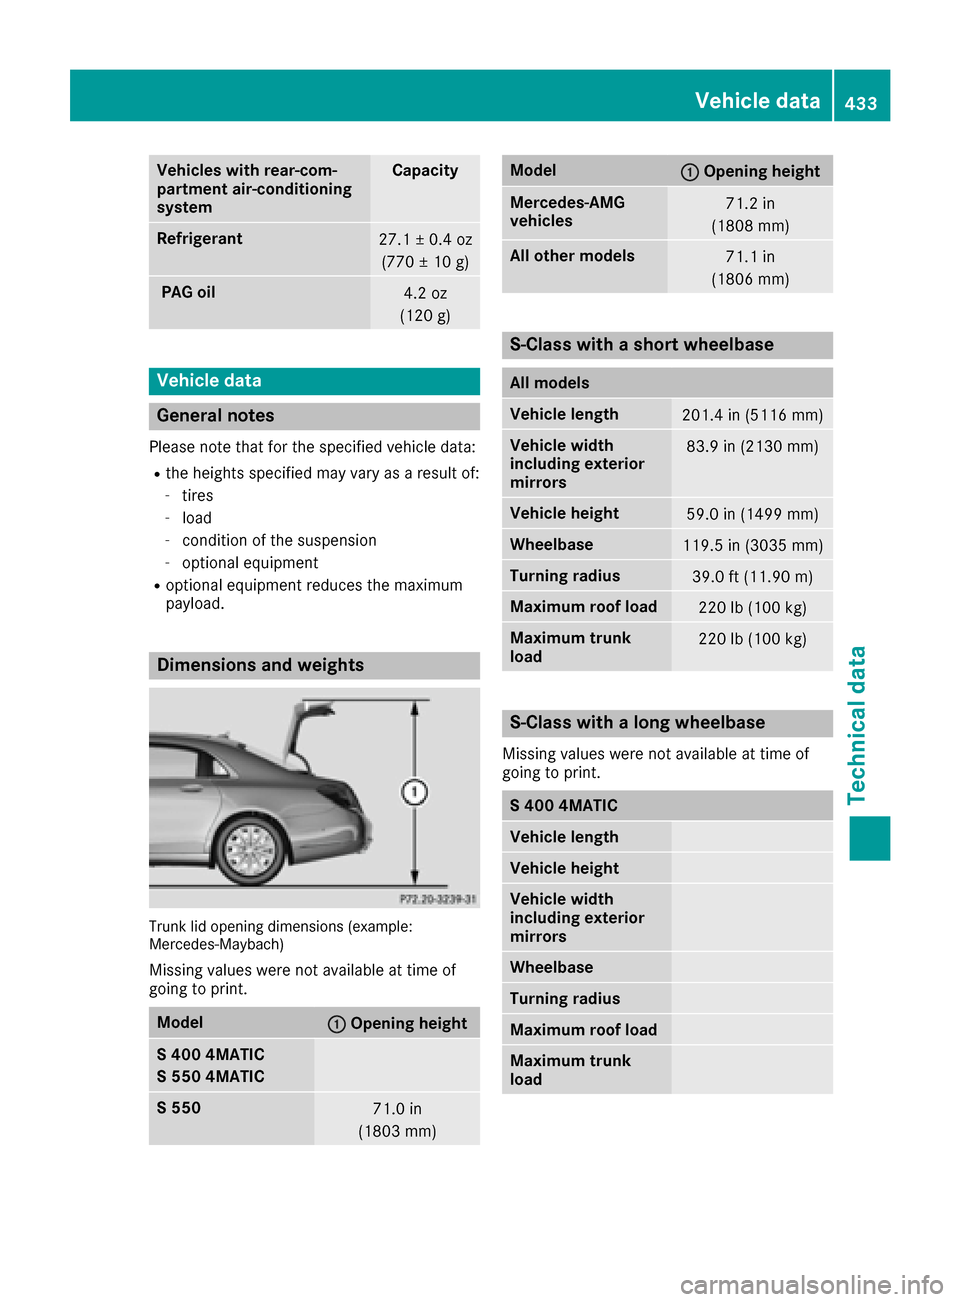
Trunk lid opening dimensions (example:
Mercedes‑Maybach)
Missing values were not available at time of
going to print.
Model:Opening height
S 400 4MATIC
S 550 4MATIC
S 55071.0 in
(1803 mm)
Model:Opening height
Mercedes ‑AMG
vehicles71.2 in
(1808 mm)
All other models71.1 in
(1806 mm)
S-Class with a short wheelbase
All models
Vehicle length201.4 in (5116 mm)
Vehicle width
including exterior
mirrors83.9 in (2130 mm)
Vehicle height59.0 in (1499 mm)
Wheelbase119.5 in (3035 mm)
Turning radius39.0 ft (11.90 m)
Maximum roof load220 lb (100 kg)
Maximum trunk
load220 lb (100 kg)
S-Class with a long wheelbase
Missing values were not available at time of
going to print.
S 400 4MATIC
Vehicle length
Vehicle height
Vehicle width
including exterior
mirrors
Wheelbase
Turning radius
Maximum roof load
Maximum trunk
load
Vehicle data433
Technical data
Z