2016 MERCEDES-BENZ S-Class SEDAN engine
[x] Cancel search: enginePage 201 of 438

iCruise controlisnot deactivated ifyou
depr ess the accelerator pedal. Ifyou acceler-
ate to overtake, cruise control adjusts the
veh icle's speed to the last speed stored after
you have finished overtaking.
Deactivating cruise control
There are several ways to deactivate cruise con-
trol:
XBriefly press cruise the control lever for-
wards :.
or
XBrake.
Cruise control isautomatically deactivated if:
Ryou engage the electr icparking brake
Ryou are driving at less than 20 mph (30 km/h)
RESP®intervenes or you deactivate ESP®
Ryou shift the transmission to position Nwhile
driv ing
If cruise control isdeactivate d,you willhear a
warning tone. You willsee the Cruise Con‐
trol Offmessage inthe multifunction display
for approximate lyfive seconds.
iWhen you switch off the engine, the last
speed stored iscleared.
DISTRONIC PLUS
General notes
DI ST RONIC PLUS regulates the speed and auto-
matically helps you maintain the distance to the
veh icle detected infront. Vehicle s are detected
wit h the aid of the radar sensor system.
DI ST RONIC PLUS brakes automatically so that
the set speed is not excee ded.Change into a lower gear in good time on long
and steep
downhillgradients. This isespecially
important ifthe vehicle is laden. By doing so, you
will make use of the braking effect of the engine.
This relieves the load on the brake system and
prevents the brakes from overheating and wear-
ing too quickly.
If DI ST RONIC PLUS detects that there isa risk of
a collision, you will bewarned visually and
acoustically. DI STRONIC PLUS cannot prevent a
collision without your intervention. An intermit-
tent warning tone will then sound and the dis-
tance warning lamp willlight up in the instru-
ment cluster. Brake immediately inorder to
increase the distance to the vehicle in front or
take evasive action provided it issafe to doso.
DISTRONIC PLUS operates inrange between
0 mph (0 km/ h)and 120 mph (200km/ h).
Do not use DISTRONIC PLUS while driving on
roads with steep gradients.
As DISTRONIC PLUS transmits radar waves, it
can resemble the radar de tectors o
f the respon-
sible authorities. You can refer to the relevant
chapter in the Operator's Manual if questions
are asked about this.
iUSA only: This device has been approved by
the FCC as a "Vehicular Radar System". The
radar sensor is intended for use in an auto-
motive radar system only. Removal, tamper-
ing, or altering of the device will void any war-
ranties, and is not permitted by the FCC. Do
not tamper with, alter, or use in any non-
approved way.
Any unauthorized modification to this device
could void the user's authority to operate the
equipment.
iCanada only: This device complies with
RSS-210 of Industry Canada. Operation is
subject to the following two conditions:
1. This device may not cause harmful inter-
ference, and
2. This device must accept any interference
received, including interference that may
cause undesired operation of the device.
Removal, tampering, or altering of the device
will void any warranties, and is not permitted.
Do not tamper with, alter, or use in any non-
approved way.
Any unauthorized modification to this device
could void the user's authority to operate the equipment.
Driving system s199
Driving an d parking
Z
Page 203 of 438
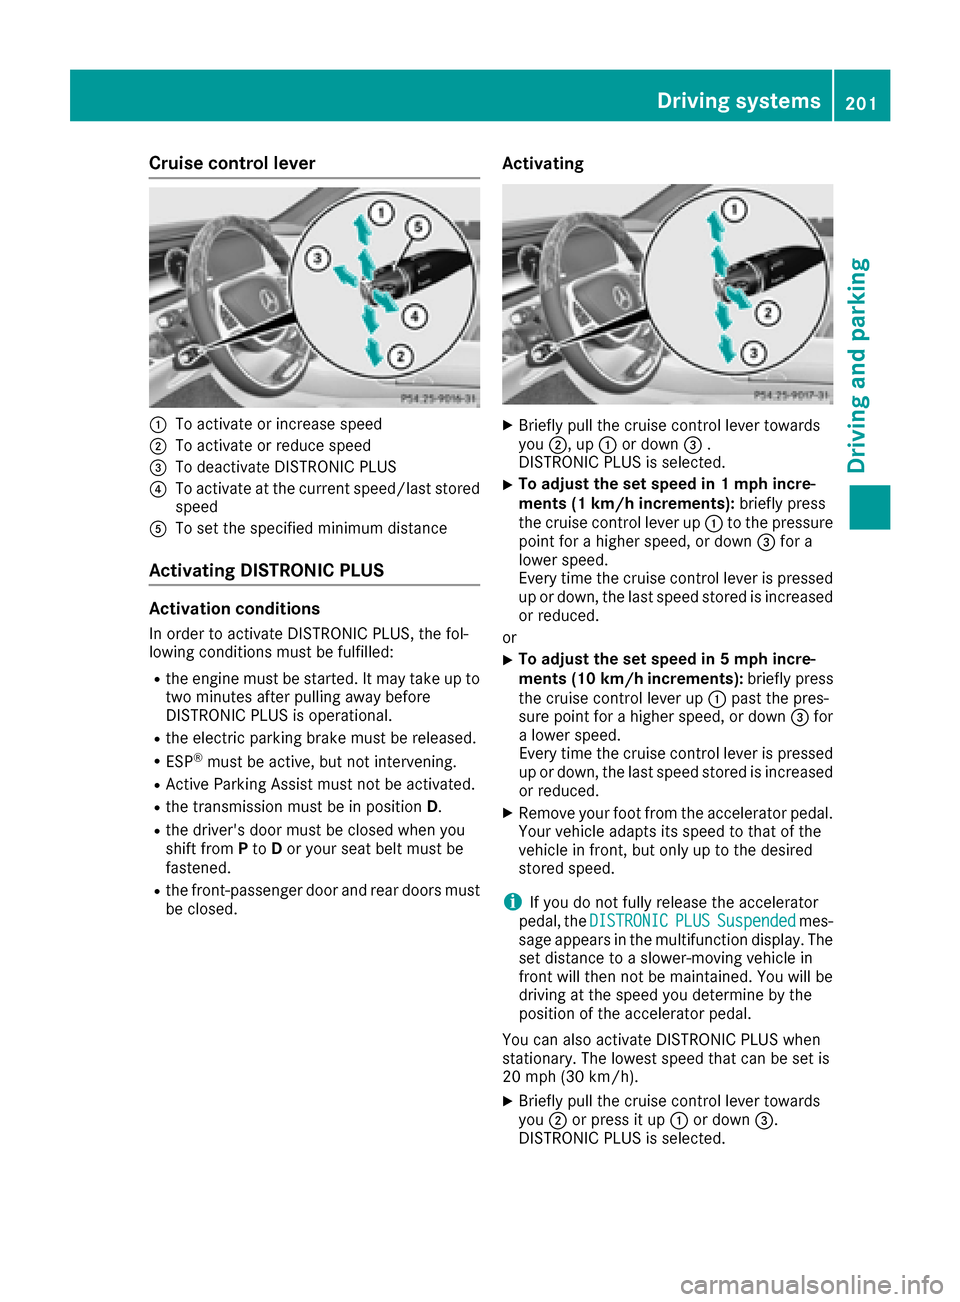
Cruise control lever
:To activate or increase speed
;To activate or reduce speed
=To deactivate DISTRONIC PLUS
?To activate at the current speed/last storedspeed
ATo set the specified minimum distance
Activating DISTRONIC PLUS
Activation conditions
In order to activate DISTRONIC PLUS, the fol-
lowing conditions must be fulfilled:
Rthe engine must be started. It may take up totwo minutes after pulling away before
DISTRONIC PLUS is operational.
Rthe electric parking brake must be released.
RESP®must be active, but not intervening.
RActive Parking Assist must not be activated.
Rthe transmission must be in position D.
Rthe driver's door must be closed when you
shift fromPto Dor your seat belt must be
fastened.
Rthe front-passenger door and rear doors must
be closed.
Activating
XBriefly pull the cruise control lever towards
you ;, up :or down =.
DISTRONIC PLUS is selected.
XTo adjust the set speed in 1 mph incre-
ments (1 km/h increments): briefly press
the cruise control lever up :to the pressure
point for a higher speed, or down =for a
lower speed.
Every time the cruise control lever is pressed
up or down, the last speed stored is increased
or reduced.
or
XTo adjust the set speed in 5 mph incre-
ments (10 km/h increments): briefly press
the cruise control lever up :past the pres-
sure point for a higher speed, or down =for
a lower speed.
Every time the cruise control lever is pressed
up or down, the last speed stored is increased
or reduced.
XRemove your foot from the accelerator pedal.
Your vehicle adapts its speed to that of the
vehicle in front, but only up to the desired
stored speed.
iIf you do not fully release the accelerator
pedal, the DISTRONICPLUSSuspendedmes-
sage appears in the multifunction display. The set distance to a slower-moving vehicle in
front will then not be maintained. You will be
driving at the speed you determine by the
position of the accelerator pedal.
You can also activate DISTRONIC PLUS when
stationary. The lowest speed that can be set is
20 mph (30 km/h).
XBriefly pull the cruise control lever towards
you ;or press it up :or down =.
DISTRONIC PLUS is selected.
Driving systems201
Driving and parking
Z
Page 205 of 438
If these conditions are fulfilled, your vehicle is
accelerated. Acceleration will be interrupted if
changing lanes takes too long or if the distance
between your vehicle and the vehicle in front
becomes too small.
iWhen you change lanes, DISTRONIC PLUS
monitors the left lane on left-hand-drive vehi-
cles or the right lane on right-hand-drive vehi-
cles.
Stopping
GWARNING
When leaving the vehicle, even if it is braked
only by DISTRONIC PLUS, it could roll away if:
Rthere is a malfunction in the system or in
the voltage supply.
RDISTRONIC PLUS has been deactivated
with the cruise control lever, e.g. by a vehi-
cle occupant or from outside the vehicle.
Rthe electrical system in the engine com-
partment, the battery or the fuses have
been tampered with.
Rthe battery is disconnected.
Rthe accelerator pedal has been depressed, e.g. by a vehicle occupant.
There is a risk of an accident.
If you wish to exit the vehicle, always turn off
DISTRONIC PLUS and secure the vehicle
against rolling away.
For further information on deactivating
DISTRONIC PLUS (
Ypage 205).
If DISTRONIC PLUS detects that the vehicle in
front is stopping, it brakes your vehicle until it is
stationary.
Once your vehicle is stationary, it remains sta-
tionary and you do not need to depress the
brake.
After a time, the electric parking brake secures
the vehicle and relieves the service brake.
Depending on the specified minimum distance,
your vehicle will come to a standstill at a suffi-
cient distance behind the vehicle in front. The
specified minimum distance is set using the
control on the cruise control lever. When DISTRONIC PLUS is activated, the trans-
mission is shifted automatically to position
Pif:
Rthe driver's seat belt is not fastened and the
driver's door is open.
Rthe engine is switched off, unless it is auto-
matically switched off by the ECO start/stop
function.
The electric parking brake secures the vehicle
automatically if DISTRONIC PLUS is activated
when the vehicle is stationary and:
Ra system malfunction occurs.
Rthe power supply is not sufficient.
If a malfunction in the electric parking brake
occurs, then the transmission may also be shif-
ted into position Pautomatically.
Setting a speed
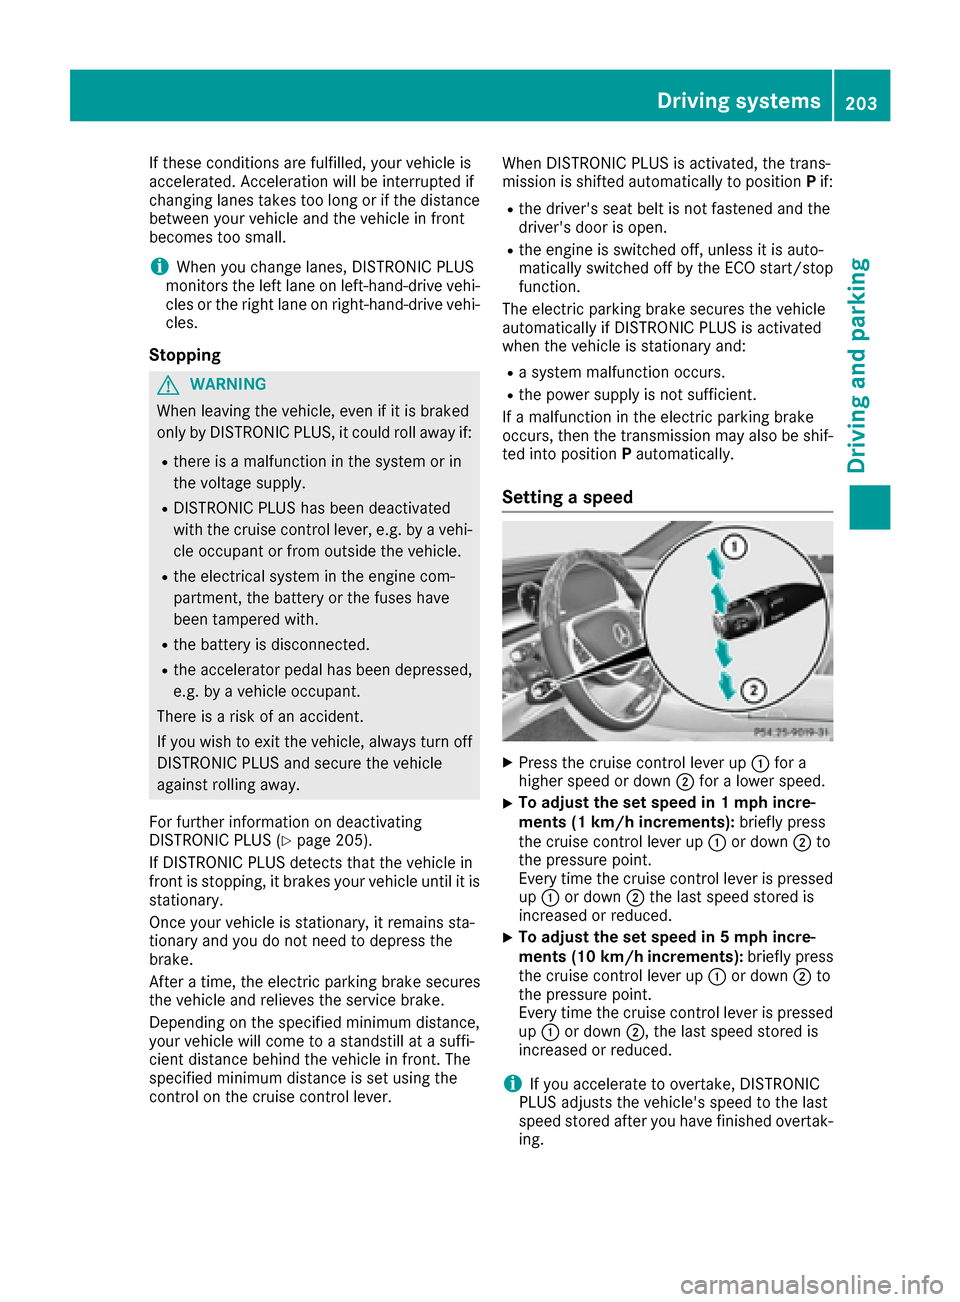
XPress the cruise control lever up :for a
higher speed or down ;for a lower speed.
XTo adjust the set speed in 1 mph incre-
ments (1 km/h increments): briefly press
the cruise control lever up :or down ;to
the pressure point.
Every time the cruise control lever is pressed up : or down ;the last speed stored is
increased or reduced.
XTo adjust the set speed in 5 mph incre-
ments (10 km/h increments): briefly press
the cruise control lever up :or down ;to
the pressure point.
Every time the cruise control lever is pressed
up : or down ;, the last speed stored is
increased or reduced.
iIf you accelerate to overtake, DISTRONIC
PLUS adjusts the vehicle's speed to the last
speed stored after you have finished overtak-
ing.
Driving systems203
Driving and parking
Z
Page 207 of 438
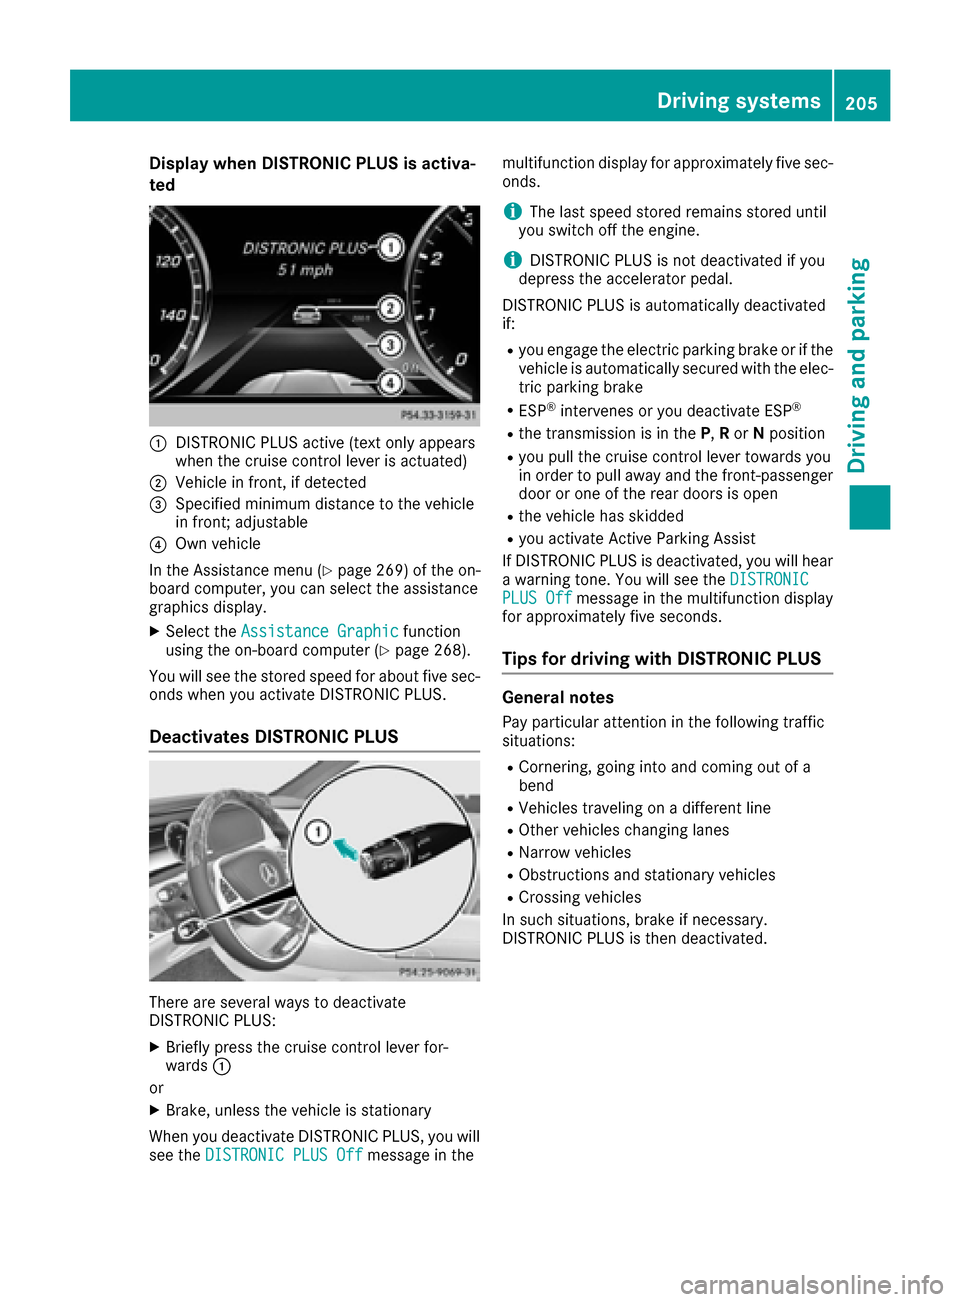
Display when DISTRONIC PLUS is activa-
te d
:DISTRONIC PLU Sactive (tex tonly appears
when th ecruise control lever is actuated)
;Vehicl ein front, if detecte d
=Specified minimum distanc eto th evehicl e
in front; adjustable
?Own vehicl e
In th eAssistance men u (
Ypage 269) of theon -
boar dcomputer, you can select th eassistanc e
graphic sdisplay.
XSelec tth eAssistanc eGraphi cfunction
usin gth eon-boar dcomputer (Ypage 268).
You will see th estore dspeed fo rabout fiv esec -
onds when you activat eDISTRONIC PLUS.
Deactivate sDISTRONIC PLUS
There are severa lways to deactivat e
DISTRONIC PLUS:
XBriefly press th ecruise control lever for-
ward s:
or
XBrake ,unless th evehicl eis stationary
Whe nyou deactivat eDISTRONIC PLUS, you will
see th eDISTRONIC PLU SOff
message in th emultifunction display fo
rapproximately fiv esec -
onds.
iThe last speed store dremain sstore duntil
you switch of fth eengine.
iDISTRONIC PLU Sis no tdeactivated if you
depress th eaccelerato rpedal.
DISTRONIC PLU Sis automatically deactivated
if:
Ryou engage th eelectric parkin gbrak eor if th e
vehicl eis automatically secured wit hth eelec -
tric parkin gbrak e
RESP®intervenes or you deactivat eES P®
Rthetransmissio nis in th eP, Ror Nposition
Ryou pull th ecruise control lever toward syou
in order to pull away and th efront-passenger
doo ror on eof th erea rdoors is ope n
Rthevehicl ehas skidde d
Ryou activat eActive Parking Assis t
If DISTRONIC PLU Sis deactivated, you will hear
a warnin gtone .You will see th eDISTRONIC
PLU SOffmessage in th emultifunction display
fo rapproximately fiv eseconds.
Tips for drivin gwit hDISTRONIC PLUS
General notes
Pay particular attention in th efollowing traffic
situations:
RCornering, goin ginto and comin gout of a
ben d
RVehicles travelin gon adifferen tlin e
ROther vehicles changin glanes
RNarrow vehicles
RObstruction sand stationary vehicles
RCrossing vehicles
In suc hsituations, brak eif necessary.
DISTRONIC PLU Sis then deactivated.
Driving systems20 5
Driving an d parking
Z
Page 212 of 438
The electric parking brake secures the vehicle
automatically if the HOLD function is activated
when the vehicle is stationary and:
Ra system malfunction occurs.
Rthe power supply is not sufficient.
If a malfunction in the electric parking brake
occurs, then the transmission may also be shif-
ted into position Pautomatically.
MAGIC BODY CONTROL
General notes
MAGIC BODY CONTROL consists of Active Body
Control (ABC), ROAD SURFACE SCAN as well as
automatic vehicle stabilization in the event of a
crosswind.
Your vehicle automatically adjusts its ride height
to improve driving safety and reduce fuel con-
sumption. The suspension mode is adjusted
according to your selection (sports or comfort),
the road surface conditions and the vehicle load. A multifunction camera detects bumps in the
road surface before the vehicle drives over
them. This reduces chassis movements.
Important safety notes
GWARNING
When the vehicle is being lowered, people
could become trapped if their limbs are
between the vehicle body and the wheels or
underneath the vehicle. There is a risk of
injury.
Make sure no one is underneath the vehicle or
in the immediate vicinity of the wheel arches
when the vehicle is being lowered.
!The vehicle is lowered when the engine is
switched off. When parking, position your
vehicle so that it does not make contact with
the curb as the vehicle is lowered. Your vehi-
cle could otherwise be damaged.
Crosswind Assist
The crosswind stabilization operates by chang-
ing wheel loads through adjusting the ABC
spring struts. It reduces impairments in handling
when driving in a straight line and assists during
countersteering. Crosswind Assist is active in the speed range
between 50 mph (80 km/h)
and
130 mph (210 km/h) when driving straight
ahead or cornering gently.
Active Body Control ABC
Vehicle level
All vehicles except AMG vehicles: depending
on the vehicle level that has been set, the vehi-
cle automatically adjusts its height dependent
on the current speed. The vehicle is lowered by
up to 0.6 in (15 mm) as the speed increases. As
the speed is reduced, the vehicle is raised up to
the set vehicle height.
AMG vehicles: depending on the vehicle level
that has been selected, the vehicle automati-
cally adjusts its height dependent on the current
speed. The vehicle is lowered by up to 0.4 in
(10 mm) below the normal level as the speed
increases. As the speed is reduced, the vehicle
is raised up to the set vehicle height.
Select the "Normal" setting for normal road con-
ditions and "Raised" for driving with snow chains
or in particularly poor road conditions.
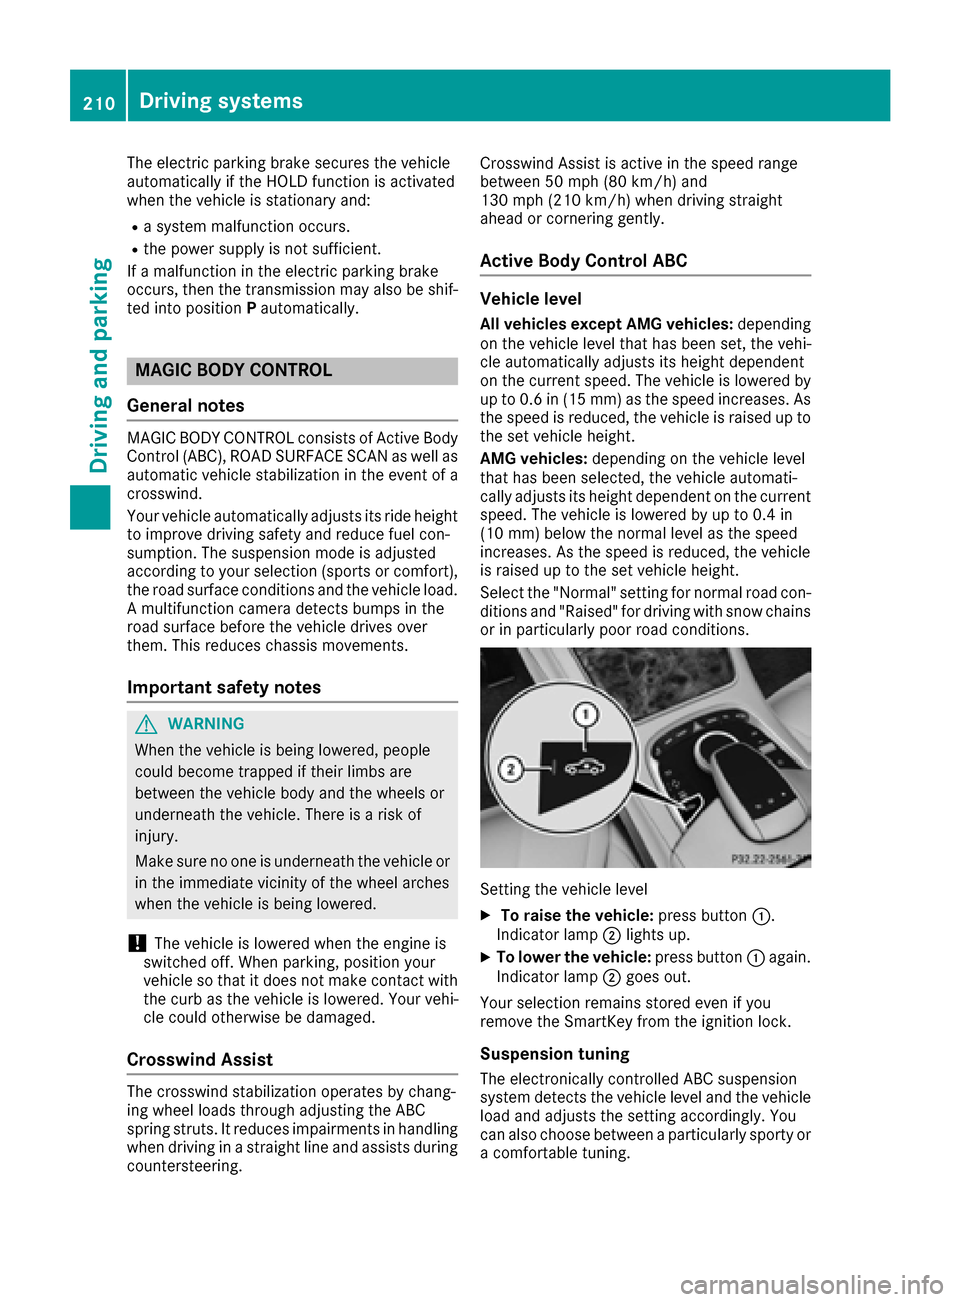
Setting the vehicle level
XTo raise the vehicle: press button:.
Indicator lamp ;lights up.
XTo lower the vehicle: press button:again.
Indicator lamp ;goes out.
Your selection remains stored even if you
remove the SmartKey from the ignition lock.
Suspension tuning
The electronically controlled ABC suspension
system detects the vehicle level and the vehicle
load and adjusts the setting accordingly. You
can also choose between a particularly sporty or
a comfortable tuning.
210Driving systems
Driving and parking
Page 214 of 438
Rsections of the route have a very small radius
of curvature
Ryou accelerate hard or brake sharply
AIRMATIC
General notes
AIRMATIC is an air suspension with variable
damping for improved driving comfort. All-round
level control ensures the best possible suspen-
sion and constant ground clearance, even with a
laden vehicle. When you drive fast, the vehicle is
lowered automatically to improve driving safety
and to reduce fuel consumption. There is also
the option to manually adjust the vehicle level.
AIRMATIC consists of level setting, level control and the Adaptive Damping System ADS PLUS.
Important safety notes
GWARNING
When the vehicle is being lowered, people
could become trapped if their limbs are
between the vehicle body and the wheels or
underneath the vehicle. There is a risk of
injury.
Make sure no one is underneath the vehicle or
in the immediate vicinity of the wheel arches
when the vehicle is being lowered.
Vehicle level
Setting the raised vehicle level
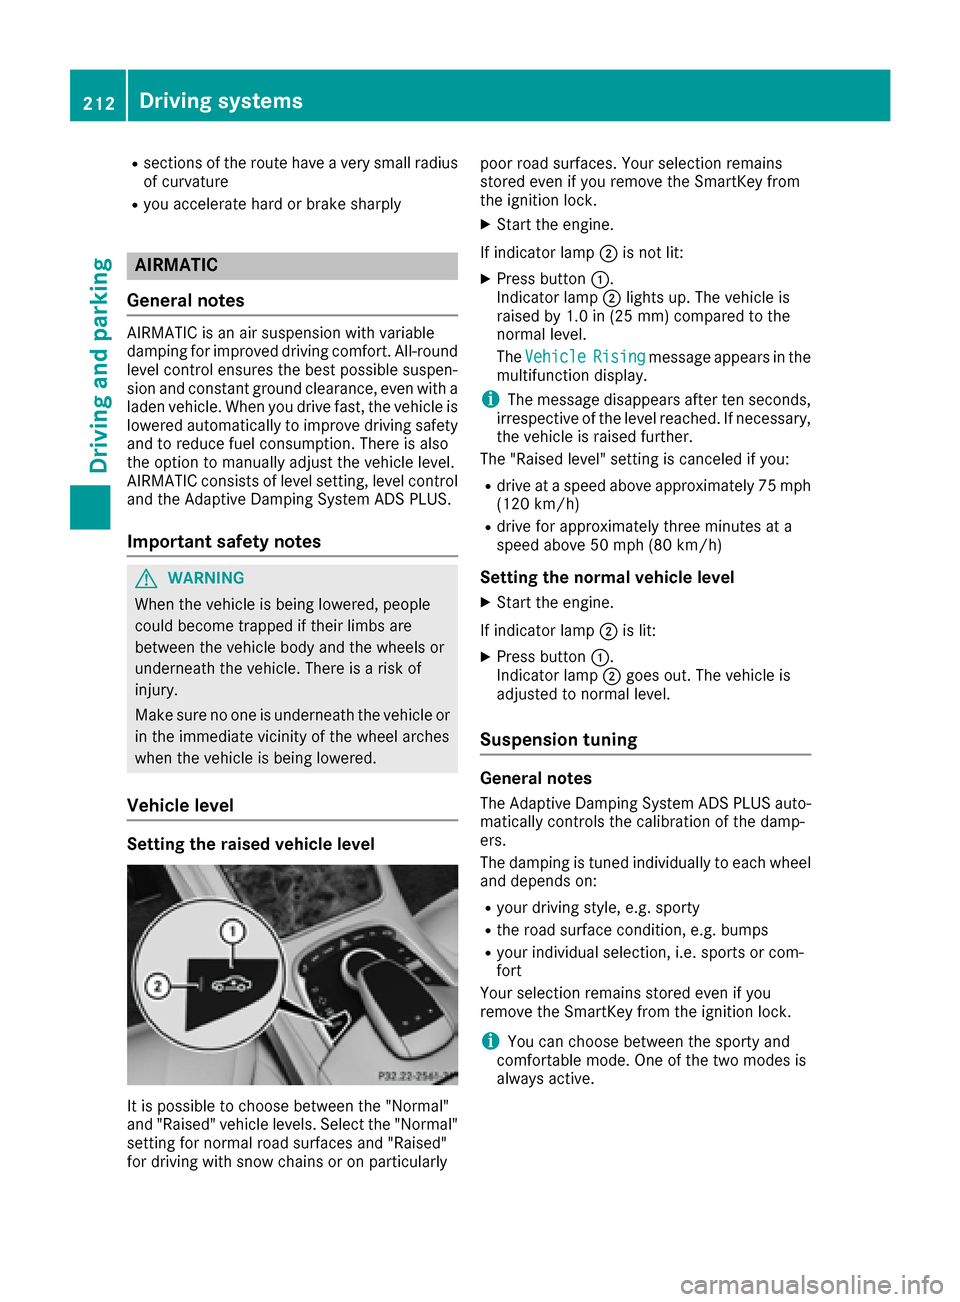
It is possible to choose between the "Normal"
and "Raised" vehicle levels. Select the "Normal"
setting for normal road surfaces and "Raised"
for driving with snow chains or on particularly poor road surfaces. Your selection remains
stored even if you remove the SmartKey from
the ignition lock.
XStart the engine.
If indicator lamp ;is not lit:
XPress button :.
Indicator lamp ;lights up. The vehicle is
raised by 1.0 in (25 mm) compared to the
normal level.
The Vehicle
Risingmessage appears in the
multifunction display.
iThe message disappears after ten seconds,
irrespective of the level reached. If necessary,
the vehicle is raised further.
The "Raised level" setting is canceled if you:
Rdrive at a speed above approximately 75 mph
(120 km/h)
Rdrive for approximately three minutes at a
speed above 50 mph (80 km/h)
Setting the normal vehicle level
XStart the engine.
If indicator lamp ;is lit:
XPress button :.
Indicator lamp ;goes out. The vehicle is
adjusted to normal level.
Suspension tuning
General notes
The Adaptive Damping System ADS PLUS auto-
matically controls the calibration of the damp-
ers.
The damping is tuned individually to each wheel
and depends on:
Ryour driving style, e.g. sporty
Rthe road surface condition, e.g. bumps
Ryour individual selection, i.e. sports or com-
fort
Your selection remains stored even if you
remove the SmartKey from the ignition lock.
iYou can choose between the sporty and
comfortable mode. One of the two modes is
always active.
212Driving systems
Driving and parking
Page 217 of 438

Rear sensors
CenterApprox. 48 in (approx.
120 cm)
CornersApprox. 32 in (approx.
80 cm)
Minimum distance
CenterApprox. 8 in (approx. 20 cm)
CornersApprox. 6 in (approx. 15 cm)
If there is an obstacle within this range, the rel-
evant warning displays light up and a warning
tone sounds. If the distance falls below the min-
imum, the distance may no longer be shown.
Warning displays
:Segments on the left-hand side of the vehi-
cle
;Segments on the right-hand side of the vehi-
cle
=Segments showing operational readiness
The warning displays show the distance
between the sensors and the obstacle. The
warning display for the front area is in the instru-
ment cluster. The warning display for the rear
area is located on the headliner in the rear com- partment.
The warning display for each side of the vehicle
is divided into five yellow and two red segments.
PARKTRONIC is operational if operational read-
iness indicator =lights up.
The selected transmission position and the
direction in which the vehicle is rolling deter-
mine which warning display is active when the
engine is running.
Transmission posi-
tionWarning display
DFront area activated
R, Nor the vehicle is
rolling backwardsRear and front areas
activated
PNo areas activated
One or more segments light up as the vehicle
approaches an obstacle, depending on the vehi-
cle's distance from the obstacle.
From the:
Rsixth segment onwards, you will hear an inter-
mittent warning tone for approximately two
seconds.
Rseventh segment onwards, you will hear a
warning tone for approximately two seconds.
This indicates that you have now reached the minimum distance.
Deactivating/activating PARKTRONIC
:Indicator lamp
;Deactivating/activating PARKTRONIC
If indicator lamp :is on then PARKTRONIC is
deactivated. Active Parking Assist is then also
deactivated.
iPARKTRONIC is automatically activated
when you turn the SmartKey to position 2in
the ignition lock.
Driving systems215
Driving and parking
Z
Page 220 of 438
Rthat are parallel to the direction of travel andat least 39.5 in (1.0 m)longer than your vehi-
cle
Rthat are at right angles to the direction of
travel and at least 39.5 in (1.0 m) wider than
your vehicle
iNote that Active Parking Assist cannot
measure the size of a parking space if it is at
right angles to the direction of travel. You will
need to judge whether your vehicle will fit into the parking space.
When driving at speeds below 19 mph
(30 km/h), you will see the parking symbol as a
status indicator in the instrument cluster. When
a parking space has been detected, an arrow
towards the right or the left also appears. By
default, Active Parking Assist only displays park-
ing spaces on the front-passenger side. Parking
spaces on the driver's side are displayed as
soon as the turn signal on the driver's side is
activated. When parking on the driver's side,
this must remain switched on until you acknowl-
edge the use of Active Parking Assist by press-
ing the abutton on the multifunction steer-
ing wheel. The system automatically determines
whether the parking space is parallel or at right
angles to the direction of travel.
A parking space is displayed while you are driv-
ing past it, and until you are approximately 50 ft (15 m) away from it.
Parking
GWARNING
If you leave the vehicle when it is only being
braked by Active Parking Assist it could roll
away if:
Rthere is a malfunction in the system or in
the voltage supply.
Rthe electrical system in the engine com-
partment, the battery or the fuses have
been tampered with.
Rthe battery is disconnected.
Rthe accelerator pedal has been depressed,
e.g. by a vehicle occupant.
There is a risk of an accident.
Before leaving the vehicle, always secure it
against rolling away.
iWhen PARKTRONIC detects obstacles,
Active Parking Assist brakes automatically
during the parking process. You are respon-
sible for braking in good time.
XStop the vehicle when the parking space sym- bol shows the desired parking space in the
instrument cluster.
XShift the transmission to position R.
The Start
ParkAssist?Yes:OKNo:%
message appears in the multifunction display.
XTo cancel the procedure: press the%
button on the multifunction steering wheel or
pull away.
or
XTo park using Active Parking Assist: press
the a button on the multifunction steering
wheel.
The Park Assist Active Accelerate
and BrakeObserve Surroundingsmes-
sage appears in the multifunction display.
XLet go of the multifunction steering wheel.
XBack up the vehicle, being ready to brake at all
times. When backing up, drive at a speed
below approximately 6 mph (10 km/h). Oth-
erwise Active Parking Assist will be canceled.
Active Parking Assist brakes the vehicle to a
standstill when the vehicle approaches the
rear border of the parking space.
Maneuvering may be required in tight parking spaces.
The Park
AssistActiveSelect DObserveSurroundingsmessage appears in the multi-
function display.
XShift the transmission to position Dwhile the
vehicle is stationary.
Active Parking Assist immediately steers in
the other direction.
The Park Assist Active Accelerate
and BrakeObserve Surroundingsmes-
sage appears in the multifunction display.
iYou will achieve the best results by waiting
for the steering procedure to complete before
pulling away.
XDrive forwards and be ready to brake at all
times.
Active Parking Assist brakes the vehicle to a
standstill.
The Park
AssistActiveSelect RObserveSurroundingsmessage appears in the multi-
function display.
218Driving systems
Driving and parking