2016 MERCEDES-BENZ GLS SUV phone
[x] Cancel search: phonePage 309 of 397
X
Select Town
Town .
The town in which the vehicle is currently
located (current vehicle position) is at the top.
Below this, you will see locations for which
route guidance has already been carried out.
X Enter the town.
The Gsymbol: the location is contained on
the digital map multiple times.
X To switch to the list: slide5the control-
ler.
X Select the location.
If available, the postcode is shown. If there
are different postcodes available for the loca-
tion, the corresponding digits are displayed
with an X
X.
X Enter the street and house number.
The address is in the menu.
Further options for destination entry:
R search for a keyword
The keyword search finds destinations using
fragments of words.
R select the last destination
R select a contact
R select a POI
You can search for a POI by location, name or
telephone number.
R select destination on the map
R enter intermediate destination
You can map the route to the destination
yourself with up to four intermediate destina-
tions.
R select travel guide destination (only available
for selected European countries)
R select destinations from Mercedes-Benz
Apps
R select geo-coordinates
Calculating the route Prerequisite: the address has been entered and
is in the menu.
X Select Start StartorContinue
Continue .
The route is calculated with the selected route
type and the selected route options. If route guidance has already been activated,
a prompt will appear asking whether you wish to end the current route guidance.
X Select Cancel
Cancel current
current route
routeguidance
guidance or
Set as intermediate destination
Set as intermediate destination.
Cancel current route guidance Cancel current route guidance cancels
the current route guidance and starts route
calculation to the new destination.
Set as intermediate destination
Set as intermediate destination adds
the new destination in addition to the existing destination and opens the intermediate des-
tinations list. Connecting the mobile phone
Requirements For telephony via the Bluetooth
®
interface, you
require a Bluetooth ®
-capable mobile phone. The
mobile phone must support Hands-Free Profile
1.0 or above.
Multimedia system:
X Select Vehicle VehicleQ System set‐
System set‐
tings
tingsQActivate Bluetooth Activate Bluetooth.
X Activate Bluetooth ®
O.
Mobile phone:
X Activate Bluetooth ®
and, if necessary, Blue-
tooth ®
visibility for other devices (see the
manufacturer's operating instructions).
The Bluetooth ®
device names for all of one man-
ufacturer's products might be identical. To
make it possible to clearly identify your mobile
phone, change the device name (see the man-
ufacturer's operating instructions).
If the mobile phone supports the PBAP (Phone
Book Access Profile) and MAP (Message
Access Profile) Bluetooth ®
profiles, the follow-
ing information will be transmitted after you
connect:
R Phone book
R Call lists
R Text messages and e-mails
i Further information on suitable mobile
phones can be found at: http://
www.mercedes-benz.com/connect 306
Operating systemMultimedia system
Page 310 of 397
Searching for and authorising (connect-
ing) a mobile phone Before using your mobile phone with the multi-
media system for the first time, you will need to
search for the phone and then authorise (con-
nect) it. Depending on the mobile phone, author- isation takes place by means of Secure Simple
Pairing or by entering a passkey. The multimedia
system automatically makes the procedure that is relevant for your mobile phone available. The
mobile phone is always connected automati-
cally after authorisation. Further information on using a mobile phone with the multimedia sys-
tem (see the Digital Owner's Manual).
If the multimedia system does not detect your
mobile phone, this may be due to particular
security settings on your mobile phone (see the
manufacturer's operating instructions).
Only one mobile phone can be connected to the multimedia system at any one time.
Searching for a mobile phone
Multimedia system:
X Select Tel/
Tel/®QConnect Connect
device deviceQSearch for phones Search for phonesQStart Start
search
search.
The available mobile phones are displayed.
Symbols in the device list Sym-
bol Explanation
Ï
New mobile phone found, not yet
authorised.
Ñ
Mobile phone is authorised, but is
not connected. #
Mobile phone is authorised and
connected.
Connecting the mobile phone
Authorisation using Secure Simple Pairing:
X Select the mobile phone.
A code is displayed in the multimedia system
and on the mobile phone.
X If codes match: selectYes Yeson the multimedia
system.
X Confirm the code on the mobile phone.
Depending on the mobile phone used, con-
firm the connection to the multimedia system
and for the PBAP and MAP Bluetooth ®
pro-
files. The prompt to confirm may take up to two minutes to be displayed (see the manu-
facturer's operating instructions).
X If the codes are different: selectNo
No on the
multimedia system.
The process is cancelled.
Repeat authorisation.
Authorisation by entering a passkey (passcode): X Select the Bluetooth ®
name of the mobile
phone.
The input menu for the passkey is displayed.
X Choose a one- to sixteen-digit number com-
bination as a passkey.
X Enter the passkey on the multimedia system.
X Press ¬to confirm.
X Enter and confirm the passkey on the mobile
phone. Depending on the mobile phone used,
confirm the connection to the multimedia sys-
tem and for the PBAP and MAP Bluetooth ®
profiles. The prompt to confirm may take up
to two minutes to be displayed (see the man- ufacturer's operating instructions).
i Mobile phones that are connected to the
optionally available telephone module with
Bluetooth ®
(SAP profile) are displayed sepa-
rately in the device list. These are found below
the entry MB SAP module phones
MB SAP module phones.
Switching between mobile phones If you have authorised more than one mobile
phone, you can switch between the individual
phones.
Multimedia system:
X Select Connect device
Connect device.
X Select a mobile phone from the device list. Telephone module with Bluetooth
®
(SAP profile)
Introduction The module can be used as a permanently instal-
led telephone with its own SIM card
(Y page 309) or in conjunction with a mobile
phone (Y page 309).
If you wish to use the module in conjunction with
your mobile telephone, the mobile phone must
support the Bluetooth ®
SAP profile (SIM Access
Profile). Operating system
307Multimedia system Z
Page 311 of 397
The following functions are available using the
module:
R hands-free mode
R data modem mode (Y page 309)
R sending and receiving text messages
(Y page 310)
R access to the phone book of the mobile phone
(if supported by the mobile phone)
(Y page 310)
R charging a mobile phone via the USB connec-
tion (Y page 310)
i The module is not available in all vehicles,
depending on the equipment.
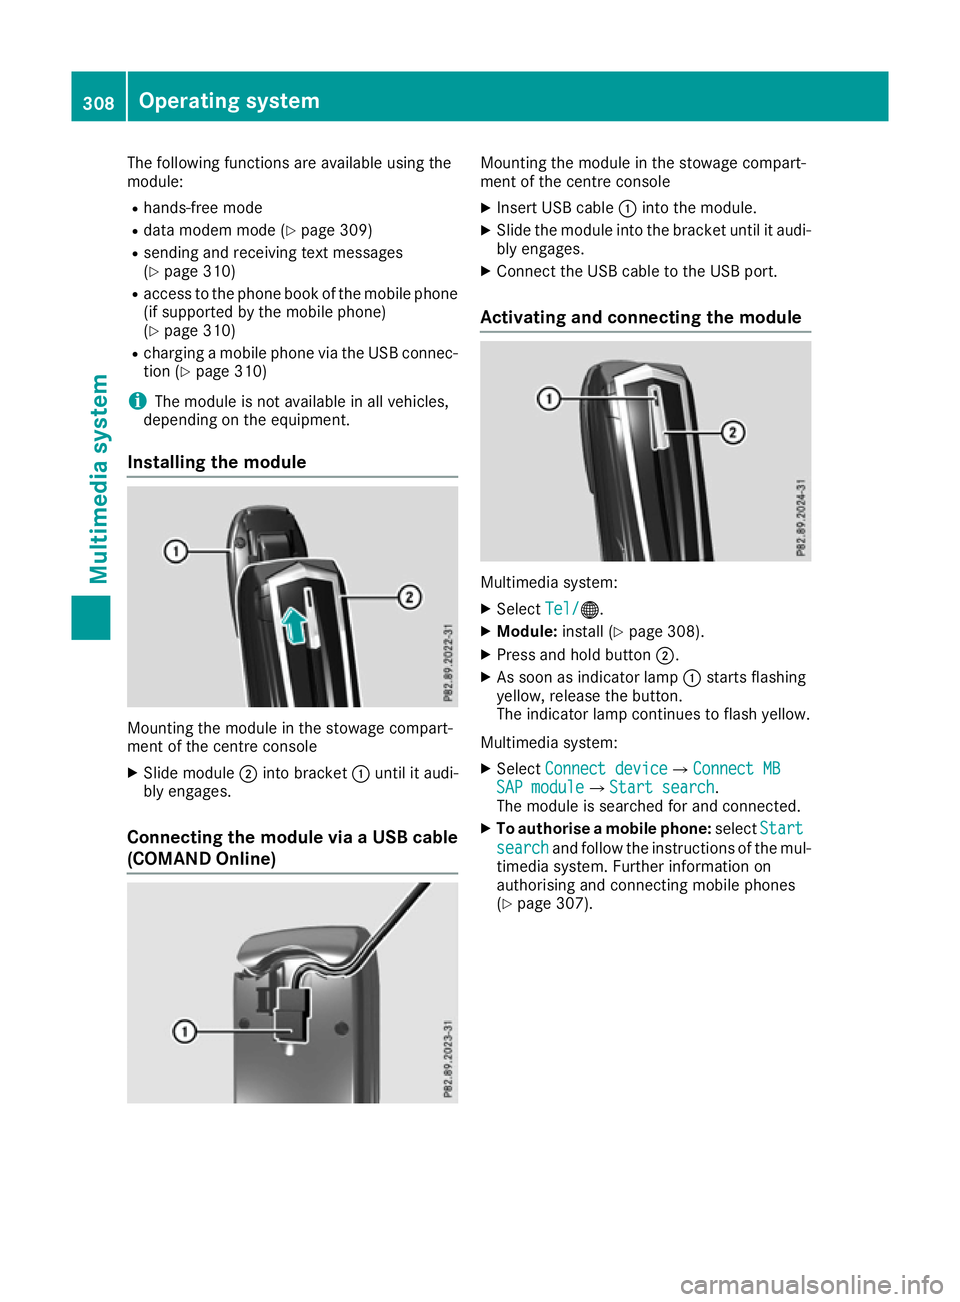
Installing the module Mounting the module in the stowage compart-
ment of the centre console
X Slide module ;into bracket :until it audi-
bly engages.
Connecting the module via a USB cable (COMAND Online) Mounting the module in the stowage compart-
ment of the centre console
X Insert USB cable :into the module.
X Slide the module into the bracket until it audi-
bly engages.
X Connect the USB cable to the USB port.
Activating and connecting the module Multimedia system:
X Select Tel/ Tel/®.
X Module: install (Y page 308).
X Press and hold button ;.
X As soon as indicator lamp :starts flashing
yellow, release the button.
The indicator lamp continues to flash yellow.
Multimedia system: X Select Connect device Connect deviceQConnect MB Connect MB
SAP module
SAP moduleQStart search Start search.
The module is searched for and connected.
X To authorise a mobile phone: selectStart
Start
search
search and follow the instructions of the mul-
timedia system. Further information on
authorising and connecting mobile phones
(Y page 307). 308
Operating systemMultimedia system
Page 312 of 397
SIM card mode
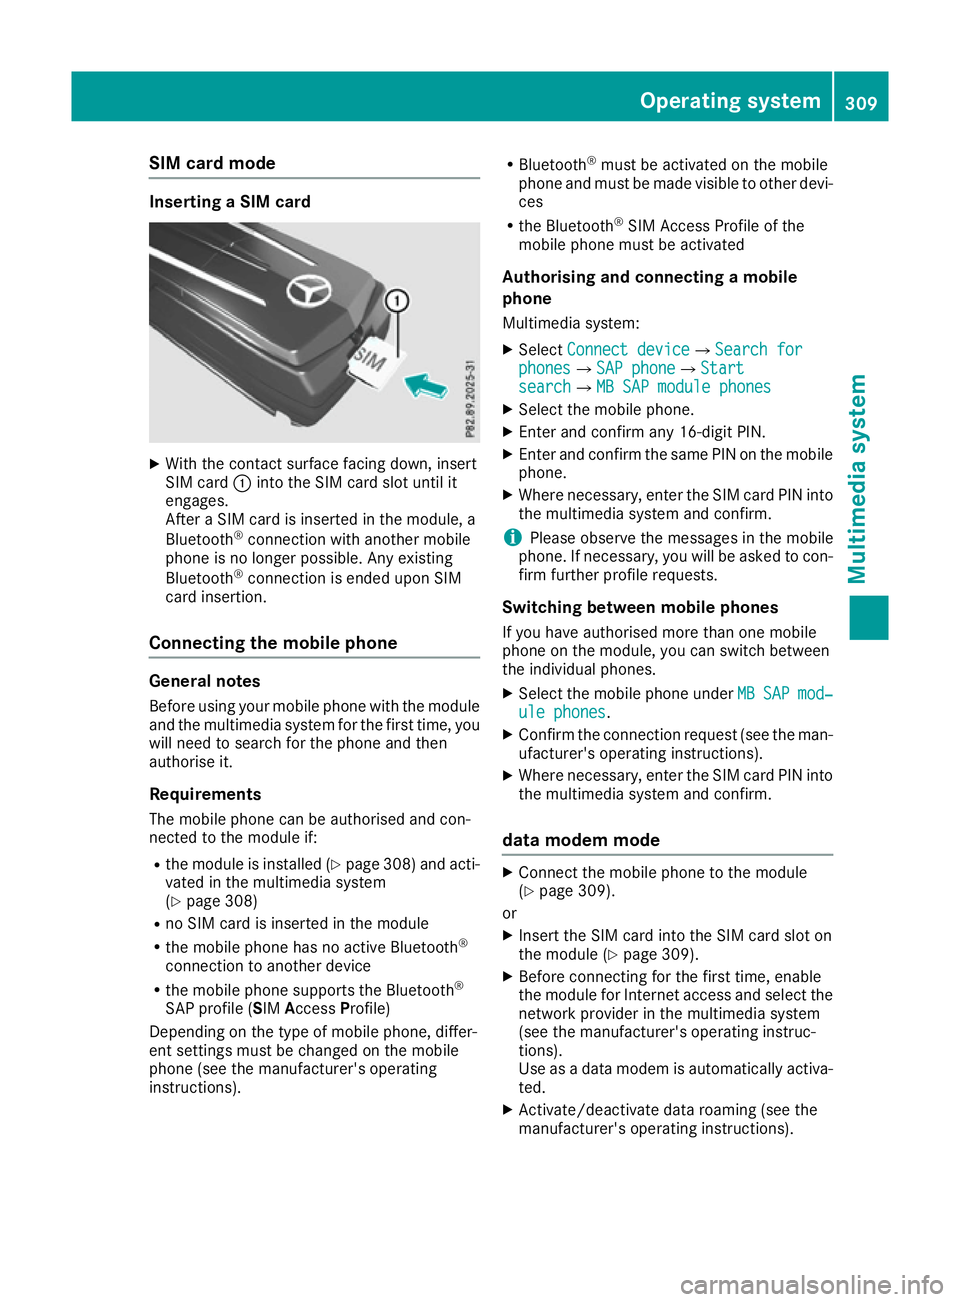
Inserting a SIM card
X
With the contact surface facing down, insert
SIM card :into the SIM card slot until it
engages.
After a SIM card is inserted in the module, a
Bluetooth ®
connection with another mobile
phone is no longer possible. Any existing
Bluetooth ®
connection is ended upon SIM
card insertion.
Connecting the mobile phone General notes
Before using your mobile phone with the module and the multimedia system for the first time, youwill need to search for the phone and then
authorise it.
Requirements The mobile phone can be authorised and con-
nected to the module if:
R the module is installed (Y page 308) and acti-
vated in the multimedia system
(Y page 308)
R no SIM card is inserted in the module
R the mobile phone has no active Bluetooth ®
connection to another device
R the mobile phone supports the Bluetooth ®
SAP profile (SIM AccessProfile)
Depending on the type of mobile phone, differ-
ent settings must be changed on the mobile
phone (see the manufacturer's operating
instructions). R
Bluetooth ®
must be activated on the mobile
phone and must be made visible to other devi-
ces
R the Bluetooth ®
SIM Access Profile of the
mobile phone must be activated
Authorising and connecting a mobile
phone Multimedia system:
X Select Connect device
Connect deviceQSearch for Search for
phones phonesQSAP phone SAP phoneQStart Start
search
searchQMB SAP module phones MB SAP module phones
X Select the mobile phone.
X Enter and confirm any 16-digit PIN.
X Enter and confirm the same PIN on the mobile
phone.
X Where necessary, enter the SIM card PIN into
the multimedia system and confirm.
i Please observe the messages in the mobile
phone. If necessary, you will be asked to con-
firm further profile requests.
Switching between mobile phones If you have authorised more than one mobile
phone on the module, you can switch between
the individual phones.
X Select the mobile phone under MB MBSAP
SAP mod‐
mod‐
ule phones
ule phones.
X Confirm the connection request (see the man-
ufacturer's operating instructions).
X Where necessary, enter the SIM card PIN into
the multimedia system and confirm.
data modem mode X
Connect the mobile phone to the module
(Y page 309).
or
X Insert the SIM card into the SIM card slot on
the module (Y page 309).
X Before connecting for the first time, enable
the module for Internet access and select the
network provider in the multimedia system
(see the manufacturer's operating instruc-
tions).
Use as a data modem is automatically activa- ted.
X Activate/deactivate data roaming (see the
manufacturer's operating instructions). Operating system
309Multimedia system Z
Page 313 of 397
For further information on data mode without
telephony with COMAND Online (see the man-
ufacturer's operating instructions).
Settings Storing/deleting the SIM card PIN
Multimedia system:
X Select Connect
Connect device
deviceQMB MBSAP
SAP module
module
phones
phones
X Highlight the mobile phone.
X To select G: navigate to the right.
X Activate Oor deactivate ªStore PINStore PIN.
Transferring the phone book In order to use the phone book of the mobile
phone via the multimedia system, the phone
book must be transferred using the module.
The transfer of data may take up to ten minutes.
Transmission occurs automatically after a Blue-
tooth ®
connection is automatically established.
Text messages Requirements
The module is connected with the mobile phone
(Y page 309) or is being used in the SIM card
mode (Y page 309).
Activating/deactivating text message
downloading from the mobile phone Dial number Function
00080 Text message down-
loading is deactiva-
ted.
00081 Text message down-
loading is activated.
For further information on receiving text mes-
sages when using the telephone module (see
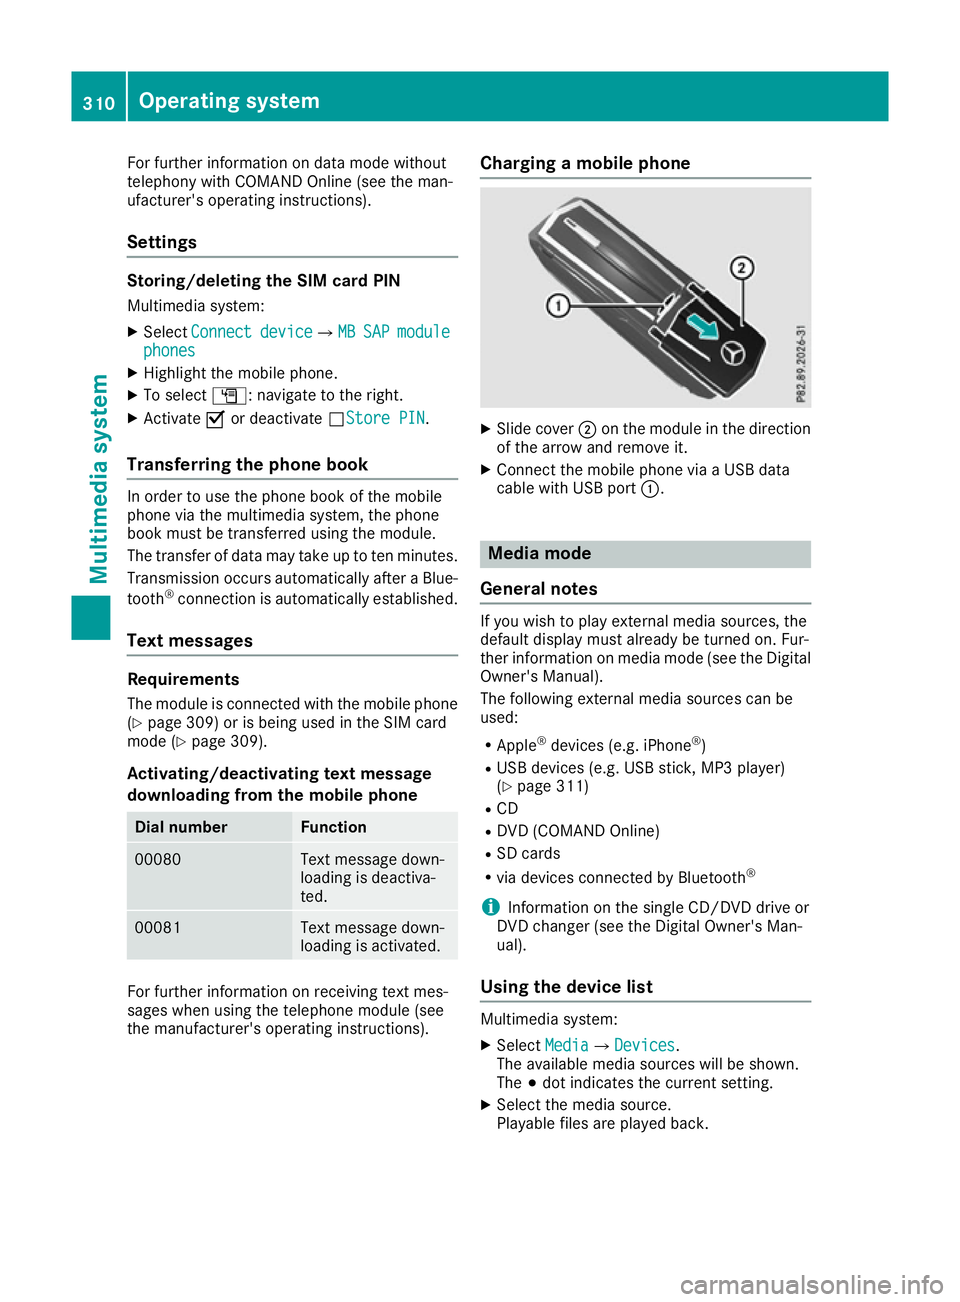
the manufacturer's operating instructions). Charging a mobile phone X
Slide cover ;on the module in the direction
of the arrow and remove it.
X Connect the mobile phone via a USB data
cable with USB port :. Media mode
General notes If you wish to play external media sources, the
default display must already be turned on. Fur-
ther information on media mode (see the Digital
Owner's Manual).
The following external media sources can be
used:
R Apple ®
devices (e.g. iPhone ®
)
R USB devices (e.g. USB stick, MP3 player)
(Y page 311)
R CD
R DVD (COMAND Online)
R SD cards
R via devices connected by Bluetooth ®
i Information on the single CD/DVD drive or
DVD changer (see the Digital Owner's Man-
ual).
Using the device list Multimedia system:
X Select Media MediaQDevices Devices.
The available media sources will be shown.
The #dot indicates the current setting.
X Select the media source.
Playable files are played back. 310
Operating systemMultimedia system
Page 315 of 397
Stowage areas
Loading guidelines
G
WARNING
If objects, luggage or loads are not secured or not secured sufficiently, they could slip, tip
over or be flung around and thereby hit vehicle
occupants. There is a risk of injury, especially when braking or abruptly changing directions.
Always store objects so that they cannot be
flung around. Secure objects, luggage or
loads against slipping or tipping before the
journey. G
WARNING
Combustion engines emit poisonous exhaust
gases such as carbon monoxide. If the tailgate is open when the engine is running, particu-
larly if the vehicle is moving, exhaust fumes
could enter the passenger compartment.
There is a risk of poisoning.
Turn off the engine before opening the tail-
gate. Never drive with the tailgate open. G
WARNING
The exhaust tail pipe and tail pipe trim can
become very hot. If you come into contact
with these parts of the vehicle, you could burn
yourself. There is a risk of injury.
Always be particularly careful around the
exhaust tail pipe and the tail pipe trim. Allow
these components to cool down before touch-
ing them.
The handling characteristics of a laden vehicle
are dependent on the distribution of the load
within the vehicle. For this reason, you should
observe the following notes when transporting a
load:
R never exceed the maximum permissible gross
vehicle weight or the permissible axle loads
for the vehicle (including occupants).
R the luggage compartment is the preferred
place to store objects.
R position heavy loads as far forwards as pos-
sible and as low down in the load compart-
ment as possible. R
the load must not protrude above the upper
edge of the seat backrests.
R always place the load against the rear or front
seat backrests. Make sure that the seat
backrests are securely locked into place.
R always place the load behind unoccupied
seats if possible.
R use the lashing eyelets and the luggage nets
to transport loads and luggage.
R only use lashing eyelets and fastening com-
ponents that are suitable for the weight and
size of the load.
R secure the load with sufficiently strong and
wear-resistant lashing material. pad sharp
edges for protection.
i Load restraints are available at any qualified
specialist workshop, e.g. a Mercedes-Benz
Service Centre. Stowage compartments
Important safety notes G
WARNING
If you transport objects in the vehicle interior and these are not adequately secured, they
could slip or be flung around and thereby
strike vehicle occupants. In addition, cup
holders, open stowage spaces and mobile
phone brackets may not always be able to
hold the objects placed in them in the event of an accident. There is a risk of injury, particu-
larly in the event of sharp braking or sudden
changes of direction.
R Always stow objects in such a way that they
cannot be tossed about in these or similar
situations.
R Always make sure that objects do not proj-
ect from stowage spaces, luggage nets or
stowage nets.
R Ensure that closable stowage spaces are
shut before beginning your journey.
R Always stow and secure heavy, hard, poin-
ted, sharp-edged, fragile or outsize objects
in the load compartment.
Observe the loading guidelines (Y page 312).312
Stowage areasStowing and features
Page 316 of 397
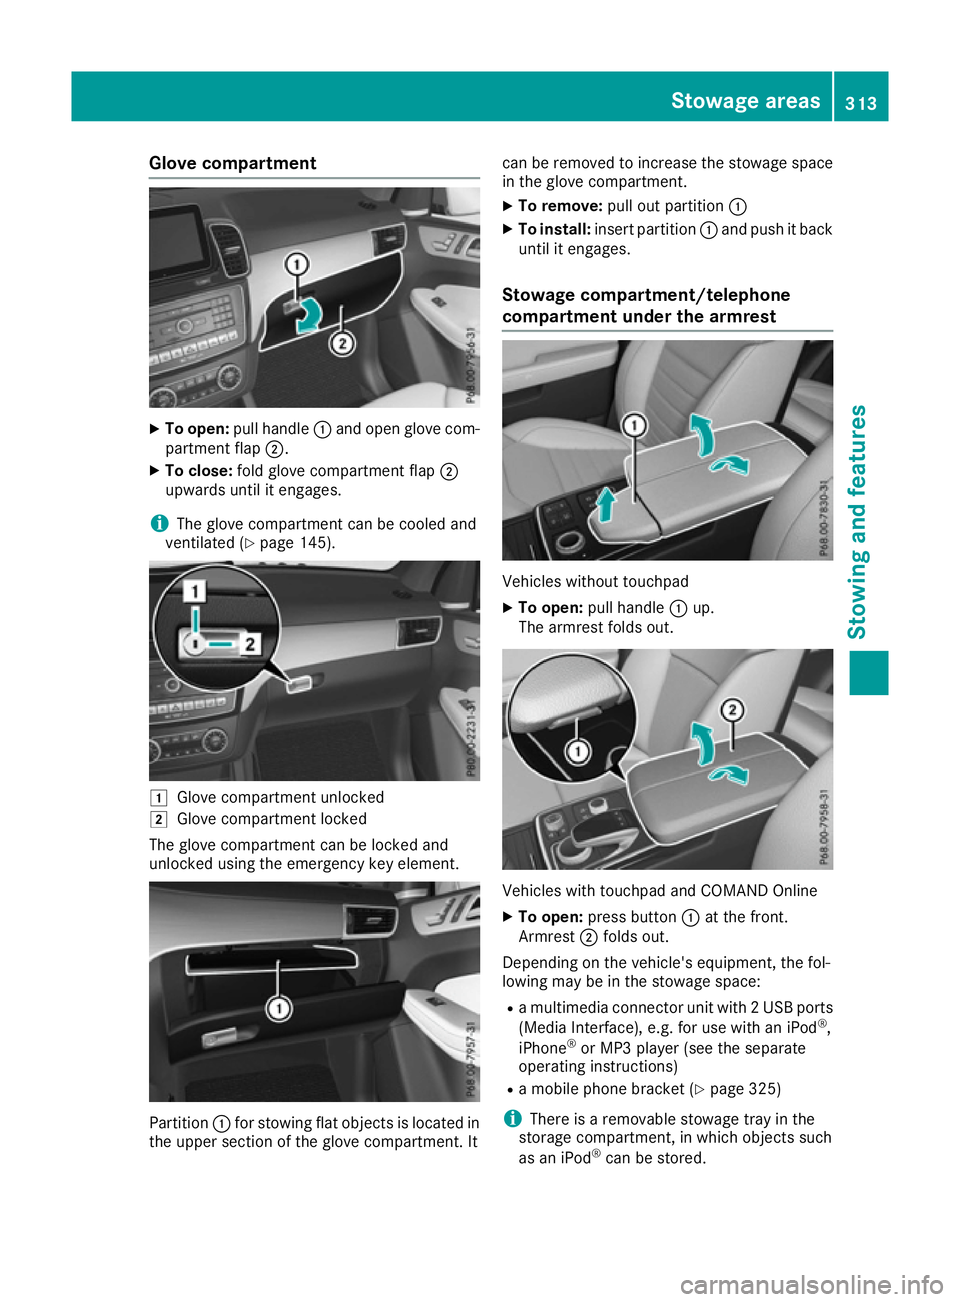
Glove compartment
X
To open: pull handle :and open glove com-
partment flap ;.
X To close: fold glove compartment flap ;
upwards until it engages.
i The glove compartment can be cooled and
ventilated (Y page 145). 1
Glove compartment unlocked
2 Glove compartment locked
The glove compartment can be locked and
unlocked using the emergency key element. Partition
:for stowing flat objects is located in
the upper section of the glove compartment. It can be removed to increase the stowage space
in the glove compartment.
X To remove: pull out partition :
X To install: insert partition :and push it back
until it engages.
Stowage compartment/telephone
compartment under the armrest Vehicles without touchpad
X To open: pull handle :up.
The armrest folds out. Vehicles with touchpad and COMAND Online
X To open: press button :at the front.
Armrest ;folds out.
Depending on the vehicle's equipment, the fol-
lowing may be in the stowage space:
R a multimedia connector unit with 2 USB ports
(Media Interface), e.g. for use with an iPod ®
,
iPhone ®
or MP3 player (see the separate
operating instructions)
R a mobile phone bracket (Y page 325)
i There is a removable stowage tray in the
storage compartment, in which objects such
as an iPod ®
can be stored. Stowage areas
313Stowing and features Z
Page 323 of 397
Depending on the vehicle equipment, ensure
that when the roof carrier is fitted you can:
R raise the sliding sunroof fully
R open the panorama sliding sunroof fully
R open the tailgate fully
You will find information on the maximum roof
load in the "Technical data" section
(Y page 387).
An incorrectly secured roof carrier or roof load
may become detached from the vehicle. You
must therefore ensure that you observe the roof
carrier manufacturer's installation instructions.
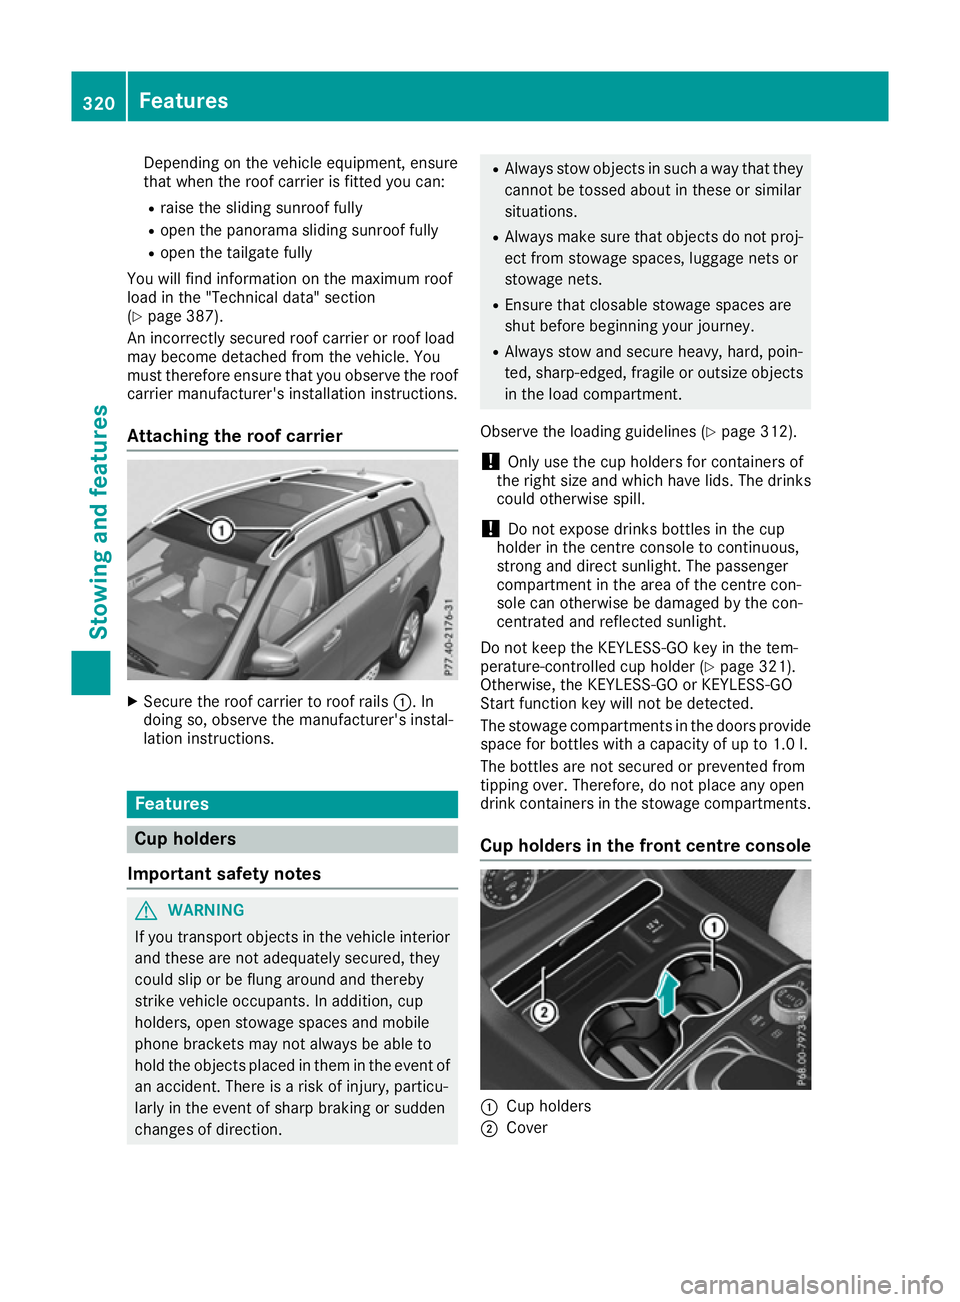
Attaching the roof carrier X
Secure the roof carrier to roof rails :. In
doing so, observe the manufacturer's instal-
lation instructions. Features
Cup holders
Important safety notes G
WARNING
If you transport objects in the vehicle interior and these are not adequately secured, they
could slip or be flung around and thereby
strike vehicle occupants. In addition, cup
holders, open stowage spaces and mobile
phone brackets may not always be able to
hold the objects placed in them in the event of an accident. There is a risk of injury, particu-
larly in the event of sharp braking or sudden
changes of direction. R
Always stow objects in such a way that they
cannot be tossed about in these or similar
situations.
R Always make sure that objects do not proj-
ect from stowage spaces, luggage nets or
stowage nets.
R Ensure that closable stowage spaces are
shut before beginning your journey.
R Always stow and secure heavy, hard, poin-
ted, sharp-edged, fragile or outsize objects
in the load compartment.
Observe the loading guidelines (Y page 312).
! Only use the cup holders for containers of
the right size and which have lids. The drinks
could otherwise spill.
! Do not expose drinks bottles in the cup
holder in the centre console to continuous,
strong and direct sunlight. The passenger
compartment in the area of the centre con-
sole can otherwise be damaged by the con-
centrated and reflected sunlight.
Do not keep the KEYLESS-GO key in the tem-
perature-controlled cup holder (Y page 321).
Otherwise, the KEYLESS-GO or KEYLESS-GO
Start function key will not be detected.
The stowage compartments in the doors provide
space for bottles with a capacity of up to 1.0 l.
The bottles are not secured or prevented from
tipping over. Therefore, do not place any open
drink containers in the stowage compartments.
Cup holders in the front centre console :
Cup holders
; Cover 320
FeaturesStowing and features