2016 MERCEDES-BENZ GLS SUV snow chains
[x] Cancel search: snow chainsPage 207 of 397
Parking Pilot
General notes Parking Pilot is an electronic parking aid with
ultrasound. It measures the road on both sides
of the vehicle. A parking symbol indicates a suit-
able parking space. Active steering intervention
and brake application can assist you during
parking. Parking Assist PARKTRONIC is also
available (Y page 201).
Important safety notes Parking Pilot is only an aid. It is not a substitute
for your attention to the immediate surround-
ings. The responsibility for safe manoeuvring
and parking remains with you. Make sure that no
persons, animals or objects are in the manoeu-
vring range.
When Parking Assist PARKTRONIC is deactiva-
ted, Parking Pilot is also unavailable. G
WARNING
While parking or pulling out of a parking
space, the vehicle swings out and can drive
onto areas of the oncoming lane. This could
cause you to collide with other road users.
There is a risk of an accident.
Pay attention to other road users. Stop the
vehicle if necessary or cancel the Active Park- ing Assist parking procedure.
! If unavoidable, you should drive over obsta-
cles such as kerbs slowly and not at a sharp
angle. Otherwise, you may damage the
wheels or tyres.
Parking Pilot may show parking spaces which
are not suitable for parking, e.g.:
R in a zone where parking or stopping is pro-
hibited
R in front of driveways or entrances and exits
R on unsuitable surfaces
Parking tips:
R on narrow roads, drive as closely as possible
past the parking space
R parking spaces that are littered or overgrown
may not be identified or may be measured
incorrectly
R parking spaces in front of parked trailers, the
trailer drawbars of which protrude into the parking space, might not be identified as such
or be measured incorrectly
R snowfall or heavy rain may lead to a parking
space being measured inaccurately
R pay attention to the warning messages of
Parking Pilot PARKTRONIC during the parking
procedure (Y page 201)
R you can intervene in the steering procedure to
correct it at any time. Parking Pilot will then be cancelled.
R when transporting a load that protrudes from
your vehicle, you must not use Parking Pilot
R never use Parking Pilot when snow chains are
fitted
R Make sure that the tyre pressures are always
correct. This has a direct influence on the
parking characteristics of the vehicle
Use Parking Pilot for parking spaces that are:
R parallel or at right angles to the direction of
travel
R on straight roads, not bends
R on the same level as the road, e.g. not on the
pavement
Detecting parking spaces Objects located above the detection range of
Parking Pilot will not be detected when the park-
ing space is measured. These are not taken into
account when the parking procedure is calcula-
ted, e.g. overhanging loads, tail sections or load-
ing ramps of goods vehicles. Parking Pilot may
therefore guide you into the parking space too
early. G
WARNING
If there are objects above the detection range:
R Active Park Assist may steer too early
R the vehicle may not stop in front of these
objects
This could cause a collision. There is a risk of
an accident.
If objects are located above the detection
range, stop and deactivate Active Parking
Assist.
Further information on the detection range
(Y page 201). 204
Driving systemsDriving and parking
Page 230 of 397
R
you brake hard.
R you steer actively, e.g. swerve to avoid an
obstacle or change lane quickly.
R you cut the corner on a sharp bend.
Towing a trailer
If you couple up a trailer, make sure that you
have correctly established the electrical con-
nection. This can be accomplished by checking
the trailer lighting. Lane-correcting brake appli-
cation does not take place when towing a trailer.
Active Lane Keeping Assist is not activated and the lines in the assistance graphic are grey. Off-road driving systems
4MATIC (permanent all-wheel drive) 4MATIC ensures that all four wheels are perma-
nently driven. Together with ESP ®
and 4ETS, it
improves the traction of your vehicle whenever
a drive wheel spins due to insufficient grip.
If you fail to adapt your driving style, 4MATIC can
neither reduce the risk of an accident nor over-
ride the laws of physics. 4MATIC cannot take
account of road, weather and traffic conditions.
4MATIC is only an aid. You are responsible for
the distance to the vehicle in front, for vehicle
speed, for braking in good time and for staying in
lane.
! Never tow the vehicle with one axle raised.
This may damage the transfer case. Damage
of this sort is not covered by the Mercedes-
Benz implied warranty. All wheels must
remain either on the ground or be fully raised. Observe the instructions for towing the vehi-
cle with all wheels in full contact with the
ground.
! A function or performance test should only
be carried out on a twin-axle dynamometer.
Before you operate the vehicle on such a
dynamometer, please consult a qualified
workshop. You could otherwise damage the
drive train or the brake system.
i In wintry driving conditions, the maximum
effect of 4MATIC can only be achieved if you
use winter tyres (M+S tyres), with snow
chains if necessary.
Further information about "Driving off-road"
(Y page 176). DSR (Downhill Speed Regulation) General notes
DSR is an aid to assist you when driving down-
hill. It keeps the speed of travel at the speed
selected on the on-board computer. The steeper
the downhill gradient, the greater the DSR brak- ing effect on the vehicle. When driving on flat
stretches of road or on an uphill gradient, the
DSR braking effect is minimal or non-existent.
DSR controls the vehicle’s speed when it is acti-
vated and the transmission is in position D,Ror
N. By accelerating or braking, you can always
drive at a higher or a lower speed than that set
on the on-board computer.
Important safety notes G
WARNING
If the speed driven and the set speed deviate and you activate DSR on a slippery road sur-
face, the wheels may lose traction. This
increases the risk of skidding and having an
accident.
Before switching DSR on, please take into
consideration the road surface and the differ-
ence between driving speed and the set
speed.
If you fail to adapt your driving style, DSR can
neither reduce the risk of accident nor override the laws of physics. DSR cannot take account ofroad, weather and traffic conditions. DSR is only
an aid. You are responsible for the distance to
the vehicle in front, for vehicle speed, for brak-
ing in good time and for staying in lane.
You are always responsible for keeping control
of the vehicle and for assessing whether the
downhill gradient can be managed. DSR may not
always be able to keep to the set speed, depend-
ing on road surface and tyre conditions. Select a set speed suitable for the prevailing conditions
and when necessary, apply the brakes manually. Driving systems
227Driving and parking Z
Page 232 of 397
Do not use the
Offroaddrive program on roads
that are snow-covered or icy, or if you have fitted
your vehicle with snow chains.
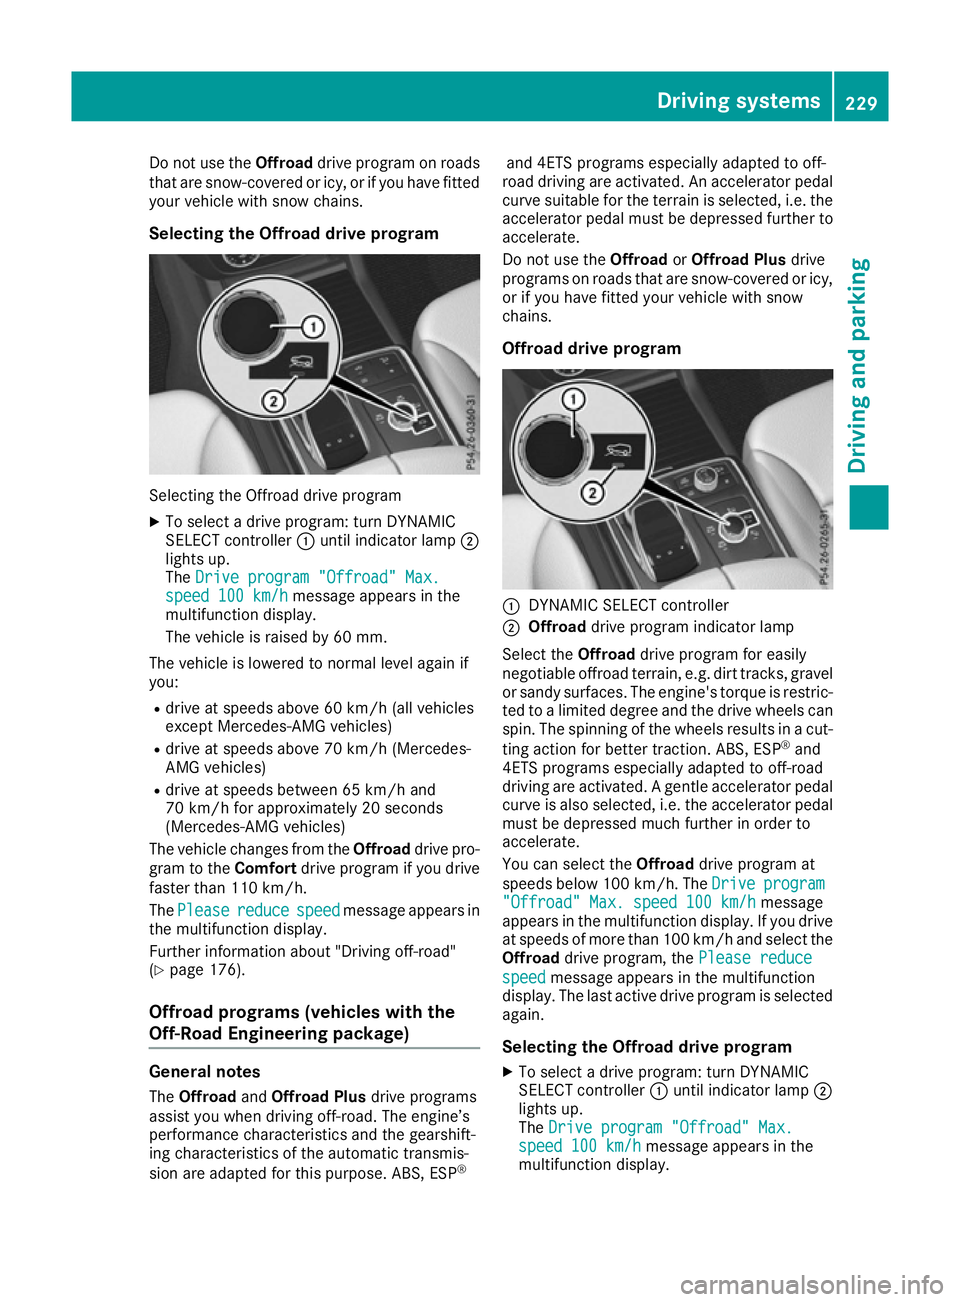
Selecting the Offroad drive program Selecting the Offroad drive program
X To select a drive program: turn DYNAMIC
SELECT controller :until indicator lamp ;
lights up.
The Drive program "Offroad" Max.
Drive program "Offroad" Max.
speed 100 km/h speed 100 km/h message appears in the
multifunction display.
The vehicle is raised by 60 mm.
The vehicle is lowered to normal level again if
you: R drive at speeds above 60 km/h (all vehicles
except Mercedes-AMG vehicles)
R drive at speeds above 70 km/h (Mercedes-
AMG vehicles)
R drive at speeds between 65 km/h and
70 km/h for approximately 20 seconds
(Mercedes-AMG vehicles)
The vehicle changes from the Offroaddrive pro-
gram to the Comfortdrive program if you drive
faster than 110 km/h.
The Please
Please reduce reducespeed
speedmessage appears in
the multifunction display.
Further information about "Driving off-road"
(Y page 176).
Offroad programs (vehicles with the
Off-Road Engineering package) General notes
The Offroad andOffroad Plus drive programs
assist you when driving off-road. The engine’s
performance characteristics and the gearshift-
ing characteristics of the automatic transmis-
sion are adapted for this purpose. ABS, ESP ®and 4ETS programs especially adapted to off-
road driving are activated. An accelerator pedal
curve suitable for the terrain is selected, i.e. the accelerator pedal must be depressed further to accelerate.
Do not use the OffroadorOffroad Plus drive
programs on roads that are snow-covered or icy,
or if you have fitted your vehicle with snow
chains.
Offroad drive program :
DYNAMIC SELECT controller
; Offroad drive program indicator lamp
Select the Offroaddrive program for easily
negotiable offroad terrain, e.g. dirt tracks, gravel
or sandy surfaces. The engine's torque is restric-
ted to a limited degree and the drive wheels can
spin. The spinning of the wheels results in a cut-
ting action for better traction. ABS, ESP ®
and
4ETS programs especially adapted to off-road
driving are activated. A gentle accelerator pedal curve is also selected, i.e. the accelerator pedal
must be depressed much further in order to
accelerate.
You can select the Offroaddrive program at
speeds below 100 km/h. The Drive
Drive program program
"Offroad" Max. speed 100 km/h
"Offroad" Max. speed 100 km/h message
appears in the multifunction display. If you drive
at speeds of more than 100 km/h and select the
Offroad drive program, the Please reduce
Please reduce
speed
speed message appears in the multifunction
display. The last active drive program is selected
again.
Selecting the Offroad drive program X To select a drive program: turn DYNAMIC
SELECT controller :until indicator lamp ;
lights up.
The Drive program "Offroad" Max. Drive program "Offroad" Max.
speed 100 km/h
speed 100 km/h message appears in the
multifunction display. Driving systems
229Driving and parking Z
Page 234 of 397
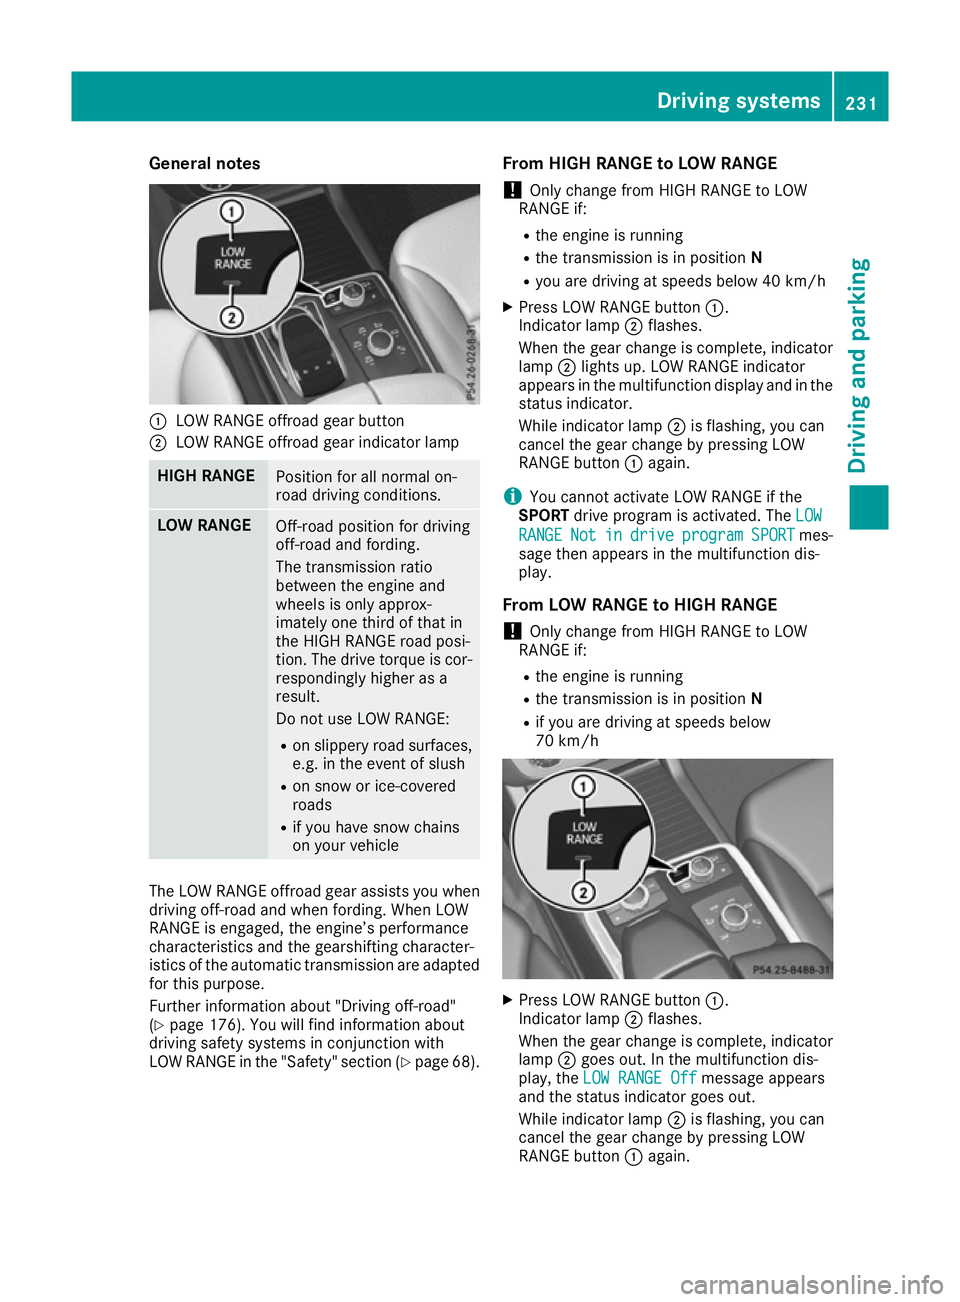
General notes
:
LOW RANGE offroad gear button
; LOW RANGE offroad gear indicator lamp HIGH RANGE
Position for all normal on-
road driving conditions.
LOW RANGE
Off-road position for driving
off-road and fording.
The transmission ratio
between the engine and
wheels is only approx-
imately one third of that in
the HIGH RANGE road posi-
tion. The drive torque is cor-
respondingly higher as a
result.
Do not use LOW RANGE:
R on slippery road surfaces,
e.g. in the event of slush
R on snow or ice-covered
roads
R if you have snow chains
on your vehicle The LOW RANGE offroad gear assists you when
driving off-road and when fording. When LOW
RANGE is engaged, the engine’s performance
characteristics and the gearshifting character-
istics of the automatic transmission are adapted
for this purpose.
Further information about "Driving off-road"
(Y page 176). You will find information about
driving safety systems in conjunction with
LOW RANGE in the "Safety" section (Y page 68).From HIGH RANGE to LOW RANGE
! Only change from HIGH RANGE to LOW
RANGE if:
R the engine is running
R the transmission is in position N
R you are driving at speeds below 40 km/h
X Press LOW RANGE button :.
Indicator lamp ;flashes.
When the gear change is complete, indicator
lamp ;lights up. LOW RANGE indicator
appears in the multifunction display and in the
status indicator.
While indicator lamp ;is flashing, you can
cancel the gear change by pressing LOW
RANGE button :again.
i You cannot activate LOW RANGE if the
SPORT drive program is activated. The LOW LOW
RANGE RANGE Not Notin
indrive
drive program
program SPORT
SPORTmes-
sage then appears in the multifunction dis-
play.
From LOW RANGE to HIGH RANGE ! Only change from HIGH RANGE to LOW
RANGE if:
R the engine is running
R the transmission is in position N
R if you are driving at speeds below
70 km/h X
Press LOW RANGE button :.
Indicator lamp ;flashes.
When the gear change is complete, indicator
lamp ;goes out. In the multifunction dis-
play, the LOW RANGE Off
LOW RANGE Off message appears
and the status indicator goes out.
While indicator lamp ;is flashing, you can
cancel the gear change by pressing LOW
RANGE button :again. Driving systems
231Driving and parking Z
Page 367 of 397

When you have fitted the M+S tyres:
X Check the tyre pressures (Y page 364).
X Restart the tyre pressure monitor
(Y page 368).
X Restart the tyre pressure loss warning system
(Y page 366).
Information about driving with an emergency
spare wheel (Y page 375). Snow chains
G
WARNING
If you have fitted snow chains to the front
wheels, they may scrape against the vehicle
body or chassis components. This could
cause damage to the vehicle or the tyres.
There is a risk of an accident.
To avoid hazardous situations:
R never fit snow chains on the front wheels
R fit snow chains to the rear wheels in pairs.
! You must drive at a raised vehicle level if
snow chains have been fitted. The vehicle
could otherwise be damaged. Observe the
notes in the "AIRMATIC package" section.
! When driving with snow chains fitted, do not
use the ADS sport mode (Adaptive Damping
System). The vehicle could otherwise be dam-
aged.
For safety reasons, Mercedes-Benz recom-
mends that you only use snow chains that have been approved for Mercedes-Benz or that are of
an equivalent standard of quality. For more
information, please contact a qualified special-
ist workshop.
Fit the snow chains on all driven wheels for max-
imum tractive power and driving stability. If you
own snow chains for two driven wheels only, fit the snow chains to the wheels on the rear axle.
The vehicle then remains more stable under
braking.
If you wish to fit snow chains, please bear the
following points in mind:
R snow chains cannot be fitted to all wheel/tyre
combinations. Permitted wheel/tyre combi-
nations (Y page 374).
R use snow chains only if the road surface is
completely snow-covered. Remove the snow chains as soon as possible when you come to
a road that is not snow-covered.
R local regulations may restrict the use of snow
chains. Observe the appropriate regulations if you wish to fit snow chains.
R do not exceed the maximum permissible
speed of 50 km/h.
R never use Parking Pilot when snow chains are
fitted (Y page 204).
You may wish to deactivate ESP ®
when pulling
away with snow chains fitted (Y page 73). This
allows the wheels to spin in a controlled manner, achieving increased propulsive force (cut).
Information on driving with an emergency sparewheel (Y page 375). Tyre pressure
Tyre pressure specifications
G
WARNING
Underinflated or overinflated tyres pose the
following risks:
R the tyres may burst, especially as the load
and vehicle speed increase.
R the tyres may wear excessively and/or
unevenly, which may greatly impair tyre
traction.
R the driving characteristics, as well as steer-
ing and braking, may be greatly impaired.
There is a risk of an accident.
Observe the recommended tyre pressure and check the tyre pressure of all the tyres includ-
ing the spare wheel:
R at least every two weeks
R when the load changes
R before embarking on a longer journey
R for changed operating conditions, e.g. off-
road driving
If necessary, correct the tyre pressure. G
WARNING
If you fit unsuitable accessories onto tyre
valves, the tyre valves may be overloaded and malfunction, which can cause tyre pressure
loss. Due to their design, retrofitted tyre pres- 364
Tyre pressureWheels and tyres
Page 369 of 397
Tyre pressure loss warning system
General notes While the vehicle is in motion, the tyre pressure
loss warning system monitors the set tyre pres-
sure using the rotational speed of the wheels.
This enables the system to detect significant
pressure loss in a tyre. If the speed of rotation of a wheel changes as a result of a loss of pressure,
a corresponding warning message will appear in
the multifunction display.
You can recognise the tyre pressure loss warn-
ing by the Run Flat Indicator active
Run Flat Indicator active
Restart with OK
Restart with OK message which appears in
the Serv.
Serv. menu of the multifunction display.
Information on the message display can be
found in the "Restarting the tyre pressure loss
warning system" section (Y page 366).
Important safety notes The tyre pressure warning system does not warn
you of an incorrectly set tyre pressure. Observe the notes on the recommended tyre pressure
(Y page 364).
The tyre pressure loss warning does not replace the need to regularly check the tyre pressures.
An even loss of pressure on several tyres at the
same time cannot be detected by the tyre pres-
sure loss warning system.
The tyre pressure monitor is not able to warn
you of a sudden loss of pressure, e.g. if the tyre is penetrated by a foreign object. In the event of
a sudden loss of pressure, bring the vehicle to a halt by braking carefully. Avoid abrupt steering
manoeuvres.
The function of the tyre pressure loss warning
system is limited or delayed if:
R snow chains are fitted to your vehicle's tyres.
R road conditions are wintry.
R you are driving on sand or gravel.
R you adopt a very sporty driving style (corner-
ing at high speeds or driving with high rates of
acceleration).
R you are towing a very heavy or large trailer.
R you are driving with a heavy load (in the vehi-
cle or on the roof). Restarting the tyre pressure loss warn-
ing system Restart the tyre pressure loss warning system if
you have:
R changed the tyre pressure
R changed the wheels or tyres
R fitted new wheels or tyres
X Before restarting, make sure that the tyre
pressures are set properly on all four tyres for the respective operating conditions. The rec-
ommended tyre pressures can be found in the
tyre pressure table on the fuel filler flap.
The tyre pressure loss warning system can
only give reliable warnings if you have set the correct tyre pressure. If an incorrect tyre
pressure is set, these incorrect values will be
monitored.
X Observe the notes in the section on tyre pres-
sures (Y page 364).
X Make sure that the key is in position 2in the
ignition lock (Y page 148).
X Press the =or; button on the steering
wheel to select the Serv.
Serv. menu.
X Press the 9or: button to select
Tyre pressure Tyre pressure.
X Press the abutton.
The Run Flat Indicator active
Run Flat Indicator active
Restart with OK
Restart with OK message appears in the
multifunction display.
If you wish to confirm the restart:
X Press the abutton.
The Tyre
Tyre press.
press. now
nowOK?
OK?message appears
in the multifunction display.
X Press the 9or: button to select Yes
Yes.
X Press the abutton.
The Run Flat Indicator restarted
Run Flat Indicator restarted mes-
sage appears in the multifunction display.
After a teach-in period, the tyre pressure loss warning system will monitor the set tyre pres-
sures of all four tyres.
If you wish to cancel the restart: X Press the %button.
or X When the Tyre press. now OK?
Tyre press. now OK? message
appears, press the 9or: button to
select Cancel Cancel . 366
Tyre pressureWheels and tyres
Page 378 of 397
Emergency spare wheel
Important safety notes
G
WARNING
The wheel/tyre dimensions and the tyre type of the spare wheel/emergency spare wheel
and the wheel to be replaced may differ. Fit-
ting a spare wheel/emergency spare wheel
may severely impair the driving characteris-
tics. There is a risk of accident.
To prevent hazardous situations:
R Adapt your driving style accordingly and
drive carefully.
R Never fit more than one spare wheel/emer-
gency spare wheel if the dimensions are
different to those of the wheel being
replaced.
R Only use a spare wheel/emergency spare
wheel briefly if the dimensions are different
to those of the wheel being replaced.
R Do not switch off ESP ®
.
R Have the spare wheel/emergency spare
wheel in question replaced at the nearest
qualified specialist workshop. Make sure
that the wheel/tyre dimensions and tyre
type are correct.
! Mercedes-AMG vehicles with
"Minispare" emergency spare wheel: only
use the "Minispare" emergency spare wheel
on the rear axle. If you fit the "Minispare"
emergency spare wheel to the front axle, the braking system could be damaged.
If a tyre on the front axle is damaged, an
undamaged wheel on the rear axle must be
replaced first with the "Minispare" emergency
spare wheel. The damaged wheel on the front
axle can then be replaced by the undamaged wheel from the rear axle.
You must observe the instruction label on the"Minispare" emergency spare wheel.
When using an emergency spare wheel or spare wheel of a different size, you must not exceed
the maximum speed of 80 km/h.
Snow chains must not be fitted to emergency
spare wheels. General notes
You can ask for information regarding permitted emergency spare wheels at a Mercedes-Benz
Service Centre.
Fitting the emergency spare wheel is described under "Fitting a wheel" (Y page 370).
You should check the pressure of all your tyres, including the emergency spare wheel, regularly
as well as prior to long trips, and correct the
pressure as necessary (Y page 364). The value
on the wheel is valid.
An emergency spare wheel may also be fitted
against the direction of rotation. Observe the
time restriction on use as well as the speed lim- itation specified on the emergency spare wheel.
Replace the tyres after six years at the latest,
regardless of wear. This also applies to the
emergency spare wheel.
If you are driving with the emergency spare
wheel fitted, the tyre pressure loss warning sys- tem or the tyre pressure monitor cannot func-
tion reliably. Restart the tyre pressure loss warn-
ing system or tyre pressure monitor only once
the defective wheel has been replaced with a
new wheel.
Vehicles with tyre pressure monitor: after an
emergency spare wheel has been fitted, the sys- tem may still display the tyre pressure of the
removed wheel for a few minutes. The value dis-
played for the position where the emergency
spare wheel is fitted is not the same as the cur- rent tyre pressure of the emergency spare
wheel. Removing/stowing the emergency
spare wheel
Vehicles with a "Minispare" emergency
spare wheel under the luggage com-
partment floor Observe the instructions and safety notes in the
"Fitting a wheel" section (Y page 370).
Example image: vehicle without lockable lug-
gage compartment floor. Emergency spare wheel
375Wheels and tyres Z