2016 MERCEDES-BENZ GLS SUV ECO mode
[x] Cancel search: ECO modePage 68 of 397

Legend for the table:
XI
SOFIX position that is not suitable for ISOFIX child restraint systems in this weight category
and/or size category.
IUF Suitable for forward-facing ISOFIX child restraint systems that belong to the "Universal" cat- egory and are approved for use in this weight category.
IL Suitable for ISOFIX child restraint systems as recommended; see the "Recommended child restraint systems" table (Y page 65).
The manufacturer will also recommend a suitable ISOFIX child restraint system. For this, your
vehicle and the seat must be listed in the child restraint system manufacturer's vehicle model list. For more information, contact the child restraint system manufacturer or visit the manu-facturer's website. Weight category Size category Equipment Rear seat, left,
right Carry cot
F ISO/L1 X
G ISO/L2 X
0
up to 10 kg
up to approximately 6 months E ISO/R1 IL
0+
up to 13 kg
up to approximately 15 months E ISO/R1 IL
D ISO/R2 IL
C ISO/R3
IL
3 I
9 kg to 18 kg
between approximately 9 months
and 4 years D ISO/R2 IL
C ISO/R3
IL
3 B ISO/F2 IUF
B1 ISO/F2X IUF
A ISO/F3 IUF
The child restraint system must not touch the roof or be put under strain by the head restraint.
Adjust the angle of the seat backrest and the head restraint position accordingly. Also observe the
child restraint system manufacturer's installation instructions. Recommended child restraint systems
General notes Always observe the information in "Child restraint systems on the front-passenger seat" (Y
page 61)
and in "Suitable positioning of the child restraint system" (Y page 62).
You can obtain further information about the correct child restraint system from any Mercedes-Benz
Service Centre.
3 If you are using a child restraint system of size category C (ISO/R3), move the front seat to the highest position
and move the backrest to an upright position. Make sure that the front seat backrest does not rest against the
child restraint system. Children in the vehicle
65Safety Z
Page 121 of 397
The rear-view mirror and the exterior mirror on
the driver's side automatically go into anti-daz-
zle mode if the following conditions are met
simultaneously:
R the ignition is switched on and
R incident light from headlamps strikes the sen-
sor in the rear-view mirror
The mirrors do not dip if reverse gear is engaged or if the interior lighting is switched on. Parking position of the exterior mirror
on the front-passenger side
Setting and storing the parking position You can set the front-passenger side exterior
mirror so that you can see the rear wheel on that side as soon as you engage reverse gear. You
can store this position.
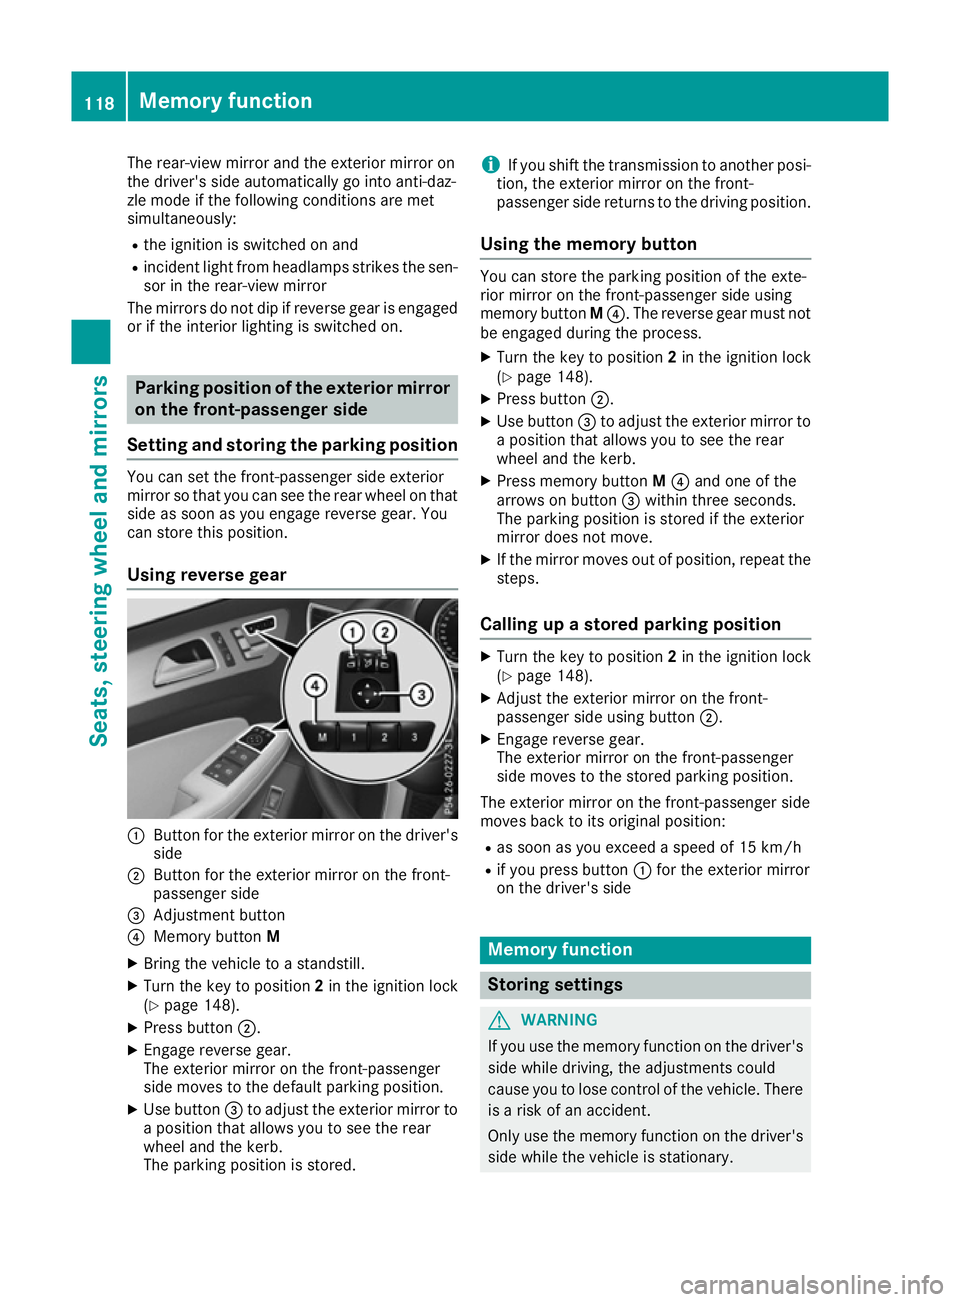
Using reverse gear :
Button for the exterior mirror on the driver's
side
; Button for the exterior mirror on the front-
passenger side
= Adjustment button
? Memory button M
X Bring the vehicle to a standstill.
X Turn the key to position 2in the ignition lock
(Y page 148).
X Press button ;.
X Engage reverse gear.
The exterior mirror on the front-passenger
side moves to the default parking position.
X Use button =to adjust the exterior mirror to
a position that allows you to see the rear
wheel and the kerb.
The parking position is stored. i
If you shift the transmission to another posi-
tion, the exterior mirror on the front-
passenger side returns to the driving position.
Using the memory button You can store the parking position of the exte-
rior mirror on the front-passenger side using
memory button
M?. The reverse gear must not
be engaged during the process.
X Turn the key to position 2in the ignition lock
(Y page 148).
X Press button ;.
X Use button =to adjust the exterior mirror to
a position that allows you to see the rear
wheel and the kerb.
X Press memory button M? and one of the
arrows on button =within three seconds.
The parking position is stored if the exterior
mirror does not move.
X If the mirror moves out of position, repeat the
steps.
Calling up a stored parking position X
Turn the key to position 2in the ignition lock
(Y page 148).
X Adjust the exterior mirror on the front-
passenger side using button ;.
X Engage reverse gear.
The exterior mirror on the front-passenger
side moves to the stored parking position.
The exterior mirror on the front-passenger side
moves back to its original position: R as soon as you exceed a speed of 15 km/h
R if you press button :for the exterior mirror
on the driver's side Memory function
Storing settings
G
WARNING
If you use the memory function on the driver's side while driving, the adjustments could
cause you to lose control of the vehicle. There
is a risk of an accident.
Only use the memory function on the driver's
side while the vehicle is stationary. 118
Memory functionSeats, steering wheel and mirrors
Page 123 of 397

Exterior lighting
General notes
For reasons of safety, Mercedes-Benz recom-
mends that you drive with the lights switched on even during the daytime. In some countries,
operation of the headlamps varies due to legal
requirements and self-imposed obligations. Driving abroad
General notes If your journey takes you to countries where
vehicles are driven on the opposite side of the
road to the country in which the vehicle is reg-
istered, your headlamps must be switched to
symmetrical dipped beam as soon as possible
after crossing the border. This prevents oncom-
ing traffic from being dazzled. Symmetrical
lights do not illuminate as large an area of the
edge of the carriageway.
Vehicles with halogen headlamps X
Turn cap :anti-clockwise and remove it.
X Push switchover lever ;down.
X Replace cap :and turn it clockwise.
Convert the headlamps back to asymmetrical
dipped beam as soon as possible after returning across the border.
Vehicles with Intelligent Light System X
Before crossing the border, set the head-
lamps to symmetrical dipped beam and after
returning back to asymmetrical dipped beam via the "Dipped-beam headlamps for driving
on the right/left" function in the on-board
computer (Y page 252). If the headlamps are converted to symmetrical
dipped beam, the "motorway mode" and "exten-
ded range foglamps" functions are not available. Setting the exterior lighting
Setting options Exterior lighting can be set using:
R the light switch
R headlamp range control (vehicles with halo-
gen headlamps only) (Y page 122)
R the combination switch (Y page 122)
R the on-board computer (Y page 252)
Light switch Operation
1
W
Left-hand parking lamps
2 X
Right-hand parking lamps
3 T
Side lamps, licence plate and instru-
ment cluster lighting
4 c
Automatic headlamps, controlled by
the light sensor
5 L
Dipped-beam/main-beam headlamps
B R
Rear foglamp
If you hear a warning tone when you leave the
vehicle, the lights may still be switched on.
X Turn the light switch to c.
The exterior lighting (except the side lamps/
parking lamps) switches off automatically if you: R remove the key from the ignition lock
R open the driver's door with the key in posi-
tion 0in the ignition lock 120
Exterior lightingLights and windscreen wipers
Page 126 of 397
The hazard warning lamps switch on automati-
cally if:
R an airbag is deployed or
R the vehicle decelerates rapidly from a speed
of above 70 km/h and comes to a standstill
The hazard warning lamps switch off automati-
cally if the vehicle reaches a speed of above
10 km/h again after a full brake application.
i The hazard warning lamps continue to oper-
ate even if the ignition is switched off. Intelligent Light System
General notes The Intelligent Light System is a system that
adjusts the headlamps automatically to suit the
prevailing driving and weather conditions. It
offers advanced functions for improved illumi-
nation of the road surface, e.g. depending on the vehicle speed or weather conditions. The sys-
tem includes the active light function, corneringlight function, motorway mode and extended
range foglamps. The system is only active when it is dark.
You can activate or deactivate the "Intelligent
Light System" function using the on-board com-
puter (Y page 252).
Active light function The active light function is a system that moves
the headlamps according to the steering move-
ments of the front wheels. In this way, relevant
areas remain illuminated while you are driving.
This allows you to recognise pedestrians,
cyclists and animals.
Active: when the lights are switched on.
Cornering light function The cornering light function improves the illu-
mination of the road over a wide angle in the
direction you are turning, enabling better visi-
bility in tight bends, for example. It can be acti-
vated only when the dipped-beam headlamps
are switched on. Active:
R if you are driving at speeds below 40 km/h
and switch on the turn signal or turn the steer-
ing wheel
R if you are driving at speeds between 40 km/h
and 70 km/h and turn the steering wheel
The cornering light function may remain lit for a
short time, but is automatically switched off
after no more than three minutes.
Motorway mode Motorway mode increases the range of the
beam.
Active:if you are driving at a speed above
110 km/h and do not make any large steering
movements for at least 1,000 m or if you are
driving at a speed above 130 km/h.
Not active: if you are driving at speeds below
80 km/h following activation.
Extended range fog lamps The extended-range foglamps reduce the glare
experienced by the driver and improve the illu-
mination of the edge of the carriageway.
Active: if you are driving at speeds below
70 km/h and you switch on the rear foglamp.
Not active: if, following activation, you are driv-
ing at speeds above 100 km/h or if you switch
off the rear foglamp.
Off-road lights The off-road lights facilitate the early recogni-
tion of objects/obstacles when driving off-road
thanks to a symmetrical, wider and brighter dis-
tribution of light from the dipped-beam head-
lamps.
Active: when driving at speeds no faster than
50 km/h and the off-road program selector
wheel is in position 1 or 2.
Not active: when driving at speeds above
50 km/h.
When the off-road lights are switched on, the
cornering light function is permanently activa-
ted, the active light function is deactivated and
the headlamp range control is set to static
mode. Exterior lighting
123Lights and windscreen wipers Z
Page 134 of 397
Overview of climate control systems
General notes
Observe the settings recommended on the fol-
lowing pages. Otherwise, the windows could
mist up.
To prevent the windows from misting up:
R switch off climate control only briefly
R activate air-recirculation mode only briefly
R switch on "Cooling with air dehumidification"
R activate the "Windscreen demisting" function
briefly, if required
Climate control regulates the temperature and
the humidity in the vehicle interior and filters
undesirable substances out of the air.
the "Residual heat" function can be switched on
or off only with the ignition switched off
(Y page 140).
i Ventilate the vehicle for a brief period during
warm weather, e.g. using the convenience
opening feature (Y page 95).
This will speed up the cooling process and the desired interior temperature will be reached
more quickly. i
The integrated filter filters out most parti-
cles of dust and soot and completely filters
out pollen. It also reduces gaseous pollutants
and odours. A clogged filter reduces the
amount of air supplied to the vehicle interior.
For this reason, you should always observe
the interval for replacing the filter, which is
specified in the Service Booklet. As this
depends on environmental conditions, e.g.
heavy air pollution, the interval may be
shorter than stated in the Service Booklet.
i Vehicles with AIR-BALANCE package:
in
addition to ionisation, the vehicle has an air
filter with anti-allergenic properties that con-
tribute to improved air filtration.
i Under certain environmental conditions, the
residual heat function may be activated auto-
matically an hour after the key has been
removed in order to dry the automatic climate control. The vehicle is then ventilated for 30
minutes. Control panel for THERMATIC automatic climate control (2-zone)
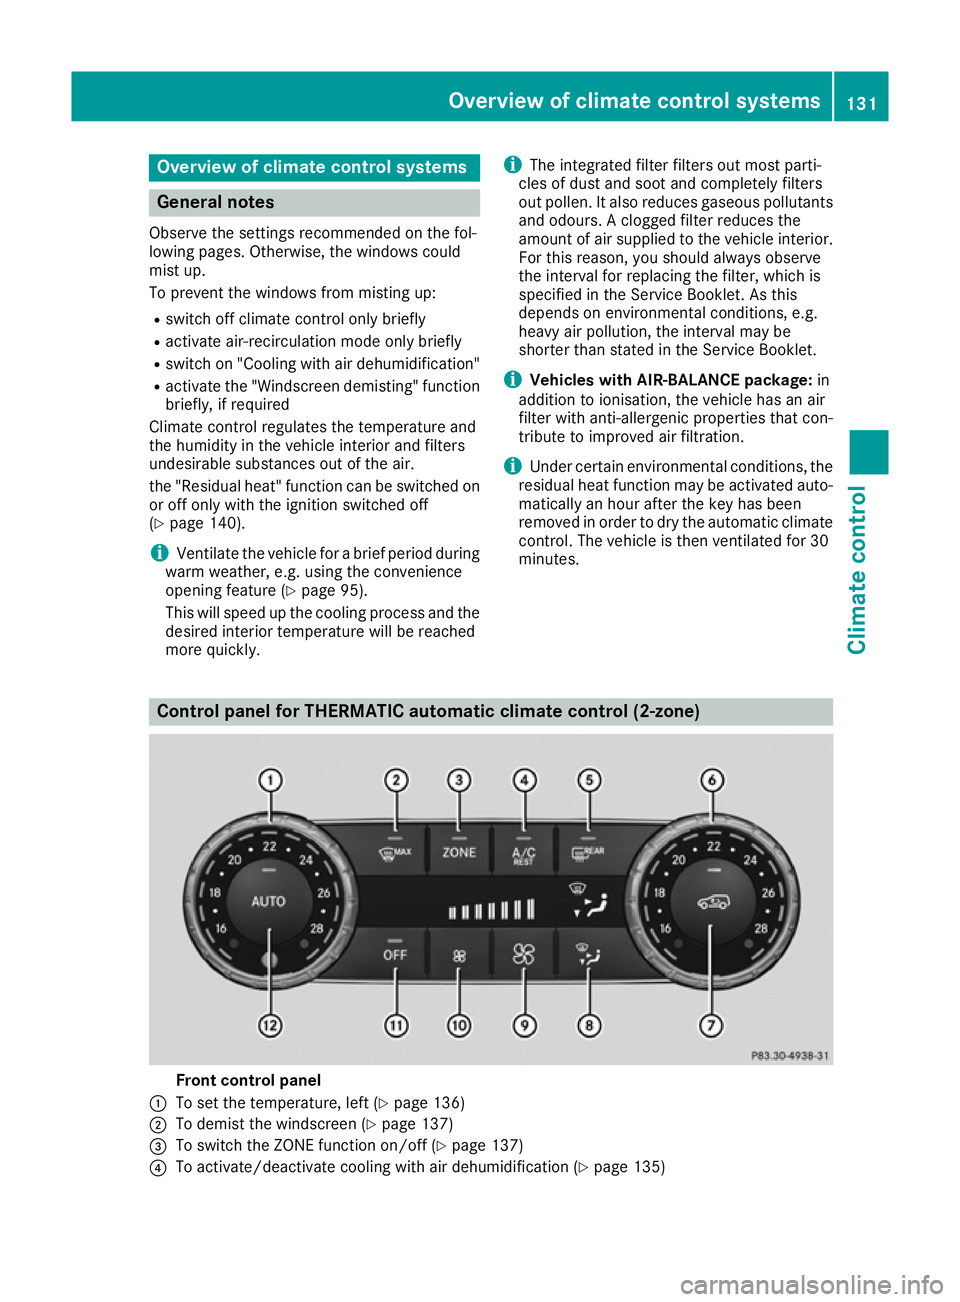
Front control panel
: To set the temperature, left (Y page 136)
; To demist the windscreen (Y page 137)
= To switch the ZONE function on/off (Y page 137)
? To activate/deactivate cooling with air dehumidification (Y page 135) Overview of climate control systems
131Climate control
Page 137 of 397
=
To switch the ZONE function on/off (Y page 137)
? To activate/deactivate cooling with air dehumidification (Y page 135)
To switch the residual heat on/off (Y page 140)
A To switch the rear window heating on/off (Y page 138)
B To set the temperature, right (Y page 136)
C To switch the rear climate control on/off
D To switch the climate control on/off (Y page 135)
E To set the air distribution (Y page 136)
F To increase the airflow (Y page 137)
G To reduce the airflow (Y page 137)
H Display
I To set the climate mode (Y page 136)
J To switch air-recirculation mode on/off (Y page 138)
K To set climate control to automatic mode (Y page 135)
Rear control panel
L To increase the airflow (Y page 137)
M To set the temperature (Y page 136)
N To control the rear-compartment climate control automatically (Y page 135)
O To direct the airflow through the rear air vents (Y page 136)
P To direct the airflow through the footwell vents (Y page 136)
Q To switch the rear climate control on/off (Y page 135)
R To reduce the airflow (Y page 137)Notes on using the automatic climate
control
Optimum use of the automatic climate
control The following contains notes and recommenda-
tions on how best to use THERMATIC automatic climate control or THERMOTRONIC.
R Activate climate control using the Ãand
Á buttons. The indicator lamps in the
à andÁ buttons light up.
R Vehicles with THERMOTRONIC:in auto-
matic mode, you can also use the ñbutton
to set a climate mode (FOCUS/MEDIUM/
DIFFUSE). The MEDIUM level is recommen-
ded.
R Set the temperature to 22 †.
R Use the "Windscreen demisting" function only
briefly until the windscreen is clear again.
R Use air-recirculation mode only briefly, e.g. if
there are unpleasant outside odours or when
in a tunnel. The windows could otherwise mist up as no fresh air is drawn into the vehicle in
air-recirculation mode. R
Vehicles with THERMOTRONIC:use the
ZONE function to adopt the temperature set-
tings on the driver's side for the front-
passenger side and the rear compartment as well. The indicator lamp above the ábut-
ton goes out.
R Vehicles with THERMOTRONIC:use the
"residual heat" function if you want to heat or
ventilate the vehicle interior when the ignitionis switched off. The residual heat function can
be activated or deactivated only with the igni- tion switched off.
R If you change the settings of the climate con-
trol system, the climate status display
appears for approximately three seconds at
the bottom of the screen in the multimedia
system display. You will see the current set-
tings of the various climate control functions.
During automatic engine switch-off, the climate
control operates only at a reduced capacity. If
you require the full climate control output, you
can switch off the ECO start/stop function by
pressing the ECO button (Y page 153).134
Overview of climate control systemsClimate control
Page 142 of 397
Outside air is added after about 30 minutes.
X To deactivate: press thedbutton.
The indicator lamp in the dbutton goes
out.
i Air-recirculation mode is deactivated auto-
matically:
R after approximately five minutes at outside
temperatures below approximately 5 †
R after approximately five minutes if cooling
with air dehumidification is deactivated
R after approximately 30 minutes at outside
temperatures above approximately 5 † if
the "Cooling with air dehumidification"
function is activated Convenience opening/closing using
the air-recirculation button
G
WARNING
When the convenience closing feature is oper- ating, parts of the body could become trapped
in the closing area of the side window and the
sliding sunroof. There is a risk of injury.
Observe the complete closing procedure
when the convenience closing feature is oper-
ating. When closing make sure that no parts of the body are in the closing area. G
WARNING
During convenience opening parts of the body could be drawn in or become trapped
between the side window and window frame.
There is a risk of injury.
When opening, make sure that nobody is
touching the side window. If someone
becomes trapped, immediately press
the W switch in the door to stop the move-
ment of the side windows. To continue closing
the side window, pull on the Wswitch.
X Convenience closing feature: press and
hold the dbutton until the side windows
close.
Vehicles with sliding sunroof or pano-
rama sliding sunroof: the sliding sunroof or
panorama sliding sunroof closes simultane-
ously. The indicator lamp in the
dbutton lights
up. Air-recirculation mode is activated.
If parts of the body are in the closing area during
convenience closing, proceed as follows:
X Press the Wbutton to stop the side win-
dows.
The side windows stop.
X To then open the side windows, press the
W button again.
X Only vehicles with sliding sunroof or pan-
orama sliding sunroof: press the2
switch to stop the sliding sunroof or pano-
rama sliding sunroof.
The sliding sunroof or panorama sliding sun-
roof stops.
X To then open the sliding sunroof or panorama
sliding sunroof, pull back on the 2button.
i If the sliding sunroof is raised and closes,
press the 2switch, to stop the sliding
sunroof. Do not pull back on the 2switch
afterwards. The sliding sunroof closes before
it opens.
i Notes on the automatic reversing function
for:
R the side windows (Y page 93)
R the panorama sliding sunroof (Y page 97)
R the sliding sunroof (Y page 97)
X Convenience opening feature: press and
hold the dbutton until the side windows
open.
Vehicles with sliding sunroof or pano-
rama sliding sunroof: the sliding sunroof or
panorama sliding sunroof opens simultane-
ously.
The indicator lamp in the dbutton goes
out. Air-recirculation mode is deactivated.
i If you open the side windows or the sliding
sunroof or the panorama sliding sunroof man-
ually after closing them with the convenience closing feature, they will remain in this posi-
tion when opened using the convenience
opening feature. Operating the climate control system
139Climate control Z
Page 153 of 397
ignite if in contact with the exhaust system or
parts of the engine that heat up. There is a risk
of fire.
Carry out regular checks to make sure that
there are no flammable foreign materials in
the engine compartment or in the exhaust
system.
General notes Vehicles with a petrol engine:
the catalytic
converter is preheated for up to 30 seconds
after a cold start. The sound of the engine may
change during this time.
Automatic transmission X
Shift the transmission to position P
(Y page 156).
The transmission position indicator in the
multifunction display shows P(Y page 158).
i You can start the engine in transmission
position Pand N.
Starting procedure with the key X
To start a diesel engine : turn the key to
position 2in the ignition lock (Y page 148).
The % preglow indicator lamp in the instru-
ment cluster lights up.
X Turn the key to position 3in the ignition lock
(Y page 148) and release it as soon as the
engine is running.
i Vehicles with a diesel engine:
you can
start the engine without preglow if the engine
is warm.
Using KEYLESS-GO to start the engine The Start/Stop button can be used to start the
vehicle without inserting the key into the ignition
lock. The key must be in the vehicle and the
Start/Stop button must be inserted in the igni-
tion lock. This mode for starting the engine oper-
ates independently of the ECO start/stop auto- matic engine start function. X
Depress the brake pedal and keep it
depressed.
X Press the Start/Stop button once
(Y page 148).
Vehicles with a petrol engine: the engine
starts.
Vehicles with a diesel engine: preglow is
activated and the engine starts. Pulling away
General notes G
WARNING
If the engine speed is above the idling speed
and you engage transmission position Dor R,
the vehicle could pull away suddenly. There is a risk of an accident.
When engaging transmission position Dor R,
always firmly depress the brake pedal and do not simultaneously accelerate.
Depress the accelerator carefully when pulling
away.
The vehicle locks centrally once you have pulled
away. The locking knobs in the doors drop down.
You can open the doors from the inside at any
time.
You can also deactivate the automatic locking
feature (Y page 253).
It is only possible to shift the transmission from position Pto the desired position if you depress
the brake pedal. Only then is the parking lock
released. If you do not depress the brake pedal,
the DIRECT SELECT lever can still be moved but the parking lock remains engaged.
i Upshifts take place at higher engine speeds
after a cold start. This helps the catalytic con- verter to reach its operating temperature
more quickly.
Information on automatically releasing the elec-
trical parking brake (Y page 171).150
DrivingDriving and parking