2016 MERCEDES-BENZ GLC COUPE display
[x] Cancel search: displayPage 117 of 389
X
Adjust the seat accordingly (Y page 103).
X On the driver's side, adjust the steering wheel
(Y page 109) and the exterior mirrors
(Y page 111).
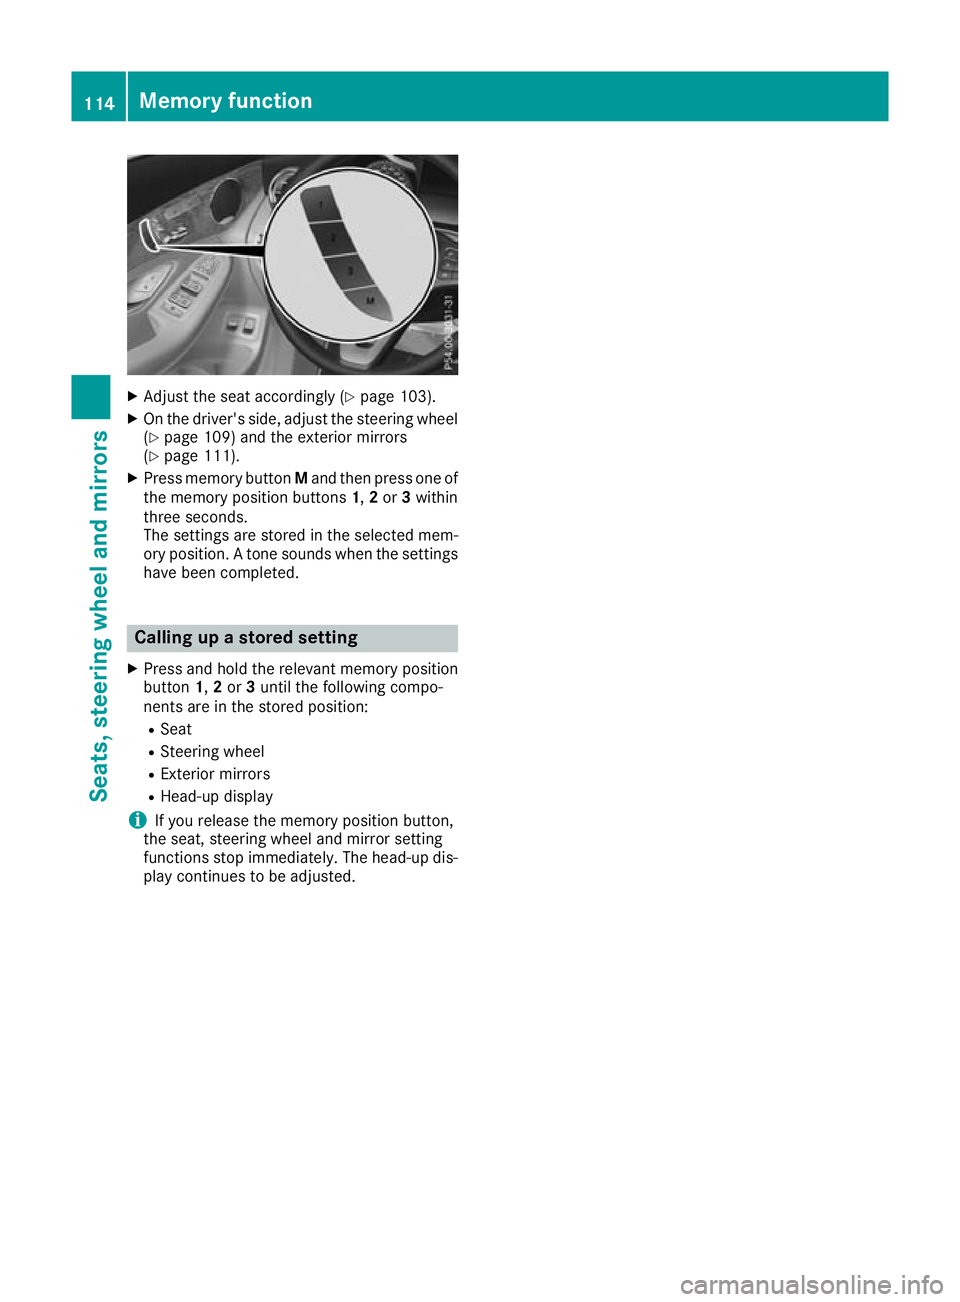
X Press memory button Mand then press one of
the memory position buttons 1,2or 3within
three seconds.
The settings are stored in the selected mem-
ory position. A tone sounds when the settings have been completed. Calling up a stored setting
X Press and hold the relevant memory position
button 1,2or 3until the following compo-
nents are in the stored position:
R Seat
R Steering wheel
R Exterior mirrors
R Head-up display
i If you release the memory position button,
the seat, steering wheel and mirror setting
functions stop immediately. The head-up dis-
play continues to be adjusted. 114
Memory functionSeats, steering
wheel and mirrors
Page 122 of 389
Adaptive Highbeam Assist
General notes You can use this function to set the headlamps
to switch automatically between dipped beam
and main beam. The system recognises vehicles
with their lights on, either approaching from the opposite direction or travelling in front of your
vehicle, and consequently switches the head-
lamps from main beam to dipped beam.
The system automatically adapts the dipped-
beam headlamp range depending on the dis-
tance to the other vehicle. Once the system no
longer detects any other vehicles, it switches on
the main-beam headlamps again.
The system's optical sensor is located behind
the windscreen near the overhead control
panel.
Important safety notes G
WARNING
Adaptive Highbeam Assist does not recognise road users:
R who have no lights, e.g. pedestrians
R who have poor lighting, e.g. cyclists
R whose lighting is blocked, e.g. by a barrier
On very rare occasions, Adaptive Highbeam
Assist may fail to recognise other road users
that have lights, or may recognise them too
late. In this, or in similar situations, the auto-
matic main-beam headlamps will not be deac-
tivated or will be activated despite the pres-
ence of other road users. There is a risk of an accident.
Always carefully observe the traffic conditionsand switch off the main-beam headlamps in
good time.
Adaptive Highbeam Assist cannot take into
account road, weather or traffic conditions.
Adaptive Highbeam Assist is only an aid. You are
responsible for adjusting the vehicle's lighting
to the prevailing light, visibility and traffic con-
ditions. In particular, the detection of obstacles can be
impaired in the case of:
R poor visibility, e.g. due to fog, heavy rain or
snow
R dirt on the sensors or obscured sensors
Switching Adaptive Highbeam Assist
on/off X
To switch on: turn the light switch to the
à position.
X Press the combination switch forwards
beyond the pressure point (Y page 117).
The indicator lamp _on the multifunction
display lights up when it is dark and the light
sensor switches on the dipped-beam head-
lamps.
If you are driving at speeds above approx-
imately 25 km/h:
The headlamp range is set automatically
depending on the distance between the vehi- cle and other road users.
If you are driving at speeds above approx-
imately 30 km/h and no other road users are
detected:
The main-beam headlamps are switched on
automatically. The Kindicator lamp on the
instrument cluster also lights up.
If you are driving at speeds below 25 km/h or
other road users are detected or the roads are adequately lit:
the main-beam headlamps are switched off
automatically The Kindicator lamp on the
instrument cluster goes out. The _indi-
cator lamp on the multifunction display
remains lit.
X To switch off: move the combination switch
back to its normal position or move the light
switch to another position.
The K indicator lamp on the instrument
cluster goes out. Adaptive Highbeam Assist Plus
General notes With Adaptive Highbeam Assist Plus, you can
automatically switch between dipped-beam,
partial main-beam and main-beam headlamps.
Partial main-beam illumination is a form of illu-
mination whereby the main beam is directed Exterior lighting
119Lights and windscreen wipers Z
Page 123 of 389
past other road users. Other road users are kept
out of the main beam. This prevents glare. If
there is a vehicle in front, for example, the main- beam headlamps illuminate the areas to its right
and left, and the vehicle in front is illuminated by the dipped-beam headlamps.
The system automatically adapts the dipped-
beam headlamp range depending on the dis-
tance to the other vehicle. Once the system no
longer detects any other vehicles, it switches on
the main-beam headlamps again.
If the main-beam or partial main-beam head-
lamps are causing too much reflection from traf- fic signs, the lights are automatically dimmed
and glare for the driver caused by the reflectionsis thus avoided.
The system's optical sensor is located behind
the windscreen near the overhead control
panel.
Important safety notes G
WARNING
Adaptive Highbeam Assist Plus does not rec-
ognise road users:
R who have no lights, e.g. pedestrians
R who have poor lighting, e.g. cyclists
R whose lighting is blocked, e.g. by a barrier
In very rare cases, Adaptive Highbeam Assist
Plus may not recognise road users who do
have lights, or may recognise them too late. In this, or in similar situations, the automatic
main-beam headlamps will not be deactivated
or will be activated despite the presence of
other road users. There is a risk of an acci-
dent.
Always carefully observe the traffic conditions and switch off the main-beam headlamps in
good time.
Adaptive Highbeam Assist Plus cannot take into
account road, weather or traffic conditions.
Adaptive Highbeam Assist Plus is only an aid.
You are responsible for adjusting the vehicle's
lighting to the prevailing light, visibility and traf-
fic conditions. In particular, the detection of obstacles can be
impaired in the case of:
R poor visibility, e.g. due to fog, heavy rain or
snow
R dirt on the sensors or obscured sensors
Switching Adaptive Highbeam Assist
Plus on/off X
To switch on: turn the light switch to the
à position.
X Press the combination switch forwards
beyond the pressure point (Y page 117).
The _ indicator lamp on the multifunction
display lights up when it is dark and the light
sensor switches on the dipped-beam head-
lamps.
At speeds above approx. 25 km/ h:the head-
lamp range is automatically controlled
according to the distance to other road users.
At speeds above approximately 30 km/h:
R if no other road users are detected, the
main-beam headlamps are automatically
switched on
R if other road users are detected, the partial
main-beam headlamps are automatically
switched on
The K indicator lamp on the instrument
cluster also lights up.
At speeds below approx. 25 km/h or when
there is sufficient street lighting:
R the partial main-beam headlamps are
switched off automatically
R the main-beam headlamps are switched off
automatically
The K indicator lamp on the instrument
cluster goes out. The _indicator lamp on
the multifunction display remains lit.
X To switch off:move the combination switch
back to its normal position or move the light
switch to another position.
The _ indicator lamp on the multifunction
display goes out. Headlamps misted up on the inside
Certain climatic and physical conditions may
cause moisture to form in the headlamp. This
moisture does not affect the functionality of the headlamp. 120
Exterior lightingLights and
windscreen wipers
Page 132 of 389
I
Display
J To set the airflow (Y page 132) Notes on using automatic climate
control
Optimum use of automatic climate con-
trol The following contains notes and recommenda-
tions on how best to use THERMATIC automatic
climate control or THERMOTRONIC.
R Activate climate control using the Ã
rocker switch. The indicator lamp above the
à rocker switch lights up. The "Cooling
with dehumidification" function is activated in
automatic mode.
R Set the temperature to 22 †.
R Use the "Windscreen demisting" function only
briefly until the windscreen is clear again.
R Use the "Air-recirculation mode" function only
briefly, e.g. if there are unpleasant outside
odours or when in a tunnel. The windows
could otherwise mist up as no fresh air is
drawn into the vehicle in air-recirculation
mode.
R Vehicles with THERMATIC with auxiliary heat-
ing or THERMOTRONIC: use the "Residual
heat" function if you want to heat or ventilate
the vehicle interior when the ignition is
switched off. The "Residual heat" function can
be switched on or off only with the ignition
switched off. The "Residual heat" function is
switched off when the ignition is switched on.
DYNAMIC SELECT switch (except
Mercedes-AMG vehicles) You can choose between various drive programs
with the DYNAMIC SELECT switch
(Y page 152).
If you have selected drive program E:
R during heating, the electrical heater booster
is deactivated and heat output is reduced as a
result
R the rear window heating running time is
reduced If you have selected drive program
C,Sor S+ ,
the current climate settings are maintained.
ECO start/stop function During automatic engine switch-off, the climate
control operates only at a reduced capacity. If
you require the full climate control output, you
can switch off the ECO start/stop function by
pressing the ECO button (Y page 149). Operating the climate control system
Switching the climate control on/off
General notes When climate control is switched off, the air
supply and air circulation are also switched off.
The windows could mist up. Therefore, switch
off climate control only briefly.
Switch on climate control primarily using the
à rocker switch (Y page 131).
Activating/deactivating X
Turn the key to position 2in the ignition lock
(Y page 144).
X To switch on: set the airflow to level 1 or
higher using the Hrocker switch.
X To switch off:set the airflow to level 0 using
the H rocker switch.
i THERMOTRONIC automatic climate control:
when climate control is switched off, "OFF"
appears in the rear-compartment display. Operating the climate control system
129Climate control
Page 134 of 389
Setting climate control to automatic
mode
General notes In automatic mode, the set temperature is main-
tained automatically at a constant level. The
system automatically regulates the temperature of the dispensed air, the airflow and the air dis- tribution.
During automatic controlling, the "Cooling with
air dehumidification" function is activated.
Automatic control X
Turn the key to position 2in the ignition lock
(Y page 144).
X To activate: press theÃrocker switch up
or down.
The indicator lamp above the Ãrocker
switch lights up.
X Set the desired temperature using the w
rocker switch on the front control unit.
X To switch to manual operation: press the
H rocker switch up or down.
or
X Press the _rocker switch up or down.
The indicator lamp above the Ãrocker
switch goes out.
In automatic mode, if you adjust the airflow or
air distribution manually, the indicator lamp
above the Ãrocker switch goes out. The
function that has not been changed manually,
however, continues to be controlled automati-
cally. When the manually set function switches
back to automatic mode, the indicator lamp
above the Ãrocker switch lights up again. Setting the climate mode
This function is available only with
THERMOTRONIC automatic climate control.
In automatic mode, you can select the following airflow settings for the driver's and front-
passenger areas:
FOCUS high airflow, slightly cooler setting
MEDIUM medium airflow, standard setting
DIFFUSE low airflow, slightly warmer and draught-free setting
X To set: set the climate mode using the mul-
timedia system (Y page 296). Setting the temperature
THERMATIC automatic climate control Different temperatures can be set for the driv-
er's and front-passenger sides.
X Turn the key to position 2in the ignition lock
(Y page 144).
X To increase or reduce: press thew
rocker switch up or down.
Change the temperature setting only in small
increments. Start at 22 †.
THERMOTRONIC automatic climate
control General notes
You can select different temperature settings
for the driver's and front-passenger sides as well
as for the rear compartment.
Setting the temperature in the front com-
partment using the front control panel
X Turn the key to position 2in the ignition lock
(Y page 144).
X To increase or reduce: press thew
rocker switch up or down.
Change the temperature setting only in small
increments. Start at 22 †.
Setting the temperature in the rear com-
partment using the rear control panel X Turn the key to position 2in the ignition lock
(Y page 144).
X To increase or reduce: press thew
rocker switch on the rear control panel up or
down (Y page 128).
Change the temperature setting only in small
increments. Start at 22 †.
The set temperature appears on the rear-
compartment display. Setting the air distribution
Air distribution settings ¯
Directs the airflow through the demister
vents
P Directs the airflow through the centre
and side air vents Operating the climate control system
131Climate control
Page 135 of 389
O
Directs the airflow through the footwell
air vents
S Directs the airflow through the centre
and side air vents as well as the footwell
air vents
a Directs the airflow through the footwell
and demister vents
_ Directs the airflow through the demister
vents, the centre and side air vents as
well as the footwell air vents
b Directs the airflow through the centre
and side air vents as well as the demister
vents
W Sets the air distribution to automatic
Setting THERMOTRONIC automatic climate control: you
can set the air distribution separately for the
driver's and front-passenger side.
X Turn the key to position 2(Y page 144).
X Press the _rocker switch up or down.
The various air distribution settings appear in the multimedia system. Setting the airflow
Setting the front-compartment airflow X
Turn the key to position 2in the ignition lock
(Y page 144).
X To increase or reduce: press theH
rocker switch up or down.
Setting the rear compartment airflow
using the rear control panel It is only possible to set the airflow using the rear
control panel on vehicles with THERMOTRONIC automatic climate control. You can set the air-
flow separately for the front and rear compart-
ment.
X Turn the key to position 2in the ignition lock
(Y page 144).
X To increase or reduce:press the upper or
lower section of the KorI rocker
switch on the rear control panel.
The selected airflow level appears in the rear
display. Activating/deactivating the synchro-
nisation function
General notes Climate control can be set centrally using the
synchronisation function. The temperature set-
ting is adopted for the front-passenger side. For
THERMOTRONIC automatic climate control, the
temperature setting is adopted for the front-
passenger side and rear compartment.
Activating/deactivating THERMATIC automatic climate control
without auxiliary heating
X Press the 0rocker switch up or down.
The indicator lamp above the 0rocker
switch lights up or goes out.
The synchronisation function is deactivated if
the settings for the front-passenger side are
changed.
THERMATIC automatic climate control
with auxiliary heating and
THERMOTRONIC automatic climate con-
trol
X Activate or deactivate the "Synchronisation"
function using the multimedia system
(Y page 297).
The synchronisation function is deactivated if:
R the settings for the front-passenger side are
changed
R only THERMOTRONIC automatic climate con-
trol: the settings for the rear compartment are
changed Demisting the windscreen
General notes You can use this function to defrost the wind-
screen or to demist the inside of the windscreen and the front side windows.
Switch off the "Windscreen demisting" functionas soon as the windscreen is clear again. 132
Operating the climate control systemClimate control
Page 142 of 389
Switching the auxiliary heating/venti-
lation on or off using the remote control
General notes
Your vehicle comes with one remote control.
You may use two additional remote controls for
your vehicle. For more information, please con-
tact a qualified specialist workshop.
Store the remote control for the auxiliary heat-
ing so that the auxiliary heating cannot be
switched on unintentionally. In particular,
ensure that the remote control for the auxiliary
heating is kept out of the reach of children.
The remote control has a range of approximately
300 metres. This range is reduced by:
R sources of radio interference
R solid objects between the remote control and
the vehicle
R the remote control being in an unfavourable
position in relation to the vehicle
R transmitting from an enclosed space
If the remote control battery is low, the battery
symbol on the left of the display is shown as
empty. Replace the remote control battery and
observe the important safety notes when doing so (Y page 140).
Activating/deactivating the auxiliary
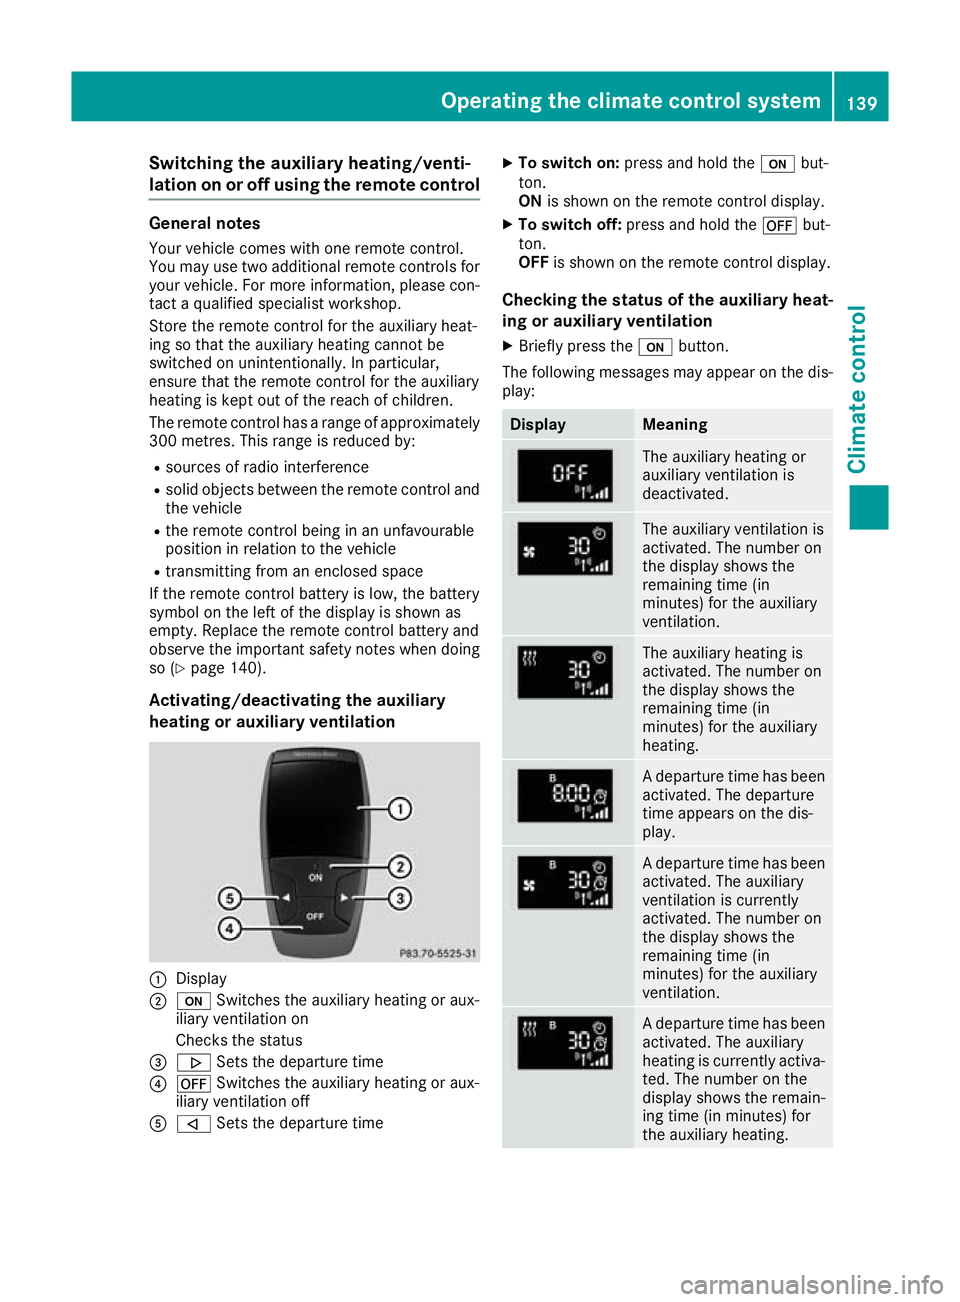
heating or auxiliary ventilation :
Display
; u Switches the auxiliary heating or aux-
iliary ventilation on
Checks the status
= . Sets the departure time
? ^ Switches the auxiliary heating or aux-
iliary ventilation off
A , Sets the departure time X
To switch on: press and hold the ubut-
ton.
ON is shown on the remote control display.
X To switch off: press and hold the ^but-
ton.
OFF is shown on the remote control display.
Checking the status of the auxiliary heat-
ing or auxiliary ventilation
X Briefly press the ubutton.
The following messages may appear on the dis- play: Display Meaning
The auxiliary heating or
auxiliary ventilation is
deactivated.
The auxiliary ventilation is
activated. The number on
the display shows the
remaining time (in
minutes) for the auxiliary
ventilation.
The auxiliary heating is
activated. The number on
the display shows the
remaining time (in
minutes) for the auxiliary
heating.
A departure time has been
activated. The departure
time appears on the dis-
play. A departure time has been
activated. The auxiliary
ventilation is currently
activated. The number on
the display shows the
remaining time (in
minutes) for the auxiliary
ventilation. A departure time has been
activated. The auxiliary
heating is currently activa-
ted. The number on the
display shows the remain-
ing time (in minutes) for
the auxiliary heating. Operating the climate control system
139Climate control Z
Page 143 of 389
If the engine has not yet reached operating tem-
perature when it is started, the auxiliary heating running time is increased. The auxiliary heating
continues to run until the engine has reached its
operating temperature. If this is the case, the
y symbol appears on the remote control dis-
play and the running time is zero minutes.
Setting the departure time Make sure that the time set in the vehicle is
correct before setting the departure time (see
the Digital Owner's Manual). Otherwise, the aux- iliary heating may activate at the wrong time and
at an unsuitable location. When setting the
departure time, also observe the important
safety notes (Y page 137).
X Briefly press the ubutton.
X Press the ,or. button repeatedly
until the time to be changed appears on the
display.
X Press the uand^ buttons simultane-
ously.
The Îsymbol on the remote control display
flashes.
X Press the ,or. button to set the
desired departure time.
i The longer you press the
,or. but-
ton, the faster the time changes.
X Press the uand^ buttons simultane-
ously.
The new departure time is stored.
Activating the set departure time
X Briefly press the ubutton.
X Press the ,or. button repeatedly
until the desired departure time appears on
the display.
X Press the ubutton.
The Ísymbol, the departure time and,
depending on the selected departure time,
the letter A, BorCappears on the display.
Deactivating the set departure time
X Briefly press the ubutton.
The status of the auxiliary heating is shown on
the display.
X Press the .button.
The first departure time stored appears on the
display.
X Press the ^button.
OFF is shown on the remote control display. Replacing the remote control battery Important safety notes
G
WARNING
Batteries contain toxic and corrosive substan- ces. If batteries are swallowed, it can result in
severe health problems. There is a risk of fatal injury.
Keep batteries out of the reach of children. If
a battery is swallowed, seek medical attention immediately. H
Environmental note Batteries contain pollutants.
It is illegal to dispose of them
with the household rubbish.
They must be collected sep-
arately and disposed of in anenvironmentally responsible
recycling system. Dispose of batteries in an
environmentally responsible
manner. Take discharged
batteries to a qualified spe-
cialist workshop or to a col-
lection point for used batter-
ies.
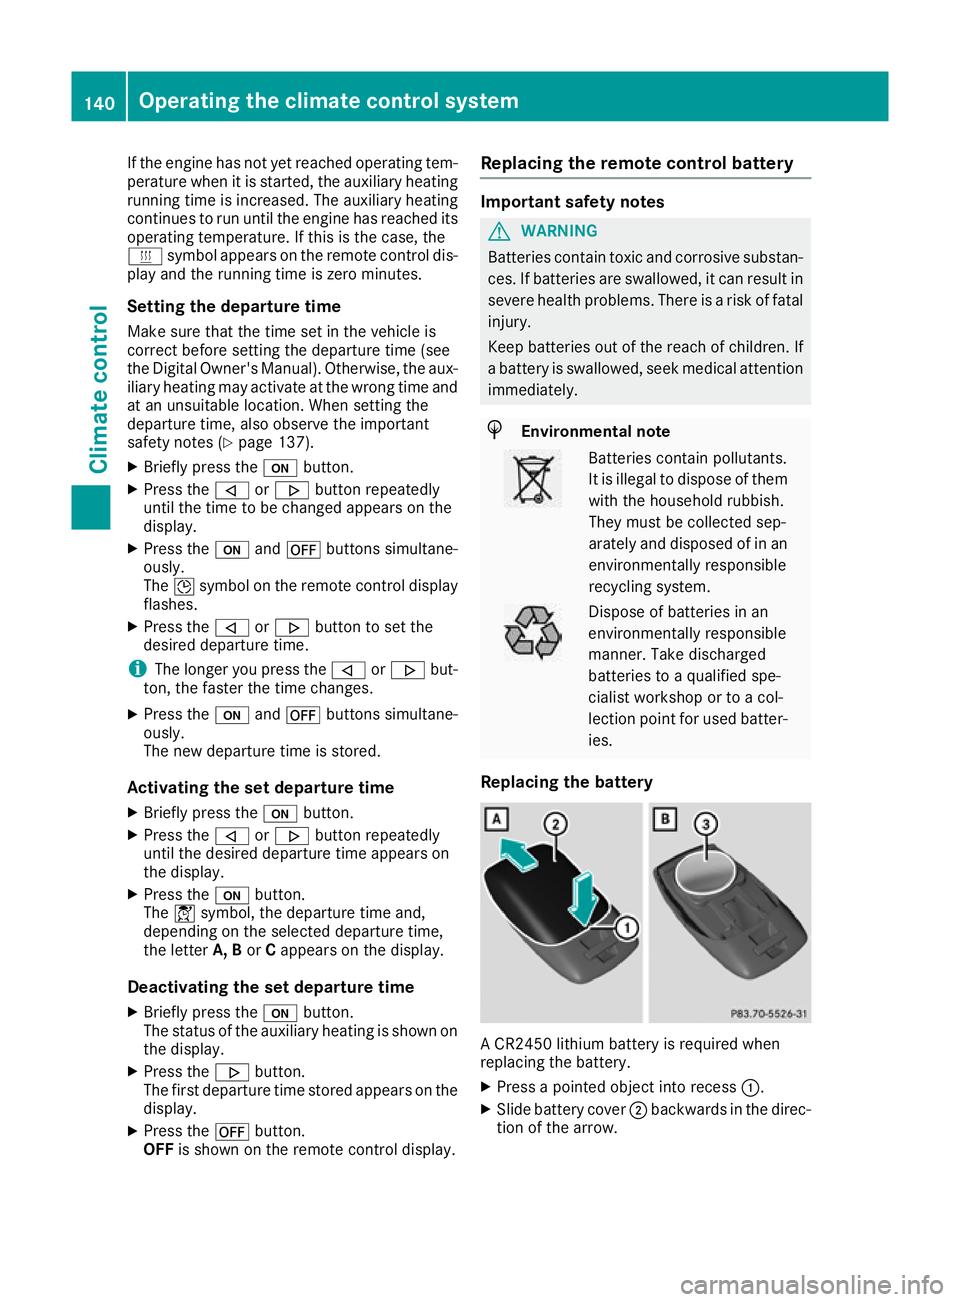
Replacing the battery A CR2450 lithium battery is required when
replacing the battery.
X Press a pointed object into recess :.
X Slide battery cover ;backwards in the direc-
tion of the arrow. 140
Operating the climate control systemClimate control