2016 MERCEDES-BENZ GLC COUPE light
[x] Cancel search: lightPage 305 of 389
Requirements
The mobile phone can be authorised and con-
nected to the module if the following conditions are met:
R The module is installed (Y page 300)and acti-
vated in the multimedia system (Y page 301).
R No SIM card is inserted in the module.
R The mobile phone has no active Bluetooth ®
connection to another device.
Depending on the type of mobile phone, differ-
ent settings must be changed on the mobile
phone; see the manufacturer's operating
instructions.
R Bluetooth ®
must be activated on the mobile
phone and must be made visible to other devi-
ces
R the Bluetooth ®
SIM Access Profile of the
mobile phone must be activated
Authorising and connecting a mobile
phone
Multimedia system:
X Select Connect device Connect device QSearch forSearch for
phones
phones QSAP phoneSAP phoneQ Start
Start
search
search QMB SAP module phonesMB SAP module phones .
X Select the mobile phone.
X Enter and confirm any 16-digit PIN.
X Enter and confirm the same PIN on the mobile
phone.
X Where necessary, enter the SIM card PIN into
the multimedia system and confirm.
i Please observe the messages in the mobile
phone. If necessary, you will be asked to con-
firm further profile requests.
Switching between mobile phones If you have authorised more than one mobile
phone on the module, you can switch between
the individual phones.
X Select the mobile phone under MB MBSAP
SAP mod‐
mod‐
ule phones
ule phones .
X Confirm the connection request; see the man-
ufacturer's operating instructions.
X Where necessary, enter the SIM card PIN into
the multimedia system and confirm. Data modem mode X
Connect the mobile phone to the module
(Y page 301).
or
X Insert the SIM card into the SIM card slot on
the module (Y page 301).
X Before connecting for the first time, enable
the module for Internet access and select the network provider in the multimedia system;
see the Digital Owner's Manual.
Use as a data modem is automatically activa- ted.
X Activate/deactivate data roaming; see Digital
Owner's Manual.
For further information on data mode without
telephony with COMAND Online; see the Digital Owner's Manual.
Settings Storing/deleting the SIM card PIN
Multimedia system:
X Select Connect Connect device
deviceQ MB
MBSAP
SAP module
module
phones
phones .
X Highlight the mobile phone.
X To select G: navigate to the right.
X Activate Oor deactivate ªStore PINStore PIN .
For more information on further settings; see
the Digital Owner's Manual.
Transferring the phone book In order to use the phone book of the mobile
phone via the multimedia system, the phone
book must be transferred using the module.
The transfer of data may take up to ten minutes.
Transmission occurs automatically after a Blue- tooth ®
connection is automatically established.
Text messages Requirements
The module is connected with the mobile phone
(Y page 301) or is being used in the SIM card
mode (Y page 301). 302
Operating systemMultimedia system
Page 310 of 389
Stowage compartment/telephone com-
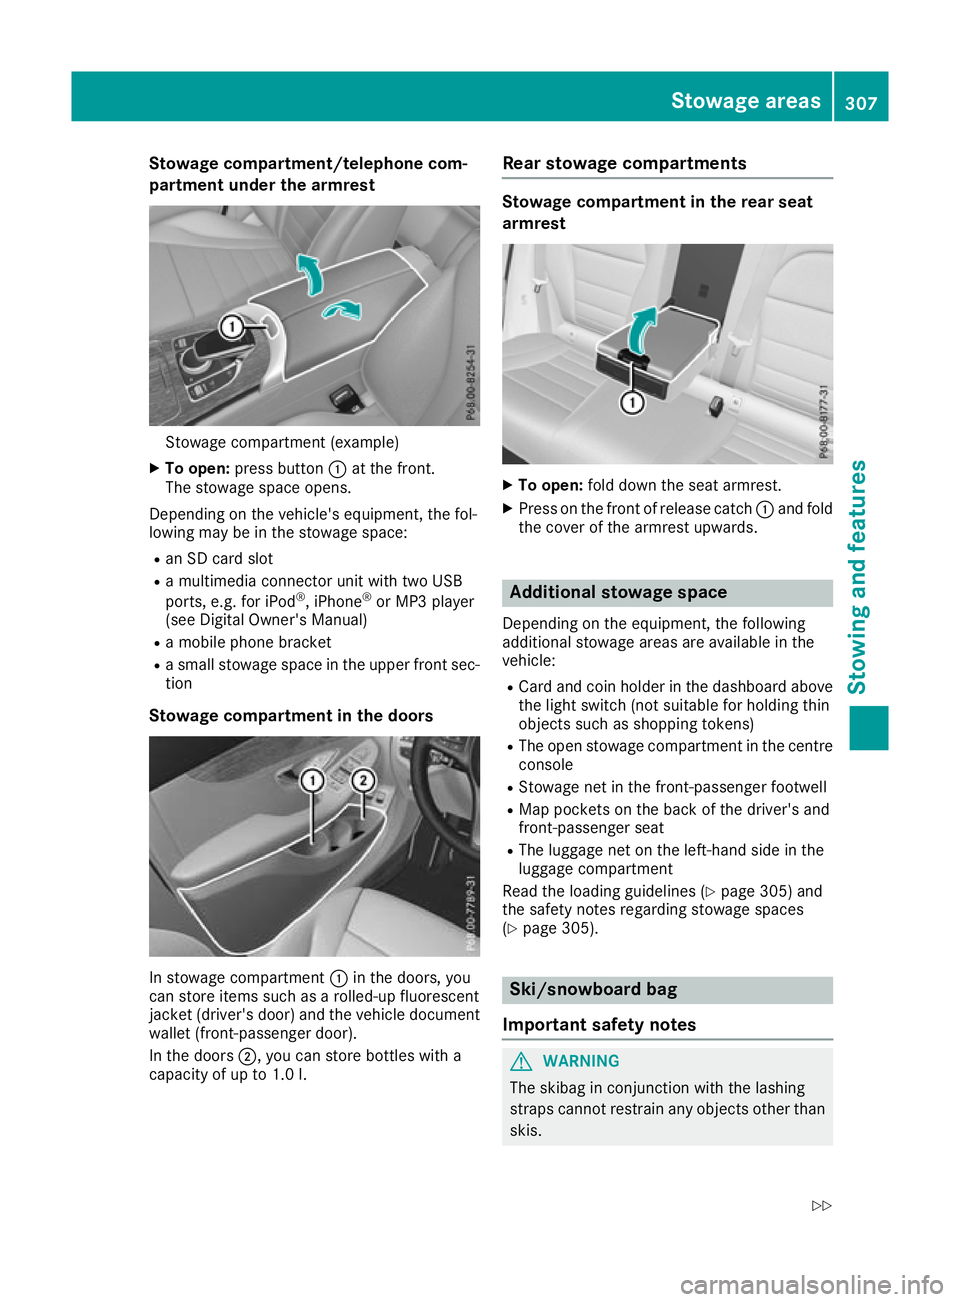
partment under the armrest Stowage compartment (example)
X To open: press button :at the front.
The stowage space opens.
Depending on the vehicle's equipment, the fol-
lowing may be in the stowage space:
R an SD card slot
R a multimedia connector unit with two USB
ports, e.g. for iPod ®
, iPhone ®
or MP3 player
(see Digital Owner's Manual)
R a mobile phone bracket
R a small stowage space in the upper front sec-
tion
Stowage compartment in the doors In stowage compartment
:in the doors, you
can store items such as a rolled-up fluorescent
jacket (driver's door) and the vehicle document wallet (front-passenger door).
In the doors ;, you can store bottles with a
capacity of up to 1.0 l. Rear stowage compartments Stowage compartment in the rear seat
armrest
X
To open: fold down the seat armrest.
X Press on the front of release catch :and fold
the cover of the armrest upwards. Additional stowage space
Depending on the equipment, the following
additional stowage areas are available in the
vehicle:
R Card and coin holder in the dashboard above
the light switch (not suitable for holding thin
objects such as shopping tokens)
R The open stowage compartment in the centre
console
R Stowage net in the front-passenger footwell
R Map pockets on the back of the driver's and
front-passenger seat
R The luggage net on the left-hand side in the
luggage compartment
Read the loading guidelines (Y page 305) and
the safety notes regarding stowage spaces
(Y page 305). Ski/snowboard bag
Important safety notes G
WARNING
The skibag in conjunction with the lashing
straps cannot restrain any objects other than skis. Stowage areas
307Stowing and features
Z
Page 312 of 389
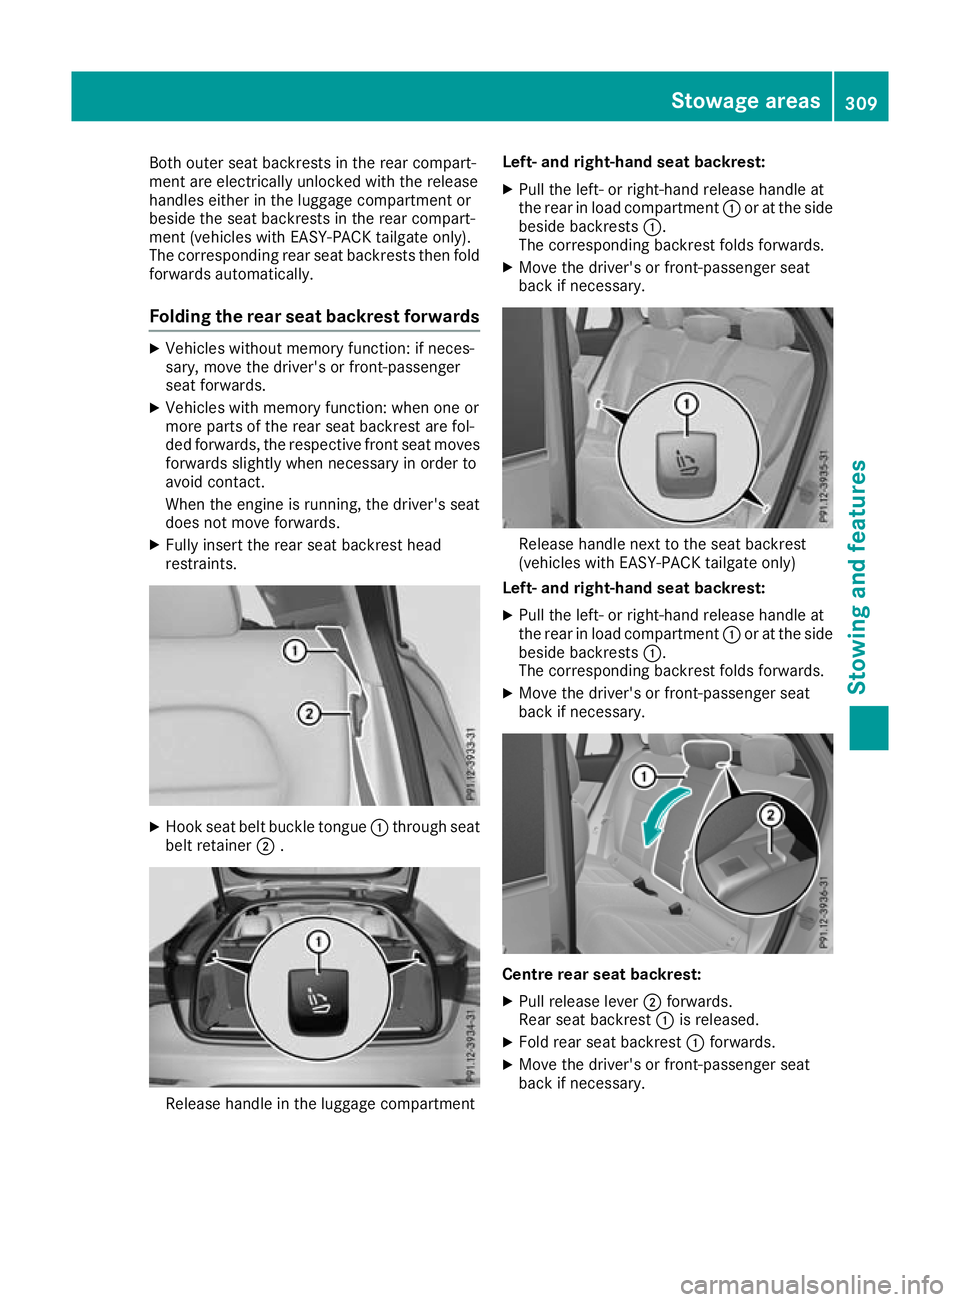
Both outer seat backrests in the rear compart-
ment are electrically unlocked with the release
handles either in the luggage compartment or
beside the seat backrests in the rear compart-
ment (vehicles with EASY-PACK tailgate only).
The corresponding rear seat backrests then fold forwards automatically.
Folding the rear seat backrest forwards X
Vehicles without memory function: if neces-
sary, move the driver's or front-passenger
seat forwards.
X Vehicles with memory function: when one or
more parts of the rear seat backrest are fol-
ded forwards, the respective front seat moves
forwards slightly when necessary in order to
avoid contact.
When the engine is running, the driver's seat
does not move forwards.
X Fully insert the rear seat backrest head
restraints. X
Hook seat belt buckle tongue :through seat
belt retainer ;. Release handle in the luggage compartment Left- and right-hand seat backrest:
X Pull the left- or right-hand release handle at
the rear in load compartment :or at the side
beside backrests :.
The corresponding backrest folds forwards.
X Move the driver's or front-passenger seat
back if necessary. Release handle next to the seat backrest
(vehicles with EASY-PACK tailgate only)
Left- and right-hand seat backrest:
X Pull the left- or right-hand release handle at
the rear in load compartment :or at the side
beside backrests :.
The corresponding backrest folds forwards.
X Move the driver's or front-passenger seat
back if necessary. Centre rear seat backrest:
X Pull release lever ;forwards.
Rear seat backrest :is released.
X Fold rear seat backrest :forwards.
X Move the driver's or front-passenger seat
back if necessary. Stowage areas
309Stowing and features Z
Page 313 of 389
Folding the rear seat backrest back
!
Make sure that the seat belt does not
become trapped when folding the rear seat
backrest back. Otherwise, it could be dam-
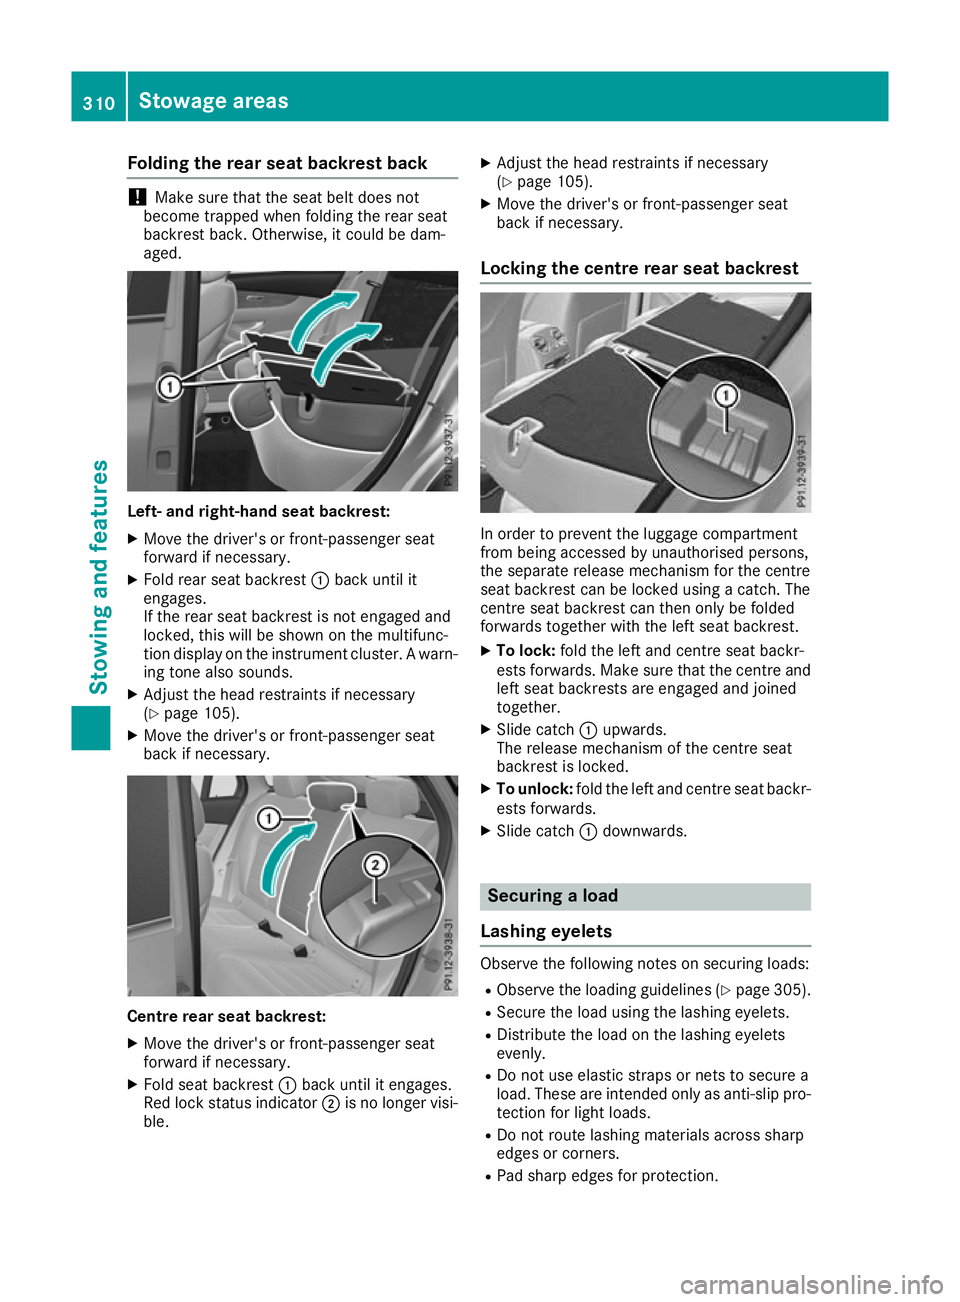
aged. Left- and right-hand seat backrest:
X Move the driver's or front-passenger seat
forward if necessary.
X Fold rear seat backrest :back until it
engages.
If the rear seat backrest is not engaged and
locked, this will be shown on the multifunc-
tion display on the instrument cluster. A warn- ing tone also sounds.
X Adjust the head restraints if necessary
(Y page 105).
X Move the driver's or front-passenger seat
back if necessary. Centre rear seat backrest:
X Move the driver's or front-passenger seat
forward if necessary.
X Fold seat backrest :back until it engages.
Red lock status indicator ;is no longer visi-
ble. X
Adjust the head restraints if necessary
(Y page 105).
X Move the driver's or front-passenger seat
back if necessary.
Locking the centre rear seat backrest In order to prevent the luggage compartment
from being accessed by unauthorised persons,
the separate release mechanism for the centre
seat backrest can be locked using a catch. The
centre seat backrest can then only be folded
forwards together with the left seat backrest.
X To lock: fold the left and centre seat backr-
ests forwards. Make sure that the centre and left seat backrests are engaged and joined
together.
X Slide catch :upwards.
The release mechanism of the centre seat
backrest is locked.
X To unlock: fold the left and centre seat backr-
ests forwards.
X Slide catch :downwards. Securing a load
Lashing eyelets Observe the following notes on securing loads:
R Observe the loading guidelines (Y page 305).
R Secure the load using the lashing eyelets.
R Distribute the load on the lashing eyelets
evenly.
R Do not use elastic straps or nets to secure a
load. These are intended only as anti-slip pro-
tection for light loads.
R Do not route lashing materials across sharp
edges or corners.
R Pad sharp edges for protection. 310
Stowage areasStowing and featu
res
Page 314 of 389
:
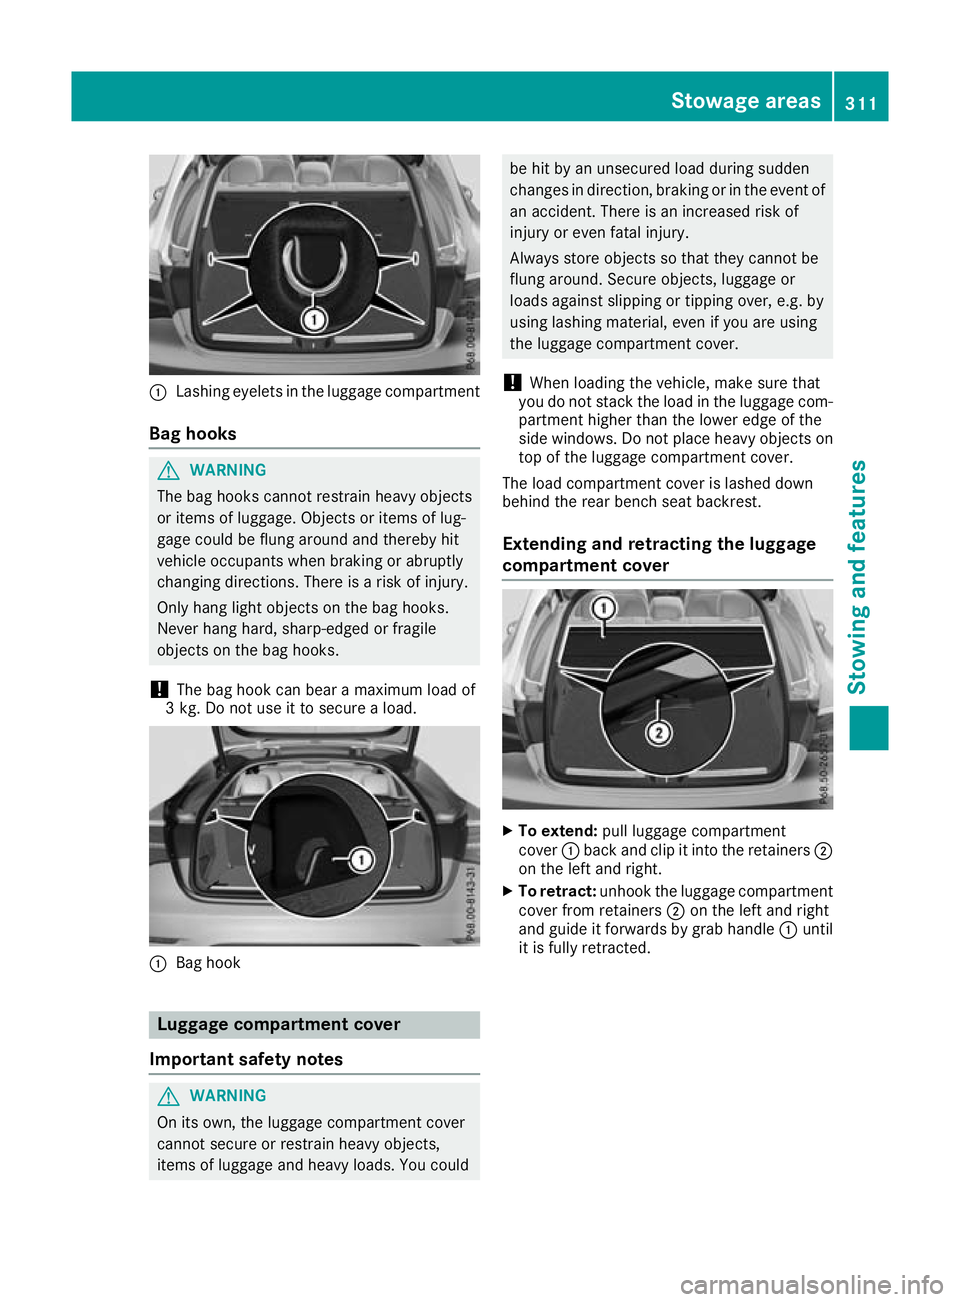
Lashing eyelets in the luggage compartment
Bag hooks G
WARNING
The bag hooks cannot restrain heavy objects
or items of luggage. Objects or items of lug-
gage could be flung around and thereby hit
vehicle occupants when braking or abruptly
changing directions. There is a risk of injury.
Only hang light objects on the bag hooks.
Never hang hard, sharp-edged or fragile
objects on the bag hooks.
! The bag hook can bear a maximum load of
3 kg. Do not use it to secure a load. :
Bag hook Luggage compartment cover
Important safety notes G
WARNING
On its own, the luggage compartment cover
cannot secure or restrain heavy objects,
items of luggage and heavy loads. You could be hit by an unsecured load during sudden
changes in direction, braking or in the event of
an accident. There is an increased risk of
injury or even fatal injury.
Always store objects so that they cannot be
flung around. Secure objects, luggage or
loads against slipping or tipping over, e.g. by
using lashing material, even if you are using
the luggage compartment cover.
! When loading the vehicle, make sure that
you do not stack the load in the luggage com- partment higher than the lower edge of the
side windows. Do not place heavy objects ontop of the luggage compartment cover.
The load compartment cover is lashed down
behind the rear bench seat backrest.
Extending and retracting the luggage
compartment cover X
To extend: pull luggage compartment
cover :back and clip it into the retainers ;
on the left and right.
X To retract: unhook the luggage compartment
cover from retainers ;on the left and right
and guide it forwards by grab handle :until
it is fully retracted. Stowage areas
311Stowing and features Z
Page 316 of 389
X
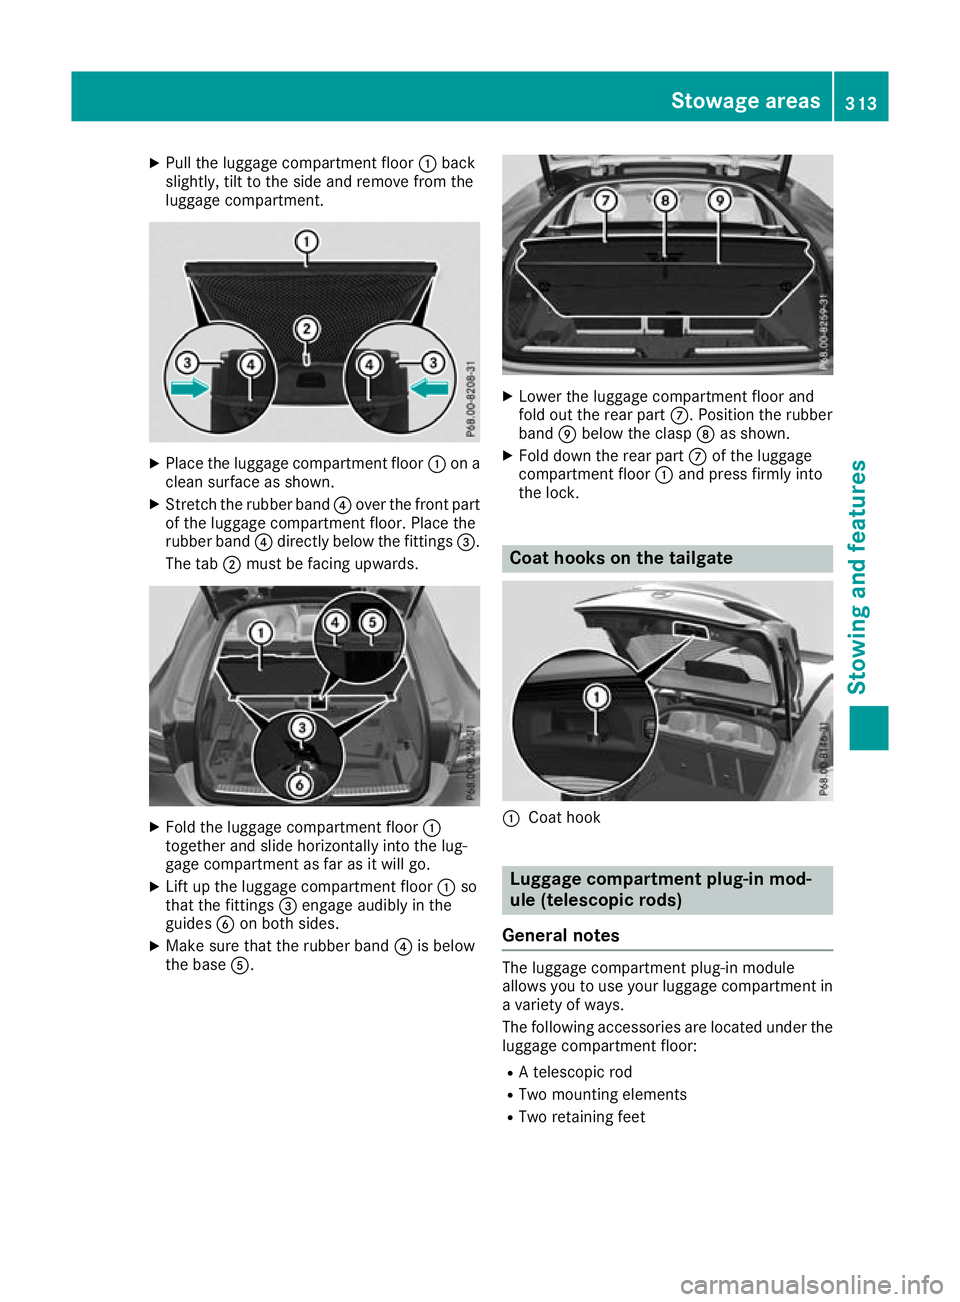
Pull the luggage compartment floor :back
slightly, tilt to the side and remove from the
luggage compartment. X
Place the luggage compartment floor :on a
clean surface as shown.
X Stretch the rubber band ?over the front part
of the luggage compartment floor. Place the
rubber band ?directly below the fittings =.
The tab ;must be facing upwards. X
Fold the luggage compartment floor :
together and slide horizontally into the lug-
gage compartment as far as it will go.
X Lift up the luggage compartment floor :so
that the fittings =engage audibly in the
guides Bon both sides.
X Make sure that the rubber band ?is below
the base A. X
Lower the luggage compartment floor and
fold out the rear part C. Position the rubber
band Ebelow the clasp Das shown.
X Fold down the rear part Cof the luggage
compartment floor :and press firmly into
the lock. Coat hooks on the tailgate
:
Coat hook Luggage compartment plug-in mod-
ule (telescopic rods)
General notes The luggage compartment plug-in module
allows you to use your luggage compartment in
a variety of ways.
The following accessories are located under the
luggage compartment floor:
R A telescopic rod
R Two mounting elements
R Two retaining feet Stowage areas
313Stowing and features Z
Page 319 of 389
strike vehicle occupants. In addition, cup
holders, open stowage spaces and mobile
phone brackets may not always be able to
hold the objects placed in them in the event of an accident. There is a risk of injury, particu-
larly in the event of sharp braking or sudden
changes of direction.
R Always stow objects in such a way that they
cannot be tossed about in these or similar
situations.
R Always make sure that objects do not proj-
ect from stowage spaces, luggage nets or
stowage nets.
R Ensure that closable stowage spaces are
shut before beginning your journey.
R Always stow and secure heavy, hard, poin-
ted, sharp-edged, fragile or outsize objects in the load compartment.
! Only use the cup holders for containers of
the right size and which have lids. The drinks
could otherwise spill.
! Do not expose drinks bottles in the cup
holder in the centre console to continuous,
strong and direct sunlight. The passenger
compartment in the area of the centre con-
sole can otherwise be damaged by the con-
centrated and reflected sunlight.
Observe the loading guidelines (Y page 305).
Cup holder on the front centre console X
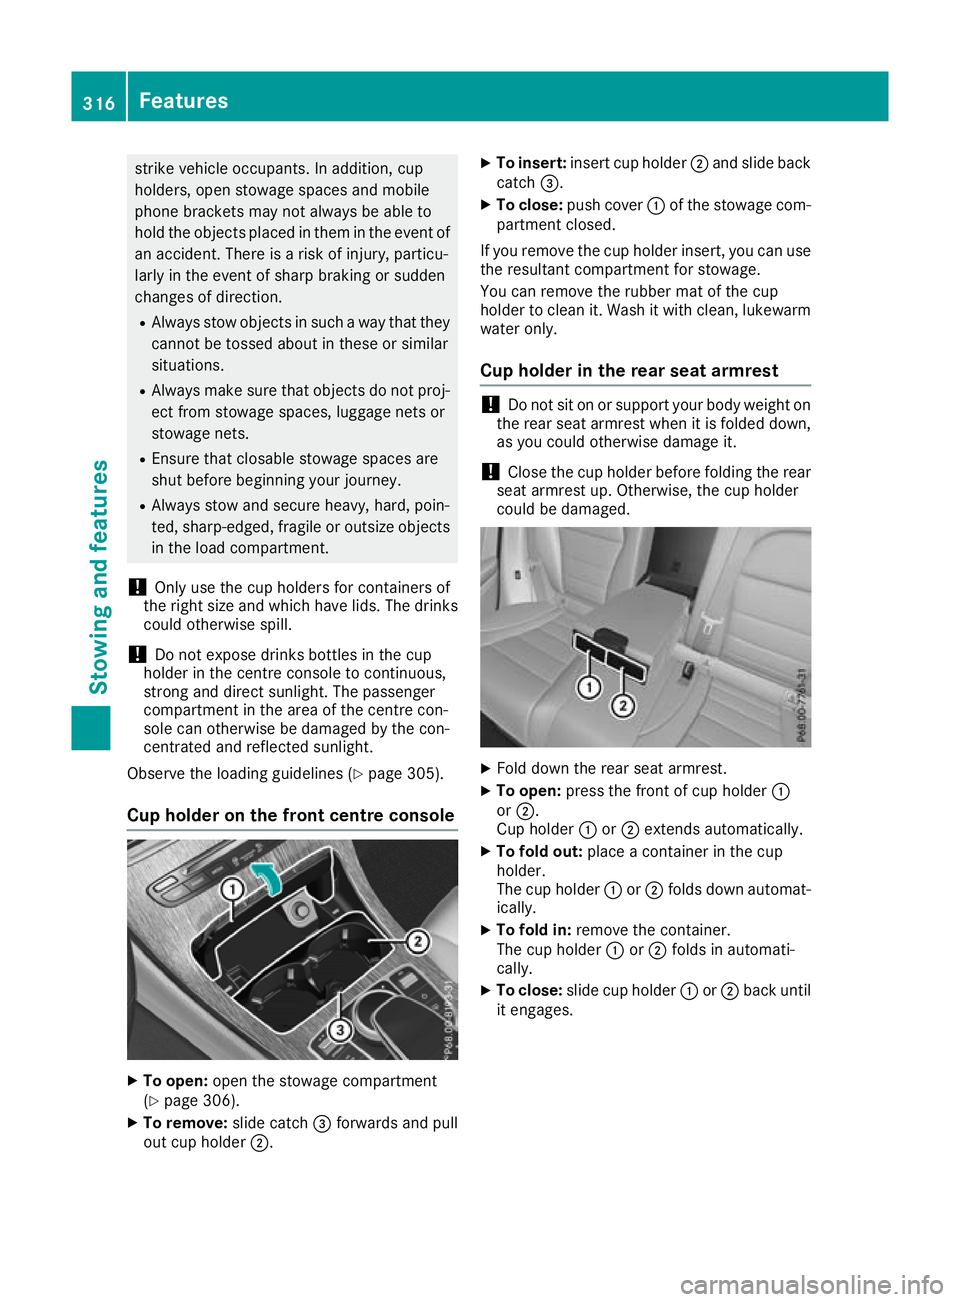
To open: open the stowage compartment
(Y page 306).
X To remove: slide catch=forwards and pull
out cup holder ;. X
To insert: insert cup holder ;and slide back
catch =.
X To close: push cover :of the stowage com-
partment closed.
If you remove the cup holder insert, you can use
the resultant compartment for stowage.
You can remove the rubber mat of the cup
holder to clean it. Wash it with clean, lukewarm water only.
Cup holder in the rear seat armrest !
Do not sit on or support your body weight on
the rear seat armrest when it is folded down,
as you could otherwise damage it.
! Close the cup holder before folding the rear
seat armrest up. Otherwise, the cup holder
could be damaged. X
Fold down the rear seat armrest.
X To open: press the front of cup holder :
or ;.
Cup holder :or; extends automatically.
X To fold out: place a container in the cup
holder.
The cup holder :or; folds down automat-
ically.
X To fold in: remove the container.
The cup holder :or; folds in automati-
cally.
X To close: slide cup holder :or; back until
it engages. 316
FeaturesStowing and features
Page 320 of 389
Sun visors
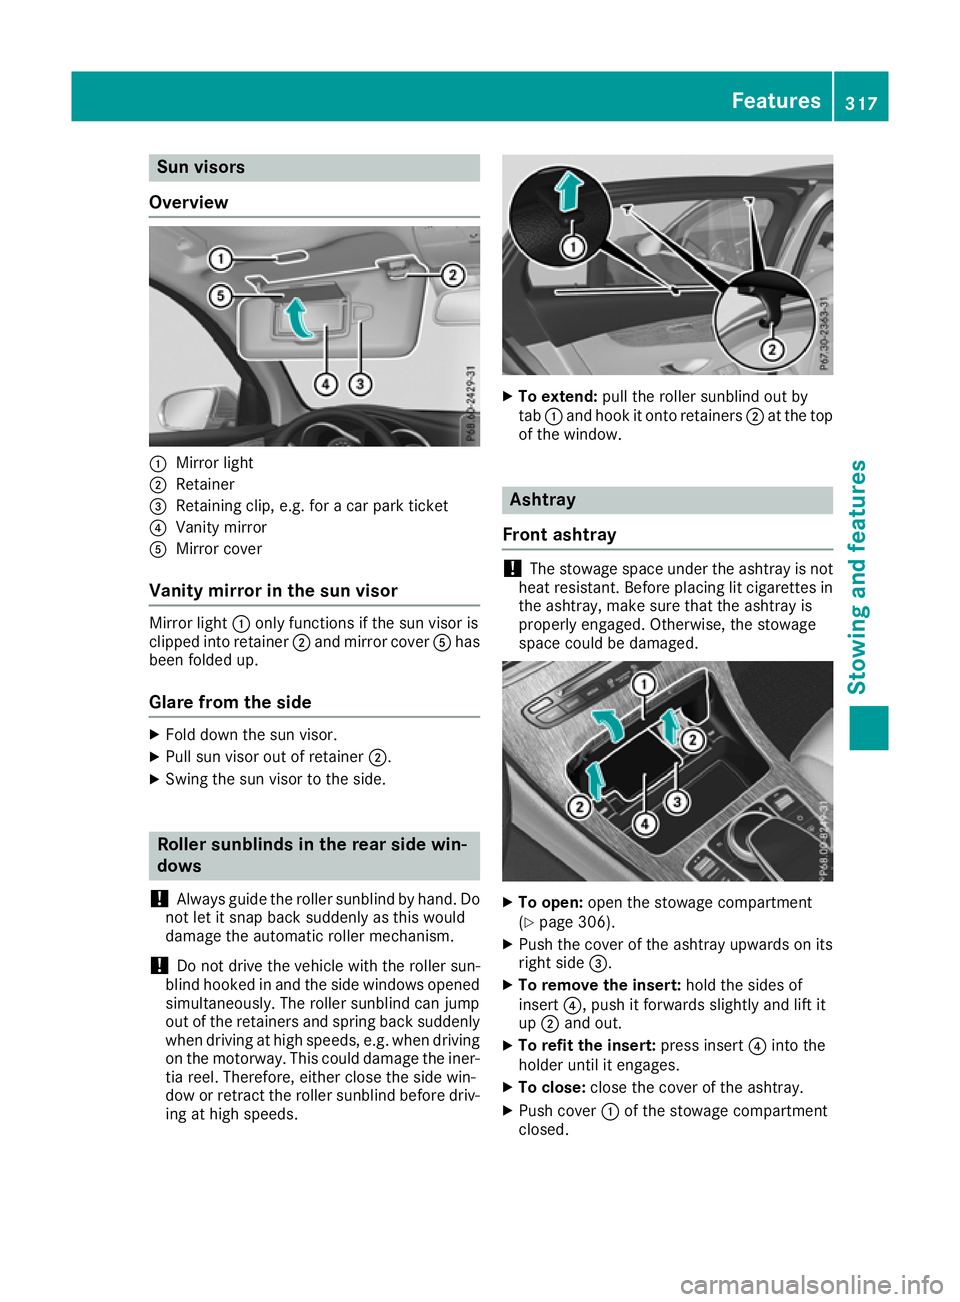
Overview :
Mirror light
; Retainer
= Retaining clip, e.g. for a car park ticket
? Vanity mirror
A Mirror cover
Vanity mirror in the sun visor Mirror light
:only functions if the sun visor is
clipped into retainer ;and mirror cover Ahas
been folded up.
Glare from the side X
Fold down the sun visor.
X Pull sun visor out of retainer ;.
X Swing the sun visor to the side. Roller sunblinds in the rear side win-
dows
! Always guide the roller sunblind by hand. Do
not let it snap back suddenly as this would
damage the automatic roller mechanism.
! Do not drive the vehicle with the roller sun-
blind hooked in and the side windows opened simultaneously. The roller sunblind can jump
out of the retainers and spring back suddenly
when driving at high speeds, e.g. when driving on the motorway. This could damage the iner-
tia reel. Therefore, either close the side win-
dow or retract the roller sunblind before driv- ing at high speeds. X
To extend: pull the roller sunblind out by
tab :and hook it onto retainers ;at the top
of the window. Ashtray
Front ashtray !
The stowage space under the ashtray is not
heat resistant. Before placing lit cigarettes in the ashtray, make sure that the ashtray is
properly engaged. Otherwise, the stowage
space could be damaged. X
To open: open the stowage compartment
(Y page 306).
X Push the cover of the ashtray upwards on its
right side =.
X To remove the insert: hold the sides of
insert ?, push it forwards slightly and lift it
up ; and out.
X To refit the insert: press insert?into the
holder until it engages.
X To close: close the cover of the ashtray.
X Push cover :of the stowage compartment
closed. Features
317Stowing and features Z