2016 MERCEDES-BENZ GLC-Class oil
[x] Cancel search: oilPage 353 of 418

can lose their shine if chrome polish is
used. Use a damp, lint-free cloth instead
when cleaning the trim pieces.
If the chrome-plated trim pieces are very
dirty, you can use a chrome polish. If you
are unsure as to whether the trim pieces
are chrome-plated or not, consult an
authorized Mercedes-Benz Center.
XWipe the wooden trim and trim pieces with
a damp, lint-free cloth, e.g. a microfiber
cloth.
XTrim elements with piano black finish:
clean with a soft, damp cloth and a com-
mercially available soap solution.
XHeavy soiling:use care and cleaning prod-
ucts recommended and approved by
Mercedes-Benz.
Cleaning the seat covers
General notes
!Do not use a microfiber cloth to clean
covers made out of real leather, artificial
leather or DINAMICA. If used often, these
can damage the cover.
Note that regular care is essential to ensure
that the appearance and comfort of the cov-
ers is retained over time.
Genuine leather seat covers
!To retain the natural appearance of the
leather, observe the following cleaning
instructions:
RClean genuine leather covers carefully
with a damp cloth and then wipe the cov-
ers down with a dry cloth.
RMake sure that the leather does not
become soaked. It may otherwise
become rough and cracked.
ROnly use leather care agents that have
been tested and approved by Mercedes-
Benz. You can obtain these from a quali-
fied specialist workshop.
Leather is a natural product. It exhibits natural surface characteristics, for
example:
Rdifferences in the texture
Rmarks caused by growth and injury
Rslight nuances of color
These are characteristics of leather and not
material defects.
Seat covers of other materials
!Observe the following when cleaning:
Rclean artificial leather covers with a cloth
moistened with a solution containing 1% detergent (e.g. dish washing liquid).
Rclean cloth covers with a microfiber cloth
moistened with a solution containing 1%
detergent (e.g. dish washing li quid)
. Rub
carefully and always wipe entire seat sec-
tions to avoid leaving visible lines. Leave
the seat to dry afterwards. Cleaning
results depend on the type of dirt and
how long it has been there.
Rclean DINAMICA covers with a damp
cloth. Make sure that you wipe entire
seat sections to avoid leaving visible
lines.
Cleaning the seat belts
GWARNING
Seat belts can become severely weakened if
bleached or dyed. This could cause the seat
belts to tear or fail, for instance, in the event of an accident. This poses an increased risk of
injury or fatal injury.
Never bleach or dye the seat belts.
!Do not clean the seat belts using chemical
cleaning agents. Do not dry the seat belts
by heating at temperatures above 176 ‡
(80 †) or in direct sunlight.
XUse clean, lukewarm water and soap solu-
tion.
Care351
Maintenance and care
Z
Page 357 of 418

life span also depends on use, care, stor-
age, etc.
RThe reflective safety jackets should be dis-posed of and replaced with new ones:
-after 15 washes, and/or
-if the reflective strips have become
scratched, and/or
-if the backing material and/or reflective
strips have become soiled and cannot becleaned off, and/or
-the fluorescence of a reflective safety
vest has faded e.g. due to the effects of
sunlight
RDispose of reflective safety jackets in an
environmentally responsible manner. To do
so, contact your local waste disposal com- pany.
Vehicle tool kit
General notes
The towing eye is located in the left-hand
stowage well under the cargo compartment
floor.
Apart from certain country-specific varia-
tions, the vehicles are not equipped with a
tire-change tool kit.
Some tools for changing a wheel are specific
to the vehicle. For more information on which tire changing tools are required and approved
to perform a wheel change on your vehicle,
consult a qualified specialist workshop.
Tools required for changing a wheel may
include, for example:
RJack
RWheel chock
RLug wrench
RRatchet wrench
RAlignment bolt
Towing eye
XOpen the tailgate.
XOpen the cargo compartment floor
(
Ypage 316).
The towing eye is located in the left-hand
stowage well under the cargo compartment
floor.
Vehicles with a TIREFIT kit
Example
XOpen the tailgate.
XOpen the cargo compartment floor
(
Ypage 316).
XPush retaining clamps :on the cover
downwards so as to release them.
XFold up cover in the direction of arrow ;.
XRemove tire inflation compressor=and
tire sealant bottle ?.
Where will I find...?355
Breakdown assistance
Page 361 of 418

XPull connector?with the cable and hose
A out of the tire inflation compressor
housing.
XScrew hose Aonto flange Bof tire seal-
ant bottle :.
XPlace tire sealant bottle :head down-
wards into recess ;of the tire inflation
compressor.
XRemove the cap from valve Con the faulty
tire.
XScrew filler hose Donto valve C.
XInsert connector ?into a socket in your
vehicle.
Cigarette lighter socket: (
Ypage 320)
12 V socket: (
Ypage 321)
Observe the notes on the cigarette lighter
(
Ypage 320). Observe the notes on sock-
ets (
Ypage 321).
XTurn the SmartKey to position 1in the igni-
tion lock (
Ypage 153).
XPress on and off switch =on the tire infla-
tion compressor.
The tire inflation compressor is switched
on. The tire is inflated.
First, tire sealant is pumped into the tire.
The pressure may briefly rise to approx-
imately 500 kPa (5 bar/73 psi).
Do not switch off the tire inflation com-
pressor during this phase.
XLet the tire inflation compressor run for a
maximum of five minutes. The tire should
then have attained a pressure of at least
180 kPa (1.8 bar/26 psi). If a pressure of 180 kPa (1.8 bar/26 psi) has
been attained after five minutes, see "Tire
pressure reached" (
Ypage 359).
If a tire pressure of 180 kPa (1.8 bar/26 psi)
has not been attained after five minutes, see
"Tire pressure not reached" (
Ypage 359).
If tire sealant has escaped, clean it off affec-
ted areas as quickly as possible. Use plain
water if possible.
If your clothes are soiled with tire sealant,
have them cleaned with perchloroethylene at
a dry cleaner as soon as possible.
Tire pressure not reached
If a pressure of 180 kPa (1.8 bar/26 psi) has
not been attained after five minutes:
XSwitch off the tire inflation compressor.
XUnscrew the filler hose from the valve of
the faulty tire.
Note that tire sealant may escape when you
unscrew the filler hose.
XVery slowly drive forwards or reverse
approximately 30 ft (10 m).
XPump up the tire again.
After a maximum of five minutes the tire
pressure must be at least 180 kPa (1.8 bar/ 26 psi).
GWARNING
If the required tire pressure is not reached
after the specified time, the tire is too badly
damaged. The tire sealant cannot repair the
tire in this instance. Damaged tires and a tire
pressure that is too low can significantly
impair the vehicle's braking and driving char-
acteristics. There is a risk of accident.
Do not continue driving. Contact a qualified
specialist workshop.
Tire pressure reached
GWARNING
A tire temporarily sealed with tire sealant
impairs the driving characteristics and is not
Flat tire359
Breakdown assistance
Z
Page 396 of 418

Curb weight
The weight of a vehicle with standard equip-
ment including the maximum capacity of fuel,
oil and coolant. It also includes the air-condi-
tioning system and optional equipment if
these are installed in the vehicle, but does not
include passengers or luggage.
Maximum load rating
The maximum tire load is the maximum per-
missible weight in kilograms or lbs for which a
tire is approved.
Maximum permissible tire pressure
Maximum permissible tire pressure for one
tire.
Maximum load on one tire
Maximum load on one tire. This is calculated
by dividing the maximum axle load of one axle
by two.
PSI (pounds per square inch)
A standard unit of measure for tire pressure.
Aspect ratio
Relationship between tire height and tire
width in percent.
Tire pressure
This is pressure inside the tire applying an
outward force to each square inch of the tire's
surface. The tire pressure is specified in
pounds per square inch (psi), in kilopascal
(kPa) or in bar. The tire pressure should only
be corrected when the tires are cold.
Cold tire pressure
The tires are cold:
Rif the vehicle has been parked with the tires
out of direct sunlight for at least three
hours and
Rif the vehicle has not been driven further
than 1 mile (1.6 km) Tread
The part of the tire that comes into contact
with the road.
Bead
The tire bead ensures that the tire sit
s
securely on t
he wheel. There are several steel
wires in the bead to prevent the tire from
coming loose from the wheel rim.
Sidewall
The part of the tire between the tread and the bead.
Weight of optional extras
The combined weight of those optional extras
that weigh more than the replaced standard
parts and more than 5 lbs (2.3 kg). These
optional extras, such as high-performance
brakes, level control, a roof rack or a high-
performance battery, are not included in the
curb weight and the weight of the accesso-
ries.
TIN (Tire Identification Number)
This is a unique identifier which can be used
by a tire manufacturer to identify tires, for
example for a product recall, and thus identify
the purchasers. The TIN is made up of the
manufacturer's identity code, tire size, tire
type code and the manufacturing date.
Load bearing index
The load bearing index (also load index) is a
code that contains the maximum load bearing
capacity of a tire.
Traction
Traction is the result of friction between the
tires and the road surface.
Treadwear indicators
Narrow bars (tread wear bars) that are dis-
tributed over the tire tread. If the tire tread is
level with the bars, the wear limit of áin
(1.6 mm) has been reached.
394All about wheels and tires
Wheels and tires
Page 397 of 418

Occupant distribution
The distribution of occupants in a vehicle at
their designated seating positions.
Total load limit
Nominal load and luggage load plus 68 kg
(150 lbs) multiplied by the number of seats in
the vehicle.
Changing a wheel
Flat tire
The "Breakdown assistance" section
(
Ypage 356) contains information and notes
on how to deal with a flat tire. Information on driving with MOExtended tires in the event of
a flat tire can be found under "MOExtended
tires (tires with run-flat characteristics"
(
Ypage 357).
Rotating the wheels
GWARNING
Interchanging the front and rear wheels may
severely impair the driving characteristics if
the wheels or tires have different dimensions. The wheel brakes or suspension components
may also be damaged. There is a risk of acci-
dent.
Rotate front and rear wheels only if the wheels and tires are of the same dimensions.
!On vehicles equipped with a tire pressure
monitor, electronic components are loca-
ted in the wheel.
Tire-mounting tools should not be used
near the valve. This could damage the elec- tronic components.
Only have tires changed at a qualified spe-
cialist workshop.
Always observe the instructions and safety
notes in the "Mounting a wheel" section
(
Ypage 395).
The wear patterns on the front and rear tires
differ, depending on the operating conditions. Rotate the wheels before a clear wear pattern
has formed on the tires. Front tires typically
wear more on the shoulders and the rear tires
in the center.
On vehicles that have the same size front and
rear wheels, you can rotate the wheels
according to the intervals in the tire manu-
facturer's warranty book in your vehicle docu-
ments. If no warranty book is available, the
tires should be rotated every 3,000 to 6,000
miles (5,000 to 10,000 km). Earlier may be
necessary, depending on the degree of tire
wear. Do not change the direction of wheel
rotation.
Clean the contact surfaces of the wheel and
the brake disc thoroughly every time a wheel
is rotated. Check the tire pressure and reac-
tivate the tire pressure monitor if necessary
(
Ypage 383).
Direction of rotation
Tires with a specified direction of rotation
have additional benefits, e.g. if there is a risk
of hydroplaning. These advantages can only
be gained if the tires are installed correspond-
ing to the direction of rotation.
An arrow on the sidewall of the tire indicates
its correct direction of rotation.
Storing wheels
Store wheels that are not being used in a cool,
dry and preferably dark place. Protect the
tires from oil, grease, gasoline and diesel.
Mounting a wheel
Preparing the vehicle
XStop the vehicle on solid, non-slippery and
level ground.
XApply the electric parking brake manually.
XBring the front wheels into the straight-
ahead position.
Changing a wheel395
Wheels and tires
Z
Page 400 of 418
XTurn ratchet wrench?until jack =sits
completely on jacking point ;and the
base of the jack lies evenly on the ground.
XTurn ratchet wrench ?until the tire is
raised a maximum of 1.2 in (3 cm) off the
ground.
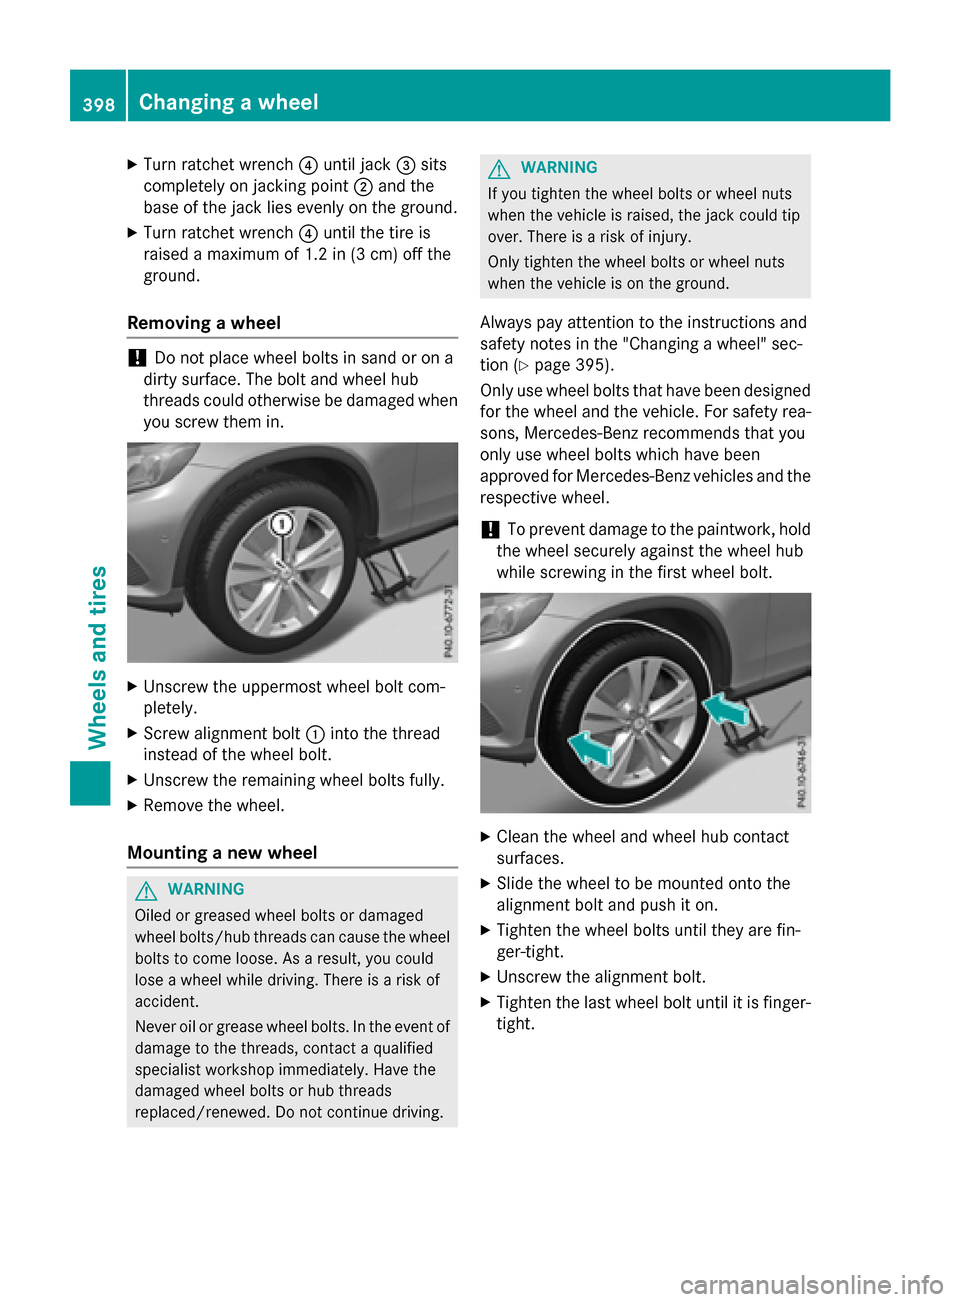
Removing a wheel
!Do not place wheel bolts in sand or on a
dirty surface. The bolt and wheel hub
threads could otherwise be damaged when
you screw them in.
XUnscrew the uppermost wheel bolt com-
pletely.
XScrew alignment bolt :into the thread
instead of the wheel bolt.
XUnscrew the remaining wheel bolts fully.
XRemove the wheel.
Mounting a new wheel
GWARNING
Oiled or greased wheel bolts or damaged
wheel bolts/hub threads can cause the wheel bolts to come loose. As a result, you could
lose a wheel while driving. There is a risk of
accident.
Never oil or grease wheel bolts. In the event of
damage to the threads, contact a qualified
specialist workshop immediately. Have the
damaged wheel bolts or hub threads
replaced/renewed. Do not continue driving.
GWARNING
If you tighten the wheel bolts or wheel nuts
when the vehicle is raised, the jack could tip
over. There is a risk of injury.
Only tighten the wheel bolts or wheel nuts
when the vehicle is on the ground.
Always pay attention to the instructions and
safety notes in the "Changing a wheel" sec-
tion (
Ypage 395).
Only use wheel bolts that have been designed for the wheel and the vehicle. For safety rea-
sons, Mercedes-Benz recommends that you
only use wheel bolts which have been
approved for Mercedes-Benz vehicles and the
respective wheel.
!To prevent damage to the paintwork, hold
the wheel securely against the wheel hub
while screwing in the first wheel bolt.
XClean the wheel and wheel hub contact
surfaces.
XSlide the wheel to be mounted onto the
alignment bolt and push it on.
XTighten the wheel bolts until they are fin-
ger-tight.
XUnscrew the alignment bolt.
XTighten the last wheel bolt until it is finger-
tight.
398Changing a wheel
Wheels and tires
Page 411 of 418

Engine number
:Engine number (stamped into the crank-
case)
;VIN (on the lower edge of the windshield)
=Emission control information plate,
including the certification of both federal
and Californian emissions standards
Service products and filling capaci-
ties
Important safety notes
GWARNING
Service products may be poisonous and haz-
ardous to health. There is a risk of injury.
Comply with instructions on the use, storage
and disposal of service products on the labels
of the respective original containers. Always
store service products sealed in their original
containers. Always keep service products out
of the reach of children.
HEnvironmental note
Dispose of service products in an environ-
mentally responsible manner.
Service products include the following:
RFuels
RLubricants (e.g. engine oil, transmission oil)
RCoolant
RBrake fluid
RWindshield washer fluid
RClimate control system refrigerant Components and service products must be
matched. Only use products recommended
by Mercedes-Benz. Damage which is caused
by the use of products which have not been
recommended is not covered by the
Mercedes-Benz warranty or goodwill ges-
tures. They are listed in this Mercedes-Benz
Operator's Manual in the appropriate section.
Information on tested and approved products
can be obtained at an authorized Mercedes-
Benz Center or on the Internet at
http://bevo.mercedes-benz.com.
You can recognize service products approved
by Mercedes-Benz by the following inscrip-
tion on the containers:
RMB-Freigabe (e.g. MB-Freigabe 229.51)
RMB-Approval (e.g. MB-Approval 229.51)
Other designations or recommendations indi-
cate a level of quality or a specification in
accordance with an MB Sheet Number (e.g.
MB 229.5). They have not necessarily been
approved by Mercedes-Benz.
Other identifications, for example:
R0 W-30
R5 W-30
R5 W-40
Fuel
Important safety notes
GWARNING
Fuel is highly flammable. If you handle fuel
incorrectly, there is a risk of fire and explo-
sion.
You must avoid fire, open flames, creating
sparks and smoking. Switch off the engine
and, if applicable, the auxiliary heating before refueling.
GWARNING
Fuel is poisonous and hazardous to health.
There is a risk of injury.
Service products and filling capacities409
Technical data
Z
Page 413 of 418

formance and increase fuel consumption.
Avoid driving at full throttle and sudden accel-
eration. Never refuel using fuel with a lower
AKI.
Information on refueling (
Ypage 170).
Additives
!Operating the engine with fuel additives
added later can lead to engine failure. Do
not mix fuel additives with fuel. This does
not include additives for the removal and
prevention of residue buildup. gasoline
must only be mixed with additives recom-
mended by Mercedes-Benz. Comply with
the instructions for use on the product
label. More information about recommen-
ded additives can be obtained from any
authorized Mercedes-Benz Center.
Mercedes-Benz recommends that you use
branded fuels that have additives.
The quality of the fuel available in some coun-
tries may not be sufficient. Residue could
build up in the injection system as a result. In
such cases, and in consultation with an
authorized Mercedes-Benz Center, the gaso-
line may be mixed with the cleaning additive
recommended by Mercedes-Benz. You must
observe the notes and mixing ratios specified
on the container.
Fuel consumption information
HEnvironmental note
CO
2(carbon dioxide) is the gas which scien-
tists believe to be principally responsible for
global warming (the greenhouse effect). Your
vehicle's CO
2emissions are directly related to
fuel consumption and therefore depend on:
Refficient use of the fuel by the engine
Rdriving style
Rother non-technical factors, such as envi-
ronmental influences, road conditions or
traffic flow
You can minimize your vehicle's CO
2emis-
sions by driving carefully and having it serv-
iced regularly.
The vehicle will use more fuel than usual in the
following situations:
Rat very low outside temperatures
Rin city traffic
Ron short journeys
Rin mountainous terrain
Rwhen towing a trailer
Engine oil
General notes
!Never use engine oil or an oil filter of a
specification other than is necessary to ful-
fill the prescribed service intervals. Do not
change the engine oil or oil filter in order to
achieve longer replacement intervals than
those prescribed. You could otherwise
cause engine damage or damage to the
exhaust gas aftertreatment.
Follow the instructions in the service inter-
val display regarding the oil change. Other-
wise, you may damage the engine and the
exhaust gas aftertreatment.
When handling engine oil, observe the impor-
tant safety notes on service products
(
Ypage 409).
The engine oils are matched to the perform-
ance of Mercedes-Benz engines and service
intervals. You should therefore only use
engine oils and oil filters that are approved for
vehicles with maintenance systems.
For a list of approved engine oils and oil filters,
consult an authorized Mercedes-Benz Cen-
Service products and filling capacities411
Technical data
Z