2016 MERCEDES-BENZ GLC-Class navigation
[x] Cancel search: navigationPage 243 of 418

Multifunction display
:Drive program (Ypage 163)
;Transmission position (Ypage 164)
=Additional speedometer (Ypage 255)
?Display
ATime
BOutside temperature
Display panel =shows the selected menu or
submenu and display messages.
XTo open the menu list: press theò
button on the steering wheel.
Display panel =appears in the menu list.
Possible displays in the multifunction dis-
play:
RZ Gearshift recommendation, when shifting
manually (
Ypage 167)
Rj Active Parking Assist (Ypage 201)
RCRUISECruise control (Ypage 181)
R_ Adaptive Highbeam Assist
(
Ypage 127)
Rè ECO start/stop function
(
Ypage 158)
Rë HOLD function (Ypage 194)
RaDISTRONIC PLUS Steering Assist and
Stop&Go Pilot (
Ypage 192)
Head-up display
General notes
The head-up display projects information
from the navigation system and the driver
assistance system above the dashboard into
the driver's field of vision.
A requirement for the display of the contents
is that the following functions are available in
the vehicle and are switched on:
RCruise control
RDISTRONIC PLUS
RTraffic Sign Assist
RNavigation
The head-up display allows the driver to see
all of the information without having to take
his eyes off the road.
Important safety notes
The head-up display is only an aid and is not a
substitute for attentive driving.
The visibility of the head-up display is influ-
enced by the following conditions:
Rthe driver's seat position
Rthe positioning of the display image
Rthe general ambient light
Rsunglasses with polarization filters
Rwet roads
Rblocking of sunlight by objects on the dis-
play cover
In the event of extreme sunlight, sections of
the display may fade. This can be reversed by
switching the head-up display off and on
again.
iVehicles with the head-up display are
equipped with a special windshield. Should
repairs be necessary, have the windshield
replaced at a qualified specialist workshop.
Displays and operation241
On-board computer and displays
Z
Page 245 of 418

Standard displays in the head-up display
The head-up display shows the following contents and information:
:Navigation messages
;Current speed
=Selected DISTRONIC PLUS speed (Ypage 183)
Cruise control set speed (
Ypage 181)
?Detected traffic signs
Setting options
You can adjust the following settings in the
head-up display submenu:
Radjust the position of the head-up display
on the windshield (
Ypage 254)
Radjust the brightness of the displays in the head-up display (
Ypage 255)
Rselect desired displays in the head-up dis-
play (
Ypage 254)
Using the Display Content
function, you
can, depending on your vehicle's equip-
ment, choose between four standard dis-
plays. The selected contents then appear in
the head-up display.
If you select a display with traffic signs,
detected traffic signs from Traffic Sign
Assist appear in the head-up display.
Menus and submenus
Menu overview
Press the òbutton on the steering wheel
to open the menu list.
Operating the on-board computer
(
Ypage 239).
Depending on the vehicle equipment, you can
select the following menu:
RTripmenu (Ypage 244)
RNavimenu (navigation instructions)
(
Ypage 246)
RRadiomenu (Ypage 248)
RMediamenu (Ypage 248)
RTelephonemenu (Ypage 250)
RAssistance Graphicmenu
(
Ypage 251)
RServicemenu (Ypage 252)
RSettingsmenu (Ypage 252)
Menus and submenus243
On-board computer and displays
Z
Page 248 of 418

You can reset the values of the following func-
tions:
RTrip odometer
R"From Start" trip computer
R"From Reset" trip computer
RECO display
If you reset the values in the ECO display, the
values in the "From Start" trip computer are
also reset. If you reset the values in the "From
Start" trip computer, the values in the ECO
display are also reset.
Navigation system menu
Displaying navigation instructions
In the Navimenu, the multifunction display
shows navigation instructions.
Additional information on navigation can be
found in the separate Audio 20 or COMAND
operating instructions.
XSwitch on Audio 20 or COMAND, see the
separate operating instructions.
XPress the òbutton on the steering
wheel to open the menu list.
XPress :or9 on the steering wheel
to select the Navi
menu.
XConfirm by pressing aon the steering
wheel.
Route guidance not active
:Direction of travel
;Current road
Route guidance active
No change of direction announced
:Distance to the next destination
;Estimated arrival time
=Distance to the next change of direction
?Current road
Change of direction announced with a
lane recommendation
:Road into which the change of direction
leads
;Distance to the change of direction
=Change-of-direction symbol
?Recommended lane and new lane during a
change of direction (white)
APossible lane
BLane not recommended (dark gray)
On multilane roads, new lane recommenda-
tions can be displayed for the next change of
direction if the digital map supports this data.
During the change of direction, new lanes
may be added.
246Menus and submenus
On-board computer and displays
Page 250 of 418

No route could be calculated to the selec-
ted destination.
RO
You have reached the destination or an
intermediate destination.
Radio menu
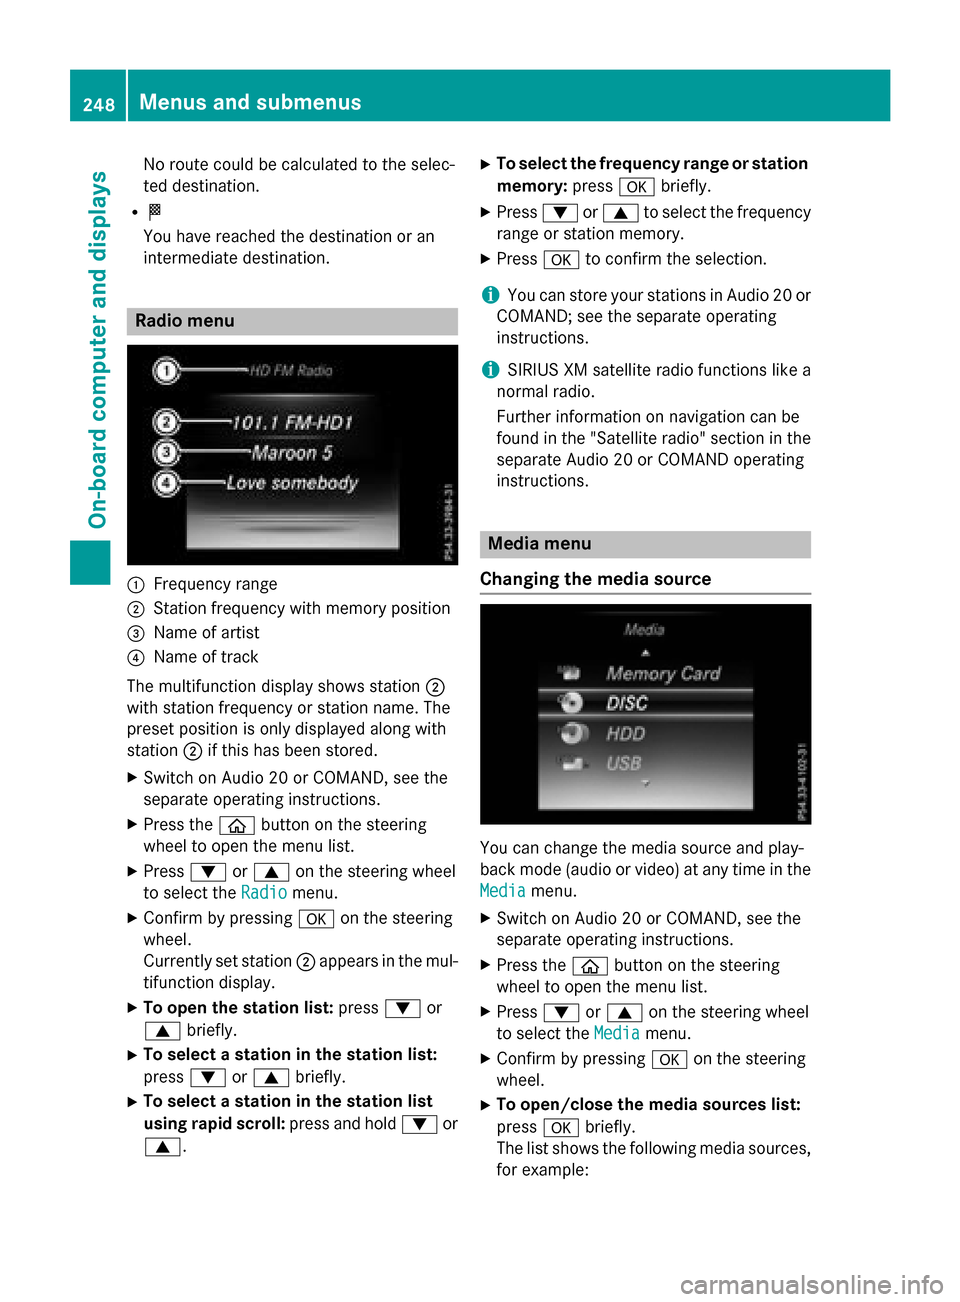
:Frequency range
;Station frequency with memory position
=Name of artist
?Name of track
The multifunction display shows station ;
with station frequency or station name. The
preset position is only displayed along with
station ;if this has been stored.
XSwitch on Audio 20 or COMAND, see the
separate operating instructions.
XPress the òbutton on the steering
wheel to open the menu list.
XPress :or9 on the steering wheel
to select the Radio
menu.
XConfirm by pressing aon the steering
wheel.
Currently set station ;appears in the mul-
tifunction display.
XTo open the station list: press:or
9 briefly.
XTo select a station in the station list:
press :or9 briefly.
XTo select a station in the station list
using rapid scroll: press and hold:or
9.
XTo select the frequency range or station memory: pressabriefly.
XPress :or9 to select the frequency
range or station memory.
XPress ato confirm the selection.
iYou can store your stations in Audio 20 or
COMAND; see the separate operating
instructions.
iSIRIUS XM satellite radio functions like a
normal radio.
Further information on navigation can be
found in the "Satellite radio" section in the
separate Audio 20 or COMAND operating
instructions.
Media menu
Changing the media source
You can change the media source and play-
back mode (audio or video) at any time in the
Media
menu.
XSwitch on Audio 20 or COMAND, see the
separate operating instructions.
XPress the òbutton on the steering
wheel to open the menu list.
XPress :or9 on the steering wheel
to select the Media
menu.
XConfirm by pressing aon the steering
wheel.
XTo open/close the media sources list:
press abriefly.
The list shows the following media sources,
for example:
248Menus and submenus
On-board computer and displays
Page 256 of 418

XConfirmbypressing aon the steering
wheel.
XUse : or9 to select the DriveAs‐
sistsubmenu.
XPressato confirm.
XPress :or9 to select Lane Keep‐
ing Assist.
XPressato confirm.
The current selection, Standard
orAdap‐
tive, appears.
XTo change the setting: pressaagain.
For further information about Lane Keeping
Assist, see (
Ypage 220).
For further information about Active Lane
Keepin g Assist, see (
Ypage 225).
Head-up display submenu
Selecting other displays
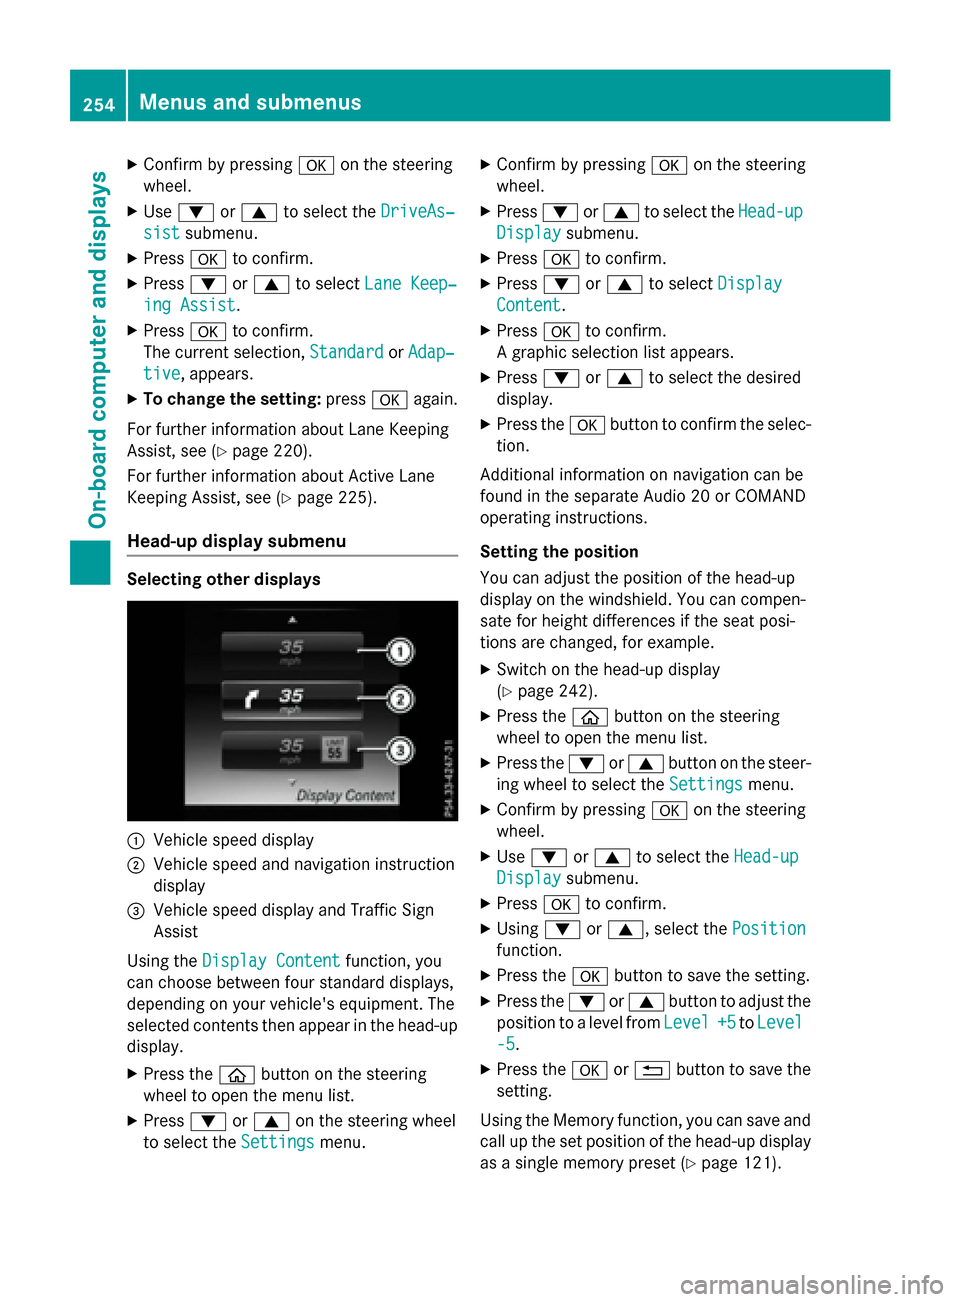
:Vehicle speed display
;Vehiclespeed and navigation instruction
disp lay
=Vehicle speed display and Traffic Sign
Assist
Using the Display Content
function, you
can choose between four standard displays,
depe nding on your vehicle's equipment. The
selected contents then appear inthe head-up
disp lay.
XPress the òbutton on the steering
wheel to open the menu list.
XPress :or9 on the steering wheel
to select the Settings
menu.
XConfirmbypressing aon the steering
wheel.
XPress :or9 to select the Head-up
Displaysubmenu.
XPressato confirm.
XPress :or9 to select Display
Content.
XPressato confirm.
A graphic selection listappears.
XPress :or9 to select the desired
display.
XPress the abutton to confirm the selec-
tion.
Ad ditional information on navigation can be
found inthe separate Aud io20 or COMAND
operating instructions.
Setting the positi on
You can adjust the position of the head-up
display on the windshield. You can compen-
sate for height differences ifthe seat posi-
tions are changed, for example.
XSwit ch on the head-up display
(
Ypage 242).
XPress the òbutton on the steering
wheel to open the menu list.
XPress the :or9 button on the steer-
ing wheel to select the Settings
menu.
XConfirmbypressing aon the steering
wheel.
XUse : or9 to select the Head-up
Displaysubmenu.
XPressato confirm.
XUsing :or9, select the Position
function.
XPress theabutton to save the setting.
XPress the :or9 button to adjust the
position to a level from Level
+5toLevel
-5.
XPress the aor% button to save the
setting.
Using the Memory function, you can save and
call up the set position of the head-up display
as a single memory preset (
Ypage 121).
254Menus and submenus
On-board computer and displays
Page 257 of 418

Setting the brightness
The brightness of the head-up display is auto-
matically adjusted to the surrounding ambi-
ent light. You can also individually adjust the
brightness of the head-up display.
XSwitch on the head-up display
(
Ypage 242).
XPress theòbutton on the steering
wheel to open the menu list.
XPress the :or9 button on the steer-
ing wheel to select the Settings
menu.
XConfirm by pressingaon the steering
wheel.
XUse : or9 to select the Head-up
Displaysubmenu.
XPressato confirm.
XUsing :or9, select the Bright‐
nessfunction.
XPress theabutton to save the setting.
XPress the :or9 button to adjust the
brightness to a level from Level
+5(bright)
to Level -5
(dark).
XPress the aor% button to save the
setting.
Light submenu
Switching the daytime running lamps on/
off
This function is not available in Canada.
XPress the òbutton on the steering
wheel to open the menu list.
XPress the :or9 button on the steer-
ing wheel to select the Settings
menu.
XConfirm by pressingaon the steering
wheel.
XUse : or9 to select the Lights
submenu.
XPressato confirm.
XPress the :or9 button to select the
Daytime Running Lights
function.
If the Daytime Running Lights
function
has been switched on, the cone of light and the
W symbol in the multifunction dis-
play are shown in white.
XPress the abutton to save the setting.
Further information on daytime running
lamps Daytime Running Lights
(Ypage 124).
Instrument cluster submenu
Selecting the distance unit
TheDisplay
UnitSpeed-/Odometerfunc-
tion allows you to choose whether certain
displays appear in kilometers or miles in the
multifunction display.
XPress the òbutton on the steering
wheel to open the menu list.
XPress the :or9 button on the steer-
ing wheel to select the Settings
menu.
XConfirm by pressingaon the steering
wheel.
XUse : or9 to select the Instru‐
ment Clustersubmenu.
XPressato confirm.
XPress :or9 to select the Display
Unit Speed-/Odometerfunction.
The current setting km
orMilesappears.
XPress the abutton to save the setting.
The selected unit of measurement for dis-
tance applies to:
RDigital speedometer in the Tripmenu
ROdometer and the trip odometer
RTrip computer
RCurrent consumption and the range
RNavigation instructions in the Navimenu
RCruise Control
RDISTRONIC PLUS with Steering Assist and
Stop&Go Pilot
RASSYST PLUS service interval display
Switching the additional speedometer
on/off
The Additional Speedometer [km/h]
function allows you to choose whether the
status area in the multifunction display shows
Menus and submenus255
On-board computer and displays
Z
Page 296 of 418

Warning/
indicator
lampNSignal type
Possible causes/consequences and M
Solutions
!NThe yellow ABS warning lamp is lit while the engine is running.
ABS (Anti-lock Braking System) is deactivated due to a malfunction. Therefore
BAS (Brake Assist), BAS PLUS with Cross-Traffic Assist, COLLISION PREVEN-
TION ASSIST PLUS, ESP
®(Electronic Stability Program), PRE‑SAFE®,
PRE‑SAFE®PLUS, PRE‑SAFE®Brake, the HOLD function, Hill Start Assist,
Crosswind Assist, STEER CONTROL, Active Lane Keeping Assist and Active
Blind Spot Assist are also deactivated.
ATTENTION ASSIST is deactivated.
GWARNING
The brake system continues to function normally, but without the functions
listed above. The wheels could therefore lock if you brake hard, for example.
The steerability and braking characteristics may be severely affected. The
braking distance in an emergency braking situation can increase.
If ESP
®is not operational, ESP®is unable to stabilize the vehicle.
There is an increased risk of skidding and an accident.
XObserve the additional display messages in the multifunction display.
XDrive on carefully.
XVisit a qualified specialist workshop immediately.
If the ABS control unit is faulty, there is also a possibility that other systems,
such as the navigation system or the automatic transmission, will not be
available.
294Warning and indicator lamps in the instrument cluster
On-board computer and displays
Page 329 of 418

If a mobile phone network and GPS reception
are available, the system transfers data to the
Mercedes-Benz Customer Assistance Center,
for example:
Rcurrent location of the vehicle
Rvehicle identification number
The COMAND/Audio 20 display indicates
that a call is active. During the call, you can
change to the navigation menu by pressing
the NAVI button in COMAND/Audio 20, for
example.
Voice output is not available in this case.
A voice connection is established between
the Mercedes-Benz Customer Assistance
Center and the vehicle occupants.
From the remote malfunction diagnosis, the
Mercedes-Benz Customer Assistance Center
can ascertain the nature of the problem
(
Ypage 330).
The Mercedes-Benz Customer Assistance
Center either sends a qualified Mercedes-
Benz technician or makes arrangements for
your vehicle to be transported to the nearest authorized Mercedes-Benz Center.
You may be charged for services such as
repair work and/or towing.
You can find more information in the separate
mbrace manual.
The system has not been able to initiate a
Roadside Assistance call, if:
Rthe indicator lamp for Roadside Assistance
call button Fis flashing continuously.
Rno voice connection to the Mercedes-Benz
Customer Assistance Center was estab-
lished.
This can occur if the relevant mobile phone
network is not available, for example.
The Call Failed
message appears in the
multifunction display.
XTo end a call: press the~button on the
multifunction steering wheel.
or
XPress the corresponding COMAND/Audio
20 button for ending a phone call.
MB Info call button
XTo call MB Info: press MB Info call but-
ton :.
This initiates a call to the Mercedes-Benz
Customer Assistance Center.
The indicator lamp in MB Info call button :
flashes while the connection is being made.
The Connecting
Callmessage appears in
the multifunction display. The audio output
is muted.
If a connection can be made, the Call Con‐
nectedmessage appears in the multifunction
display.
If a mobile phone network and GPS reception
are available, the system transfers data to the
Mercedes-Benz Customer Assistance Center,
for example:
Rcurrent location of the vehicle
Rvehicle identification number
The COMAND/Audio 20 display indicates
that a call is active. During the call, you can
change to the navigation menu by pressing
the NAVI button in COMAND/Audio 20, for
example.
Voice output is not available in this case.
A voice connection is established between
the Mercedes-Benz Customer Assistance
Center and the vehicle occupants.
You receive information about operating your
vehicle, about the nearest authorized
Mercedes-Benz Center and about other prod-
ucts and services from Mercedes-Benz.
Features327
Stowage and features
Z