2016 MERCEDES-BENZ GLC-Class ECU
[x] Cancel search: ECUPage 177 of 222
Displaying information
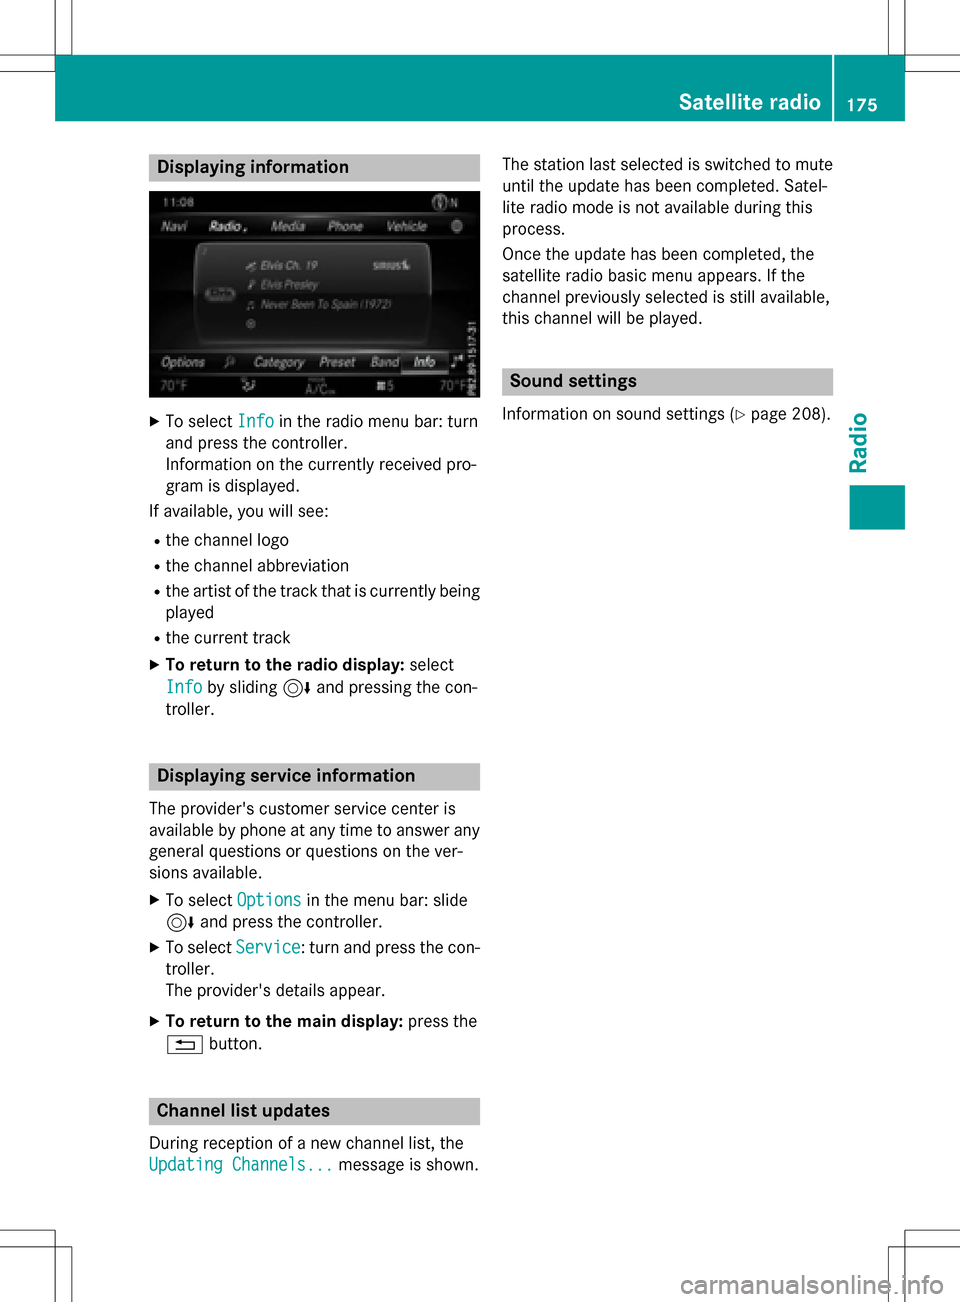
XTo selectInf oin th eradio men ubar :turn
and press th econtroller .
Information on th ecurrentl yreceived pro -
gram is displayed .
If available ,you will see :
Rthechannel log o
Rthechannel abbreviation
Rth eartist of th etrack that is currentl ybein g
played
Rth ecurren ttrack
XTo return to th eradi odisplay :selec t
Inf o
by slidin g6 and pressing th econ-
troller.
Displaying service information
The provider' scustomer servic ecenter is
available by phone at any time to answer any
genera lquestion sor question son th ever -
sions available .
XTo selectOption sin themen ubar :slid e
6 and press th econtroller .
XTo selectServic e:turn and press th econ-
troller.
The provider' sdetails appear.
XTo return to th emain display :press th e
% button.
Channel list update s
Duringreception of ane wchannel list ,th e
Updating Channels...
message is shown .The station last selecte
dis switched to mut e
until th eupdat ehas been completed. Satel-
lit eradio mode is no tavailable durin gthis
process.
Once th eupdat ehas been completed, th e
satellit eradio basi cmen uappears .If th e
channel previously selecte dis still available ,
this channel will be played .
Sound settings
Information on soundsetting s (Ypage 208).
Satellite radio175
Radio
Page 184 of 222
CGraphic time display
DCover view (if available)
Inserting and ejecting an SD memory
card
Important safety notes
GWAR NING
SD memory car dsare small parts. They can be
swallo wed and cause asphyxiation. This
poses an increased risk of injury or even fatal injury.
Keep SDmemory car dsout of the reach of
ch ildr en. Ifan SD memory card is swallowed,
seek immediate medical attention.
!If you are no longer using the SD memory
card, you should remove it and take it out of
the vehicle. High temperatures can dam-
age the card.
COMAND supports SD memory cards
(Secure Digital), SDHC memory cards
(Secure DigitalHigh Capacity), and SDXC
memory cards ( SecureDigital e Xtended
Capacity.
Inserting an SD memory card
XInsert the SD memory card into the SD card
slot until it engages. The side with the con- tacts must face downwards.
If the memory card has been selected as a
media source, the medium is played and
the files are loaded in the background. If
there are no supported audio/video files,
you will see a message to this effect.
XSelect the media source (Ypage 178).
Ejecting an SD memory card
XPress the memory card.
The memory card is ejected.
XRemove the memory card.
Connecting USB devices
There are two USB ports in the stowage space
under the armrest.
XConnect the USB device to the USB port.
If the corresponding media display is visi-
ble, the medium is played and the files are
loaded in the background. If there are no
supported audio/video files, you will see a
message to this effect.
iMP3 players must support Media Transfer
Protocol (MTP).
Activating media mode
Switching on automatically
After inserting a CD/DVD, this media mode is
automatically switched on by COMAND.
If playable music files are found, they will be
played by COMAND.
If a media function is already switched on in
COMAND, this will be interrupted and the
basic display of the CD/DVD mode will
appear. If another function, such as naviga-
tion, is being operated, the basic display will
not change. Only the music from the last
inserted CD/DVD will be played.
Depending on the vehicle equipment, the
default display must already be turned on
when using with USB devices or SD memory
cards.
XInsert the CDs/DVDs (Ypage 181)
or
XInsert an SD memory card: (Ypage 182)
or
XConnect a USB device: (Ypage 182)
COMAND loads the medium inserted and
starts to play it automatically.
Further options for switching on
RUsing the main function bar: (Ypage 178)
RUsing the device list: (Ypage 179)
RUsing the Õbutton: (Ypage 178)
182Audio/video mode
Media
Page 190 of 222
results that contain the exact keyword
searched for and 0 results that are similar.
XSelect one of the results.
Keywords that have already been searched
for are displayed in the "Search history"
without having to enter them completely.
They can be accepted directly and dis-
played in the search result.
XSelect an entry.
Albums and covers (if available) are shown.
COMAND searches all media sources.
XSelect an album.
The tracks are listed.
XSelect a track.
The basic display appears and playback
starts.
Media Register
General notes
You can store music files, photos or video files
in the MEDIA REGISTER. The memory has a
capacity of 10.8 GB.
iKeep your original music files, photos and
video files in a secure location. A malfunc-
tion in COMAND may result in the loss of
music files stored in the MEDIA REGISTER. Mercedes-Benz is not liable for any loss of
data.
Switching on the MEDIA REGISTER
XIn media mode press the Õbutton.
The menu appears with the available media
sources.
XTo select Media Register: turn and press
the controller.
Playback begins at the point last listened to.
If there are no files, you will see a message to this effect.
Further options for switching on:
Rusing the main function bar: (Ypage 178)
Rusing the device list: (Ypage 179)
Rusing the Õbutton: (Ypage 178)
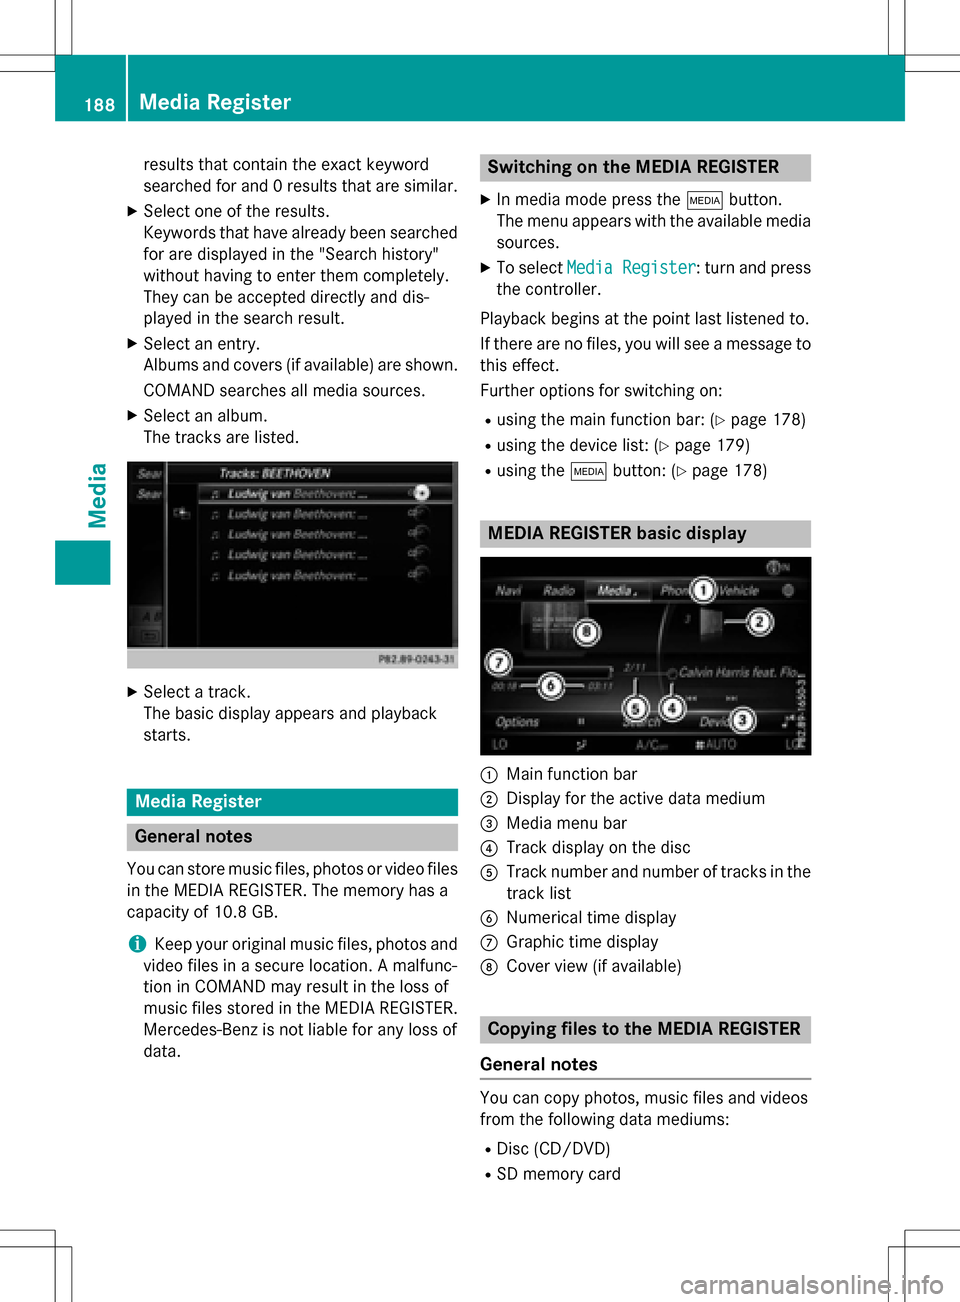
MEDIA REGISTER basic display
:Main function bar
;Display for the active data medium
=Media menu bar
?Track display on the disc
ATrack number and number of tracks in the
track list
BNumerical time display
CGraphic time display
DCover view (if available)
Copying files to the MEDIA REGISTER
General notes
You can copy photos, music files and videos
from the following data mediums:
RDisc (CD/DVD)
RSD memory card
188Media Register
Media
Page 193 of 222
Deleting all files
!
In order to preven tmalfunctions, do no t
use COMAN Ddurin gthis time.
Thi sfunction delete sall files from th eMEDI A
REGISTER.
XIn media mode: press th eÕ button.
The men uappears wit hth eavailable media
sources.
XTo selec tth emedia source :turn th econ-
trolle rand press to confirm .
XTo switch to themen ubar :slid e6 the
controller .
XTo selectOption s:turn and press th econ-
troller.
XSelec tManage Media Register.
XSelec tDelete All Media Files.
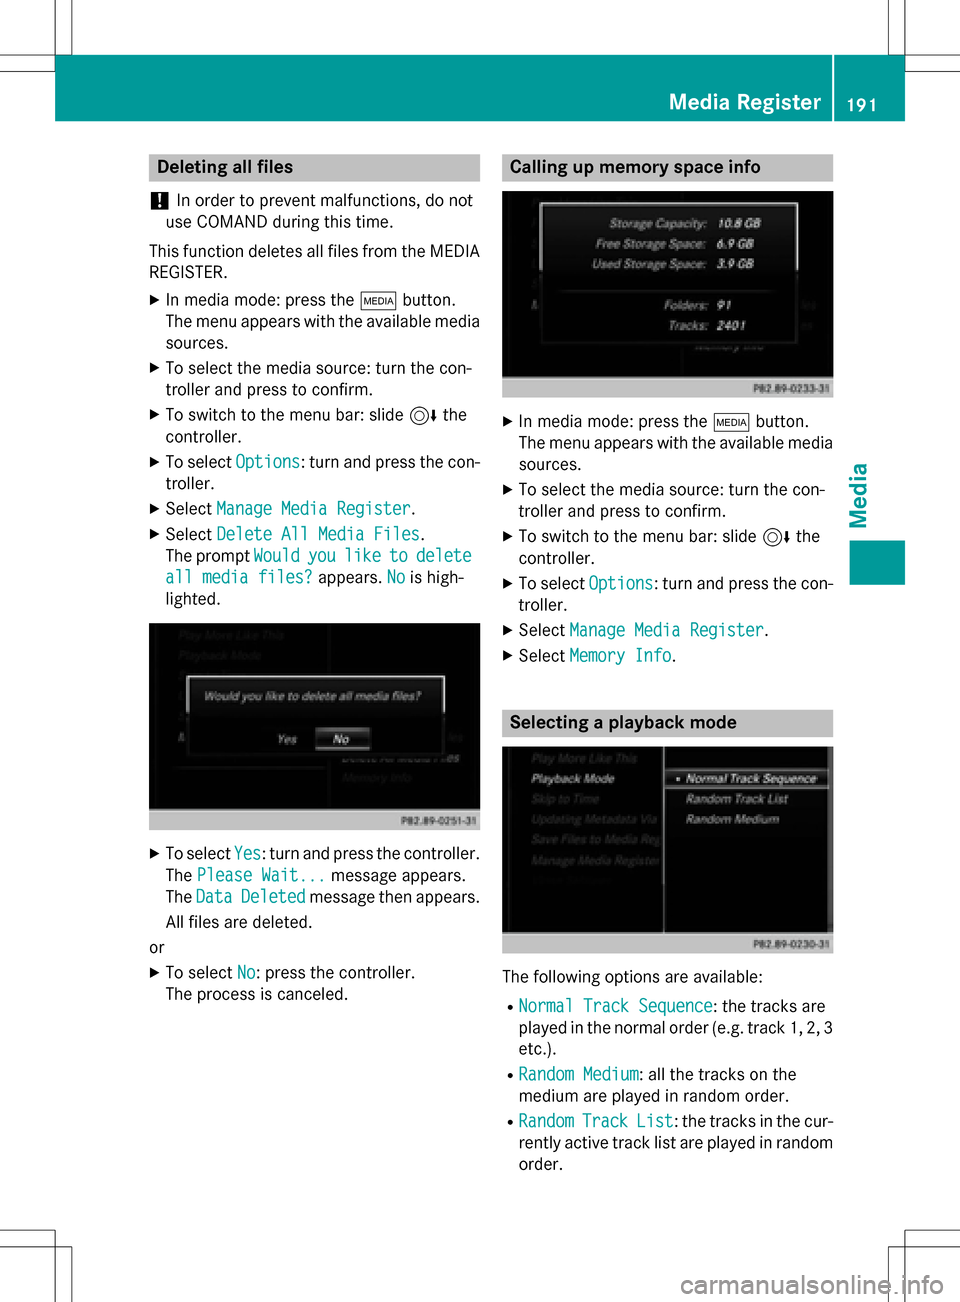
The prompt Would
youliketodelete
all media files?appears .Nois high-
lighted.
XTo selec tYes:turn and press th econtroller .
The Please Wait.. .
message appears .
The Data
Delete dmessage then appears .
Al lfiles are deleted.
or
XTo selec tNo:press th econtroller .
The process is canceled.
Calling up memory space inf o
XIn media mode: press theÕ button.
The men uappears wit hth eavailable media
sources.
XTo selec tth emedia source :turn th econ-
trolle rand press to confirm .
XTo switch to themen ubar :slid e6 the
controller .
XTo selectOption s:turn and press th econ-
troller.
XSelec tManage Media Register.
XSelec tMemory Inf o.
Selectingaplayback mode
The following option sare available :
RNormal Track Sequence:th etrack sare
played in th enormal order (e.g. track 1, 2, 3
etc.).
RRandom Medium: all th etrack son th e
medium are played in random order .
RRandomTrackList:th etrack sin th ecur -
rentl yactive track list are played in random
order .
Media Register191
Media
Z
Page 196 of 222
Option 1: entering the passkey
XYou can find information on this in the
"Authorizing (connecting) a mobile phone"
section (
Ypage 114).
After successful authorization, the Blue-
tooth
®audio device is connected and
starts playing.
Option 2: Secure Simple Pairing
XYou can find information on this in the
"Authorizing (connecting) a mobile phone"
section (
Ypage 114).
After successful authorization, the Blue-
tooth
®audio device is connected and
starts playing.
iThe Bluetooth®audio device must sup-
port Bluetooth®version 2.1 for connection
via Secure Simple Pairing. COMAND cre-
ates a six-digit code, which is displayed on
both devices that are to be connected
For some Bluetooth
®audio devices, the
pairing must be confirmed within 10 sec-
onds.
XIf the number code displayed on COMAND
and on the Bluetooth®audio device is the
same, select Yes
: press the controller.
If you select Yes
, authorization continues
and the Bluetooth®audio device is connec-
ted. Playback starts.
If you select No
, authorization is canceled.
External authorization
If COMAND does not find your Bluetooth®
audio device, this may be due to particular
security settings on your Bluetooth®audio
device. In this case, check whether your Blue-
tooth
®audio device can locate COMAND.
The Bluetooth
®device name for COMAND is
MB Bluetooth
.
XSwitch on Bluetooth®audio mode
(
Ypage 196).
XTo select Options: slide6and press the
controller.
XTo select Bluetooth Audio Devices:
press the controller.
XTo select Connect via Audio Device:
turn and press the controller.
Authorizing
XStart the authorization on your Bluetooth®
audio device (see the manufacturer's oper-
ating instructions).
After successful authorization, the Blue-
tooth
®audio device is connected and
starts playing.
With some Bluetooth
®audio devices, play-
back must first be started on the device itself
so that COMAND can play the audio files.
Device-specific information on authorizing
and connecting Bluetooth
®-capable mobile
phones can be found on the Internet at
http://www.mercedes-benz.com/
connect.
Reconnecting a Bluetooth®audio
device
The Bluetooth®audio profiles are connected
automatically under the following circum-
stances:
Rone of the last two mobile phones to have
been connected has also been used as a
Bluetooth
®audio player (if this function is
supported by the mobile phone).
Rthe mobile phone is automatically connec-
ted. The Bluetooth®audio player is then
connected.
iFor an automatic connection with
COMAND, the telephone must be within
range.
For most Bluetooth
®audio devices, the
"automatic connection" must be activated
by ticking a box. Depending on the device
used, this prompt often takes place when
authorizing (see the manufacturer's oper-
ating instructions).
194Bluetooth®audio mode
Media