2016 MERCEDES-BENZ GL ignition
[x] Cancel search: ignitionPage 234 of 462
R
if there is a sudden change in temperature,
e.g. when driving into a heated garage in
winter R
if the camera lens is dirty or obstructed.
Observe the notes on cleaning
( Y
page 380) R
if the rear of your vehicle is damaged. In this
event, have the camera position and setting
checked at a qualified specialist workshop
The field of vision and other functions of the
rear view camera may be restricted due to
additional accessories on the rear of the vehi-
cle (e.g. license plate holder, bicycle rack).
For technical reasons, leaving the standard
height can result in inaccuracies in the guide
lines on vehicles with a height-adjustable
chassis.
Activating/deactivating the rear view
camera
X
To activate: make sure that the SmartKey
is in position 2 in the ignition lock.X
Make sure that the "Show rear view camera
display" function is selected in COMAND
(see the Digital Operator's Manual). X
Engage reverse gear.
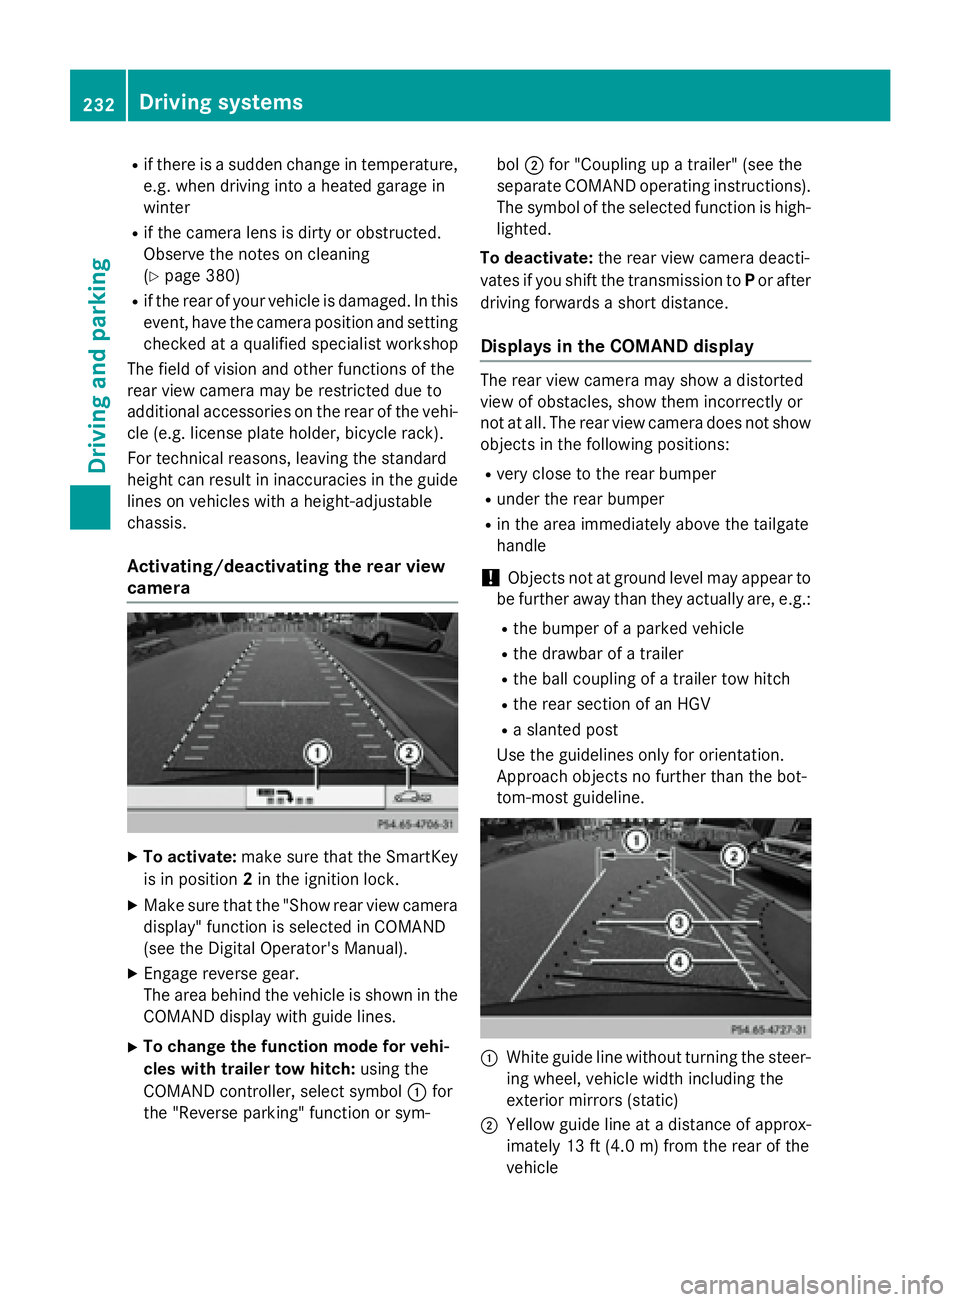
The area behind the vehicle is shown in the
COMAND display with guide lines. X
To change the function mode for vehi-
cles with trailer tow hitch: using the
COMAND controller, select symbol �C for
the "Reverse parking" function or sym- bol �D for "Coupling up a trailer" (see the
separate COMAND operating instructions).
The symbol of the selected function is high-
lighted.
To deactivate: the rear view camera deacti-
vates if you shift the transmission to P or after
driving forwards a short distance.
Displays in the COMAND display The rear view camera may show a distorted
view of obstacles, show them incorrectly or
not at all. The rear view camera does not show
objects in the following positions: R
very close to the rear bumper R
under the rear bumper R
in the area immediately above the tailgate
handle
! Objects not at ground level may appear to
be further away than they actually are, e.g.: R
the bumper of a parked vehicle R
the drawbar of a trailer R
the ball coupling of a trailer tow hitch R
the rear section of an HGV R
a slanted post
Use the guidelines only for orientation.
Approach objects no further than the bot-
tom-most guideline.
�C
White guide line without turning the steer-
ing wheel, vehicle width including the
exterior mirrors (static)
�D
Yellow guide line at a distance of approx-
imately 13 ft (4.0 m) from the rear of the
vehicle232
Driving system s
Dr ivi ng an d parking
Page 244 of 462
Pedestrian recognition may be impaired or
inoperative if: R
pedestrians are partially or entirely
obscured by objects, e.g. parked vehicles R
the silhouette of the pedestrian in the Night
View Assist Plus display is incomplete or
interrupted, e.g. by powerful light reflec-
tions R
pedestrians do not contrast adequately
from the background R
pedestrians are not in an upright position,
e.g. sitting, squatting or lying
Activating Night View Assist Plus Activation conditions
You can only activate Night View Assist Plus
if: R
the SmartKey is in position 2 in the ignition
lock. R
it is dark. R
the light switch is in the �X or �X posi-
tion. R
reverse gear has not been engaged.
Activating Night View Assist Plus
X
Make sure that COMAND is switched on. X
Press button �C .
The Night View Assist Plus display appears
in the COMAND display.
You can read about how to adjust the bright-
ness of the COMAND display in the COMAND
operating instructions. i The infrared headlamps only switch on
when the vehicle is being driven at speeds
of approximately 6 mph (10 km/h). This
means that you do not have the full visual
range while the vehicle is stationary and
cannot check whether Night View Assist
Plus is working.
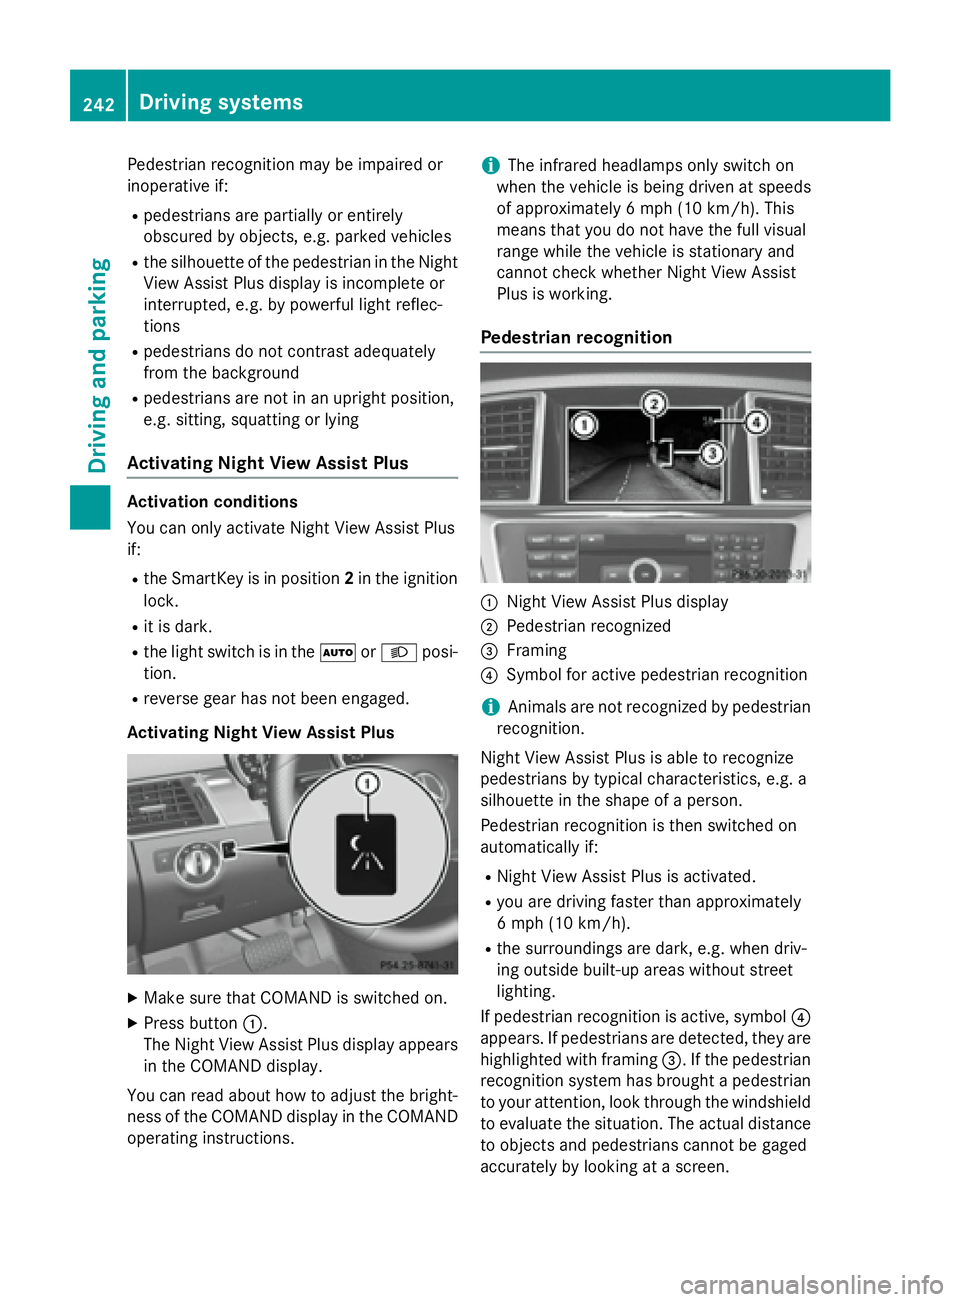
Pedestrian recognition
�C
Night View Assist Plus display �D
Pedestrian recognized �
Page 256 of 462
R
you switch on th e tur n signals. In this
event , th e warnings are suppressed fo r a
certain period of time. R
a drivin g safet y system intervenes, e.g.
ABS, BA S or ES P ®
.R
you accelerat e hard, e.g. kickdown .R
you brak e hard.R
you steer actively, e.g. swerve to avoid an
obstacle or chang e lanes quickly.R
you cut th e corner on a shar p bend.
Towing a trailer
Whe n you attach a trailer , mak e sur e you hav e
correctl y established th e electrica l connec -
tion . This can be accomplished by checking
th e trailer lighting . Lane-correcting brak e
application doe s no t take plac e when towin g
a trailer . Active Lan e Keepin g Assis t is no t
activated and th e lines in th e assistanc e
graphi c are gray.
On-road program s (vehicles wit h th e
ON&OFFROAD package)
General notes
The on-road programs assist you during on -
road drivin g and th e off-road programs when
drivin g off-road ( Y
page 258).
The following program message s remain in
th e multifunction display until th e corre-
spondin g vehicl e level has been set . Up to off-
road level 2, you can hide th e program mes -
sage s usin g th e �8 or �v butto n on th e
multifunction steerin g wheel. AUT O program
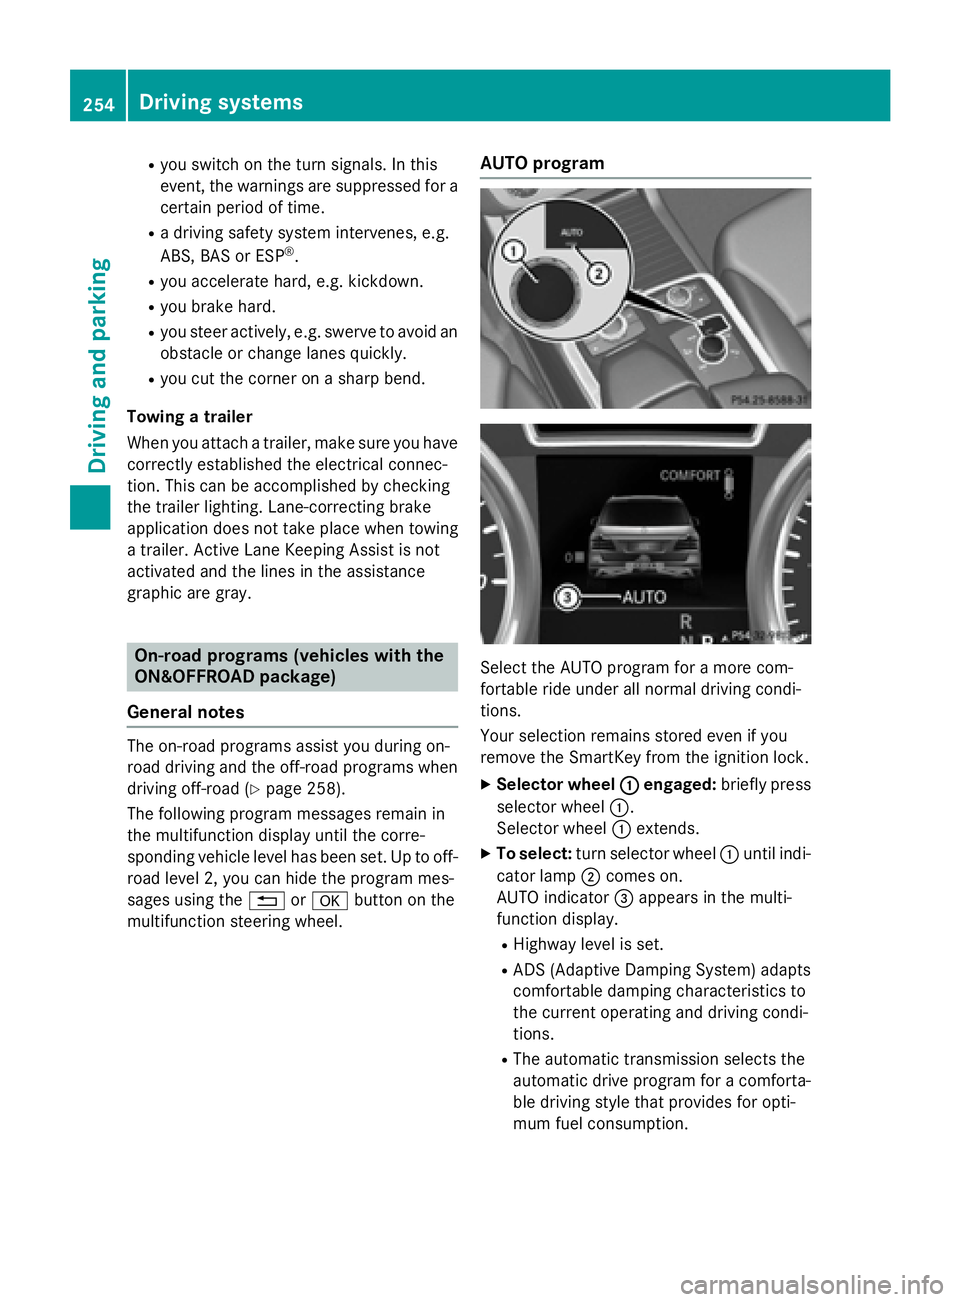
Selec t th e AUTO program fo r a mor e com-
fortable rid e under all normal drivin g condi-
tions.
Your selection remain s stored eve n if you
remov e th e SmartKey from th e ignition lock.X
Selecto r wheel �C engaged : briefl y press
selector whee l �C .
Selecto r whee l �C extends. X
To select : tur n selector whee l �C until indi-
cator lamp �D comes on .
AUTO indicator �
Page 257 of 462
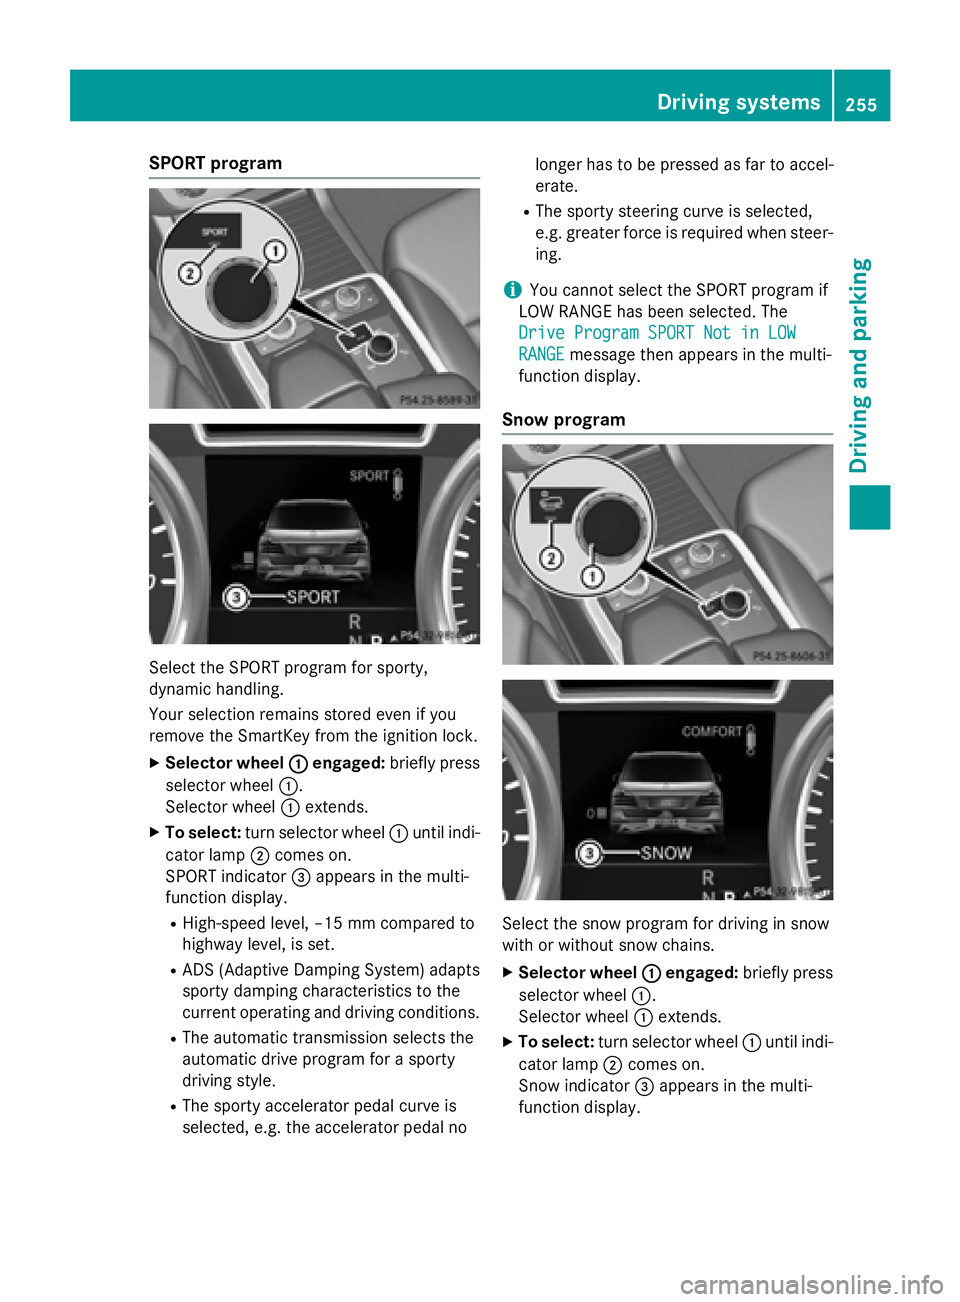
SPORT program
Select the SPORT program for sporty,
dynamic handling.
Your selection remains stored even if you
remove the SmartKey from the ignition lock. X
Selector wheel �C engaged: briefly press
selector wheel �C .
Selector wheel �C extends.X
To select: turn selector wheel �C until indi-
cator lamp �D comes on.
SPORT indicator �
Page 264 of 462
Messages in the multifunction display
If a gear change process has not been successful, the following messages may be displayed in
the multifunction display:
Display messages
Possible causes/consequences and �P Solutions
LOW RANGE Max.
Speed 40 km/h You have been driving faster than 40 km/h. Additionally, the indi-
cator lamp on the button in the center console blinks. X
Drive more slowly to carry out the gear change process.
LOW RANGE Shift to
Position N Briefly The transmission is in position D and you are driving at below
40 km/h. X
Shift the transmission to N to complete the gear change proc-
ess.
LOW RANGE Shifting
Canceled Please
Reactivate The gear change process was not carried out. X
Ensure that all gear change conditions are fulfilled and carry out
the gear change process again.
LOW RANGE Stop
Apply Parking Brake A warning tone also sounds. The gear change process has not been
completed. LOW RANGE is in the neutral position. There is no
connection between the engine and the drive wheels.
! Do not drive any further. You could otherwise damage the
vehicle's drive train. X
Stop the vehicle. Take into account the road and traffic condi-
tions when doing this. X
Depress the electric parking brake ( Y
page 190).X
Carry out the gear change process again.
If the gear change process has been carried out, the LOW
RANGE
Stop Apply Parking Brake message disappears.
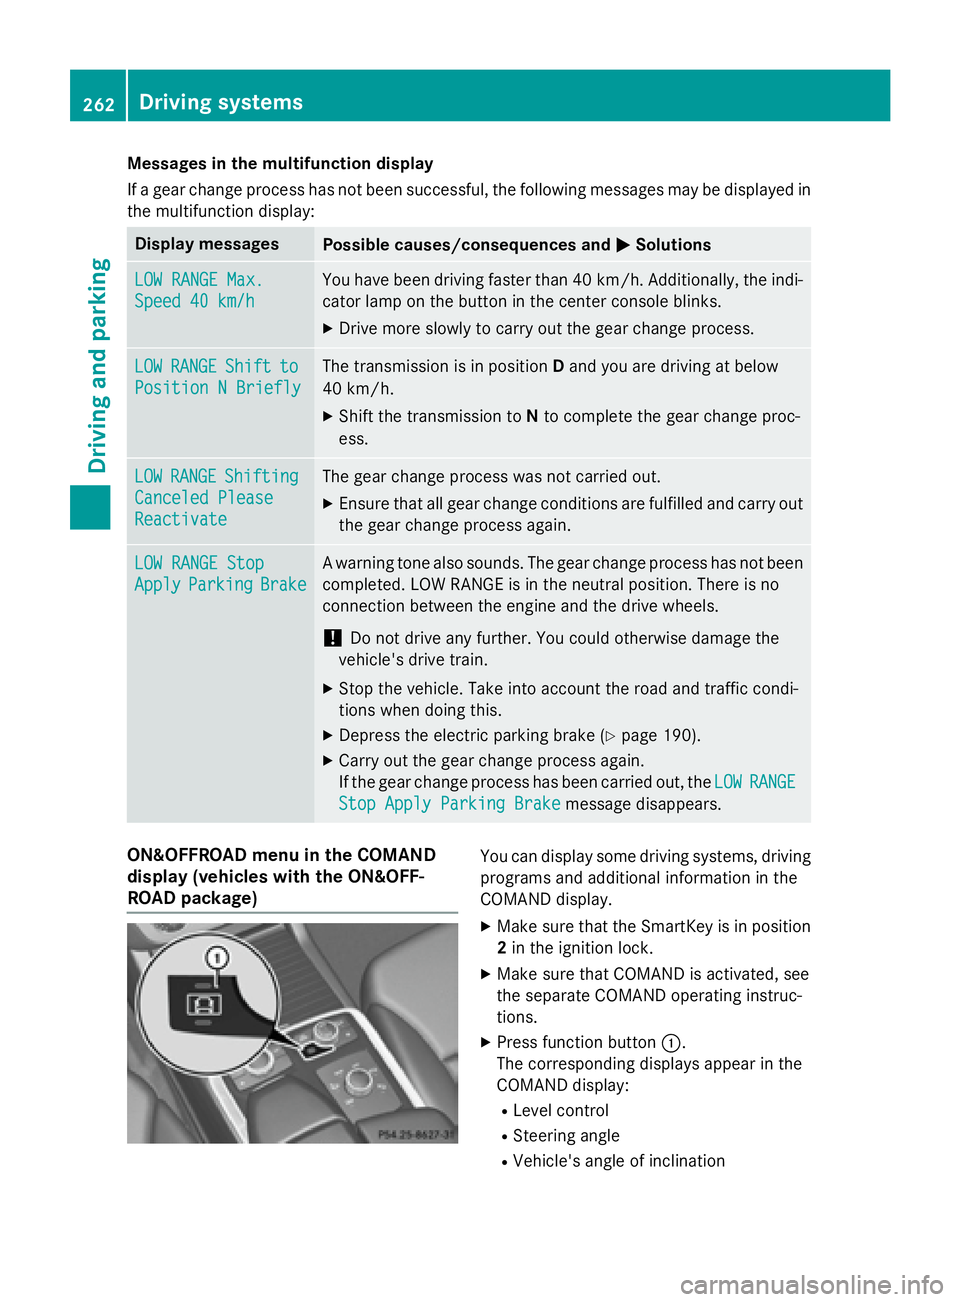
ON&OFFROAD menu in the COMAND
display (vehicles with the ON&OFF-
ROAD package) You can display some driving systems, driving
programs and additional information in the
COMAND display. X
Make sure that the SmartKey is in position
2 in the ignition lock. X
Make sure that COMAND is activated, see
the separate COMAND operating instruc-
tions. X
Press function button �C .
The corresponding displays appear in the
COMAND display: R
Level control R
Steering angle R
Vehicle's angle of inclination262
Driving systems
Driving and parking
Page 287 of 462
R
surround lighting: the exterior lighting
remains lit for 40 seconds after unlocking
with the SmartKey. If you start the engine,
the surround lighting is switched off and
automatic headlamp mode is activated
( Y
page 130). R
exterior lighting delayed switch-off: the
exterior lighting remains lit for 60 seconds
after the engine is switched off. If you close
all the doors and the tailgate, the exterior
lighting goes off after 15 seconds.
i Depending on your vehicle's equipment,
when the surround lighting and delayed
switch-off exterior lighting are on, the fol-
lowing light up: R
Parking lamps R
Daytime running lamps R
Side marker lamps R
Surround lighting in the exterior mirrors
Activating/deactivating the interior light-
ing delayed switch-off
If you activate the Light. Delay
function,
the interior lighting remains on for
20 seconds after you remove the SmartKey
from the ignition lock. X
Press the �Y or �e button on the steer-
ing wheel to select the Settings
menu.X
Press the �d or �c button to select the
Lights
submenu.X
Press �v to confirm.X
Press the �d or �c button to select the
Lighting delayed sw.-off
function.
If the Interior
Lighting Delay function
has been switched on, the vehicle interior is
displayed in orange in the multifunction
display. X
Press the �v button to save the setting. Vehicle submenu Activating/deactivating the automatic
door locking mechanism
If you activate the Automatic Door Lock
function, the vehicle is centrally locked above
a speed of approximately 9 mph (15 km/h). X
Press the �Y or �e button on the steer-
ing wheel to select the Sett
menu.X
Press the �d or �c button to select the
Vehicle
submenu. X
Press �v to confirm. X
Press the �d or �c button to select the
Automatic Door Lock
function.
When the Automatic
Door Lock function
is activated, the vehicle doors are displayed
in orange in the multifunction display. X
Press the �v button to save the setting.
For further information on the automatic lock-
ing feature, see ( Y
page 91).
Activating/deactivating the acoustic
locking verification signal
If you switch on the Acoustic
Lock function,
an acoustic signal sounds when you lock the
vehicle. X
Press the �Y or �e button on the steer-
ing wheel to select the Sett.
menu.X
Press �d or �c to select the Vehicle
submenu. X
Press �v to confirm. X
Press the �d or �c button to select the
Acoustic Lock
function.
If the Acoustic
Lock function is activated,
the �7 symbol in the multifunction dis-
play lights up orange. X
Press the �v button to save the setting.
Convenience submenu
Activating/deactivating the EASY-
ENTRY/EXIT feature
G WARNING
When the EASY-ENTRY/EXIT feature adjusts
the steering wheel, you and other vehicleMenus and submenus 285
On-board computer and displays Z
Page 290 of 462
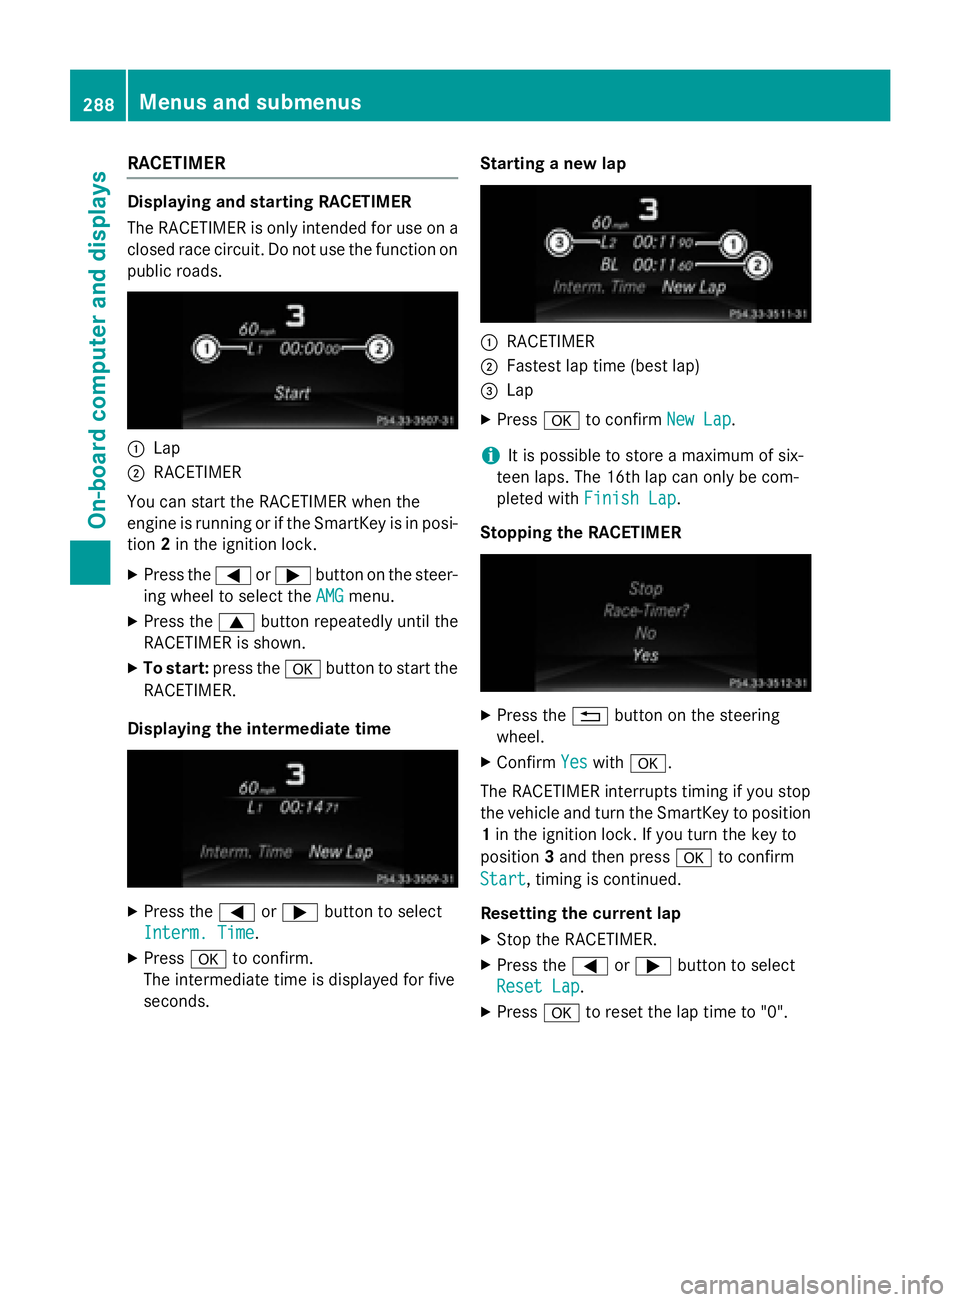
RACETIMER Displaying and starting RACETIMER
The RACETIMER is only intended for use on a
closed race circuit. Do not use the function on
public roads.
�C
Lap�D
RACETIMER
You can start the RACETIMER when the
engine is running or if the SmartKey is in posi-
tion 2 in the ignition lock.X
Press the �Y or �e button on the steer-
ing wheel to select the AMG
menu.X
Press the �c button repeatedly until the
RACETIMER is shown. X
To start: press the �v button to start the
RACETIMER.
Displaying the intermediate time
X
Press the �Y or �e button to select
Interm. Time
.X
Press �v to confirm.
The intermediate time is displayed for five
seconds. Starting a new lap
�C
RACETIMER �D
Fastest lap time (best lap) �
Page 292 of 462
Display messages
Introduction
General notes Display message s appear in th e multifunction display.
Display message s wit h graphi c displays may be shown in simplified form in th e Operator's
Manual and may therefore diffe r from th e multifunction display.
Please respon d in accordance wit h th e display message s and follow th e additional note s in this
Operator's Manual.
Certain display message s are accompanied by an audible warnin g tone or a continuous tone .
Whe n you stop and par k th e vehicle, pleas e observ e th e note s on :R
HOLD function ( Y
page 217)R
Parking ( Y
page 189)
Hiding display messages X
Press th e �v or �8 butto n on th e steerin g wheel.
The multifunction display hide s th e display message .
High-priorit y display message s are shown in red in th e multifunction display. Some high-pri -
orit y display message s canno t be hidden .
The multifunction display shows these message s continuously until th e causes fo r th e mes -
sage s hav e been remedied.
Message memory
The on-boar d compute r saves certain display message s in th e message memory . You can cal l
up th e display messages:X
Press �Y or �e on th e steerin g whee l to selec t th e Serv. menu.
If there are display messages, th e multifunction display shows 2 Messages
, fo r example.X
Press th e �c or �d butto n to selec t th e entry, e.g. 2 messages .X
Press �v to confirm .X
Press th e �c or �d butto n to scroll through th e display messages.
Whe n th e ignition is switched off, all display message s are deleted, apar t from som e high-
priorit y display messages. Once th e causes of th e high-priorit y display message s hav e been
rectified, th e correspondin g display message s are also deleted.290
Display messages
On-board computer and displays