2016 MERCEDES-BENZ GL automatic transmission
[x] Cancel search: automatic transmissionPage 262 of 462
vehicle rolling away unintentionally. There is a
risk of an accident.
Wait until the transfer case shift process is
completed.
Do not turn off the engine while changing gear
and do not shift the automatic transmission
to another position.
General notes
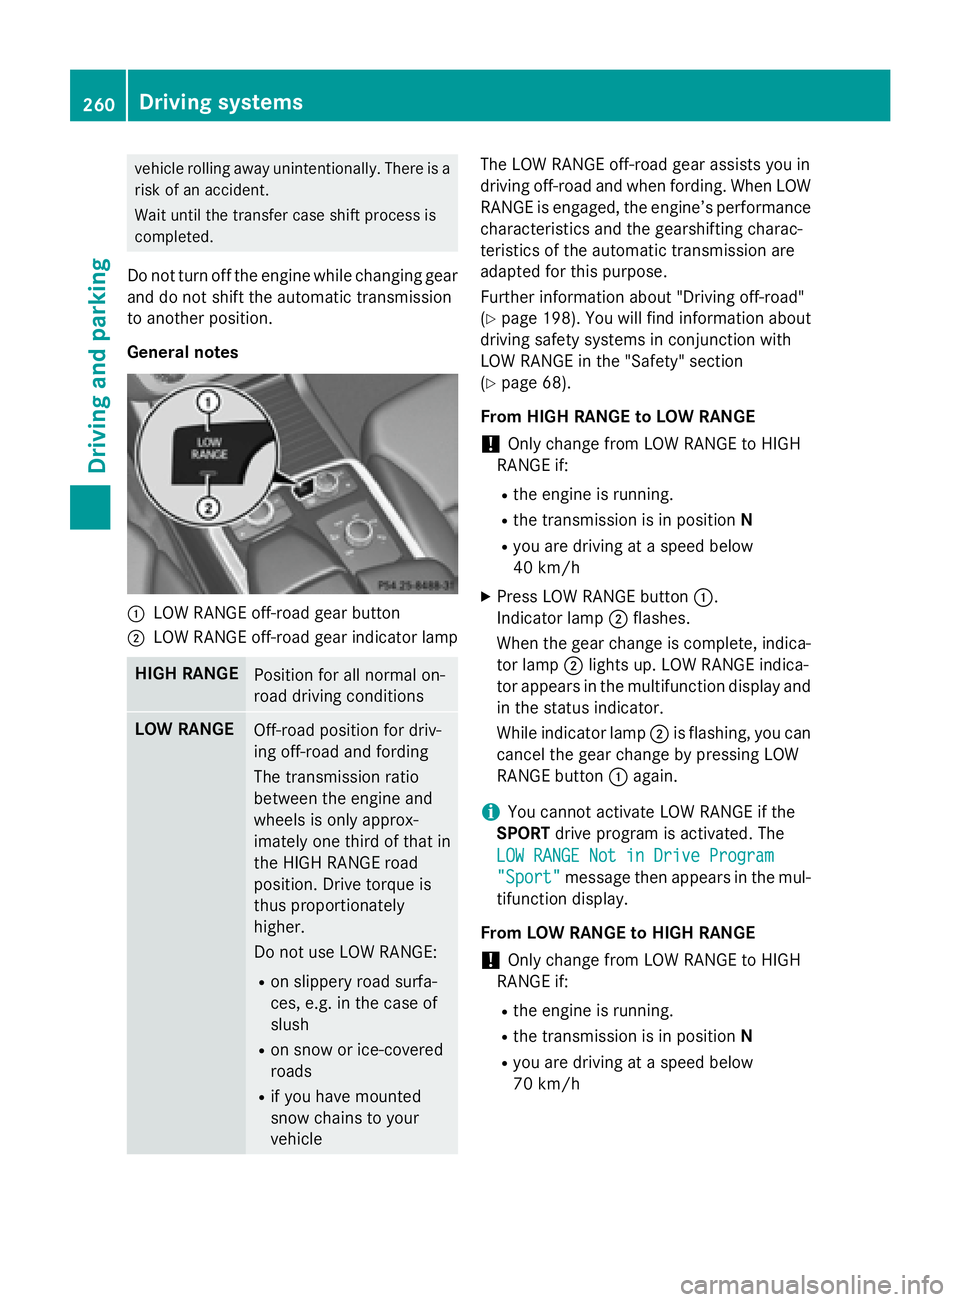
�C
LOW RANGE off-road gear button�D
LOW RANGE off-road gear indicator lamp
HIGH RANGE
Position for all normal on-
road driving conditions
LOW RANGE
Off-road position for driv-
ing off-road and fording
The transmission ratio
between the engine and
wheels is only approx-
imately one third of that in
the HIGH RANGE road
position. Drive torque is
thus proportionately
higher.
Do not use LOW RANGE: R
on slippery road surfa-
ces, e.g. in the case of
slush R
on snow or ice-covered
roads R
if you have mounted
snow chains to your
vehicle The LOW RANGE off-road gear assists you in
driving off-road and when fording. When LOW
RANGE is engaged, the engine’s performance
characteristics and the gearshifting charac-
teristics of the automatic transmission are
adapted for this purpose.
Further information about "Driving off-road"
( Y
page 198). You will find information about
driving safety systems in conjunction with
LOW RANGE in the "Safety" section
( Y
page 68).
From HIGH RANGE to LOW RANGE
! Only change from LOW RANGE to HIGH
RANGE if: R
the engine is running. R
the transmission is in position NR
you are driving at a speed below
40 km/h X
Press LOW RANGE button �C .
Indicator lamp �D flashes.
When the gear change is complete, indica-
tor lamp �D lights up. LOW RANGE indica-
tor appears in the multifunction display and
in the status indicator.
While indicator lamp �D is flashing, you can
cancel the gear change by pressing LOW
RANGE button �C again.
i You cannot activate LOW RANGE if the
SPORT drive program is activated. The
LOW RANGE Not in Drive Program
"Sport" message then appears in the mul-
tifunction display.
From LOW RANGE to HIGH RANGE
! Only change from LOW RANGE to HIGH
RANGE if: R
the engine is running. R
the transmission is in position NR
you are driving at a speed below
70 km/h260
Driving systems
Driving and parking
Page 269 of 462
so will result in a loss of function of the
brake systems of both the vehicle and the
trailer. X
Shift the transmission to position P .X
Apply the vehicle's electric parking brake. X
Start the engine. X
Vehicles with the AIRMATIC package:
select highway level. X
Vehicles with ADS: set ADS to AUTO or
COMF .X
Switch off the engine. X
Close the doors and tailgate. X
Couple up the trailer. X
Establish the electrical connection
between the vehicle and the trailer. X
Check that the trailer lighting system is
working.
i Vehicles with the AIRMATIC package:
with a trailer attached, the vehicle will
always remain at highway level. When cou-
pling up a trailer, please observe the fol-
lowing: R
Unless highway level has been set man-
ually, the vehicle is automatically low-
ered to highway level. This is the case if a
speed of 5 mph (8 km/h) is reached. R
High-speed level is not available.
These restrictions apply to all accessories
powered through a connection to the trailer
power socket of your vehicle, e.g. a bicycle
carrier.
Observe the maximum permissible trailer
dimensions (width and length).
Most U.S. states and all Canadian provinces
require by law: R
Safety chains between the towing vehicle
and the trailer. The chains should be cross-
wound under the trailer drawbar. They must
be fastened to the vehicle's trailer cou-
pling, not to the bumper or the axle. Leave enough play in the chains to make
tight cornering possible. R
A separate brake system for certain types
of trailer. R
Safety switch for braked trailers. Check the
specific legal requirements applicable to
your state.
If the trailer becomes detached from the
towing vehicle, the safety switch applies
the trailer brakes.
Towing a trailer There are numerous legal requirements con-
cerning the towing of a trailer, e.g. speed
restrictions. Make sure that your car/trailer
combination complies with the local regula-
tions: R
in your place of residence R
in the location to which you are driving
The police and local authorities can provide
reliable information.
Observe the following when towing a trailer: R
To gain driving experience and to become
accustomed to the new handling charac-
teristics, you should practice the following
in a traffic-free location: -
cornering -
stopping -
backing up R
Before driving, check: -
trailer tow hitch -
safety switch for braked trailers -
safety chains -
electrical connections -
lights -
wheels R
Adjust the exterior mirrors to provide an
unobstructed view of the rear section of the
trailer. R
If the trailer has electronically controlled
brakes, pull away carefully. Brake manually Towing a trailer 267
Driving and parking Z
Page 378 of 462
R
solvents R
cleaning agents containing solvents
Do not scrub.
Do not touch the surfaces or protective
films with hard objects, e.g. a ring or ice
scraper. You could otherwise scratch or
damage the surfaces and protective film.
! Do not park the vehicle for an extended
period straight after cleaning it, particularly
after having cleaned the wheels with wheel
cleaner. Wheel cleaners could cause
increased corrosion of the brake discs and
brake pads/linings. For this reason, you
should drive for a few minutes after clean-
ing. Braking heats the brake discs and the
brake pads/linings, thus drying them. The
vehicle can then be parked.
Regular care of your vehicle is a condition for
retaining the quality in the long term.
Use care products and cleaning agents rec-
ommended and approved by Mercedes-Benz.
Washing the vehicle and cleaning the
paintwork
Automatic car wash
G WARNING
Braking efficiency is reduced after washing
the vehicle. There is a risk of an accident.
After the vehicle has been washed, brake
carefully while paying attention to the traffic
conditions until full braking power is restored. ! Before driving into an automatic car wash,
make sure that it is suitable for the dimen-
sions of the vehicle. In particular, make
sure that: R
there is enough ground clearance
between the vehicle underbody and the
guide rails of the automatic car wash. R
the clearance width of the automatic car
wash is sufficient, particularly the width
of the guide rails. R
you enter the automatic car wash
straight and in the center of the guide
rails in order to avoid damaging the tires
or wheel rims.
Fold in the exterior mirrors before the vehi-
cle is washed. The exterior mirrors could
otherwise be damaged.
! If DISTRONIC PLUS or the HOLD function
is activated, the vehicle brakes automati-
cally in certain situations.
To prevent damage to the vehicle, deacti-
vate DISTRONIC PLUS and the HOLD func-
tion in the following or other similar situa-
tions: R
when towing the vehicle R
in the car wash
! Never clean your vehicle in a Touchless
Automatic Car Wash as these use special
cleaning agents. These cleaning agents can
damage the paintwork or plastic parts.
! Make sure that: R
the side windows and the sliding sunroof
are fully closed. R
the ventilation/heating is switched off
(the OFF button has been pressed). R
the windshield wiper switch is in position
0 .
Otherwise, the vehicle might be damaged.
! In car washes with a towing mechanism,
make sure that the automatic transmission
is in transmission position N , otherwise the
vehicle could be damaged. R
Vehicles with a SmartKey:376
Care
Maintenance and care
Page 379 of 462
Do not remove the SmartKey from the
ignition lock. Do not open the driver's
door or front-passenger door when the
engine is switched off. Otherwise, the
automatic transmission selects park
position P automatically and locks the
wheels. You can prevent this by shifting
the automatic transmission to N before-
hand. R
Vehicles with KEYLESS-GO:
Do not open the driver's door or front-
passenger door when the engine is
switched off. Otherwise, the automatic
transmission selects park position P
automatically and locks the wheels.
Observe the following to make sure that the
automatic transmission stays in position N :X
Make sure the vehicle is stationary and the
ignition is switched off. X
Turn the SmartKey to position 2 in the igni-
tion lock ( Y
page 165).
Use the SmartKey instead of the Start/
Stop button on vehicles with KEYLESS-GO. X
Depress and hold the brake pedal. X
Shift the automatic transmission to posi-
tion N .X
Release the brake pedal. X
Release the electric parking brake. X
Switch off the ignition and leave the Smart-
Key in the ignition lock.
You can wash the vehicle in an automatic car
wash from the very start.
If the vehicle is very dirty, pre-wash it before
cl e
aning it in an automatic car wash.
After using an automatic car wash, wipe off
wax from the windshield and the wiper
blades. This will prevent smears and reduce
wiping noises caused by residue on the wind-
shield.
Washing by hand
In some countries, washing by hand is only
allowed at specially equipped washing bays. Observe the legal requirements in all coun-
tries concerned. X
Do not use hot water and do not wash the
vehicle in direct sunlight. X
Use a soft sponge to clean. X
Use a mild cleaning agent, such as a car
shampoo approved by Mercedes-Benz. X
Thoroughly hose down the vehicle with a
gentle jet of water. X
Do not point the water jet directly towards
the air inlets. X
Use plenty of water and rinse out the
sponge frequently. X
Rinse the vehicle with clean water and dry
thoroughly with a chamois. X
Do not let the cleaning agent dry on the
paintwork.
When using the vehicle in winter, remove all
traces of road salt deposits carefully and as
soon as possible.
Power washers
G WARNING
The water jet from a circular jet nozzle (dirt
blasters) can cause invisible exterior damage
to the tires or chassis components. Compo-
nents damaged in this way may fail unexpect-
edly. There is a risk of an accident.
Do not use power washers with circular jet
nozzles to clean the vehicle. Have damaged
tires or chassis components replaced imme-
diately.
! Always maintain a distance of at least
11.8 in (30 cm) between the vehicle and the
power washer nozzle. Information about
the correct distance is available from the
equipment manufacturer.
Move the power washer nozzle around
when cleaning your vehicle.
Do not aim directly at any of the following: R
tires R
door gaps, roof gaps, joints, etc. R
electrical components Care 377
Maintenance and care Z
Page 400 of 462
To prevent damage to the vehicle, deacti-
vate DISTRONIC PLUS and the HOLD func-
tion in the following or other similar situa-
tions: R
when towing the vehicle R
in the car wash
! Make sure that the electric parking brake
is released. If the electric parking brake is
faulty, visit a qualified specialist workshop.
! Only secure the tow rope or tow bar at the
towing eyes. Otherwise, the vehicle could
be damaged.
! Do not use the trailer tow hitch for recov-
ery or towing. Do not use the towing eye for
recovery. this could damage the vehicle. If
in doubt, have the vehicle recovered using
a crane.
! When towing, pull away slowly and
smoothly. Pull the towed vehicle as straight
as possible and not at an acute angle.
Excessive tractive power could damage the
vehicles.
i When towing, it is preferable to use a rigid
towing bar as opposed to a tow rope. A rigid
towing bar helps to keep the tractive power
low.
! When towing vehicles with KEYLESS-GO,
use the key instead of the Start/Stop but-
ton. Otherwise, the automatic transmission
may shift to position P when the driver's or
front-passenger door are opened, which
could lead to damage to the transmission.
! Do not tow with sling-type equipment.
This could damage the vehicle.
! Vehicles with differential locks: make
sure the differential locks are in automatic
mode. When towing, the differential locks
must not be switched on. The transmission
may otherwise be damaged.
! The vehicle can be towed a maximum of
30 miles (50km). The towing speed of
30 mph (50 km/ h) must not be exceeded. If the vehicle has to be towed more than
30 miles (50km), the entire vehicle must be
raised and transported.
It is better to have the vehicle transported
than to have it towed away.
If the vehicle has suffered transmission dam-
age, have it transported on a transporter or
trailer.
The automatic transmission must be in posi-
tion N when the vehicle is being towed.
The battery must be connected and charged.
Otherwise, you: R
cannot turn the SmartKey to position 2 in
the ignition lock R
cannot release the electric parking brake R
cannot shift the automatic transmission to
position N
i Disarm the automatic locking feature
( Y
page 285). You could otherwise be
locked out when pushing or towing the
vehicle.
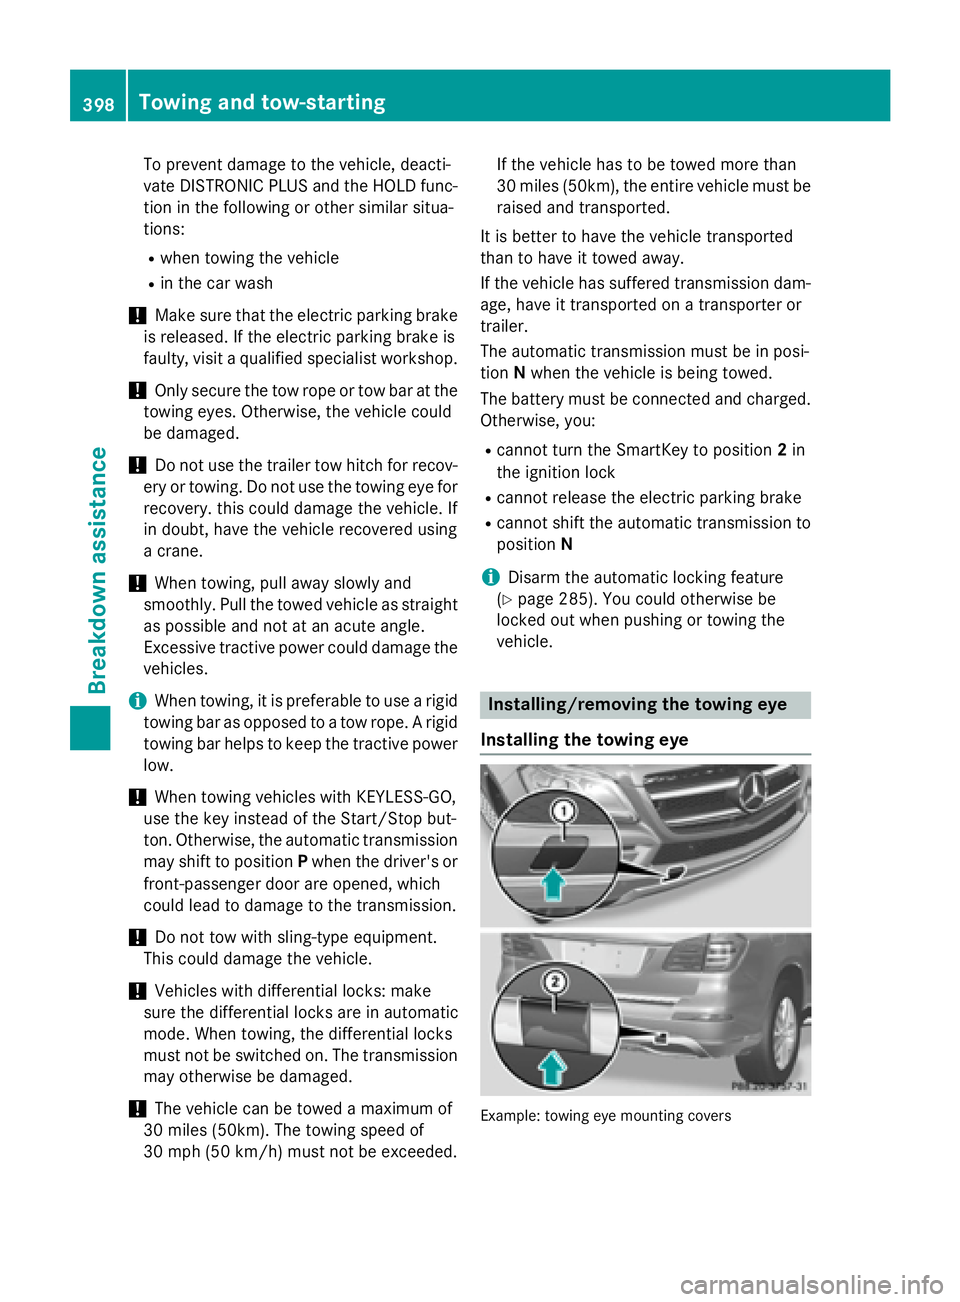
Installing/removing the towing eye
Installing the towing eye
Example: towing eye mounting covers398
Towing and tow-starting
Breakdown assistance
Page 401 of 462
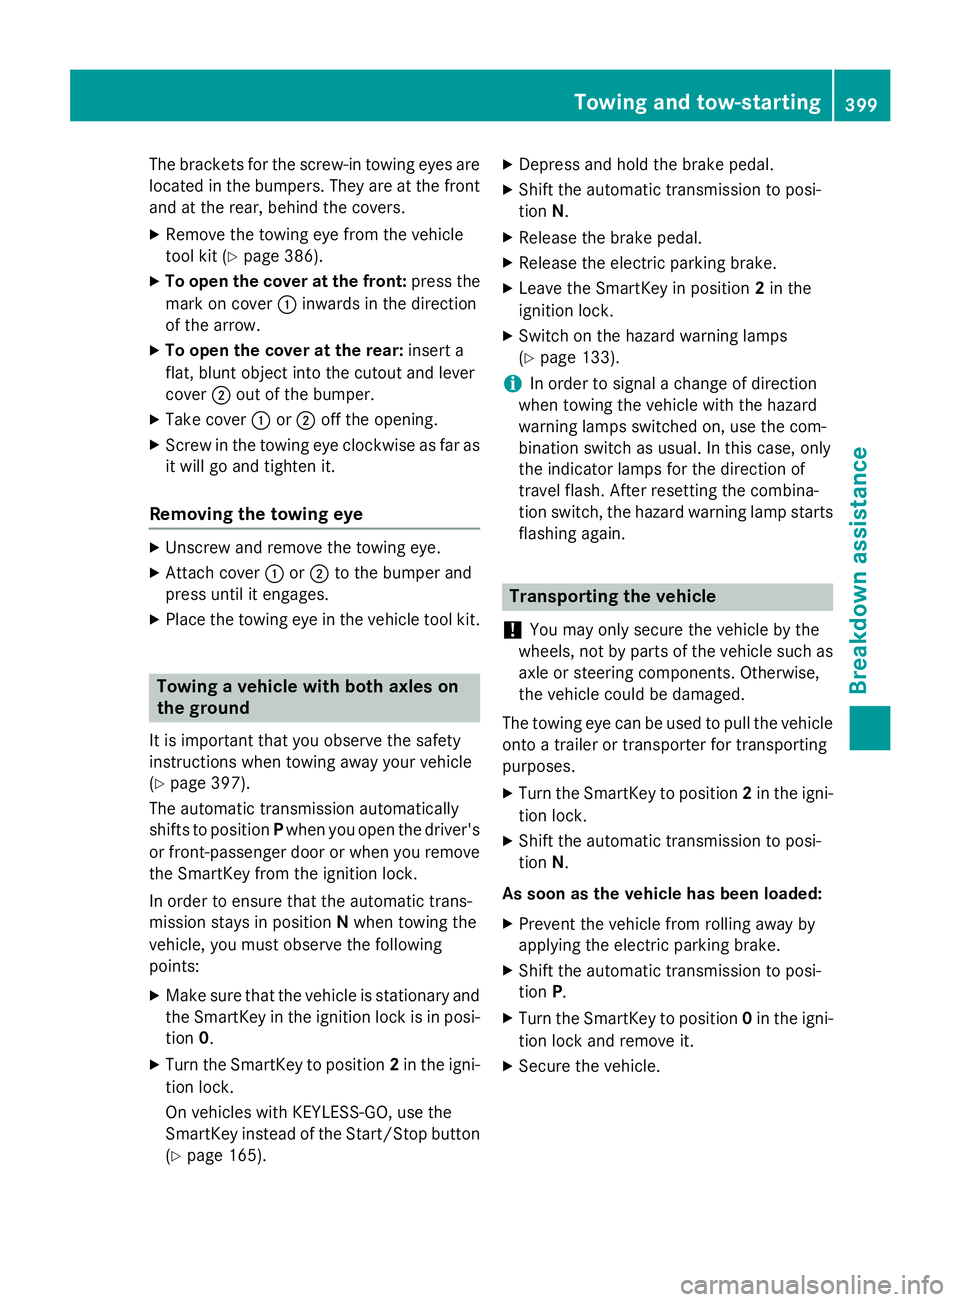
The brackets for the screw-in towing eyes are
located in the bumpers. They are at the front
and at the rear, behind the covers. X
Remove the towing eye from the vehicle
tool kit ( Y
page 386).X
To open the cover at the front: press the
mark on cover �C inwards in the direction
of the arrow. X
To open the cover at the rear: insert a
flat, blunt object into the cutout and lever
cover �D out of the bumper.X
Take cover �C or �D off the opening.X
Screw in the towing eye clockwise as far as
it will go and tighten it.
Removing the towing eye X
Unscrew and remove the towing eye. X
Attach cover �C or �D to the bumper and
press until it engages. X
Place the towing eye in the vehicle tool kit.
Towing a vehicle with both axles on
the ground
It is important that you observe the safety
instructions when towing away your vehicle
( Y
page 397).
The automatic transmission automatically
shifts to position P when you open the driver's
or front-passenger door or when you remove
the SmartKey from the ignition lock.
In order to ensure that the automatic trans-
mission stays in position N when towing the
vehicle, you must observe the following
points: X
Make sure that the vehicle is stationary and
the SmartKey in the ignition lock is in posi-
tion 0 .X
Turn the SmartKey to position 2 in the igni-
tion lock.
On vehicles with KEYLESS-GO, use the
SmartKey instead of the Start/Stop button
( Y
page 165). X
Depress and hold the brake pedal. X
Shift the automatic transmission to posi-
tion N . X
Release the brake pedal. X
Release the electric parking brake. X
Leave the SmartKey in position 2 in the
ignition lock. X
Switch on the hazard warning lamps
( Y
page 133).
i In order to signal a change of direction
when towing the vehicle with the hazard
warning lamps switched on, use the com-
bination switch as usual. In this case, only
the indicator lamps for the direction of
travel flash. After resetting the combina-
tion switch, the hazard warning lamp starts
flashing again.
Transporting the vehicle
! You may only secure the vehicle by the
wheels, not by parts of the vehicle such as
axle or steering components. Otherwise,
the vehicle could be damaged.
The towing eye can be used to pull the vehicle
onto a trailer or transporter for transporting
purposes. X
Turn the SmartKey to position 2 in the igni-
tion lock. X
Shift the automatic transmission to posi-
tion N .
As soon as the vehicle has been loaded: X
Prevent the vehicle from rolling away by
applying the electric parking brake. X
Shift the automatic transmission to posi-
tion P . X
Turn the SmartKey to position 0 in the igni-
tion lock and remove it. X
Secure the vehicle.Towing and tow-starting 399
Breakdown assistance Z