2016 MERCEDES-BENZ GL tow
[x] Cancel search: towPage 213 of 462
speed stored after you have finished over-
taking.
DISTRONIC PLUS is automatically deactiva-
ted if: R
you engage the electric parking brake or if
the vehicle is automatically secured with
the electric parking brake R
you are driving slower than 15 mph
(25 km/h) and there is no vehicle in front,
or if the vehicle in front is no longer detec-
ted R
ESP ®
intervenes or you deactivate ESP ®
R
the transmission is in the P , R or N positionR
you pull the cruise control lever towards
you in order to pull away and the front-
passenger door or one of the rear doors is
open R
you activate DSR R
you activate off-road program 2 on vehicles
with the ON&OFFROAD package R
the vehicle has skidded
If DISTRONIC PLUS is deactivated, you will
hear a warning tone. You will see the
DISTRONIC PLUS Off
message in the multi-
function display for approximately five sec-
onds.
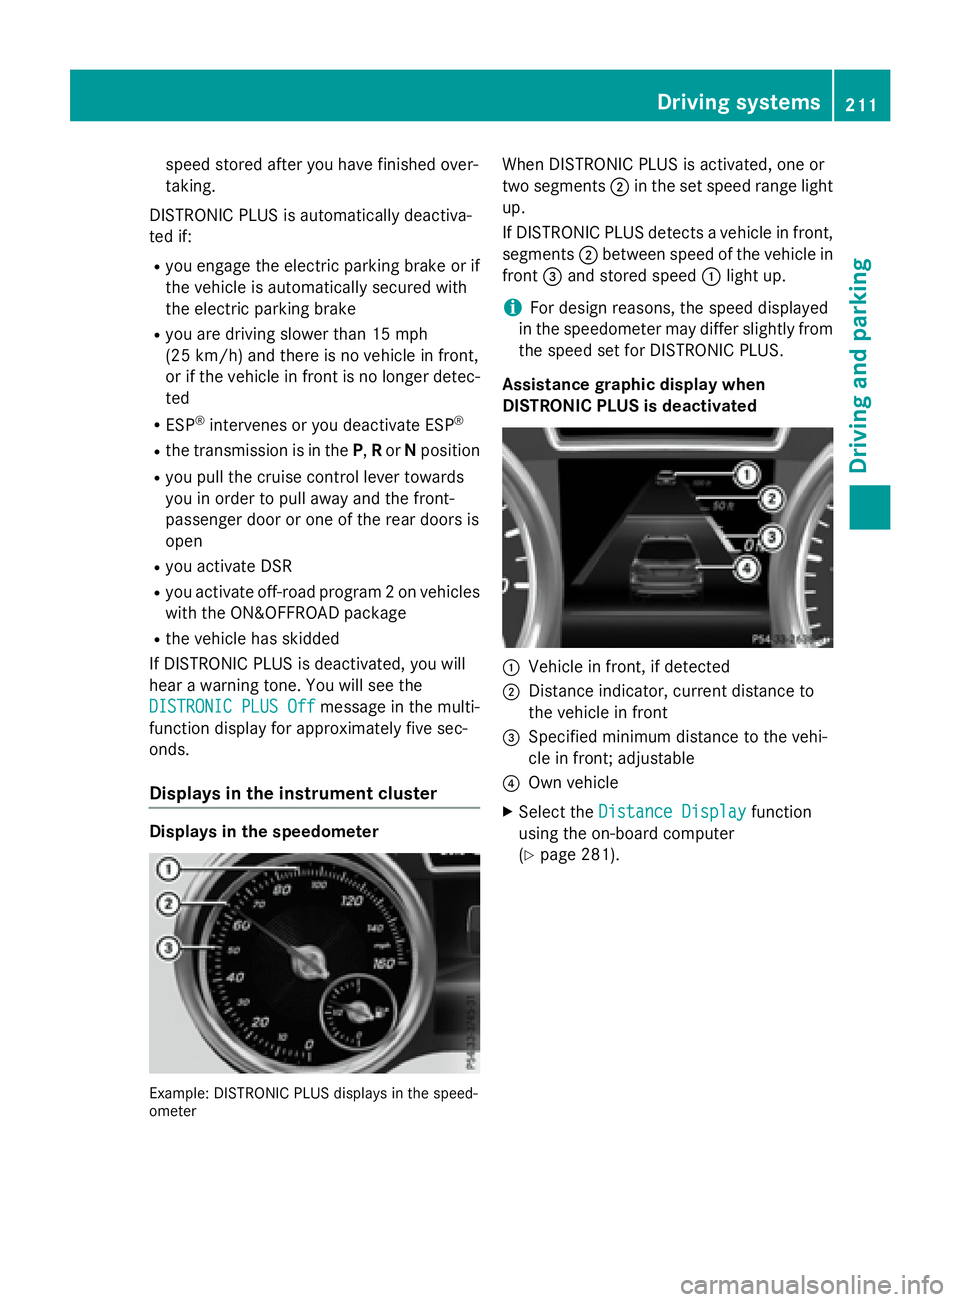
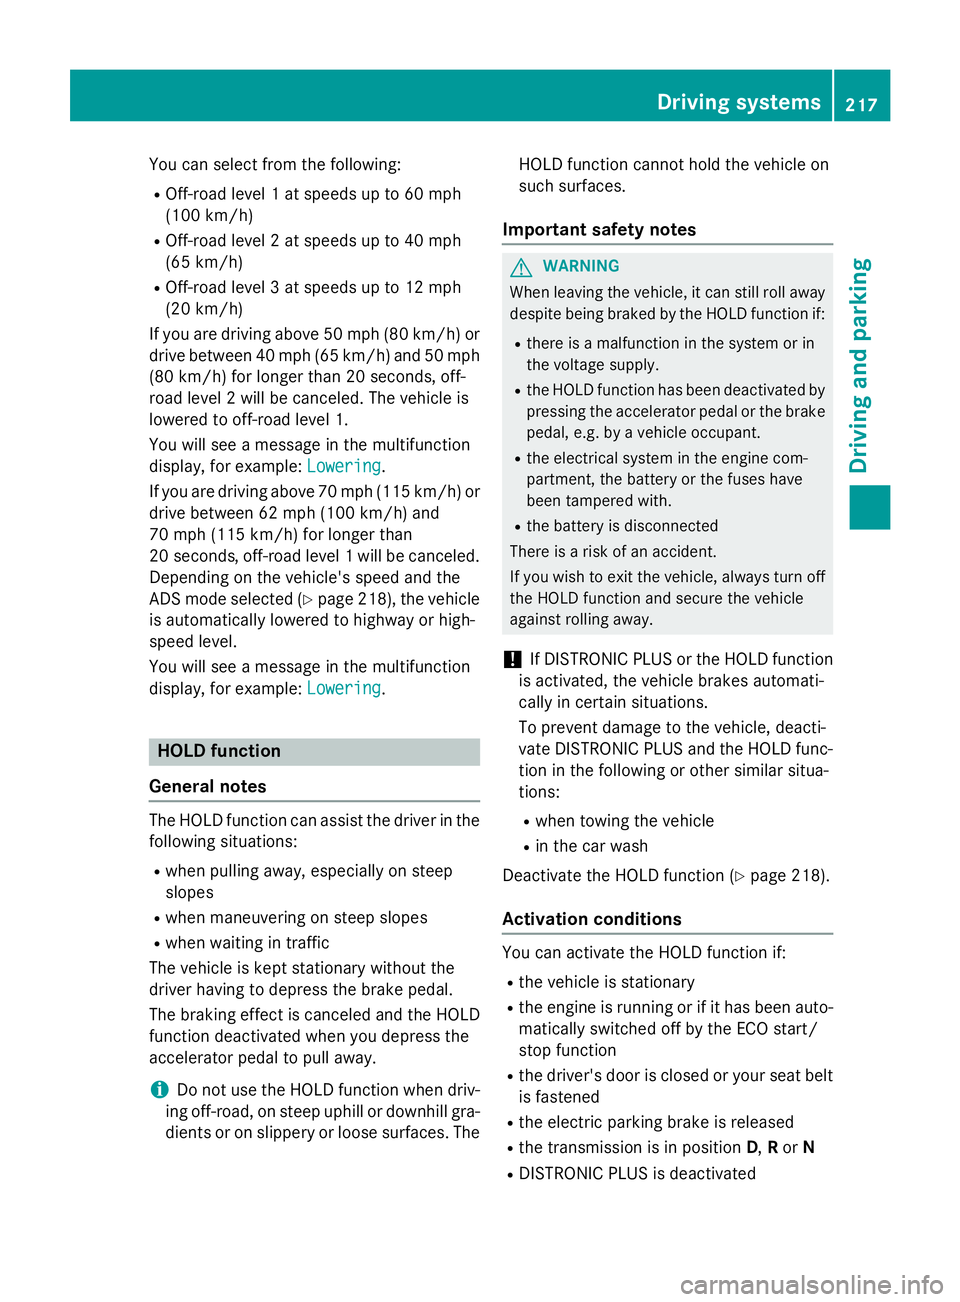
Displays in the instrument cluster
Displays in the speedometer
Example: DISTRONIC PLUS displays in the speed-
ometer When DISTRONIC PLUS is activated, one or
two segments �D in the set speed range light
up.
If DISTRONIC PLUS detects a vehicle in front,
segments �D between speed of the vehicle in
front �
Page 219 of 462
You can select from the following: R
Off-road level 1 at speeds up to 60 mph
(100 km/h) R
Off-road level 2 at speeds up to 40 mph
(65 km/h) R
Off-road level 3 at speeds up to 12 mph
(20 km/h)
If you are driving above 50 mph (80 km/h) or
drive between 40 mph (65 km/h) and 50 mph
(80 km/h) for longer than 20 seconds, off-
road level 2 will be canceled. The vehicle is
lowered to off-road level 1.
You will see a message in the multifunction
display, for example: Lowering
.
If you are driving above 70 mph (115 km/h) or
drive between 62 mph (100 km/h) and
70 mph (115 km/h) for longer than
20 seconds, off-road level 1 will be canceled.
Depending on the vehicle's speed and the
ADS mode selected ( Y
page 218), the vehicle
is automatically lowered to highway or high-
speed level.
You will see a message in the multifunction
display, for example: Lowering
.
HOLD function
General notes
The HOLD function can assist the driver in the
following situations: R
when pulling away, especially on steep
slopes R
when maneuvering on steep slopes R
when waiting in traffic
The vehicle is kept stationary without the
driver having to depress the brake pedal.
The braking effect is canceled and the HOLD
function deactivated when you depress the
accelerator pedal to pull away.
i Do not use the HOLD function when driv-
ing off-road, on steep uphill or downhill gra-
dients or on slippery or loose surfaces. The HOLD function cannot hold the vehicle on
such surfaces.
Important safety notes
G WARNING
When leaving the vehicle, it can still roll away
despite being braked by the HOLD function if: R
there is a malfunction in the system or in
the voltage supply. R
the HOLD function has been deactivated by
pressing the accelerator pedal or the brake
pedal, e.g. by a vehicle occupant. R
the electrical system in the engine com-
partment, the battery or the fuses have
been tampered with. R
the battery is disconnected
There is a risk of an accident.
If you wish to exit the vehicle, always turn off
the HOLD function and secure the vehicle
against rolling away.
! If DISTRONIC PLUS or the HOLD function
is activated, the vehicle brakes automati-
cally in certain situations.
To prevent damage to the vehicle, deacti-
vate DISTRONIC PLUS and the HOLD func-
tion in the following or other similar situa-
tions: R
when towing the vehicle R
in the car wash
Deactivate the HOLD function ( Y
page 218).
Activation conditions
You can activate the HOLD function if: R
the vehicle is stationary R
the engine is running or if it has been auto-
matically switched off by the ECO start/
stop function R
the driver's door is closed or your seat belt
is fastened R
the electric parking brake is released R
the transmission is in position D , R or NR
DISTRONIC PLUS is deactivated Driving systems 217
Driving and parking Z
Page 228 of 462
One or more segments light up as the vehicle
approaches an obstacle, depending on the
vehicle's distance from the obstacle.
From the: R
sixth segment onwards, you will hear an
intermittent warning tone for approx-
imately two seconds. R
seventh segment onwards, you will hear a
warning tone for approximately two sec-
onds. This indicates that you have now
reached the minimum distance.
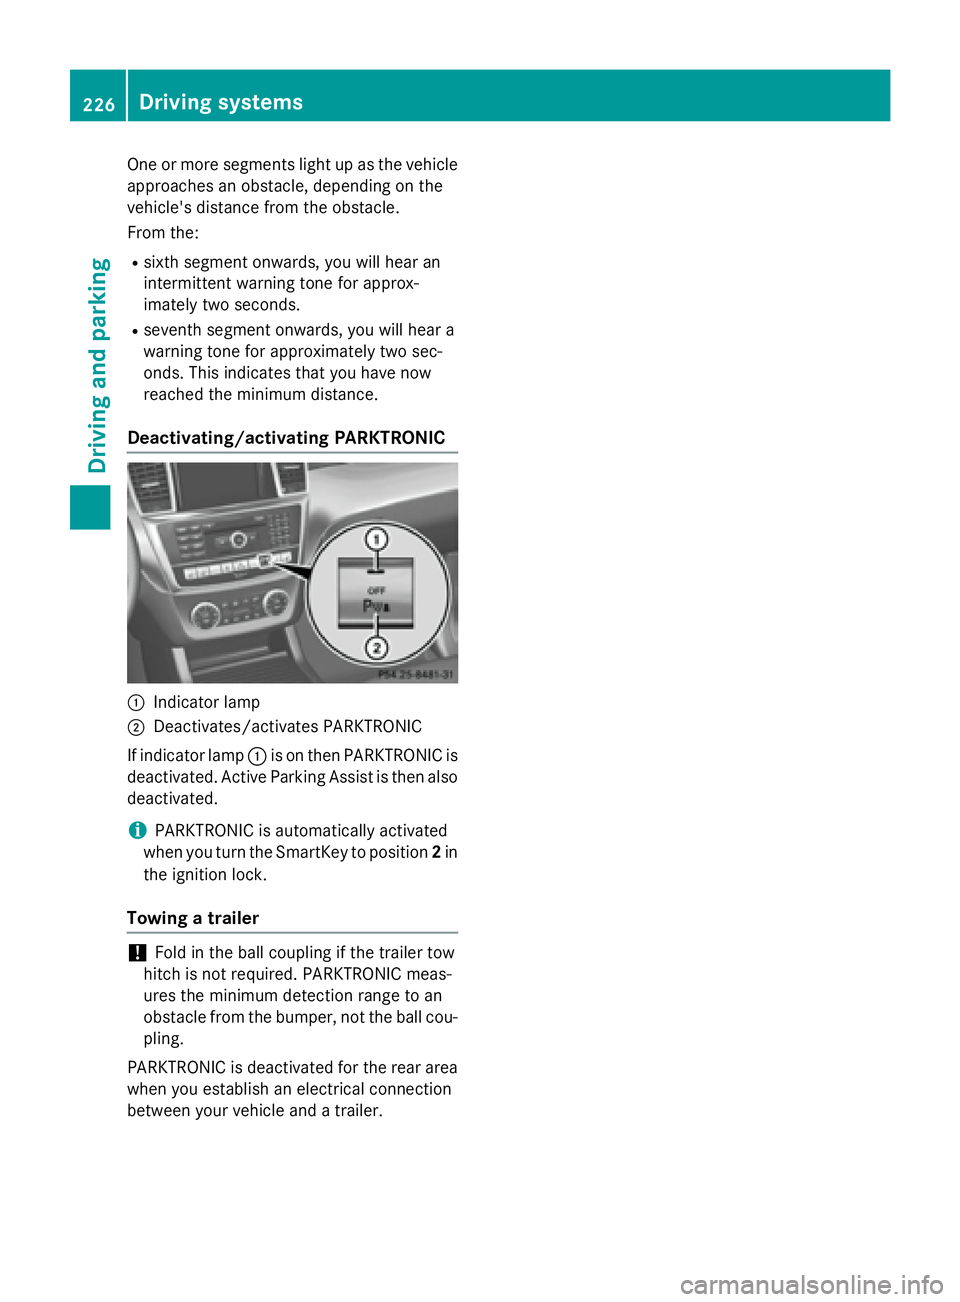
Deactivating/activating PARKTRONIC
�C
Indicator lamp�D
Deactivates/activates PARKTRONIC
If indicator lamp �C is on then PARKTRONIC is
deactivated. Active Parking Assist is then also
deactivated.
i PARKTRONIC is automatically activated
when you turn the SmartKey to position 2 in
the ignition lock.
Towing a trailer
! Fold in the ball coupling if the trailer tow
hitch is not required. PARKTRONIC meas-
ures the minimum detection range to an
obstacle from the bumper, not the ball cou-
pling.
PARKTRONIC is deactivated for the rear area
when you establish an electrical connection
between your vehicle and a trailer.226
Driving systems
Driving and parking
Page 231 of 462
arrow towards the right or the left also
appears. By default, Active Parking Assist
only displays parking spaces on the front-
passenger side. Parking spaces on the driv-
er's side are displayed as soon as the turn
signal on the driver's side is activated. When
parking on the driver's side, this must remain
switched on until you acknowledge the use of
Active Parking Assist by pressing the �v
button on the multifunction steering wheel.
A parking space is displayed while you are
driving past it, and until you are approx-
imately 50 ft (15 m) awa y from it .
Pa rking
G WARNING
Active Parking Assist merely aids you by inter-
vening actively in the steering. If you do not
brake there is a risk of an accident.
Always apply the brakes yourself when
maneuvering and parking. X
Stop the vehicle when the parking space
symbol shows the desired parking space in
the instrument cluster. X
Shift the transmission to position R .
The Start Park Assist? Yes: OK No:
�8 message appears in the multifunction
display. X
To cancel the procedure: press the �8
button on the multifunction steering wheel
or pull away.
or X
To park using Active Parking Assist:
press the �v button on the multifunction
steering wheel.
The Park Assist Active Accelerate
and Brake Observe Surroundings mes-
sage appears in the multifunction display. X
Let go of the multifunction steering wheel. X
Back up the vehicle, being ready to brake at
all times. When backing up, drive at a speed
below approximately 6 mph (10 km/h).
Otherwise Active Parking Assist will be can-
celed. i In tight parking spaces, you will achieve
the best parking results by backing up as
far as possible. When doing so, also
observe the PARKTRONIC messages. X
Stop as soon as PARKTRONIC sounds the
continuous warning tone, if not before.
Maneuvering may be required in tight park-
ing spaces.
The Park Assist active Select D
Observe surroundings message appears in
the multifunction display. X
Shift the transmission to position D while
the vehicle is stationary.
Active Parking Assist immediately steers in
the other direction.
The Park Assist active Accelerate
and brake Observe surroundings mes-
sage appears in the multifunction display.
i You will achieve the best results by wait-
ing for the steering procedure to complete
before pulling away. X
Drive forwards and be ready to brake at all
times. X
Stop as soon as PARKTRONIC sounds the
continuous warning tone, if not before.
The Park Assist active Select R
Observe surroundings message appears in
the multifunction display.
As soon as the parking procedure is com-
plete, the Park
Assist switched off mes-
sage appears and a warning tone sounds.
Active Parking Assist no longer supports you
with steering interventions. When Active
Parking Assist is finished, you must steer
again yourself. PARKTRONIC is still available.
Parking tips: R
The way your vehicle is positioned in the
parking space after parking is dependent
on various factors. These include the posi-
tion and shape of the vehicles parked in
front and behind it and the conditions of the
location. It may be the case that Active
Parking Assist guides you too far into a
parking space, or not far enough into it. In Driving system s 229
Dr ivi ng an d parking Z
Page 234 of 462
R
if there is a sudden change in temperature,
e.g. when driving into a heated garage in
winter R
if the camera lens is dirty or obstructed.
Observe the notes on cleaning
( Y
page 380) R
if the rear of your vehicle is damaged. In this
event, have the camera position and setting
checked at a qualified specialist workshop
The field of vision and other functions of the
rear view camera may be restricted due to
additional accessories on the rear of the vehi-
cle (e.g. license plate holder, bicycle rack).
For technical reasons, leaving the standard
height can result in inaccuracies in the guide
lines on vehicles with a height-adjustable
chassis.
Activating/deactivating the rear view
camera
X
To activate: make sure that the SmartKey
is in position 2 in the ignition lock.X
Make sure that the "Show rear view camera
display" function is selected in COMAND
(see the Digital Operator's Manual). X
Engage reverse gear.
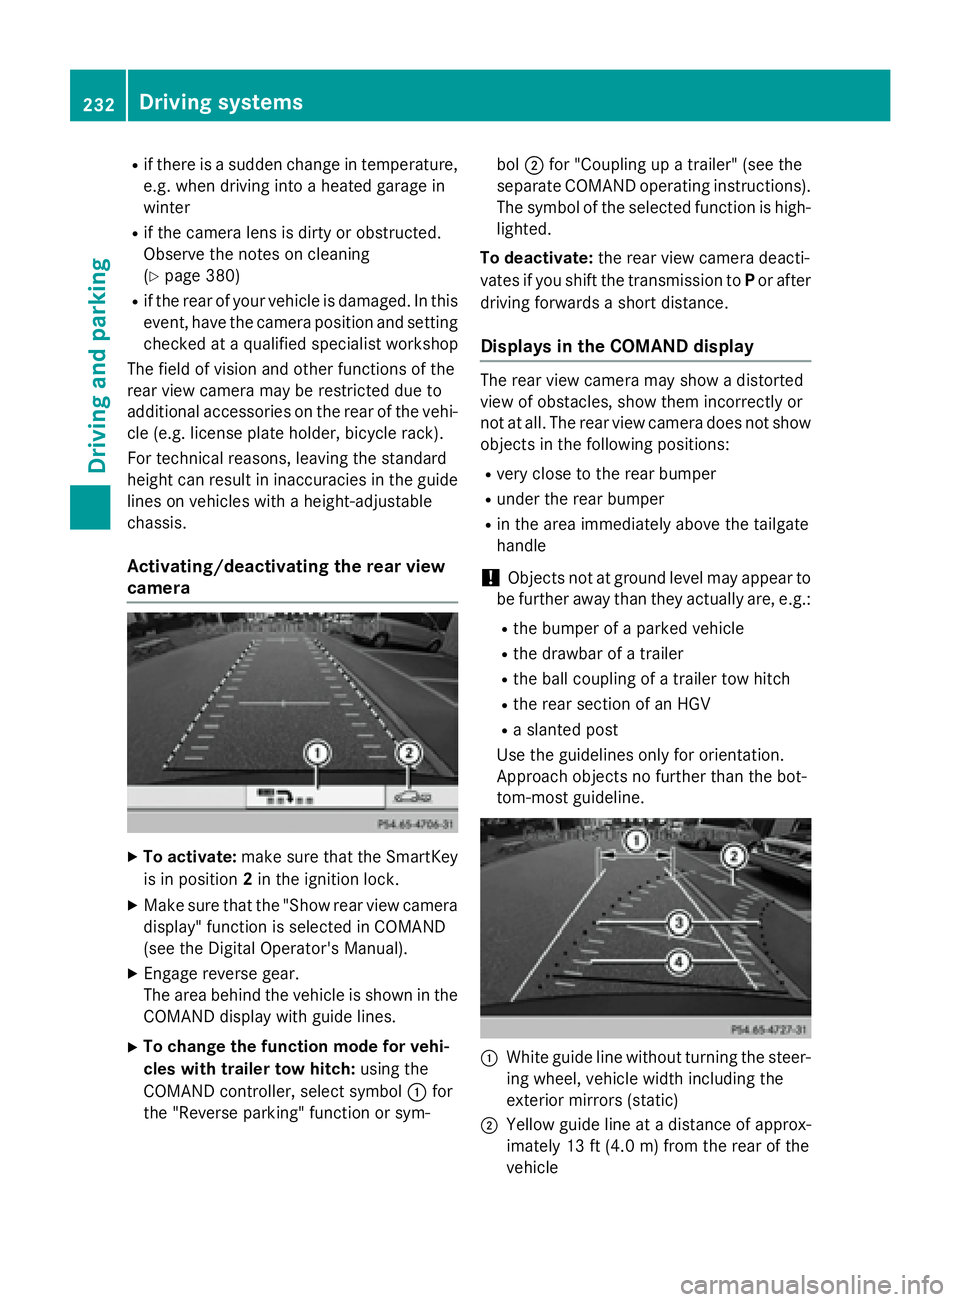
The area behind the vehicle is shown in the
COMAND display with guide lines. X
To change the function mode for vehi-
cles with trailer tow hitch: using the
COMAND controller, select symbol �C for
the "Reverse parking" function or sym- bol �D for "Coupling up a trailer" (see the
separate COMAND operating instructions).
The symbol of the selected function is high-
lighted.
To deactivate: the rear view camera deacti-
vates if you shift the transmission to P or after
driving forwards a short distance.
Displays in the COMAND display The rear view camera may show a distorted
view of obstacles, show them incorrectly or
not at all. The rear view camera does not show
objects in the following positions: R
very close to the rear bumper R
under the rear bumper R
in the area immediately above the tailgate
handle
! Objects not at ground level may appear to
be further away than they actually are, e.g.: R
the bumper of a parked vehicle R
the drawbar of a trailer R
the ball coupling of a trailer tow hitch R
the rear section of an HGV R
a slanted post
Use the guidelines only for orientation.
Approach objects no further than the bot-
tom-most guideline.
�C
White guide line without turning the steer-
ing wheel, vehicle width including the
exterior mirrors (static)
�D
Yellow guide line at a distance of approx-
imately 13 ft (4.0 m) from the rear of the
vehicle232
Driving system s
Dr ivi ng an d parking
Page 248 of 462
�C
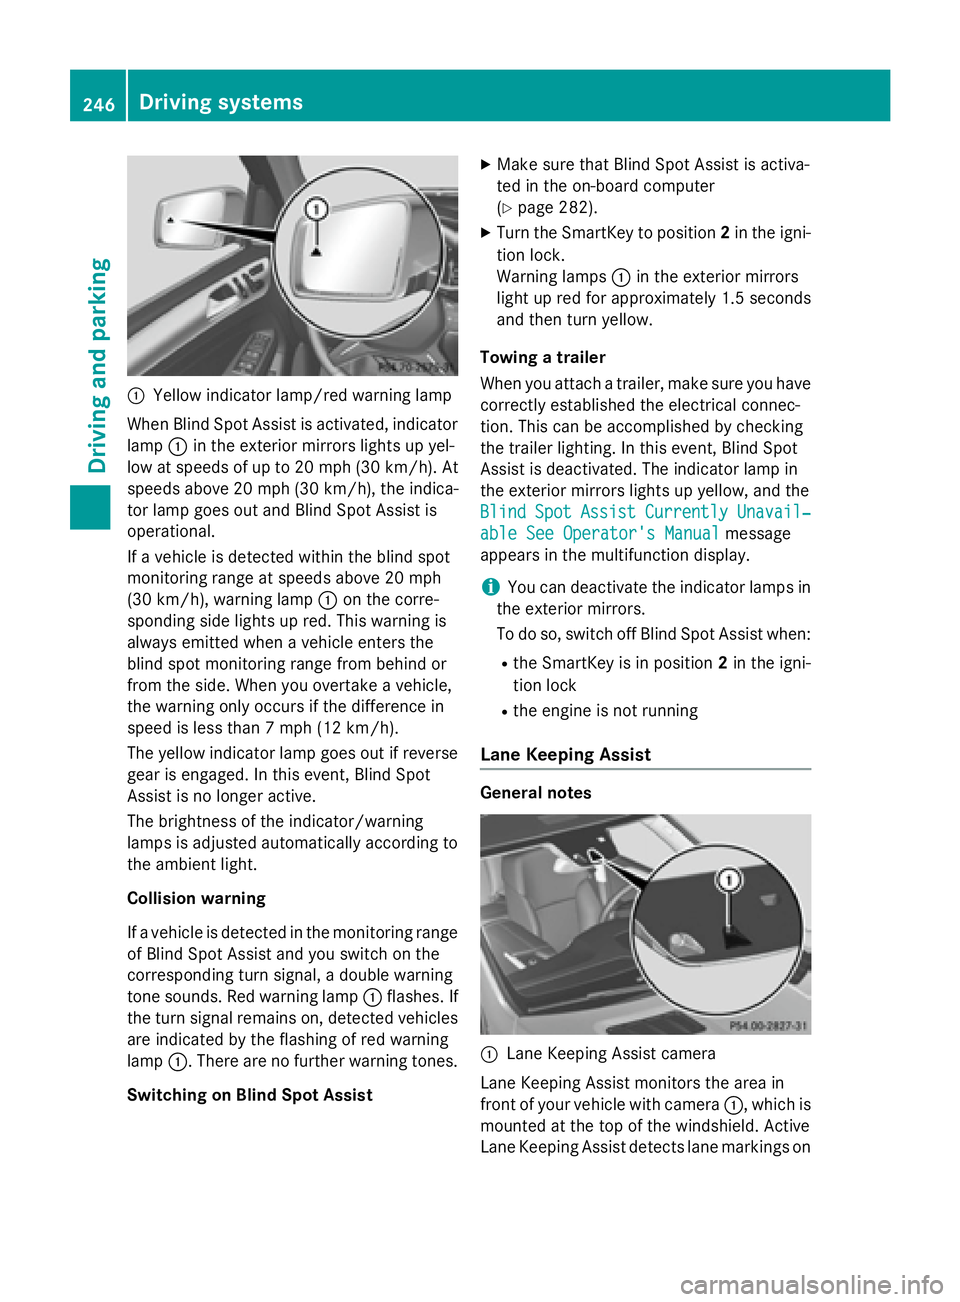
Yellow indicator lamp/red warning lamp
When Blind Spot Assist is activated, indicator
lamp �C in the exterior mirrors lights up yel-
low at speeds of up to 20 mph (30 km/h). At
speeds above 20 mph (30 km/h), the indica-
tor lamp goes out and Blind Spot Assist is
operational.
If a vehicle is detected within the blind spot
monitoring range at speeds above 20 mph
(30 km/h), warning lamp �C on the corre-
sponding side lights up red. This warning is
always emitted when a vehicle enters the
blind spot monitoring range from behind or
from the side. When you overtake a vehicle,
the warning only occurs if the difference in
speed is less than 7 mph (12 km/h).
The yellow indicator lamp goes out if reverse
gear is engaged. In this event, Blind Spot
Assist is no longer active.
The brightness of the indicator/warning
lamps is adjusted automatically according to
the ambient light.
Collision warning
If a vehicle is detected in the monitoring range
of Blind Spot Assist and you switch on the
corresponding turn signal, a double warning
tone sounds. Red warning lamp �C flashes. If
the turn signal remains on, detected vehicles
are indicated by the flashing of red warning
lamp �C . There are no further warning tones.
Switching on Blind Spot Assist X
Make sure that Blind Spot Assist is activa-
ted in the on-board computer
( Y
page 282). X
Turn the SmartKey to position 2 in the igni-
tion lock.
Warning lamps �C in the exterior mirrors
light up red for approximately 1.5 seconds
and then turn yellow.
Towing a trailer
When you attach a trailer, make sure you have
cor rectly established the electrical connec-
t ion . This can be accomplished by checking
the trailer lighting. In this event, Blind Spot
Assist is deactivated. The indicator lamp in
the exterior mirrors lights up yellow, and the
Blind Spot Assist Currently Unavail‐
able See Operator's Manual message
appears in the multifunction display.
i You can deactivate the indicator lamps in
the exterior mirrors.
To do so, switch off Blind Spot Assist when: R
the SmartKey is in position 2 in the igni-
tion lock R
the engine is not running
Lane Keeping Assist
General notes
�C
Lane Keeping Assist camera
Lane Keeping Assist monitors the area in
front of your vehicle with camera �C , which is
mounted at the top of the windshield. Active
Lane Keeping Assist detects lane markings on246
Driving systems
Driving and parking
Page 253 of 462
Either no braking application, or a course-
correcting brake application adapted to the
driving situation occurs if: R
there are vehicles or obstacles, e.g. crash
barriers, close to both sides of your vehicle. R
a vehicle approaches you too closely at the
side. R
you have adopted a sporty driving style with
high cornering speeds. R
you brake or accelerate significantly. R
a driving safety system intervenes, e.g.
ESP ®
or PRE-SAFE ®
Brake.R
ESP ®
is switched off.R
the off-road program is activated (vehicles
without the ON&OFFROAD package). R
off-road program 1 or 2 is activated (vehi-
cles with the ON&OFFROAD package). R
the LOW RANGE off-road gear is activated
(vehicles with the ON&OFFROAD package). R
a loss of tire pressure or a defective tire is
detected.
Switching on Active Blind Spot Assist X
Make sure that Active Blind Spot Assist is
activated in the on-board computer
( Y
page 282). X
Turn the SmartKey to position 2 in the igni-
tion lock.
Warning lamps �C in the exterior mirrors
light up red for approximately 1.5 seconds
and then turn yellow.
Towing a trailer
When you attach a trailer, make sure you have
co rr ectly established the electrical connec-
tion. This can be accomplished by checking
the trailer lighting. Active Blind Spot Assist is
then deactivated. The indicator lamp lights up
yellow in the exterior mirrors and the Active
Blind Spot Assist Currently Unavail‐
able See Operator's Manual message
appears in the multifunction display. Active Lane Keeping Assist General notes
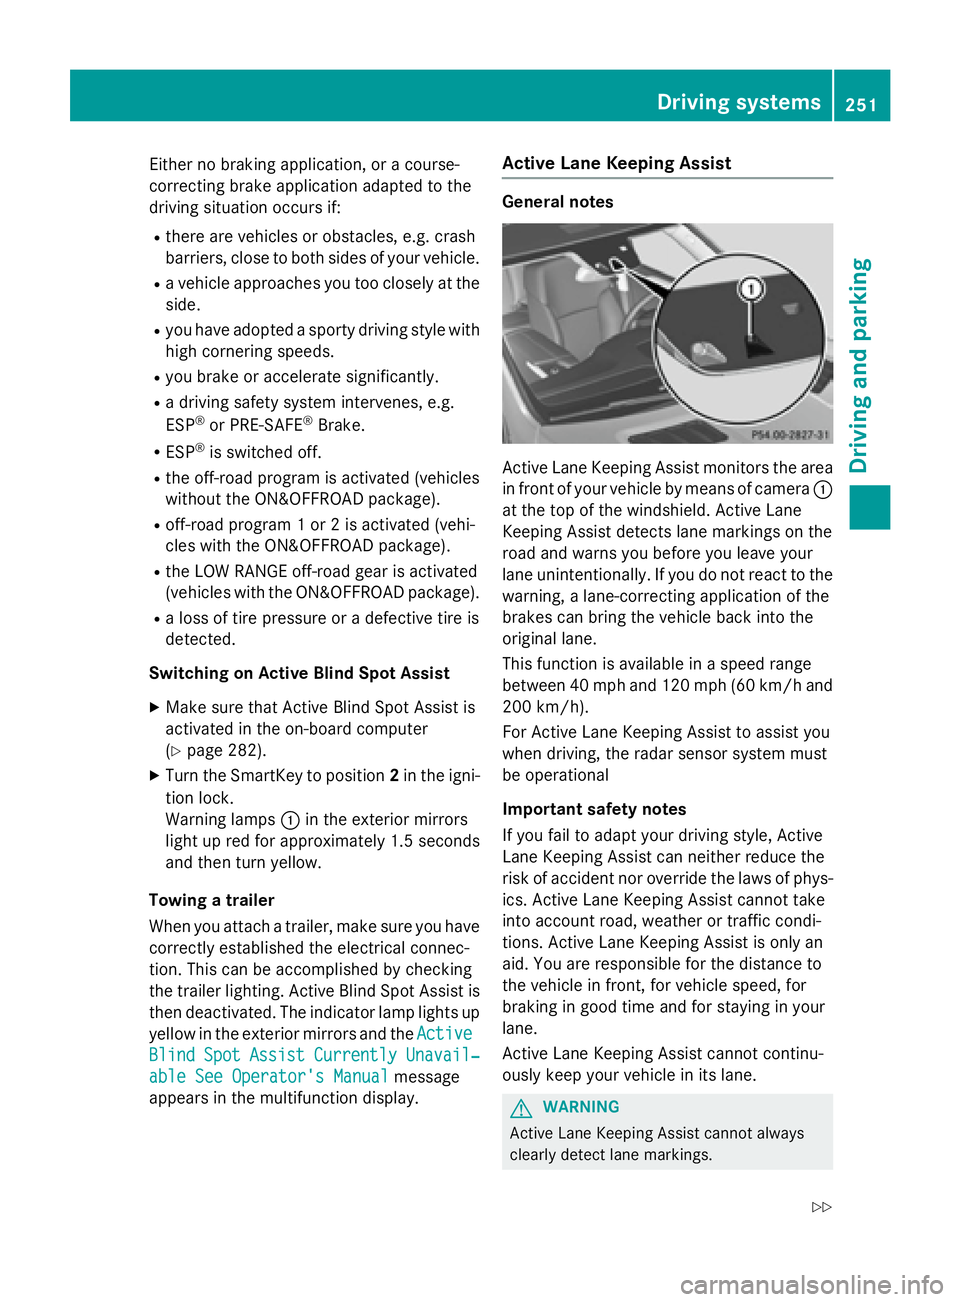
Active Lane Keeping Assist monitors the area
in front of your vehicle by means of camera �C
at the top of the windshield. Active Lane
Keeping Assist detects lane markings on the
road and warns you before you leave your
lane unintentionally. If you do not react to the
warning, a lane-correcting application of the
brakes can bring the vehicle back into the
original lane.
This function is available in a speed range
between 40 mph and 120 mph (60 km/h and
200 km/h).
For Active Lane Keeping Assist to assist you
when driving, the radar sensor system must
be operational
Important safety notes
If you fail to adapt your driving style, Active
Lane Keeping Assist can neither reduce the
risk of accident nor override the laws of phys-
ics. Active Lane Keeping Assist cannot take
into account road, weather or traffic condi-
tions. Active Lane Keeping Assist is only an
aid. You are responsible for the distance to
the vehicle in front, for vehicle speed, for
braking in good time and for staying in your
lane.
Active Lane Keeping Assist cannot continu-
ously keep your vehicle in its lane.
G WARNING
Active Lane Keeping Assist cannot always
clearly detect lane markings.Driving system s 251
Dr ivi ng an d parking Z
Page 255 of 462
If you leave your lane, under certain circum-
stances the vehicle will brake briefly on one
side. This is meant to assist you in bringing
the vehicle back to the original lane.
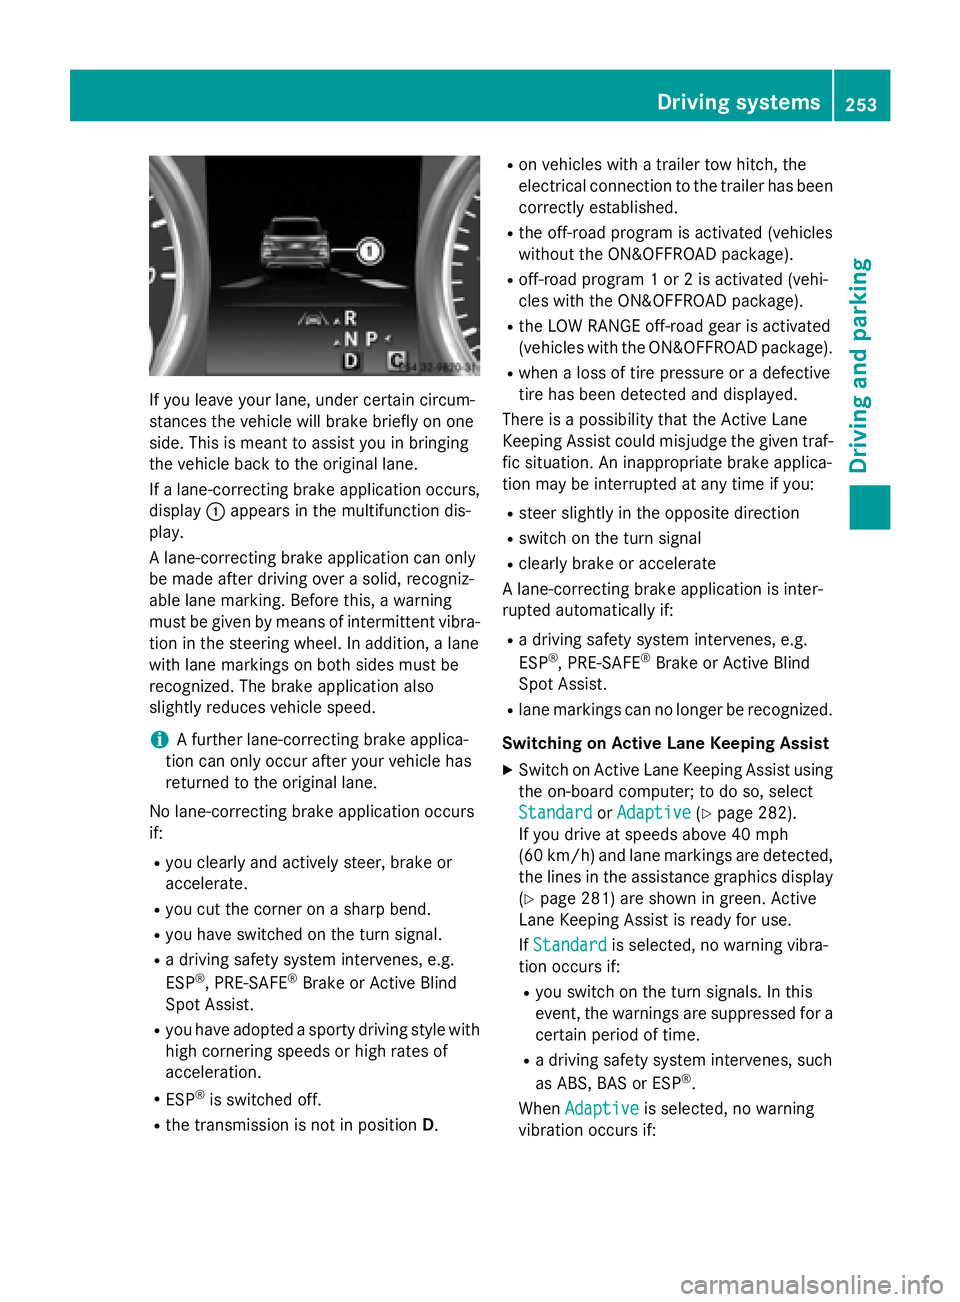
If a lane-correcting brake application occurs,
display �C appears in the multifunction dis-
play.
A lane-correcting brake application can only
be made after driving over a solid, recogniz-
able lane marking. Before this, a warning
must be given by means of intermittent vibra-
tion in the steering wheel. In addition, a lane
with lane markings on both sides must be
recognized. The brake application also
slightly reduces vehicle speed.
i A further lane-correcting brake applica-
tion can only occur after your vehicle has
returned to the original lane.
No lane-correcting brake application occurs
if: R
you clearly and actively steer, brake or
accelerate. R
you cut the corner on a sharp bend. R
you have switched on the turn signal. R
a driving safety system intervenes, e.g.
ESP ®
, PRE-SAFE ®
Brake or Active Blind
Spot Assist. R
you have adopted a sporty driving style with
high cornering speeds or high rates of
acceleration. R
ESP ®
is switched off.R
the transmission is not in position D . R
on vehicles with a trailer tow hitch, the
electrical connection to the trailer has been
correctly established. R
the off-road program is activated (vehicles
without the ON&OFFROAD package). R
off-road program 1 or 2 is activated (vehi-
cles with the ON&OFFROAD package). R
the LOW RANGE off-road gear is activated
(vehicles with the ON&OFFROAD package). R
when a loss of tire pressure or a defective
tire has been detected and displayed.
There is a possibility that the Active Lane
Keeping Assist could misjudge the given traf-
fic situation. An inappropriate brake applica-
tion may be interrupted at any time if you: R
steer slightly in the opposite direction R
switch on the turn signal R
clearly brake or accelerate
A lane-correcting brake application is inter-
rupted automatically if: R
a driving safety system intervenes, e.g.
ESP ®
, PRE-SAFE ®
Brake or Active Blind
Spot Assist. R
lane markings can no longer be recognized.
Switching on Active Lane Keeping Assist X
Switch on Active Lane Keeping Assist using
the on-board computer; to do so, select
Standard
or Adaptive ( Y
page 282).
If you drive at speeds above 40 mph
(60 km/h) and lane markings are detected,
the lines in the assistance graphics display
( Y
page 281) are shown in green. Active
Lane Keeping Assist is ready for use.
If Standard is selected, no warning vibra-
tion occurs if: R
you switch on the turn signals. In this
event, the warnings are suppressed for a
certain period of time. R
a driving safety system intervenes, such
as ABS, BAS or ESP ®
.
When Adaptive is selected, no warning
vibration occurs if: Driving systems 253
Driving and parking Z