2016 MERCEDES-BENZ G-CLASS SUV warning light
[x] Cancel search: warning lightPage 85 of 261
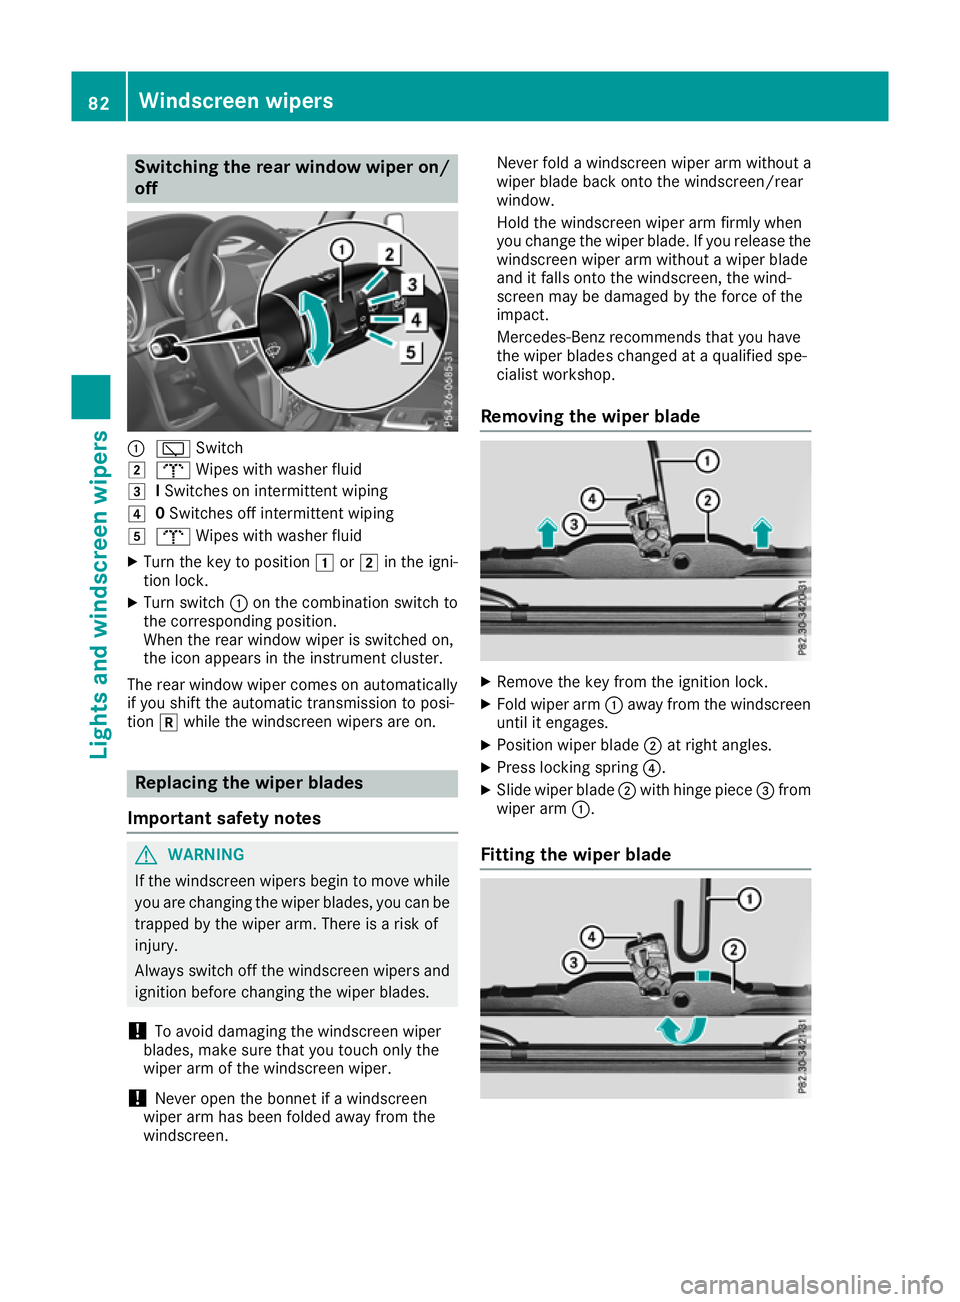
Switching the rear window wiper on/
off :
è Switch
2 b Wipes with washer fluid
3 ISwitches on intermittent wiping
4 0Switches off intermittent wiping
5 b Wipes with washer fluid
X Turn the key to position 1or2 in the igni-
tio nlock.
X Turn switch :on the combination switch to
the corresponding position.
Whe nthe rea rwindow wiper is switched on,
the ico nappears in the instrument cluster.
The rea rwindow wiper come sonautomatically
if yo ushift the automatic transmissio ntoposi-
tion kwhil ethe windscreen wiper sare on. Replacing the wiper blades
Important safety notes G
WARNING
If the windscreen wipers begi ntomove while
you are changing the wiper blades, you can be trappe dbythe wiper arm. There is arisk of
injury.
Always switch off the windscreen wipers and
ignitio nbefore changing the wiper blades.
! To avoi
ddamaging the windscreen wiper
blades, make sure that you touch only the
wiper arm of the windscreen wiper.
! Never open the bonnet if
awindscreen
wiper arm has been folde dawayfrom the
windscreen. Never fold
awindscreen wipera rm withouta
wiperb ladeback onto the windscreen/rear
window.
Hold the windscreen wipera rm firmly when
you change the wiperb lade. If you release the
windscreen wipera rm withoutawiperblade
and it falls onto the windscreen, the wind-
screen may be damaged by the force of the
impact.
Mercedes-Benz recommends that you have
the wiperb lades changed at aqualifieds pe-
cialist workshop.
Removing the wiper blade X
Remove the key from the ignitio nlock.
X Fold wiper arm :away from th ewindscreen
until it engages.
X Position wiper blade ;at right angles.
X Press lockin gspring ?.
X Slide wiper blade ;withhinge piece =from
wiper arm :.
Fitting th ewiper blade 82
Windscreen wipersLight
sand windscreen wipers
Page 92 of 261
Activating/deactivating air-recircula-
tion mode
Genera lnotes If yo
uactivate air-recirculation mode, the win-
dows can mist up more quickly, particularly at
low temperatures. Use air-recirculation mode
only briefl ytoprevent the window sfrom misting
up.
Activating/deactivating X
Turn the key to position 2(Ypage 96) in
the ignition lock.
X To activa te:press the dbutton.
The indicator lamp in the dbutton lights
up.
i Air-recirculation mode is automatically acti-
vated at high levels of pollution or at high out-
side temperatures. When air-recirculation
mode is activated automatically, the indicator
lamp in the dbutton is not lit.
Outside air is added after about 30 minutes.
X To deactivate: press thedbutton.
The indicator lamp in the dbutton goes
out.
i Air-recirculation mode is deactivated auto-
matically:
R after approximately five minutes at outside
temperatures below approximately 5†
R after approximately five minutes if "Cooling
with air dehumidification" is deactivated
R after approximately 30 minutes at outside
temperatures above approximately 5†Switching the residual heat on/off
General notes It is possible to make use of the residual heat of
the engine to continue heating the stationary
vehicle for up to 30 minutes after the engine has
been switched off. The heating time depends on
the set interior temperature. Switching on/off X
Turn the key to position g(Ypage 96) in
the ignition lock or remove it.
X To switch on: press theÁbutton.
The indicator lamp in the Ábutton lights
up.
i The blower will run at
alow speed regardless
of the airflow setting.
i If you switch on the residual heat function at
high temperatures, only the ventilation will be
activated.
X To switch off: press theÁbutton.
The indicator lamp in the Ábutton goes
out.
Residua lheat is switched off automatically:
R after approximately 30 minutes
R when the ignition is switched on
R if the battery voltage drops
R if the coolant temperature is too low
R when the auxiliary heating is switched on Auxiliary heating
Important safety notes G
DAN
GER
If th eexhaust pipe is blocke dorsufficient
ventilation is no tpossible, toxic exhaust
fumes can ente rthe vehicle, especially car-
bon monoxide. This is th ecase, e.g. in
enclosed spaces, or if th evehicl eiss tuck in
snow. There is ariskoff atal injuries.
You should switch off th eauxiliary heating in
enclosed spaces whic hdonothav eane xtrac-
tion system, e.g. agarage. If th evehicl eis
stuck in snow and you mus tleav ethe auxiliary
heating running, keep th eexhaust pipe and
th ea rea around th evehicl eclear of snow. To
guarantee asufficien tsupply of fresh air, open
aw indow on th eside of th evehicl eaway from
th ew ind. G
WARNING
When th eauxiliary heating is switched on,
parts of the vehicl ecan become very hot. Operating the climate control system
89Climate control
Z
Page 99 of 261

!
Avoid high engine speeds when the engine
is cold. The engine's service life could other-
wise be significantly shortened. Do not use
the engine's full performance until it has
reached operating temperature. Key positions
g
To remove the key
1 Power supply for some consumers, such as
the windscreen wipers
2 Ignition (power supply for all consumers)
and drive position
3 Starting the vehicle
You can only remove the key if: R the key is in position gin the ignition lock
R the automatic transmission selector lever is
in j Starting the vehicle
Important safety notes G
WARNING
If children are left unsupervised in the vehicle, they can:
R open doors and endanger other persons or
road users
R climb out and be injured by the traffic
R operate vehicle equipment and, for exam-
ple, trap themselves. Children could als
oset th evehicle in motion,
for example by:
R releasin gthe parking brake
R shiftin gthe automatic transmission out of
park position P
R starting th eengine.
Ther eisar iskofana ccidentand injury.
When leaving th evehicle ,always tak ethe key
wit hyou and loc kthe vehicle .Never leave
children unattende dinthevehicle .Always
keep th ekeyout of reac hofchildren. G
WARNING
Combustion engine semit poisonous exhaust
gase ssuch as carbon monoxide .Inhaling
these exhaust gase sleads to poisoning. There
is ar isk of fatal injury .Therefore never leave
the engine running in enclose dspace swith-
out sufficient ventilation. G
WARNING
Flammable materials introduced through
environmental influence or by animals can
ignite if in contact with the exhaust system or parts of the engine that heat up. There is arisk
of fire.
Carry out regular checks to make sure that
there are no flammable foreig nmaterials in
the engine compartment or in the exhaust
system.
! Do not depress the accelerator when start-
ing the engine.
Starting procedure X
Shift the automatic transmissio ntoposition
j.
i You can also star
tthe engine when the auto-
mati ctransmissio nisinpositioni.
X Make sure that the parking brake is applied.
X Turn the key to position 2(Ypage 96) in the
ignition lock.
The % preglow indicator lamp on the
instrument cluster lights up.
X Whe nthe % preglow indicator lamp goes
out, turn the key to position 3(Ypage 96) 96
DrivingDrivin
gand park ing
Page 117 of 261
To ensure that the vehicle is safeguarded
against rolling away unintentionally:
R the parking brake must be applied
R the transmission must be in position Pand the
key must be removed from the ignition lock
R the transfer case must not be in the neutral
position
R on uphill or downhill gradients, turn the front
wheels towards the kerb
R the empty vehicle must be secured at the
front axle with awheel chock or similar
object ,for example, on uphill or downhill gra-
dients
R al aden vehicle must also be secured at the
rear axle with awheel chock or similar object,
for example, on uphill or downhill gradients Switching off the engine
G
WARNING
The automatic transmission switches to neu-
tral position Nwhen you switch off the engine.
The vehicle may roll away. There is arisk of an
accident.
After switching off the engine, alwayss witch
to parking position P.Prevent the parked vehi-
cle from rolling awaybya pplying the parking
brake.
X Shift the automatic transmission to position
P.
X Turn the key to position 0in the ignitionlock
and remove it.
The immobiliser is activated.
X Firmly apply the parking brake.
X Turn the steering whee luntil the steering
whee llock engages.
If you switch the engine off with the transmis-
sion in position Ror D,t he automatic transmis-
sion shifts to Nautomatically.
If you then open the driver's door or the front-
passenger door or remove the key from the igni- tion, the automatic transmission shifts to P
automatically.
If you switch off the engine while the transmis-
sion is in position N,the automatic transmission
remains in Neven if adoor is opened .The auto-
matic transmission only automatically shifts into neutral
Nwhe nyou switc hoff the engine
using the key. Parking brake
G
WARNING
If you mus tbrake the vehicl ewith the parking
brake, the braking distance is considerably
longer and the wheels coul dlock. This increa-
ses the risk of skidding and an accident.
Only use the parking brake to brake the vehi- cle when the service brake is faulty. Do not
apply the parking brake too firmly .Ifthe
wheels lock, release the parking brake until
the wheels begi nturning again. G
WARNING
If you leave children unattended in the vehi-
cle, they may be abletos et the vehiclein
motion if, for example, they:
R release the parking brake
R shift the automatic transmission out of park
position P
R start the engine
In addition, they may operate vehicl eequip-
ment and become trapped. There is arisk of
an accident and injury.
When leaving the vehicle, alwayst ake the key
with you and lock the vehicle. Never leave
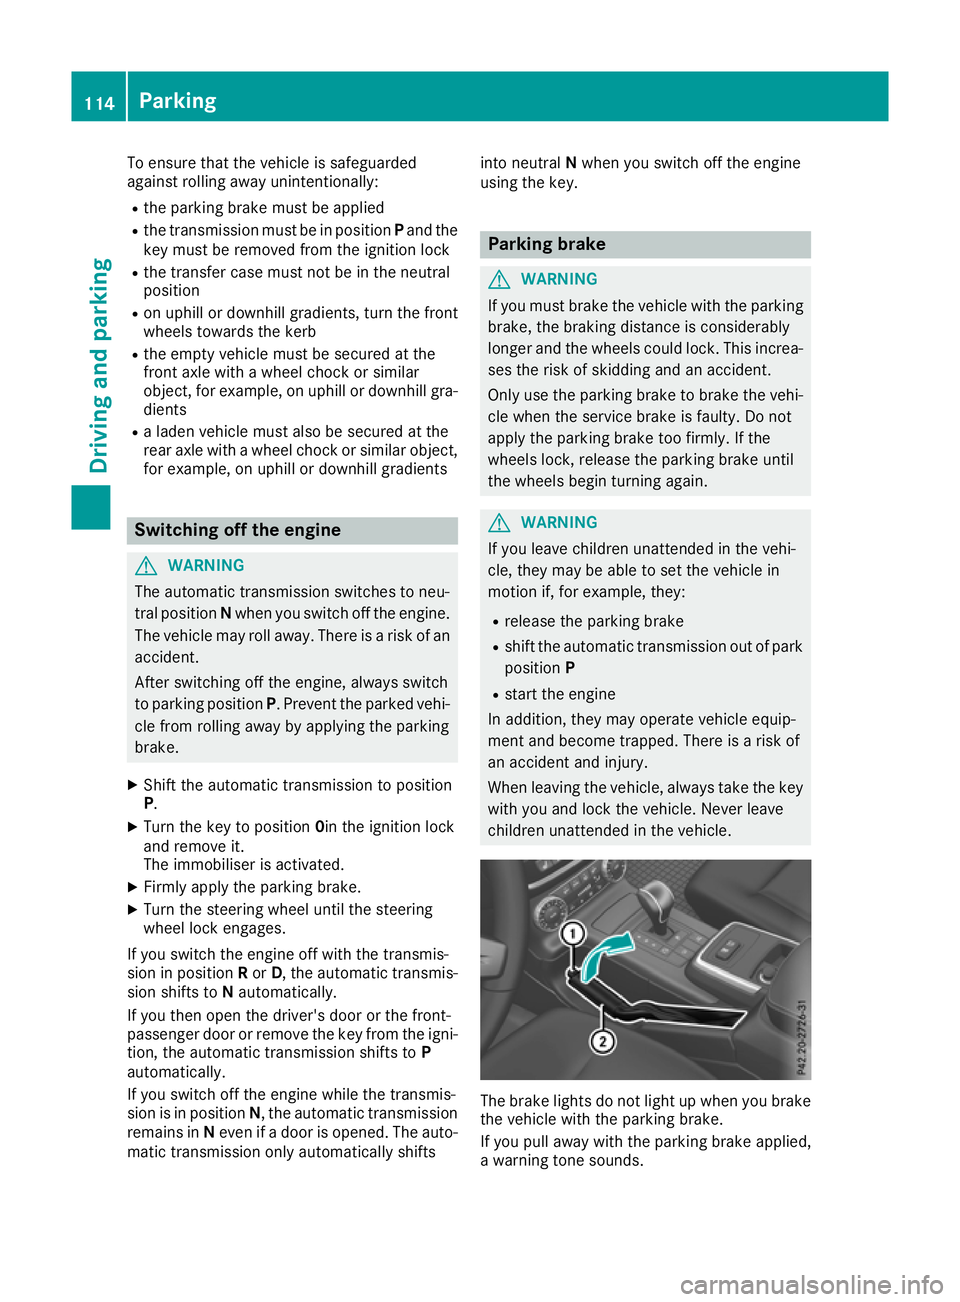
children unattended in the vehicle. The brake light
sdonot light up when you brake
the vehicle with the parking brake.
If you pull away with the parking brake applied,
aw arning tones ounds.114
ParkingDriving and parking
Page 118 of 261

X
To apply: pull parking brake lever ;up
firmly.
Whe nthe ignition is switched on, the red J
indicator lamp in the instrument cluster lights up.
X To release: pull parking brake lever ;
slightly.
X Press release button :and guid eparking
brake ;down to the stop.
The J indicator lamp in the instrument
cluster goe sout.
The vehicl ecan also be braked during an emer-
genc ybyu sing the parking brake.
X To brake in an emergency: press and hold
release button :and carefull ypullp arking
brake lever ;upwards.
If yo udrive on we troads or dirt-covered surfa-
ces, roa dsalta nd/or dirt could get into the
parking brake.
In order to prevent corrosion and areduction in
the braking powe rofthe parking brake, observe
the following:
R pull the parking brake upwards with release
button :depresse dfrom time to time before
beginning ajourney
R drive for approximatel y100 ma tamaximum
speed of 20 km/h Parkin
gupthe vehicle
If you leave the vehicle parked up for longer than
four weeks, the battery may be damaged by
exhaustive discharging.
If you leave the vehicle parked up for longer than
six weeks, it may suffer from lack of use.
X Contact aqualified specialist workshop and
seek advice.
i You can obtain information on trickle charg-
ers from aqualified specialist workshop. Driving tips
General drivin
gtips
Important safety notes G
WARNING
If you switch off the ignition while driving,
safety-relevant functions are only available wit
hlimitations, or not at all. This could affect,
for example, th epower steerin gand th ebrake
boosting effect .You will requir econsiderably
mor eeffort to steer and brake. Ther eisarisk
of an accident.
Do not switch off th eignitio nwhile driving.
Drive sensibly –savef uel Observe the following tips to save fuel:
X The tyre sshould always be inflated to the rec-
ommended tyre pressure.
X Remove unnecessary loads.
X Remove roof carriers when they are not nee-
ded.
X Warm up the engine at low engine speeds.
X Avoid frequent acceleration or braking.
X Have all service and maintenance work car-
ried out at the specified intervals.
Fuel consumption also increases when driving in
cold weather, in stop-start traffic, on short jour- neys and in hilly terrain. Short journeys
! Vehicles with
adiesel particle filter: if the
vehicle is mostly driven for short distances, it
is possible that malfunction smay occur dur-
ing the automatic cleaning of the diesel par-
ticle filter. This may lead to fuel collecting in
the engine oil and cause engine failure. There- fore, if you frequently drive short distances,
you should take a20minute trip on amotor-
way or rural road at least every 500km. Brakes
Imp ortant safety notes G
WARNING
If you shift dow nonaslippery road surface in
an attempt to increas ethe engine's braking
effect, the drive wheels coul dlose their grip.
This increases the risk of skidding and having
an accident.
Do not shift downf or additionalengine brak-
ing on aslippery road surface. Drivingt
ips
115Driving an dparking Z
Page 119 of 261
G
WARNING
If you select the LOW RANGE off-road gearon as lippery road surface, the wheels coul dlose
traction:
R if you release the accelerator peda lwhen
the vehicl eisinmotion
R if Off-road ABS intervenes when braking
If the wheels lose traction, it willnol onger be
possible to steer the vehicle. This increases
the risk of skidding and having an accident.
Never select the LOW RANGE off-road gear
when driving on slippery road surfaces.
Information on the parking brake (Y page114).
Downhill gradients Shift to
alower gearing oodt ime on long and
stee pdownhil lgradients.
Take particula rnote of this when driving alad en
vehicl eand when towing atrailer.
Thi sw illu se the braking effect of the engine, so
less braking will be required to maintai nthe
vehicl espeed. Thi srelieves the load on the
brake system and prevents the brakes from
overheating and wearing too quickly.
Heav yand light loads G
WARNING
The braking system can overheat if you leave you rfoot on the brake peda lwhile driving.
This increases the braking distance and could
even caus ethe braking system to fail .There is
ar isk of an accident.
Never use the brake peda lasafootrest. Do
not simultaneously depress both the brake
peda land the accelerator peda lwhile driving.
! Depressing the brake peda
lconstantly
results in excessive and premature wearto
the brake pads.
If heavy demands are made on the brakes ,do
not park the vehicl eimmediately. Drive on for a
short while. This allows the airflow to cool the
brakes more quickly.
If the brakes have been used only moderately,
you should occasionall ytest their effectiveness.
To do this, brake more firmly from ahigher speed while paying attention to the traffic con-
ditions .This improves the grip of the brakes.
Wet road surfaces If driving in heavy rain for
aprolonge dperiod of
time withou tbraking, there may be adelayed
reaction from the brakes when braking for the
first time. This may also occur after the vehicle
has been washed.
You have to depres sthe brake pedalm ore
firmly .Maintai nagreater distance from the
vehicle in front.
After driving on awet road or having the vehicle
washed, brake firmly whilep aying attention to
the traffic conditions. This willw arm up the
brake discs, thereby drying them more quickly
and protecting them against corrosion.
Limited braking performance on salt-
treated roads If you drive on salt-treated roads,
alayer of salt
may form on the brake discs and pads.T his can
increase the braking distance considerably.
R In order to prevent any salt build-up,a pplythe
brakes occasionally whilep aying attention to
the traffic conditions.
R Carefullyd epressthe brake pedalatt he end
of the journey and when starting the next
journey.
R Maintai namuch greater distance to the vehi-
cle in front.
New brake discs and brake pads/
linings Brake pads/linings and discs that either are new
or have been replaced achieve optimum braking
effect only after several hundred kilometres of
driving. Compensate for the reduced braking
effect by applying greater force to the brake
pedal.
For safety reasons, Mercedes-Benz recom-
mends only fittingt he following brake discs and
brake pads/linings:
R brake discs that hav ebeena pproved by
Mercedes-Benz
R brake pads/linings that hav ebeena pproved
by Mercedes-Benz or that are of an equivalent
standard of quality
Other brake discs or brake pads/linings can
compromise the safety of your vehicle. 116
Drivin
gtipsDriving and parking
Page 127 of 261
Off-road driving systems
Transfer case
General notes The vehicle has permanent all-wheel drive. The
front and rear axles are constantly driven.
Further information on driving off-road
(Y page 119).
Shift ranges HIGH
RANGE
Position for all normal on-
road driving conditions.
LOW RANGE
Low-range position for driving
off-road.
Also for use on steep uphill or downhill gradients, especially
when towin gatrailer.
The vehicle travels around
half the speed of on-road driv-
ing range HIGH RANGE.T he
tractive powerisc orrespond-
ingly higher. Shiftin
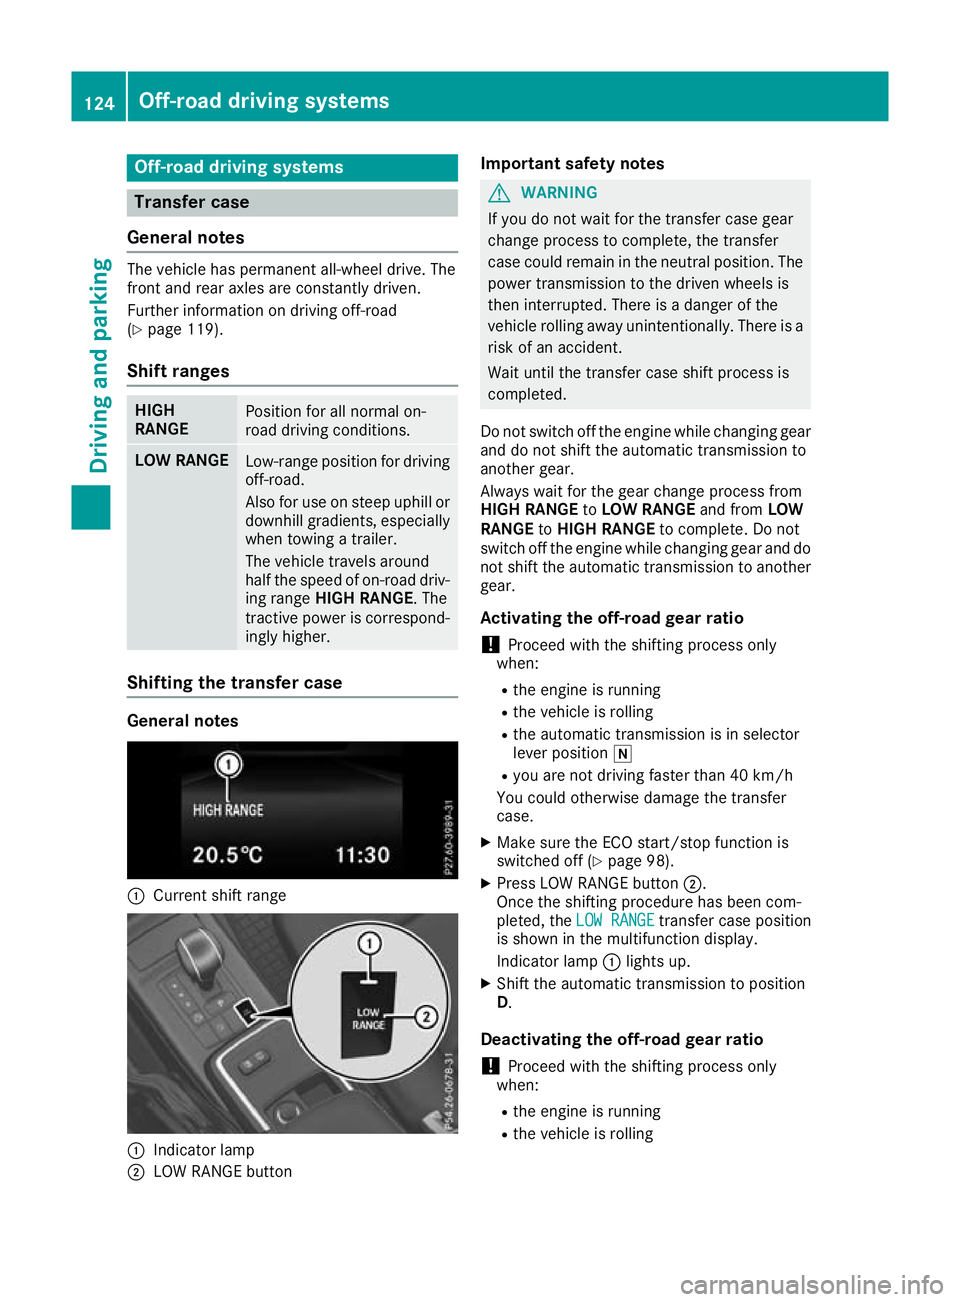
gthe transfer case General notes
:
Curren tshif trange :
Indicator lamp
; LOW RANGE button Important safety notes G
WARNING
If yo udon ot waitf or the transfer case gear
change process to complete, the transfer
case coul dremai ninthe neutral position. The
power transmission to the drive nwheels is
then interrupted. There is adange rofthe
vehicl erolling awayu nintentionally.T here is a
risk of an accident.
Waitu ntil the transfer case shift process is
completed.
Do not switch off the engine while changing gear and do not shift the automatic transmission to
another gear.
Always waitf or the gearchange process from
HIGH RANGE toLOW RANGE and fromLOW
RANGE toHIGH RANGE to complete. Do not
switch off the engine while changing geara nd do
not shift the automatic transmission to another gear.
Activating the off-road gear ratio ! Proceed with the shifting process only
when:
R the engine is running
R the vehicl eisrolling
R the automatic transmission is in selector
leve rposition i
R you are not driving faster than 40 km/h
You coul dotherwise damage the transfer
case.
X Make sure the ECO start/stop function is
switched off (Y page98).
X Press LOW RANGE button ;.
Once the shifting procedure has been com-
pleted, the LOW RANGE LOW RANGE transfer case position
is show ninthe multifunction display.
Indicator lamp :lights up.
X Shift the automatic transmission to position
D.
Deactivatin gthe off-road gear ratio
! Proceed with the shifting process only
when:
R the engine is running
R the vehicl eisrolling 124
Off-roa
ddriving systemsDriving and parking
Page 129 of 261
Engaging th
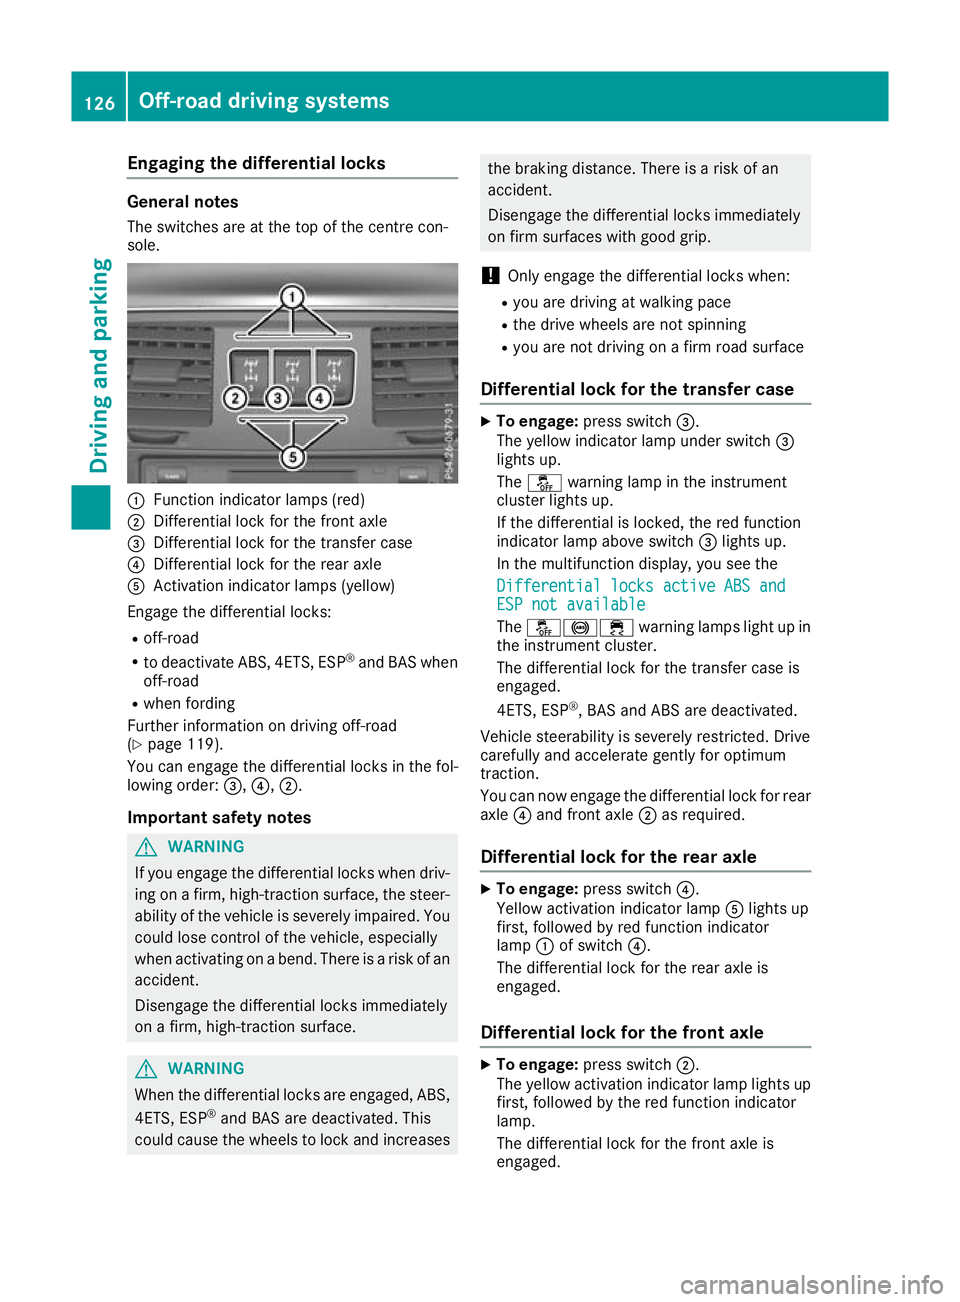
edifferential locks General notes
The switches are at the top of the centre con-
sole. :
Function indicato rlam ps (red)
; Differentia llock for the front axle
= Differentia llock for the transfe rcase
? Differentia llock for the rea raxle
A Activation indicator lamps (yellow)
Engag ethe differential locks:
R off-road
R to deactivate ABS, 4ETS, ESP ®
and BAS when
off-road
R whe nfording
Furthe rinformation on driving off-road
(Y page 119).
You can engage the differential locks in the fol-
lowing order: =,?,;.
Important safety notes G
WARNING
If you engag ethe differential locks when driv-
ing on afirm, high-traction surface, the steer-
ability of the vehicl eisseverely impaired .You
coul dlose control of the vehicle, especially
when activating on abend. There is arisk of an
accident.
Disengage the differential locks immediately
on afirm, high-traction surface. G
WARNING
When the differential locks are engaged, ABS, 4ETS, ESP ®
and BAS are deactivated. This
coul dcauset he wheels to lock and increases the braking distance. There is
ariskofan
accident.
Disengag ethe differential locks immediately
on fir msurfaces with good grip.
! Onl
yengag ethe differential locks when:
R youa redrivin gatw alking pace
R the drive wheels ar enot spinning
R youa renot drivin gonafirmr oads urface
Differential lock fo rthe transfe rcase X
To engage: press switch =.
The yellow indicator lamp under switch =
lights up.
The å warning lamp in the instrument
cluster lights up.
If the differential is locked ,the red function
indicator lamp above switch =lights up.
In the multifunctio ndisplay ,you see the
Differential locks active ABS and Differential locks active ABS and
ESP not available ESP not available
The å!÷ warninglamps light up in
the instrument cluster.
The differential lock for the transfer case is
engaged.
4ETS, ESP ®
,B AS and ABS are deactivated.
Vehicle steerability is severely restricted. Drive
carefully and accelerate gently for optimum
traction.
You can now engage the differential lock for rear axle ?and front axle ;as required.
Differential lockf or the rear axle X
To engage: press switch ?.
Yellow act ivation indicator lamp Alights up
first, followe dbyred functio nindicator
lamp :of switch ?.
The differential lock for the rea raxleis
engaged.
Differential lock for the fron taxle X
To engage: press switch ;.
The yellow activation indicator lamp lights up
first, followe dbythe red functio nindicator
lamp.
The differential lock for the front axl eis
engaged. 126
Off-road driving systemsDriving an
dparking