2016 MERCEDES-BENZ G-CLASS SUV warning light
[x] Cancel search: warning lightPage 195 of 261
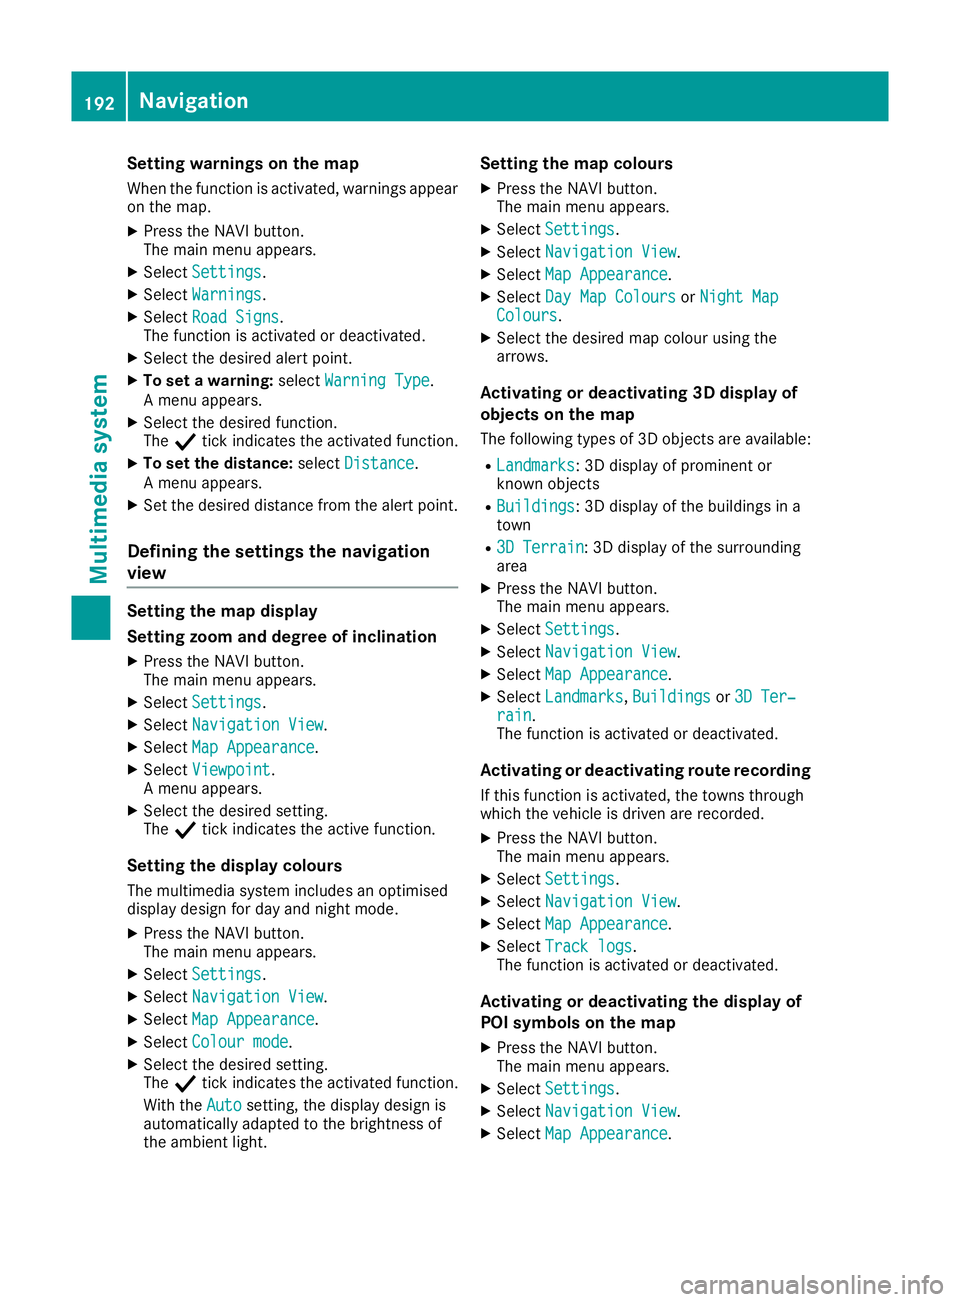
Setting warnings on the map
When the function is activated, warnings appear on the map.
X Press the NAVI button.
The main menu appears.
X Select Settings
Settings.
X Select Warnings
Warnings.
X Select Road Signs
Road Signs.
The function is activated or deactivated.
X Select the desired alert point.
X To set awarning: selectWarning Type Warning Type.
Am enu appears.
X Select the desired function.
The Ytick indicates the activated function.
X To set the distance: selectDistance
Distance.
Am enu appears.
X Set the desired distance from the alert point.
Defining the settings the navigation
view Setting the map display
Setting zoom and degree of inclination X Press the NAVI button.
The main menu appears.
X Select Settings
Settings.
X Select Navigation View
Navigation View.
X Select Map Appearance
Map Appearance.
X Select Viewpoint
Viewpoint.
Am enu appears.
X Select the desired setting.
The Ytick indicates the active function.
Setting the display colours
The multimedia system includes an optimised
display design for day and night mode.
X Press the NAVI button.
The main menu appears.
X Select Settings
Settings.
X Select Navigation View
Navigation View.
X Select Map Appearance
Map Appearance.
X Select Colour mode Colour mode.
X Select the desired setting.
The Ytick indicates the activated function.
With the Auto Autosetting, the display design is
automatically adapted to the brightness of
the ambient light. Setting the map colours
X Press the NAVI button.
The main menu appears.
X Select Settings Settings.
X Select Navigation View
Navigation View.
X Select Map Appearance
Map Appearance.
X Select Day Map Colours
Day Map Colours orNight Map
Night Map
Colours
Colours.
X Select the desired map colour using the
arrows.
Activating or deactivating 3D display of
objects on the map
The following types of 3D objects are available:
R Landmarks Landmarks:3Dd isplayofprominent or
known objects
R Buildings
Buildings:3Dd isplayofthe buildings in a
town
R 3D Terrain
3D Terrain:3Dd isplayofthe surrounding
area
X Press the NAVI button.
The main menu appears.
X Select Settings Settings.
X Select Navigation View Navigation View.
X Select Map Appearance Map Appearance.
X Select Landmarks
Landmarks, Buildings
Buildingsor3D Ter‐
3D Ter‐
rain
rain.
The function is activated or deactivated.
Activating or deactivating route recording
If this function is activated, the towns through
which the vehicle is driven are recorded.
X Press the NAVI button.
The main menu appears.
X Select Settings Settings.
X Select Navigation View
Navigation View.
X Select Map Appearance
Map Appearance.
X Select Track logs
Track logs.
The function is activated or deactivated.
Activating or deactivating the display of
POI symbols on the map
X Press the NAVI button.
The main menu appears.
X Select Settings Settings.
X Select Navigation View Navigation View.
X Select Map Appearance
Map Appearance. 192
NavigationMultimedia system
Page 205 of 261
Rear benc
hseat Folding th
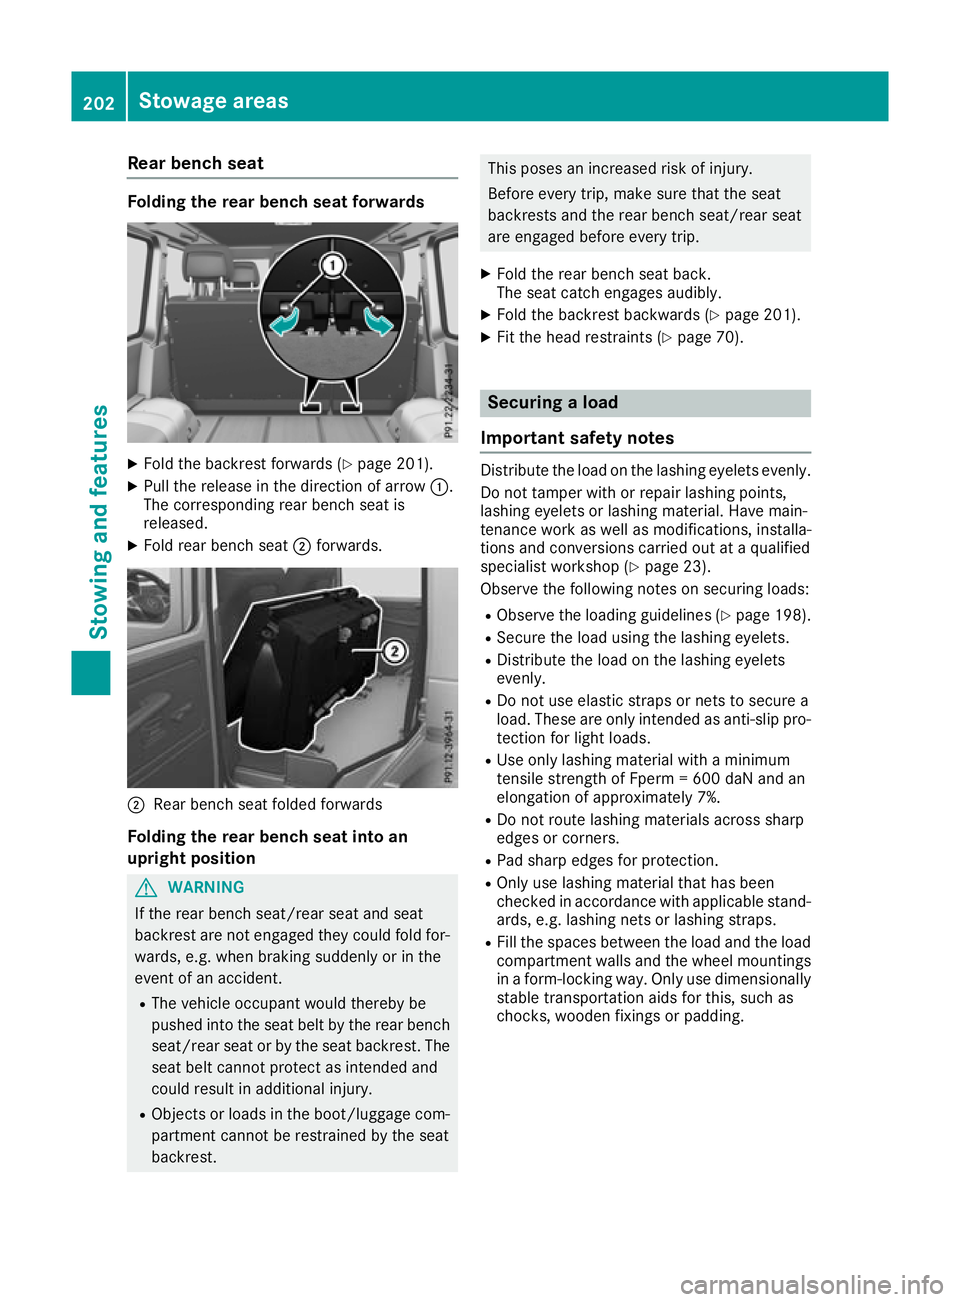
erearb ench seat forwards X
Fold th ebackrest forward s(Ypage 201).
X Pull the release in the directio nofarrow:.
The corresponding rea rbench sea tis
released.
X Fold rea rbench seat ;forwards. ;
Rear bench seat foldedf orwards
Folding th erearb ench sea tint oan
upright position G
WARNING
If th erear bench seat/rea rseat and seat
backrest are not engaged they coul dfold for-
wards, e.g. when braking suddenly or in the
event of an accident.
R The vehicl eoccupant would thereby be
pushed into the seat beltb ythe rear bench
seat/rea rseat or by the seat backrest. The
seat beltc annot protect as intended and
coul dresult in additiona linjury.
R Objects or loads in the boot/luggag ecom-
partment cannot be restrained by the seat
backrest. This poses an increased risk of injury.
Befor
eevery trip, make sure that the seat
backrest sand the rear bench seat/rear seat
are engaged before every trip.
X Fold the rear bench seat back.
The seat catche ngages audibly.
X Fold the backrest backwards (Y page 201).
X Fit the head restraints (Y page 70). Securing
aload
Important safety notes Distribute the load on the lashing eyelets evenly.
Do not tamper with or repair lashing points,
lashing eyelets or lashing mater ial.Hav emain-
tenance work as well as modifications, installa-
tions and conversions carrie doutataq uali fied
specialis tworkshop (Y page 23).
Observe the following note sonsecuring loads:
R Observe the loading guideline s(Ypage 198).
R Secure the load using the lashing eyelets.
R Distribute the load on the lashing eyelets
evenly.
R Do not us eelast ic straps or nets to secur ea
load .These ar eonlyi ntende dasanti-slip pro-
tection for light loads.
R Use onl ylas hing material with aminimum
tensil estrength of Fperm =600 da Nand an
elongation of approximately 7%.
R Do not route lashing material sacross sharp
edge sorc orners.
R Pa ds harp edge sfor protection.
R Onl yuselashing material tha thas been
checked in accordance with applicabl estand-
ards ,e.g.las hing nets or lashing straps.
R Fillthe space sbetween the load and the load
compartment wall sand the whee lmountings
in af orm-locking way. Onl yusedimensionally
stabl etransportatio naidsf or this, such as
chocks, wooden fixings or padding. 202
Stowag
eareasStowing and features
Page 210 of 261
could sli
porbef lung around and thereby
strike vehicle occupants. In addition, cup
holders, ope nstowag espaces and mobile
phone brackets may not always be able to
hol dthe objects place dinthem in the event of
an accident. There is ariskofi njury, particu-
larly in the event of sharp braking or sudden
changes of direction.
R Alway sstow objects in such awaythat they
cannot be tosse dabout in these or similar
situations.
R Alway smake sure that objects do not proj-
ect from stowag espaces, luggage nets or
stowag enets.
R Ensure that closable stowag espaces are
shu tbefore beginning your journey.
R Alway sstow and secure heavy, hard, poin-
ted, sharp-edged, fragil eoroutsize objects
in the loa dcompartment. G
WARNING
The cup holder cannot secure adrinks con-
tainer in place during ajourney .Ifyou use a
cup holder during ajourney ,the drinks con-
tainer coul dbeflung around and liquid could
be spilt. Vehicle occupants coul dcome into
contact with the liquid and, in particular, be
scalded by hot liquid.Y ou couldbedistracted
from the traffic situation and lose control of
the vehicle. There is arisk of an accident and
injury.
Only use the cup holder when the vehicl eis
stationary. Only place containers of asuitable
size in the cup holder. Seal the container, in
particular when it contains hot liquid.
! Only use the cup holders for containers of
the right size and which have lids. The drinks
coul dotherwise spill.
Observe the loading guidelines (Y page198). Cu
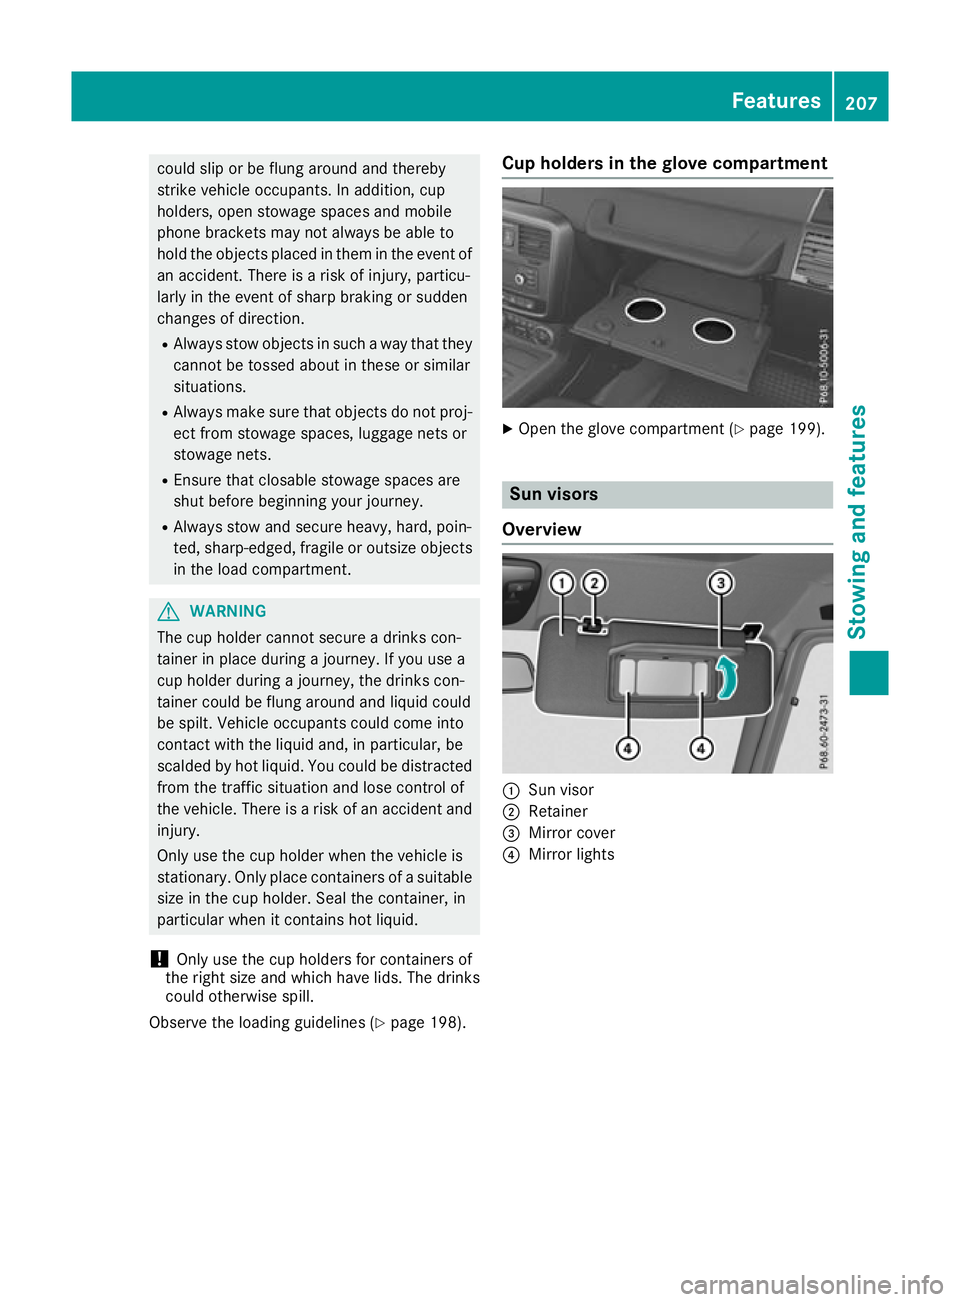
ph olders in th eglove compartment X
Ope nthe glove compartment (Y page 199). Sun visors
Overview :
Sun visor
; Retainer
= Mirror cover
? Mirror lights Features
207Stowing and features Z
Page 211 of 261
Vanity mirro
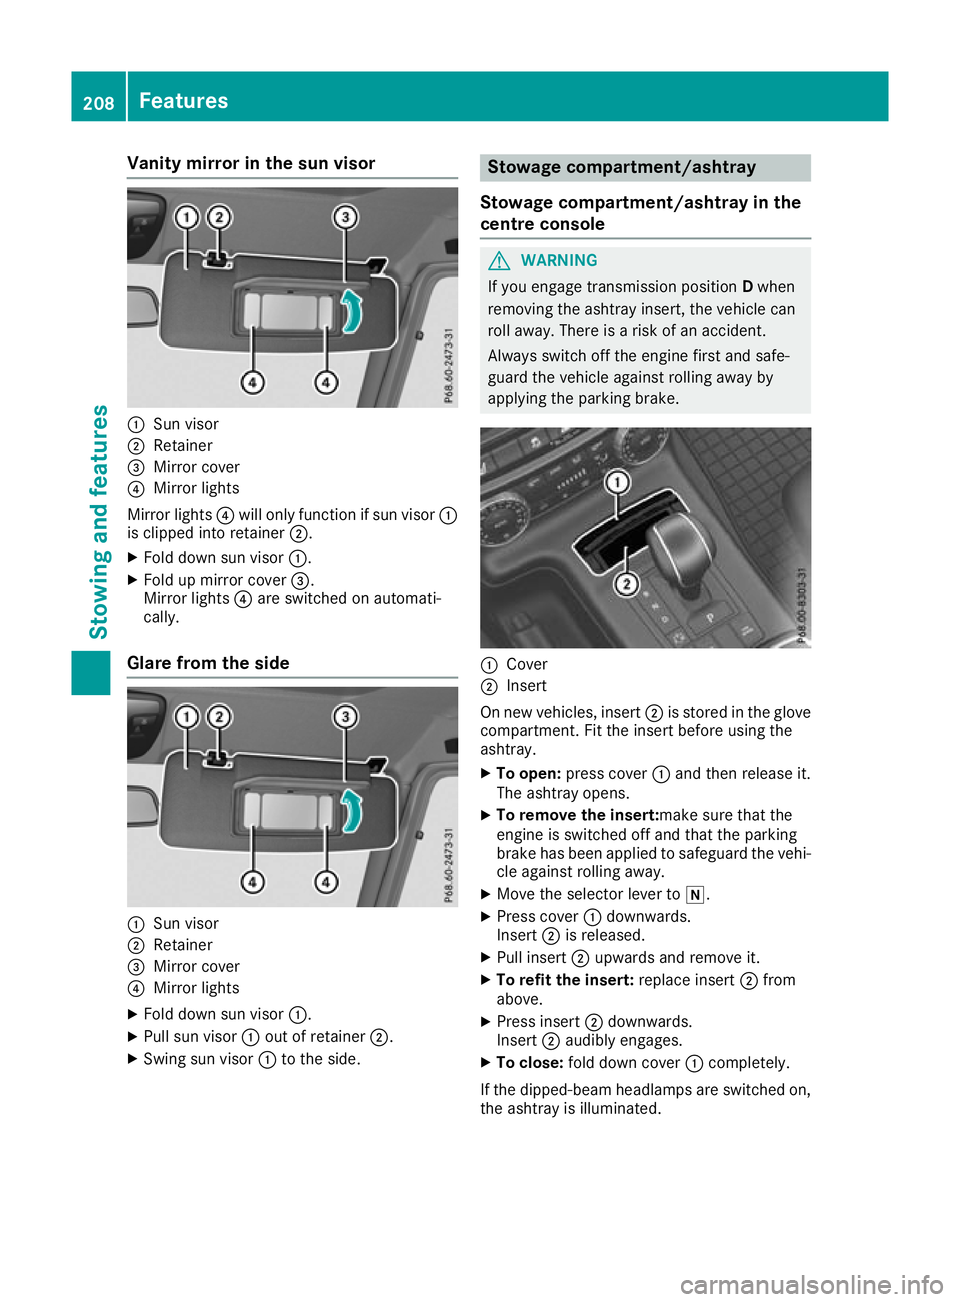
rint he sun visor :
Sun visor
; Retainer
= Mirror cover
? Mirror lights
Mirror lights ?will only function if su nvisor :
is clippe dinto retainer ;.
X Fol dd owns un visor :.
X Fol dupm irror cover =.
Mirror lights ?are switched on automati-
cally.
Glare from the side :
Sun visor
; Retainer
= Mirror cover
? Mirror lights
X Fol dd owns un visor :.
X Pull su nvisor :outofr etainer ;.
X Swing su nvisor :to the side. Stowag
ecompartment/ashtray
Stowage compartment/ashtray in the
centre console G
WARNING
If you engage transmission position Dwhen
removing the ashtray insert, the vehicle can
roll away. There is arisk of an accident.
Always switch off the engine first and safe-
guard the vehicl eagainst rolling awayby
applying the parking brake. :
Cover
; Insert
On new vehicles, insert ;is stored in the glove
compartment. Fi tthe insert before usin gthe
ashtray.
X To open: press cover :and then release it.
The ashtray opens.
X To remove th einsert:ma ke sure that the
engin eisswitched off and that th eparking
brak ehas been applied to safeguard th evehi-
cle against rolling away.
X Mov ethe selector leve rtoi.
X Press cover :downwards.
Insert ;is released.
X Pull insert ;upward sand remove it.
X To refit th einsert: replace insert ;from
above.
X Press insert ;downwards.
Insert ;audibly engages.
X To close: fold down cover :completely.
If th edipped-beam headlamps are switched on,
th ea shtray is illuminated. 208
Featu
resStowing and features
Page 212 of 261
Cigarett
elighter G
WARNING
Yo uc an burn yourself if you touch the hot
heating element or the socket of the cigarette lighter.
In addition, flammable materials can ignite if:
R the hot cigarette lighter falls
R ac hild hold sthe hot cigarette lighter to
objects, for example
There is arisk of fire and injury.
Always hold the cigarette lighter by the knob.
Always make sure that the cigarette lighter is
out of reach of children. Never leave children unattended in the vehicle. X
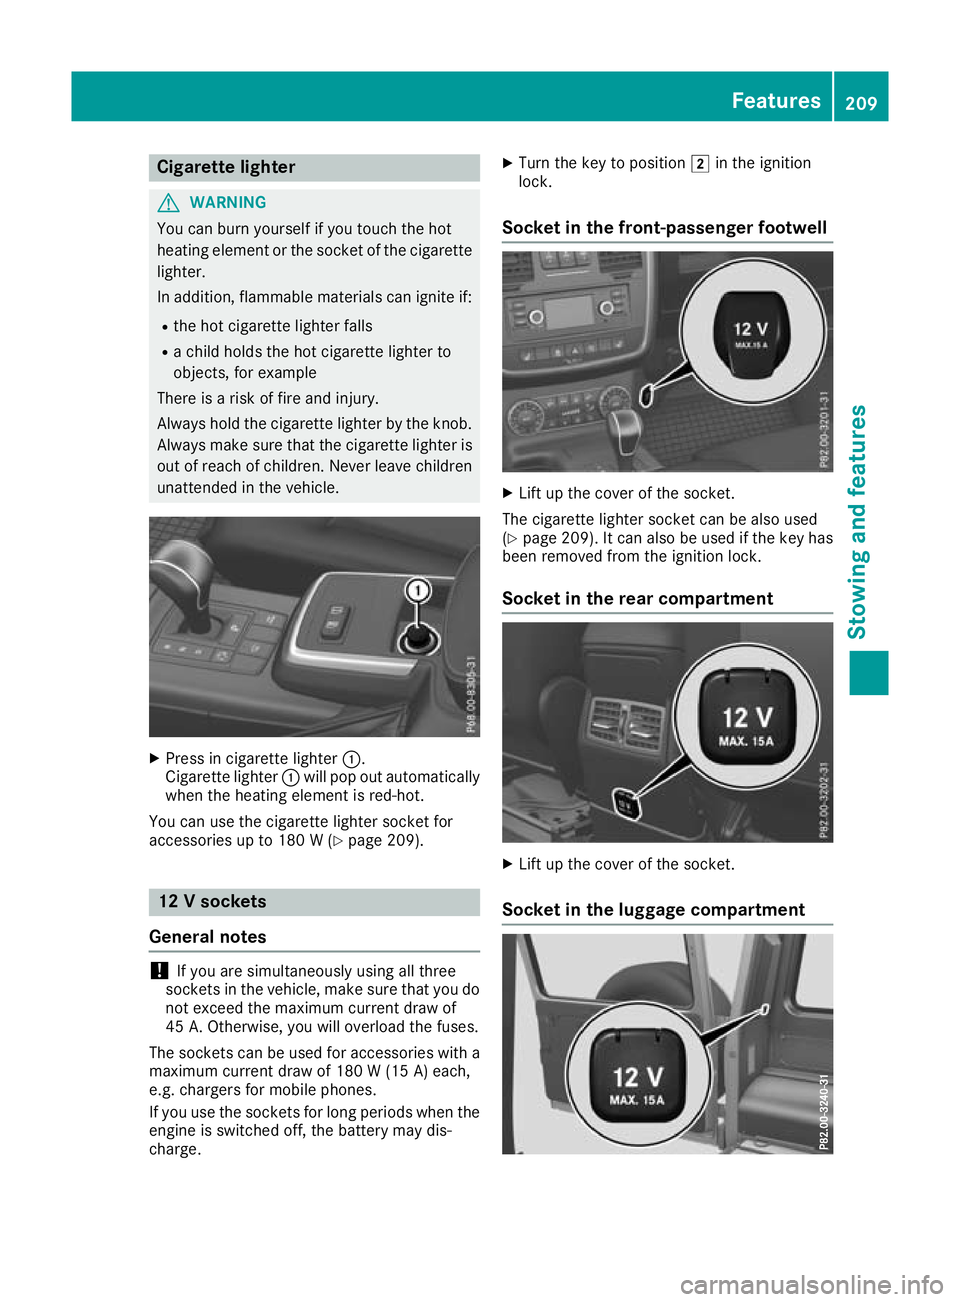
Pres sinc igarett elighter :.
Cigarette lighter :will pop out automatically
when the heating element is red-hot.
You can use the cigarett elighter socket for
accessories up to 180 W(Ypage 209). 12
Vsockets
General notes !
If you are simultaneously using all three
socketsint he vehicle, make sure that you do
not exceed the maximum current draw of
45 A. Otherwise, you will overload the fuses.
The sockets can be used for accessories with a maximum current draw of 180 W(15 A) each,
e.g. chargers fo rmobile phones.
If you use the sockets for long periods whe nthe
engine is switched off, the battery may dis-
charge. X
Turn the key to position 2in the ignition
lock.
Socket in the front-passenger footwell X
Lift up the cover of the socket.
The cigarette lighter socket can be also used
(Y page 209). It can also be used if the key has
been removed from the ignition lock.
Socket in the rear compartment X
Lift up the cover of the socket.
Socket in the luggag ecompartment Features
209Stowing and features Z
Page 215 of 261
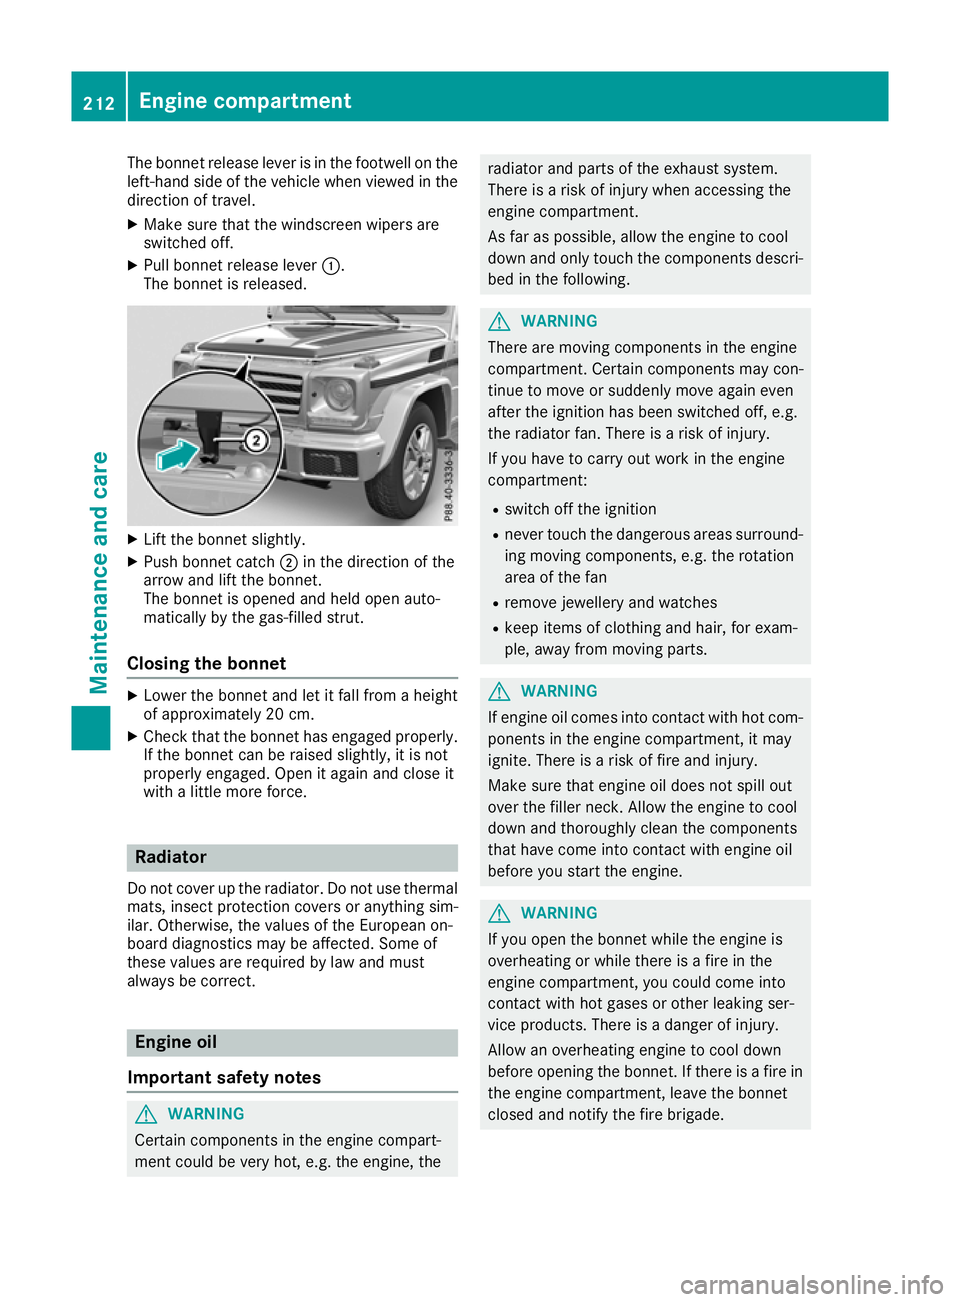
The bonnet release lever is in the footwell on the
left-hand side of the vehicle when viewed in the
direction of travel.
X Make sure that the windscreen wipers are
switched off.
X Pull bonnet release lever :.
The bonnet is released. X
Lift the bonnet slightly.
X Push bonnet catch ;in the direction of the
arrow and lift the bonnet.
The bonnet is opened and held open auto-
matically by the gas-filled strut.
Closing the bonnet X
Lower the bonnet and let it fall from aheight
of approximately 20 cm.
X Check that the bonnet has engaged properly.
If the bonnet can be raiseds lightly, it is not
properl yengaged .Open it again and close it
with alittle more force. Radiator
Do not cover up the radiator. Do not use thermal mats, insect protection covers or anything sim-
ilar. Otherwise, the valuesoft he Europeanon-
board diagnostics may be affected .Some of
thes evalue sare required by la wand must
always be correct. Engine oil
Importan tsafety notes G
WARNING
Certain components in th eengine compart-
ment coul dbevery hot, e.g. the engine, the radiator and parts of the exhaust system.
There is
arisk of injury when accessing the
engine compartment.
As far as possible, allow the engine to cool
down and only touch the components descri- bed in the following. G
WARNING
There are moving components in the engine
compartment. Certain components may con-
tinue to move or suddenly move again even
after the ignitio nhas been switched off, e.g.
the radiator fan. There is arisk of injury.
If you have to carry out work in the engine
compartment:
R switch off the ignition
R never touch the dangerous area ssurround-
ing moving components, e.g. the rotation
area of the fan
R remove jewellery and watches
R keep items of clothing and hair, for exam-
ple,a wayfrom moving parts. G
WARNING
If engine oil comes into contact with hot com- ponents in the engine compartment, it may
ignite. There is arisk of fire and injury.
Make sure that engine oil does not spil lout
over the filler neck. Allow the engine to cool
downa nd thoroughly clea nthe components
that have come into contact with engine oil
before you start the engine. G
WARNING
If you open the bonnet while the engine is
overheating or while there is afire in the
engine compartment, you coul dcome into
contact with hot gase sorother leaking ser-
vice products. There is adange rofinjury.
Allow an overheating engine to cool down
before opening the bonnet. If there is afire in
the engine compartment, leave the bonnet
closed and notify the fire brigade. 212
Engine compartmentMaintenanc
eand care
Page 220 of 261
Do not touch the surfaces or protective films
with hard objects ,e.g.ar ingori ce scraper.
Yo uc ould otherwis escratch or damage the
surfaces and protective film.
! Do not park up your vehicl
efor alon gp eriod
of time immediatel yafter cleaning, particu-
larly after cleaning the whee lrim with wheel
cleaner. Whee lcleane rmaylead to increased
corrosion of the brake discs and pads .You
shoul dtherefore drive for afew minute safter
cleaning. By heating up the brakes ,the brake
discs and pads dry .The vehicl ecan the nbe
parked up for alon gp eriodoft ime. H
Environmental note
Dispose of empty packaging an dcleaning
cloths in an environmentally responsible man- ner.
Regular car eofyour vehicle is acondition for
retainin gqualit yint helongterm.
Use car eproduct sand cleaning agents recom-
mended and approved by Mercedes-Benz. Washin
gthe vehiclea nd cleaning the
paintwork
Automatic car wash G
WARNING
Braking efficiency is reduced after the vehicle has been washed. There is arisk of an acci-
dent.
After washing the vehicle, brake carefully
while paying attention to the traffic conditions in order to restore full braking efficiency.
! When the HOLD function is activated, the
vehicl ebrakes automatically in certain situa-
tions.
To avoi ddamage to the vehicle, deactivate
the HOLD function in the following or similar
situations:
R when towing away
R in ac ar wash
! Make sure that the automatic car washis
suitable for the size of the vehicle. Fold in the exterior mirrors before the vehicl eiswashed.
The exterior mirrors coul dotherwise be dam-
aged. !
Make sure that the automatic transmission
is in position Nwhen washing your vehicle in
at ow-through car wash. The vehicle could be
damagedift he transmission is in another
position.
! Make sure:
R the side windows and sliding sunroof are
closed completely.
R the blower is switched off
R the windscreen wiper switch is at position
0
The vehicle could otherwise be damaged.
You can wash the vehicle in an automatic car
wash from the very start.
If the vehicle is very dirty, wash off excess dirt
before cleaning the vehicle in an automatic car
wash.
After using an automatic car wash, wipe off the
wax from the windscreen and the windscreen
wiper blades. This will prevent smears and
reduce wiping noises caused by residue on the
windscreen.
Washing by hand In some countries, washing by hand is only
allowed at specially equipped washing bays.
Observe the legal requirements for each indi-
vidual country.
When using the vehicle in winter, remove all
traces of road salt deposits carefully and as
soon as possible.
When washing the underside of the vehicle, also
clean the insides of the wheels.
X Do not use hot water and do not wash the
vehicle in direct sunlight.
X Use asoft sponge to clean.
X Use amild cleaning agent, such as acar
shampo oapproved by Mercedes-Benz.
X Thoroughly hose down the vehicle with agen-
tle jet of water.
X Do not point the water jet directly towards the
air inlet.
X Use plenty of water and rinse out the sponge
frequently.
X Rinse the vehicle with clean water and dry
thoroughl ywithachamois.
X Do not let the cleaning agent dry on the paint-
work. Ca
re
217Maintenance an dcare Z
Page 221 of 261
High-pressure cleaner
G
WARNING
The wate rjet of circular-jet nozzles (dirt grind-
ers) can caus edamage not visible from the
outside to tyres or chassi scomponents. Com-
ponents damaged in this way can unexpect-
edlyf ail.There is arisk of an accident.
Do not use high-pressure cleaners with circu-
lar-jet nozzles to clea nthe vehicle. Have dam-
agedt yres or chassi scomponents replaced
immediately.
! Always maintai
nadistance of at least 30 cm
between the vehicl eand the high-pressure
cleaner nozzle. Information about the correct
distance is available from the equipment
manufacturer.
Move the high-pressure cleaner nozzle
around when cleaning yourv ehicle.
Do not aim directly at any of the following:
R tyres
R door gaps, roof gaps, joints etc.
R electrica lcomponents
R battery
R plugc onnectors
R lamps
R seals
R trim elements
R ventilation slots
Damag etosealsore lectrica lcomponents
can leadtol eaks or failures.
! Vehicles with decorative film: parts of your
vehicl eare covered with adecorative film.
Maintain adistance of at least 70 cm between
the parts of the vehicl ecovered with the film
and the nozzle of the high pressure cleaner.
Information about the correct distance is
available from the equipment manufacturer.
Move the high-pressure cleaner nozzle
around whilst cleaning.
Cleaning the paintwork !
Do not affix:
R stickers
R films
R magneti cplates or similari tems to painted surfaces. You could oth
erwise
damage the paintwork.
Scratches, corrosive deposits, area saffecte dby
corrosion and damage cause dbyinadequate
car ecannot always be completel yrepaired .In
such cases ,visit aquali fied specialis tworkshop.
X Remov eimpuri ties immediately, where pos-
sible, whilst avoiding rubbing too hard.
X Soa kinsect remains with insect remove rand
rinse off the treated area safterwards.
X Soa kbirdd ropping swithw ater and rinse off
the treated area safterwards.
X Remov ecoolant, brake fluid ,tree resins ,oils,
fuel sand greases by rubbing gently with a
cloth soaked in petroleu mether or lighter
fluid.
X Use tar remove rtoremove tar stains.
X Use silicone remove rtoremove wax. Cleanin
gvehicle parts
Cleaning th ewheels G
WARNING
Th ew ater jet of circular-jet nozzles (dirt grind-
ers) can caus edamage not visible from the
outside to tyres or chassi scomponents. Com-
ponents damaged in this way can unexpect-
edlyf ail.There is arisk of an accident.
Do not use high-pressure cleaners with circu-
lar-jet nozzles to clea nthe vehicle. Have dam-
agedt yres or chassi scomponents replaced
immediately.
! Do not use acidic whee
lcleaning products
to remove brake dust. This coul ddamage
whee lbolts and brake components.
! Do not park up yourv
ehiclefor along period
of time immediatel yafter cleaning, particu-
larl yafter cleaning the whee lrim with wheel
cleaner. Whee lcleaner may leadtoi ncreased
corrosio nofthe brake discs and pads. You
should therefore drive for afew minutes after
cleaning. By heating up the brakes ,the brake
discs and padsd ry. The vehiclecan then be
parked up for along period of time. 218
CareMaintenanc
eand care