2016 MERCEDES-BENZ G-CLASS SUV ECO mode
[x] Cancel search: ECO modePage 87 of 261
Overview of the climat
econtrol sys-
tem General notes
Observe the settings recommended on the fol-
lowing pages. Otherwise, the windows could
mist up.
To prevent the windows from misting up:
R switch off climate control only briefly
R activate air-recirculation mode only briefly
R activate the "Cooling with dehumidification"
function
R activate the "Windscreen demisting" function
briefly, if required
Climate control regu lates the temperature and
the humidity in the vehicle interior and filters
undesirables ubstances out of the air. The "Cooling with air dehumidification" function
is available only when the engin eisrunning.
Optimum operation is only achieved when the
side windows and the sliding sunroof are closed.
Climate comfor tmay be adversely affected if the
sliding sunroof is open for along period of time.
Set the temperature manually if the sliding sun-
roof is open.
The "Residual heat" function can be switched on or off only when the ignition is switched off
(Y page 89).
The integrated filter can filter out most particles of dust and completely filters out pollen. Aclog-
ged filter reduces the amount of air supplied to
the vehicle interior. Dependin gonthe operating
conditions and environmental influences, the
interval for replacing the filter may be shorter
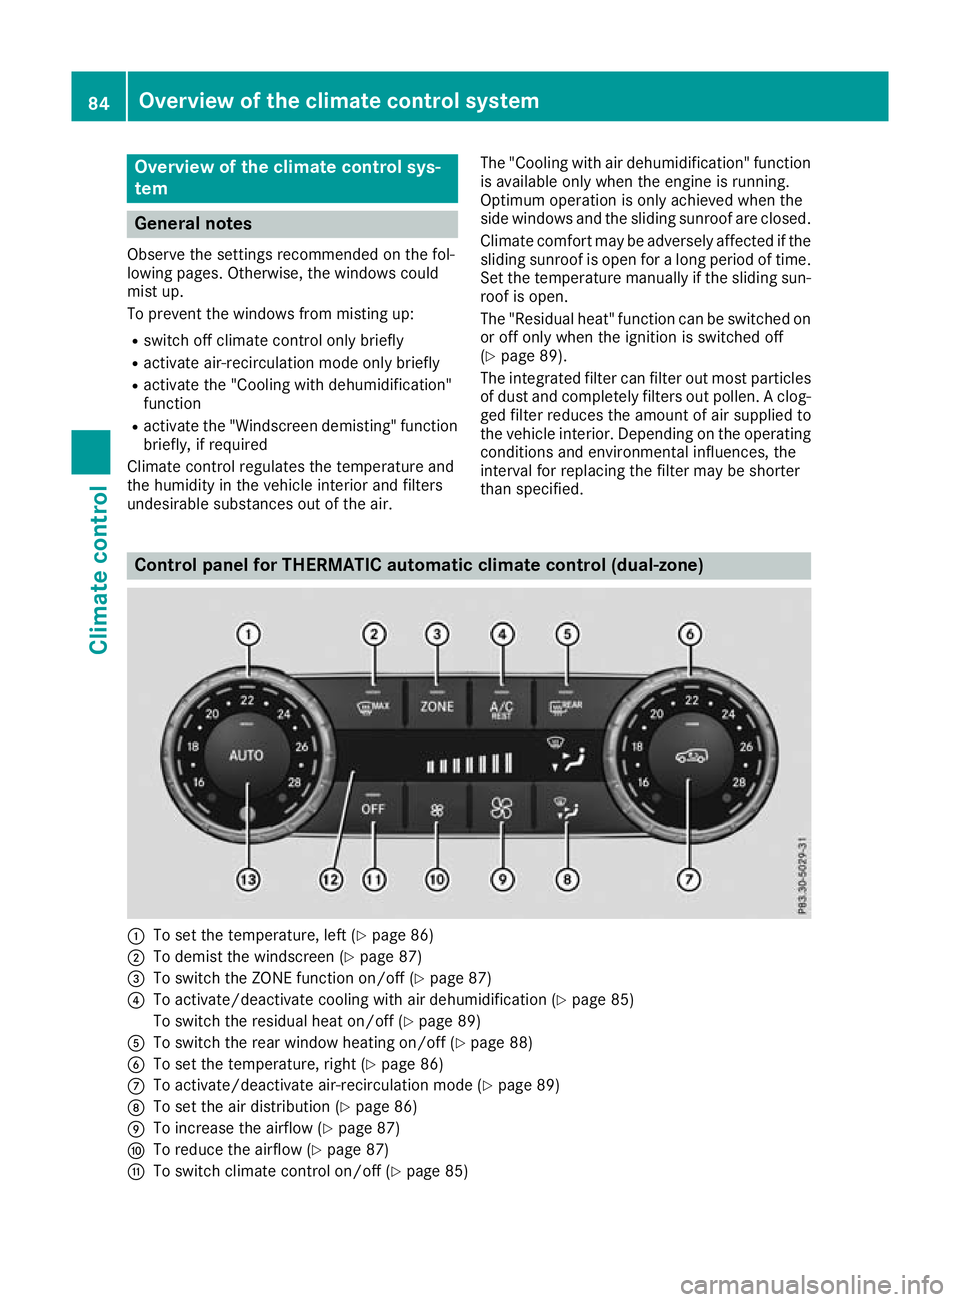
than specified. Control panel for THERMATIC automatic climate control (dual-zone)
:
To set the temperature, left (Y page 86)
; To demist the windscreen (Y page 87)
= To switch the ZONE function on/of f(Y page 87)
? To activate/deactivate cooling with air dehumidification (Y page 85)
To switch the residual heat on/of f(Ypage 89)
A To switch the rear window heating on/of f(Y page 88)
B To set the temperature, right (Y page 86)
C To activate/deactivate air-recirculation mode (Y page 89)
D To set the air distribution (Y page 86)
E To increase the airflow (Y page 87)
F To reduce the airflow (Y page 87)
G To switch climate control on/of f(Y page 85) 84
Overview of the climate control systemClimate
control
Page 88 of 261
H
Display
I To set climate contro ltoautomatic mod e(Ypage 86) Information on using THERMATIC
automatic climate control
Optimum us eofautomatic climat econ-
trol The followin
gcontains notes and recommenda-
tions on how best to use THERMATIC automatic
climate control.
R Activate climate control using the Ãand
Á buttons. The indicator lamps in the
à andÁ button slight up.
R Set the temperature to 22 †.
R Use the "Windscreen demisting" function only
briefly until the windscreen is clear again.
R Use the "Air-recirculation mode" function only
briefly, e.g. if there are unpleasant outside
odours or when in atunnel. The windows
could otherwise mist up as no fresh air is
drawn into the vehicle in air-recirculation
mode.
R Use the ZONE function to adopt the temper-
ature settings on the driver's side for the
front-passenger side as well. The indicator
lamp in the ábutton goes out.
ECO start/stop function During automatic engine switch-off, th
eclimate
contro lope rates onl yatareducedcapacity. If yo
ur equire th efull climat econtro loutput ,you
can switch off th eECO start/sto pfunction by
pressing th eECO butto n(Ypage 98). Oper
ating the climat econtrol system Switching the climate control on/off
General notes When climate control is switched off, the air
supply and air circulation are also switched off.
The windows could mist up. Therefore, switch
off climate control only briefly.
Switc honc limate control primarily using the
à button (Y page 86).
Activating/deactivating X
Turn the key to position 2(Ypage 96) in
the ignition lock.
X To switch on: press theÃbutton.
The indicator lamp in the Ãbutton lights
up. Airflow and air distribution are set to auto-
matic mode.
X To switch off: press the^button.
The indicator lamp in the ^button lights
up. Activating/deactivating cooling with air dehumidification
General notes If you deactivate the "Cooling with dehumidification
"function, the air inside the vehicle willn ot be
cooled during warm weather. The air inside the vehicle willa lso not be dehumidified. The windows
can mist up more quickly. Therefore, only deactivate the "Cooling with air dehumidification" function briefly.
The "Cooling with dehumidification" function is available only when the engine is running.
The air inside the vehicle is cooled and dehumidified according to the temperature selected.
Condensation may drip from the underside of the vehicle when cooling mode is active. This is normal
and not asign that there is amalfunction. Operating the climate control system
85Climate control
Page 89 of 261
Activating/deactivating
X
To activate: press theÁbutton.
Th eindicator lamp in the Ábutton lights up.
X To deactivate: press theÁbutton.
The indicator lamp in the Ábutton goe sout.T he cooling with ai rdehumidifica tion functionhas
ad elayed switch-off feature.
Problems with the "Cooling with dehumidification" function Problem
Possible causes/consequence
sand M
MSolutions The indicator lamp in the
¿ orÁ button
flashes three times or
remains off. The cooling
with air dehumidification
function cannot be acti-
vated. The cooling with dehumidification function has been deactivated due
to am alfunction.
X Consult aqualified specialist workshop. Setting climate control to automatic
mode
General notes In automatic mode, the set temperature is main-
tained at aconstant level.T he system automat-
icallyr egulates the temperature of the dis-
pensed air, the airflow and the air distribution.
Automatic mode works best when cooling with
air dehumidification is also activated. If desired,
cooling with air dehumidification can be deacti- vated.
Automatic control X
Turn the key to position 2(Ypage 96) in
the ignition lock.
X Set the desire dtemperature.
X To activate: press theÃbutton.
The indicator lamp in the Ãbutton lights
up. Automatic air distribution and airflow are
activated.
X To deactivate: press the_button.
or X Press the IorK button.
The indicator lamp in the Ãbutton goes
out.
X To switch to manual mode:press the _
button. Setting the temperature
Differen ttemperatures can be set for the driv-
er's and front-passenger sides.
X Turn the key to position 2(Ypage 96) in
the ignition lock.
X Adjust control :orB (Ypage 84) to the
desired temperature.
Change the temperature settingo nly in small
increments. Start at 22 †. Setting the air distribution
Air distribution settings P
Directs the airflow throug hthe centre
and side ai rvents
O Directs the airflow throug hthe footwell
ai rv ents
S Directs the airflow throug hthe centre
and side ai rvents as well as the footwell
ai rv ents
¯ Directs the airflow throug hthe demister
vents
a Directs the airflow throug hthe footwell
and demister vents 86
Operatin
gthe climat econtrol systemClimat econt rol
Page 90 of 261
Settings
X
Turn the key to position 2(Ypage 96) in
the ignition lock.
X Press the _button repeatedly until the
desired symbol appears in the display. Setting the airflow
X Turn the key to position 2(Ypage 96) in
the ignition lock.
X To increase: press theKbutton.
X To reduce: press theIbutton.
i The airflow from the rear-compartment
ventsa nd the centre ventsist he same.Switching the ZONE function on/off
X To switch on: press theábutton.
The indicator lamp in the ábutton lights
up.
The temperature settingf or the driver's side
is not adopted for the front-passenger side
and the rear compartment. The temperature
for the front-passenger side and the rear com-
partment is set separately.
X To switch off: press theábutton.
The indicator lamp in the ábutton goes
out.
The temperature settingf or the driver's side
is adopted for the front-passenger side and
the rear compartment. Demisti
ng thewindscreen
General notes You can use this function to defrost the wind-
screen or to demis
tthe inside of the windscreen
and the side windows.
Switch off the "Windscreen demisting" function as soon as the windscreen is clear again. Switching on/off X
Turn the key to position 2(Ypage 96) in
the ignitio nlock.
X To switch on: press the¬button.
The indicator lamp in the ¬button lights
up.
The climate control system switches to the
following functions:
R cooling with air dehumidification
R high airflow
R high temperature
R air distribution to the windscreen and front
side windows
R air-recirculation mode off
X To switch off: press the¬button.
The indicator lamp in the ¬button goes
out. The previous settings are reactivated.
The cooling with air dehumidification function remains on. Air-recirculation mode remains
deactivated.
or
X Press the Ãbutton.
The indicator lamp in the ¬button goes
out. Airflow and air distribution are set to
automatic mode.
or
X Turn control :orB clockwise or anti-clock-
wise (Y page 84).
or
X Press the KorI button. Demisting the windo
ws
Windows misted up on th einside X
Activate the Ácoolin gwitha irdehumidi-
ficatio nfunction.
X Activate the Ãautomatic mode.
X If the windows continue to mis tup,activate
the "Windscreen demisting "fun ction
(Y page 87).
i Yo
us houl donlys elect thi ssetting unti lthe
windscree nisc lear again. Operatin
gthe climat econtrol system
87Climatecont rol
Page 92 of 261
Activating/deactivating air-recircula-
tion mode
Genera lnotes If yo
uactivate air-recirculation mode, the win-
dows can mist up more quickly, particularly at
low temperatures. Use air-recirculation mode
only briefl ytoprevent the window sfrom misting
up.
Activating/deactivating X
Turn the key to position 2(Ypage 96) in
the ignition lock.
X To activa te:press the dbutton.
The indicator lamp in the dbutton lights
up.
i Air-recirculation mode is automatically acti-
vated at high levels of pollution or at high out-
side temperatures. When air-recirculation
mode is activated automatically, the indicator
lamp in the dbutton is not lit.
Outside air is added after about 30 minutes.
X To deactivate: press thedbutton.
The indicator lamp in the dbutton goes
out.
i Air-recirculation mode is deactivated auto-
matically:
R after approximately five minutes at outside
temperatures below approximately 5†
R after approximately five minutes if "Cooling
with air dehumidification" is deactivated
R after approximately 30 minutes at outside
temperatures above approximately 5†Switching the residual heat on/off
General notes It is possible to make use of the residual heat of
the engine to continue heating the stationary
vehicle for up to 30 minutes after the engine has
been switched off. The heating time depends on
the set interior temperature. Switching on/off X
Turn the key to position g(Ypage 96) in
the ignition lock or remove it.
X To switch on: press theÁbutton.
The indicator lamp in the Ábutton lights
up.
i The blower will run at
alow speed regardless
of the airflow setting.
i If you switch on the residual heat function at
high temperatures, only the ventilation will be
activated.
X To switch off: press theÁbutton.
The indicator lamp in the Ábutton goes
out.
Residua lheat is switched off automatically:
R after approximately 30 minutes
R when the ignition is switched on
R if the battery voltage drops
R if the coolant temperature is too low
R when the auxiliary heating is switched on Auxiliary heating
Important safety notes G
DAN
GER
If th eexhaust pipe is blocke dorsufficient
ventilation is no tpossible, toxic exhaust
fumes can ente rthe vehicle, especially car-
bon monoxide. This is th ecase, e.g. in
enclosed spaces, or if th evehicl eiss tuck in
snow. There is ariskoff atal injuries.
You should switch off th eauxiliary heating in
enclosed spaces whic hdonothav eane xtrac-
tion system, e.g. agarage. If th evehicl eis
stuck in snow and you mus tleav ethe auxiliary
heating running, keep th eexhaust pipe and
th ea rea around th evehicl eclear of snow. To
guarantee asufficien tsupply of fresh air, open
aw indow on th eside of th evehicl eaway from
th ew ind. G
WARNING
When th eauxiliary heating is switched on,
parts of the vehicl ecan become very hot. Operating the climate control system
89Climate control
Z
Page 93 of 261
Flammable materials such as leaves, grass or
twig smay ignite if they come into contact
with:
R hot parts of the exhaust system
R the exhaust ga sitself
There is arisk of fire.
Whe nthe auxiliary heating is switched on,
make sur ethat:
R no flammable materials come into contact
with hot vehicle components
R the exhaust ga scan escape from the
exhaust pip eunhindered
R the exhaust ga sdoesn ot come into contact
with flammable materials.
! Operating the auxiliary heating/ventilation
draws on the vehicle battery. After yo uhave
heated or ventilated the vehicle amaximum of
two times ,drive for alonger distance.
i Switch the auxiliary heating on regularly –
once amonth –for abou tten minutes.
The auxiliary heating heats the ai rinthe vehicle
interior to the set temperature. Thi soccur swith-
ou tu sing the hea tofthe running engine. The
auxiliary heating is operate ddirectly using the
vehicle' sfuel. For this reason, the fue ltank level
mus tbea bove the reserve rang etoensure that
the auxiliary heating functions.
The auxiliary heating or auxiliary ventilation
automaticall yadjusts to changes in tempera-
ture and weathe rconditions. For this reason,
the auxiliary heating could switch from ventila-
tion mode to heating mode or from heating
mode to ventilation mode.
The auxiliary heating switches off automatically afte r30m inutes. Thi stime period can be
altered .Todot his, consult aquali fied specialist
workshop.
You cannot use the auxiliary ventilation to cool
the vehicle interior to atemperature lower than
the outsid etemperature.
Before switchin gonX
Turn the key to position 2(Ypage 96) in
the ignition lock.
X Set the desired temperature.
Auxiliary heating or auxiliary ventilation can also
be switched on if the manually set climate con- trol is activated. Optimum comfort is attained by
settin gthe syste mtoautomatic mode. Set the
temperatur eto22†.
The auxiliary heating or auxiliary ventilatio ncan
be switched on/off using the button on the
centr econsol eorthe remote control.
The on-board compute rcan be used to specify
up to thre edepartur etimes ,one of which may
be preselected (Y page 139).
Switchin gthe auxiliary heating/venti-
lation on/off using the centre console
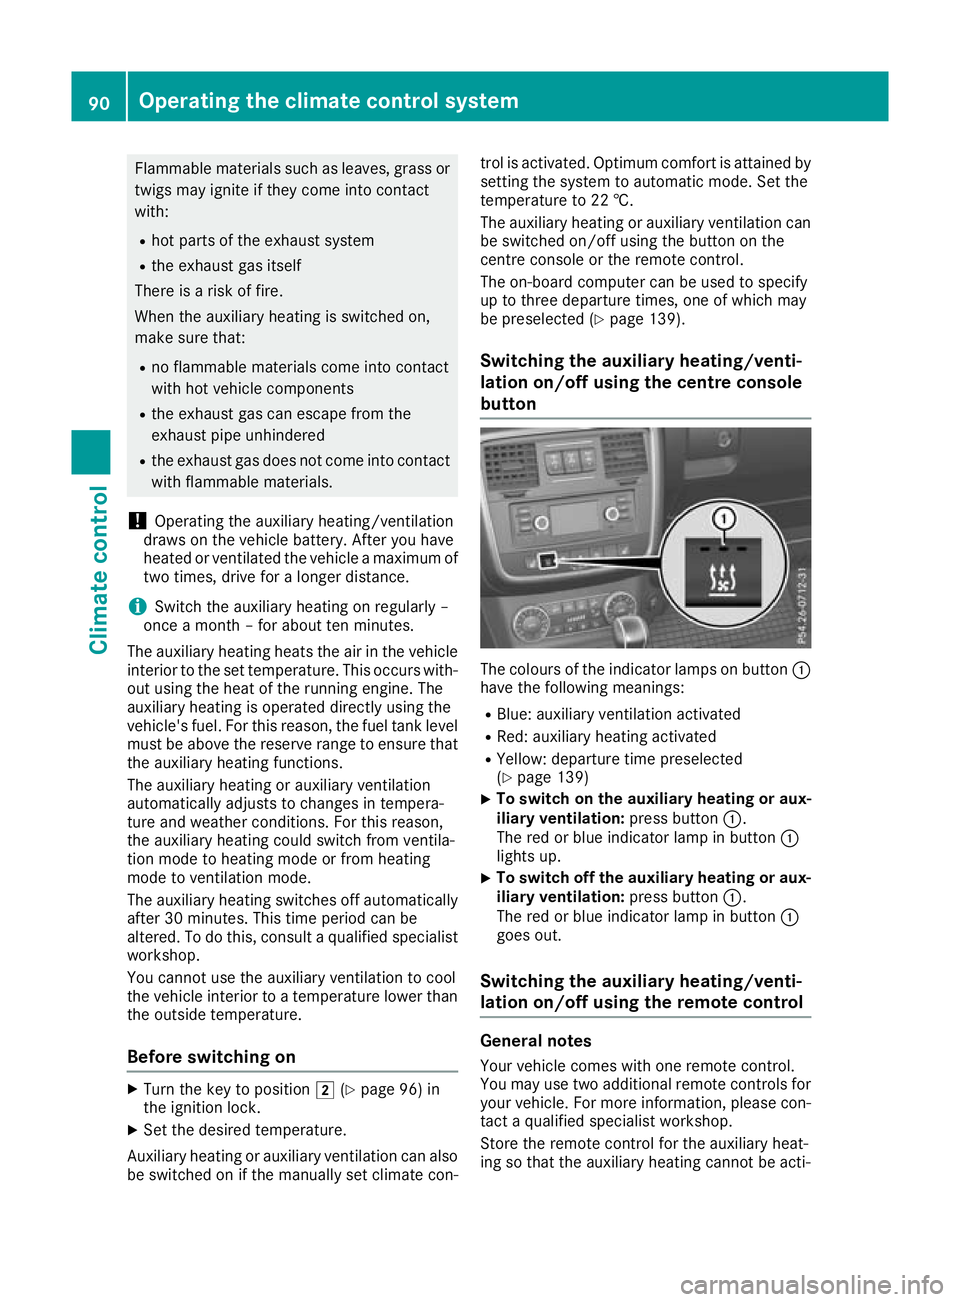
button Th
ec olours of the indicator lamps on button :
have the following meanings:
R Blue: auxiliary ventilation activated
R Red: auxiliary heating activated
R Yellow: departure time preselected
(Y page 139)
X To switch on the auxiliar
yheating or aux-
iliary ventilation: press button:.
The red or blue indicator lamp in button :
lights up.
X To switch off the auxiliar
yheating or aux-
iliary ventilation: press button:.
The red or blue indicator lamp in button :
goes out.
Switching the auxiliar yheating/venti-
lation on/off using the remotec ontrol General notes
Your vehicle comes with one remot econtrol.
You may use two additional remote controls for
yourv ehicle.For more information, please con-
tact aqualified specialist workshop.
Store the remote control for the auxiliary heat-
ing so that the auxiliary heating cannot be acti- 90
Operating the climate control systemClimate control
Page 111 of 261
Problems with the automatic transmission
Problem
Possible causes/consequences and
M
MSolutions The transmission has
problems shifting gear. The transmission is losing oil.
X Have the transmission checked at aqualified specialist workshop
immediately. The acceleration ability
is deteriorating.
The transmission no lon-
ger shifts gear. The transmission is in emergenc
ymode.
It is possible to shift to secondgear and reverse gear only.
X Stop.
X Shift the transmission to position P.
X Turn the key to position gin the ignition lock.
X Wait at least ten seconds before restarting the engine.
X Shift the transmission to position Dor R.
If D is selected, the transmission shifts to secondgear; ifRis
selected, the transmission shifts to reverse gear.
X Have the transmission checked at aqualified specialist workshop
immediately. Aw
arning tone sounds. Yo
uh ave:
R switched off the engine
R opene dthe driver's door
R not shifted the selector lever to position P
X Shif tthe selector lever to position P.Refuelling
Important safety notes
G
WARNING
Fue lish ighly flammable.Ify ou handlefuel
incorrectly ,there is arisk of fire and explo-
sion.
You must avoi dfire, naked flames, creating
sparks and smoking. Switch off the engine
and, if applicable,t he auxiliary heating before
refuelling. G
WARNING
Fuel sare poisonous and hazardous to health.
There is adange rofinjury.
Do not swallowf uel or let it come into contact
with skin, eyesorc lothing. Do not inhal efuel
vapours. Keep fuel sout of the reach of chil-
dren. If you or others come into contact with fuel,
observe the following:
R Wash the fuel off any affected area sofskin
with water and soap immediately.
R If you get fuel in youre yes,rinse them thor-
oughlyw ith clean water immediately.S eek
immediate medica lattention.
R If fuel is swallowed, seek immediate medi-
cal attention. Do not induce vomiting.
R Change any clothing that has come into
contact with fuel immediately. G
WARNING
Electrostatic charge can cause sparks and
thereby ignite fuel vapours. There is arisk of
fire and explosion.
Always touch the vehicl ebody before opening
the fuel filler flap or touching the fuel pump 108
RefuellingDrivinga
nd parking
Page 119 of 261
G
WARNING
If you select the LOW RANGE off-road gearon as lippery road surface, the wheels coul dlose
traction:
R if you release the accelerator peda lwhen
the vehicl eisinmotion
R if Off-road ABS intervenes when braking
If the wheels lose traction, it willnol onger be
possible to steer the vehicle. This increases
the risk of skidding and having an accident.
Never select the LOW RANGE off-road gear
when driving on slippery road surfaces.
Information on the parking brake (Y page114).
Downhill gradients Shift to
alower gearing oodt ime on long and
stee pdownhil lgradients.
Take particula rnote of this when driving alad en
vehicl eand when towing atrailer.
Thi sw illu se the braking effect of the engine, so
less braking will be required to maintai nthe
vehicl espeed. Thi srelieves the load on the
brake system and prevents the brakes from
overheating and wearing too quickly.
Heav yand light loads G
WARNING
The braking system can overheat if you leave you rfoot on the brake peda lwhile driving.
This increases the braking distance and could
even caus ethe braking system to fail .There is
ar isk of an accident.
Never use the brake peda lasafootrest. Do
not simultaneously depress both the brake
peda land the accelerator peda lwhile driving.
! Depressing the brake peda
lconstantly
results in excessive and premature wearto
the brake pads.
If heavy demands are made on the brakes ,do
not park the vehicl eimmediately. Drive on for a
short while. This allows the airflow to cool the
brakes more quickly.
If the brakes have been used only moderately,
you should occasionall ytest their effectiveness.
To do this, brake more firmly from ahigher speed while paying attention to the traffic con-
ditions .This improves the grip of the brakes.
Wet road surfaces If driving in heavy rain for
aprolonge dperiod of
time withou tbraking, there may be adelayed
reaction from the brakes when braking for the
first time. This may also occur after the vehicle
has been washed.
You have to depres sthe brake pedalm ore
firmly .Maintai nagreater distance from the
vehicle in front.
After driving on awet road or having the vehicle
washed, brake firmly whilep aying attention to
the traffic conditions. This willw arm up the
brake discs, thereby drying them more quickly
and protecting them against corrosion.
Limited braking performance on salt-
treated roads If you drive on salt-treated roads,
alayer of salt
may form on the brake discs and pads.T his can
increase the braking distance considerably.
R In order to prevent any salt build-up,a pplythe
brakes occasionally whilep aying attention to
the traffic conditions.
R Carefullyd epressthe brake pedalatt he end
of the journey and when starting the next
journey.
R Maintai namuch greater distance to the vehi-
cle in front.
New brake discs and brake pads/
linings Brake pads/linings and discs that either are new
or have been replaced achieve optimum braking
effect only after several hundred kilometres of
driving. Compensate for the reduced braking
effect by applying greater force to the brake
pedal.
For safety reasons, Mercedes-Benz recom-
mends only fittingt he following brake discs and
brake pads/linings:
R brake discs that hav ebeena pproved by
Mercedes-Benz
R brake pads/linings that hav ebeena pproved
by Mercedes-Benz or that are of an equivalent
standard of quality
Other brake discs or brake pads/linings can
compromise the safety of your vehicle. 116
Drivin
gtipsDriving and parking